by Contributed | Jan 26, 2024 | Technology
This article is contributed. See the original author and article here.
Web application firewalls (WAFs) are essential tools for cyber security professionals who want to protect their web applications from malicious attacks. WAFs can filter, monitor, and block web traffic based on predefined as well as custom rules. Custom rules allow you to create your own unique rule that is evaluated for each request that passes through the WAF. These rules hold higher priority than rules in the managed rulesets and will be processed first. One of the most powerful features of Azure Web Application Firewall is the ability to create geomatch custom rules, which allow you to match web requests based on the geographic location of the source IP address. You may want to block requests from certain countries or regions that are known to be sources of malicious activity, or you may want to allow requests from specific locations that are part of your business operations. Geomatch custom rules can also help you comply with data sovereignty and privacy regulations, by restricting access to your web applications based on the location of the data subjects.
In this blog post, we will introduce you to the geomatch custom rules feature of Azure Web Application Firewall and show you how to create and manage them using the Azure portal, Bicep and PowerShell.
Geomatch Custom Rule Patterns
Geomatch custom rules can help you achieve various security objectives, such as blocking requests from high-risk regions and allowing requests from trusted locations. Geomatch custom rules can also be very useful for mitigating distributed denial-of-service (DDoS) attacks, which aim to overwhelm your web application with a large volume of requests from multiple sources. By using geomatch custom rules, you can quickly identify and block the regions that are generating the most DDoS traffic, while allowing legitimate users to access your web application. In this blog, we’ll cover different custom rule patterns that you can use to tune your Azure WAF using geomatch custom rules.
Scenario: Block traffic from all countries except “x”
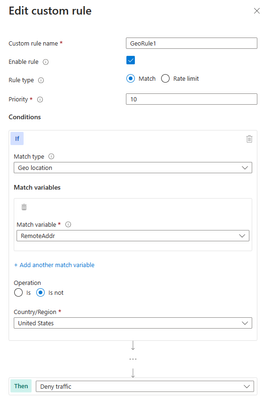
One of the common scenarios where geomatch custom rules can be very helpful is when you want to block traffic from all countries except a specific one. For example, if your web application is only intended for users in the United States, you can create a geomatch custom rule that blocks all requests that do not originate from the US. This way, you can reduce the attack surface of your web application and prevent unauthorized access from other regions. This specific technique uses a negating condition for this traffic pattern to work. To create a geomatch custom rule that blocks traffic from all countries except the US, check out the Portal, Bicep, and PowerShell examples below:
Portal example – Application Gateway:
Portal example – Front Door:

*Note: You’ll notice on the Azure Front Door WAF, we are using SocketAddr as the Match variable and not RemoteAddr. The RemoteAddr variable is the original client IP that’s usually sent via the X-Forwarded-For request header. The SocketAddr variable is the source IP address the WAF sees.
Bicep example – Application Gateway:
properties: {
customRules: [
{
name: ‘GeoRule1’
priority: 10
ruleType: ‘MatchRule’
action: ‘Block’
matchConditions: [
{
matchVariables: [
{
variableName: ‘RemoteAddr’
}
]
operator: ‘GeoMatch’
negationConditon: true
matchValues: [
‘US’
]
transforms: []
}
]
state: ‘Enabled’
}
Bicep example – FrontDoor:
properties: {
customRules: {
rules: [
{
name: ‘GeoRule1’
enabledState: ‘Enabled’
priority: 10
ruleType: ‘MatchRule’
matchConditions: [
{
matchVariable: ‘SocketAddr’
operator: ‘GeoMatch’
negateCondition: true
matchValue: [
‘US’
]
transforms: []
}
]
action: ‘Block’
}
PowerShell example – Application Gateway:
$RGname = “rg-waf “
$policyName = “waf-pol”
$variable = New-AzApplicationGatewayFirewallMatchVariable -VariableName RemoteAddr
$condition = New-AzApplicationGatewayFirewallCondition -MatchVariable $variable -Operator GeoMatch -MatchValue “US” -NegationCondition $true
$rule = New-AzApplicationGatewayFirewallCustomRule -Name GeoRule1 -Priority 10 -RuleType MatchRule -MatchCondition $condition -Action Block
$policy = Get-AzApplicationGatewayFirewallPolicy -Name $policyName -ResourceGroupName $RGname
$policy.CustomRules.Add($rule)
Set-AzApplicationGatewayFirewallPolicy -InputObject $policy
PowerShell example – FrontDoor:
$RGname = “rg-waf”
$policyName = “wafafdpol”
$matchCondition = New-AzFrontDoorWafMatchConditionObject -MatchVariable SocketAddr -OperatorProperty GeoMatch -MatchValue “US” -NegateCondition $true
$customRuleObject = New-AzFrontDoorWafCustomRuleObject -Name “GeoRule1” -RuleType MatchRule -MatchCondition $matchCondition -Action Block -Priority 10
$afdWAFPolicy= Get-AzFrontDoorWafPolicy -Name $policyName -ResourceGroupName $RGname
Update-AzFrontDoorWafPolicy -InputObject $afdWAFPolicy -Customrule $customRuleObject
Scenario: Block traffic from all countries except “x” and “y” that target the URI “foo” or “bar”
Another scenario where geomatch custom rules can be useful is when you want to block traffic from all countries except two or more specific ones, that target an explicit URI. For example, if your web application has specific URI paths that are only intended for users in the US and Canada, you can create a geomatch custom rule that blocks all requests that do not originate from either of these countries. With this pattern, request payloads from the US and Canada are still processed through the managed rulesets, catching any unwanted malicious attacks while still blocking requests from all other countries. This way, you can ensure that only your target audience can access your web application and avoid unwanted traffic from other regions. Furthermore, to reduce potential false positives, you can include the country code “ZZ” in the list to capture IP addresses that aren’t yet mapped to a country in Azure’s dataset. This specific technique also uses a negate condition for the Geo location type and a non-negate condition for our URI match. To create a geomatch custom rule that blocks traffic from all countries except the US and Canada to a specified URI, check out the Portal, Bicep, and PowerShell examples below:
Portal example – Application Gateway:


Portal example – Front Door:


Bicep example – Application Gateway:
properties: {
customRules: [
{
name: ‘GeoRule2’
priority: 11
ruleType: ‘MatchRule’
action: ‘Block’
matchConditions: [
{
matchVariables: [
{
variableName: ‘RemoteAddr’
}
]
operator: ‘GeoMatch’
negationConditon: true
matchValues: [
‘US’
‘CA’
]
transforms: []
}
{
matchVariables: [
{
variableName: ‘RequestUri’
}
]
operator: ‘Contains’
negationConditon: false
matchValues: [
‘/foo’
‘/bar’
]
transforms: []
}
]
state: ‘Enabled’
}
Bicep example – FrontDoor:
properties: {
customRules: {
rules: [
{
name: ‘GeoRule2’
enabledState: ‘Enabled’
priority: 11
ruleType: ‘MatchRule’
matchConditions: [
{
matchVariable: ‘SocketAddr’
operator: ‘GeoMatch’
negateCondition: true
matchValue: [
‘US’
‘CA’
]
transforms: []
}
{
matchVariable: ‘RequestUri’
operator: ‘Contains’
negateCondition: false
matchValue: [
‘/foo’
‘/bar’
]
transforms: []
}
]
action: ‘Block’
}
PowerShell example – Application Gateway:
$RGname = “rg-waf “
$policyName = “waf-pol”
$variable1a = New-AzApplicationGatewayFirewallMatchVariable -VariableName RemoteAddr
$condition1a = New-AzApplicationGatewayFirewallCondition -MatchVariable $variable1a -Operator GeoMatch -MatchValue @(“US”, “CA”) -NegationCondition $true
$variable1b = New-AzApplicationGatewayFirewallMatchVariable -VariableName RequestUri
$condition1b = New-AzApplicationGatewayFirewallCondition -MatchVariable $variable1b -Operator Contains -MatchValue @(“/foo”, “/bar”) -NegationCondition $false
$rule1 = New-AzApplicationGatewayFirewallCustomRule -Name GeoRule2 -Priority 11 -RuleType MatchRule -MatchCondition $condition1a, $condition1b -Action Block
$policy = Get-AzApplicationGatewayFirewallPolicy -Name $policyName -ResourceGroupName $RGname
$policy.CustomRules.Add($rule1)
Set-AzApplicationGatewayFirewallPolicy -InputObject $policy
PowerShell example – FrontDoor:
$RGname = “rg-waf”
$policyName = “wafafdpol”
$matchCondition1a = New-AzFrontDoorWafMatchConditionObject -MatchVariable SocketAddr -OperatorProperty GeoMatch -MatchValue @(“US”, “CA”) -NegateCondition $true
$matchCondition1b = New-AzFrontDoorWafMatchConditionObject -MatchVariable RequestUri -OperatorProperty Contains -MatchValue @(“/foo”, “/bar”) -NegateCondition $false
$customRuleObject1 = New-AzFrontDoorWafCustomRuleObject -Name “GeoRule2” -RuleType MatchRule -MatchCondition $matchCondition1a, $matchCondition1b -Action Block -Priority 11
$afdWAFPolicy= Get-AzFrontDoorWafPolicy -Name $policyName -ResourceGroupName $RGname
Update-AzFrontDoorWafPolicy -InputObject $afdWAFPolicy -Customrule $customRuleObject1
Scenario: Block traffic specifically from country “x”
A similar scenario where geomatch custom rules can be helpful is when you want to block traffic from a specific country or multiple countries. For example, if your web application is facing a lot of malicious requests from country X, you can create a geomatch custom rule that blocks all requests that originate from that country. This way, you can protect your web application from potential attacks and reduce the load on your resources. You can use this pattern to block multiple countries that you have validated as malicious or hostile. This specific technique uses a match condition for this traffic pattern to work. To create a geomatch custom rule that blocks traffic from country X, check out the Portal, Bicep, and PowerShell examples below:
Portal example – Application Gateway:

Portal example – Front Door:

Bicep example – Application Gateway:
properties: {
customRules: [
{
name: ‘GeoRule3’
priority: 12
ruleType: ‘MatchRule’
action: ‘Block’
matchConditions: [
{
matchVariables: [
{
variableName: ‘RemoteAddr’
}
]
operator: ‘GeoMatch’
negationConditon: false
matchValues: [
‘US’
]
transforms: []
}
]
state: ‘Enabled’
}
Bicep example – FrontDoor:
properties: {
customRules: {
rules: [
{
name: ‘GeoRule3’
enabledState: ‘Enabled’
priority: 12
ruleType: ‘MatchRule’
matchConditions: [
{
matchVariable: ‘SocketAddr’
operator: ‘GeoMatch’
negateCondition: false
matchValue: [
‘US’
]
transforms: []
}
]
action: ‘Block’
}
PowerShell example – Application Gateway:
$RGname = “rg-waf “
$policyName = “waf-pol”
$variable2 = New-AzApplicationGatewayFirewallMatchVariable -VariableName RemoteAddr
$condition2 = New-AzApplicationGatewayFirewallCondition -MatchVariable $variable2 -Operator GeoMatch -MatchValue “US” -NegationCondition $false
$rule2 = New-AzApplicationGatewayFirewallCustomRule -Name GeoRule3 -Priority 12 -RuleType MatchRule -MatchCondition $condition2 -Action Block
$policy = Get-AzApplicationGatewayFirewallPolicy -Name $policyName -ResourceGroupName $RGname
$policy.CustomRules.Add($rule2)
Set-AzApplicationGatewayFirewallPolicy -InputObject $policy
PowerShell example – FrontDoor:
$RGname = “rg-waf”
$policyName = “wafafdpol”
$matchCondition2 = New-AzFrontDoorWafMatchConditionObject -MatchVariable SocketAddr -OperatorProperty GeoMatch -MatchValue “US” -NegateCondition $false
$customRuleObject2 = New-AzFrontDoorWafCustomRuleObject -Name “GeoRule3” -RuleType MatchRule -MatchCondition $matchCondition2 -Action Block -Priority 12
$afdWAFPolicy= Get-AzFrontDoorWafPolicy -Name $policyName -ResourceGroupName $RGname
Update-AzFrontDoorWafPolicy -InputObject $afdWAFPolicy -Customrule $customRuleObject2
Geomatch custom rules and Priority
When using geomatch custom rules, it’s important to use the priority parameter wisely to avoid unnecessary processing or conflicts. The Azure WAF will determine the order that it evaluates the rules by using the priority parameter. This parameter is a numerical value that ranges from 1 to 100, with lower values indicating higher priority. The priority must be unique across all custom rules. You should assign higher priority to the rules that are more critical or specific for your web application security, and lower priority to the rules that are less essential or general. This way, you can ensure that WAF applies the most appropriate actions to your web traffic. Given our examples above, the scenario where we’ve identified an explicit URI path is the most specific and should have a higher priority rule than other types of patterns. This allows us to protect a critical path on the application with the highest priority while allowing more generic traffic to be evaluated across the other custom rules or managed rulesets.
Geomatch Custom Rule Anti-Patterns
On the other hand, there are some anti-patterns that you should avoid when using geomatch custom rules. These are scenarios where you set the custom rule action to allow instead of block. This can have unintended consequences, such as allowing a lot of traffic to bypass the WAF and potentially exposing your web application to other threats. Instead of using an allow action, you should use a block action with a negate condition, as shown in the previous patterns. This way, you can ensure that only traffic from the countries that you want is allowed, and all other traffic is blocked by the WAF.
Scenario: Allow traffic from country “x”
The first anti-pattern that you should be aware of is setting the geomatch custom rule to allow traffic from a specific country. For example, suppose you want to allow traffic from the United States because you have a large customer base there. You might think that creating a custom rule with the action “allow” and the value “United States” would achieve this. However, this is not the case. What this rule does is to allow all traffic that originates from the United States, regardless of whether it has a malicious payload or not, as the allow action bypasses further rule processing of the managed rulesets. Additionally, traffic from all other countries will still be allowed to be processed by the WAF, consuming resources. This exposes your web application to malicious requests from the United States that would otherwise be blocked by the WAF.
Portal example – Application Gateway:

Portal example – Front Door

Bicep example – Application Gateway:
properties: {
customRules: [
{
name: ‘GeoRule4’
priority: 20
ruleType: ‘MatchRule’
action: ‘Allow’
matchConditions: [
{
matchVariables: [
{
variableName: ‘RemoteAddr’
}
]
operator: ‘GeoMatch’
negationConditon: false
matchValues: [
‘US’
]
transforms: []
}
]
state: ‘Enabled’
}
Bicep example – FrontDoor:
properties: {
customRules: {
rules: [
{
name: ‘GeoRule4’
enabledState: ‘Enabled’
priority: 20
ruleType: ‘MatchRule’
matchConditions: [
{
matchVariable: ‘SocketAddr’
operator: ‘GeoMatch’
negateCondition: false
matchValue: [
‘US’
]
transforms: []
}
]
action: ‘Allow’
}
PowerShell example – Application Gateway:
$RGname = “rg-waf”
$policyName = “waf-pol”
$variable3 = New-AzApplicationGatewayFirewallMatchVariable -VariableName RemoteAddr
$condition3 = New-AzApplicationGatewayFirewallCondition -MatchVariable $variable3 -Operator GeoMatch -MatchValue “US” -NegationCondition $false
$rule3 = New-AzApplicationGatewayFirewallCustomRule -Name GeoRule4 -Priority 20 -RuleType MatchRule -MatchCondition $condition3 -Action Allow
$policy = Get-AzApplicationGatewayFirewallPolicy -Name $policyName -ResourceGroupName $RGname
$policy.CustomRules.Add($rule3)
Set-AzApplicationGatewayFirewallPolicy -InputObject $policy
PowerShell example – FrontDoor:
$RGname = “rg-waf”
$policyName = “wafafdpol”
$matchCondition3 = New-AzFrontDoorWafMatchConditionObject -MatchVariable SocketAddr -OperatorProperty GeoMatch -MatchValue “US” -NegateCondition $false
$customRuleObject3 = New-AzFrontDoorWafCustomRuleObject -Name “GeoRule4” -RuleType MatchRule -MatchCondition $matchCondition3 -Action Allow -Priority 20
$afdWAFPolicy= Get-AzFrontDoorWafPolicy -Name $policyName -ResourceGroupName $RGname
Update-AzFrontDoorWafPolicy -InputObject $afdWAFPolicy -Customrule $customRuleObject3
Scenario: Allow traffic from all counties except “x”
Another anti-pattern that you should avoid when using geomatch custom rules is to set the rule action to allow and specify a list of countries to exclude. For example, you might want to allow traffic from all countries except the United State, where the US is a country that you suspect of malicious activity. However, this approach can also have unintended consequences, such as allowing traffic from countries that you have not verified or validated as safe or legitimate or allowing traffic from countries that have low or no security standards, exposing your web application to potential vulnerabilities or attacks. As mentioned in the previous scenario, using the allow action for all countries except the US, indicates to the WAF to stop processing the request payloads against the managed rulesets. All rule evaluation will cease once the custom rule with allow is processed, thus exposing the application to unwanted malicious attacks.
Therefore, it is better to use a more restrictive and specific rule action, such as block, and specify a list of countries to allow with a negate condition. This way, you can ensure that only traffic from trusted and verified sources can access your web application, while blocking any suspicious or unwanted traffic.
Portal example – Application Gateway:

Portal example – Front Door:

Bicep example – Application Gateway:
properties: {
customRules: [
{
name: ‘GeoRule5’
priority: 21
ruleType: ‘MatchRule’
action: ‘Allow’
matchConditions: [
{
matchVariables: [
{
variableName: ‘RemoteAddr’
}
]
operator: ‘GeoMatch’
negationConditon: true
matchValues: [
‘US’
]
transforms: []
}
]
state: ‘Enabled’
}
Bicep example – FrontDoor:
properties: {
customRules: {
rules: [
{
name: ‘GeoRule5’
enabledState: ‘Enabled’
priority: 21
ruleType: ‘MatchRule’
matchConditions: [
{
matchVariable: ‘SocketAddr’
operator: ‘GeoMatch’
negateCondition: true
matchValue: [
‘US’
]
transforms: []
}
]
action: ‘Allow’
}
PowerShell example – Application Gateway:
$RGname = “rg-waf”
$policyName = “waf-pol”
$variable4 = New-AzApplicationGatewayFirewallMatchVariable -VariableName RemoteAddr
$condition4 = New-AzApplicationGatewayFirewallCondition -MatchVariable $variable4 -Operator GeoMatch -MatchValue “US” -NegationCondition $true
$rule4 = New-AzApplicationGatewayFirewallCustomRule -Name GeoRule5 -Priority 21 -RuleType MatchRule -MatchCondition $condition4 -Action Allow
$policy = Get-AzApplicationGatewayFirewallPolicy -Name $policyName -ResourceGroupName $RGname
$policy.CustomRules.Add($rule4)
Set-AzApplicationGatewayFirewallPolicy -InputObject $policy
PowerShell example – FrontDoor:
$RGname = “rg-waf”
$policyName = “wafafdpol”
$matchCondition4 = New-AzFrontDoorWafMatchConditionObject -MatchVariable SocketAddr -OperatorProperty GeoMatch -MatchValue “US” -NegateCondition $true
$customRuleObject4 = New-AzFrontDoorWafCustomRuleObject -Name “GeoRule5” -RuleType MatchRule -MatchCondition $matchCondition4 -Action Allow -Priority 10
$afdWAFPolicy= Get-AzFrontDoorWafPolicy -Name $policyName -ResourceGroupName $RGname
Update-AzFrontDoorWafPolicy -InputObject $afdWAFPolicy -Customrule $customRuleObject4
Conclusion
The Azure Web Application Firewall is a powerful tool for protecting your web applications from common threats and attacks and by using geomatch custom rules, you can fine-tune your security controls based on the geographic location of the requests. The patterns outlined help to maintain the effectiveness and performance of the Azure WAF when utilizing geomatch custom rules. You should always test your rules before applying them to production and monitor their performance and impact regularly. By following these best practices, you can leverage the power of geomatch custom rules to enhance your web application security.
Resources
What is Azure Web Application Firewall on Azure Application Gateway? – Azure Web Application Firewall | Microsoft Learn
Azure Web Application Firewall (WAF) v2 custom rules on Application Gateway | Microsoft Learn
Azure Web Application Firewall (WAF) Geomatch custom rules | Microsoft Learn
What is Azure Web Application Firewall on Azure Front Door? | Microsoft Learn
Web application firewall custom rule for Azure Front Door | Microsoft Learn
Geo-filtering on a domain for Azure Front Door | Microsoft Learn
Configure v2 custom rules using PowerShell – Azure Web Application Firewall | Microsoft Learn
Create and use v2 custom rules – Azure Web Application Firewall | Microsoft Learn
Configure an IP restriction WAF rule for Azure Front Door | Microsoft Learn


Recent Comments