
by Contributed | Aug 27, 2023 | Technology
This article is contributed. See the original author and article here.
Summary
Data in ADX (aka Kusto aka RTA in Fabric) almost always has columns that contain datetime values like 2023-08-01 16:45 and sometimes timespan values like 2 hours or 36 minutes.
In this article I’ll describe how these values are represented in ADX in Power Query and in Power BI.
Notice that I don’t just say Power BI because timespan values have different types in Power Query and in Power BI.
Dates and times in ADX
ADX have to relevant data types : datetime and timespan.
In the attached pbix file, there are two basic columns, one is a datetime and one is a timespan.
Datetime values are assumed to be in UTC. They can be converted to local time using the datetime_utc_to_local function.
Here is the query that creates the data in KQL: (You can click on the web Hyperlink to run the query)
Execute in [Web] [Desktop] [cluster(‘help.kusto.windows.net’).database(‘ContosoSales’)]
datatable(Date_and_Time:datetime, Span:timespan ,Spantext:string) [
datetime(2023-09-01), 2m,”2m”,
datetime(2023-09-01 06:00), 2h,”2h”,
datetime(2023-09-01 06:25:33),2d,”2d”,
datetime(2023-09-01 23:55:12.1234), 30s, “30s”,
datetime(2023-09-30),251ms,”251ms”
]
| extend Time_In_New_York=datetime_utc_to_local(Date_and_Time,”America/New_York”)
Table0
Date_and_Time
|
Span
|
Spantext
|
Time_In_New_York
|
2023-09-01T00:00:00Z
|
00:02:00
|
2m
|
2023-08-31T20:00:00Z
|
2023-09-01T06:00:00Z
|
02:00:00
|
2h
|
2023-09-01T02:00:00Z
|
2023-09-01T06:25:33Z
|
2.00:00:00
|
2d
|
2023-09-01T02:25:33Z
|
2023-09-01T23:55:12.1234Z
|
00:00:30
|
30s
|
2023-09-01T19:55:12.1234Z
|
2023-09-30T00:00:00Z
|
00:00:00.2510000
|
251ms
|
2023-09-29T20:00:00Z
|
Dates and time types in Power Query
The datetime columns in ADX are typed as Date/Time/Zone.
Changing the type to datetime will not change the value because the datetime is assumed to be in UTC .
The timespan column is typed as duration.
Date and Time types in the PBI data model
Power BI data types are described here.
The paragraph about Date/time types explains how Power Query types are mapped to the data model.
Some types are converted when moved from Power Query to the data model.
Date/Time/Timezone is converted to Date/Time and Duration is converted to decimal.
The behavior of timespan->duration->decimal needs some explanation.
A timespan of 12h is shown in PQ as 0.12:0:0 and in the model as 0.5.
For those of you with an Excel background, it will make perfect sense.
0.5 is half a day, the decimal is expressed as the decimal parts of a day.
For someone coming from KQL background it looks odd.
The timespan column can be converted in the query to seconds by multiplying it by 24*60*60 which is the number of seconds in 24 hours.
by Contributed | Aug 26, 2023 | Technology
This article is contributed. See the original author and article here.
When building an application, one of the things we have to work alongside with is business requirements but we mostly forget about the users, “Is this application accessible to the users?”
User’s Interaction and accessibility are many of the factors that needs to be discussed when building an application. It’s important to consider how efficient your application is to your users.
Check out this Podcast Episode on A Girl in Love with Tech Podcast where I and Microsoft Snr Program Manager Ilya Fainberg who role is researching market trends and understanding customer needs to formulate product strategy. Helping customers succeed in their journey to the Microsoft Cloud by advising on best practices and product discussed about the importance of User’s Experience in Microsoft Power Platform
In this article, we would learn about simple user’s needs we can easily work on when building a Power apps application but first, let us understand what Power Apps is
What is Microsoft Power Apps?
Microsoft Power Apps is a low-code or no- code tool in the Microsoft Power Platform ecosystem that is used in building business applications with or without the use of programming languages. Microsoft has been able to bridge that gap, where both developers and non-developers have free rays in building solutions. What this means is that, the platform can be extended by code making it a pro code platform for professional developers.
What to look at for
1. Simple icons: it is advisable to use icons in place to help increase space and avoid distractions. Make use of icons that are understandable on what it does.
2. Consistency: When building an application, especially when you have many screens in the application. It’s important to consider the consistency of the controls in your screen especially the width and height.
3. Colours: How well you use your colours is very important, especially to the users, it has to be accessible, not contrasting the other, the colour should not be too dull.
These are the few examples to consider when working with colours
- The font colour and background colour of your screen should be accessible. Check the Colour contrast checker to see which colour works best.
- When using an image in the screen the colour in the background of the image should not contradict the background colour of your screen.
- Use primary colours to point out the main objective. A good example of not working well with colors is using a green colour for the delete icon.
4. Avoiding distractions: Application should always be easy to use. A user should not need a manual to use your application.
5. Performance: Improving how users interact with your applications should be met. A few examples to consider when working in an application:
- Application should not take too long to load or respond to an action.
- When a user clicks on a button they expect that something will happen. Button controls should not be used as a text control.
Check this out to learn more about ways you can improve Performance in your application
6. Size: The font type and size should be readable and accessible. Check here and learn more about accessible fonts.
7.Responsive: Building an application, always think about the use of your application on different devices. When building an application one of the mistakes we make is not having an idea or design of how the application layout will look like on different types of screens.
Check out the learning resources
PowerApps Canvas App Accessibility Guidelines | Microsoft Power Apps
Understand the Power Apps Studio
How to build the UI in a canvas app in Power Apps
How to build a color-contrast-ratio checker for improved accessibility in Power Apps
How to use custom fonts in Power Apps
Power Apps performance optimization guidelines
by Contributed | Aug 25, 2023 | Technology
This article is contributed. See the original author and article here.
With ongoing advancements in technology, there has been a continuous shift in how we learn, network, and interact with each other. Communities in Teams experience enables students and mentors to connect and bring out a true sense of connection among them.
IIT Madras, one of the leading engineering institutions in India, has been using Teams to enable mentorship-led communities along with their Microsoft Learn for Educators (MSLE) effort in their data science program. Mentors connect with the students to help them with course curriculum and technical questions related to various Microsoft certification courses that they are encouraging their students to take up, both asynchronously and with live online office hours, in one place.
In this article, we will explore how IIT Madras created communities for mentorship cohorts and engaged their students to help them easily connect with one another and have a go-to space for upskilling and networking.
Why create mentorship communities on Teams?
Building a strong connection between the mentors and mentees is critical for folks to achieve goals and learn from each other. This is especially true if the students are from diverse geographical locations, ages, roles, and backgrounds. The BS Degree in Data Science and Application Program offered by IIT Madras is born out of the philosophy of democratizing education and has seen wide acceptance both inside and outside the country.
With data science being a buzzword in the industry for quite some time, the BS program aims to provide without compromising the strong academic foundations needed in this arena. Knowledge of cloud computing and use of cloud resources is a significant extracurricular component where IIT Madras is working with Microsoft (through a faculty development program – Microsoft Learn for Educator program) to enable Microsoft Cloud-related certifications, both in Data Science and Application Development, for its students. Communities in Teams provides a single platform for students to connect, engage, and build relationships with their fellow students and mentors before and after their sessions.
This community is the centralized space for students to find information related to their out-of-class mentoring sessions scheduled in the program and address all questions and concerns. Students can
- Find the program schedule
- Engage with the coordinating team
- Track important dates
- Help, interact, and collaborate with peers
- Resolve queries in real time
- One-stop access to all your reading materials
- Connect with your trainers/mentors
- Follow upcoming events
Additionally, since students could potentially use Teams in their colleges, it serves as an excellent opportunity for them to navigate on a single platform.
How is IIT Madras creating and managing mentorship cohorts in Communities in Teams?
IIT Madras has been using Communities in Teams as a platform for all its students and mentors to build relationships, expand their network, and motivate students in finishing their Microsoft certification programs.
For every mentorship session, they share the QR code/ invite link of the community to all its registered participants. Students join the community before/during the course delivery session to connect asynchronously with their peers and discuss key elements discussed during the session.
The mentors/coordinating team shares all the required details of the cloud certification including meeting details, and prerequisites, and supports students by providing them a platform to ask questions, seek guidance, and share their certificates.
These communities also act as a knowledge resource for all the students aiming to get themselves certified with other certifications as IIT Madras leverages the existing community network they have built to cross-promote the upcoming mentorship sessions and certifications.
Here is what IIT Madras has to say about Teams
In the unique context of IIT Madras BS Degree in Data Science and Programming, the mentorship communities through MS Teams help emulate the informal learning environment that is available in the regular on-campus programs for extra-curricular activities. This is a very significant activity as students aiming to get Cloud Certifications not only get guidance from their peers/seniors who have already completed their journey but also promote a strong sense of belonging. We are really happy to be part of this journey with Microsoft Teams and are looking forward to having a strong community built within this space.
Overall, these communities have been helping the students to engage proactively, find easy resolution of queries, and stay motivated to complete their programs and certifications.
Best practices to keep in mind while creating student-mentor communities on Teams
- Set Community Description, Avatar, and Guidelines: Once the community is created, ensure the community description encourages participation and delivers the goal of the community. Additionally, fill out any specific community guidelines you want to communicate to members of the community. Having a community avatar makes the community more real. Learn more about updating the community details.
- Restrict Community Join Link Sharing: To ensure the community remains secure and limited to authorized members, disable the option to share the community join link and enable requests for members to join. This step prevents the link from being shared outside the intended audience, maintaining the privacy and exclusivity of the community. Learn more about how to disable the option to share a community link
- Create an engagement plan: Plan your engagement for 2 weeks beforehand as starters to kick-start conversations in the community. You can have multiple types of posts planned with details on who will post and when.

- Change your profile name so members can uniquely identify you as the mentor. You can use titles such as Your Name – Mentor
- Diversify Communities: Consider creating separate communities for every certification/program type. This segmentation allows for more targeted discussions and networking opportunities within specific cohorts.
- Empower the community to lead: A community becomes strong and sustainable only when leaders are nurtured within the community and empowered. As part of this, there is a cognitive apprenticeship within the community through which students can move up to become Mentors and Community managers.
By following these steps, you can harness the power of Communities in Teams to create vibrant communities that foster connections, facilitate networking, and enhance the overall mentorship experience.
How to send feedback and suggestions?
We are always happy to receive feedback and suggestions to make our product even better. To participate in our feedback program and help us in our endeavor, please follow the steps below:
You can also sign up for a user panel, to get opportunities to connect directly with the product team and help make Teams (free) better. Learn more.
by Contributed | Aug 24, 2023 | Technology
This article is contributed. See the original author and article here.
PIM for Groups
Entra ID (formerly Azure AD) offers the Privileged Identity Management (PIM) for Groups feature, enabling users to attain just-in-time membership and ownership of groups, thus governing access to a range of services. This feature allows the implementation of policies similar to those in PIM for Entra ID Roles and PIM for Azure Resources, allowing the configuration of actions like approval enforcement, multi-factor authentication (MFA), justification requirements, and activation time limits. Each PIM for Groups configured group features two distinct policies, catering to membership and ownership activation. This means that if an account is both an eligible owner and an eligible member of a group, each of them have their own activation.
For more information you can read the official documentation here.
Microsoft 365 Defender RBAC
Microsoft 365 Defender RBAC offers centralized permissions management for the following services:
- Defender for Endpoint
- Defender for Identity
- Defender for Cloud Apps
- Defender for Office 365
- Microsoft Defender Vulnerability Management
- Secure score
When a role is created, the services which the role covers can be selected. The advantage of using the new M365 Defender RBAC as opposed to the legacy RBAC for each individual service is that it is possible to grant permissions to multiple services from just a single role assignment. If you have been using legacy RBAC assignments it’s very simple to import those roles into the new M365 Defender unified RBAC. The steps for importing the roles can be found here.
M365 Defender unified RBAC workloads need to be activated before they are applied. Until the workloads are activated Defender will apply the legacy RBAC model for each individual service.
When creating an M365 Defender role you will need to create an assignment for it. Assignments will have a scope (which Defender data sources the assignment will apply to) and Entra ID users or groups (which users or groups the assignment will be applied to).
For more information you can read the official documentation here.
Putting the two together
As group membership can define getting M365 Defender roles, and group membership can be given in a just-in-time manner, it means that indirectly M365 Defender roles can be given in a just-in-time manner.
The steps to set this up would be the following.
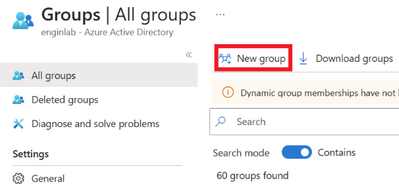
Create the Entra ID group and add members
In the Azure portal go to Azure Active Directory and click on Groups and then New group.
Figure 1 Creating new group
Enter the details as required.

Figure 2 Adding details to group being created
Add Eligible Members to the group
Go to the Azure portal and search for Azure AD Privileged Identity Management in the search bar. Once there, select Groups on the left side of the menu. The group needs to be discovered before eligible members can be added. To discover the group, search the group name and select Discover groups.

Figure 3 Discover groups to manage with PIM
Select the group and click Manage groups.

Figure 4 Manage group using PIM
Click on OK.

Figure 5 Onboarding selected groups
Now the group should be visible. Select the group and click Assignments, then Add assignments in the Eligible assignments tab. If it is not added to this tab, the assignment will be active and not eligible.

Figure 6 Adding assignment to PIM managed group
Select the members to be added to the group.

Figure 7 Selecting members

Figure 8 Selecting members
Select Eligible and enter the start and end dates of the eligibility assignment. Once the correct dates are set click Done. Finish the assignment process.

Figure 9 Setting details of eligible membership
Now there should be the account added in the Eligible assignments tab on the groups membership.

Figure 10 Viewing eligible assignment of groups members
Now the group has PIM eligible members.
Create the M365 Defender Role
M365 Defender roles can be created in the M365 Defender portal. If you have the correct permissions you can click on Permissions on the left side in the menu.

Figure 11 Permissions tab in Defender menu
Under Microsoft 365 Defender select Roles.

Figure 12 Microsoft 365 Defender Roles in permissions page
Click on Create custom role. Enter the name of the role and click Next.

Figure 13 Beginning the creation of a custom role
On the Choose permissions tab click on each permission an select the level of access you want the role to have.

Figure 14 Permissions selection screen

Figure 15 Example permissions for Security Operations
Once the permissions you want are selected click on Next.

Figure 16 Permissions selected for each group
On the next screen assignment are created for the role. The assignments created will determine which account are assigned this role. Click on Add assignment.

Figure 17 Adding assignment to role
Enter the assignment name and select the group created in Step 1. Click Add.

Figure 18 Entering assignment details
Move to the next screen by clicking Next. Review the permissions and click Submit.

Figure 19 Reviewing and submitting the roles settings
As mentioned earlier, the M365 Defender RBAC has to be activated for workloads so that it can be applied. If this hasn’t been done already then it will need to be activated. On the main page for M365 Defender Roles there will be a note if any workload has not been activated. If this note is there then you will need to Activate workloads.


Figure 21 Activating workloads
Users perspective
Once a user has been made an eligible member of the group they can activate their membership and get temporarily assigned to the M365 Defender role. The user will have to follow these steps:
Go to Azure AD Privileged Identity Management and to the Groups tab in the menu on the left. The group should be visible. If the group is not visible, verify that the user is an eligible member of the group and that the group was ‘discovered’ by the admins. These steps can be found in the previous sections. Select Activate role.

Figure 22 Activating group membership
On the next screen select Activate on the group you want to activate the membership for.

Figure 23 Activating group membership
Select the duration the membership should last for and add a reason. Select Activate.

Figure 24 Activating group membership
After activating the role, if the membership status of the group is checked, you will see the account there with details about when the membership was activated.

Figure 25 Viewing the activated group membership
The users view in M365 Defender before and after activating the group membership, and therefore getting assigned the M365 Defender role. Notice that after the role is assigned the user can see menus for Defender related activities.

Figure 26 The Defender menu before activating the group membership

Figure 27 The Defender menu after activating the group membership
Wrapping it up
PIM for Groups paired with M365 Defender RBAC offers a solution for those looking for just-in-time Defender access. These can also be used in combinations. For example, if you want a certain sures to always have read access but access to take device actions should be granted just-in-time, then a read-only Defender role can be assigned permanently and the role for taking device actions can be granted to the group via the steps mentioned above.
by Contributed | Aug 23, 2023 | Technology
This article is contributed. See the original author and article here.
Hello everyone,
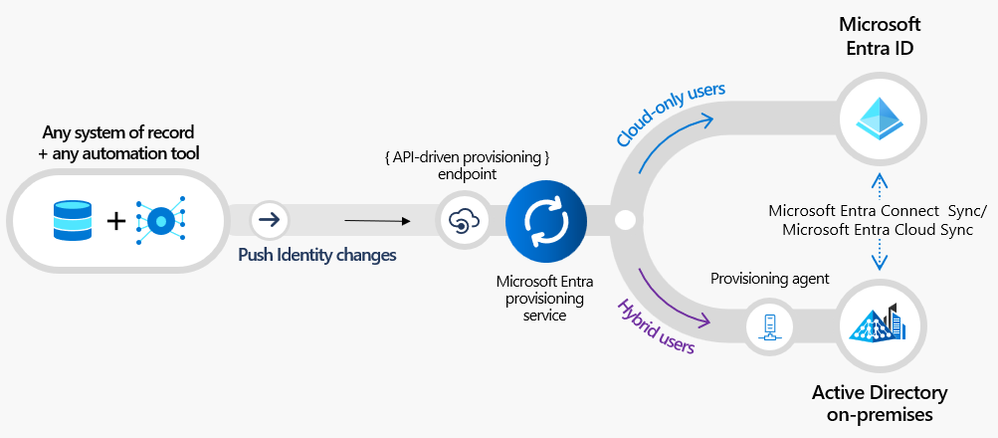
I’m thrilled to announce that Microsoft Entra API-driven provisioning is now in public preview!
With today’s announcement, we’re expanding our support for HR-driven provisioning to address the most common customer asks, including:
- Automatically provisioning cloud-only users and hybrid users (users that require an on-premises Active Directory account) from any trusted source
- Importing data from sources like CSV files and SQL staging tables using the automation tool of your choice
- Simplifying the integration by using standard SCIM schema attributes to abstract schema differences across systems and provide a consistent mapping experience
- Leveraging Lifecycle Workflows to automate joiner-mover-leaver workflows for users sourced from any system of record
In one common customer scenario, organizations use a cloud human capital management (HCM) platform for managing employees and extracting nightly flat files/CSVs to manage vendor and contractor data. Both of these sources can send information to Microsoft Entra API-driven provisioning using your automation tool of choice. Then, the provisioning service will automatically determine the right operation to perform for each user, and Microsoft Entra ID Governance Lifecycle Workflows will automate the joiner-mover-leaver processes configured by your IAM admin.
Figure 1: Microsoft Entra API-driven provisioning data flow
Let’s walk through the steps involved in configuring this integration.
Bring identities into your directory from any source in three easy steps
Step 1 – Configure API-driven provisioning app
In the Microsoft Entra Portal, sign in as a user with Application Administrator and Hybrid Identity Administrator role. You will see two new provisioning applications in the Enterprise App gallery:
- API-driven provisioning to Microsoft Entra ID: Configure this app if you’d like to provision cloud-only user accounts from your authoritative source.
- API-driven provisioning to on-premises Active Directory: Configure this app if you’d like to provision user accounts first to your on-premises Active Directory and then sync them into Microsoft Entra ID using Microsoft Entra Cloud Sync / Connect Sync.
If your provisioning target is an on-premises Active Directory domain, download and configure the Microsoft Entra provisioning agent. Once configured, you can select the Active Directory domain in the provisioning app.
 Figure 2: Connect to your on-premises Active Directory domain
By default, the provisioning app maps attributes from the standard SCIM Core User schema and the SCIM Enterprise User schema extension to the corresponding Microsoft Entra ID / on-premises Active Directory user attributes.
 Figure 3: SCIM schema attributes to on-premises Active Directory attribute mapping
The Microsoft Entra provisioning service creates a unique API endpoint for your provisioning app. You can copy this API endpoint from the “Overview” blade. Select “Start provisioning” to accept inbound provisioning requests at this API endpoint.
 Figure 4:API endpoint for your provisioning app
The inbound provisioning API endpoint has the format:
https://graph.microsoft.com/beta/servicePrincipals/{servicePrincipalId}/synchronization/jobs/{jobId}/bulkUpload
where {servicePrincipalId} is the object ID of your provisioning app and {jobId} is the provisioning job id.
Step 2 – Grant permission to your application or service to upload identity data
In this step, you create an entity in Microsoft Entra ID that represents your application or service calling the inbound provisioning API and grant it the necessary permissions. You can use one of the following options:
Grant the following Graph API permissions with admin consent:
- SynchronizationData-User.Upload
- AuditLog.Read.All
 Figure 5: Permissions required to perform API-driven provisioning
Step 3 – Upload identity data using any automation tool of your choice
You can now securely upload identity data to the provisioning /bulkUpload API endpoint. The great thing about API-driven provisioning is that you don’t need to implement custom logic to figure out whether an operation in your system of record requires creating or updating an identity. Just upload the data from your source systems and the Microsoft Entra provisioning service will automatically determine the right operation to perform for each user record based on mapping rules configured by your IAM admin.
Unlock more integration scenarios
In the set of steps above, we showed you how to provision to Microsoft Entra ID in the cloud, and to Active Directory on-premises. You can apply these steps to implement several enterprise HR integration scenarios.
Scenario 1: IT teams can import HR data extracts from any source
Flat files, CSV files and SQL staging tables are commonly used in enterprise integration scenarios. Employee, contractor, and vendor information are periodically exported into one of these formats, and an automation tool is used to sync this data with Microsoft Entra ID. With API-driven provisioning, IT teams can use any automation tool of their choice (example: PowerShell scripts or Azure Logic Apps) to modernize and simplify this integration.
Scenario 2: HR ISVs can build direct inbound sync with Microsoft Entra ID
With API-driven provisioning, HR ISVs can ship native synchronization experiences so that changes in the HR system automatically flow into Microsoft Entra ID and connected on-premises Active Directory domains. For example, an HR app or student information systems app can send data to Microsoft Entra ID as soon as a transaction is complete or as end-of-day bulk update.
Scenario 3: System integrators can build more connectors to systems of record
System integrators can build custom HR connectors to meet different integration requirements around identity data flow from systems of record to Microsoft Entra ID.
What customers and partners are telling us
We got some great feedback from customers and partners like you during the previews.
Microsoft Entra API-driven provisioning will allow us to achieve our cloud-first vision by provisioning identity directly in the cloud and on-premises, integrating with our HR application. We will be able to remove legacy infrastructure and automate many fragmented workflows and reduce dependency on on-premises Active Directory infrastructure. This will enhance our security, efficiency, and user experience.
Sachin Desai, Sr. Director at Avanade Inc.
With API-driven provisioning, HR has better control over the identity lifecycle & data in Active Directory and Microsoft Entra ID. When combined with Lifecycle Workflows, onboarding and offboarding becomes easy and seamless, and with that, no more manual work and always an up-to-date identity!
Pim Jacobs, Principal Consultant at InSpark and Microsoft Most Valuable Professional (MVP)
Microsoft Entra API-driven inbound provisioning is a game changer for customers constrained by existing technologies, opening the possibility for any customer to start the journey for joiner, mover, and leaver automation.
Martyn Gill, Senior Architect and Team Lead at Kocho
With API-driven provisioning, our customers can link employee information in SmartHR with Microsoft Entra ID. This will reduce the time and effort required to manage accounts as employees join, move, or leave the company. SmartHR is excited to partner with Microsoft in building this integration!
Takumi Kanzaki, Product Engineer at SmartHR
Rippling gives businesses one place to run HR, IT, and Finance by automating payroll, expenses, and benefits in one integrated platform. With Microsoft Entra API-driven provisioning, we can now extend this automation to streamline access to more workforce apps, regardless of whether it’s in the cloud or on-premises. We look forward to enabling this seamless experience for our customers by partnering with Microsoft!
Sam Gnesin, Product Lead at Rippling
Give it a try
With this new capability, you now have even more flexibility on how to keep identity data in sync with your authoritative sources, regardless of whether they are hosted in the cloud or on-premises. Working with your HR/IT teams, you can select from a range of automation tools like Azure Logic Apps, PowerAutomate, Azure Functions or Azure Data Factory to retrieve, transform and merge HR data and simply upload the data to the new provisioning API endpoint.
To quickly configure and evaluate API-driven provisioning with your favorite API testing tool, refer to one of these tutorials:
To get started with your favorite automation tools, refer to one of these samples:
The API-driven provisioning feature is in preview, and you can start using it if you have Microsoft Entra ID P1 (formerly Azure AD Premium P1) license or above. Licensing terms will be released at general availability.
Have more questions? Check out our frequently asked questions to see if it’s answered there.
We’d love to hear your feedback along the way! Share your feedback through the Azure forum or by tagging @AzureAD on Twitter.
Joseph Dadzie, Partner Director of Product Management
LinkedIn: @joedadzie
Twitter: @joe_dadzie
Learn more about Microsoft Entra:

Recent Comments