This article is contributed. See the original author and article here.
Introduction
The new task history feature in Microsoft Project for the web helps task owners stay on top of their tasks and quickly identify recent progress that has been made or changes that have impacted the schedule. Edits to tasks such as adding or removing labels, changing the duration, or changes to other tasks that affect the schedule of work all appear in the new Changes pane in Task Details. It is rolling out now, and will be available world-wide over the next few days.
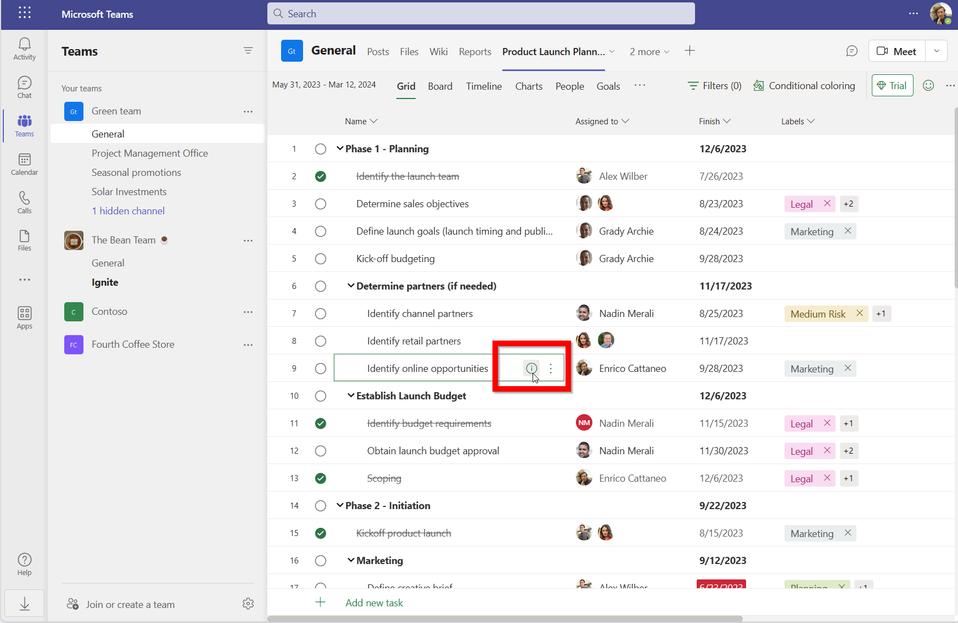
First open a project at Project Home or in a Project tab in Microsoft Teams.
Open task details for any task. It can be reached by clicking the task details in the task grid, or by clicking a task card in the board view.
In the corner of task details, there is a new task history icon. Click it to open the changes pane.
Details about the recorded changes
All the changes a user makes to a task are recorded in task history. For each edit, details are shown such as who made the change, when they made it, what property was changed, the previous value, and the new value.
Changes that are recorded include edits such as
Adding or removing labels
Changing the duration or effort
Editing checklists
Adding or removing attachments
Edits to any custom columns
Changes made to other tasks that impact the selected task
Project for the web makes it easy to track tasks and identify dependencies. Dependencies between tasks means it is crucial for task owners to understand how changes across the project impacts their work. Task history makes it easy to identify these changes and stay on track. Changes made to other tasks that impact either the start date or finish date of the selected task have a history record that shows high-level information about the edit.
In the example shown below, Allan Smith edited the duration of a related task called “Kick-off budgeting.” This edit impacted the start date of the currently selected task.
Navigating to related task edits
Clicking the task title for these changes takes you to the related task and highlights the relevant edit. In this example, clicking the task title of the previously shown change record opens the “Kick-off budgeting” task and highlights the change in duration.
Pressing the browser back button or pressing the back button in Teams returns to the previously selected task.
Pro-tip: use task history with task conversations to stay on track
Task history pairs perfectly with task conversations to enable in-context chat about changes to tasks. For projects that have been pinned in Teams channels, the bottom of the task details pane includes a task conversation button. Pressing it opens the conversation pane.
Chats in this pane automatically include a link to the task to help everyone quickly get to a shared context. More information about task conversations can be found at the Microsoft support page for them.
Frequently Asked Questions
Why don’t I see the task history button? Task History is only available to users with a Project Plan 3 or greater license. If the icon doesn’t appear in task details, work with your Administrator to verify the license that is assigned to you.
Will edits made by users without a Project Plan 3 license be shown in the Changes pane? Yes. Edits made by all users, regardless of their license, will appear in the changes pane. Only users with a Project Plan 3 or greater license will be able to open the changes pane to view these edits.
Is task history available in Planner? No. Task history -along with other powerful features such as custom columns and the timeline view- helps to give teams with more sophisticated project management requirements the tools they need to keep their projects on track. These features can all be found in Project for the web.
Can my team build Power BI reports using Task History data? Yes. Task history data is stored in Microsoft Dataverse and can be queried using Power BI. Learn more about the schema by visiting our support page.
Do edits to tasks using the Project scheduling APIs appear in task history? No. Only edits to tasks made using the grid, board, or timeline views appear in the Changes pane.
My team uses Project in Power Apps, do edits made in that context appear in task history? Edits made in the grid, board, and timeline views appear in Task History. Any edits to tasks using Power Apps forms as well as any edits to columns added to tables in Dataverse are not shown in task history.
My team has customized Project in Power Apps, will task history work in our environment?
Yes, but your administrator needs to ensure that they are validating their customizations with the latest release, including any customization of security roles in Dataverse.
This article is contributed. See the original author and article here.
We are excited to announce some updates to our Viva Insights Meeting effectiveness report template that will enhance your experience and make the insights more actionable! As part of our ongoing commitment to providing valuable tools for our customers, we have reevaluated the insight naming conventions for this template and made some changes.
In our quest to enhance meeting effectiveness, we have focused on ensuring insights resonate with users. While the conclusions drawn from the data remain unchanged, you’ll notice a shift from a passive tone to a more actionable sense in our insight framing.
To improve clarity and eliminate confusion, we have revisited the names of several insights, making them easier to comprehend. We understand the significance of intuitive and understandable naming conventions, and addressing this issue has been a priority for us.
Existing insight name
New insight name
Short and small
Large and long
Advanced meeting notice
Short notice
Attendee availability
Conflicting
Joined on time
Joined late
Ended on time
Ended late
No multitasking
Multitasked
New name descriptions and actionable takeaways for improved meeting effectiveness
1. “Short and small” is now “Large and long”: This insight highlights meetings that have 9 or more invitees and last more than 1 hour.
Action: Foster focused discussions and prevent attendee fatigue to ensure more productive and impactful outcomes.
2. “Advanced meeting notice” has been renamed “Short notice”: This change aims to emphasize meetings that have are scheduled with less than 24 hours of notice.
Action: Ensure that important meetings are scheduled with enough lead time to enable employees to feel in control over their days and sufficiently prepare for meetings.
3. “Attendee availability” is now “Conflicting”: This insight highlights meetings where scheduling conflicts are present amongst participants, potentially impacting meeting attendance.
Action: Identify and address scheduling conflicts, optimize attendee availability, and facilitate more productive meetings by effectively managing conflict commitments.
4. “Joined on time” is now “Joined late”: This insight highlights meetings where attendees were unable to join a Teams meeting within five minutes of the scheduled start time.
Action: This can be caused by back-to-back meetings that make it challenging for employees to take breaks and join the next meeting on time. Use the Shared meeting plan to automatically build in a few minutes between meetings to provide a short break.
5. “Ended on time” is now “Ended late”: This insight focuses on meetings that exceeded their scheduled duration.
Action: Prompt participants to conclude discussions within the allotted time and ensure timely transitions to subsequent tasks.
6.”No multitasking” has been changed to “Multitasked”: This insight highlights the instances where attendees are sending chats or emails during meetings.
Action: Encourage attendees to minimize multitasking and prioritize focused engagement, enhancing meeting productivity and outcomes.
To see these changes, simply download a new version of the Power BI template from the product and load in data from a Meeting effectiveness query. All your existing Meeting effectiveness queries will be compatible with this new version. Any Meeting effectiveness reports that you have created before this update will also continue to work, however from this point forward, the prior version of the template will not be available to download.
We’re committed to continuously improving our products to better serve our customers. The updates to The Meeting effectiveness report template are rooted in research and user feedback, with the aim of providing actionable insights and eliminating confusion. We believe that these changes will significantly enhance your experience with our product and empower you to drive better outcomes in your meetings. We look forward to your feedback and encourage you to explore the newly refined template.
This article is contributed. See the original author and article here.
In this guest blog post, Stig Panduro, Senior Director of Microsoft Alliance at Silk Technologies, explores software as a service (SaaS) and what your business should consider and prepare for as you plan your cloud migration.
In the fast-paced world of software development, staying ahead of the competition is vital for success. Simply dominating the market today is no guarantee of continued leadership in the future. To maintain a competitive edge and meet evolving customer demands, software companies must explore new technologies and business models.
One model that has gained significant traction is providing software as a service (SaaS). By adopting SaaS, companies can offer customers seamless access to software without the hassle of physical installations, making it an enticing choice, particularly in today’s remote work environment.
Is your product ready for this transformation into a SaaS offering? Achieving this requires migrating your software from traditional on-premises infrastructure to the cloud. If your software relies on databases like Oracle or Microsoft SQL Server, the migration process becomes far more complex.
The SaaS phenomenon
Migrating to SaaS is the process of transitioning from a conventional on-premises software model to a dynamic software-as-a-service paradigm. Gartner’s extensive market research indicates SaaS is expected to grow 17.9% in 2023. This surge in popularity can be attributed to several factors. SaaS empowers software customers with unparalleled flexibility, allowing them to purchase and install software at their convenience, and providing remote accessibility. No longer must they schedule on-site visits from the vendor for hardware installations. Moreover, SaaS offers subscription-based pricing, replacing hefty upfront costs with a pay-as-you-go model, significantly reducing capital expenditures.
Simultaneously, SaaS presents software companies with a wealth of opportunities. By offering a SaaS version of their products, companies can tap into a broader customer base. The subscription-based pricing model enables them to achieve stable, recurring revenue. These factors combine to make the transformation into a SaaS offering an enticing prospect.
Challenges you might encounter
While the potential rewards of migrating to SaaS are immense, cloud migration itself poses formidable challenges. Moving your applications to the cloud is a complex undertaking. Some applications can be effortlessly lifted and shifted to the cloud, but others require significant refactoring. This process is time-consuming, costly, and inherently risky. If your applications rely on databases, expect additional hurdles during the migration process. These databases demand unparalleled performance levels, which might not be achievable through native cloud infrastructure alone unless you’re willing to pay for additional cloud resources. These challenges frequently surface unexpectedly during the migration process, causing significant complications.
Implementing a zero-downtime deployment strategy is another potential stumbling block. SaaS applications are expected to be available around the clock, serving a global user base. Any downtime is met with little tolerance from users, who demand uninterrupted service. By adopting a zero-downtime deployment approach, you can seamlessly update your application without disrupting customer workflows. However, downtime events can occasionally be beyond your control. It becomes crucial to establish a robust disaster recovery plan to minimize the impact of outages on your zero-downtime deployment strategy.
As you onboard more customers, achieving seamless and cost-effective scalability becomes paramount. Furthermore, the inherent flexibility of SaaS makes it challenging to calculate an accurate total cost of ownership (TCO) and offer competitive pricing. Questions concerning user capacity, traffic handling capabilities, and storage volume must be thoroughly analyzed during the early stages of SaaS cloud migration to ensure optimized TCO and cost control.
Formulating your SaaS migration strategy
In the face of these daunting cloud migration obstacles, hope shouldn’t be lost. By bringing together your business analysts, architects, and developers and meticulously outlining business and application requirements, you can begin to simplify your SaaS migration strategy. Careful analysis of your software’s architecture will help identify elements that can be smoothly transitioned to the cloud, as well as areas requiring more extensive adjustments. Significant code optimization will likely be necessary to achieve the desired outcome.
If you find yourself at a loss on how to execute a SaaS cloud migration, turn to Silk. The Silk Data Virtualization Platform acts as a bridge between your applications and the underlying infrastructure. By utilizing a higher-performance compute network, Silk connects with compute VMs, surpassing the limited-capacity data network of cloud infrastructure. This empowers Silk to support performance-intensive workloads, eliminating the need for oversized compute VMs to achieve faster performance. Silk’s innovative design decouples performance and capacity, eliminating wasteful spending on unnecessary resources to meet IOPS or throughput targets. By offloading network layer tasks to the compute layer, Silk significantly reduces latency, resulting in highly responsive applications.
In addition to performance optimization, Silk offers enhanced resiliency through a self-healing architecture that proactively avoids disruptions and an active-active architecture that eliminates single points of failure by distributing management across cloud zones. The platform also provides critical enterprise data services like zero-footprint snapshots, enabling the creation of data copies for dev/test or disaster recovery purposes without compromising performance or incurring additional storage costs.
Scalability is a core pillar of Silk’s value proposition, ensuring seamless and cost-efficient migration of customers and their data as your SaaS platform expands. Leveraging machine learning-based monitoring capabilities, Silk analyzes cloud usage patterns to optimize your cloud experience and achieve the most cost-effective price point.
SimCorp’s success story
One company that recently made a successful move to SaaS was SimCorp. SimCorp is a leading provider of investment management solutions serving 40 percent of the world’s top financial companies. SimCorp’s flagship product, SimCorp Dimensions, empowers over 200 global clients with efficiency and flexibility in asset management. Initially available solely as an on-premises solution, SimCorp recognized the market was increasingly turning toward SaaS and embarked on transitioning SimCorp Dimensions into a SaaS offering. Considering the time and effort required for a full refactor, it opted for a lift-and-shift approach to Microsoft Azure. However, it needed to ensure the consistent high performance needed for its SaaS offering to be a success.
SimCorp turned to Silk and its data virtualization platform that sits between SimCorp Dimensions and the underlying Azure infrastructure. Silk proved ideal for performance-intensive workloads, giving SimCorp the boost it needed while providing dramatic and consistent reductions in latency for maximum application responsiveness. With Silk, SimCorp migrated one of its largest clients from an on-premises setup utilizing expensive compute and storage solutions to its SaaS offering. By leveraging Silk’s capabilities, the client experienced a remarkable 20 percent improvement in performance compared to its previous on-premises setup.
Ulrik Elstrup Hansen, VP and Head of SaaS Innovations at SimCorp, attests to the value of Silk: “I would recommend other companies to use Silk because of their ability to provide you with the right level of performance and resiliency. You get a partner that is truly invested in your success. With Silk, we are able to get closer to the promise of the cloud.”
Embrace the SaaS revolution with Silk
The shift toward SaaS holds immense potential for software companies seeking sustained growth and customer satisfaction. Overcoming the challenges of cloud migration is a prerequisite for unlocking the benefits of this transformative model. And while it might be a mountain to overcome, it is not, in fact, impossible.
This article is contributed. See the original author and article here.
Sharing and collaboration are at the heart of Microsoft 365, empowering you to work seamlessly with coworkers and partners on files and documents. Collaboration across Word, Excel, PowerPoint, Teams, Outlook, OneDrive, SharePoint and other applications maximizes your efficiency and productivity at work. We understand the importance of file sharing, and that’s precisely why we’ve focused on refining and improving the experience based on the feedback you have given us. When you click the “Share” button, the Share Dialog box pops up. It’s this experience, used over eight hundred million times each month across Microsoft 365 applications, that we set out to improve. Our goal was to make it easier for you to share and collaborate. Today, we’re thrilled to announce that the Simplified Sharing experience is available across more than fifty Microsoft 365 applications on all platforms: Web, Desktop, and Mobile!
The new Simplified Sharing in Microsoft 365 applications makes file sharing easier and faster than ever before!
Simple and fast sharing across Microsoft 365
As part of the Simplified Sharing experience, we’ve refreshed the Share dialog to be streamlined and free of distractions. Let’s take a look at these enhancements and the various ways you can share today:
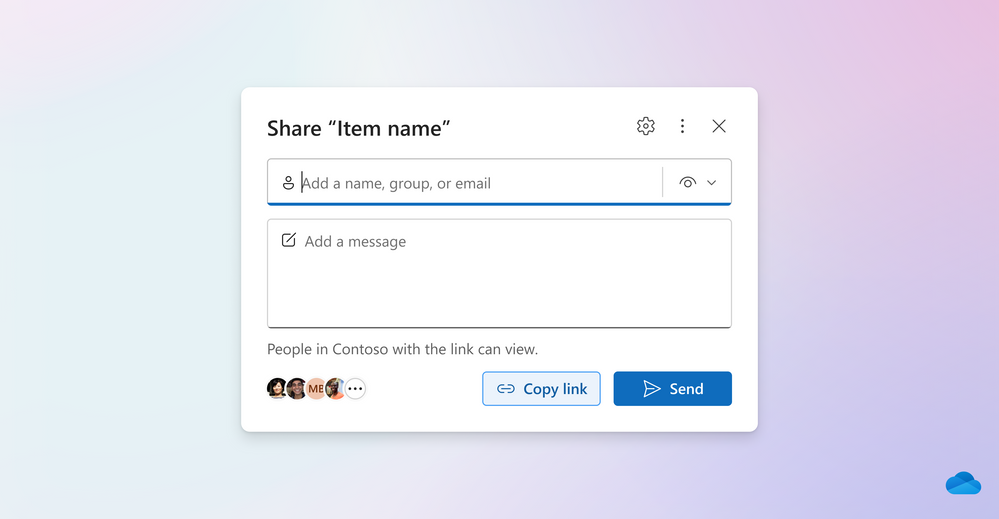
Easily and quickly share a file with your coworkers by sending them an email or copying a link.
Email a link: When you want to email someone a link to a file, simply start typing a name, group or email and you’ll be given suggestions based on your most frequent collaborators. You also have the option to add a brief message. Once you hit “Send,” OneDrive will craft an e-mail and send it to your chosen recipients!
Copy a link: If you want to send your file in a different application, such as Teams or Outlook, you can always copy a link to your clipboard. We’ve made it easier to create and copy a link with a single click and see a quick confirmation. Once copied you can paste it into a Microsoft Teams chat, document, or email to give others access to the file. If you want more granular control around how others can access your file, such as giving them edit, view, review permissions or if you want to block downloads, just click the gear icon for further customization.
It’s now simple to share externally while respecting admin settings and external policies in Microsoft 365.
Share files externally: You can also share links easily with people external to your organization. The new streamlined experience asks for your confirmation before creating an external share link while respecting admin settings and external policies, making it a lot easier and faster than the previous experience.
Granular control when sharing files
We are making it easier to view and control who has access to shared files or folders and what permissions they have.
Manage who has access to shared files and their respective permissions.
Manage Access: At the bottom of the Share dialog, you’ll see the people who have access to the shared file. Clicking on the people’s profile pictures or initials will take you to the Manage Access dialog which shows a comprehensive list of people and groups who have access to the file or folder, along with their respective permissions. The Manage Access dialog also lets you grant additional access, stop sharing, or set controls for how recipients access the files and folders you’ve shared with them.
Links: Clicking on the “Links” tab will surface a view of all the sharing links that have been created for the file or folder and who has access via each link. From the links view you can fine-tune who has access and what permissions they have.
Easily determine a file’s sensitivity level in Microsoft 365 before sharing it.
Sharing sensitive files – We understand that some organizations want to handle sensitive information with an extra layer of protection. Sensitivity Labels in Microsoft 365 allow you to classify files based on their level of confidentiality, enabling better control over access and distribution. We’ve seamlessly integrated these labels into the Share dialog and Manage Access dialog. These labels, specific to each file, give you at-a-glance understanding of file sensitivity before sharing, helping to ensure security for your sensitive documents.
Learn more
When you’re ready to try the simplified sharing experience in Microsoft 365, just tap the Share button in the file you are working in to get started. And keep the feedback coming! To give us feedback just tap the feedback icon in any Microsoft 365 app. Your feedback is invaluable in shaping a better experience tailored to your needs. Let’s elevate collaboration in Microsoft 365 together!
Ihcene Cheriet is a Senior Product Manager on the OneDrive team. She joined the team in 2020 where she focused on improving the sharing and collaboration experience across the M365 ecosystem. In her free time, she enjoys learning more about photography and exploring diverse cuisines.
This article is contributed. See the original author and article here.
Introduction
Every warehouse manager is keen on improving the processes on the warehouse floor. But where to start? What to optimize? It is far from easy to discover the bottlenecks. This is where the Power Automate Process Mining comes really handy. In the 10.0.35 release we ship the integration of Supply Chain Management Warehouse module with Power Automate Process Mining. This integration gives some really valuable insight into the material movement in the warehouse.
What is Power Automate Process Mining?
Power Automate Process Mining is a tool which exists exactly to help you gain insights, find bottlenecks and continuously improve business processes. It offers rich visualizations and deep analytics so one can get clear insights into the data.
There is an online version of it – part of the Power Automate offering. Using Power Query Online one can load data about the processes from various sources – starting from the Excel file, SQL databases and even calling custom APIs. Users can also connect to the already prepared data in Azure Data Lake and utilize powerful tools like Azure Data Factory for data preparation. The online version offers a customizable Power BI report with detailed process insights. However, one can download a desktop application which allows to perform deep process analysis. The desktop version reuses the same backend – same data and process definition – as an online version.
When working with Power Automate Process Mining you have to know some terminology – cases and activities. In the context of the warehouse material movement process analysis, Case is a closed warehouse work and Activity is a single work line (pick or put). Thus, a single case consists of activities – each of them is a “visit” to a certain location in the warehouse.
How to analyze material movement process in the warehouse using the Power Automate Process Mining?
In the 10.0.35 release we ship the integration of Supply Chain Management Warehouse module with the Power Automate Process Mining. It allows you to:
Easily load warehouse material movement data into the Power Automate Process Mining. Users can choose how much data to load and so forth.
The resulting Power Automate Process Mining Power BI report is integrated right into Supply Chain Management. Users can gain process insights without leaving Supply Chain Management – similar to embedded Power Bi reports experience.
In order to get insights, the user should first upload the data to Power Automate Process Mining. Our integration allows to achieve that right from Supply Chain Management UI:
Go to Warehouse management > Setup > Process mining > Warehouse material movement process configuration.
On the Action Pane, select Deploy process to open the deployment wizard and follow the on-screen instructions.
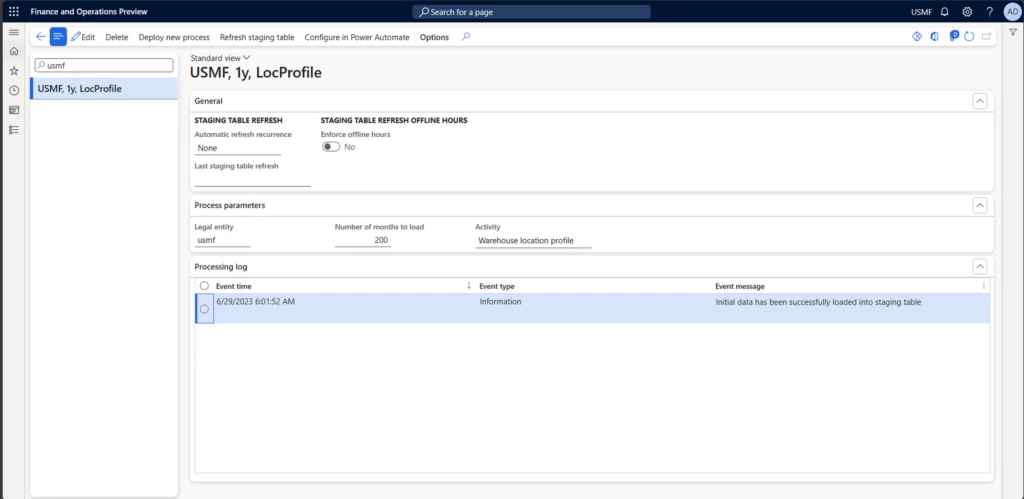
Note that for sake of integration with Power Automate Process Mining a staging table is created on the Supply Chain Management side. It contains data which is then read by Power Automate Process Mining. As part of the deployment wizard execution, the system will load only 200 cases (closed warehouse works) into the staging table and thus into the Power Automate Process Mining. Below we show how to load a full set of data.
After the successful deployment user will see a page like this:
Here user can see the processing history – “Processing log” section will show events related to the staging table population and cleanup. Users can refresh the staging table manually by clicking the “Refresh staging table”. One can also set an automatic refresh schedule. But remember that it will only refresh data in the staging table in Supply Chain Management. After the staging table in Supply Chain Management is updated, you would normally want to refresh the Power Automate Process Mining process as well. You can do that by clicking the “Configure in Power Automate” button and trigger a refresh there (you can also setup an automatic refresh there as well).
Let’s now see what insights you can get from this.
What kind of insights are available?
Take a look at this short video to get a feel of the possibilities:
After the deployment is done, users can go to “Warehouse management > Setup > Process mining > Warehouse material movement process configuration” and view the process report.
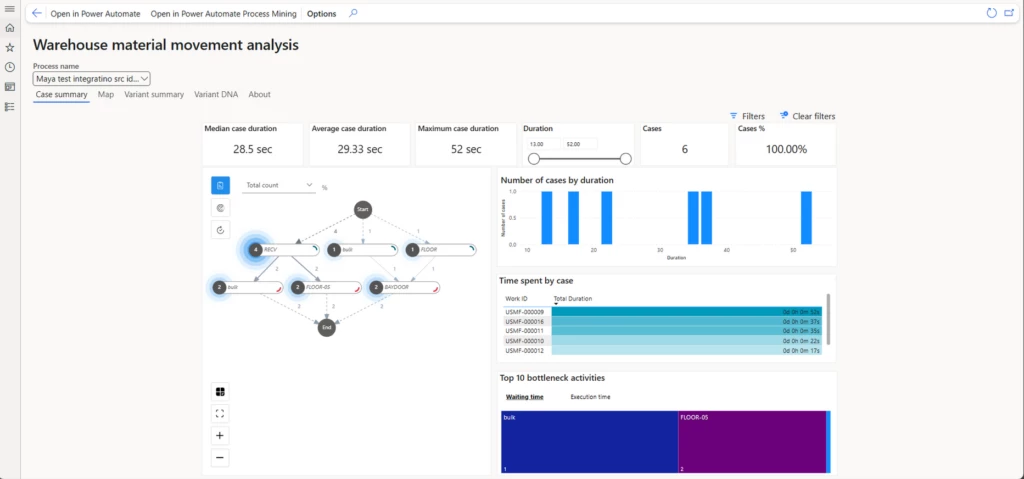
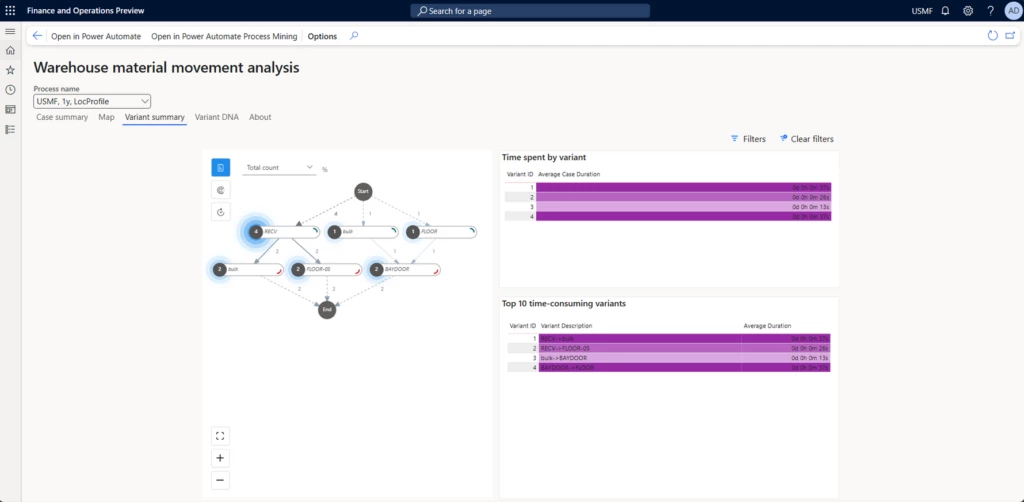
On the “Case summary” page one can get a quick overview of the material movements in the warehouse which can feed furthermore detailed investigation. The map control at the left basically shows you how material flows in the warehouse. Depending on your selection during the process deployment nodes can represent either Location Profile, Warehouse Zone or the Warehouse Location. On the map control you can choose if you want to look at frequencies or performance. Other KPIs on page are self-describing – they aim to give you an overview of the overall state of the process and also give you a feeling of the slowest cases (works) and activities (locations).
“Variant summary” and “Variant DNA” pages deal with the concept of variants. Several cases (works) could basically repeat the same route through the warehouse. Each unique route is a variant. So by looking at statistic related to variants you could find the most common ones and optimize for those. Or you could find unexpected outliers and further investigate the reason behind them.
But let’s take a sneak peek into a more advance process mining scenarios available with the desktop application. First you need to download and install it by clicking on the “Open in Power Automate Process Mining” button.
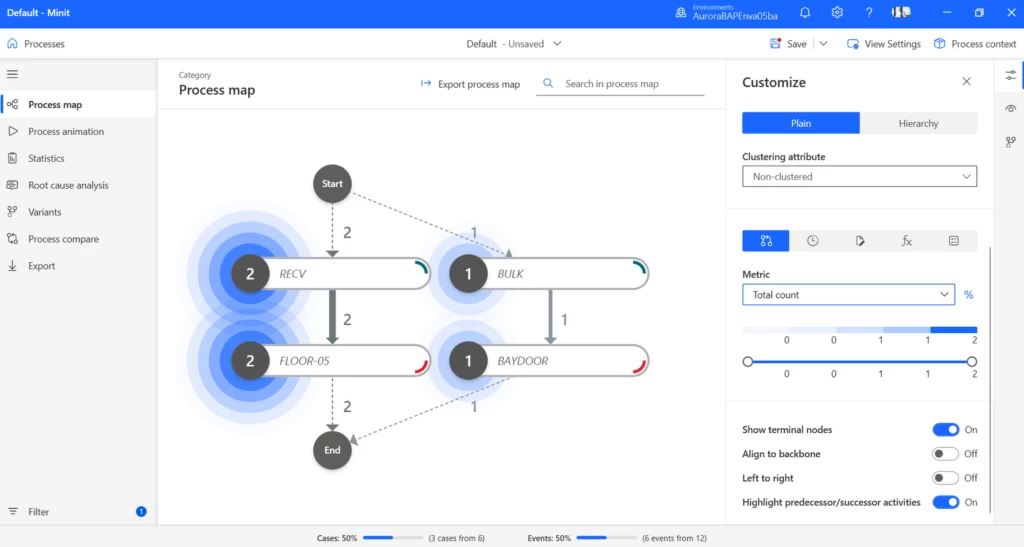
“Process map” visualization also is a prominent part of the tool. After all, it is very natural to represent processes as graphs. But here you have much richer possibilities about what metrics to show, how to highlight and cluster nodes:
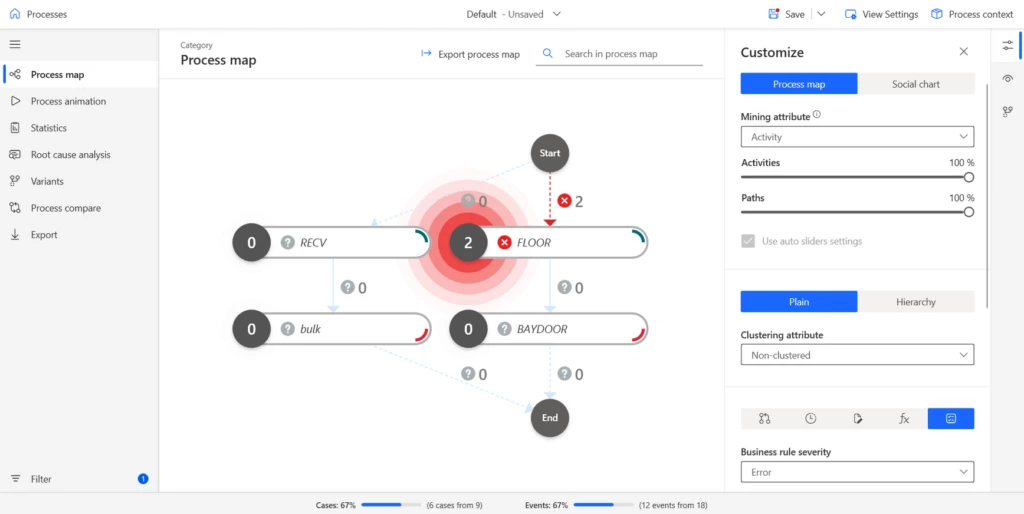
You could even define your own business rules which would influence the process map visualization by directly showing if process violates expected process behavior. For example, here I have created a business rule which highlights where short picking has happened:
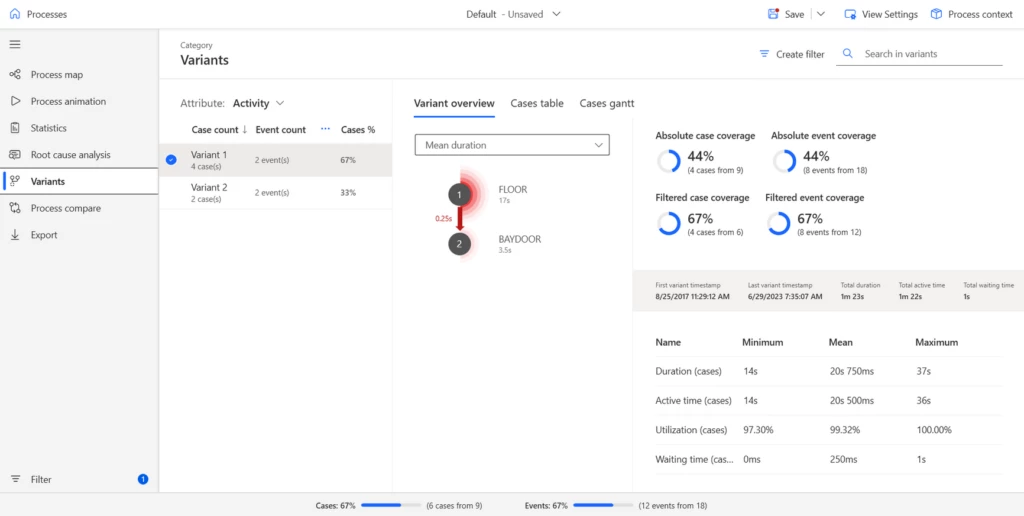
We have met the concept of variants when looking into the Power BI report. But in the desktop application you can get much more insights and statistics around the variants:
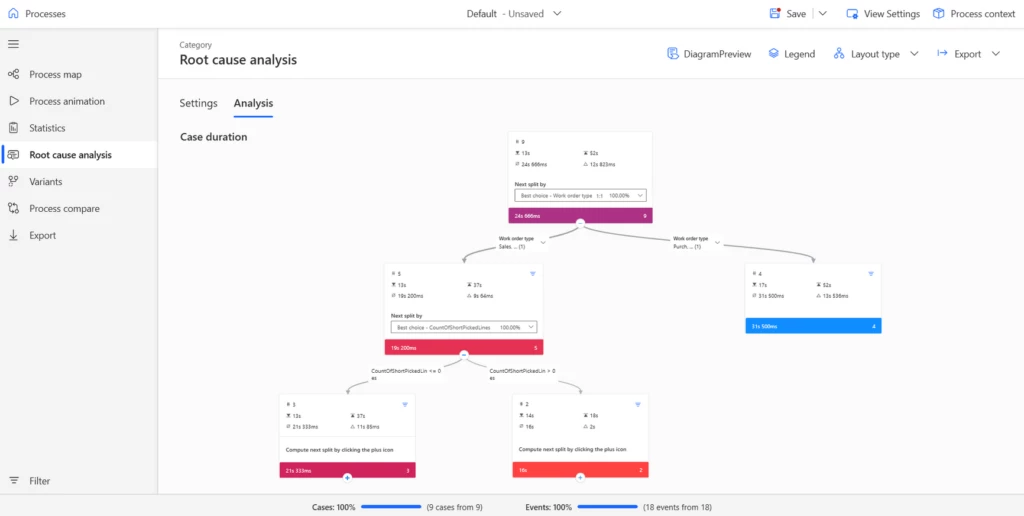
Most of the features we have seen so far are helping at discovering, visualizing and analyzing the processes. But AI powered Root Cause Analysis feature goes beyond that. It allows you to analyze what and how different business factors influence business process performance. For example, you may want to find out which factors are influencing warehouse work execution time the most. Remember though that tool requires the case level attributes to be used in RCA analysis. You can define your own custom metrics (like “Number of short picked lines”) and use those in the RCA.
Conclusion
Usage of Power Automate Process Mining for sake of getting insights into the warehouse material movement definitely enriches analytical toolset and allows to get insights which were pretty hard to get before.
To learn more about this feature and Supply Chain at Microsoft,
We’re excited to launch Free Trial | Microsoft Supply Chain Center Preview , which harnesses generative AI to assist Supply Chain managers in real-time communication with suppliers regarding specific news


Recent Comments