This article is contributed. See the original author and article here.
A key component of the Subscription billing feature is the Recurring contract billing module. Recurring contract billing allows customers to manage their recurring billing contracts through billing schedules which contain the financial details of a contract. Recurring billing contracts can be managed across one or many customers based on how a contract is drafted. The new feature Customer split allows Dynamics 365 Finance users to split billing schedules across multiple customers based on a percentage of the invoice. This feature reduces the risk of incorrect billing, as a single billing schedule can manage the billing for all customers that are to be billed.
What is Customer Split
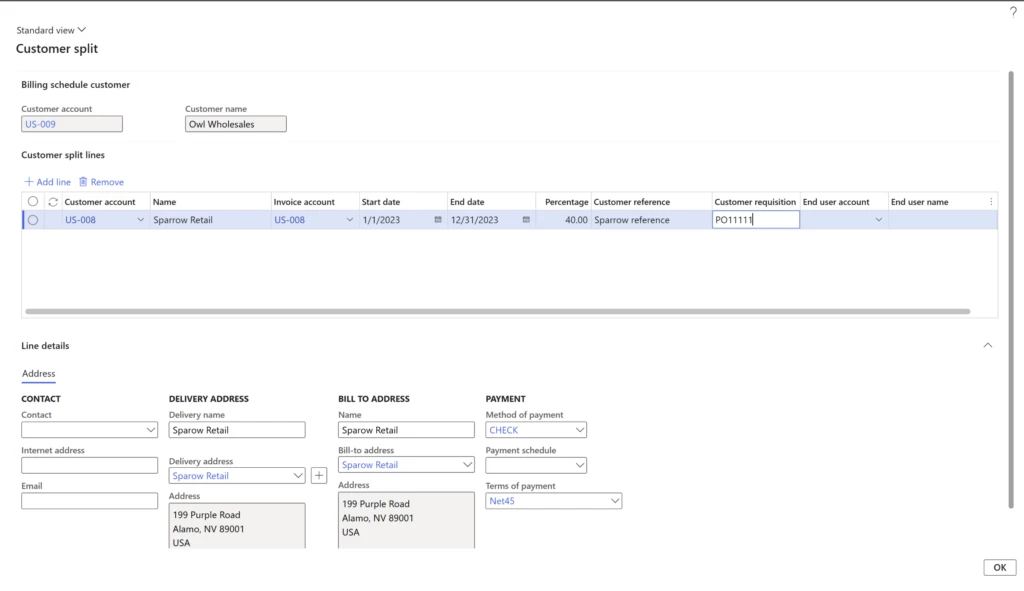
Customer split allows a single billing schedule to be billed across multiple customers. For example, let’s consider a scenario where a contract should be billed to two customers: one is responsible for 60% of the bill and the other is responsible for 40%. Customer split allows users to configure a scenario such as this and reduce additional manual entry as well as reduce risk of inaccurate billing.
The feature is enabled by setting the Customer split parameter in Recurring contract billing parameters page to Yes.
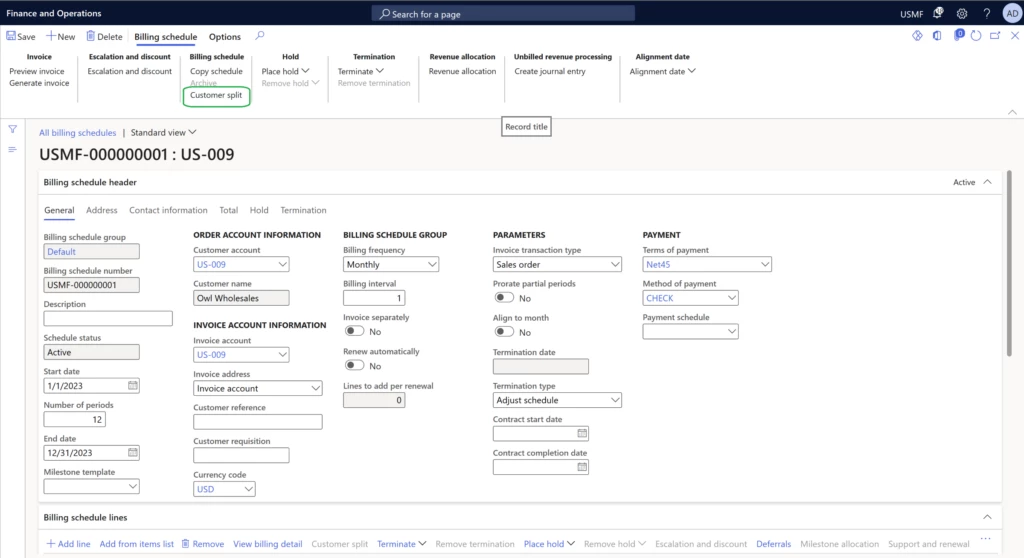
Once the Customer split feature has been enabled in the Recurring contract billing parameters, the customer split can be set up on a billing schedule. The billing schedule header contains the primary customer responsible for the invoice, including the Bill to address on the Address tab.
The Customer split option under Billing schedule in the action pane can be used to add additional customers and their responsibility for the bill at the header level. Customer split can also be added on a line-by-line basis.
When creating the record for the customer split, the billing schedule parent customer will get billed the remainder of what is not defined. In our example, that will be 60%. When defining the customer split a start date, end date, customer reference, customer requisition, end user account, end user name, delivery address, and bill to address can be entered.
When generating invoices for a billing schedule that has customer split defined, a sales order will be created for each customer defined in the customer split as well as the billing schedule header customer.
Customer split is available on a billing schedule or billing schedule lines when:
Billing schedules have an Invoice transaction type of Sales order
Billing schedule line is a service item
Billing schedule is not linked to a project
Billing schedule line is not configured for unbilled revenue
How to get started
This functionality is available in 10.0.29 and later of Dynamics 365 Finance. Read the documentation for a more detailed look at the feature: Customer split on billing schedules.
This article is contributed. See the original author and article here.
Microsoft partners like Signly, Tessell, and Varonis deliver transact-capable offers, which allow you to purchase directly from Azure Marketplace. Learn about these offers below:
Signly SLaaS: Signly sign language as a service (SLaaS), a fully managed solution powered by Microsoft Azure, makes it easy to provide access to sign language by capturing the text of a web page and sending it to highly qualified deaf sign language translators. Translated content is then available for all users, enabling website owners to provide improved service for deaf customers.
Tessell – Migrate and Manage Oracle on Azure: Tessell is a fully managed database as a service (DBaaS) designed to enable Oracle databases to thrive on Microsoft Azure by delivering enterprise-grade functionality coupled with consumer-grade experience. Tessell makes deploying Oracle databases on Azure simple and elegant, taking care of your data infrastructure and data management needs for both Oracle Enterprise Edition and Standard Edition 2.
Varonis – Find, Monitor, and Protect Sensitive Data: Is your midsize or large organization trying to understand where your sensitive data is, who has access to it, and what users are doing with it? The Varonis platform protects your data with low-touch, accurate security outcomes by classifying more data, revoking permissions, enforcing policies, and triggering alerts for the Varonis incident response team to review on your behalf.
This article is contributed. See the original author and article here.
Enterprises are increasingly turning to collaborative apps to enhance workplace engagement and productivity. That presents an opportunity for independent software vendors (ISVs) to earn customer loyalty by building easily accessible enterprise apps with rich features that deliver business value.
This article is contributed. See the original author and article here.
We are excited to announce the launch of Microsoft AI SDK for SAP ABAP. This software development kit (SDK) is designed to provide SAP ABAP developers with the tools they need to create intelligent enterprise applications using Artificial Intelligence (AI) technologies.
Engineered with a deep understanding of developers’ needs, the Microsoft AI SDK for SAP ABAP presents an intuitive interface that effortlessly brings AI capabilities to your ABAP applications. This toolkit offers an exciting avenue to tap into the power of Azure OpenAI. And this is just the beginning — our commitment to progress promises the inclusion of even more AI engines in future versions.
Azure OpenAI, the crown jewel of Microsoft Azure’s offerings, is a powerhouse of AI services and tools. It is your passport to harnessing machine learning algorithms, leveraging advanced natural language processing tools, and exploring versatile cognitive services. Its vast suite of tools paves the way for the creation of intelligent applications that excel in pattern detection, natural language processing, and data-driven predictions. Azure OpenAI grants you access to an array of pre-built AI models and algorithms, along with custom model training and deployment tools, all under the umbrella of stringent security, compliance, and data privacy standards.
With the AI SDK for SAP ABAP and Azure OpenAI integration with SAP, developers are on the brink of a new frontier. Now you have the power to craft innovative applications that can revolutionize the enterprise landscape by automating mundane tasks, bolstering smarter business decisions, and providing a more personalized customer experience. It’s more than a development kit — it’s your passport to an exciting future of technological evolution for enterprises running on the SAP platform.
Features:
The Microsoft AI SDK for SAP ABAP v1.0 is not just a toolset, it’s an innovation accelerator, an efficiency propellant. Designed for ABAP developers, it supercharges their workflows, slashing the time taken to integrate cutting-edge AI capabilities. With its streamlined integration process and ABAP-ready data types, developers can fast-track their tasks and concentrate on their real mission – crafting intelligent, transformative applications. This is no ordinary toolkit; it’s your express lane to the future of enterprise software development.
Extensive Capabilities: It provides a comprehensive suite of functionalities, including Models, Deployment, Files, Fine-Tuning, and Completion (GPT3), along with Chat Completion (GPT4) capabilities.
ABAP-Ready Data Types: We’ve simplified the integration process for ABAP developers by offering ABAP-ready data types. This feature substantially lowers the entry barriers, enabling developers to leverage the SDK with ease.
Azure OpenAI Support: The SDK is fully compatible with Azure OpenAI, ensuring seamless integration and performance.
Enterprise Control: To safeguard sensitive data, we’ve incorporated a robust enterprise control mechanism, offering three levels of control granularity. Enterprises can effectively manage SDK usage by implementing policies to permit or block specific functionalities. For instance, an organization could use authorizations to designate a user group capable of performing setup operations (Deployment, Files, and Fine-Tuning), while enabling all users to utilize the Completions functionality.
Flexible Authentication: The SDK supports authentication using either Azure OpenAI Keys or Azure Active Directory (AAD), providing users with a secure and flexible approach to authentication.
In this age of relentless technological progress, AI is undeniably the cornerstone of enterprise software development’s future. The Microsoft AI SDK for SAP ABAP is a dynamic and transformative tool, purpose-built for SAP professionals. It’s not just a toolkit; it’s a supercharger for your innovative instincts, enabling you to build intelligent, data-centric applications. Our aim is to help businesses stay nimble and competitive in a marketplace where the pace of innovation is breakneck.
The launch of the Microsoft AI SDK for SAP ABAP is a leap into the future. It encapsulates our commitment to fostering the symbiotic relationship between technology and business, nurturing an environment where the opportunities for innovation are limitless. As we unfurl this state-of-the-art tool, we can’t wait to see the inventive applications that you, the talented developers working within the SAP ecosystem, will craft. The potential is staggering, poised to redefine how businesses operate and flourish.
And our commitment doesn’t stop at providing you with the tools. We pledge unwavering support on your journey of discovery and innovation with the Microsoft AI SDK for SAP ABAP. We’re with you every step of the way — to guide, support, and celebrate as you traverse this transformative technological landscape. Let’s stride boldly together into this new era of intelligent, data-driven enterprise solutions. The future is here, and it’s brighter than ever.
Best Regards,
Gopal Nair – Principal Software Engineer, Microsoft, – Author
Amit Lal – Principal Technical Specialist, Microsoft – Contributor
Disclaimer: The announcement of the Microsoft AI SDK for SAP ABAP is intended for informational purposes only. Microsoft reserves the right to make adjustments or changes to the product, its features, availability, and pricing at any time without prior notice. This blog does not constitute a legally binding offer or guarantee of specific functionalities or performance characteristics. Please refer to the official product documentation and agreements for detailed information about the product and its use. Microsoft is deeply committed to the responsible use of AI technologies. It is recommended to review and comply with all applicable laws, regulations, and organizational policies to ensure the responsible and ethical use of AI.
This article is contributed. See the original author and article here.
For Azure log alert notification action using logic app, we have read numerous articles. But I notice that most of them are either very brief or don’t go into great detail about all the nuances, tips, or tricks. I therefore wanted to write one with as much detail as I could and some fresh additional strategies. I hope this aids in developing the logic and putting it into practise.
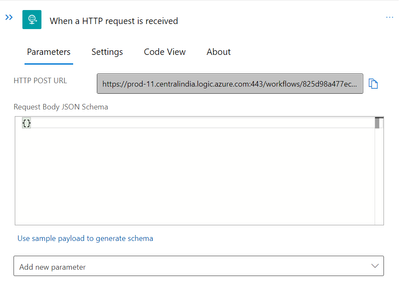
So let’s get going. We already know that creating the Alert rule and choosing the logic app as the action are necessary. Additionally, the Logic app’s alert notification trigger for when an HTTP request is received. So let’s construct one.
We can use the below sample schema for the above trigger task
{
“type”: “object”,
“properties”: {
“schemaId”: {
“type”: “string”
},
“data”: {
“type”: “object”,
“properties”: {
“essentials”: {
“type”: “object”,
“properties”: {
“alertId”: {
“type”: “string”
},
“alertRule”: {
“type”: “string”
},
“severity”: {
“type”: “string”
},
“signalType”: {
“type”: “string”
},
“monitorCondition”: {
“type”: “string”
},
“monitoringService”: {
“type”: “string”
},
“alertTargetIDs”: {
“type”: “array”,
“items”: {
“type”: “string”
}
},
“configurationItems”: {
“type”: “array”,
“items”: {
“type”: “string”
}
},
“originAlertId”: {
“type”: “string”
},
“firedDateTime”: {
“type”: “string”
},
“description”: {
“type”: “string”
},
“essentialsVersion”: {
“type”: “string”
},
“alertContextVersion”: {
“type”: “string”
}
}
},
“alertContext”: {
“type”: “object”,
“properties”: {
“properties”: {},
“conditionType”: {
“type”: “string”
},
“condition”: {
“type”: “object”,
“properties”: {
“windowSize”: {
“type”: “string”
},
“allOf”: {
“type”: “array”,
“items”: {
“type”: “object”,
“properties”: {
“searchQuery”: {
“type”: “string”
},
“metricMeasureColumn”: {},
“targetResourceTypes”: {
“type”: “string”
},
“operator”: {
“type”: “string”
},
“threshold”: {
“type”: “string”
},
“timeAggregation”: {
“type”: “string”
},
“dimensions”: {
“type”: “array”
},
“metricValue”: {
“type”: “integer”
},
“failingPeriods”: {
“type”: “object”,
“properties”: {
“numberOfEvaluationPeriods”: {
“type”: “integer”
},
“minFailingPeriodsToAlert”: {
“type”: “integer”
}
}
},
“linkToSearchResultsUI”: {
“type”: “string”
},
“linkToFilteredSearchResultsUI”: {
“type”: “string”
},
“linkToSearchResultsAPI”: {
“type”: “string”
},
“linkToFilteredSearchResultsAPI”: {
“type”: “string”
}
},
“required”: [
“searchQuery”,
“metricMeasureColumn”,
“targetResourceTypes”,
“operator”,
“threshold”,
“timeAggregation”,
“dimensions”,
“metricValue”,
“failingPeriods”,
“linkToSearchResultsUI”,
“linkToFilteredSearchResultsUI”,
“linkToSearchResultsAPI”,
“linkToFilteredSearchResultsAPI”
]
}
},
“windowStartTime”: {
“type”: “string”
},
“windowEndTime”: {
“type”: “string”
}
}
}
}
},
“customProperties”: {}
}
}
}
}
However, as can be seen, the output above is insufficient to provide a thorough error message for the notification. In order to receive the message, we must perform additional tasks.
The same query that was used in the Alert rule can be run again with additional filtering options to produce the error code and message shown below.
The aforementioned query serves as an example of how to extract the error message using multiple iterations from the Properties field.
Now, initialise the variables as shown below.
By choosing type as “String,” we must create 4 “Initialise Variable” tasks for “Runquery,” “Owner,” “HTMLtable,” and “Authorise.”
Also keep in mind that the List query result may contain multiple logs. Therefore, we will use a foreach loop to go through each error log one at a time and send notifications for each one. Let’s create the following foreach task to accomplish that.
The result of the “Run query and list result” task is the value.
The next step is to retrieve the current Log from a variable we previously initialised. Let’s now set the value for that variable using the current item from the Foreach task.
The value is the output of the “Run query and list result” task.
The next step is to get the most recent Log from a variable that was initialised earlier. Using the current item from the Foreach task, let’s now set the value for that variable.
So that we can obtain the field values in subsequent tasks, parse this variable into JSON. You can simply run the Logicapp to obtain the output for the aforementioned variable in order to obtain the schema for this task. Next, duplicate that output and paste it into the sample payload link for the task below.
Our actual strategy is to e-mail or notify each error log. In this instance, the owner of the subscription will receive the email containing the reported error or violation.
We must make sure the logs are captured, which is done in the Alert rule window itself, because the query will be run once more after the alert. So let’s add a requirement to only gather those logs.
In order to ensure that the TimeGenerated field is between the Alert rule (trigger task), we will create a Condition task and choose it from the aforementioned “Parse JSON task.” Windows commencement and termination
Now If it is accurate, we can move on to obtaining the owner user or users’ information. However, let’s use HTTP action for API GET call if you have numerous subscriptions and want to display Subscription Name in your Notification as well. Use the API link as shown below and the SubscriptionID from the Current query Parse JSON task.
You can choose Managed Identity (of Logicapp) as your authentication type. You can choose Identity from the main menu list in the Logicapp, enable Managed Identity, and grant Reader permission for each subscription before setting this task.
Run the logicapp now to obtain the results of the aforementioned API request. To have the attributes of a subscription, copy the output and paste it into the sample payload for the subsequent Parse JSON task.
The Owners must now be filtered by the Subscription Users. Let’s make another HTTP action for the API GET task to accomplish that.
Let’s run the logicapp once more to obtain the results of this API task, then copy and paste them into the sample payload for the subsequent Parse JSON task in order to obtain the schema. Make sure the Content you choose is the API task’s body from above.
We currently have access to every subscription for the current log. To send the notification, however, we only need the Owner user. Therefore, we must use the Foreach task once more to filter each user and find the Owner user. The output of the previous parse JSON task serves as the Value for this.
Let’s now enter the details of the current user into a variable. Keep in mind that we previously initialised the variable “owner.” To set the value for it, create a Set Variable task now. Make sure the value represents the result of the previous foreach task.
To get the attribute values of the current user for later use, we must now parse the Variable into JSON.
To obtain the output of the aforementioned variable and obtain the schema, we must once again run the logicapp and copy/paste the results to the sample payload link above.
To identify the Owner user, we must now obtain the Owner’s Role AssignmentID (which is common in Azure). To obtain the Role Assignment ID, go to your subscription’s IAM (Access Control), click Role Assignments, then select any Owner and the JSON tab. However, you can also use PowerShell/CLI. Alternately, you can use the logicapp to validate the owner’s role assignment ID after receiving the output of the aforementioned “Parse JSON for Users” task. For future use, copy that.
The ID guid value can also be copied from the ID value.
To select only the Owner user for subsequent tasks, we must now create a Condition task to filter the users. The ID field from the task “Parse JSON for current user” should be used as the condition field.
The most crucial thing to keep in mind right now is that we must run a Graph API query in order to obtain user attributes like email and UPN, etc. For obtaining those attributes, the results of the current API queries are insufficient. But we need the following permission in the AAD in order to access those users’ attributes. The SPN (app registration) must be created, the following API permissions must be provided, and admin consent must be granted.
Permission
Type
Directory.AccessAsUser.All
Delegated
Directory.ReadWrite.All
Delegated
Directory.ReadWrite.All
Application
Group.ReadWrite.All
Delegated
Group.ReadWrite.All
Application
User.Read
Delegated
User.Read.All
Delegated
User.Read.All
Application
User.ReadWrite.All
Delegated
User.ReadWrite.All
Application
Additionally, duplicate the App ID and Tenant ID, make a secret, and copy the Secret key for the subsequent task.
To run a Graph API query, we must now execute the following HTTP action for API task. To obtain information about the current user, use the ‘Parse Json for current user’s principalID’ command.
Choose the Authentication parameter and enter the SPN-copied Tenant ID, App ID (Client ID), and Secret.
For the output from the aforementioned API, create a new “Parse JSON” task. To obtain the output of the aforementioned task’s sample payload to paste into the parse json task’s payload to obtain the schema, we can run the logicapp once more.
We should now have a good format for the notification to appear in the email. We’ll use an HTML table for that, filled with information from the query above (such as the error code, error message, severity, and subname). Although you are free to use your own format, you can use the sample provided by this github link (attached below) as a guide. You must choose the HTML table (the initialise variable we created earlier) and use the ‘Set Variable’ task to paste the value from the example HTML code I’ve attached below.
<>
Update the fields/values as indicated below in the code at the appropriate lines/locations.
After that, a task called Send email V2 can be created in Outlook 365 to send the notification.
You will receive an email as below.
Before we go any further, make sure your Alert rule in Azure Monitor has been created and the aforementioned logicapp has been selected as the action. Make sure the error/administration diagnostic logs are enabled to send to the Log analytics workspace for all subscriptions. If you want to set up separate alert rules for “Error” and “Critical,” create them separately and choose the same logicapp as the action. Here is just a sample.
And the Condition query should be as below (you can modify as per your requirement)
The evaluation of the log analytics workspace (activity logs) will be performed every 5 minutes, and if any policy violation errors are discovered, an alert will be sent. The Logic app will be activated as soon as the Alert is fired, and the Owner of the resource subscription will receive a notification email in the format shown above with all necessary information.


Recent Comments