How to mass deploy Dynamics 365 Warehouse Management – Mobile App

How to mass deploy Dynamics 365 Warehouse Management – Mobile App

This article is contributed. See the original author and article here.

Automating the deployment and configuration of Warehouse Management can be more efficient for big-scale deployments if you have a lot of devices to manage. One solution for this is using a mobile device management (MDM) solution such as Microsoft Intune, but not limited to it. To learn general information about using Intune to add apps, refer to the guide Add apps to Microsoft Intune.

Mobile Device Management (MDM) Perquisites

This article provides a demonstration of the practical deployment with Intune. It is imperative to ensure the availability of the following resources:

Setting up Warehouse Management app in

Endpoint Manager

Each MDM solution offers several methods for delivering an application to end devices, including delivering app binaries or from app stores. The preferred delivery method is through app stores, as it is simple and offers the most convenient way to receive updates.

Here is an example of how to configure it on Intune portal.

Android

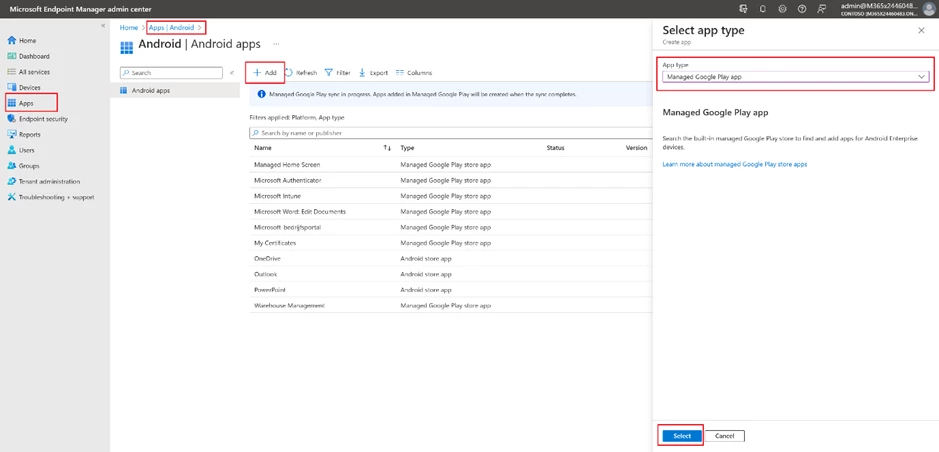
Add the Warehouse Management app with Add button in the Apps -> Android section.

graphical user interface, application

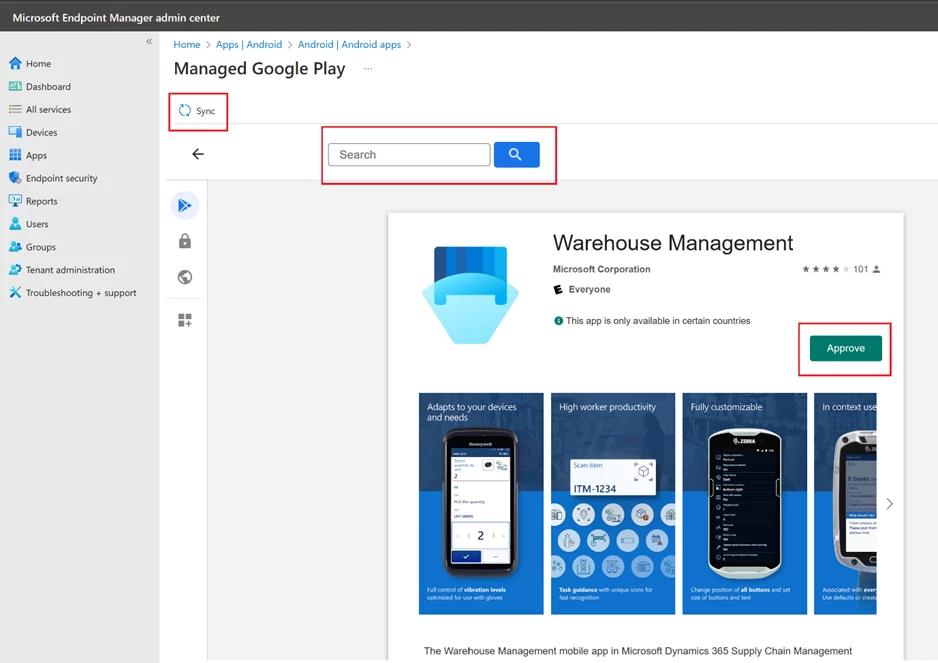
Select app type as Managed Google Play app. Use your Google account to log into Google Play, it requests only once the first time. In the window that opens, find Warehouse Management then click the Approve button and then the Sync button.

graphical user interface, application

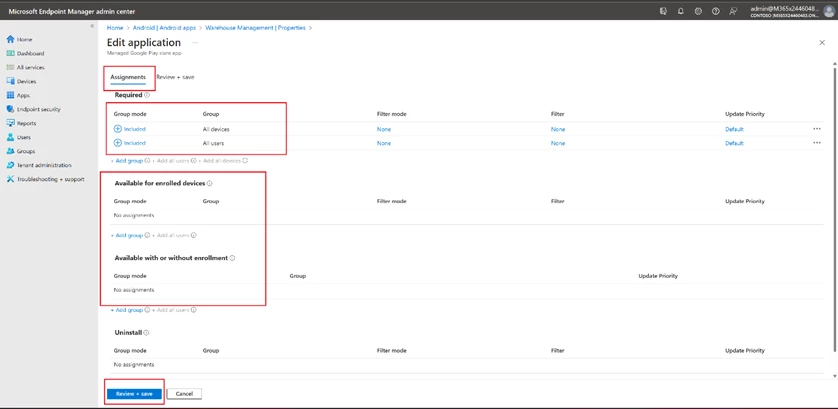
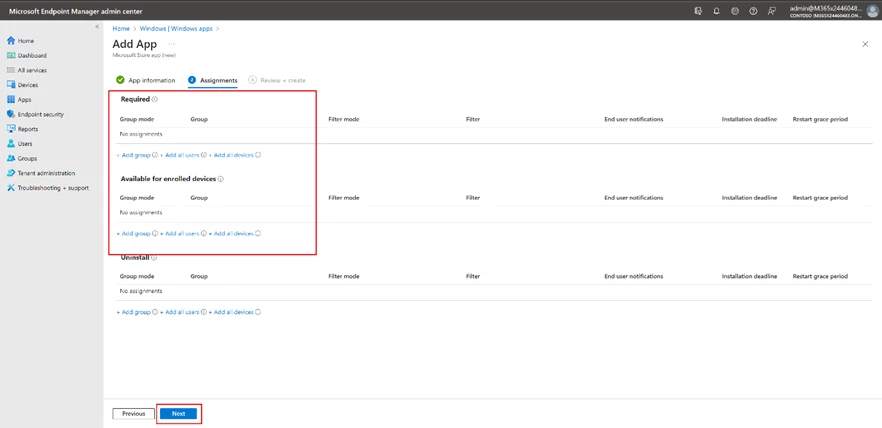
In the list of applications, select Warehouse Management, in the page that opens, select Assignments -> Edit.

graphical user interface, text, website

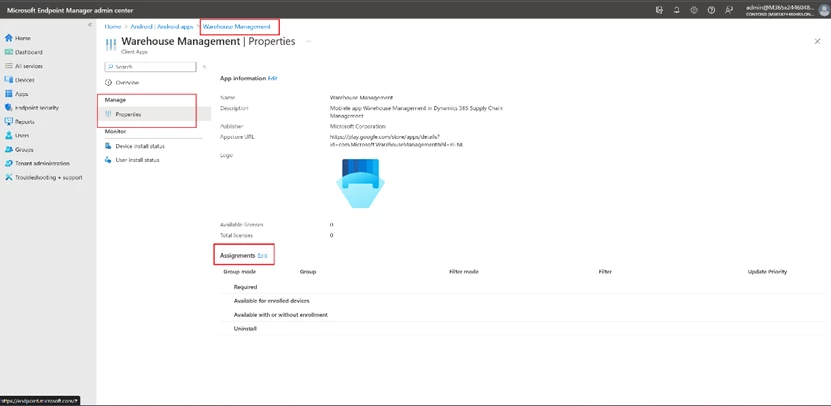
On the assignments page, select the user groups for which this application is intended and save.

a screenshot of a computer

Windows

The setup process for Windows apps is like Android, except for selecting an app from the Microsoft Store.

Add a new app with Add button in the Apps -> Microsoft Store app (new).

graphical user interface, text, application, email

Search for Warehouse Management

graphical user interface, application

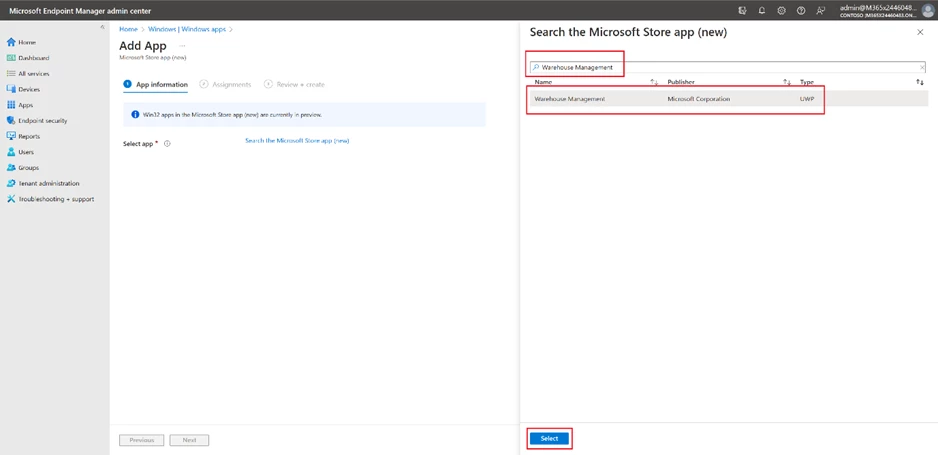
Apply user assignments.

graphical user interface, application, email

Managed Configuration

The Warehouse Management app (available from version 2.0.41.0+) enables connection settings to be import as a managed configuration through an MDM solution, and the same ConnectionsJson configuration key is shared across all platforms.

As a prerequisite, you must have connection JSON file, described in the Create a connection settings file or QR code section.

text

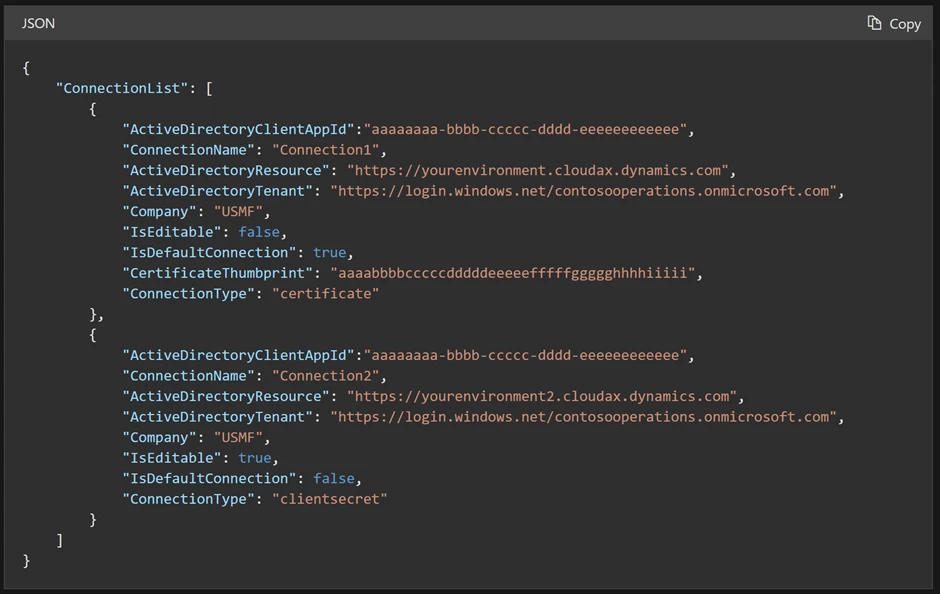
Remember that it is necessary to have a single connection set as the default (IsDefaultConnection=true) for the first time the application instantly connects to the backend. If this is not done, the user will have to manually choose the initial connection from the available options.

Here is an example of how to configure it on Intune portal.

Android

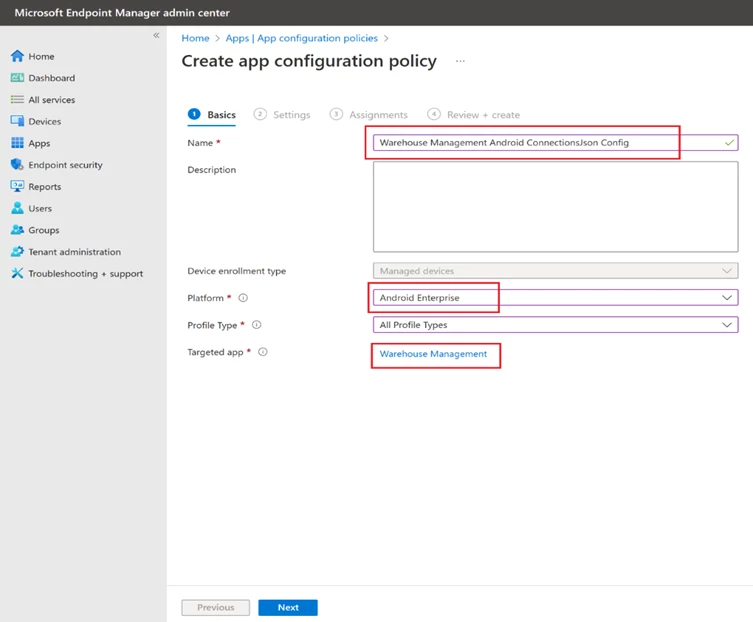
On the Apps tab, select App Configuration policies -> Managed devices.

graphical user interface, application

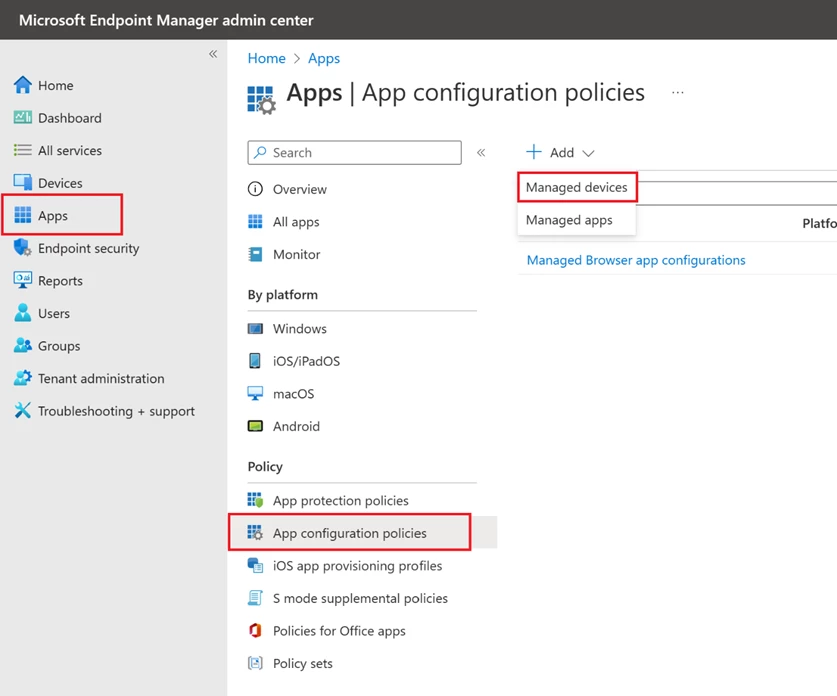
Define a name, platform, profile, and app.

graphical user interface, text, application, email

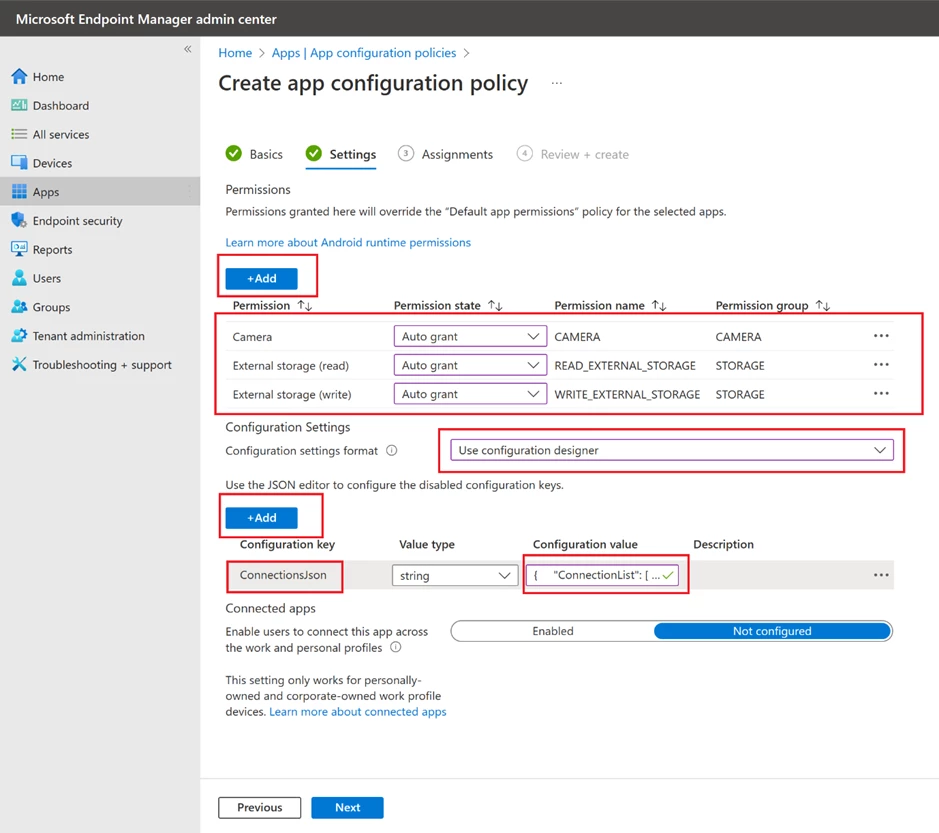
To create an app configuration policy, you need to grant the following permissions: Camera, External storage (write), and External storage (read). Then, add a configuration key and choose the ConnectionsJson option from the dialog box that appears. Insert the contents of the Connections.json file as the value of the ConnectionsJson key. Finally, proceed to the subsequent steps and assign the relevant user groups.

graphical user interface, application

Windows

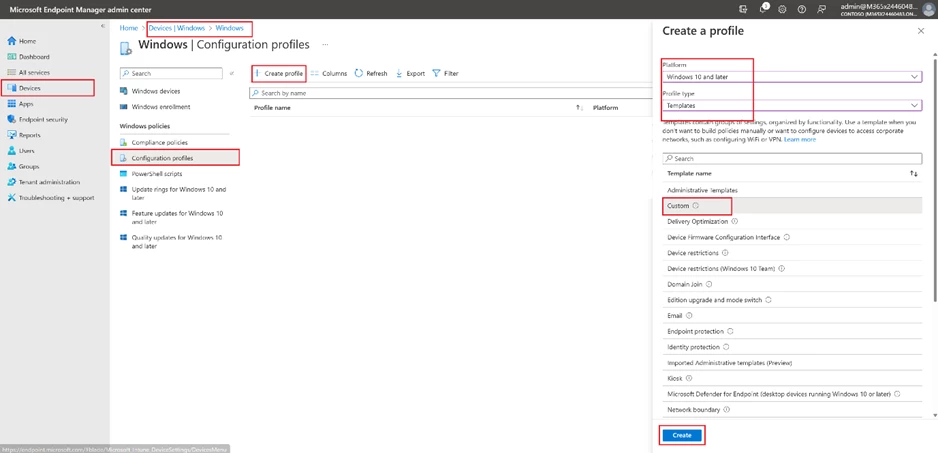
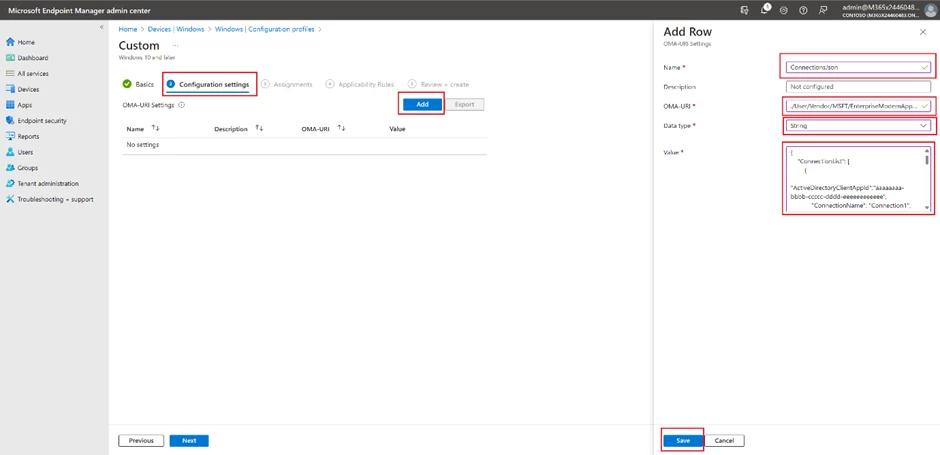
The Warehouse Managed for Windows requires a slightly different approach to deliver managed configuration. Navigate to the Devices section and choose Windows. This is where you will be able to view your Windows devices. Then, move to the Configuration Profiles section and create a custom profile by using templates for the Windows 10 platform.

graphical user interface, text, application, email

Define a name.

graphical user interface, text, application, email

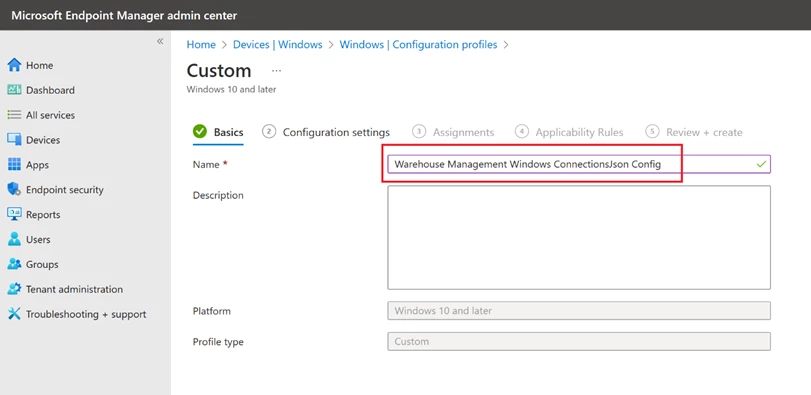
In the Configuration settings step, add a new OMA-URI Setting and complete all necessary fields. Enter “./User/Vendor/MSFT/EnterpriseModernAppManagement/AppManagement/AppStore/Microsoft.WarehouseManagement_8wekyb3d8bbwe/AppSettingPolicy/ConnectionsJson” in the OMA-URI field and insert the contents of your Connections.json file in the Value field. Finally, proceed to the subsequent steps and assign the relevant user groups.

graphical user interface, application

Certificate-based authentication

Certificate-based authentication is widely used for secure and efficient method of authentication. In mass deployment scenarios, it is advantageous due to its ability to provide a secure access alongside the simplicity of certificate deployment to end devices. This helps in reducing the risk of security breaches, which can be a significant concern in large-scale deployments.

To use the Warehouse Management mobile app, you need to have the certificate stored on each device. If you’re using Intune to manage your devices, you can find additional instructions on how to handle certificates for authentication in the Use certificates for authentication in Microsoft Intune guide.

To utilize a Certificate-based authentication approach, you must obtain a self-signed certificate (.pfx) either through the Windows Server Certificate Authority or by using PowerShell. It’s important to ensure that the certificate is exported along with its private key and protected by a password.

The objective is to transfer the PFX certificate (.pfx) with the thumbprint specified in the ConnectionsJson to the target devices. To achieve this, utilize the PKCS imported certificate configuration profile, as it enables the delivery of the same certificate across devices.

Certificate import

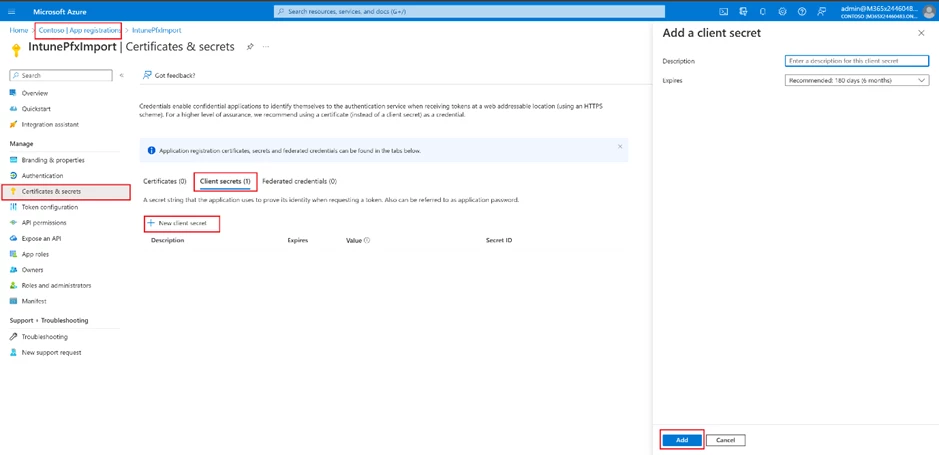
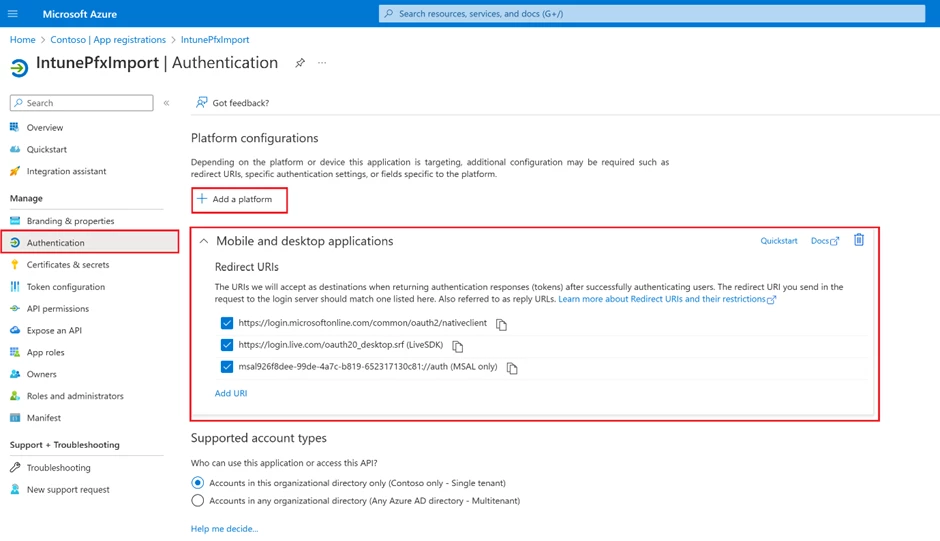
Create App registration in Azure Active Directory for PFXImport Powershell

Create new client secret on Certificates & secrets tab.

graphical user interface, text, application

Add and configure Mobile and desktop applications on Authentication tab.
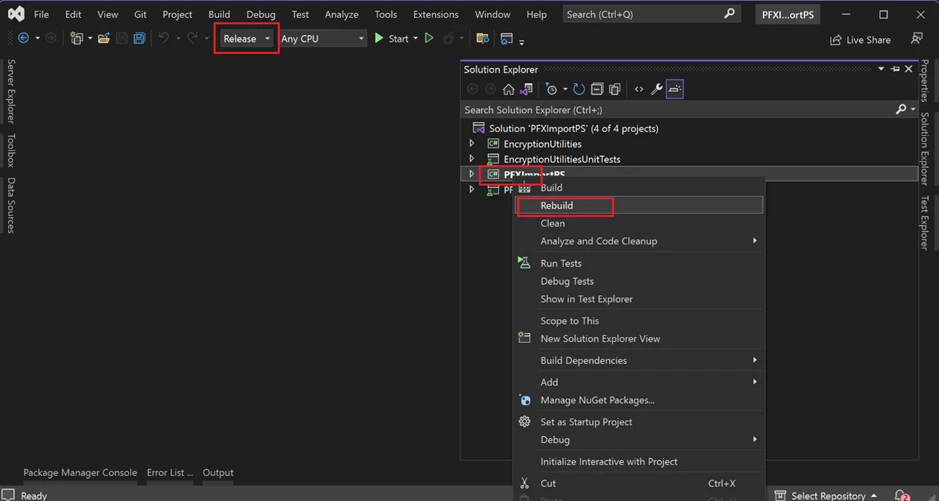
graphical user interface, text, application, email

Build PFXImport

Download Visual Studio 2022.

Download PFXImport Powershell Project from GitHub.

Open PFXImportPS.sln file, switch it to release mode, and build the project. You can find additional information by following the link.

graphical user interface, text

Dedicated machine for Certificate Connector

Start up the designated machine and carry out all subsequent actions on it.

Copy your self-signed PXF certificate to the Certificate Connector machine.

Copy the project binaries to the machine. (~Intune-Resource-Access-developsrcPFXImportPowershellPFXImportPSbinRelease)

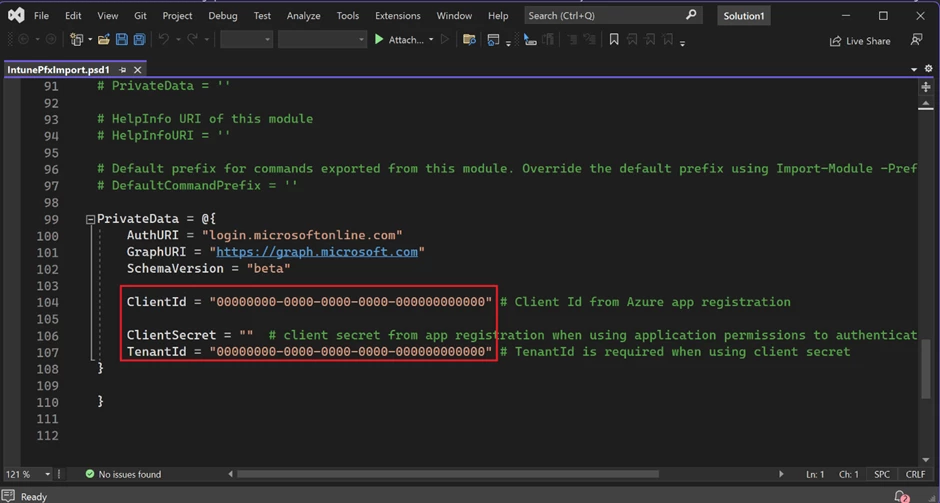
Modify IntunePfxImport.psd1 in Release folder file with data from App registration.

text

To install the Microsoft Intune Certificate Connector, locate the installation file under the Tenant administration tab in the Endpoint Manager.

graphical user interface, text, application, email

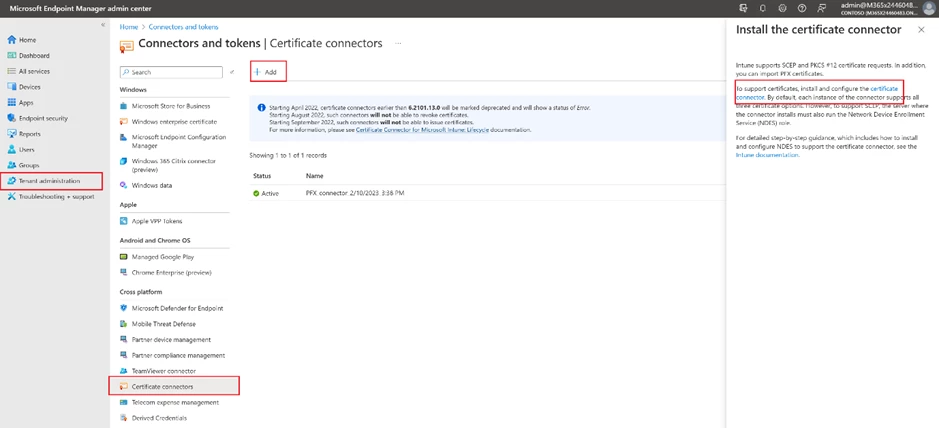
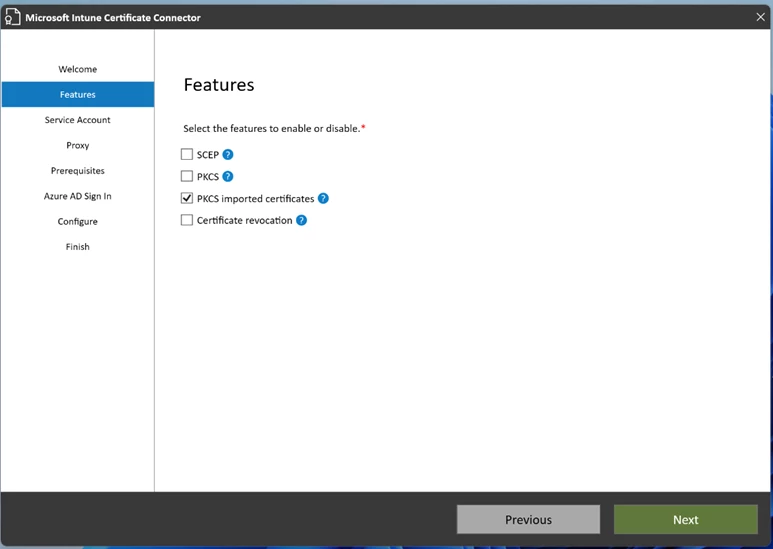
To install the Certificate Connector, transfer the installation file to the designated machine where it will be used and then run the file. During the installation process, be sure to select the “PKCS imported certificates” checkbox. Then sign into your Azure AD account using an admin user. As a result of successful installation, you will see a green checkmark on the Endpoint Manager page. You can find additional information by following the link.

graphical user interface, text, application

Import certificate with PFXImport Powershell

Run Powershell Terminal as administrator on the Certificate Connector machine.

Change folder to PFXImportPowershell release folder.

Run the following commands in the given sequence.

  1. Import-Module .IntunePfxImport.psd1
  2. Set-IntuneAuthenticationToken -AdminUserName “
  3. Add-IntuneKspKey -ProviderName “Microsoft Software Key Storage Provider” -KeyName “PFXEncryptionKey”
  4. $SecureFilePassword = ConvertTo-SecureString -String “” -AsPlainText -Force
  5. $UserPFXObject = New-IntuneUserPfxCertificate -PathToPfxFile “C:.pfx” $SecureFilePassword “<END_USER@DOMAIN.COM>” “Microsoft Software Key Storage Provider” “PFXEncryptionKey” “smimeEncryption”
  6. Import-IntuneUserPfxCertificate -CertificateList $UserPFXObject

To deliver the certificate for additional end users, repeat steps 5 and 6 while including their logins.

Use the following command to validate the result.

Get-IntuneUserPfxCertificate -UserList “<END_USER@DOMAIN.COM>”

Additional information is available at the following link.

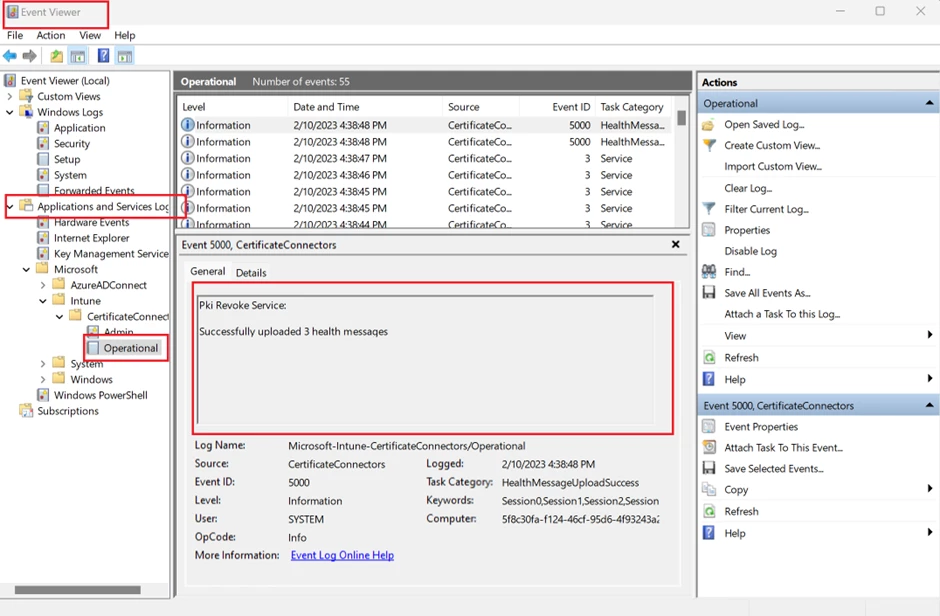
Troubleshooting: Use Windows Event Viewer to review the Certificate Connector logs.

graphical user interface

Endpoint manager portal configurations

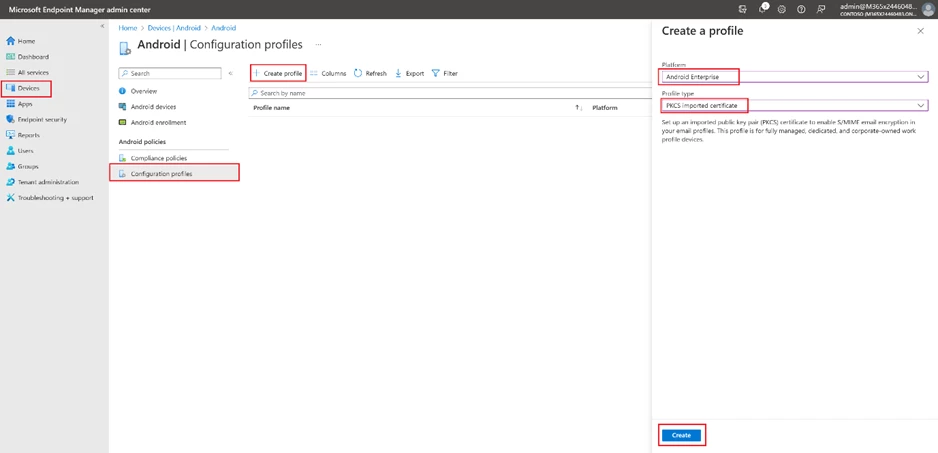
To create a new configuration profile, the process is the same across all platforms. Start by going to the Device tab, selecting the desired operating system, and clicking the “Create profile” button. Then, select “PKCS imported certificate” as the profile type (If the operating system is Android, also select the “Android Enterprise platform” option). Give the profile a name and description in the next step.

graphical user interface, text, application, email

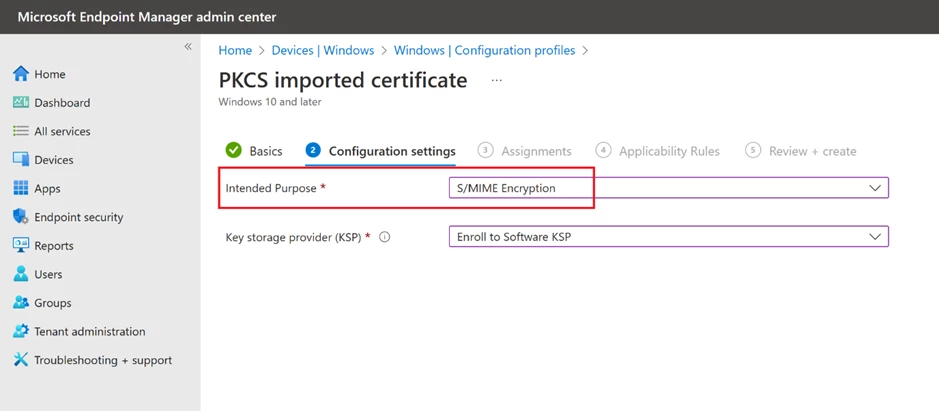
In the following step, choose “S/MIME Encryption” as the “Intended purpose” and finalize the process by assigning it to a user group (If the operating system is Windows, also select the “Enroll to Software KSP” option).

graphical user interface, text, application, email

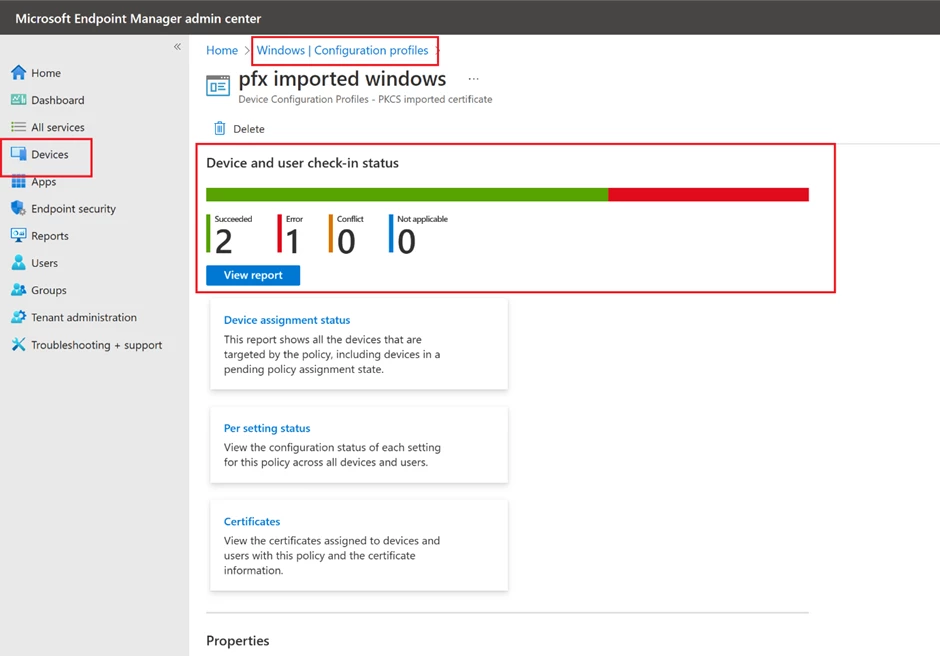
Use the configuration profile details page to validate the result.

graphical user interface, application, email

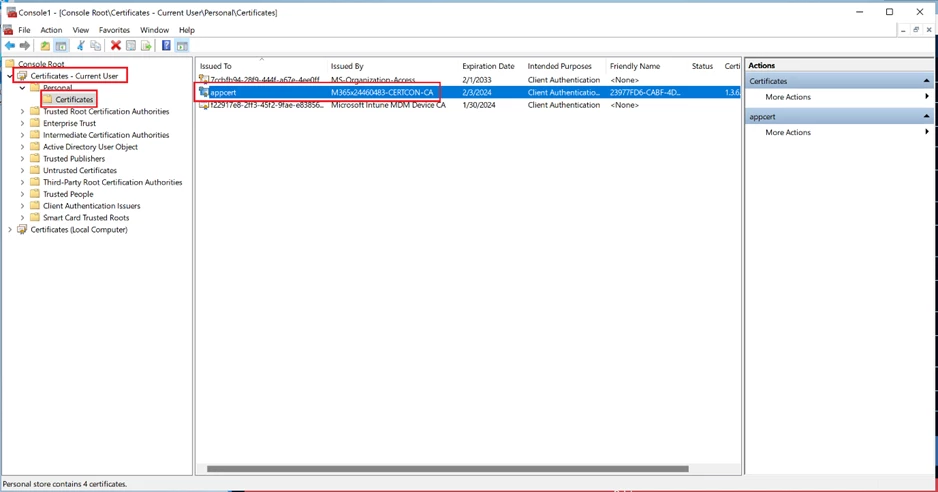
Another way to verify is to inspect the end devices. You can check the certificates using:

  1. the “Manage user certificates” option on Windows, or
  2. an app like “My certificates” to view installed certificates on Android. Please note, this app needs to be installed in the same way and the same work profile as Warehouse Management to access certificates distributed from Intune.

graphical user interface, text, application, email

End Device Enrolment

Devices can be enrolled with the Company Portal app, depending on the type of device and platform, and these enrolment programs provide access to work or school resources. Enrolment involves registering with Microsoft Intune and applying organizational policies for security. The Company Portal app is accessible on multiple devices.

Android

You must install the Intune Company Portal app and log in to your company account.

Windows

Windows has several options to setup end user devices.

  1. With the Intune Company Portal app
  2. Login into “Access -> Access work” or school and login into “Accounts -> Email & accounts -> Add a work or school account” then reboot the device.
  3. Other options

Not yet a Supply Chain Management customer? Take a guided tour.

The post How to mass deploy Dynamics 365 Warehouse Management – Mobile App appeared first on Microsoft Dynamics 365 Blog.

Brought to you by Dr. Ware, Microsoft Office 365 Silver Partner, Charleston SC.

Create inclusive content with the new Accessibility Assistant in Microsoft 365

Create inclusive content with the new Accessibility Assistant in Microsoft 365

This article is contributed. See the original author and article here.

Inaccessible content is everywhere in the digital world. Today, we’re introducing Accessibility Assistant in Microsoft 365 to help creators produce more accessible content with less effort, all in the flow of work.

The post Create inclusive content with the new Accessibility Assistant in Microsoft 365 appeared first on Microsoft 365 Blog.

Brought to you by Dr. Ware, Microsoft Office 365 Silver Partner, Charleston SC.

Delivery Optimization report now generally available

Delivery Optimization report now generally available

This article is contributed. See the original author and article here.


Start monitoring Delivery Optimization usage and performance across your organization today! Following the Windows Update for Business reports announcement back in November 2022, we are excited to announce the general availability of the Delivery Optimization Windows Update for Business report.


We genuinely appreciate those of you who participated in the public preview! You helped us verify the accuracy of the new data tables and revise the layout. Your responses helped us identify and address all critical issues, so it can now be offered to all Delivery Optimization users. In this article, find guidance to:


  • Get started with Windows Update for Business reports

  • Customize your Delivery Optimization report


Get started with Windows Update for Business reports


If you’re an existing Update Compliance user, you’re probably aware of the Update Compliance migration to Windows Update for Business reports. The new report experience provides templates for Windows reporting for monitoring organization and device level data with the added flexibility to customize a given report.


The Delivery Optimization Window Update for Business report provides a familiar experience, surfacing important data points that supply a unified way to check the performance across your organization. It contains data for the last 28 days, and we’ve added the long-awaited Microsoft Connected Cache data. In addition, we’ve reorganized the information to be more easily discoverable, leveraging the key cards that provide a quick and easy view of Delivery Optimization usage and performance.


Key cards with main metrics in Windows Update for Business reportsKey cards with main metrics in Windows Update for Business reports


You can quickly find the key pieces of data at the top of the report. We’ve bubbled up the metrics you care most about. You’ll find total bandwidth savings for both Delivery Optimization technologies, including peer-to-peer (P2P) and Connected Cache.


Further down the report, there are now three tabs that distinguish between Device configuration, Configuration details, and Efficiency by group.


Within Device configuration, you’ll see the breakdown of Download Mode configuration for your devices. Each configuration number in parentheses references the Download Mode set on the device.


Device configuration details for peering status are shown as a pie chart while configuration names and device counts are shown as a bar graph in Windows Update for Business reportsDevice configuration details for peering status are shown as a pie chart while configuration names and device counts are shown as a bar graph in Windows Update for Business reports


In Content distribution, you can explore the breakdown of how bytes are delivered, from CDN/HTTP source, peers, or Connected Cache. You can also visualize the delivery method based on the different content types. By clicking on a particular content type, further drill down to richer content type details.


See an example of a particular environment that does not have an Connected Cache cache server, displaying 0% of bytes.


Content distribution is visualized as a pie chart broken down by source type and a bar graph of volume by content type and sourceContent distribution is visualized as a pie chart broken down by source type and a bar graph of volume by content type and source


The last tab presents a new option. Most of your organizations use policies to create peering groups to manage devices. In the Efficiency by group section, you can toggle among four different options. After talking with many of you, we’ve generally seen that device groups for Delivery Optimization are managed in four common ways by:


  • GroupID

  • City

  • Country

  • ISP


We’ve added each of these as a quick and easy tab, so you can view the top 10 groups by number of devices. So, for example, if you’re looking at the GroupID, you’ll see the 10 top group IDs with the highest number of devices. Similarly, in the City or Country view, you’ll see the top 10 cities or countries with the greatest number of devices. Or perhaps you’re more interested in monitoring the top ISPs delivering content based on the number of devices within the organization – for that, we’ve included the ISP option.


The Efficiency By Group tab shows the top 10 groups based on Group ID, along with pertinent details such as P2P percentage, volume, and device countThe Efficiency By Group tab shows the top 10 groups based on Group ID, along with pertinent details such as P2P percentage, volume, and device count


As mentioned above, this is just the start of a new offering that enables you to tailor your report to meet the requirements of your organization. We will continue to incorporate richer features and enhanced experience in the Delivery Optimization report based on your feedback.


Customize your Delivery Optimization report


Much of the excitement with this new report format is centered on flexibility. It’s easy to modify the report template to meet your needs or if you want to run queries to further investigate your data. To do this, you can use the Windows Updates for Business reports data schema where you can access the new Delivery Optimization-related schema tables:


See what these tables look like within the LogManagement section.


The Microsoft Azure interface showing Logs options, focused on a list of tables, including UCClient, UCDOAggregateStatus, and U DOStatusThe Microsoft Azure interface showing Logs options, focused on a list of tables, including UCClient, UCDOAggregateStatus, and U DOStatus


We recommend running a query on each table to learn of the available fields. Let’s take a brief look at each.


UCClient table


The UCClient table is used within the Delivery Optimization report to get OSBuild, OSBuildNumber, OSRevisionNumber, and OSFeatureStatus. The data from UCClient is joined with UCDOStatus to complete the Device configuration breakdown table. You’ll notice that in Edit mode, you can easily modify the query that builds this visualization. If any changes are needed, you can modify this query accordingly.


The Azure Workbooks interface showing the DO Device Configuration breakdown in Edit modeThe Azure Workbooks interface showing the DO Device Configuration breakdown in Edit mode


UCDOStatus table


One of the two tables that hold Delivery Optimization-only data is UCDOStatus. This table provides aggregated data on Delivery Optimization bandwidth utilization. Explore the data for a single device or by content type. For example, the ‘Peering Status’ pie chart is powered by the UCDOStatus table.


The Peering Status pie chart, powered by the UCDOStatus table, is shown when editing the query item for DeviceCountPeeringThe Peering Status pie chart, powered by the UCDOStatus table, is shown when editing the query item for DeviceCountPeering


UCDOAggregatedStatus table


The second Delivery Optimization-only data table is UCDOAggregatedStatus. The role of this table is twofold:


  • Provide aggregates of all individual UCDOStatus records across the tenant.

  • Summarize bandwidth savings across all devices enrolled with Delivery Optimization.


One way this table is used is to build the volume by content types. Similarly, this view can be easily changed either through the query or built-in UX controls available via Log Analytics.


A bar graph summary of volume by content types, such as quality updatesA bar graph summary of volume by content types, such as quality updates


Keep in touch


We hope you are as excited as we are about these new changes for Delivery Optimization reporting. There are many more things we plan to add in the future. If you have any feedback or feature requests, we’d love to hear from you! Please submit it using the Feedback link within the Azure portal.


A feedback submission form inside the Microsoft Azure portalA feedback submission form inside the Microsoft Azure portal


Continue the conversation. Find best practices. Bookmark the Windows Tech Community and follow us @MSWindowsITPro on Twitter. Looking for support? Visit Windows on Microsoft Q&A.

Microsoft Bookings now integrates with Webex using Power Automate

Microsoft Bookings now integrates with Webex using Power Automate

This article is contributed. See the original author and article here.

One of the most common pain points of scheduling online meetings, especially with people outside your organization, is the back-and-forth messages. Microsoft Bookings now makes it simple to avoid that back and forth, with Power Automate you can seamlessly integrate Webex with Bookings.


Together, Bookings and Webex, they provide a comprehensive solution for all your virtual meeting needs.


With Power Automate, the moment a booking is made on Microsoft Bookings, a Webex meeting is automatically scheduled with all the details of the booking, such as date, time, and attendees. No more back and forth emails or missed meetings due to double bookings.


An animated image demonstrating how to create a Webex meeting when a Microsoft Bookings appointment is created via a Power Automate template.An animated image demonstrating how to create a Webex meeting when a Microsoft Bookings appointment is created via a Power Automate template.


Don’t let scheduling virtual meetings stress you out anymore. With the integration of Microsoft Bookings, Webex, and Power Automate, you’ll be able to focus on what really matters – conducting successful and efficient virtual meetings. Upgrade your virtual meeting game today and experience seamless scheduling.