What to know about the U.S. Census Bureau’s American Community Survey
This article was originally posted by the FTC. See the original article here.
Brought to you by Dr. Ware, Microsoft Office 365 Silver Partner, Charleston SC.
This article was originally posted by the FTC. See the original article here.
Brought to you by Dr. Ware, Microsoft Office 365 Silver Partner, Charleston SC.
This article is contributed. See the original author and article here.
Today we have an exciting announcement to share about the evolution of Microsoft Outlook for macOS. Don’t have Outlook on your Mac yet? Get Outlook for Mac in the App Store.
Now consumers can use Outlook for free on macOS, no Microsoft 365 subscription or license necessary.
Whether at home, work or school, Mac users everywhere can easily add Outlook.com, Gmail, iCloud, Yahoo! or IMAP accounts in Outlook and experience the best mail and calendar app on macOS. The Outlook for Mac app complements Outlook for iOS – giving people a consistent, reliable, and powerful experience that brings the best-in-class experience of Outlook into the Apple ecosystem that so many love.
Outlook makes it easy to manage your day, triage your email, read newsletters, accept invitations to coffee, and much more.
One of Outlook’s strengths is helping you manage multiple accounts in a single app. We support most personal email providers and provide powerful features, such as viewing all your inboxes at once and an all-mailbox search to make managing multiple email accounts a breeze.

With Outlook, you’ll get a modern and beautiful user interface that has been designed and optimized for macOS. And these enhancements go far beyond surface level. The new Outlook is optimized for Apple Silicon, with snappy performance and faster sync speeds than previous versions.
Outlook for Mac does more to integrate into the Apple platform so that you get the most from your macOS device. To help you stay on top of your email and calendar while using other apps, you can view your agenda using a widget and see reminders in the Notification Center. We are also creating a peek of upcoming calendar events in the Menu Bar (coming soon).

We know life is multifaceted and Outlook is leveraging the Apple platform to support you by making it easier to switch contexts. With our new Handoff feature, you can pick up tasks where you left off between iOS and Mac devices, so you can get up and go without missing a beat*.

We understand it’s more important than ever to protect your time. The new Outlook Profiles (coming soon) allow you to connect your email accounts to Apple’s Focus experience. With Outlook Profiles, you won’t get unwanted notifications at the wrong time so you can stay focused on that important work email, with no distractions from your personal email.

Outlook provides a variety of ways to help you stay focused and accomplish more by helping you decide what you want to see and when. For people with multiple accounts, the all-accounts view lets you manage all your inboxes at once, without having to switch back and forth. It’s a great way to see all new messages that come in so you can choose how to respond.
Outlook also has more options for keeping important emails front and center**. The Focused Inbox automatically sorts important from non-important messages so you can easily find them with a toggle above the message list and add frequently used folders to Favorites to find them easily. Outlook also gives you power to prioritize messages your way. You can pin messages in your inbox to keep them at the top or snooze non-urgent messages until you have time to reply. Categories and flagging are available as well. With so many options for organizing email, you can make Outlook work for you.

With Outlook, you can stay on top of your daily schedule from anywhere in the Mac app. Open My Day in the task pane to view an integrated, interactive calendar right from your inbox. Not only can you see upcoming events at a glance, but you can view event details, RSVP, join virtual meetings, and create new events from this powerful view of your calendar.
We are thrilled to invite all Mac users to try our redesigned Outlook app with the latest and greatest features for macOS. Download Outlook for free in the App Store.
There is more to do and many more features we are excited to bring to the Outlook Mac experience. We are rebuilding Outlook for Mac from the ground up to be faster, more reliable, and to be an Outlook for everyone.
*The Handoff feature requires downloading Outlook for Mac from the App Store and login to your iOS device and macOS using the same AppleID.
**Categories only available with Outlook.com, MSN.com, Live.com, and Hotmail.com accounts. Focused Inbox, Snooze, and Pinning are not available with Direct Sync accounts. Click here for more information on Direct Sync accounts.

This article is contributed. See the original author and article here.
Today we announced Microsoft Dynamics 365 Copilot, providing interactive, AI-powered assistance across business functionsfrom sales, service, and marketing to supply chain. With Dynamics 365 Copilot, we’re introducing the world’s first AI copilot natively built-in to both CRM and ERP applications.
Copilot brings the power of next-generation AI capabilities and natural language processing to Dynamics 365, working alongside business professionals to help them create ideas and content faster, complete time-consuming tasks, and get insights and next best actionsjust by describing what’s needed.
Copilot features are in preview across Dynamics 365 applications and Microsoft Viva Sales. View demos of the capabilities, as well as learn how to access the previews, below.
Many sales teams struggle to scale seller experiences. AI can help any sales organization to be more productive and effective, enabling them to automate the sales process and know customers more deeply.
Microsoft Viva Sales, which is included in Dynamics 365 Sales and available for purchase separately for other CRM systems, including Salesforce, revolutionizes the way sellers work by integrating with Microsoft Outlook and Teams to augment a seller’s actions and decisions with AI-powered insights and actions. New Copilot features help sellers save time, boost productivity, lighten workloads, and stay focused on what matters most: connecting with customers and closing deals.
Last month, we announced that Viva Sales now generates content suggestions based on customer emails, such as a reply to an inquiry or a request for a proposalcomplete with data specifically relevant to the recipient, such as pricing, promotions, and deadlines. The seller simply selects the option to suit their needs and a reply is generated for the seller to review, edit to their liking, and send. The reply is enriched with the combined data from Microsoft Graphwhich provides access to people-centric data and insights in the Microsoft Cloud and the CRM system (Microsoft Dynamics 365 or Salesforce).
Today we are announcing an updateemail replies will now move into general availability and on March 15, we will add enhancements to create customizable emails. For example, a seller can generate an email that proposes a meeting time with a customer, complete with a proposed meeting date and time based on availability on the seller’s Outlook calendar.
In addition, a new feedback mechanism allows sellers to rate the AI-generated content with a thumbs up or thumbs down, which helps refine and improve future replies. Sellers can also refine generated results by providing a new prompt that creates an updated response that builds on the previously suggested draft and new context.
By auto-suggesting customizable content, sellers can spend less time composing emails and searching for sales data from colleagues and databases.
Sellers often spend hours each day on calls with prospects and customersand nearly as much time recapping action items for follow-through. To help with that, conversation intelligence provides automated summaries of key topics, issues, and concerns discussed during the meeting.
Now available for public preview in Viva Sales, the new Copilot feature uses natural language capabilities powered by Azure OpenAI Service to intelligently draft a recap of a call with action items and follow-up dates, based on CRM and meeting data. Summaries can be generated for a range of meeting types in Teams, including multi-participant and internal calls, helping sellers stay organized and on top of critical, content-heavy sales meetings.
This embed requires accepting cookies from the embed’s site to view the embed. Activate the link to accept cookies and view the embedded content.
If you’re not a current customer, start a free 1-month trial of Viva Sales to try Copilot features.
Customer service agents are critical for maintaining customer loyalty, but they often face pressure to resolve multiple customer cases quickly, leading to burnout and decreased customer satisfaction. To address these challenges, agents need tools that can help them streamline tasks across both simple and complex cases, while still providing personalized service that demonstrates their commitment to resolving each issue thoroughly and efficiently.
Now available for limited preview, we’re announcing Copilot in Microsoft Dynamics 365 Customer Servicea range of next-generation AI capabilities that can expedite resolving customer issues and increase satisfaction scores. Copilot provides the agent with 24/7 AI-powered assistance to help them find resources that will help resolve issues faster, handle cases more efficiently, and automate time-consuming tasks so agents can focus on delivering high-quality service to their customers.
With Copilot, agents can quickly craft a draft email or chat response to customers with a single click. Copilot understands the context based on the current live conversation; identifies relevant information from trusted websites and internal documents, including knowledgebase articles and previously resolved cases; and crafts a response that the agent can review and send to the customer.
For agents working on emails, Copilot can help create relevant and personalized email responses to customer queries in seconds. Once Copilot synthesizes information and suggests an email draft, agents can review and modify the content before sending it to the customer. Using conversational chat experience, agents can ask Copilot to help diagnose more complex customer issues, discover resolutions, and summarize draft responses with the right tone to the customeracross all communication channels.
With comprehensive and efficient assistance from Copilot, agents can significantly reduce the amount of time spent searching for content and drafting their response, resulting in improved agent productivity and customer experience.
This embed requires accepting cookies from the embed’s site to view the embed. Activate the link to accept cookies and view the embedded content.
Copilot features in Dynamics 365 Customer Service are now in limited preview.
Organizations can provide an even more powerful conversational experience by leveraging Power Virtual Agents, now enhanced with generative AI capabilities and available today in preview. Customers can self-serve and get their needs more easily solved with highly intelligent conversational bots that use trusted websites and the company’s internal data to resolve customer issues. Additionally, with the continued investment in the open, flexible, and composable Microsoft Digital Contact Center Platform, Nuance is announcing new AI capabilities in Nuance Mix. Dynamics 365 Customer Service, together with Teams, Microsoft Power Platform, Nuance, and Azure, deliver truly transformative experiences for both agents and customers through the contact center.
To meet customer expectations, marketers need to deliver personalized marketing experiences across physical and digital channels. The next-generation AI empowers marketers to proactively target any audience segment in lockstep with market trends and customer demand.
Marketers have traditionally relied on data analysts, leveraging their skillset to write queries in SQL, to uncover insights from their customer datawhich can take weeks for results. With Copilot in Dynamics 365 Customer Insights, marketing teams can engage directly with customer data and discover new information that they may not have been aware of, democratizing access to insights.
With simple prompts, marketers can ask questions using natural language to explore, analyze, and understand customer segment sizes and preferencesno need to be a SQL expert or wait for other teams to process their requests. For example, a marketer might want to identify customers that reside in San Francisco, California, with a high customer lifetime value, who have also made a purchase in the last 90 days. With a few clicks, Copilot produces the results, along with information such as the customers’ average age, product preferences, or average purchase price. These insights can then be configured into a segment to support a campaign. With Copilot, marketers can now get a deeper understanding of their customers in near real-time.
This embed requires accepting cookies from the embed’s site to view the embed. Activate the link to accept cookies and view the embedded content.
Copilot features in Dynamics 365 Customer Insights are now in limited preview.
Market segmentation is an important step to create personalized campaigns based on interests and needs. It also can be a time-consuming process, often requiring knowledge of the complex data structures defined by the marketing database. Query assist, a Copilot capability in Dynamics 365 Marketing, uses Azure OpenAI Service to save time creating or enhancing segments.
Marketers can describe the target audience characteristics by typing a segment description, such as “all contacts under the age of 30 living in New York City.” Rather than manually select data tables, a marketer can simply type a description of the contacts they wish to engage with, and then add the results to the segment builder. By using this simple query approach, marketers can create real-time segments without the need for knowledge of their back-end data, saving hours of time.
Email marketing is a powerful way to engage audiences if the email content is compelling and relevant. Too often, content can begin to feel stale or repetitive over time. Content ideas, a Copilot feature in Dynamics 365 Marketing, inspires marketers by turning topics into suggested copy, helping them move from concept to completion faster.
When editing an email, a marketer can prompt Copilot with up to five key points to get across in the email. The content ideas capability uses Azure OpenAI Service to generate a set of text suggestionsunique content can be used as a starting point when composing marketing emails. It can analyze the organization’s existing emails, in addition to a range of internet sources, to increase the relevance of generated ideas. With Copilot, marketers can save hours of time brainstorming and editing, while keeping content fresh and engaging.
This embed requires accepting cookies from the embed’s site to view the embed. Activate the link to accept cookies and view the embedded content.
Content ideas and query assist are both available in public preview today. If you are not a current customer, start a free trial for Microsoft Dynamics 365 Marketing to experience the new Copilot features.
Compelling product descriptions in online stores boost sales by making products stand out from the crowd. However, producing consistently engaging descriptions on-demand can be challenging, especially when writing product descriptions for dozens or even hundreds of similar products.
Copilot in Microsoft Dynamics 365 Business Central help small and medium-sized businesses to bring new products to market faster by producing AI-generated product descriptions. This Copilot feature suggests copy for engaging product descriptions, tailored to your brand using a product’s title and key attributes, such as color, material, and size. Easily customize the text to your preferred writing style by choosing the tone and length, and make any needed edits before saving. Business Central customers can seamlessly publish the new product descriptions to their Shopify store with just a few clicks.
This embed requires accepting cookies from the embed’s site to view the embed. Activate the link to accept cookies and view the embedded content.
Copilot in Dynamics 365 Business Central is now in limited preview.
In recent years, many businesses discovered that their current supply chain technologies are ill-equipped for an environment characterized by ongoing disruptions, constraints, and shortages. AI-enabled supply chain management can provide unprecedented visibility and insights, helping to solve disruptions before they happen.
Today we are announcing new Copilot capabilities for Microsoft Supply Chain Center, available to Dynamics 365 Supply Chain Management customers, to better predict and act on disruptions that occur across suppliers, weather, and geographies. Use intelligence from the news module to proactively flag external issues such as weather, financial, and geo-political news that may impact key supply chain processes. Predictive insights surface impacted orders across materials, inventory, carrier, distribution network, and more.
Copilot turns these insights into action with contextual email outreach generated by Azure OpenAI Service to help solve problems in real-time and with ease. With a custom and contextual reply, supply chain managers can save time and collaborate with impacted suppliers to quickly identify new ETAs and re-route purchase orders based on an identified disruption, like a weather event. They can also fulfill high-priority customer orders via an alternate distribution center to ensure they can meet customer demand in full and on time.
This embed requires accepting cookies from the embed’s site to view the embed. Activate the link to accept cookies and view the embedded content.
Copilot features for Microsoft Supply Chain Center are now in limited preview.
With every biannual release wave, Microsoft is enhancing Dynamics 365 applications with new, more powerful AI capabilities to help organizations drive business outcomes, improve operational efficiency, and create exceptional customer experiences.
The capabilities spotlighted today are just the start of AI-powered features to follow across business functions. Stay tuned to this blog, as well as the Dynamics 365 and Power Platform release planner, for further details.
Interactive, AI-powered assistance across business functions
Microsoft is committed to ensuring that AI systems are developed responsibly and in ways that warrant people’s trust. Learn about our AI principles that empower impactful responsible AI practices at Microsoft, as well as provide a framework for implementing responsible AI practices at our customers’ organizations.
The post Introducing Microsoft Dynamics 365 Copilot, bringing next-generation AI to every line of business appeared first on Microsoft Dynamics 365 Blog.
Brought to you by Dr. Ware, Microsoft Office 365 Silver Partner, Charleston SC.
This article was originally posted by the FTC. See the original article here.
Brought to you by Dr. Ware, Microsoft Office 365 Silver Partner, Charleston SC.
This article is contributed. See the original author and article here.
Hi, I am Samson Amaugo, a Microsoft MVP and a Microsoft Learn Student Ambassador. I love writing and talking about all things DotNet. I am currently a student at the Federal University of Technology, Owerri. We could connect on Linkedin at My Linkedin Profile.
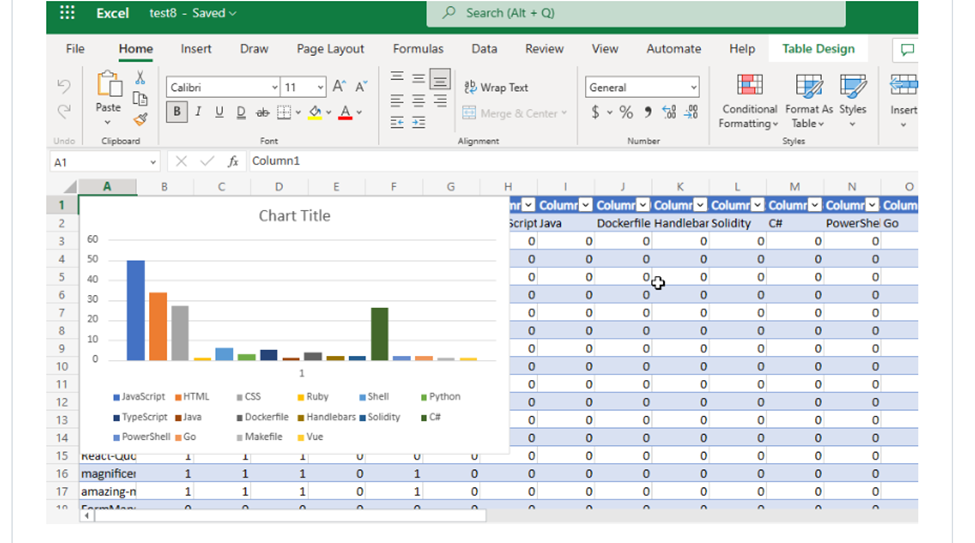
Have you ever thought about going through all your GitHub Repositories, taking note of the languages used, aggregating them, and visualizing it on Excel?
Well, that is what this post is all about except you don’t have to do it manually in a mundane way.
With the Aid of the Octokit GraphQL Library and Microsoft Graph .NET SDK, you could code up a cool that automates this process.
To build out this project in a sandboxed environment with the appropriate permissions I had to sign up on Microsoft 365 Dev Center to Create an Account that I could use to interact with Microsoft 365 products.
The outcome of the project could be seen below


{
    "AzureClientID": "eff50f7f-6900-49fb-a245-168fa53d2730",
    "AzureClientSecret": "vUx8Q~plb15_Q~2ZscyfxKnR6VrWm634lIYVRb.V",
    "AzureTenantID": "33f6d3c4-7d26-473b-a7f0-13b53b72b52b",
    "GitHubClientSecret": "ghp_rtPprvqRPlykkYofA4V36EQPNV4SK210LNt7",
    "NameOfNewFile": "chartFile.xlsx"
}
You would need to replace the credential above with yours.
using Microsoft.Extensions.Configuration;
namespace MicrosoftGraphDotNet
{
    internal class Config
    {
        // Define properties to hold configuration values
        public string? AzureClientId { get; set; }
        public string? AzureClientSecret { get; set; }
        public string? AzureTenantId { get; set; }
        public string? GitHubClientSecret { get; set; }
        public string? NameOfNewFile { get; set; }
        // Constructor to read configuration values from appsettings.json file
        public Config()
        {
            // Create a new configuration builder and add appsettings.json as a configuration source
            IConfiguration config = new ConfigurationBuilder()
                .SetBasePath(Directory.GetCurrentDirectory())
                .AddJsonFile("appsettings.json")
                .Build();

            // Bind configuration values to the properties of this class
            config.Bind(this);
        }
    }
}
In the Program.cs file I imported the necessary namespaces that I would be needing by adding the code below:
// Import necessary packages
using System.Text.Json;
using Octokit.GraphQL;
using Octokit.GraphQL.Core;
using Octokit.GraphQL.Model;
using Azure.Identity;
using Microsoft.Graph;
using MicrosoftGraphDotNet;
// retrieve the config
var config = new Config();
// Define user agent and connection string for GitHub GraphQL API
var userAgent = new ProductHeaderValue("YOUR_PRODUCT_NAME", "1.0.0");
var connection = new Connection(userAgent, config.GitHubClientSecret!);

// Define GraphQL query to fetch repository names and their associated programming languages
var query = new Query()
.Viewer.Repositories(
isFork: false,
affiliations: new Arg<IEnumerable>(
new RepositoryAffiliation?[] { RepositoryAffiliation.Owner })
).AllPages().Select(repo => new
{
    repo.Name,
    Languages = repo.Languages(null, null, null, null, null).AllPages().Select(language => language.Name).ToList()
}).Compile();

// Execute the GraphQL query and deserialize the result into a list of repositories
var result = await connection.Run(query);
var languages = result.SelectMany(repo => repo.Languages).Distinct().ToList();
var repoNameAndLanguages = JsonSerializer.Deserialize(JsonSerializer.Serialize(result));
// Define a class to hold repository data
class Repository
{
    public string? Name { get; set; }
    public List? Languages { get; set; }
}
// Define credentials and access scopes for Microsoft Graph API
var tokenCred = new ClientSecretCredential(
config.AzureTenantId!,
config.AzureClientId!,
config.AzureClientSecret!);
var graphClient = new GraphServiceClient(tokenCred);
// Define the file name and create a new Excel file in OneDrive
var driveItem = new DriveItem
{
    Name = config.NameOfNewFile!,
    File = new Microsoft.Graph.File
    {
    }
};
var newFile = await graphClient.Drive.Root.Children
.Request()
.AddAsync(driveItem);
// Define the address of the Excel table and create a new table in the file
var address = "Sheet1!A1:" + (char)('A' + languages.Count) + repoNameAndLanguages?.Count();
var hasHeaders = true;
var table = await graphClient.Drive.Items[newFile.Id].Workbook.Tables
.Add(hasHeaders, address)
.Request()
.PostAsync();
The code that represents the data above can be seen below:
// Define the first row of the Excel table with the column headers
var firstRow = new List { "Repository Name" }.Concat(languages).ToList();

// Convert the repository data into a two-dimensional list
List<List> totalRows = new List<List> { firstRow };
foreach (var value in repoNameAndLanguages!)
{
    var row = new List { value.Name! };
    foreach (var language in languages)
    {
        row.Add(value.Languages!.Contains(language) ? "1" : "0");
    }
    totalRows.Add(row);
}

// Add a new row to the table with the total number of repositories for each language
var languageTotalRow = new List();
// Add "Total" as the first item in the list
languageTotalRow.Add("Total");
// Loop through each programming language in the header row
for (var languageIndex = 1; languageIndex < totalRows[0].Count; languageIndex++)
{
    // Set the total count for this language to 0
    var languageTotal = 0;
    // Loop through each repository in the table
    for (var repoIndex = 1; repoIndex < totalRows.Count; repoIndex++)
    {
        // If the repository uses this language, increment the count
        if (totalRows[repoIndex][languageIndex] == "1")
        {
            languageTotal++;
        }
    }

    // Add the total count for this language to the languageTotalRow list
    languageTotalRow.Add(languageTotal.ToString());
}

// Add the languageTotalRow list to the bottom of the table
totalRows.Add(languageTotalRow);
// Create a new WorkbookTableRow object with the totalRows list serialized as a JSON document
var workbookTableRow = new WorkbookTableRow
{
    Values = JsonSerializer.SerializeToDocument(totalRows),
    Index = 0,
};

// Add the new row to the workbook table
await graphClient.Drive.Items[newFile.Id].Workbook.
Tables[table.Id].Rows
.Request()
.AddAsync(workbookTableRow);
// Add a new chart to the worksheet with the language totals as data
await graphClient.Drive.Items[newFile.Id].Workbook.Worksheets["Sheet1"].Charts
.Add("ColumnClustered", "Auto", JsonSerializer.SerializeToDocument($"Sheet1!B2:{(char)('A' + languages.Count)}2, Sheet1!B{repoNameAndLanguages.Count() + 3}:{(char)('A' + languages.Count)}{repoNameAndLanguages.Count() + 3}"))
.Request()
.PostAsync();

// Print the URL of the new file to the console
Console.WriteLine(newFile.WebUrl);
And that’s the end of this article. I hope you enjoyed it and got to see how I used Microsoft Graph .NET SDK to automate this process.
To learn more about Microsoft Graph API and SDKs:
Microsoft Graph https://developer.microsoft.com/graph
Develop apps with the Microsoft Graph Toolkit – Training
Hack Together: Microsoft Graph and .NET
Is a hackathon for beginners to get started building scenario-based apps using .NET and Microsoft Graph. In this hackathon, you will kick-start learning how to build apps with Microsoft Graph and develop apps based on the given Top Microsoft Graph Scenarios, for a chance to win exciting prizes while meeting Microsoft Graph Product Group Leaders, Cloud Advocates, MVPs and Student Ambassadors. The hackathon starts on March 1st and ends on March 15th. It is recommended for participants to follow the Hack Together Roadmap for a successful hackathon.
Demo/Sample Code
You can access the code for this project at https://github.com/sammychinedu2ky/MicrosoftGraphDotNet


Recent Comments