by Contributed | May 13, 2022 | Technology
This article is contributed. See the original author and article here.
App Installer is a powerful technology which enables to streamline the deployment and update of applications packaged with MSIX. Thanks to App Installer, you can enable features which are typically reserved only to managed deployment platforms (like the Microsoft Store or Endpoint Manager), for instance automatic updates. By setting up the App Installer file in the proper way, you can let Windows automatically check the availability of updates and install them without any extra effort from the developer. It’s enough to publish an updated version of the package on the original location (a website or a network share) to let Windows download and install it, based on the logic you have defined in the App Installer file (you can check for updates in background, when the application is launched, etc.).
This approach is great for many scenarios, especially the ones in which you don’t have access to the source code (for example, you’re a system administrator managing the deployment of apps for the company). However, if you’re a developer who is actively building and evolving your application, you might want more control over the update process. For instance, you may want to tell the user, within the application itself, if there’s an update available.
To support these scenarios, the Windows Runtime comes with a series of APIs that you can use to interact with App Installer: if your MSIX packaged application has been deployed using an App Installer file, you can leverage these APIs to perform tasks like checking if an update is available, triggering the update, etc.
Let’s explore this scenario in more detail.
Checking for an available update
The heart of these APIs is the Package class, which belongs to the Windows.ApplicationModel namespace. This is a Windows Runtime namespace, so to access it you might need to make a few tweaks to your project based on the UI platform you’ve chosen:
If it’s a UWP or WinUI app built using Windows App SDK, then you’re good to go. Both technologies offer built-in access to Windows Runtime APIs.
If it’s a WPF or Windows Forms application based on .NET Framework or .NET Core 3.x, you must install a dedicated NuGet package.
If it’s a WPF or Windows Forms application based on .NET 5 or .NET 6, you must set in the project’s properties one of the target frameworks dedicated to Windows 10/11, like in the following sample:
<TargetFramework>net6.0-windows10.0.19041</TargetFramework>
Now you can use the following code snippet to check if an updated version of the package is available via App Installer:
public async Task CheckForUpdates()
{
Package package = Package.Current;
PackageUpdateAvailabilityResult result = await package.CheckUpdateAvailabilityAsync();
switch (result.Availability)
{
case PackageUpdateAvailability.Available:
case PackageUpdateAvailability.Required:
break;
case PackageUpdateAvailability.NoUpdates:
break;
case PackageUpdateAvailability.Unknown:
default:
break;
}
}
The code is simple. First, we get a reference to the current package, using the Package.Current singleton. This object will enable us to access all the properties related to the MSIX package and the identity of the application. Then we call the CheckUpdateAvailabilityAsync() method, which will return us a PackageUpdateAvailabityResult object, that includes an Availability property which is an enumerator. If we get Available or Required, it means there’s an update available. As you can see, we don’t have to specify the URL where to check the update availability from. The API will automatically use the App Installer URL which is linked to the application. Windows automatically stores this connection when we install a MSIX packaged application through an App Installer file.
Thanks to this code, we can implement our own logic to communicate the information to our users: we can display a pop-up or a notification, we can tell them to restart the app so that Windows will download and install the update, etc.
But what if you want to take full control of the update process as well? Let’s see how we can do it!
Installing the update from code
The App Installer APIs enables us not just to check if an update is available, but also to install the update. This feature can be used as a companion of the automatic feature provided by App Installer or independently.
In the first scenario, you will light up the App Installer APIs but, at the same time, you will define update rules in the App Installer file, like in the following example:
<?xml version=”1.0″ encoding=”utf-8″?>

<AppInstaller

    xmlns=“http://schemas.microsoft.com/appx/appinstaller/2021”

    Version=“1.0.0.0”

    Uri=“http://mywebservice.azurewebsites.net/appset.appinstaller” >
    <MainBundle

        Name=“Contoso.MainApp”

        Publisher=“CN=Contoso”

        Version=“2.23.12.43”

        Uri=“http://mywebservice.azurewebsites.net/mainapp.msixbundle” />
    <UpdateSettings>

        <OnLaunch

            HoursBetweenUpdateChecks=“12”

            UpdateBlocksActivation=“true”

            ShowPrompt=“true” />

        <AutomaticBackgroundTask />

        <ForceUpdateFromAnyVersion>true</ForceUpdateFromAnyVersion>

    </UpdateSettings>
</AppInstaller>
In this scenario, you can check for updates and install them using the APIs, but Windows will try also to apply updates automatically based on the logic you have defined in the App Installer file (like when the application starts or in background).
In the second scenario, you won’t have any UpdateSettings section in the XML file, which will simply look like this:
<?xml version=”1.0″ encoding=”utf-8″?>

<AppInstaller

    xmlns=“http://schemas.microsoft.com/appx/appinstaller/2021”

    Version=“1.0.0.0”

    Uri=“http://mywebservice.azurewebsites.net/appset.appinstaller” >
    <MainBundle

        Name=“Contoso.MainApp”

        Publisher=“CN=Contoso”

        Version=“2.23.12.43”

        Uri=“http://mywebservice.azurewebsites.net/mainapp.msixbundle” />
</AppInstaller>
Windows will never try to update the application automatically, so you’re in full control of the update process.
Let’s see now the code we can use to download and install the update:
private async Task InstallUpdate()

{

    var pm = new PackageManager();

    var result = await pm.RequestAddPackageByAppInstallerFileAsync(new Uri(“http://mywebservice.azurewebsites.net/appset.appinstaller”),

                        AddPackageByAppInstallerOptions.ForceTargetAppShutdown, pm.GetDefaultPackageVolume());
    if (result.ExtendedErrorCode != null)

    {

        txtUpdateStatus.Text = result.ErrorText;

        logger.Error(result.ExtendedErrorCode);

    }

}
First, we create a new instance of the PackageManager class, which belongs to the Windows.Management.Deployment namespace. Then we call the RequestAddPackageByAppInstallerFileAsync() method, passing as parameters
- The URL of your App Installer file (yep, this time we need to specify it, unlike when we were checking for updates).
- The behavior we want to achieve when the update is downloaded. There are a few options, but unfortunately the only one which is applicable is
ForceTargetAppShutdown, which means that the application will be closed so that the update can be applied.
- The folder where to install the update. By calling the
GetDefaultPackageVolume() method of the PackageManager class, we get a reference to the default folder where MSIX packages are deployed.
You get back a DeploymentResult object as a result which, however, doesn’t tell you much about the operation status. Remember, in fact, that if the update is successful, the application will be downloaded and reinstalled. In case of issues, however, the object will contain an ExtendedErrorCode property which, despite the name, contains a full Exception object with all the details about what went wrong.
Pay attention that the way the update process works might be highly disruptive for the user. After calling the RequestAddPackageByAppInstallerFileAsync() method, Windows will forcibly close the application to enable the update process to complete, without any warning message. As such, before calling it, make sure to save any data that the user might be working with and provide a clear message to the user to notify him about what’s going to happen.
Tracking the progress of the update operation
To improve the user experience, you might want to at least display to the user the download progress, especially if the update is big. For this purpose, the RequestAddPackageByAppInstallerFileAsync() method doesn’t return a standard IAsyncOperation object, but an IAsyncOperationWithProgress one. This means that we can use the following code to track progress:
private async Task InstallUpdate()

{

    var pm = new PackageManager();

    var deploymentTask = pm.RequestAddPackageByAppInstallerFileAsync(new Uri(“http://mywebservice.azurewebsites.net/appset.appinstaller”),

                        AddPackageByAppInstallerOptions.ForceTargetAppShutdown, pm.GetDefaultPackageVolume());
    deploymentTask.Progress = (task, progress) =>

    {

        logger.Info($”Progress: {progress.percentage} – Status: {task.Status}“);

        Dispatcher.Invoke(() =>

        {

            txtUpdateProgress.Text = $”Progress: {progress.percentage}“;

        });
    };
    var result = await deploymentTask;
    if (result.ExtendedErrorCode != null)

    {

        txtUpdateStatus.Text = result.ErrorText;

        logger.Error(result.ExtendedErrorCode);

    }

}
The first key difference is that we have removed the await keyword before calling the RequestAddPackageByAppInstallerFileAsync() method. This means that we aren’t immediately starting the operation, but we are simply storing a reference to the asynchronous operation we want to execute. Then we subscribe to the Progress event, which is triggered every time the status of the download changes. We can use the progress parameter to determine the status of the operation, through the percentage property. Once we have defined the handler, we can start the operation, by invoking the task again, this time with the await prefix.
There’s a catch, however. The API doesn’t return an update in real time, but only after a certain amount of time. As such, if the size of the update isn’t big enough, you might not see any actual progress being returned. You will see the Progress event being triggered only at the beginning and at the end. This can be a common scenario when you use MSIX as a packaging technology. Remember, in fact, that MSIX supports differential updates, so even if the updated package is big, Windows will download only the files which changed.
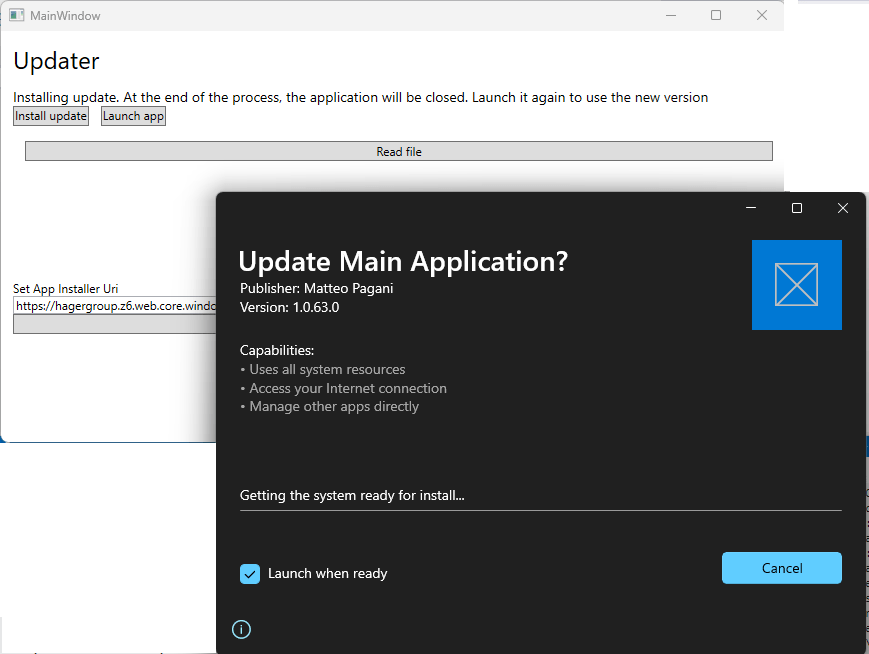
If you want to provide a better user experience, there’s a nice workaround that you can adopt and that was suggested by one of my customers during an engagement: downloading and launching the update App Installer file. This way, you’ll continue to use the App Installer APIs to check for available updates, but the update process will be managed by Windows with the traditional App Installer UI, like in the following image:
This is how you can change the code to support this scenario:
private async void OnInstallUpdate(object sender, RoutedEventArgs e)

{

    HttpClient client = new HttpClient();

    using (var stream = await client.GetStreamAsync(“http://mywebservice.azurewebsites.net/appset.appinstaller”))

    {

        using (var fileStream = new FileStream(@”C:Tempapp.appinstaller”, FileMode.CreateNew))

        {

            await stream.CopyToAsync(fileStream);

        }

    }
    try

    {

        var ps = new ProcessStartInfo(@”C:Tempapp.appinstaller”)

        {

            UseShellExecute = true

        };

        Process.Start(ps);

    }

    catch (Exception exc)

    {

        logger.Error(exc);

    }

}
First, using the HttpClient class, we download the most recent version of the App Installer file from our server, and we store it on the computer. Then, by using the Process.Start() API in .NET, we launch the file we have just downloaded, which will trigger the App Installer UI to show up and start the update.
The suggestions I shared with you before still apply, however. The UX will be indeed more polished, but the application will continue to be terminated once the update process is completed. As such, make sure to save all the data and notify the user about what’s going to happen.
Updating an application without changing the code
What if you are interested in using the App Installer APIs to have more control over updates, but you don’t want to change the code of your main application? This is a common scenario when you still need to distribute your app with a traditional installer technology, and you don’t want to make code changes which are specific for MSIX deployment. In this case, you can leverage the fact that, inside a MSIX package, you can have multiple executables, which all share the same identity. Using the Windows Application Packaging Project, you can reference two different projects:
- Your main application, which won’t have any code change.
- An updater application, which will use the APIs we have seen so far.
This is how the solution looks like in Visual Studio:

Since both applications are packaged together, the App Installer API will work regardless of if they are called by the updater application or by the main application. Being another process, it’s up to you how you want to invoke it. You might have a “Check for updates” option in the app that will invoke the updater application. Or you might have the updater application set as startup and check for updates every time the application starts. If no updates are found, the updater will close itself and launch the main application; otherwise, it will propose to the user to update the whole package.
The sample I’ve published on GitHub follows the second approach.
Wrapping up
In this article, we have seen how App Installer isn’t just a technology for easily enable deployment and updates of Windows apps through a website or a network share, but also a set of APIs that we can use in our applications to get the best of both worlds: the benefits of MSIX and App Installer (like differential updates or the ability to manage dependencies) and the flexibility of having full control over the update process.
Happy coding!
by Contributed | May 12, 2022 | Technology
This article is contributed. See the original author and article here.
Today, I worked on a service request that our customer needs to add the IP for Azure SQL node that is executing any elastic query.
We have the following situation:
- In the server $serverSource and database $DbSource we have a table called dummy that is an external table that, using elastic query is connecting to $serverTarget and other database.
- As the Azure SQL firewall has not defined the IP address of the SQL Azure node that is running the query they are getting the following error: “Exception calling “ExecuteNonQuery” with “0” argument(s): “An error occurred while establishing connection to remote data source: [Microsoft][ODBC Driver17 for SQL Server][SQL Server]Cannot open server ‘servername’ requested by the login. Client with IP address ‘xxx.xxx.xxx.xxx’ is not allowed to access the server. To enable access, use the Windows Azure Management Portal or run sp_set_firewall_rule on the master database to create a firewall rule for this IP address or address range. It may take up to five minutes for this change to take effect.[Microsoft][ODBC Driver 17 for SQL Server][SQL Server]Cannot open server ‘servername’ requested by the login. Client with IP address ‘xxx.xxx.xxx.xxx’ is not allowed to access the server. To enable access, use the Windows Azure Management Portal or run sp_set_firewall_rule on the master database to create a firewall rule for this IP address or address range. It may take up to five minutes for this change to take effect.”
Why?:
- This issue is explained in this article
Solution proposed as an example:
- Connect to the server $ServerSource and database $DbSource
- Run the query “select * from dummy”. This table is the external table that makes a reference.
- If we obtain an error:
- Obtain the IP of the SQL Azure Node.
- Connect to the server $ServerTarget and database master
- Run sp_set_firewall_rule to add this IP
- The next connection will be fine and it won’t return any error.
- As a note, of course, we need to maintain the number of IP added.
$serverTarget = "ServerNameThatHasTheReferenceTable.database.windows.net"
$userTarget = "UserNameThatHasTheReferenceTable" #UserName parameter  to connect
$passwordTarget = "PasswordThatHasTheReferenceTable" #Password Parameter  to connect
$DbTarget = "master" #DBName Parameter  to connect

$serverSource = "ServerNameThatHasDefinedExternalTable.database.windows.net"
$userSource = "UserNameThatHasDefinedExternalTable" #UserName parameter  to connect
$passwordSource = "PasswordThatHasDefinedExternalTable" #Password Parameter  to connect
$DbSource = "DBNameThatHasDefinedExternalTable" #DBName Parameter  to connect

#----------------------------------------------------------------
#Function to connect to the target database using a retry-logic
#----------------------------------------------------------------

Function GiveMeConnectionTarget()
{
  for ($i=1; $i -lt 10; $i++)
  {
   try
    {
      logMsg( "Connecting to the database...Attempt #" + $i) (1)
      logMsg( "Connecting to server: " + $serverTarget + " - DB: " + $DbTarget) (1)

      $SQLConnection = New-Object System.Data.SqlClient.SqlConnection
      $SQLConnection.ConnectionString = "Server="+$serverTarget+";Database="+$dbTarget+";User ID="+$userTarget+";Password="+$passwordTarget+";Connection Timeout=60;Application Name=Tester;Pooling=True"
      $SQLConnection.Open()
      logMsg("Connected to the database...") (1)
      return $SQLConnection
      break;
    }
  catch
   {
    logMsg("Not able to connect - Retrying the connection..." + $Error[0].Exception) (2)
    Start-Sleep -s 5
   }
  }
}

#----------------------------------------------------------------
#Function to connect to the source database using a retry-logic
#----------------------------------------------------------------

Function GiveMeConnectionSource()
{
  for ($i=1; $i -lt 10; $i++)
  {
   try
    {
      logMsg( "Connecting to the database...Attempt #" + $i) (1)
      logMsg( "Connecting to server: " + $serverSource + " - DB: " + $DbSource ) (1)

      $SQLConnection = New-Object System.Data.SqlClient.SqlConnection
      $SQLConnection.ConnectionString = "Server="+$serverSource+";Database="+$dbSource+";User ID="+$userSource+";Password="+$passwordSource+";Connection Timeout=60;Application Name=Tester;Pooling=True"
      $SQLConnection.Open()
      logMsg("Connected to the database...") (1)
      return $SQLConnection
      break;
    }
  catch
   {
    logMsg("Not able to connect - Retrying the connection..." + $Error[0].Exception) (2)
    Start-Sleep -s 5
   }
  }
}

#----------------------------------------------------------------
#Function to execute any elastic query using a command retry-logic
#----------------------------------------------------------------

Function ExecuteQuerySource($query)
{
  for ($i=1; $i -lt 3; $i++)
  {
   try
    {
     $SQLConnectionSource = GiveMeConnectionSource
     $command = New-Object -TypeName System.Data.SqlClient.SqlCommand
     $command.CommandTimeout = 6000
     $command.Connection=$SQLConnectionSource
     $command.CommandText = $query
     $command.ExecuteNonQuery() | Out-Null
    break;
    }
  catch
   {
    $ErrorMsg = $Error[0].Exception
    return $ErrorMsg
   }
  }
}

#----------------------------------------------------------------
#Function to add the firewall rule
#----------------------------------------------------------------

Function ExecuteQueryTarget( $IP)
{
  for ($i=1; $i -lt 3; $i++)
  {
   try
    {
     $SQLConnectionSource = GiveMeConnectionTarget
     $commandText = "EXECUTE sp_set_firewall_rule @name = N'TestContosoFirewallRule"+ $IP + "',"
     $commandText = $commandText + "@start_ip_address = '" + $IP+ "',"
     $commandText = $commandText + "@end_ip_address = '" + $IP+ "'"
     $command = New-Object -TypeName System.Data.SqlClient.SqlCommand
     $command.CommandTimeout = 6000
     $command.Connection=$SQLConnectionSource
     $command.CommandText = $commandText
     $command.ExecuteNonQuery() | Out-Null
    break;
    }
  catch
   {
    logMsg("Not able to run the query - Retrying the operation..." + $Error[0].Exception) (2)
    Start-Sleep -s 2
   }
  }
}

#--------------------------------
#Log the operations
#--------------------------------
function logMsg
{
    Param
    (
         [Parameter(Mandatory=$true, Position=0)]
         [string] $msg,
         [Parameter(Mandatory=$false, Position=1)]
         [int] $Color
    )
  try
   {
    $Fecha = Get-Date -format "yyyy-MM-dd HH:mm:ss"
    $msg = $Fecha + " " + $msg
    $Colores="White"
    $BackGround =
    If($Color -eq 1 )
     {
      $Colores ="Cyan"
     }
    If($Color -eq 3 )
     {
      $Colores ="Yellow"
     }

     if($Color -eq 2)
      {
        Write-Host -ForegroundColor White -BackgroundColor Red $msg
      }
     else
      {
        Write-Host -ForegroundColor $Colores $msg
      }


   }
  catch
  {
    Write-Host $msg
  }
}

#--------------------------------
#Empty?
#--------------------------------
function TestEmpty($s)
{
if ([string]::IsNullOrWhitespace($s))
  {
    return $true;
  }
else
  {
    return $false;
  }
}


#--------------------------------
#Give the IP that is trying to connect
#--------------------------------

function GiveMeIP
{
Param([Parameter(Mandatory=$true)]
      [System.String]$Text)
  try
   {
    $Pos = $Text.IndexOf("Client with IP address '")
    $return= $Text.substring( $Pos+24)
    $PosUntil = $Return.IndexOf("'")
    $return = $Return.substring(0,$PosUntil )
    return $Return
   }
  catch
  {
    $return= $Text
    return $Return
  }
}

cls

logMsg("Starting the process") (2)
$ErrorMsg = ExecuteQuerySource("Select * from dummy")
if(TestEmpty($ErrorMsg) -eq $true)
{
}
else
{
   logMsg("Adding the IP.." + $IP) (2)
   $IP = GiveMeIP($ErrorMsg)
   ExecuteQueryTarget($IP)
   logMsg("Added the IP.." + $IP) (2)
}
logMsg("Finished the process") (2)
Enjoy!
by Contributed | May 11, 2022 | Technology
This article is contributed. See the original author and article here.
At Microsoft, we value, protect, and defend privacy. We believe in transparency, so that people and organizations can control their data and have meaningful choices in how it is used. We empower and defend the privacy choices of every person who uses our products and services. In this blog, we will take a deep dive on Microsoft’s Azure Key Vault Managed HSM’s security controls for encryption and how it provides additional safeguards and technical measures to help our customers meet compliance. Encryption is one of the key technical measures to achieve sole control of your data.
Microsoft’s Azure fortifies your data through state-of-the-art encryption technologies for both data at rest and in transit. Our encryption products erect barriers against unauthorized access to the data including two or more independent encryption layers to protect against compromises of any one layer. In addition, Azure has clearly defined, well-established responses, policies and processes, strong contractual commitments, and strict physical, operational, and infrastructure security controls to provide our customers the ultimate control of their data in the cloud. The fundamental premise of Azure’s key management strategy is to give our customers more control over their data with Zero Trust posture with advanced enclave technologies, hardware security modules and identity isolation that reduces Microsoft’s access to customer keys and data.
Encryption at Rest provides data protection for stored data at rest and required by organizations need for data governance and compliance efforts. Microsoft’s compliance portfolio is the broadest in all public clouds worldwide with Industry and government regulations such as the HIPPA, General Data Protection Regulation, Schrems II and FIPS(Federal Information Processing Standards) 140-2 and 3. These regulations lay out specific safeguards regarding data protection and encryption requirements and in most cases a mandatory measure required for compliance.
How does Encryption at Rest work?
Azure Key Vault services provide encryption and key management solutions that safeguard cryptographic keys, certificates and other secrets used by cloud applications and services to protect and control data encrypted at rest. Secure key management is essential to protect and control data in the cloud. Azure offers various solutions for managing and controlling access to encryption keys, thereby giving you a choice and flexibility to meet stringent data protection and compliance needs.
- Azure Platform Encryption is a Platform Managed encryption solution that encrypts with host level encryption. Platform managed keys are encryption keys that are generated, stored, managed entirely by Azure.
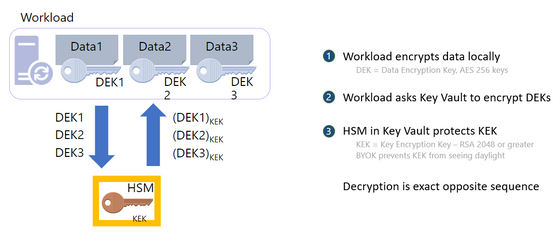
- Encryption with Customer Managed keys are keys created, read, deleted, updated and/or administered entirely by the customer. Customer Managed keys can be stored in a cloud key management service as shown below
- Azure Key Vault (AKV Standard) encrypts with a software key and is FIPS 140-2 Level 1 compliant
- Azure Key Vault (AKV Premium) encrypts with a FIPS 140-2 Level 2 hardware security module (HSM) protected keys
- Azure Key Vault Managed HSM encrypts with a single tenant FIPS 140-2 Level 3 hardware security module (HSM) protected keys and is fully managed by Microsoft and provides customers with the sole control of the cryptographic keys
For added assurance, AKV Premium and AKV Managed HSM support importing HSM-protected keys from an on-premises HSM commonly referred to as Bring your own key (BYOK)
Portfolio of Azure Key Management products
|
Azure Key Vault Standard
|
Azure Key Vault Premium
|
Azure Key Vault Managed HSM
|
Tenancy
|
Multi-Tenant
|
Multi-Tenant
|
Single-Tenant
|
Compliance
|
FIPS 140-2 level 1
|
FIPS 140-2 level 2
|
FIPS 140-2 level 3
|
High Availability
|
Automatic
|
Automatic
|
Automatic
|
Use cases
|
Encryption at Rest
|
Encryption at Rest
|
Encryption at Rest
|
Key Controls
|
Customer
|
Customer
|
Customer
|
Root of trust control
|
Microsoft
|
Microsoft
|
Customer
|
Azure Key Vault is a cloud service for securely storing and accessing secrets. A secret is anything that you want to tightly control access to, such as API keys, passwords, certificates, or cryptographic keys. Key Vault service supports two types of containers:
- Vaults
- Standard Tier – Vaults support storing secrets, certificates and software backed keys.
- Premium Tier – Vaults support storing secrets, certificates, software and HSM-backed keys.
- Managed Hardware Security Module (HSM)
- Managed HSM only support HSM-backed keys.
See Azure Key Vault Concepts and Azure Key Vault REST API overview for details.
What is Azure Key Vault Managed HSM?
Azure Key Vault Managed HSM (Hardware Security Module) is a fully managed, highly available, single-tenant, standards-compliant cloud service with a customer-controlled security domain that enables you to store cryptographic keys for your cloud applications, using FIPS 140-2 Level 3 validated HSMs
How does Azure Key Vault Managed HSM protect your keys?
Azure Key Vault Managed HSM uses a defense in depth and zero trust security posture that uses multiple layers including physical, technical, and administrative security controls to protect and defend your data.
Azure Key Vault and Azure Key Vault Managed HSM are designed, deployed and operated such that Microsoft and its agents are precluded from accessing, using or extracting any data stored in the service, including cryptographic keys.
Customer keys that are securely created and/or securely imported into the HSM devices, unless set otherwise by the customer, are not marked extractable and are never visible in plaintext to Microsoft systems, employees, or our agents.
The Key Vault team explicitly does not have operating procedures for granting such access to Microsoft and its agents, even if authorized by a customer.
We will not voluntarily attempt to defeat customer-controlled encryption features like Azure Key Vault or Azure Key Vault Managed HSM. If faced with a legal demand to do so, we would challenge such a demand on any lawful basis, consistent with our customer commitments as outlined in this blog.
Let us take a deep dive on how the security controls are implemented.
Physical Security Controls – The core of the Managed HSM offering is the hardware security module (HSM) which is a specialized, hardened, tamper resistant, high entropy dedicated cryptographic processor that is validated to FIPS 140-2 level 3 standard. All components of the HSM are further covered in hardened epoxy and a metal casing to keep your keys safe from an attacker. The HSMs are housed in racks of servers across several data centers, regions, and geographies. These geographically dispersed datacentres comply with key industry standards such as ISO/IEC 27001:2013 and NIST SP 800-53 for security and reliability.
Microsoft designs, builds, and operates datacenters in a way that strictly controls physical access to the areas where your keys and data are stored. Additional layers of physical security such as tall concrete and steel fences, dead bolted steel doors, thermal alarm systems, closed-circuit live camera monitoring, 24×7 security personnel presence, need to access basis per floor with approval, rigorous staff training, biometrics, background checks, access request and approval are mandated. In addition, the HSM devices and the related servers are caged locked with cameras filming the front and the back of the servers with tightly controlled access.
Technical Security Controls – There are several layers of technical controls around the managed HSM that further protects your key material but most importantly prevents Microsoft from accessing the key material.
- Confidentiality – The Managed HSM Service run inside a trusted execution environment built on Intel Software Guards Extension (SGX) and offers enhanced protection from internal and external attackers through hardware isolation that protects data in use. Enclaves are secured portions of the hardware’s processor and memory. You cannot view data or code inside the enclave, even with a debugger. If untrusted code tries to change content in enclave memory, SGX disables the environment and denies the operations. These unique capabilities help you protect your cryptographic key material from being accessible in the clear. In addition, Azure confidential computing offers solutions to enable the isolation of your sensitive data while it is being processed in the cloud.
- Security Domain – The security domain (SD) is an encrypted blob that contains extremely sensitive cryptographic information that contains artifacts such as the HSM backup, user credentials, the signing key, and the data encryption key unique to your managed HSM. The SD is generated in the managed HSM hardware, and the service software enclaves at the initialization time. Once the managed HSM is provisioned, you must create at least 3 RSA key pairs and send the public keys to the service when requesting the Security Domain download. Once the Security Domain is downloaded, the Managed HSM moves into an activated state and ready for consumption. Microsoft personnel have no way of recovering the security domain, nor can they access your keys without the security domain.
- Access controls and Authorization – Access to a managed HSM is controlled through two interfaces: the management plane and the data plane. The management plane is where you manage the HSM itself. Operations in this plane include creating and deleting managed HSMs and retrieving managed HSM properties. The data plane is where you work with the data stored in a managed HSM — that is HSM-backed encryption keys. You can add, delete, modify, and use keys to perform cryptographic operations, manage role assignments to control access to the keys, create a full HSM backup, restore full backup, and manage security domain from the data plane interface. To access a managed HSM in either plane, all callers must have proper authentication and authorization. Authentication establishes the identity of the caller. Authorization determines which operations the caller can execute. A caller can be any one of the security principals defined in Azure Active Directory – user, group, service principal or managed identity. Both planes use Azure Active Directory for authentication. For authorization they use different systems as follows
- The management plane uses Azure role-based access control — Azure RBAC (role-based access control) — an authorization system built on Azure Resource Manager
- The data plane uses a managed HSM-level RBAC (Managed HSM local RBAC) — an authorization system implemented and enforced at the managed HSM level. The local RBAC control model allows designated HSM administrators to have complete control over their HSM pool that even the management group, subscription, or resource group administrators cannot override.
- Encryption in Transit – All traffic to and from the Managed HSM is always encrypted with TLS (Transport Layer Security versions 1.3 and 1.2 are supported) to protect against data tampering and eavesdropping where the TLS termination happens inside the SGX enclave and not in the untrusted host
- Firewalls – Managed HSM can be configured to restrict who can reach the service in the first place, which further shrinks the attack surface. We allow you to configure Managed HSM to deny access from the public internet and only allow traffic from trusted Azure services (such as Azure Storage)
- Private Endpoints – By enabling a private endpoint, you are bringing the Managed HSM service into your virtual network allowing you to isolate that service only to trusted endpoints like your VNET and Azure Services. All traffic to and from your HSM will travel along the secure Microsoft backbone network without having to traverse the public internet.
- Monitoring and Logging – The outermost layer of protection is the monitoring and logging capabilities of Managed HSM. With Azure Monitor service, you can check your logs for analytics and alerts to ensure that access patterns conform with your expectations. This allows members of your security team to have visibility into what is happening within the Managed HSM service. If something does not look right, you can always roll your keys or revoke permissions.
- Bring Your Own Key (BYOK) – BYOK enables Azure customers to use any supported on-premises HSMs to generate keys and import them into the Managed HSM. Some customers prefer to use on-premises HSMs to generate keys to meet regulatory and compliance requirements. BYOK enables secure transfer of HSM-protected key to the Managed HSM. The key to be transferred never exists outside an HSM in plaintext form. During the import process, the key material is protected with a key held in the Managed HSM.
- External HSM – A handful of our customers have come to us where they would like to explore the option of the HSM outside of the Azure cloud to keep the data and keys segregated with an external HSM either on the 3rd party cloud or on-premises. While a 3rd party HSM outside of Azure seems to give more control over keys to customers, it introduces several concerns such as latency causing performance issues, SLA issues caused by issues with the 3rd party HSM, and maintenance and training costs. In addition, key Azure features such as soft delete and purge protection cannot be leveraged by a 3rd party HSM. We will continue to evaluate this technical option with our customers to help them navigate the complex security and compliance landscape.
Administrative Security Controls –
- EU data boundary for the Microsoft Cloud – Microsoft’s strong commitment that enables you to process and store all your data in the EU
- Microsoft’s strong commitment to challenge government requests to defend your data
- Contractual obligations around security and customer data protection as discussed in Microsoft Trust Center
- Cross region replication – Managed HSM is introducing new functionality (geo-replication) very soon that will allow you to deploy HSMs in a secondary region
- Disaster Recovery – Azure offers an end-to-end backup and disaster recovery solution that is simple, secure, scalable and cost-effective
- Microsoft Security Response Center (MSRC) – Managed HSM service administration tightly integrated with MSRC
- Security monitoring for unexpected administrative operations with full 24/7 security response
- Cloud Resilient and Secure Supply Chain – Advancing reliability through a resilient cloud supply chain
- Regulatory Compliance built-in initiative – Compliance in Azure Policy provides built-in initiative definitions to view a list of the controls and compliance domains based on responsibility (Customer, Microsoft, Shared). For Microsoft-responsible controls, we provide additional details of our audit results based on third-party attestation and our implementation details to achieve that compliance
- Audit reports – Resources to help information security and compliance professionals understand cloud features, and to verify technical compliance and control requirements
- Assume Breach philosophy – we assume that any component could be compromised at any time, and design and test appropriately, including regular Red Team/Blue Team exercises (Attack simulation in Microsoft 365 – Microsoft Service Assurance | Microsoft Docs)
In conclusion, the Azure Key Vault Managed HSM offers robust physical, technical, and administrative security controls and provides you with sole control over your key material for a scalable, centralized cloud key management solution that help satisfy growing compliance, security, and privacy needs and most importantly provides encryption safeguards required for compliance. Our customers can be assured that we are committed to ensuring their data will be protected with transparency about our practices as we progress toward the implementation of the EU Data Boundary.
For more information, reach out to your Azure account team to facilitate a discussion with the Azure Key Management product team

by Contributed | May 11, 2022 | Dynamics 365, Microsoft 365, Technology
This article is contributed. See the original author and article here.
For decades, companies have relied on skilled technicians to repair equipment and engage with customers in the field. While these technicians were often the only representation that the customer would see, their skills, processes, and systems were seldom seen as critical aspects of the company’s revenue cycle. Until recently, many field technicians or field service teams were merely thought of as necessary cost centers. But like other parts of the organization, even the cost centers must learn to innovate and discover additional revenue–generating opportunities.
Field service is the process of organizing and managing work tasks that need to be completed at a particular location, usually a customer site. The field service process often includes many variables and can be quite complex. It encompasses dispatching, scheduling, skills matching, and route optimization, to name a few. Many people have been in a situation where they’re expected to wait all day for a technician because they’ve been given a broad arrival window time between the hours of 8 AM and 4 PM. Well, that’s field servicealbeit, a rather inefficient model.
As the field service domain evolves, companies are learning their inefficiencies in the field can quickly cost them revenue as customer satisfaction is negatively impacted and the lifetime value of their customers decreases. And while companies across all industries are realizing the extended costs of inefficient field service operations, those that are innovative have begun to understand how to also leverage field service to generate more revenue. Cost reductions by becoming more efficient can be great, but reducing costs while increasing revenue is pure gold.
Here are three ways to drive revenue through your field service operations and how Microsoft Dynamics 365 Field Service can help create efficiencies.
1. Lead generation
This may sound odd primarily because lead generation has always been a staple of marketing and sales operations. But who else gets to know your customers better than your field technicians? Here’s a quick personal story:
After a recent move, I called several internet service providers. For starters, I selected the provider that could deliver service in the least amount of time. Upon arrival, the technician asked about other services, particularly mobile phone service. Since I had a different mobile phone carrier, he said they have specials and asked if I would be interested in hearing them. Shortly after confirming my interest and completing my internet installation, a field salesperson knocked on my door and converted me over to their mobile plan. A lead generated and a sale transactedall originating from the field technician’s simple question.
Field technicians are skilled workers that often have a series of tasks needed to complete the service. By simply including a question or by noting a specific item on their task list, a Microsoft Power Automate flow can be triggered to automatically create a lead and route it to the sales team. This creates a qualified lead for the sales team and a cross-sell revenue opportunity for the company.
2. Expanding business units: Field Service-as-a-Service
To truly turn your field service operations into a revenue generator, the current operation must become efficient. Efficiency requires innovation; that is, innovation of processes, system platforms, and people. When it comes to field service operations, it’s safe to say not all organizations innovate at the same pace and some prefer not to innovate at all. This is where your innovation and efficiencies can become a revenue-generating asset.
For example, a large healthcare facilities provider began as a facilities management operation. They provided facilities management services to the vast and growing network of healthcare providers. Continuing to innovate and drive efficiencies with Dynamics 365 Field Service, the healthcare facilities provider quickly recognized the value they could bring to other healthcare provider networks and began offering their services to other hospitals. By leveraging their efficiencies, they were able to provide great value to more than 160 hospitals which allows their customers to create better patient experiences. The healthcare facilities provider is a great example of how field service efficiencies were used to create a revenue-generating business unit.
3. Connected Field Service: leverage data
Connected Field Service leverages IoT data collected from device sensors and integrates with Dynamics 365 Field Service to create a new revenue-generating service model. Connected Field Service allows organizations to graduate from the traditional break-fix service model to a proactive and predictive service model. This shift creates opportunities for organizations to market and sell new service offerings that yield greater revenue and increase margin.
A connected field service example is a Pacific Northwest mechanical contractor company. The organization specializes in developing energy-efficient buildings. However, by capturing the data from IoT sensors, their connected field service solution enables them to offer post-construction optimization services. IoT sensors capture a building’s energy levels and proactively dispatches a service technician prior to failurethus, ensuring operational efficiency within their customers’ facilities. Building on their efficiencies, they can conserve and reduce travel costs by performing remote inspections and service with Dynamics 365 Remote Assist. Such efficiency creates opportunities to sell more advanced support offerings thereby increasing revenue and profitability.
Learn more about Dynamics 365 Field Service
The good news is that becoming more efficient in field service operations can be extremely valuable to your organization. The better news is that through innovation, field service operations can even be transformed into a revenue-generating machine.
The post 3 ways to turn your field service operation into a revenue-generating machine appeared first on Microsoft Dynamics 365 Blog.
Brought to you by Dr. Ware, Microsoft Office 365 Silver Partner, Charleston SC.

Recent Comments