This article is contributed. See the original author and article here.
With the continued evolution and adoption of hybrid work, we know how critical a strong identity and governance control plane is for IT scalability and a seamless user experience. Today, we are excited to share new Azure Active Directory (Azure AD) capabilities and best practices that can help organizations with these needs. With these updates, organizations will now be able to allow password writeback from the cloud when using Azure AD Connect cloud sync, provision to on-premises applications, verify their SCIM provisioning endpoints, and more.
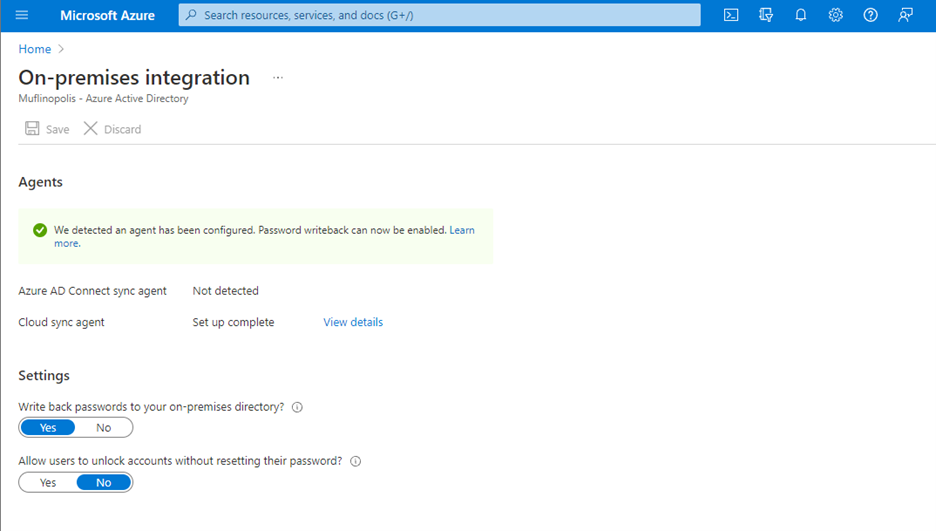
Allow users to reset their password regardless if they are on-premises or in the cloud
Password writeback allows an on-premises synched user to initiate password changes in the cloud and have the password written back to the user’s on-premises Active Directory Domain Services (AD DS) environment in real time. This enables users to seamlessly transition between cloud and on-premises applications without worrying about managing multiple passwords. No matter where the password is updated, it remains in sync across the cloud and on-premises.
Now in public preview, Azure AD Connect cloud sync password writeback includes support for users synced from disconnected environments. Organizations can sync users from multiple disconnected domains into a central Azure AD tenant and reset passwords for these users from Azure AD.
Simplify provisioning to cloud and on-premises applications
At Microsoft Ignite, we announced that an open public preview is available for Azure AD to provisioning to on-premises applications that support SCIM, SQL, and LDAP. Organizations can manage provisioning to their on-premises applications the same way they’re used to with popular SaaS applications such as monday.com, Miro, and Asana. Building on this momentum, we’ve now added the ability to provision users into third-party LDAP directories such as OpenLDAP.
Simplify building and testing your provisioning end point in compliance with the SCIM standard
A limited preview is now available of a SCIM validation tool. This enables partners and customers to validate that their end point is compatible with the Azure AD SCIM client, reducing onboarding time to the Azure AD app gallery. Once you have built your new application as per the guidelines, you can request an invite to the preview here.
Upgrade to the latest version of Azure AD Connect sync to future-proof your environment
Legacy versions of Azure AD Connect sync rely on components such as SQL2012 and ADAL that are being retired in the coming year. As such, all customers must upgrade to Azure AD Connect sync v2.0 or evaluate switching to Azure AD Connect cloud sync to ensure uninterrupted provisioning support. Azure AD Connect sync v1.x versions will be retired effective August 30, 2022.
To provide better predictability for IT planning cycles, we have also established a consistent retirement cadence for Azure AD Connect sync versions. Moving forward, we will retire each version 18 months after a new version is released.
Use date comparisons to drive provisioning logic
Attribute expression mapping enables you to control and transform data before writing to target systems. Based on your feedback, we have added new built-in date functions Now(), DateAdd() and DateDiff() to help you compare dates and define granular attribute provisioning based on date time values. You can nest and combine them with other functions in your user provisioning flow to implement scenarios such as:
Based on user type, set user account expiry date in a SaaS application or on-premises application to “X” number of days after current provisioning time.
Find the interval difference between current date and HR hire date and use it to determine account activation / data flow logic.
As always, we’d love to hear from you! Feel free to leave comments down below or reach out to us on aka.ms/AzureADFeedback.
This article was originally posted by the FTC. See the original article here.
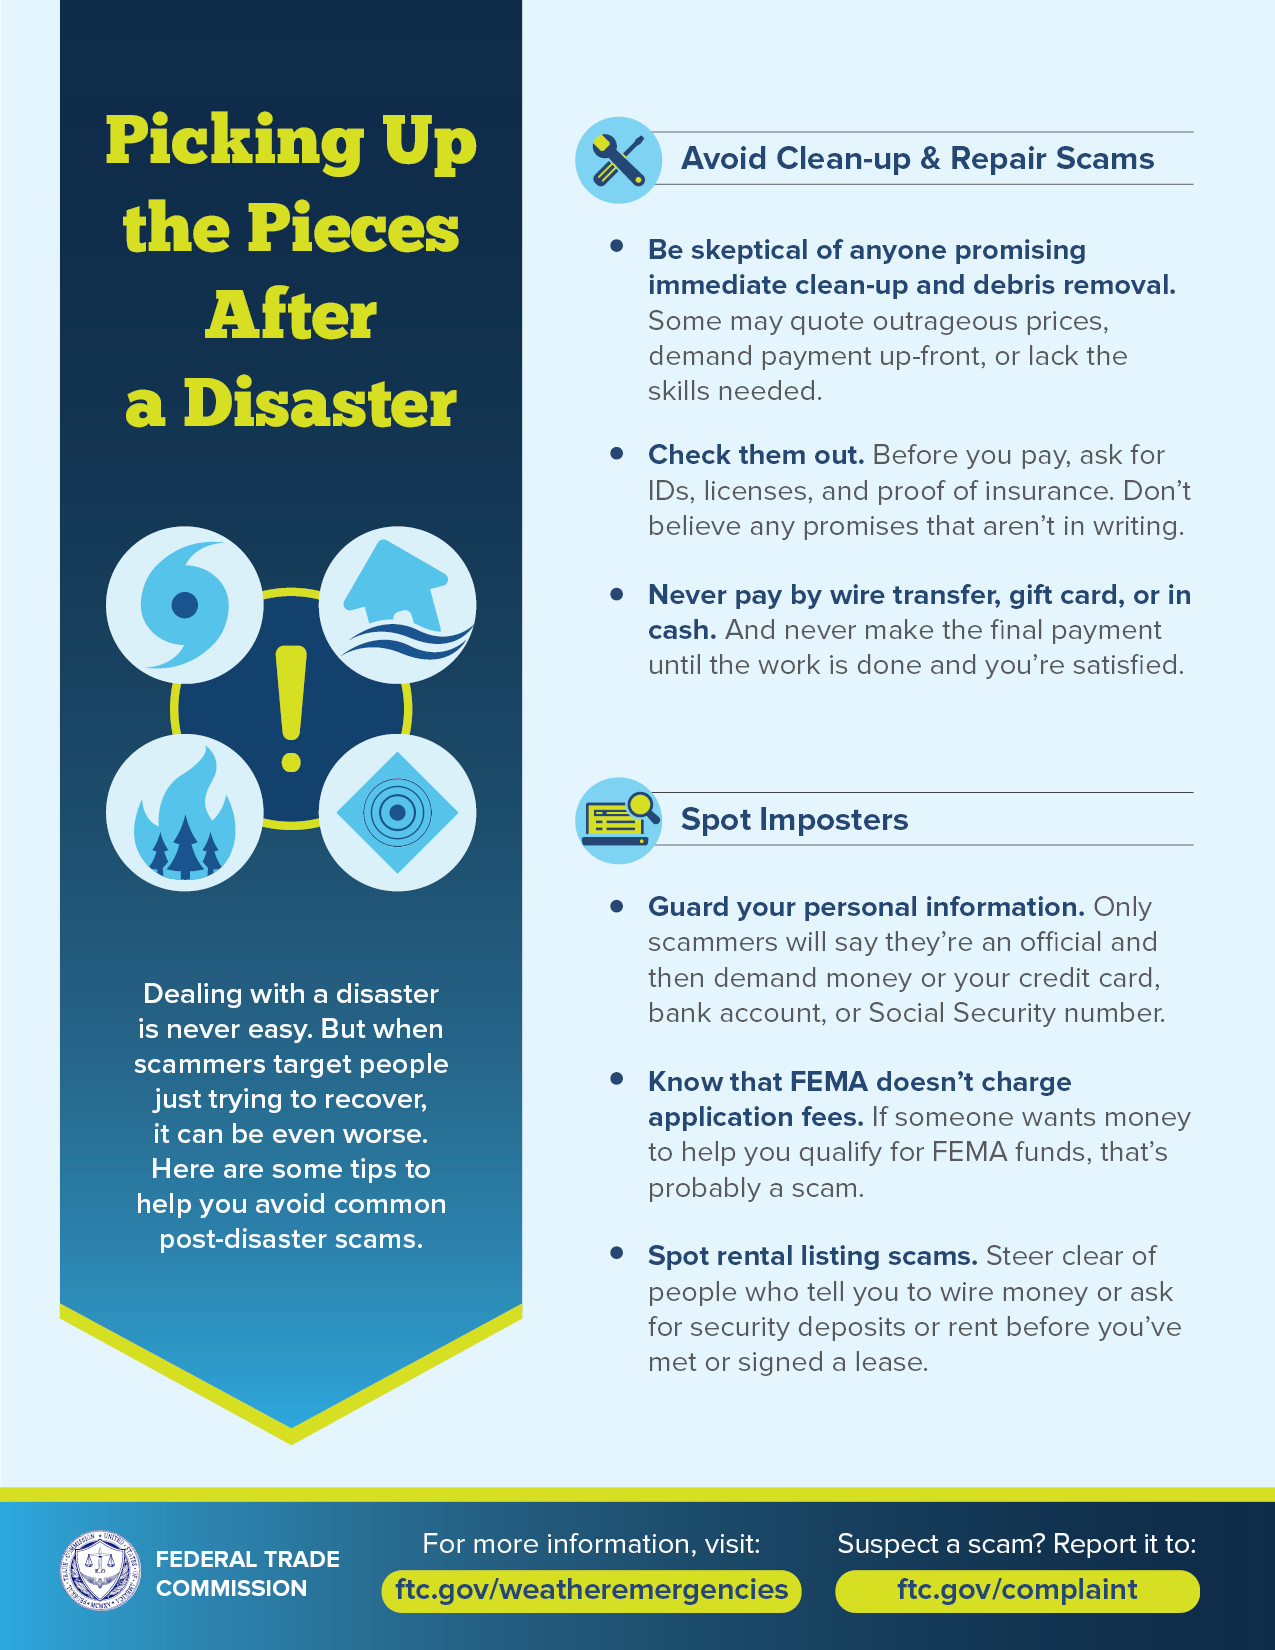
If you or someone you know has been affected by the devastating series of tornadoes that roared across Kentucky, Illinois, Tennessee, Arkansas, and Missouri, coping with the aftermath is never easy. But when scammers target people just trying to recover, it can be even worse. Here are ways to help you and your neighbors avoid common post-disaster scams.
Be skeptical of anyone promising immediate clean-up and debris removal. Some may quote outrageous prices, demand payment up-front, or lack the skills needed.
Check them out. Before you pay, ask for IDs, licenses, and proof of insurance. Don’t believe any promises that aren’t in writing.
Know that FEMA doesn’t charge application fees. If someone wants money to help you qualify for FEMA funds, that’s probably a scam.
Be wise to rental listing scams. Steer clear of people who tell you to wire money or ask for security deposits or rent before you’ve met or signed a lease.
Spot disaster-related charity scams. Scammers will often try to make a quick profit from the misfortune of others. Check out the FTC’s advice on donating wisely and avoiding charity scams.
Bookmark Dealing with Weather Emergencies. If a weather event or disaster affects you, come back for more tips on recovery and information about your rights. Like all our materials, the site is mobile-friendly, so you’ll have ready access to information when and where you need it.
Suspect a scam? Report it to the FTC at ReportFraud.ftc.gov. Want information on the latest frauds and scams we’re seeing? Sign up for our consumer alerts.
Note: This blog, originally posted on September 3, 2021, has been updated following the December 11-12 series of tornadoes.
Brought to you by Dr. Ware, Microsoft Office 365 Silver Partner, Charleston SC.
This article was originally posted by the FTC. See the original article here.
The season of giving is here. If you celebrate Christmas, you might be about to fill some stockings. But, for many, holiday giving includes supporting charitable causes. Charities in need of support will be making year-end appeals by phone, mail, email, and social media. Scammers know that, too, and every year try to trick people into giving to them, not the real deal. So here are some steps to take to make sure the charity is real and your money will support the programs you care about.
Check out the charity before you donate. Search online with the name of the charity plus words like “complaint,” “review,” or “scam.” Ask how much of your donation will go to the work of the charity (versus, say, fundraising). Learn more by seeing what organizations like the BBB Wise Giving Alliance, Charity Navigator, CharityWatch and Candid say about how a charity does its business and spends its money.
Double-check the name. Scammers sometimes use names that sound like real charities that you know and trust.
Don’t be rushed. Scammers love to pressure you to make fast decisions and pay them. But take it slow. Real charities will be happy to get your donation when you’re ready.
Avoid donations by cash, gift card, cryptocurrency, or money transfer service — if they demand to be paid that way. That’s how scammers ask to be paid. Your safer bet is to pay by credit card.
Report charity scams at ReportFraud.ftc.gov. Your report can help people in your community protect themselves from charity scams and other types of fraud. The FTC uses reports like yours to investigate and bring law enforcement cases.
Check out ftc.gov/charity for more, including on giving through online platforms. And take a moment to check out, and share, this charity fraud video. Happy giving!
Brought to you by Dr. Ware, Microsoft Office 365 Silver Partner, Charleston SC.
This article is contributed. See the original author and article here.
Before implementing data extraction from SAP systems please always verify your licensing agreement.
Over the last five episodes, we’ve built quite a complex Synapse Pipeline that allows extracting SAP data using OData protocol. Starting from a single activity in the pipeline, the solution grew, and it now allows to process multiple services on a single execution. We’ve implemented client-side caching to optimize the extraction runtime and eliminate short dumps at SAP. But that’s definitely not the end of the journey!
Today we will continue to optimize the performance of the data extraction. Just because the Sales Order OData service exposes 40 or 50 properties, it doesn’t mean you need all of them. One of the first things I always mention to customers, with who I have a pleasure working, is to carefully analyze the use case and identify the data they actually need. The less you copy from the SAP system, the process is faster, cheaper and causes fewer troubles for SAP application servers. If you require data only for a single company code, or just a few customers – do not extract everything just because you can. Focus on what you need and filter out any unnecessary information.
Fortunately, OData services provide capabilities to limit the amount of extracted data. You can filter out unnecessary data based on the property value, and you can only extract data from selected columns containing meaningful data.
Today I’ll show you how to implement two query parameters: $filter and $select to reduce the amount of data to extract. Knowing how to use them in the pipeline is essential for the next episode when I explain how to process only new and changed data from the OData service.
ODATA FILTERING AND SELECTION
There is a GitHub repository with source code for each episode. Learn more:
To filter extracted data based on the field content, you can use the $filter query parameter. Using logical operators, you can build selection rules, for example, to extract only data for a single company code or a sold-to party. Such a query could look like this:
The above query will only return records where the field SoldToParty equals AZ001. You can expand it with logical operators ‘and’ and ‘or’ to build complex selection rules. Below I’m using the ‘or’ operator to display data for two Sold-To Parties:
/API_SALES_ORDER_SRV/A_SalesOrder/?$filter=SoldToParty eq 'AZ001' or SoldToParty eq 'AZ002'
You can mix and match fields we’re interested in. Let’s say we would like to see orders for customers AZ001 and AZ002 but only where the total net amount of the order is lower than 10000. Again, it’s quite simple to write a query to filter out data we’re not interested in:
/API_SALES_ORDER_SRV/A_SalesOrder?$filter=(SoldToParty eq 'AZ001' or SoldToParty eq 'AZ002') and TotalNetAmount le 10000.00
Let’s be honest, filtering data out is simple. Now, using the same logic, you can select only specific fields. This time, instead of the $filter query parameter, we will use the $select one. To get data only from SalesOrder, SoldToParty and TotalNetAmount fields, you can use the following query:
There is nothing stopping you from mixing $select and $filter parameters in a single query. Let’s combine both above examples:
/API_SALES_ORDER_SRV/A_SalesOrder?$select=SalesOrder,SoldToParty,TotalNetAmount&$filter=(SoldToParty eq 'AZ001' or SoldToParty eq 'AZ002') and TotalNetAmount le 10000.00
By applying the above logic, the OData response time reduced from 105 seconds to only 15 seconds, and its size decreased by 97 per cent. That, of course, has a direct impact on the overall performance of the extraction process.
FILTERING AND SELECTION IN THE PIPELINE
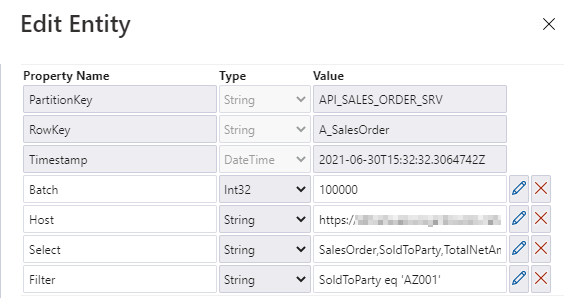
The filtering and selection options should be based on the entity level of the OData service. Each entity has a unique set of fields, and we may want to provide different filtering and selection rules. We will store the values for query parameters in the metadata store. Open it in the Storage Explorer and add two properties: filter and select.
I’m pretty sure that based on the previous episodes of the blog series, you could already implement the logic in the pipeline without my help. But there are two challenges we should be mindful of. Firstly, we should not assume that $filter and $select parameters will always contain a value. If you want to extract the whole entity, you can leave those fields empty, and we should not pass them to the SAP system. In addition, as we are using the client-side caching to chunk the requests into smaller pieces, we need to ensure that we pass the same filtering rules in the Lookup activity where we check the number of records in the OData service.
Let’s start by defining parameters in the child pipeline to pass filter and select values from the metadata table. We’ve done that already in the third episode, so you know all steps.
To correctly read the number of records, we have to consider how to combine these additional parameters with the OData URL in the Lookup activity. So far, the dataset accepts two dynamic fields: ODataURL and Entity. To pass the newly defined parameters, you have to add the Query one.
You can go back to the Lookup activity to define the expression to pass the $filter and $query values. It is very simple. I check if the Filter parameter in the metadata store contains any value. If not, then I’m passing an empty string. Otherwise, I concatenate the query parameter name with the value.
Finally, we can use the Query field in the Relative URL of the dataset. We already use that field to pass the entity name and the $count operator, so we have to slightly extend the expression.
Changing the Copy Data activity is a bit more challenging. The Query field is already defined, but the expression we use should include the $top and $skip parameters, that we use for the client-side paging. Unlike at the Lookup activity, this time we also have to include both $select and $filter parameters and check if they contain a value. It makes the expression a bit lengthy.
With above changes, the pipeline uses filter and select values to extract only the data you need. It reduces the amount of processed data and improves the execution runtime.
IMPROVING MONITORING
As we develop the pipeline, the number of parameters and expressions grows. Ensuring that we haven’t made any mistakes becomes quite a difficult task. By default, the Monitoring view only gives us basic information on what the pipeline passes to the target system in the Copy Data activity. At the same time, parameters influence which data we extract. Wouldn’t it be useful to get a more detailed view?
There is a way to do it! In Azure Synapse Pipelines, you can define User Properties, which are highly customizable fields that accept custom values and expressions. We will use them to verify that our pipeline works as expected.
Open the Copy Data activity and select the User Properties tab. Add three properties we want to monitor – the OData URL, entity name, and the query passed to the SAP system. Copy expression from the Copy Data activity. It ensures the property will have the same value as is passed to the SAP system.
Once the user property is defined we start the extraction job.
MONITORING AND EXECUTION
Let’s start the extraction. I process two OData services, but I have defined Filter and Select parameters to only one of them. Once the processing has finished, open the Monitoring area. To monitor all parameters that the metadata pipeline passes to child one, click on the [@] sign:
Now, enter the child pipeline to see the details of the Copy Data activity.
When you click on the icon in the User Properties column, you can display the defined user properties. As we use the same expressions as in the Copy Activity, we clearly see what was passed to the SAP system. In case of any problems with the data filtering, this is the first place to start the investigation.
The above parameters are very useful when you need to troubleshoot the extraction process. Mainly, it shows you the full request query that is passed to the OData service – including the $top and $skip parameters that we defined in the previous episode.
The extraction was successful, so let’s have a look at the extracted data in the lake.
There are only three columns, which we have selected using the $select parameter. Similarly, we can only see rows with SoldToParty equals AZ001 and the TotalNetAmount above 1000. It proves the filtering works fine.
I hope you enjoyed this episode. I will publish the next one in the upcoming week, and it will show you one of the ways to implement delta extraction. A topic that many of you wait for!


 The season of giving is here. If you celebrate Christmas, you might be about to fill some stockings. But, for many, holiday giving includes supporting charitable causes. Charities in need of support will be making year-end appeals by phone, mail, email, and social media. Scammers know that, too, and every year try to trick people into giving to them, not the real deal. So here are some steps to take to make sure the charity is real and your money will support the programs you care about.


Recent Comments