Deploy a highly available and scalable WordPress on Azure

Deploy a highly available and scalable WordPress on Azure

This article is contributed. See the original author and article here.

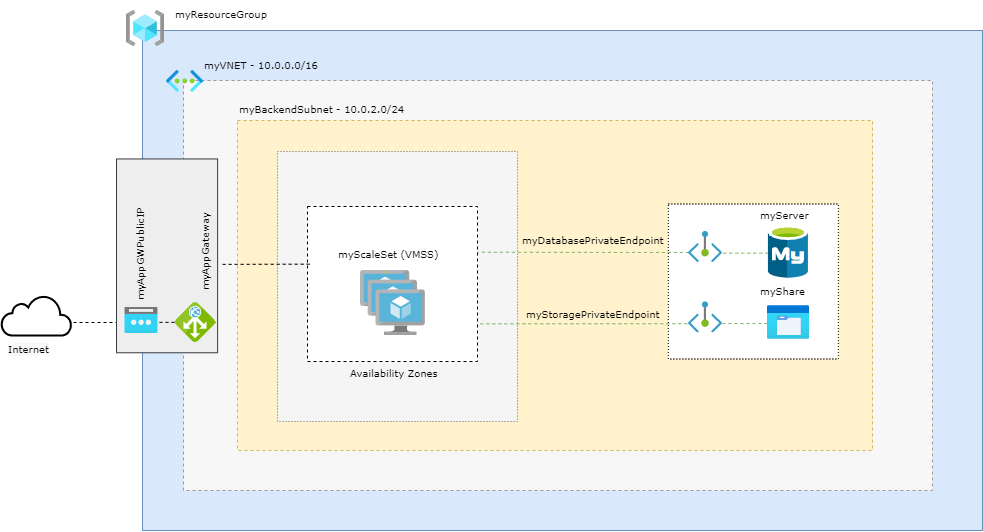
Architecture


appgw-wordpress.png


Prerequisites


  • Use the Bash environment in Azure Cloud Shell.


  • If you prefer, install the Azure CLI to run CLI reference commands.


  • This tutorial requires version 2.0.4 or later of the Azure CLI. If using Azure Cloud Shell, the latest version is already installed.


Define Variables


subscriptionId="XXXXXXXX-XXXX-XXXX-XXXX-XXXXXXXXXXXX"
resourceGroupName="myResourceGroup"
storageAccountName="mystorageacct$RANDOM"
region="westus2"
shareName="myshare$RANDOM"
mysqlServerName="myserver$RANDOM"
mysqlAdmin="myadmin"
mysqlPassword="MyWeaKPassw0rd"
privateEndpointNameStorage="myStoragePrivateEndpoint"
privateConnectionNameStorage="myStorageConnection"
privateDNSZoneNameStorage="privatelink.file.core.windows.net"
privateDNSZoneGroupNameStorage="MyStorageZoneGroup"
privateDNSLinkNameStorage="MyStorageDNSLink"
privateEndpointNameDatabase="myDatabasePrivateEndpoint"
privateConnectionNameDatabase="myDatabaseConnection"
privateDNSZoneNameDatabase="privatelink.mysql.database.azure.com"
privateDNSLinkNameDatabase="MyDatabaseDNSLink"
privateDNSZoneGroupNameDatabase="MyDatabaseZoneGroup"
dbname="wordpressdb"
dbuser="db_user"
dbpassword="db_user-weakPassword"
ScaleSetName="myScaleSet"
VNETName="myVNET"
SubnetName="mySubnet"
BackendSubnetName="myBackendSubnet"
AppGWPublicIPAddressName="myAppGWPublicIP" 
AppGatewayName="myAppGateway"


Create Resource Group


az group create --name $resourceGroupName --location $region


Create a VNET


az network vnet create 
    --resource-group $resourceGroupName
    --location $region 
    --name $VNETName 
    --address-prefixes 10.0.0.0/16 
    --subnet-name $SubnetName  
    --subnet-prefixes 10.0.0.0/24


Please note that the subnet created here will be the dedicated subnet to Application Gateway


Create a Backend Subnet


az network vnet subnet create 
  --name $BackendSubnetName 
  --resource-group $resourceGroupName 
  --vnet-name $VNETName 
  --address-prefix 10.0.2.0/24 


Create a Public IP for the Application Gateway


az network public-ip create 
 --resource-group $resourceGroupName 
 --name $AppGWPublicIPAddressName 
 --allocation-method Static 
 --sku Standard 
 --zone 1 2 3


Update the backend subnet


Is required to disable network policies for private endpoints

az network vnet subnet update 
  --name $BackendSubnetName 
  --resource-group $resourceGroupName 
  --vnet-name $VNETName 
  --disable-private-endpoint-network-policies true


Create the Application Gateway


az network application-gateway create 
  --name $AppGatewayName 
  --location $region 
  --resource-group $resourceGroupName 
  --vnet-name $VNETName 
  --subnet $SubnetName 
  --capacity 3 
  --sku Standard_v2 
  --http-settings-cookie-based-affinity Enabled 
  --frontend-port 80 
  --http-settings-port 80 
  --http-settings-protocol Http 
  --public-ip-address $AppGWPublicIPAddressName 
  --zones 1 2 3


Create FileStorage Account


az storage account create 
    --resource-group $resourceGroupName 
    --name $storageAccountName 
    --kind FileStorage 
    --sku Premium_ZRS 


Create an NFS share


az storage share-rm create 
    --resource-group $resourceGroupName 
    --storage-account $storageAccountName 
    --name $shareName 
    --enabled-protocol NFS 
    --root-squash NoRootSquash 
    --quota 1024 


Create a Private Endpoint to use with Azure FileStorage


idstorage=$(az storage account list 
    --resource-group $resourceGroupName 
    --query '[].[id]' 
    --output tsv)

az network private-endpoint create 
    --name $privateEndpointNameStorage 
    --resource-group $resourceGroupName 
    --vnet-name $VNETName 
    --subnet $BackendSubnetName 
    --private-connection-resource-id $idstorage 
    --connection-name $privateConnectionNameStorage 
    --group-id file


Configure the private DNS zone for Azure FileStorage


az network private-dns zone create 
    --resource-group $resourceGroupName 
    --name $privateDNSZoneNameStorage

az network private-dns link vnet create 
    --resource-group  $resourceGroupName 
    --zone-name $privateDNSZoneNameStorage 
    --name $privateDNSLinkNameStorage 
    --virtual-network $VNETName 
    --registration-enabled false

az network private-endpoint dns-zone-group create 
   --resource-group $resourceGroupName 
   --endpoint-name $privateEndpointNameStorage 
   --name $privateDNSZoneGroupNameStorage 
   --private-dns-zone $privateDNSZoneNameStorage 
   --zone-name storage


Disable secure transfer setting on Storage Account


The secure transfer setting isn’t supported on NFS protocol, so it’s required to disable it:

az storage account update -g $resourceGroupName -n $storageAccountName --https-only false


Register your subscription to use the NFS 4.1 protocol


As NFS is a preview feature at this time, you need register your subscription to be able to use.

az feature register 
    --name AllowNfsFileShares 
    --namespace Microsoft.Storage 
    --subscription $subscriptionId

az provider register 
    --namespace Microsoft.Storage


Create MySQL


az mysql server create --resource-group $resourceGroupName --name $mysqlServerName --location $region --admin-user $mysqlAdmin --admin-password $mysqlPassword --sku-name GP_Gen5_2 --ssl-enforcement Disabled


Create a Private Endpoint to use with Azure Database for MySQL


idmysql=$(az mysql server list 
    --resource-group $resourceGroupName 
    --query '[].[id]' 
    --output tsv)


az network private-endpoint create 
    --name $privateEndpointNameDatabase 
    --resource-group $resourceGroupName 
    --vnet-name $VNETName 
    --subnet $BackendSubnetName 
    --private-connection-resource-id $idmysql 
    --group-id mysqlServer 
    --connection-name $privateConnectionNameDatabase


Configure the Private DNS Zone for Azure Database for MySQL


az network private-dns zone create --resource-group $resourceGroupName 
   --name  $privateDNSZoneNameDatabase 

az network private-dns link vnet create --resource-group $resourceGroupName 
   --zone-name  $privateDNSZoneNameDatabase 
   --name $privateDNSLinkNameDatabase 
   --virtual-network $VNETName 
   --registration-enabled false

az network private-endpoint dns-zone-group create 
   --resource-group $resourceGroupName 
   --endpoint-name $privateEndpointNameDatabase 
   --name $privateDNSZoneGroupNameDatabase 
   --private-dns-zone $privateDNSZoneNameDatabase 
   --zone-name mysql


Create a firewall rule on Azure Database for MySQL


This will allow connect on Azure Database from AZ CLI to create the database

az mysql server firewall-rule create --resource-group $resourceGroupName --server $mysqlServerName --name "AllowAll" --start-ip-address 0.0.0.0 --end-ip-address 0.0.0.0


Create a database with a non-admin user in Azure Database for MySQL


mysql -h $mysqlServerName.mysql.database.azure.com -u$mysqlAdmin@$mysqlServerName -p$mysqlPassword<<EOFMYSQL
CREATE DATABASE wordpressdb;
CREATE USER 'db_user'@'%' IDENTIFIED BY 'db_user-weakPassword';
GRANT ALL PRIVILEGES ON wordpressdb . * TO 'db_user'@'%';
FLUSH PRIVILEGES;
EOFMYSQL


Remove the firewall rule previously created to create the database from AZ CLI.


As the access from VMs to the database will use the private endpoint connection, we don’t need it anymore. Was required just to be able to connet to MySQL from AZ CLI and create the WordPress database.

az mysql server firewall-rule delete --name AllowAll --resource-group $resourceGroupName --server-name $mysqlServerName -y


Generate cloud-init


At this step the cloud-init will be generated to create the configuration inside the VMs and install required packages.

cat <<EOF > cloud-init.txt
#cloud-config
package_upgrade: true
packages:
  - nginx
  - php-curl
  - php-gd
  - php-intl
  - php-mbstring
  - php-soap
  - php-xml
  - php-xmlrpc
  - php-zip
  - php-fpm
  - php-mysql
  - nfs-common

write_files:
- path: /tmp/wp-config.php
  content: |
      <?php
      define('DB_NAME', '$dbname');
      define('DB_USER', '$dbuser');
      define('DB_PASSWORD', '$dbpassword');
      define('DB_HOST', '$mysqlServerName.mysql.database.azure.com');
      $table_prefix = 'wp_';
      if ( ! defined( 'ABSPATH' ) ) {
        define( 'ABSPATH', __DIR__ . '/' );
      }
      require_once ABSPATH . 'wp-settings.php';
      ?>


- path: /tmp/wordpress.conf
  content: |
   server {
      listen 80;
      server_name _;
      root /data/nfs/wordpress;

      index index.html index.htm index.php;

      location / {
          try_files $uri $uri/ /index.php$is_args$args;
      }

      location ~ .php$ {
          include snippets/fastcgi-php.conf;
          fastcgi_pass unix:/var/run/php/php7.2-fpm.sock;
      }

      location = /favicon.ico { log_not_found off; access_log off; }
      location = /robots.txt { log_not_found off; access_log off; allow all; }
      location ~* .(css|gif|ico|jpeg|jpg|js|png)$ {
        expires max;
        log_not_found off;
      }

      location ~ /.ht {
          deny all;
      }

   }

runcmd: 
  - mkdir -p /data/nfs/wordpress
  - mount -t nfs $storageAccountName.file.core.windows.net:/$storageAccountName/$shareName /data/nfs -o vers=4,minorversion=1,sec=sys
  - wget http://wordpress.org/latest.tar.gz -P /data/nfs/wordpress
  - tar xzvf /data/nfs/wordpress/latest.tar.gz -C /data/nfs/wordpress --strip-components=1
  - cp /tmp/wp-config.php /data/nfs/wordpress/wp-config.php
  - cp /tmp/wordpress.conf  /etc/nginx/conf.d/wordpress.conf
  - chown -R www-data:www-data /data/nfs/wordpress
  - rm /etc/nginx/sites-enabled/default
  - rm /etc/nginx/sites-available/default
  - systemctl restart nginx
EOF


Create a Virtual Machine Scale Set


az vmss create 
  --name $ScaleSetName 
  --resource-group $resourceGroupName 
  --image UbuntuLTS 
  --admin-username azureuser 
  --generate-ssh-keys 
  --instance-count 3 
  --vnet-name $VNETName 
  --subnet $BackendSubnetName 
  --vm-sku Standard_DS2_v2 
  --upgrade-policy-mode Automatic 
  --app-gateway $AppGatewayName 
  --custom-data cloud-init.txt 
  --backend-pool-name appGatewayBackendPool 
  --zones 1 2 3


Get the Application Gateway Public IP


az network public-ip show 
  --resource-group $resourceGroupName 
  --name $AppGWPublicIPAddressName 
  --query [ipAddress] 
  --output tsv


Finish the WordPress installation


Please note the complete setup of the VMs configuration can take up to 5 minutes. So if you try access and got the “Welcome to nginx!” message, it means that the setup wasn’t finished yet. So take another cup of coffee before try access again =D


In your web browser, navigate to the Application Gateway Public IP and complete the WordPress installation through the web interface:


http://application_gateway_public_ip


Select the language you would like to use:
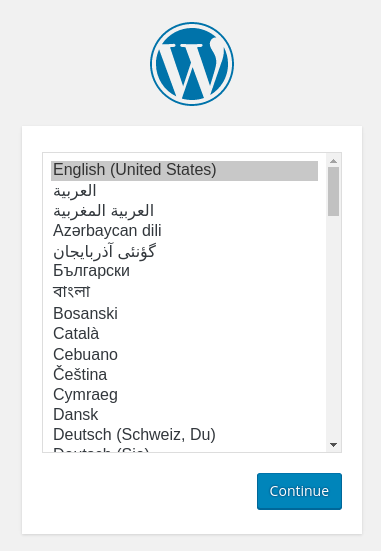


language_selection.png


Next, you will come to the main setup page.


Select a name for your WordPress site and choose a username. It is recommended to choose something unique and avoid common usernames like “admin” for security purposes. A strong password is generated automatically. Save this password or select an alternative strong password.


Enter your email address and select whether you want to discourage search engines from indexing your site:
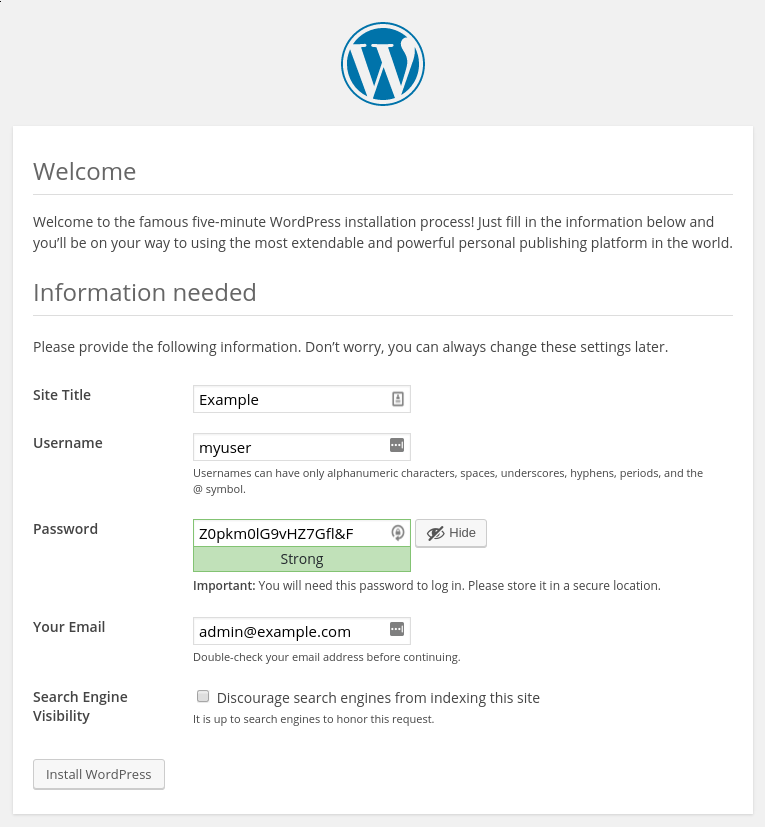


setup_installation.png


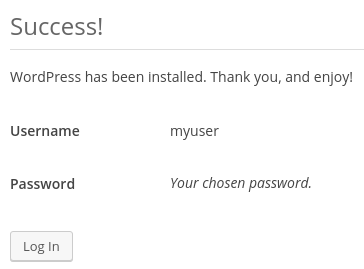
When you click ahead, you will be taken to a page that prompts you to log in:


login_prompt.png


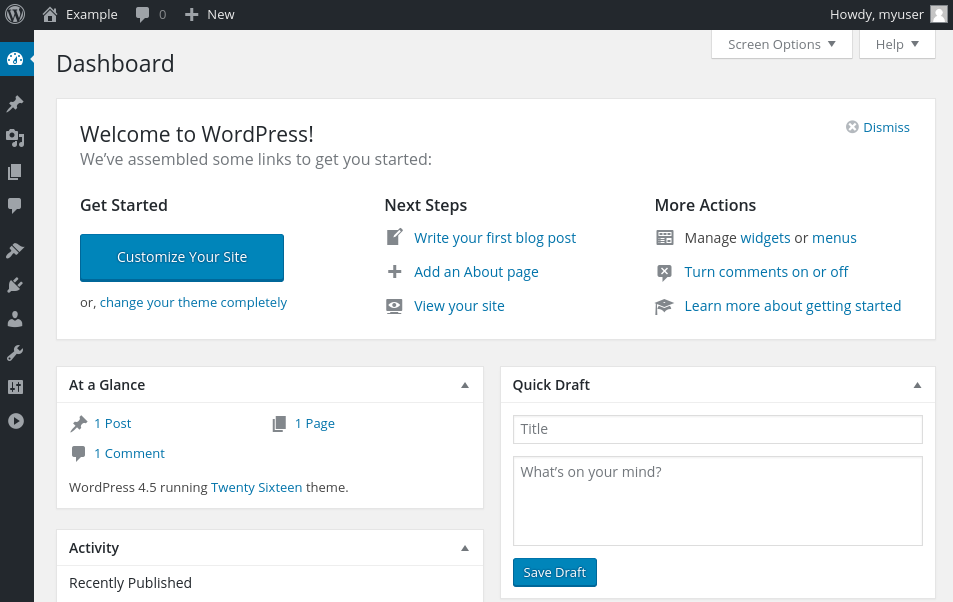
Once you log in, you will be taken to the WordPress administration dashboard:


admin_screen.png


Change manually the capacity of a scale set


When you created a Virtual Machine Scale, three VM instances were deployed by the parameter –instance-count 3. To increase or decrease the number of VM instances in your existing scale set, you can manually change the capacity. The scale set creates or removes the required number of VM instances then will distribute the traffic.


To manually increase or decrease the number of VM instances in the scale set, use az vmss scale. The following example sets the number of VM instances in your scale set to 5:

az vmss scale  --name myScaleSet --new-capacity 5 --resource-group $resourceGroupName


Using autoscale profile to change the capacity automatically


az monitor autoscale create 
  --resource-group $resourceGroupName 
  --resource $ScaleSetName 
  --resource-type Microsoft.Compute/virtualMachineScaleSets 
  --name autoscale 
  --min-count 3 
  --max-count 10 
  --count 3


Create a rule to autoscale out


az monitor autoscale rule create 
  --resource-group $resourceGroupName 
  --autoscale-name autoscale 
  --condition "Percentage CPU > 70 avg 5m" 
  --scale out 3


Create a rule to autoscale in


az monitor autoscale rule create 
  --resource-group $resourceGroupName 
  --autoscale-name autoscale 
  --condition "Percentage CPU < 30 avg 5m" 
  --scale in 1


Provision users into apps using SQL as a user store, more easily build complex expressions, and more

Provision users into apps using SQL as a user store, more easily build complex expressions, and more

This article is contributed. See the original author and article here.

Howdy folks,


I’m excited to share the latest Active Azure Directory provisioning capabilities to help you with your user lifecycle and directory management needs.


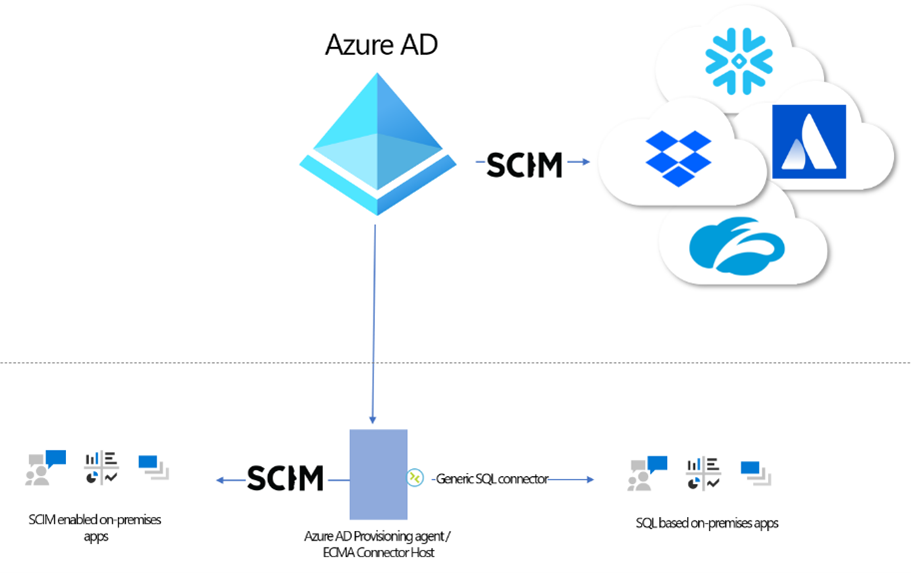
Automate provisioning users from Azure AD into on-premises applications


Azure AD now supports provisioning into on-premises applications, and we have a preview that we’re excited for you to deploy and share your feedback.


You must have an Azure AD Premium P1 or P2 tenant and an on-premises application that uses SQL as a data store or supports SCIM. You can request an invitation to the preview here. We plan to remove the invitation requirement in the coming months and add support for provisioning users into LDAP directories (excluding AD DS). 


For those customers who have previously deployed Microsoft Identity Manager (MIM), you can reuse your existing connectors and configuration without needing a full MIM deployment. And for those customers building new applications, you can use our SCIM reference code to stand up a SCIM endpoint and easily provision users into your application, whether it’s on-premises or in the cloud.


Azure AD.png


More apps with pre-built user provisioning connectors


Azure AD service now supports more than 200 provisioning connectors! Checkout the growing list of applications here.  Don’t see an app you’re looking for? Request your application vendors to support the SCIM standard and onboard to the Azure AD application gallery. We’ll work with the ISV to quickly onboard.


apps.JPG


New app integration wizard available in the Microsoft 365 admin center


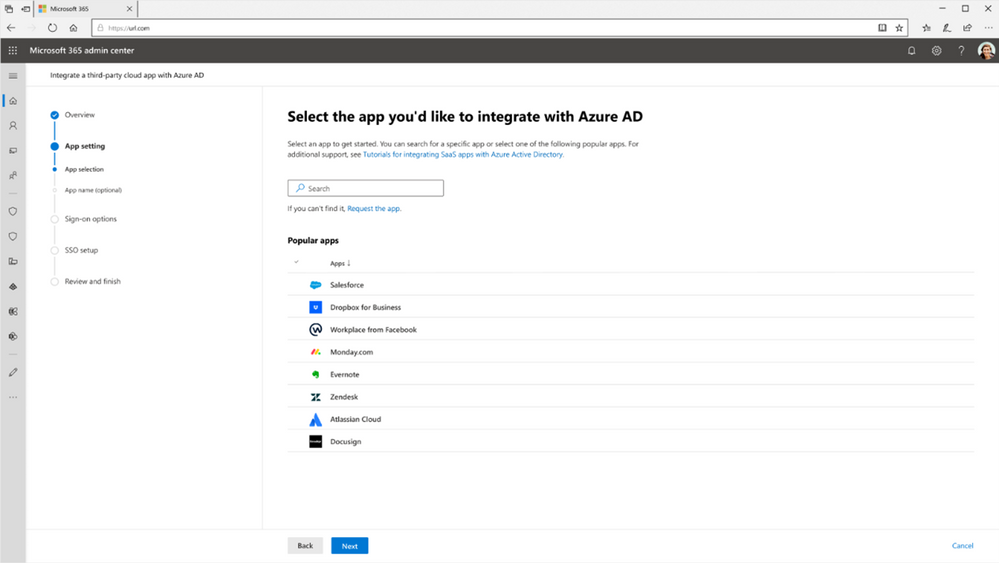
To help more admins connect third party apps to Azure AD, we’ve launched a new app integration wizard in the Microsoft 365 admin center.  The app integration wizard makes it easier to connect apps in our app gallery to Azure AD by taking admins through a guided configuration experience in setting up single sign-on. Once applications have been setup for single sign-on, admins can then automate user provisioning using the hundreds of pre-built provisioning connectors.


App integration with Azure AD.png


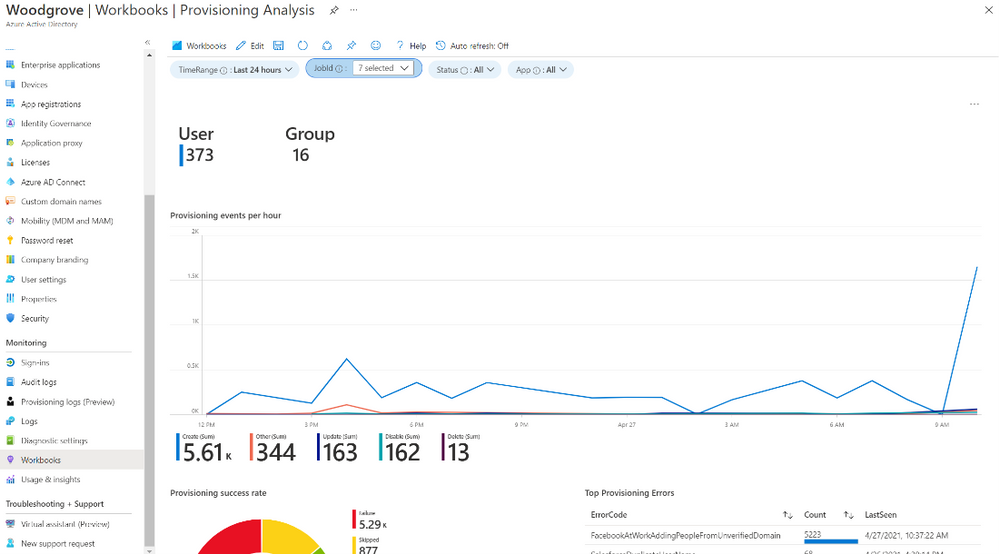
Provisioning logs are now generally available


Monitor and troubleshoot your provisioning deployment with the provisioning logs using the UI, API, or by exporting the data as a CSV. You can also build custom dashboards, alerts, and queries on the data using our Azure Monitor integration


Woodgrove.png


Simplify building and testing expressions


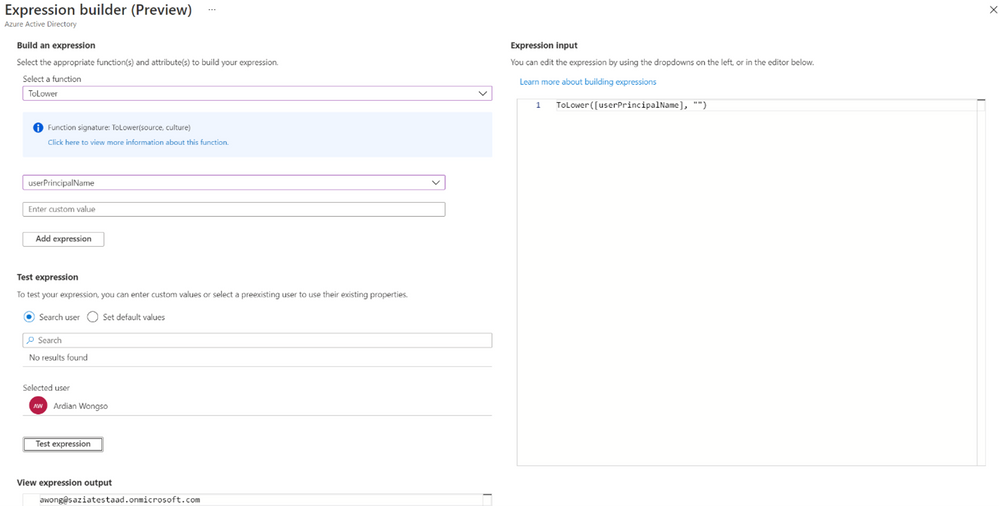
Azure AD’s provisioning service allows you to transform data prior to exporting it into a target system. In order to make it easier to build and test the expressions used to transform data, we’ve built an expression builder that is now available in public preview.  Learn more about it here, or visit our tips for general guidance on writing expressions.


Expression builder.png


 HR-driven provision updates for international assignments, gig economy workers, and cross-domain manager references


  • In large multi-national corporations, employees may temporarily work in international locations and return to their home base after the assignment is over. Typically HR creates a new user profile corresponding to this assignment, so we have updated our user provisioning integrations with Workday and SuccessFactors to support retrieval of international assignment data.

  • In today’s gig economy, we see a rise in conversion scenarios, wherein a full-time worker converts to a contingent worker or vice versa. When this happens, HR teams that use Workday deactivates the previous employment record and creates a new employment record that usually retains the previous employee ID. Classically, handling this scenario required manual intervention or creation of two separate Workday provisioning jobs to process full-time employees and contingent workers. With a recent update to our Workday integration, you can seamlessly handle this scenario so that the active employment record in Workday always takes over the ownership of the corresponding identity.

  • If you are integrating HR provisioning with multiple on-premises Active Directory (AD) domains, you may come across scenarios where the user is part of one AD domain and the user’s manager is part of another AD domain. Such cross-domain manager references can now be resolved with a recent update and you can also search for duplicate UPNs / samAccountName values across multiple domains. Learn more in our cloud HR planning guide.


A new version of Azure AD Connect sync is available


The latest version of Azure AD Connect sync has added the following capabilities:


  • Now supporting Selective Password hash Synchronization

  • A new Single Object Sync cmdlet helps you troubleshoot your Azure AD Connect sync configuration

  • Default to the V2 endpoint, which provides improved performance and allows for syncing of groups with more than 50,000 members.

  • A new built-in role, the Hybrid Identity Administrator, can be used for admins that are responsible for configuring the service.


Azure AD Connect cloud sync updated agent


With agent version # 1.1.359, Azure AD Connect cloud sync admins can now use GMSA cmdlets to set and reset their gMSA permission at a granular level. In addition, the limit of syncing members using group scope filtering has increased to 50,000 members. For more details on agent updates, including bug fixes, check out the version history.


As always, we’d love to hear your feedback or suggestions in the comments or on Twitter (@AzureAD).


Best regards, 


Alex Simons (@Alex_A_Simons)


Corporate VP of Program Management


Microsoft Identity Division


Learn more about Microsoft identity:


Managing Samsung DeX with Microsoft Endpoint Manager

Managing Samsung DeX with Microsoft Endpoint Manager

This article is contributed. See the original author and article here.

By Lothar Zeitler – Senior Program Manager | Microsoft Endpoint Manager – Intune


Mobile devices have become powerful enough to support various computationally intensive tasks. To help manage more complex projects, Samsung offers Samsung DeX, which creates a desktop experience for mobile users. With Samsung DeX, you can use mobile apps in desktop mode and work from your phone or tablet in a PC-like user interface. Samsung DeX is available on premium models. For more information and a list of supported devices, go to Samsung DeX (link to Samsung.com).


The Samsung DeX platform is an extension of Android Nougat‘s multi-window mode, which means that you can use almost any Android application in desktop mode on a supported device. However, to optimize desktop/DeX performance, developers might need to customize their application (see Optimizing your app on the Samsung website). Note that both application and device policies implemented with Microsoft Endpoint Manager will continue to work with DeX without modification.


To use Samsung DeX, you simply connect a USBC to HDMI cable to an external monitor. The DeX interface then appears on the screen via the video stream. You can also connect a mouse and keyboard to the mobile device via Bluetooth. Samsung DeX is also available as desktop (host) application for Windows and macOS, which allows you to work simultaneously between your mobile device and your computer.


IT administrators who manage mobile devices with Microsoft Intune can also use the service to manage Samsung DeX configurations. In this article, we will explain how to set up and configure DeX for managed Samsung devices in Intune.


Set up device management in Intune 


First, you will need to create an enrollment profile and set up a device group for Samsung devices that are corporate-owned with a work profile. For detailed instructions, see Set up Intune enrollment of Android Enterprise Corporate-Owned devices with a Work Profile.


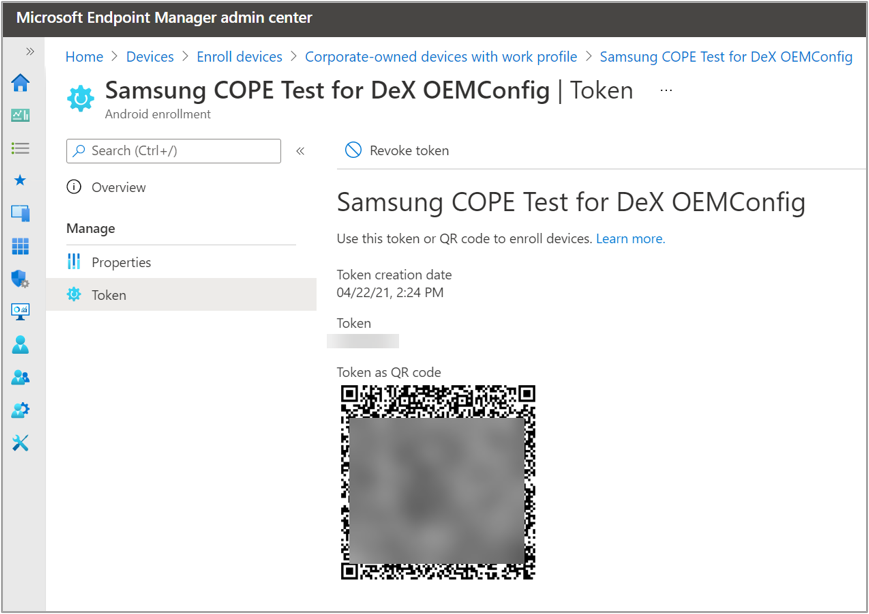
An example enrollment profile for “Corporate-owned devices with a work profile” looks like this:


Example enrollment profile for “Corporate-owned devices with a work profile”.Example enrollment profile for “Corporate-owned devices with a work profile”.


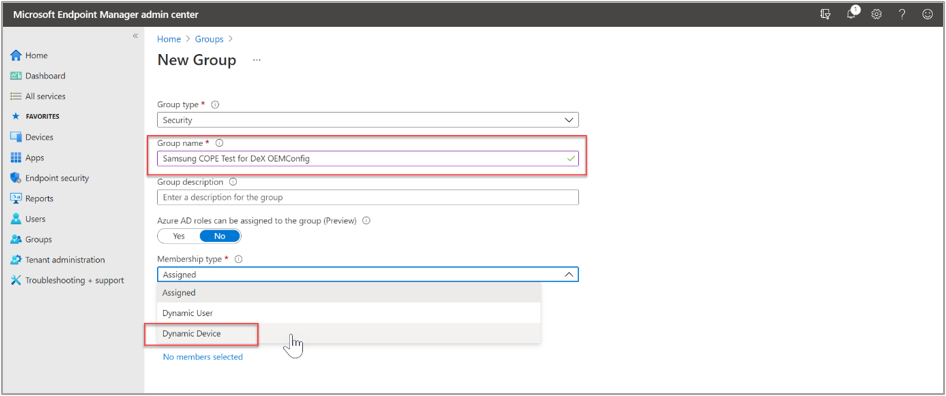
Next, we create a new device group to add all Samsung models with the same enrollment profile dynamically. We will use this dynamic group to assign policies, apps, and configurations, including the DeX configuration, to each new device that belongs to that group. We used the same enrollment profile name “Samsung COPE Test for DeX OEMConfig” for our device group. When you create this new group, make sure to select “Dynamic Device” in the Membership type field.


Example dynamic device group for DeX devices.Example dynamic device group for DeX devices.


As a membership criterion for the group, we use the name of the enrollment profile. We define the rule criteria under Dynamic device members > Add a dynamic query. Under Property, we select enrollmentProfileName then under Operator, select Equals, and under Value, we enter the profile name “Samsung COPE Test for DeX OEMConfig.


Example dynamic device query for the "Samsung COPE Test for DeX OEMConfig" profile.Example dynamic device query for the “Samsung COPE Test for DeX OEMConfig” profile.


Now, all devices that are enrolled with this profile in Intune automatically become members of our group.


Configure Samsung DeX settings


OEMConfig is an Android standard that we use to add, create, and customize OEM-specific settings, including DeX settings, for Android Enterprise devices. OEMConfig configuration settings are delivered to a device via an OEMConfig app. This section explains how to add an OEMConfig app and then create an OEMConfig profile.


Add the Knox Service Plugin app


Samsung offers the Knox Service Plugin (KSP) to help IT admins create and push app configurations to managed devices. To apply an OEMConfig configuration to a Samsung device, the KSP app must be installed first. The KSP app is available in Google Play and can be automatically deployed to devices using Intune.


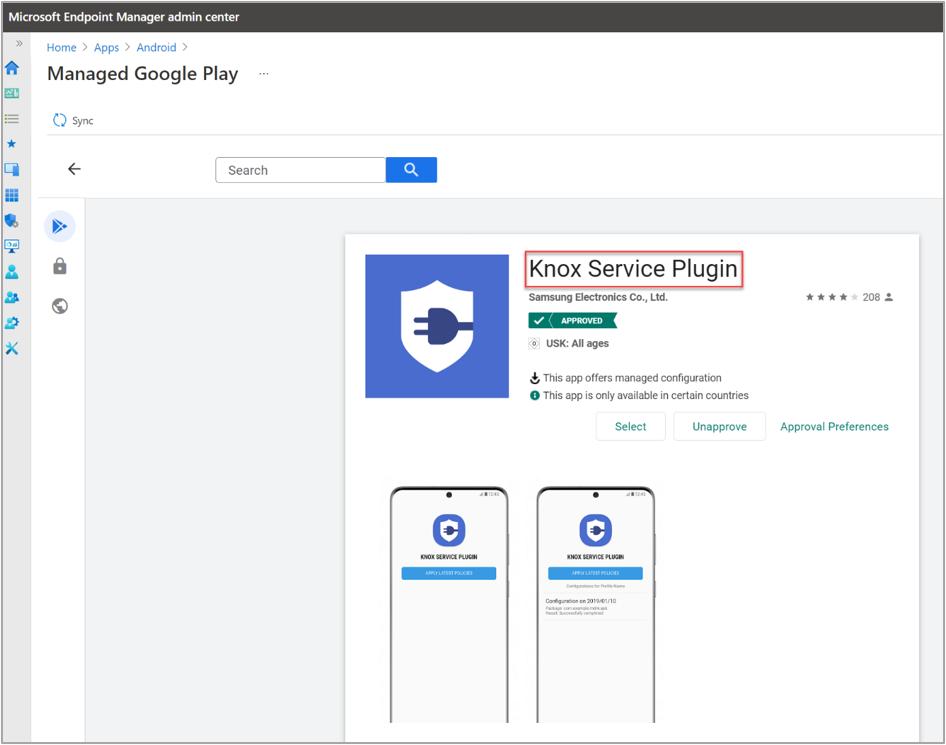
In the Microsoft Endpoint Manager admin center, add the KSP app via the Managed Google Play Store. For detailed instructions, see Add and assign Managed Google Play apps to Android Enterprise devices.


Adding the "Knox Service Plugin" via the Managed Google Play Store.Adding the “Knox Service Plugin” via the Managed Google Play Store.


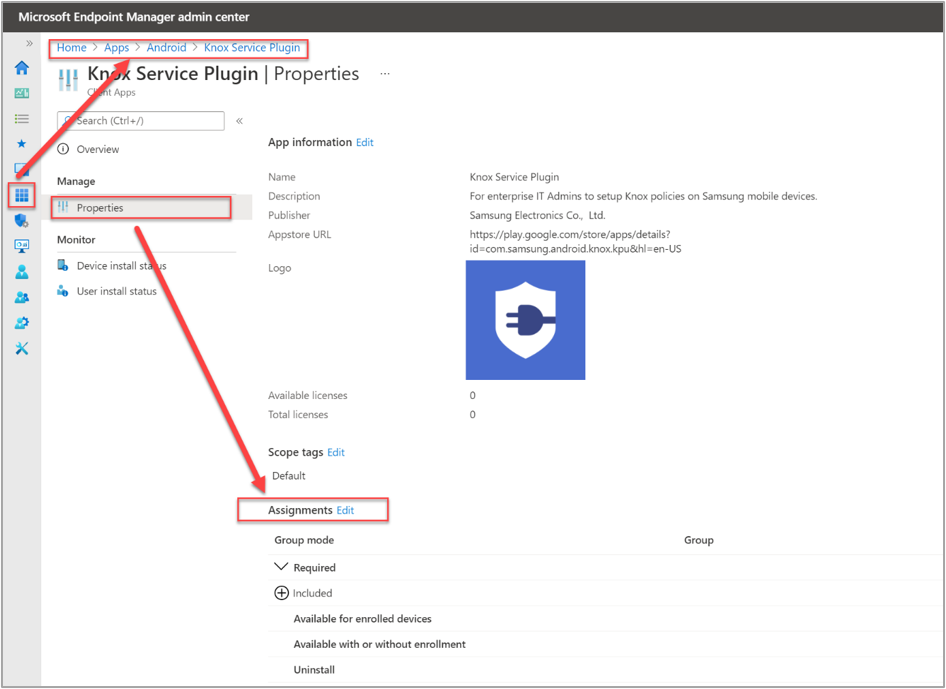
Once the KSP app is visible in the apps list in Intune, you can assign it to the device group. Navigate to Apps > Knox Service PlugIn > Properties > Assignments (select Edit).


Adding a new app assignment for the Knox Service Plugin app.Adding a new app assignment for the Knox Service Plugin app.


On the Edit application page under the Required option, we add the same device group we created earlierSamsung COPE Test for DeX OEMConfig. This will enforce mandatory install of the app on any device in the groupFor detailed instructions, see Assign apps to groups with Microsoft Intune.


After device is enrolled using the QR code and the applicable profile, the KSP app is automatically installed. Once installedthe OEMConfig policy will be assigned to the device.


Create and assign an OEMConfig policy


We typically use OEMConfig to configure settings that aren’t built into Intune, and the available settings depend on what the original equipment manufacturer (OEM) includes in their OEMConfig app. For detailed information on OEMConfig policies, see Use and manage Android Enterprise devices with OEMConfig in Microsoft Intune.


First, we need to create an Android Enterprise configuration profile with the type OEMConfig.


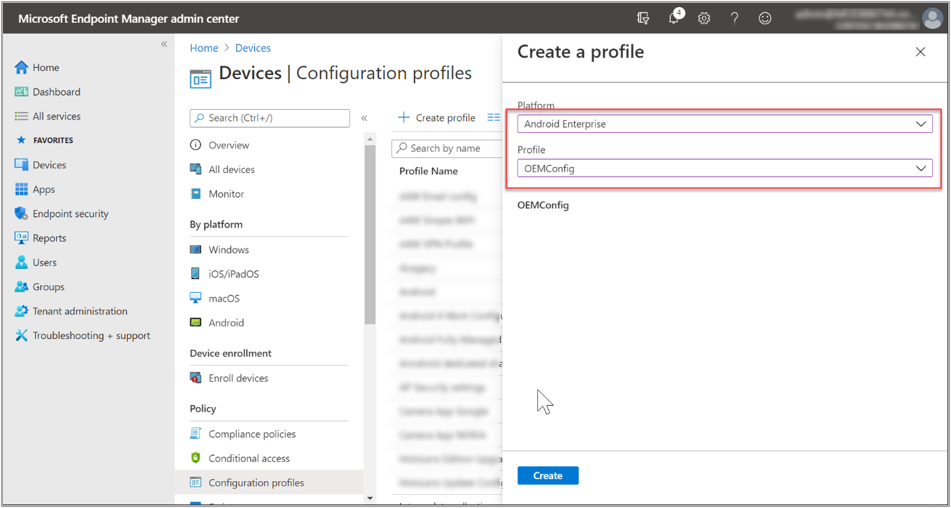
Creating a new Android Enterprise OEMConfig configuration policy.Creating a new Android Enterprise OEMConfig configuration policy.


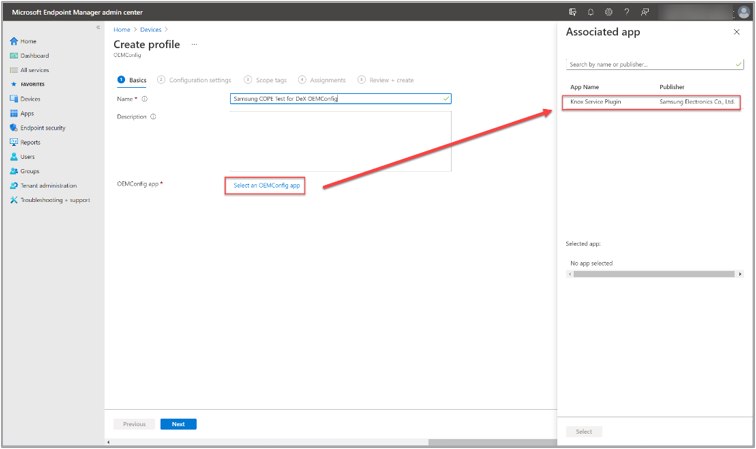
We continue to use the same name as the enrollment profile for the OEMConfig profile: “Samsung COPE Test for DeX OEMConfig,” and then select the Knox Service Plugin as the OEMConfig app, which means it is the designated app to deploy the OEMConfig profile to devices.


Assigning the Known Service Plugin to the newly created OEMConfig profile.Assigning the Known Service Plugin to the newly created OEMConfig profile.


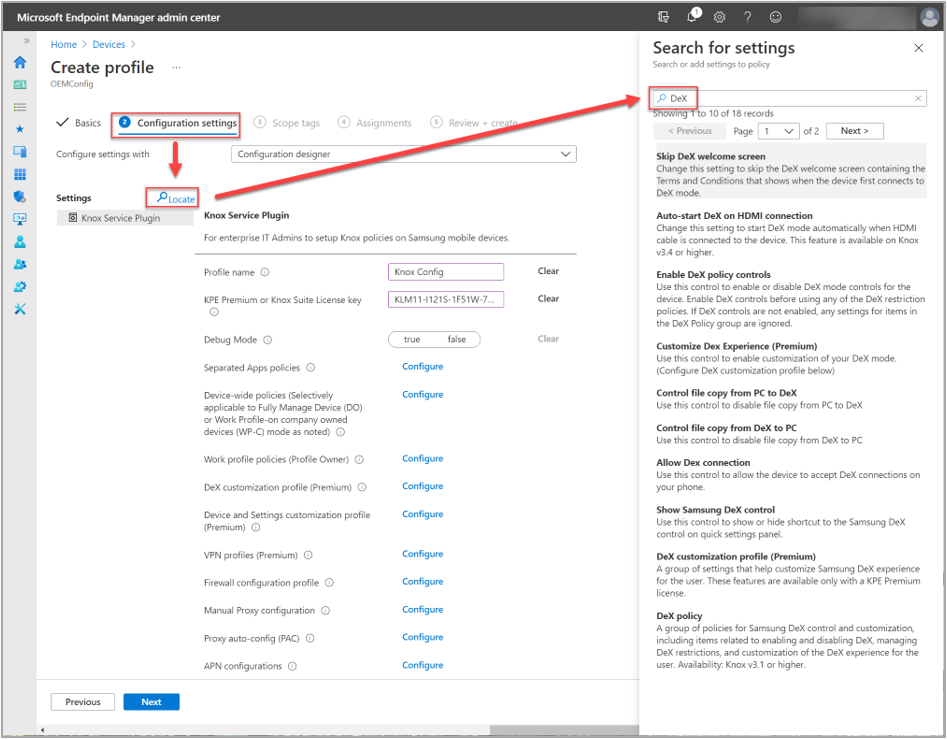
On the Configuration settings page, we search for DeX settings (select the Locate search link). This will show us all available DeX settings that we might want to configure later. You can configure additional settings in the profile, beyond the DeX configuration. There are different parameters and options for each item in the profile configuration settings. 


Clicking on the "Locate" search link to show all available DeX settings.Clicking on the “Locate” search link to show all available DeX settings.


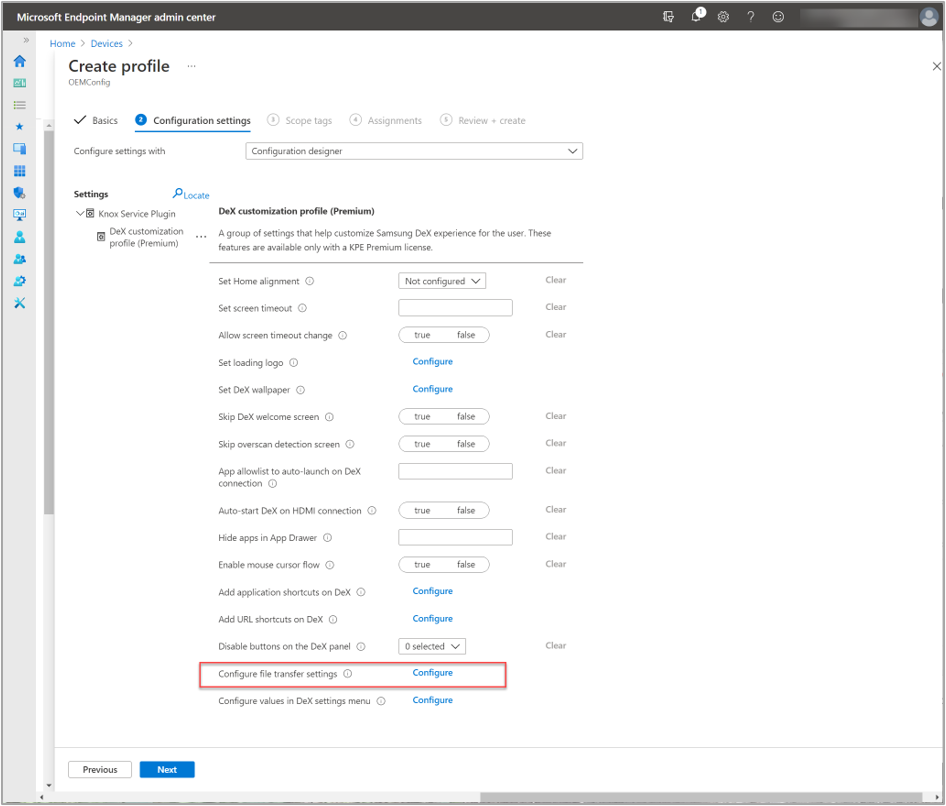
In our example scenario, we want to use the DeX for Windows application to display the DeX interface on the PC when connecting the device, and we also want to use the PC keyboard and mouse. With this setup, a user can easily copy data between a PC and DeX device. You can allow or block the direction of data flow, i.e., PC → DeX or DeX → PC, can under Configure file transfer settings, as shown below.


Example of all available DeX customization options with the "Configure file transfer settings" highlighted.Example of all available DeX customization options with the “Configure file transfer settings” highlighted.


As a next step, we want to configure the connection settings and use a custom background picture.


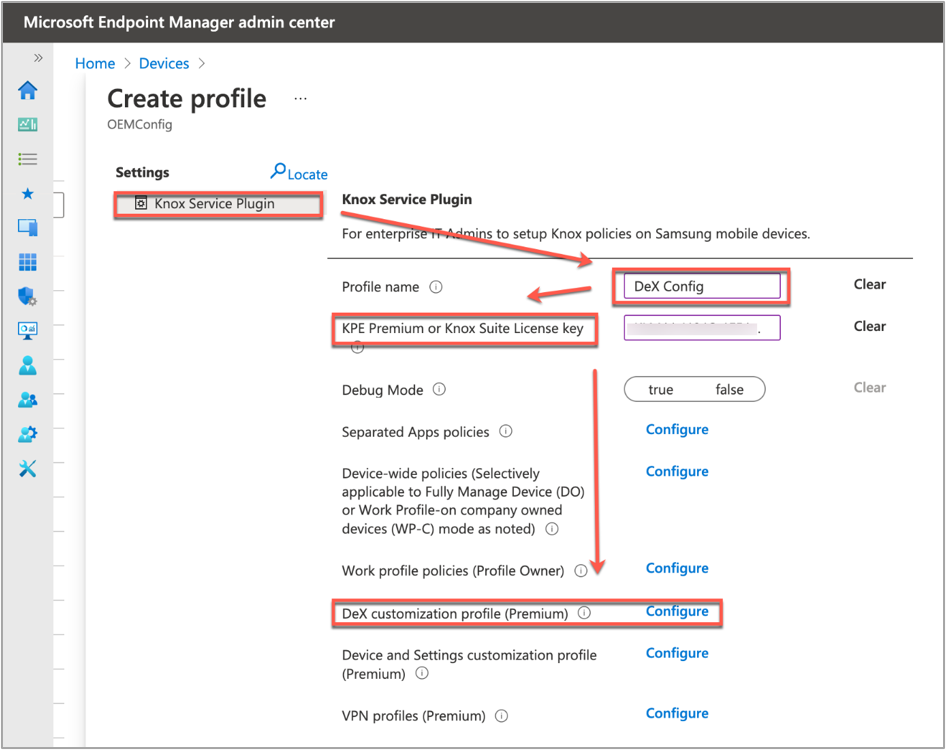
We will now create an OEMConfig policy called “Samsung COPE Test for DeX OEMConfig. First, we define a profile nameDeX Config. For our example, we will also add a Knox license key for the E-FOTA service.


Creating a new OEMConfig policy named "Samsung COPE Test for DeX OEMConfig".Creating a new OEMConfig policy named “Samsung COPE Test for DeX OEMConfig”.


The DeX customization profile (Premium) item takes us to the list of configuration options for DeX. First, we set the Auto-start DeX on HDMI connection to True, which will configure DeX to start automatically when an HDMI connection is established. We also set the Enable Mouse Cursor Flow option to True, which will enable mouse movements between the connected screen and the DeX device.


Configured settings under the "DeX customization profile (Premium)" setting.Configured settings under the “DeX customization profile (Premium)” setting.


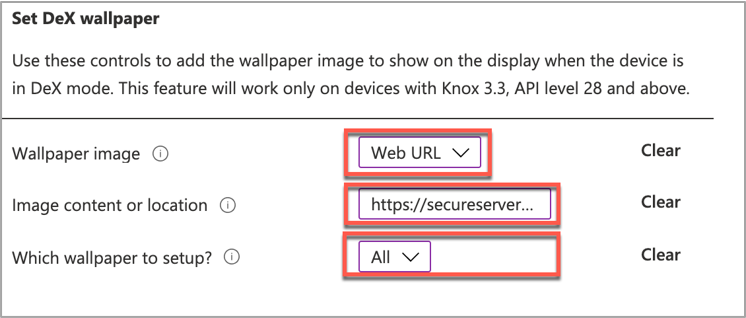
Next, we will set a custom wallpaper image that will show when a device is in DeX mode. Under the Set DeX Wallpaper, we select a Web URL for the Wallpaper Image, enter the image’s URL, and then choose when to display the wallpaper should be changed (option: Which Wallpaper to setup? AllOn lock screenOn system or Not configured).


Configuring a custom wallpaper image that will show when a device is in DeX mode.Configuring a custom wallpaper image that will show when a device is in DeX mode.


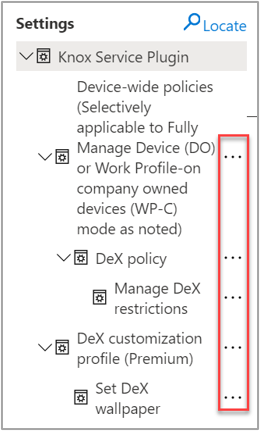
Note: To edit previous KSP configuration settings, select the ellipses next to an item (…).


To edit previous KSP configuration settings, select the "ellipses" button next to an item.To edit previous KSP configuration settings, select the “ellipses” button next to an item.


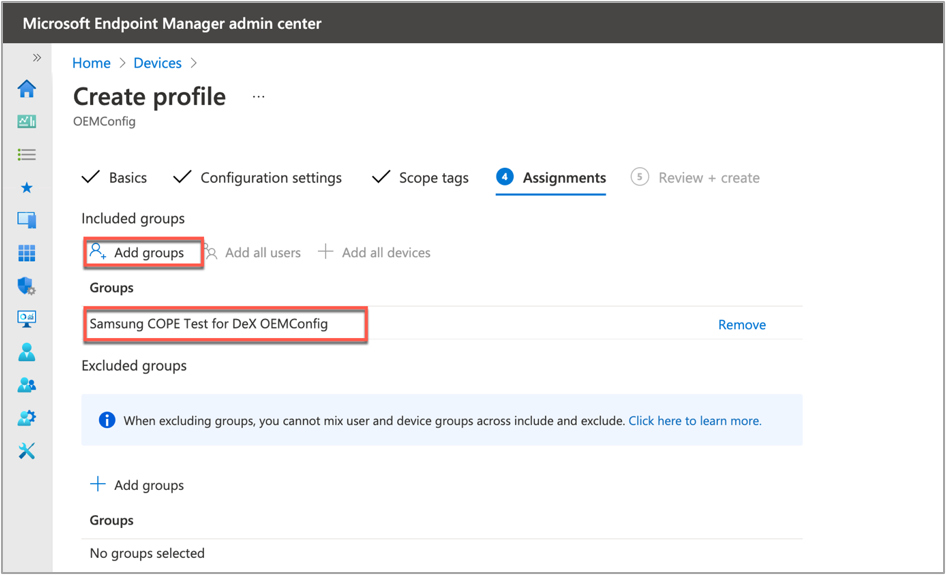
Once the DeX configuration is complete, we select Next twice. Then, under Add Groups, select the group “Samsung COPE Test for DeX OEMConfig” that we previously created.


Assigning a group under a new OEMConfig profile.Assigning a group under a new OEMConfig profile.


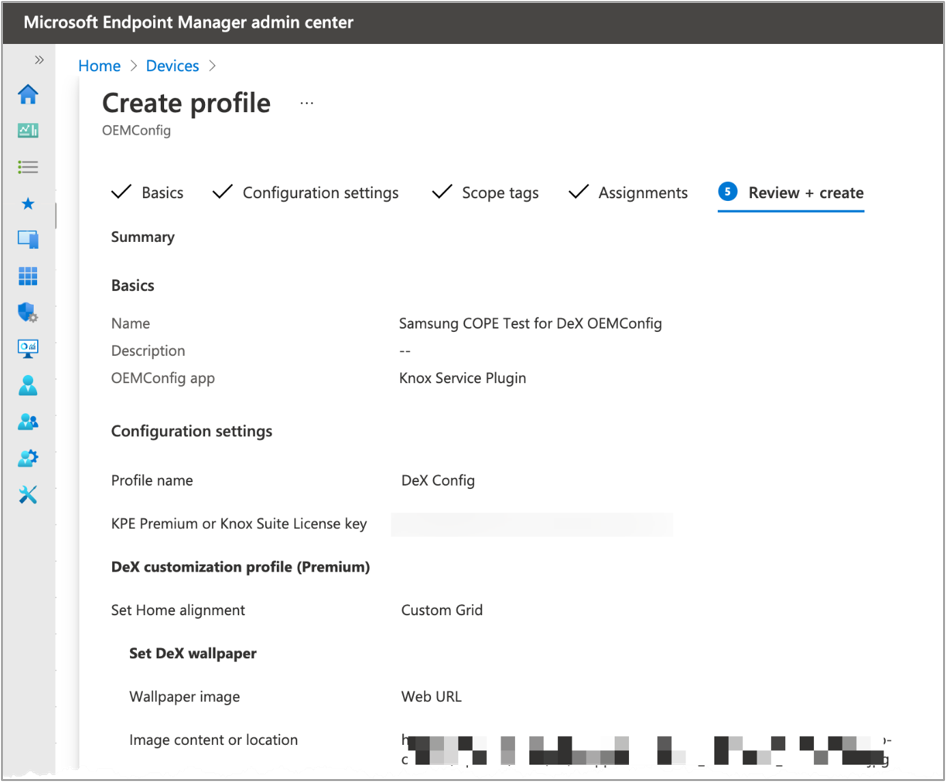
On the summary page, review the settings and select Create to create the profile.


Summary page of a new OEMConfig profile.Summary page of a new OEMConfig profile.


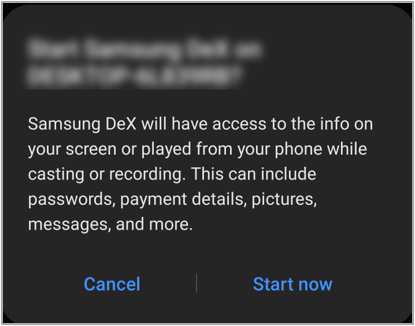
The configuration is now ready to use. When you connect a DeX device, a connection dialog appears.


Connection dialog example when connecting a new DeX device to your device.Connection dialog example when connecting a new DeX device to your device.


Select Start Now to establish a connection to the external device or screen and start the DeX interface.  


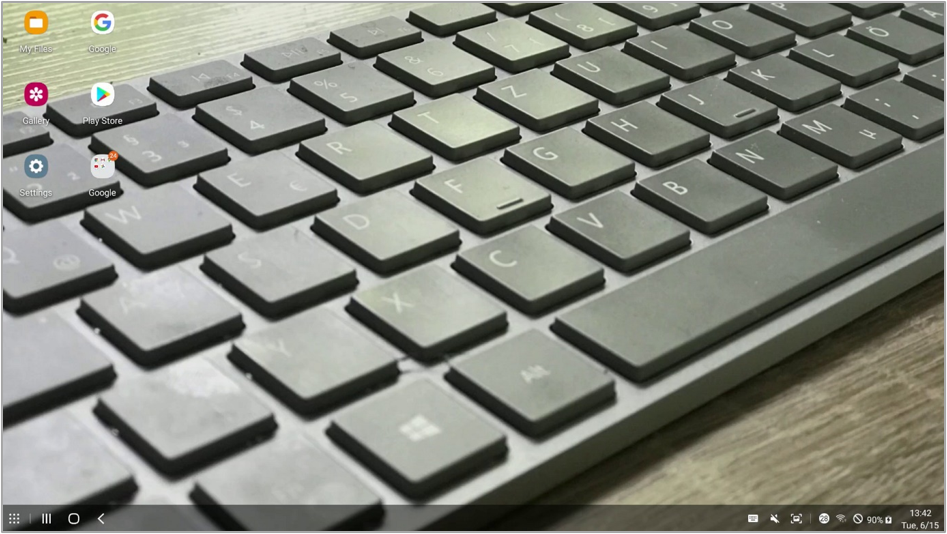
Wallpaper configuration example from a recently connected DeX device that received the configured OEMConfig.Wallpaper configuration example from a recently connected DeX device that received the configured OEMConfig.


Note: The wallpaper configuration in the OEMConfig, like other settings too, is dynamic. When you change the image source in the settings, the wallpaper will change.


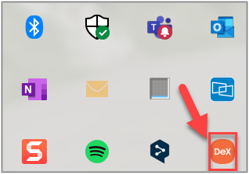
Note: If you want to use the DeX host application, you must first install the software on the PC. When a DeX device connects to the PC, the DeX icon will appear in the tray.


Example of the DeX icon in the Windows system tray when a DeX device connects to the PC.Example of the DeX icon in the Windows system tray when a DeX device connects to the PC.


Tips for using OEMConfig and DeX


When using OEMConfig and DeX, there are a few considerations and practices to keep in mind.


OEMConfig variations


OEMConfig is a functionality that is available as part of Android Enterprise. Almost all OEMs provide an app to support devicespecific configurations. However, the set of options varies from OEM to OEM.


Debug mode


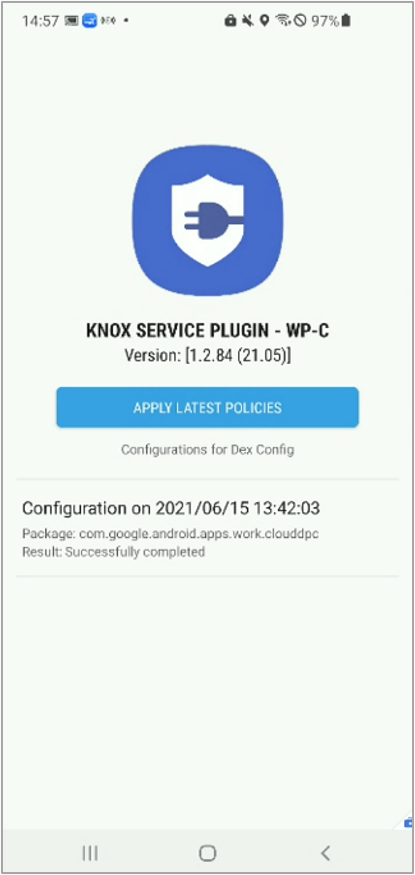
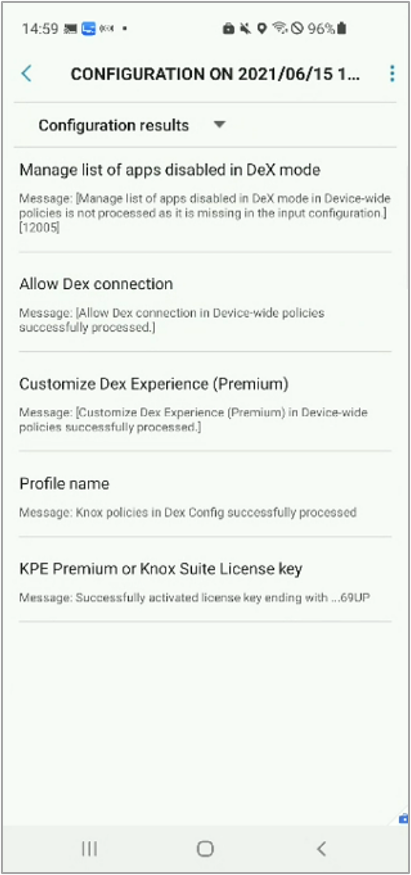
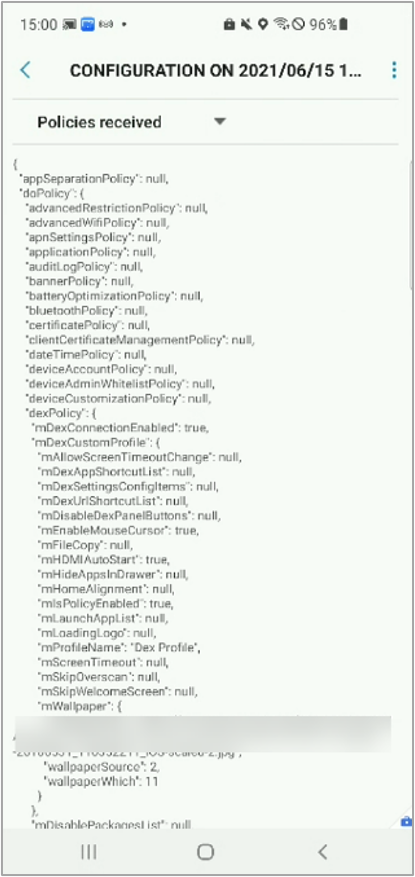
Samsung has an optional OEMConfig setting for debug mode. In debug mode, the KSP app remains visible and active on the device to facilitate troubleshooting.


KSP Debug Mode KSP Configuration KSP Profile
Screenshot of the Knox Service Plugin in Debug Mode on a DeX device.Screenshot of the Knox Service Plugin in Debug Mode on a DeX device. Screenshot of the Knox Service Plugin and configurations applied on a DeX device.Screenshot of the Knox Service Plugin and configurations applied on a DeX device. Screenshot of the Knox Service Plugin and configured settings on a DeX device.Screenshot of the Knox Service Plugin and configured settings on a DeX device.


Error messages


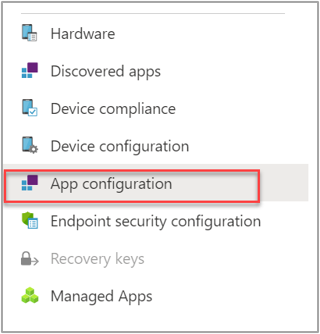
OEMConfig error messages are displayed in the Microsoft Endpoint Manager admin center. Select Devices > All devices, choose the device from the list, and then go to App Configuration.


Screenshot of the "App configuration" blade in the Microsoft Endpoint Manager admin center.Screenshot of the “App configuration” blade in the Microsoft Endpoint Manager admin center.


Note: The error messages in the admin center are identical to the messages created by the KSP app. You can find a list of error messages in the Samsung Knox documentation.


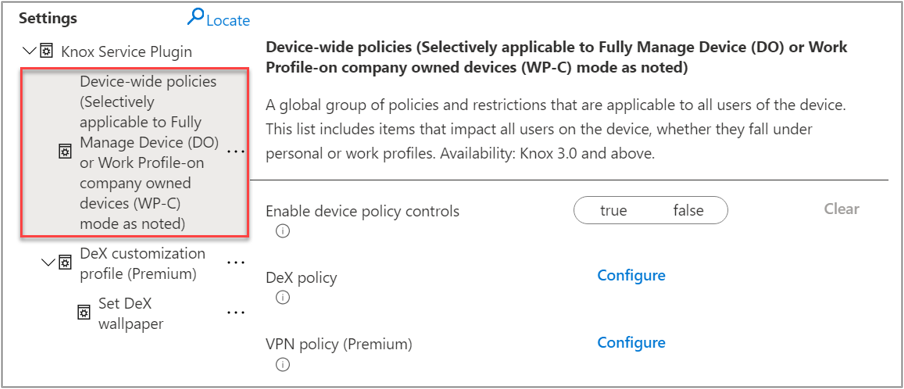
Device-wide policies


You can apply some DeX policies to all users on the device, regardless of work profile and personal settings. You’ll find these settings under the Know Service Plugin settings, as shown below.


Screenshot of an sample OEMConfig and highlighted example of the "Device-wide policies" that can be targeted to DeX devices.Screenshot of an sample OEMConfig and highlighted example of the “Device-wide policies” that can be targeted to DeX devices.


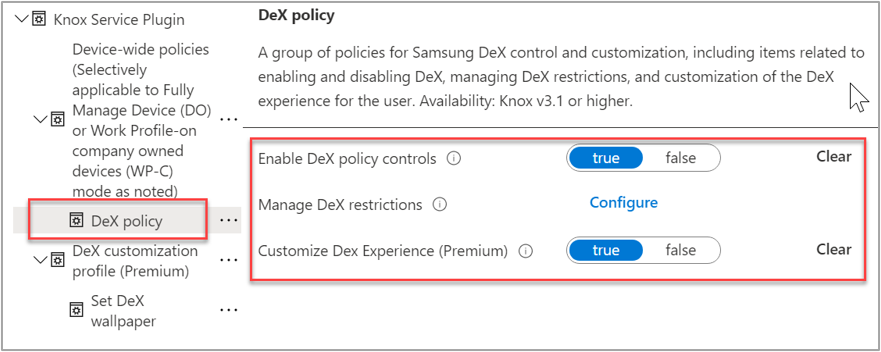
Expand this section to find the device-wide DeX policies.


Screenshot of an sample OEMConfig and an expanded "DeX policy" section to find device-wide policies.Screenshot of an sample OEMConfig and an expanded “DeX policy” section to find device-wide policies.


Now that you have a better understanding of how to manage Samsung DeX devices in Microsoft Intune, you can help your company take advantage of this technology. If you have any questions, reply to this post or reach out to @IntuneSuppTeam on Twitter.

Track and Record Data Changes with Change Data Capture (CDC) in Azure SQL | Data Exposed

This article is contributed. See the original author and article here.

Whether it’s for reporting and offloading queries from production, there are things you need to keep in mind when using a Geo Replicated Azure SQL Database Readable Secondary. Discuss with MVP Monica Rathbun the challenges when it comes to performance tuning, what to keep in mind, and what to expect.


Watch on Data Exposed


Resources:

June Project Update Blog

June Project Update Blog

This article is contributed. See the original author and article here.

Your feedback informs us on what you want added, improved, and enhanced in Project for the web.  As you may be aware, UserVoice will be retired at the end of June 2021. We value your input and want to keep the momentum of our conversations going. Please continue to provide us your suggestions either within the app or in the comment section below.  


The updates for June are as follows:  


New Features 


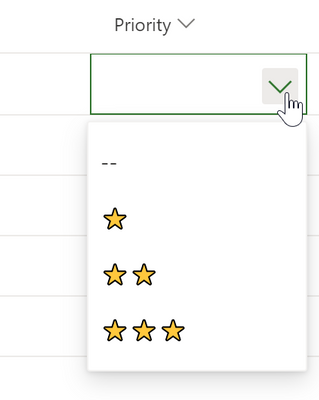
  • Choice Custom Fields: Create custom fields that allow you to quickly choose from several pre-set options. To learn more about these new fields, check out our blog post here 


MicrosoftProjectTeam_0-1625153574236.png


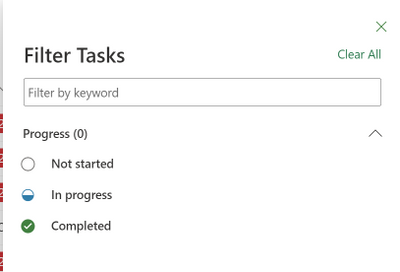
  • Filter by Progress States: Filter your projects so you only can see your Not startedIn progress or Completed tasks. Hide tasks that aren’t applicable to your work right now!  


MicrosoftProjectTeam_1-1625153574238.png


  • Filter on the Board & Timeline: Quickly find your tasks by filtering your tasks on Board & Timeline by keyword or assignee. 

  • Import from Project desktop: Users can import .mpp files from Project desktop to Project for the web. This functionality is available to all users, and you can learn more about how to use this feature by reading our blog post here. 


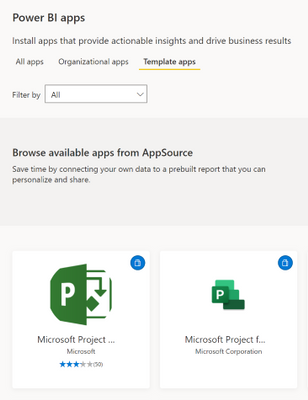
  • Project Power BI Template App: The Project Power BI Template is now available as an app accessible from Power BI or on App Source (Microsoft Project for the Web) 


MicrosoftProjectTeam_2-1625153574245.png


  • Copy link to task improvements: When you copy a link to your task, the link will be shown with the task name as the URL.  


Upcoming Features 


  • Assign tasks to non-group members:  Assign tasks to add anyone in your organization to your project automatically.  


  • Rollup Custom Fields: Add summary, average, max, or minimum calculations to your numeric custom fields. See the rollup value of all your subtasks in your summary task field. 


Microsoft Project Trivia! 


Last Month: 


  • Question: In project management, milestones often represent significant events that happen during the project process. How can you create milestones in Project for the web? 

  • Answer: You can create a milestone by setting your task’s duration to 0 days. 


This Month: 


  • Question: Users of Project for the web can use the Board view as a Kanban Board for work management. What language does the word Kanban originate from, and what does it mean in that language?