STIGing Made Easy – Microsoft Endpoint Manager

STIGing Made Easy – Microsoft Endpoint Manager

This article is contributed. See the original author and article here.

Introduction


This is John Barbare and I am a Sr Customer Engineer at Microsoft focusing on all things in the Cybersecurity space. With my large customer base in the Microsoft Federal space and having to comply with internal security baselines and moving to a cloud-centric platform to manage devices, it is important to know if the baselines/settings will carry over. In this article, I will explain and show how to import an on-premises baseline Group Policy Objects (GPO) into Microsoft Endpoint Manager (MEM) and see the settings that directly carry over and how to create a policy for the ones that are not MDM compliant. With that said, let’s import several baselines and see the correlation from on-premises to MEM mapping and see how we can make the move to the cloud that much easier.


What is Microsoft Security Baselines and/or STIGs?


Security baselines are a group of Microsoft-recommended configuration settings which explain their security impact. These settings are based on feedback from Microsoft security engineering teams, product groups, partners, and customers. Certain Federal agencies and other Department of Defense (DoD) entities have created their own internal and also publicly available baselines or better known as Security Technical Implementation Guides (STIGs). At the end of this article, I will reference several publicly available Federal baselines/STIGs to download and implement in your organization if you are not already using a stringent baseline as of today. If you are a State/Federal/DoD agency and use MEM, feel free to follow along with your tenant as this demo was performed in IL5 before writing this article below in my private Microsoft tenant.


Importing STIGs in Microsoft Endpoint Manager


This article assumes you have enrolled or are going to enroll devices in MEM and we want to check to make sure your tenant status is green on the home page before continuing. Navigate to Microsoft Endpoint Manager and log in with your credentials. Once logged in you will arrive at the home page.


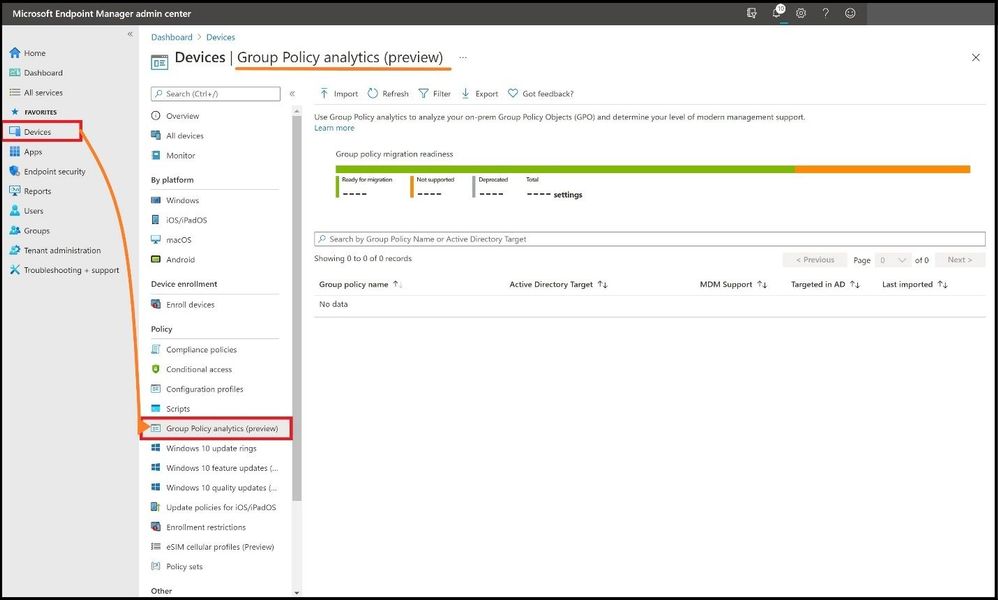
Select “Devices” and then “Group Policy analytics” to land on the policy page to perform the import of the STIGs we are going to analyze. This feature will allow you or your enterprise to analyze your on-premises GPOs and determine the level of MEM support.


Group Policy AnalyticsGroup Policy Analytics


I have already downloaded the most current STIGs (Apr 2021) as seen below from the public page of the Department of Defense (DoD) Cyber Exchange hosted by the Defense Information Systems Agency (DISA).
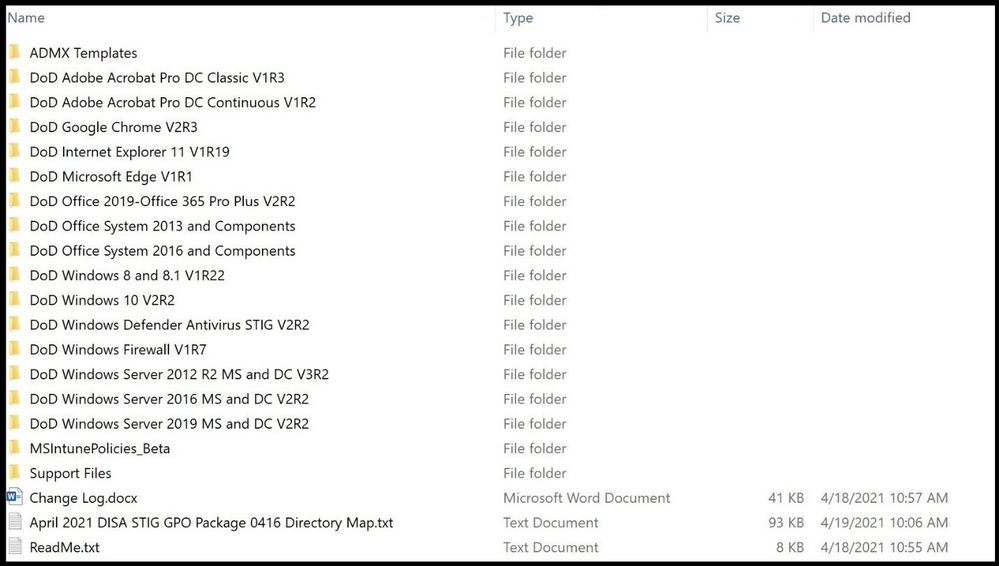


DISA STIGsDISA STIGs


Next, I will go into the DoD Windows 10 V2R2 folder and locate and confirm the gpreport.xml file is present as we will be using this file for the import. Two GPOs exist in this folder and we will be importing both (User and Computer). I will also go into the DoD Microsoft Edge V1R1 folder and locate and confirm the gpreport.xml file is present as I will also use this file for the import in addition to the other STIGs.


If your enterprise has its own internal STIGs, you would just open GPMC.msc, right-click on the STIGed GPO, and then do a “save report” and name “gpreport” and then selecting “XML” as the output and not HTML. DISA is nice enough to provide the STIGed gpreport.xml file for what we want to accomplish in each folder, so it makes it that much easier.


Selecting the gpreport.xmlSelecting the gpreport.xml


Next, we will import the three STIGs in the next several steps.


(Step 1) I will go back to the Group Policy Analytics page in MEM and (step 2) select the import icon at the top. (Step 3) This will bring out the flyout card and I will select the folder icon to import each gpreport.xml. (Step 4) I will locate and select each gpreport.xml in the three folders and (Step 5) select open each time.
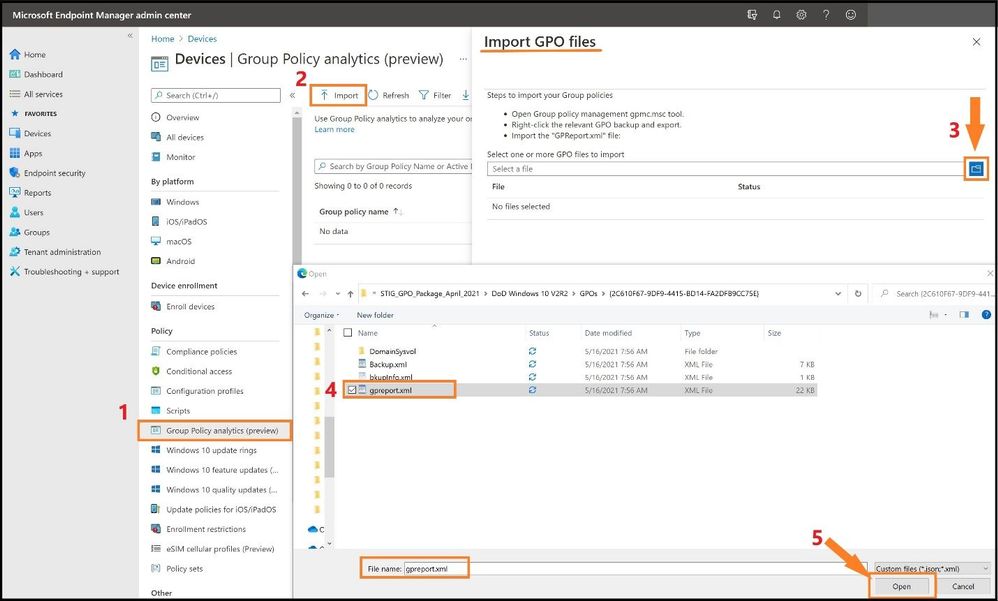


Importing the STIGsImporting the STIGs


Note: Check the sizes of any GPO XML files that you import (STIGs or any baseline XML file). A single GPO cannot be larger than 750 kB. If the GPO is larger than 750 kB, the import process will fail. Any XML files without the appropriate Unicode ending will also fail the process. See below for failure errors.
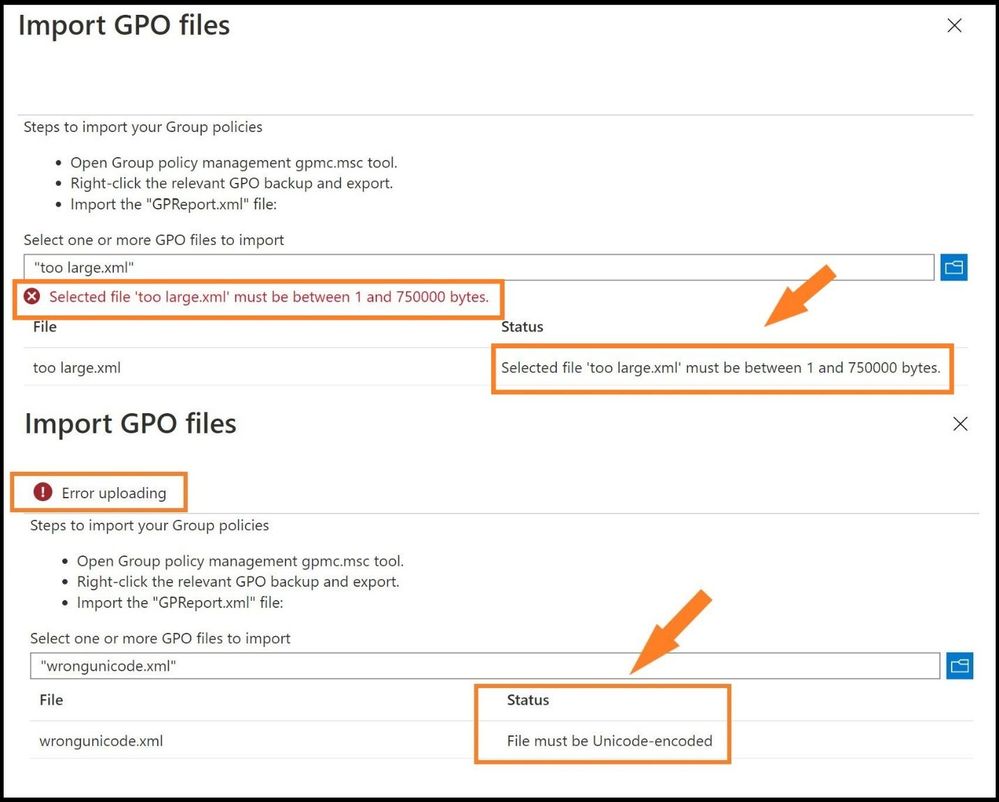


ErrorsErrors


When all three STIGs from the respective GPO folders I targeted are successfully imported, it will list the following information:


  1. Group Policy name: This name is automatically generated using the information inside the GPO.

  2. Active Directory Target: The target is automatically generated using the organizational unit (OU) target information in inside the GPO.

  3. MDM Support: Displays the percentage of group policy settings in the GPO that has the same setting in MEM.

  4. Targeted in AD: Yes, means the GPO is linked to an OU in on-premises group policy. No means the GPO is not linked to an on-premises OU.

  5. Last imported: Shows the date/time stamp of the last import.

  6. Delete: Three dots on the end to delete the imported GPO (RBAC dependent).
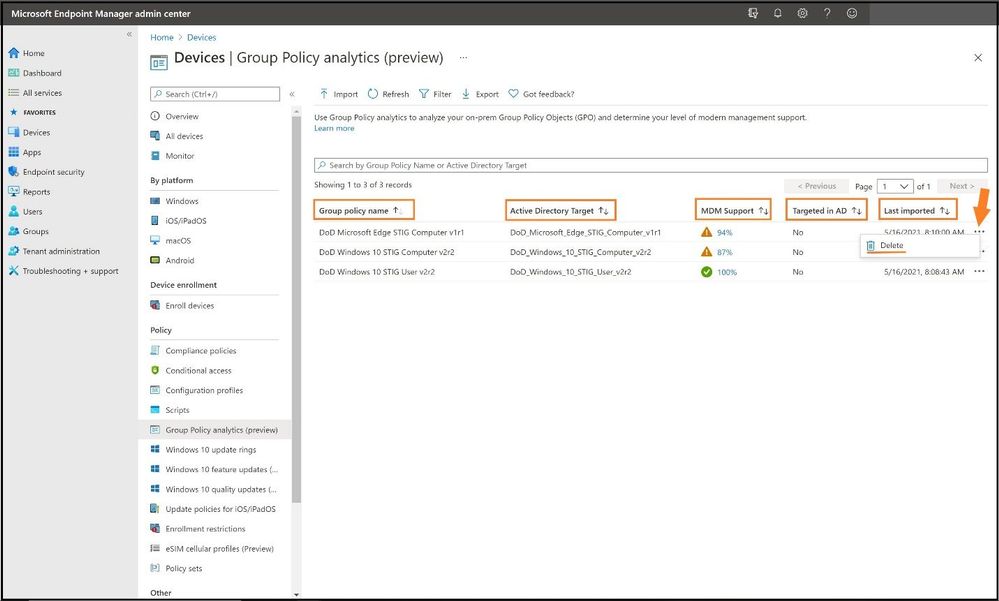


After Importing the STOGsAfter Importing the STOGs


As one can see, all three STIGs were successfully imported in MEM Group Policy analytics showing the percentage of MDM support. Next, we will have to see what STIG settings do not have MDM support and then add them in.


We will select the second STIG, DoD Windows 10 STIG Computer v2r2, by clicking on the blue 87% under MDM Support. This will show which STIGs are mapped and which are not and more detail about each GPO. The details will display the following:


  1. Setting Name: The name is automatically generated using the information in the GPO setting.

  2. Group Policy Setting Category: This shows the setting category for ADMX settings, such as Internet Explorer and Microsoft Edge. Not all settings have a setting category.

  3. ADMX SupportYes, means there is an ADMX template for this setting. No means there is not an ADMX template for the specific setting.

  4. MDM SupportYes, means there is a matching setting available in Endpoint Manager. You can configure this setting in a device configuration profile. Settings in device configuration profiles are mapped to Windows CSPs. No means there is not a matching setting available to MDM providers, including Intune.

  5. Value: This shows the value imported from the GPO. It shows different values, true, false, enabled, disabled, etc.

  6. Scope: This shows if the imported GPO targets users or targets devices.

  7. Min OS Version: This shows the minimum Windows OS version build numbers that the GPO setting applies. It may show 18362 (1903), 17130 (1803), and other Windows 10 versions. For example, if a policy setting shows 18362, then the setting supports build 18362 and newer builds.

  8. CSP Name: A Configuration Service Provider (CSP) exposes device configuration settings in Windows 10. This column shows the CSP that includes the setting. For example, you may see Policy, BitLocker, PassportforWork, etc.

  9. CSP Mapping: This shows the OMA-URI path for the on-premises policy. You can relate this to the MDM version of GPOs.
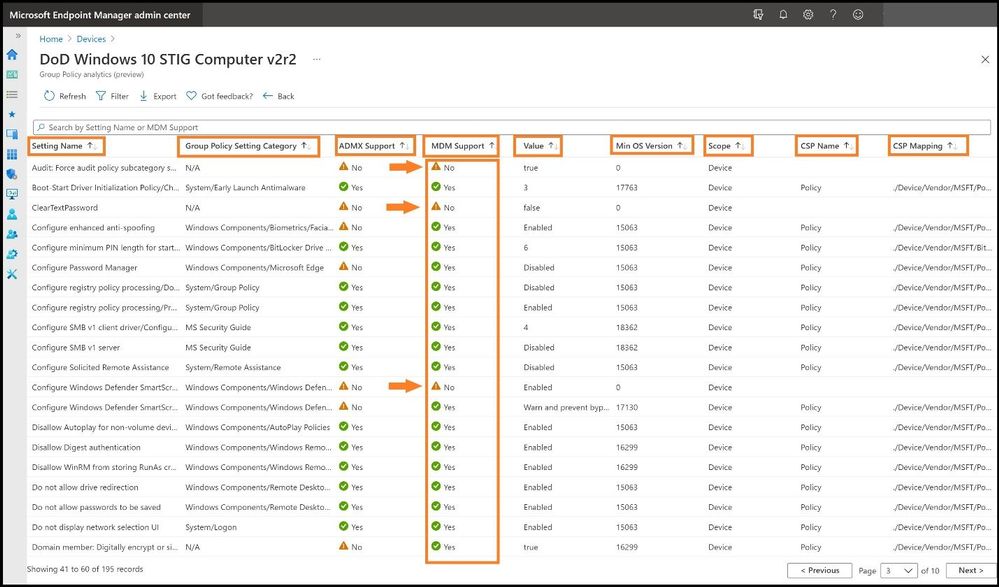


STIGs and MDM SupportSTIGs and MDM Support


Under the MDM support column, we can see several that are not mapped in MEM/no MDM support. To add these into MEM, we need to create a custom configuration profile.


Creating a Custom Configuration Profile for Non-Mapped STIGed GPOs


After you have created the direct mapping of all the STIGed GPOs in a Configuration policy, you will need to create a custom policy for the ones that did not match or either do not have MDM support.


Select Configuration profiles, Create a profile, and for Platform select Windows 10 and later. For profile type, we will select Templates and choose Custom from the list and select create.
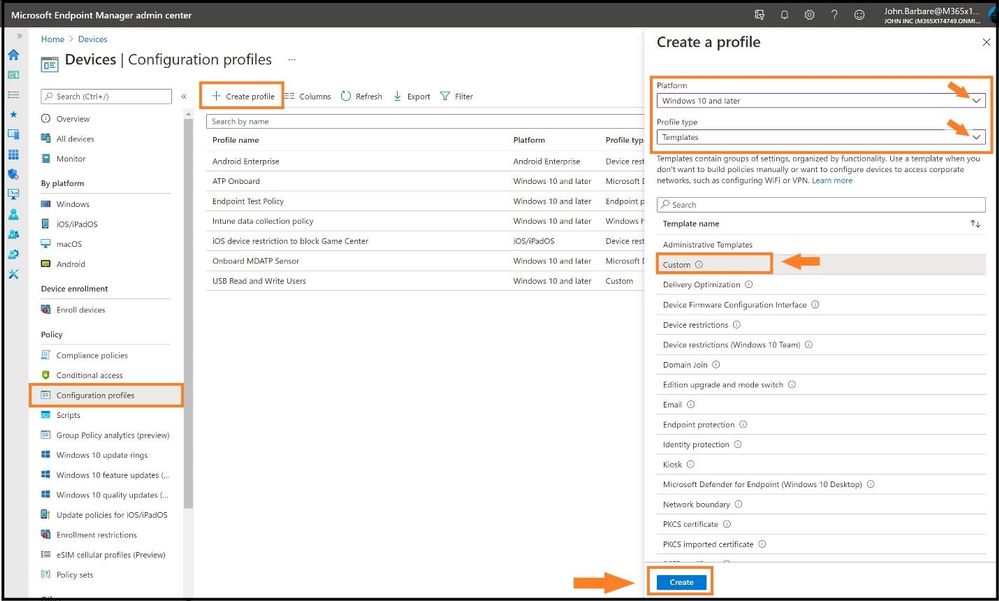


Creating a Custom ProfileCreating a Custom Profile


This will bring us to the custom policy page to create the policy so we can map the STIG to MEM/MDM. Go ahead create a name for the policy and select next. For Configuration settings, select Add, and then we will need to fill in the appropriate information for the policy. The name and description should be the policy you are creating. Next, we need to find the correct OMA-URI path and data type as this must match perfectly or it will not map.
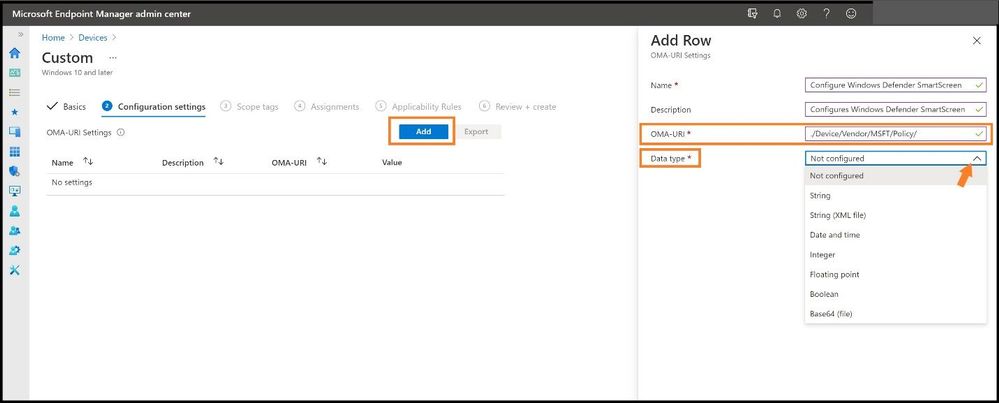


Selecting the Data TypeSelecting the Data Type


To find the OMA-URI path to map, you will need to use the Policy configuration service provider page from Microsoft Docs to find the setting for the path. Since this a Windows 10 policy, it will start with ./Device/Vendor/MSFT/Policy/Config/ but we will need the path after the Config/. After we go to the link, we search for the setting for “Windows Defender SmartScreen” and we can find the rest of the path as seen below. The full value for the OMA-URI path will be:


./Device/Vendor/MSFT/Policy/Config/SmartScreen/EnableSmartScreenInShell


Down at the bottom, we have values of 0 and 1 and this tells me this will be an integer value for the Data Type drop-down menu and we use 1 as the value.
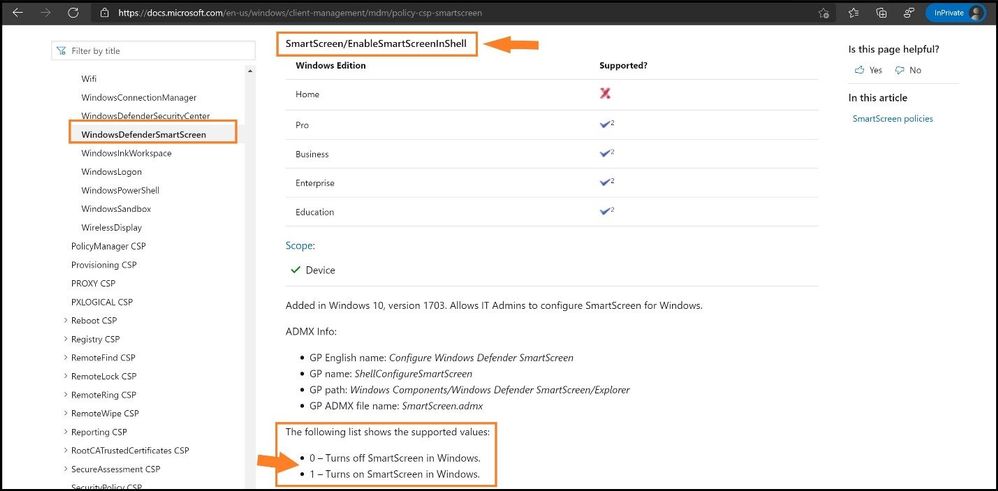


Finding the path on Microsoft DocsFinding the path on Microsoft Docs


With these pieces of information, we can apply these values found from the docs page into the correct settings as seen below.
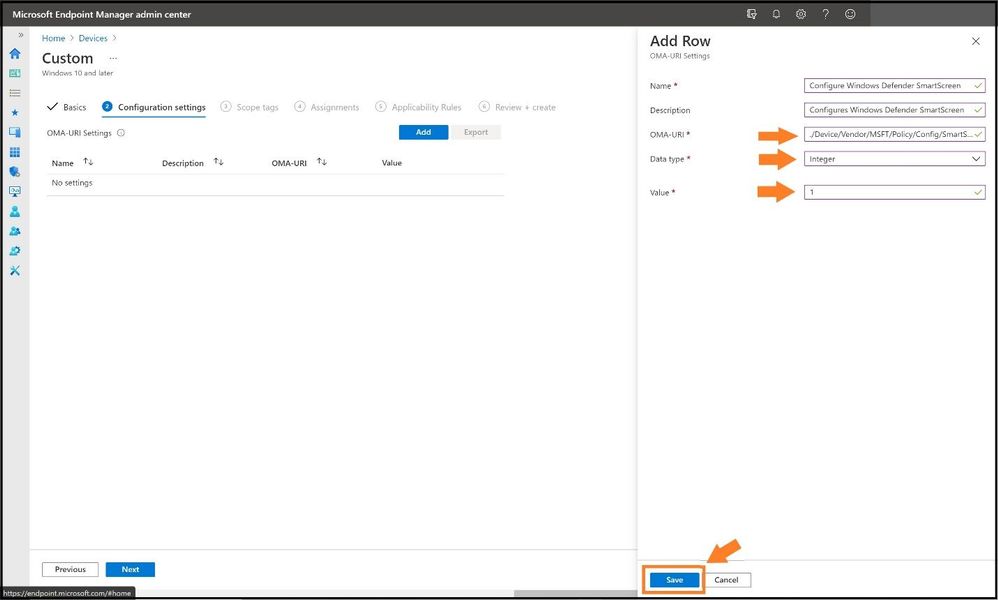


Confirming the RowsConfirming the Rows


Go ahead and select save and then continue to add more for the ones that are not MDM compliant by selecting add again. When finished, it will display a list after you have added the ones needed and also to confirm. Go ahead and select next.
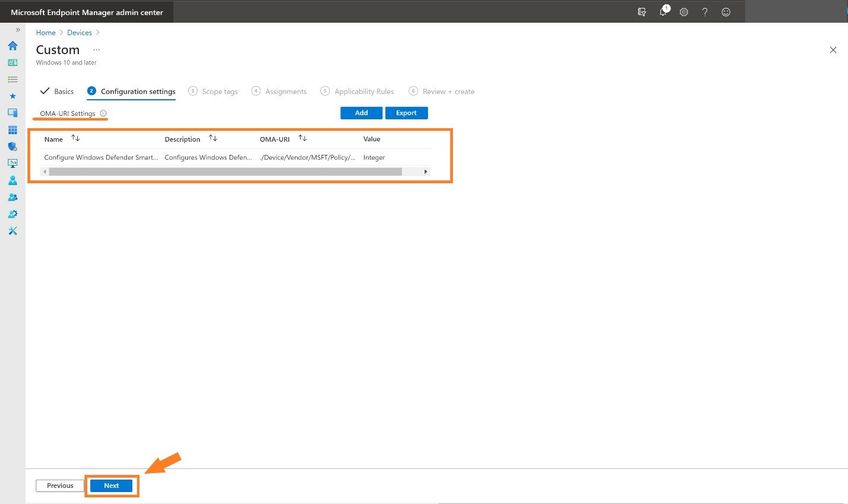


John_Barbare_11-1623076370845.jpeg


Select the groups you want the policy to apply to and select next.
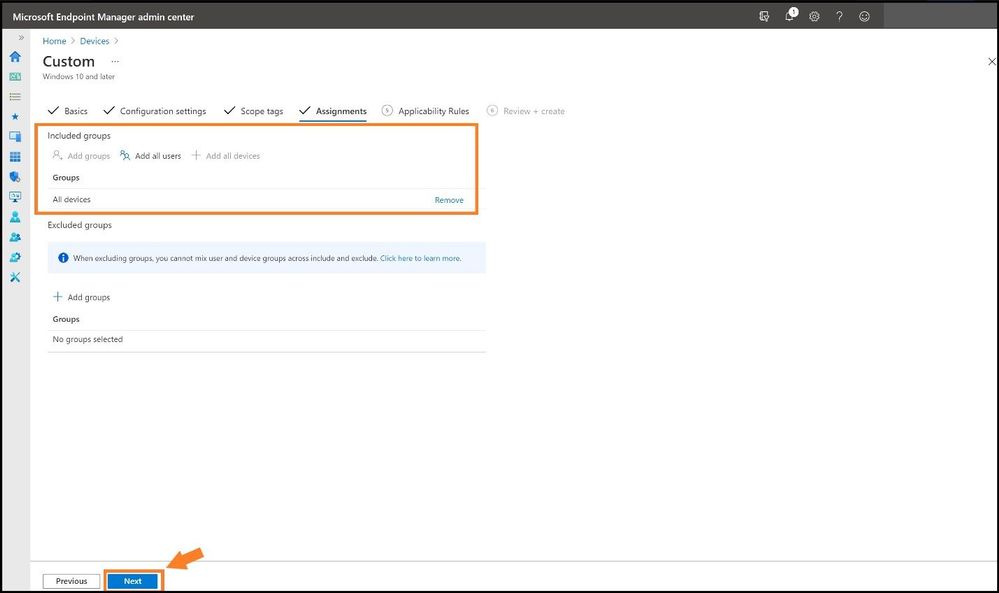


Selecting the Assignments for the PolicySelecting the Assignments for the Policy


Select any custom Applicability Rules to apply the policy and select next. Review and then create the policy to apply.
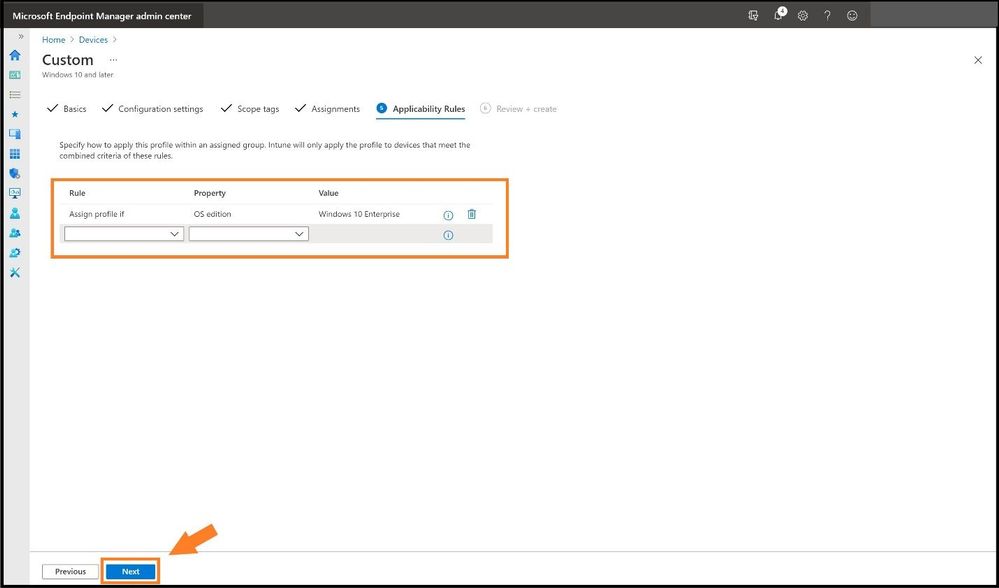


Selecting any Applicability RulesSelecting any Applicability Rules


What About Conflicting Settings in MEM from STIGed GPOs? Who Wins?


If anyone has applied multiple STIGs on top of other GPOs or other baselines (I have a customer that uses three STIGs), the big question I always get is “who wins?” Is it the first baseline policy I created or the strongest GPO setting that will win once everything is synced? Let’s go ahead a make sure that does not happen and create a policy that is called “ControlPolicyConflict policies” or “ControlPolicyConflict/MDMWinsOverGP.” This feature was added in Windows 10, version 1803 and allows the IT admin to control which policy will be used whenever both the MDM policy and its equivalent GPO are set on the device. MDMWinsOverGP only applies to policies in Policy CSP. MDM policies win over Group Policies where applicable; not all Group Policies are available via MDM or CSP. It does not apply to other MDM settings with equivalent Group Policy settings that are defined in other CSPs. This policy is used to ensure that MDM policy wins over Group Policy when the policy is configured on the MDM channel. The default value is 0. The MDM policies in Policy CSP will behave as described if this policy value is set 1. This policy does not support the Delete command and does not support setting the value to 0 again after it was previously set to 1. In Windows 10 version 1809 it will support using the Delete command to set the value to 0 again if it was previously set to 1.


You would perform the same steps as above to create a custom configuration profile as seen below. Select Configuration profiles, Create a profile, and for Platform select Windows 10 and later. For profile type, we will select Templates and choose Custom from the list and select create.


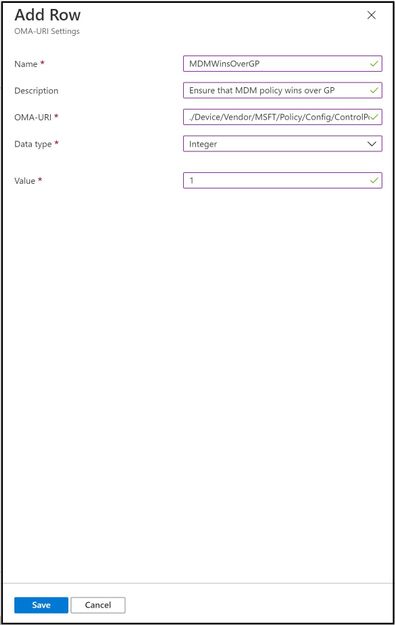
For the configuration settings, use the below values:


Name: MDMWinsOverGP


Description: Ensure that MDM policy wins over GP 


OMA-URI:  ./Device/Vendor/MSFT/Policy/Config/ControlPolicyConflict/MDMWinsOverGP


Data Type: Integer


Value: 1
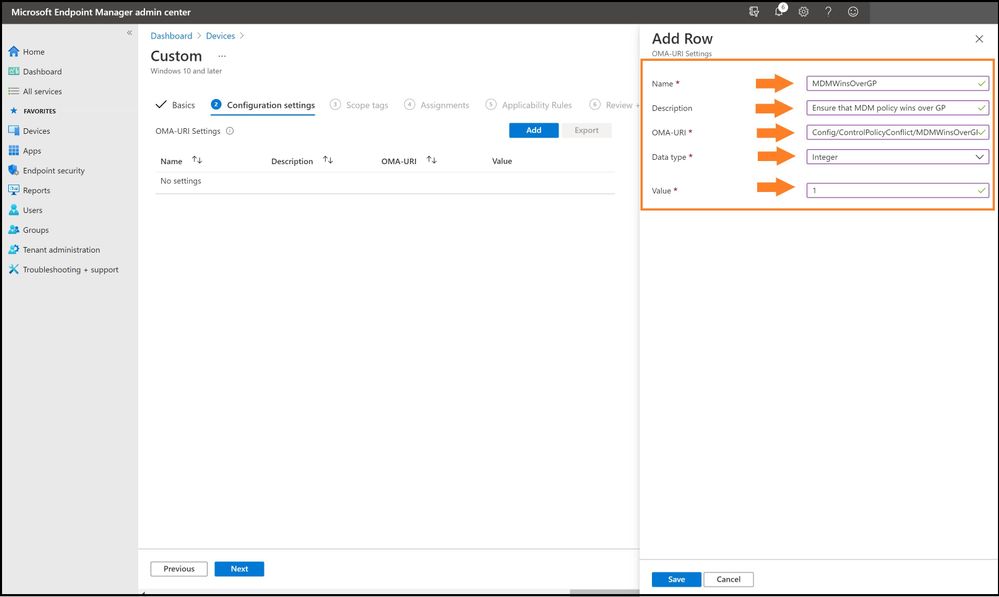


MDMWinsOverGPMDMWinsOverGP


And for a close-up view:


John_Barbare_15-1623076370911.jpeg


STIGed GPO Migration Report for MEM


With importing all the STIGs and seeing what we can migrate from on-premises, every IT Manager needs a report that will determine the status of the policies for your journey to the cloud. Select reports and then Group policy analytics.
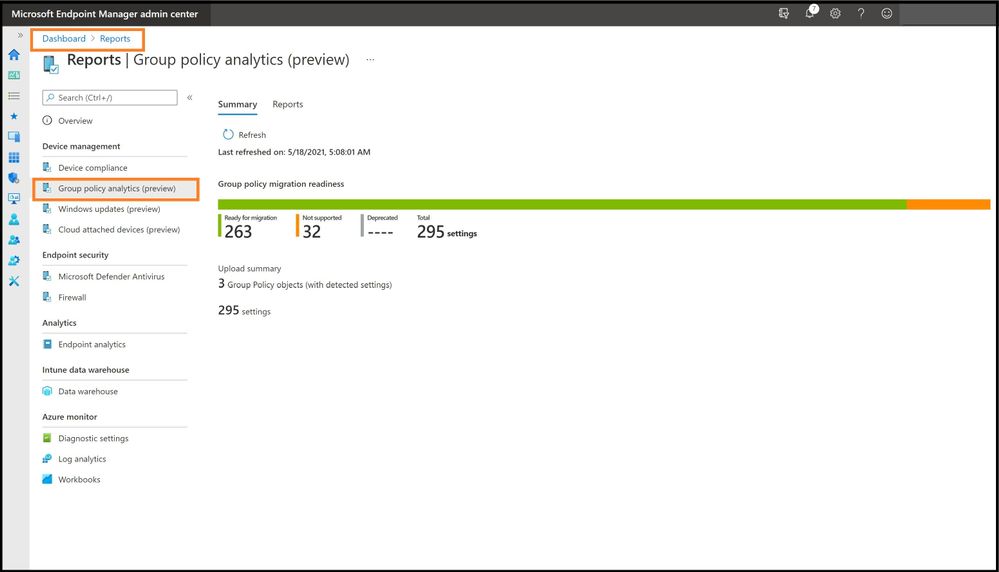


STIGed GPO Migration Report for MEMSTIGed GPO Migration Report for MEM


Select the reports tab next to the summary to see a more detailed report about the readiness of your Group Policy for modern management. Export out the results for planning purposes or to send to a certain IT Team.
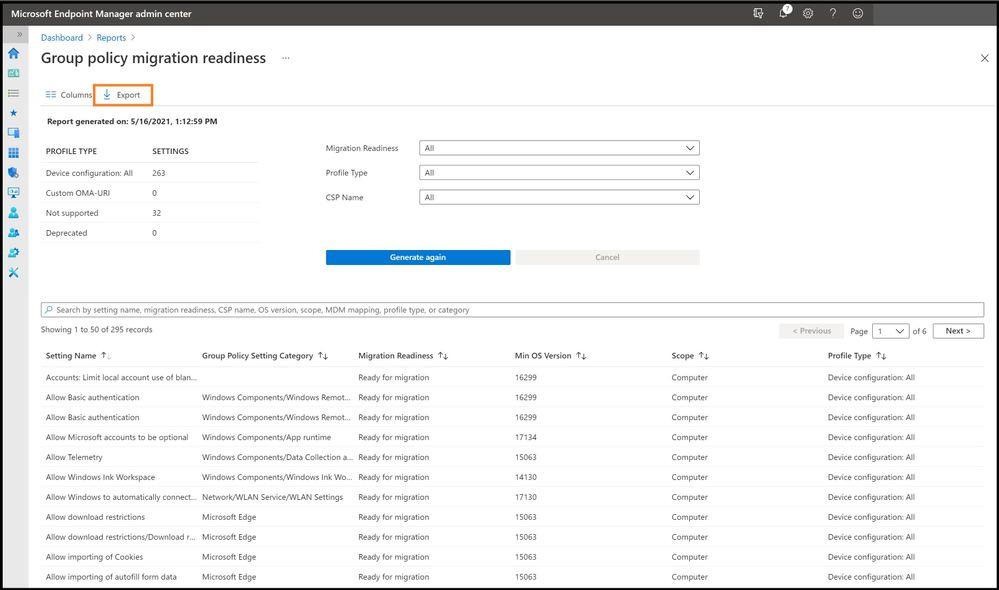


Export the ReportExport the Report


Conclusion


Thanks for taking the time to read this article and I hope you better understand the new Group Policy analytics in MEM as you use this function in your enterprise or in any Government IL5 tenant. Using the new Group Policy analytics will further show the value for any IT Manager the value of seeing what STIGs can be brought over, the mapping, and then create custom policies for the ones that are not MDM. Then finally, seeing how MEM battles the age-old question of which STIG/GPO wins for the finale! Hope to see you in the next blog and always protect your endpoints! STIG away!


Thanks for reading and have a great Cybersecurity day!


Follow my Microsoft Security Blogs: http://aka.ms/JohnBarbare  and also on LinkedIn.


References


CIS Microsoft Windows Desktop Benchmarks – Center for Internet Security (CIS)


Defense Information Systems Agency Security Technical Implementation Guide 


Group Policy Objects – DoD Cyber Exchange


NSA_Cyber – Windows-Secure-Host-Baseline: Configuration guidance for implementing the Windows 10 DoD Secure Host Baseline settings


Policy CSP – ControlPolicyConflict – Windows Client Management | Microsoft Docs

What’s new with .NET on Azure Functions – June 2021

This article is contributed. See the original author and article here.

In March, we announced the general availability of .NET 5.0 support on Azure Functions with the new .NET isolated process worker. Today, we’re happy to share more exciting news for .NET on Azure Functions! Visual Studio 2019 v16.10 now includes full support for .NET 5.0 isolated function apps. In addition, we’re announcing an early preview of Azure Functions running on .NET 6.0 in both the isolated process and in-process programming models.


Visual Studio support for .NET 5.0 isolated function apps


Visual Studio 2019 v16.10, released in May, includes full support for creating, local debugging, and deploying .NET 5.0 isolated process Azure Functions apps. Update your Visual Studio now and try the new tutorial.


Sneak peek: .NET 6.0 on Azure Functions


The Azure Functions team is committed to providing full support for .NET 6.0 as soon as .NET 6.0 is generally available in November 2021. Azure Functions supports two programming models for .NET—isolated process and in-process (learn more). Today, we’re providing early previews of .NET 6.0 for both programming models.


To run .NET 6.0, you need Azure Functions V4. Local tooling support for creating, running, and deploying .NET 6.0 function apps is currently limited to a preview release of Azure Functions Core Tools V4. You can still use Visual Studio or Visual Studio Code to write your functions.


A few important points to keep in mind for this preview:


  • Use the latest release of Azure Functions Core Tools V4 preview.


  • At this time, you can only deploy .NET 6.0 function apps to Azure Functions V4 preview on Windows hosting plans.


  • Currently, there are no optimizations enabled for .NET 6.0 apps in Azure. You may notice increased cold-start times.


  • While other language workers are included in the current Core Tools V4 preview, they are unsupported at this time. Continue to use Azure Functions V3 and Core Tools V3 for other languages and production workloads.


Note that .NET 6.0 on Azure Functions is currently offered as an early preview and there is no official support. Try it out and let us know what you think using GitHub Issues. Watch for a public preview announcement later this year.


Run isolated process functions on .NET 6.0


.NET functions using the isolated model run in a separate process from the Azure Functions host. This decoupling allows you to install dependencies without worrying about conflicts with host dependencies. Its programming model also provides greater flexibility in how you configure your app’s startup.


.NET 5.0 is the first .NET version supported by the isolated model. Today, you can also run isolated process functions on .NET 6.0 Preview 4!


See the following wiki article to learn more and build your first .NET 6 Azure Functions app.


Quickstarts: Azure Functions v4 (.NET 6) early preview


The isolated process model for .NET is new and there are some differences compared to the in-process model. Many will be addressed as the programming model continues to evolve. If you need access to features that are currently missing, such as Durable Functions, use the in-process model.


Run .NET 6.0 in-process functions with Azure Functions V4 preview


Starting today, you can also run in-process .NET 6.0 functions with an early preview of Azure Functions V4. You have access to the same features and capabilities as V3—including support for rich binding types and Durable Functions.


See the following wiki article to learn more and build your first .NET 6 Azure Functions app.


Quickstarts: Azure Functions v4 (.NET 6) early preview


What’s next for .NET on Azure Functions


Thanks for checking out our announcements and we’re excited for you to try them out. And in case you missed it, Azure App Service also announced early access for .NET 6.0 Preview today. 


There’s a lot more planned for Azure Functions in the coming months. We’re bringing .NET 6.0 Azure Functions support to tools like Visual Studio and Visual Studio Code and to all hosting plans in Azure. Expect a public preview of Azure Functions V4 in the third quarter of this year and general availability in November. Follow our twitter account for the latest updates: @AzureFunctions.

Troubleshoot HTTPS 502 error when Application Gateway in front of API management self-hosted gateway

Troubleshoot HTTPS 502 error when Application Gateway in front of API management self-hosted gateway

This article is contributed. See the original author and article here.

We will go through the below topics in the blog:


  1. Introduction on APIM self-hosted gateway and how do we configure custom domain for it.

  2. Case Study: 502 error returned by V1 Application gateway when using HTTPS protocol.

  3. V2 Application gateway’s difference between V1 when verify server cert.


*In this blog, AG = Application Gateway. SH-gateway = self-hosted gateway.


If you are not familiar with AG and APIM integration, here are two well composed blogs that let us know how to work with AGv1, AGv2 and Managed APIM.


APIM with Application Gateway v1 – Microsoft Tech Community


Integrating API Management with App Gateway V2 – Microsoft Tech Community


Introduction on APIM self-hosted gateway and how do we configure custom domain for it.


To describe in brief, self-hosted gateway is APIM packaged in a Linux Docker image and can be deploy to any VM or on-prem machines.


More information here: Self-hosted gateway overview | Microsoft Docs


The blog will not include deploying the self-hosted gateway as the thesis is to explain some common issues that we will get when an App gateway is in front of it.


One easy way to find out if your self-hosted gateway is pulling API configurations from Azure is to check this ‘Status’.


Yixuan_Wang_0-1623209739153.png


A green light means the heartbeat connectivity is successfully established.


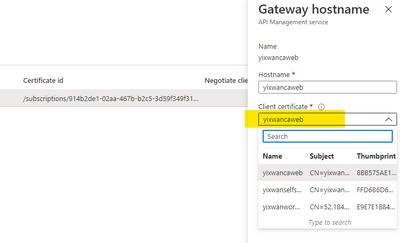
Configure the custom domain here at the ‘Hostname’ blade.


Yixuan_Wang_1-1623209739174.png


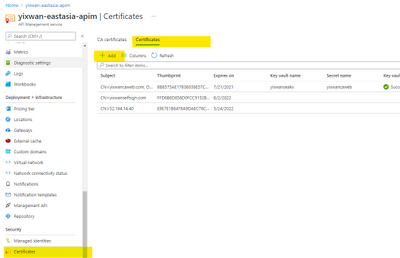
We will need to upload the pfx format first to the ‘Certificate’ blade of the APIM. So we can list it out here.


Yixuan_Wang_2-1623209739199.png


Yixuan_Wang_3-1623209739211.png


Once we made the hostname change, if we are following the docker container log for the self-hosted gateway, we can see an event being created. That means the hostname has taken effect.


Yixuan_Wang_4-1623209739233.png


Case Study: 502 errors returned by V1 Application gateway when using HTTPS


Background:


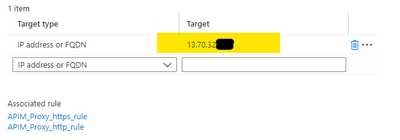
My V1 AG’s backend setting is targeting my SH-gateway’s hosting VM’s public IP.


Yixuan_Wang_5-1623209739237.png


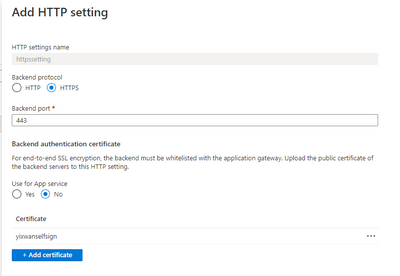
I used a self-signed certificate for my SH-gateway’s domain. And have uploaded the cer format of this certificate to the AG.


Yixuan_Wang_6-1623209739239.png


Yixuan_Wang_7-1623209739241.png


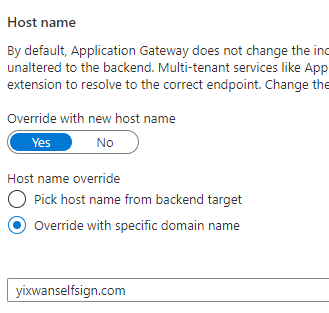
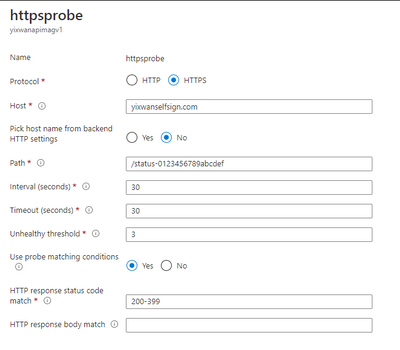
I have over-written the hostname in http setting and custom probe.


Yixuan_Wang_8-1623209739248.png


Yixuan_Wang_9-1623209739258.png


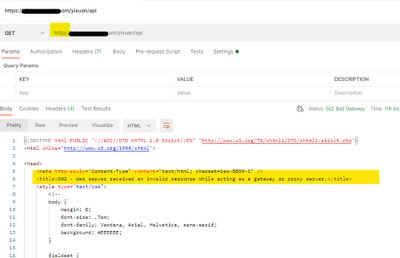
Test HTTPS with postman, got 502 error.


Yixuan_Wang_10-1623209739279.png


HTTP however is working as expected, so I am suspecting the issue could be with the certificate. However, I have already uploaded the cer format to AG.


Yixuan_Wang_11-1623209739288.png


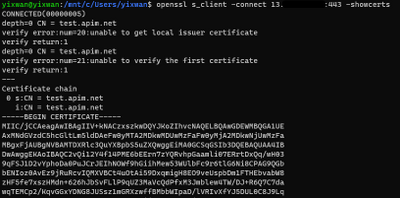
To narrow down and test HTTPS connectivity, I bypassed the AG and accessed the SH-gateway directly with IP:port. The IP is the docker container hosting VM’s public IP.


openssl s_client -connect XX.XX.XX.XX:443 -showcerts


Yixuan_Wang_12-1623209739309.png


As in the screenshot, the certificate that the server returned is not the custom domain certificate I configured for the SH-gateway. It is returning test.apim.net, the default self-signed cert.


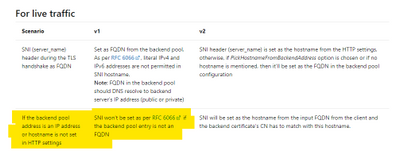
I realized that when we access the APIM with IP, there is no SNI header in the request. Based on the APIM documentation:


Yixuan_Wang_13-1623209739321.png


In other words, for Managed APIM, we need to choose a default custom certificate for APIM to return, and the catch here is that SH-gateway will not let us choose defaultSslBinding. So, if there is no SNI header in the requests, SH-gateway always return the default test.apim.net cert.


But I was expecting the AG overwrites the hostname header and the SNI supposed to be set. After some research, I found the answer in AG’s documentation.


Yixuan_Wang_14-1623209739337.png


In conclusion, V1 AG set requests’ SNI uses backend pool setting, which means the hostname overwrites does not modify the SNI header, hence if we put IP as a backend pool target, SH-gateway’s server cert always mismatches with the cert we uploaded to the AG.


There are two solution options for this issue with AGv1:


  • Use FQDN as a backend target. Don’t use IP.

  • Use IP as a backend target, and download the test.apim.net cert, upload it to AG’s http setting. We need to give up custom domain with this solution.


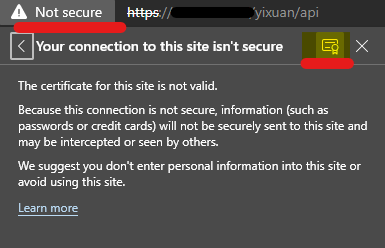
For the solution No.2, I navigated to SH-gateway by IP with browser and downloaded the certificate from the browser.


Yixuan_Wang_17-1623209963825.png


V2 AG’s difference when verify server certificate


Since the AG will verify server cert’s root cert, and the test.apim.net does not have a root cert. The HTTPS requests will get 502 even if we uploaded this cert to APIM.


Yixuan_Wang_16-1623209739346.png


Therefore, if we configure custom domain for SH-gateway and use V2 AG in front of it,


1)The custom domain cert needs to be issued with well-known CA


2)Or it can be self-signed with a root cert, with the root cert uploaded to AG.


Hope this blog will help you identify the reason we get 502 when configure AG with APIM SH-gateway.


Appendix:


Enabling end to end TLS on Azure Application Gateway | Microsoft Docs


What is SNI? How TLS server name indication works | Cloudflare

Diagnostics for Social Good

Diagnostics for Social Good

This article is contributed. See the original author and article here.

Microsoft 365 - Diagnostics for Social Good.pngAs IT Administrators, we all face daily challenges solving problems for our constituents. As we have seen over the last year, the world can use our help. In our small corner of the world, we would like to do our part to give back. When we, as IT Admins, use self-help resources to fix issues without opening support cases, we enable Microsoft to repurpose a portion of these savings towards social good.  


Therefore, we invite you to join us in our effort to give back to communities in need! The Diagnostics for Social Good campaign is designed to help solve your technical issues while at the same time helping support global communities.   


How it Works  


IT admins run customer diagnostics in the Microsoft 365 admin center to resolve issues without logging a support request and Microsoft will donate to global non-profits that support COVID-19 relief efforts in India as well as vaccination supplies across the world. (Read more about the Microsoft 365 admin center here.) Learn more about covered scenarios and how to run the diagnostics below:  


Why we are focused on Diagnostics for Social Good  


We all have an opportunity to change the world. In the technology industry, we are privileged to be able to have a broad impact on millions of people. We know what’s possible and we know that we can contribute to help.  As we introduce our new Diagnostics for Social Good initiative, we want to recognize the opportunity we all have to support others. As we move forward, we are looking for feedback and areas where we can help IT admins keep their technology environment healthy while giving back.  


Microsoft has demonstrated a passion for giving to address critical issues facing local communities and abroad. Giving has become part of our culture, and one way we live our mission to empower every person and organization on the planet to achieve more. 


Our business practices and policies reflect our commitment to making a positive impact around the globe, and we work continuously to apply the power of technology to earn and sustain the trust of our customers and partners, and the communities in which we live and work.   

General availability: Azure Sphere OS version 21.06 expected on June 23

This article is contributed. See the original author and article here.

The 21.06 Azure Sphere OS quality update is now available for evaluation in the Retail Eval feed. The retail evaluation period provides 14 days for backwards compatibility testing. During this time, please verify that your applications and devices operate properly with this release before it is deployed broadly via the Retail feed. The Retail feed will continue to deliver OS version 21.04 until we publish 21.06 in two weeks. Note: there was no 21.05 update.


This evaluation release of 21.06 includes enhancements and bug fixes for the OS only; it does not include an updated SDK.


Areas of special focus for compatibility testing with the 21.06 release should include:


  • Apps and functionality utilizing SPI Flash.  

  • Apps and functionality utilizing wolfSSL.


For more information on Azure Sphere OS feeds and setting up an evaluation device group, see Azure Sphere OS feeds and Set up devices for OS evaluation.


For self-help technical inquiries, please visit Microsoft Q&A or Stack Overflow. If you require technical support and have a support plan, please submit a support ticket in Microsoft Azure Support or work with your Microsoft Technical Account Manager. If you would like to purchase a support plan, please explore the Azure support plans.