Run reports on your tenant using the CLI for Microsoft and Azure Container Instances

Run reports on your tenant using the CLI for Microsoft and Azure Container Instances

This article is contributed. See the original author and article here.

Using the CLI for Microsoft 365, you can manage your Microsoft 365 tenant and SharePoint Framework projects on any platform, including running it in a container. By running the CLI for Microsoft 365 in a container you free yourself from installing it locally. Leveraging a Logic App, Azure Container Instances and the CLI for Microsoft 365 you can automate reporting and maintenance of your tenant.


The goal is thus to generate some form of reporting on our tenant. There are a lot of sample scripts available, but we will start simple by reporting all deleted Office 365 Groups (this will include deleted Teams). Executing a report like that with the CLI for Microsoft 365 would be just a single line:  


m365 aad o365group recyclebinitem list


To achieve our reporting scenario we need the a few other components as well:


  1. An Azure resource group to group our resources together 

  2. A managed identity to make sure we can access our tenant securely;

  3. A Logic App to orchestrate everything;

  4. Azure Container Instances to execute our script;

  5. A Git repo that contains the script we want to execute and pull in;


If you are new to running Azure Containers and using Logic Apps there is a great walkthrough on running sentiment analysis with Azure Container Instances. But let us get started with the first step.


Create an Azure Resource Group


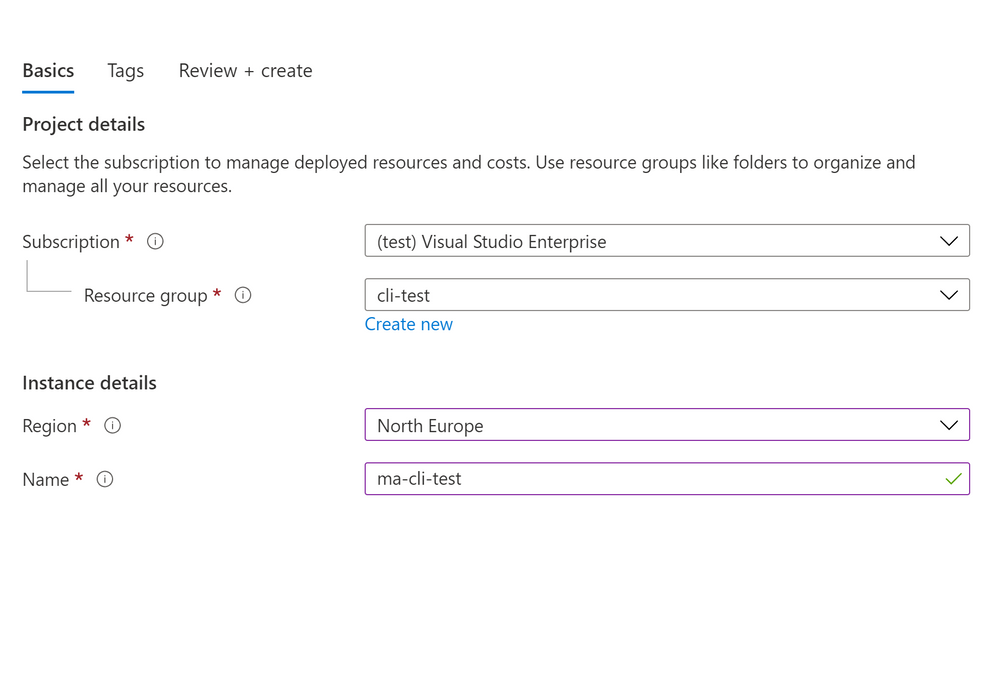
To create a new Azure resource group simply log in to the Azure Portal and create a new resource group using the create a resource button. For demo purposes I called my resource group cli-test.


Create a Managed Identity


In our resource group we can create a new user managed identity that we can use. Click on the add button and search for User Assigned Managed Identity to create the new managed identity. Simply provide a name and create your new managed identity. 


cli-ma.png


Once the managed identity is created it still need permissions to do anything. Just creating it is not enough. In order to use the managed identity we need to make sure that it has the correct permissions. The CLI for Microsoft 365 docs explain in details what the steps are required. For our reporting scenario’s we need support to query the Graph and SharePoint. You can use the CLI for Microsoft 365 to easily hand out the permissions you need with the following snippet: 


m365 aad approleassignment add --displayName "ma-cli-test" --resource "Microsoft Graph" --scope "Sites.Read.All"
m365 aad approleassignment add --displayName "ma-cli-test" --resource "Office 365 SharePoint Online" --scope "Sites.Manage.All"
m365 aad approleassignment add --displayName "ma-cli-test" --resource "Microsoft Graph" --scope "Group.Read.All" 


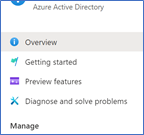
Now all we need is the GUID that identifies the managed identity. Navigate to https://portal.azure.com select Azure Active Directory and pick Enterprise Applications. In the Application Filter filter on Managed Identities and make sure to pick the Application Id of your newly created managed identity. 


cli-ma-id.png


Store it somewhere save as we need it at a later moment. 


Create a Logic App


As we need a Logic App to orchestrate the execution of our script the first step is to create one. You can do so in any resouce group, or create a new one. There are no requirements for your Logic App. So we pick a Logic App (Consumption) and provide a resource group and name. Once the Logic App is created navigate to it and click the edit button. Once in edit mode you are free to pick your trigger. You can pick any trigger you like, for demo purposes you could connect it to a list in SharePoint Online, or just use a HTTP trigger. The next step is to create two parameters, containerGroup and containerName. Both will be used more than once so it helps to create them parameters, but it is not required. For demo purposes I added a small snippet as a postfix to identify when it was created: 

formatDateTime(utcNow(),'MM-dd-yyyy')

 This helps when debugging as you can always identify when something was created. The next step is to add a new action of type Create or update a container group. It is a pretty complex action with a lot of parameters to get right, so it is worth to pay close attention when typing:


Option  Value Comments
Subscription id Any subscription you like I suggest putting it all in the same subscription. 
Resource Group Any resource group you like  I suggest putting it all in the same resource group.
Container Group Name

@{variables('containerGroup')}

Parameter for ease of use
Container Group Location Any location is supported  
Container Name – 1

@{variables('containerName')}

Parameter for ease of use
Container Image – 1

m365pnp/cli-microsoft365:latest

 
Container Resource Requests CPU – 1 1 If you are planning to run complex or large scripts it might be worth to add additional resources. 
Container Resource Requests Memory – 1 1.5 If you are planning to run complex or large scripts it might be worth to add additional resources. 
Container Command Segment – 1

bash

You cannot execute multiple commands in a single line. You will need to add each statement to a segment. 
Container Command Segment – 2

/mnt/repo1/test.sh

The value of the mount path and script name are dependant on settings below. 
Container Volume Mount Path – 1 /mnt/repo1  
Container Volume Mount Name – 1 gitrepo The name for the mount path must match the volume name specified later. 
Volume Git Repo Volume Repository – 1 https://github.com/appieschot/cli-test.git Any public repository will do. 
Volume Name – 1 gitrepo  
ContainerGroup Managed Identity User Assigned Identities {
“/subscriptions/[guid]/resourcegroups/[rg-name]/providers/microsoft.managedidentity/userassignedidentities/[identity-name]“: {}
}
Make sure to update the bold parts.
ContainerGroup Restart Policy OnFailure Make sure the container is restarted if there are problems. 

This action will thus create a new container instance, pulls in the CLI for Microsoft 365 image and make sures that a git repo with a script is pulled in. And best of all; the container created will be running with the managed identity you have specified. Now all we need to do is to capture the output of our container instance and clean up. 


To do so add a action of type until. Do not configure any requirements yet and simply add an action of type Get properties of a container to retrieve the latest status, use the containerGroup parameter to make sure you get the correct container. Put in the Container Group name as a parameter and check for status Succeeded of the untill action. Add a new condition and check there for the same status. In the true statement we can implement the logic for retrieving our data. You can use the Get logs from a container instance and e-mail the output to yourself. 


cli-la-cleanup.png


In the false branche add an wait action that waits for 10 or 15 seconds. That will make sure it takes a while before it retries checking the status to see if it is finished.  


Create your script


The last part is to make sure that the test.sh file referred to as being mounted in your container actually exists. It should contain all logic to run your script, but the first step is to authenticate. In order to authenticate with the managed identity we need to tell the CLI for Microsoft 365 to do so. By specifying the login using the authType parameter we can pass the GUID of our managed identity. The CLI then knows to use the managed identity of the container it is running in and you are done. 


m365 login --authType identity --userName 00000000-0000-0000-0000-000000000000 
m365 aad o365group recyclebinitem list --output json


Full Logic App


Once all these components are in place you can simply run any script in the container. Just make sure you have the appropriate permissions assigned to the Manged Identity! 


PnP Recording


If you are looking at a video walkthrough you can checkout the PnP recording. It highlights the results and steps taken to achieve basic reporting on your tenant. 


Lesson Learned #174: Using Synonyms in Azure SQL Managed Instance for Linked Server tables

This article is contributed. See the original author and article here.

Today, I worked on a very interesting case when our customer has a linked server to Azure SQL Database, but, they want to remove the prefix of the linked server that everytime that run a query against this Linked Server, for example, SELECT * FROM MyLinkedServer.DatabaseName.SchemaName.TableName. In this article, I would like to share with an example how to do it. 


The first thing that we need is to have a linked server connected to any other Managed Instance, OnPremises or Azure SQL Database. Let’s give the name LinkedServerMI to this linked server. 


Once we have this, basically, we need to create a new synonym using the following command: CREATE SYNONYM [dbo].[MyNewTableForLinkedServer] FOR [LinkedServerMI].[DatabaseName].[SchemaName].[TableName]


Using this synonym right now, everytime that I execute any command, for example, SELECT * FROM MyNewTableforLinkedServer automatically this command will run a query against Linked Server, database, schema and tablename. 


Enjoy!


Cloud App Security: block TOR Browser (Anonymous IP)

Cloud App Security: block TOR Browser (Anonymous IP)

This article is contributed. See the original author and article here.

Hi all, Alan here again with a new article, I’m a Customer Engineer from Italy on Identity and Security. 


I want to show you how to block TOR browser using Cloud App Security, simple and fast! 


During the last few months, I had several customers requesting how to block sign-in from anonymous Ip Addresses. One example would be someone using TOR Browser. I started playing around with CAS and finally found a quick solution. Continue reading to find out more.  


We will use Azure AD “Conditional Access policy” with Session Control together with “Cloud App Security Conditional Access App Control”. 


We will start creating a “special” Azure AD Condition Access policy that will enable the APP in CAS, let’s see how. 


PS: the APP will appear in Cloud App Security Conditional Access App Control directly after the user start authenticating/using it.


You will need access to you tenant’s Azure AD (portal.azure.com) and Cloud App Security (mycompany. portal.cloudappsecurity.com). 


Thirst thing to do is create an Azure AD Conditional Access policy: 


1. Navigate to your Azure Active Directory 


2. Under Manage click on Security 


Immagine1.png


Immagine3.png


3. Click on Conditional Access 


4. Select New Policy 


Immagine4.png


5. Give it a Name 


6. Select to which users it will apply 


7. Select the cloud application, for this demo I will select Office 365 


Immagine5.png


8. Go to Session and select Use Conditional Access App Control 


9. Select Use Custom Policy  


Immagine6.png


10. Click Select 


11. Enable the policy and click Create 


Immagine7.png


Once this is done the first time users log in Office 365 suite the application will be integrated in Cloud App Security 


Open Cloud App Security portal : https://mycompany. portal.cloudappsecurity.com 


On the top right side you have the configuration wheel, click and select “IP Address ranges” as shown below 


Immagine8.png


One interesting thing is that if you filter for one of the following Tags “Tor, Anonymous Proxy or Botnet” you will see it matches the following rule  


Immagine9.png


CAS has the “intelligence” to know which are these suspicious IP Addresses or networks 


Here some other details Create anomaly detection policies in Cloud App Security | Microsoft Docs 


  • Activity from anonymous IP addresses 

  • Activity from suspicious IP addresses, Botnet C&C 

  • Activity from a TOR IP address 


Back to our Connected Apps: 


1. Go to Connected Apps 


Immagine10.png


2. In the central pane you will have three tabs, select “Conditional Access App Control apps”. 


   You will get a list of applications for which you can start creating CAS policies 


Immagine11.png


3. Now browse to Control menu and select Policies 


Immagine13.png


4. Select “ + Create policy” 


Immagine14.png


Immagine15.png


The important part here is FILTERS and ACTIONS


Immagine16.png


5. Click on “Create” (you will see it listed)


Immagine17.png


Access Office portal from the TOR Browser (use a valid user account from your Azure AD)


Immagine18.png


Immagine19.png GREAT!!


Hope this article gives some hints on how to use Cloud App Security which I think is a great tool, simple and powerful and can really help enhance your security posture. 


Regards 


Alan @CE  


Customer Engineer – Microsoft Italy 


Useful Resources: 


Zero Trust Maturity Assessment Tool | Microsoft Security 


Update on geospatial functions

Update on geospatial functions

This article is contributed. See the original author and article here.

The geospatial functions in Azure Data Explorer (ADX) received a big update in June 2021. Based on our research and very valuable feedback from our customers we decided to add support for H3 Cell tokens. On top of that we provided new functionality to generate polygons from all of our geospatial clustering functions.


H3 Cell token


Geospatial data can be analyzed efficiently using grid systems to create geospatial clusters. You can use geospatial tools to aggregate, cluster, partition, reduce, join, and index geospatial data. These tools improve query runtime performance, reduce stored data size, and visualize aggregated geospatial data. H3 is Uber’s Hexagonal Hierarchical Spatial Index. More information on how to chose the right algorithm can be found on the documentation for geospatial grid systems.


Visualizing "Kusto" on a map: https://gist.github.com/cosh/2c22c1ccf673f2af1dc44aa764887c4b#file-map-geojsonVisualizing “Kusto” on a map: https://gist.github.com/cosh/2c22c1ccf673f2af1dc44aa764887c4b#file-map-geojson


geo_point_to_h3cell()


Calculates the H3 Cell token string value for a geographic location (doc). Example:


print h3cell = geo_point_to_h3cell(-74.04450446039874, 40.689250859314974, 6)


h3cell
862a1072fffffff


geo_h3cell_to_central_point()


Calculates the geospatial coordinates that represent the center of an H3 Cell (doc). Example:


print centralpoint = geo_h3cell_to_central_point("862a1072fffffff")


centralpoint
{
“type”: “Point”,
“coordinates”: [-74.016008479792447, 40.7041679083504]
}


Geospatial cluster to polygon


This is something we wanted to add for some time. It’s the capability to calculate the polygon that represents the grid systems rectangular area.


geo_geohash_to_polygon()


Calculates the polygon that represents the geohash rectangular area (doc).


Geohash to polygon: https://gist.github.com/cosh/e9b5d65b813b4fe4fb7b8d4bd6386287#file-map-geojsonGeohash to polygon: https://gist.github.com/cosh/e9b5d65b813b4fe4fb7b8d4bd6386287#file-map-geojson


geo_s2cell_to_polygon()


Calculates the polygon that represents the S2 Cell rectangular area (doc).


S2 to polygon: https://gist.github.com/cosh/acbc84f82441f3d41a2b73e8b26d9ae9#file-map-geojsonS2 to polygon: https://gist.github.com/cosh/acbc84f82441f3d41a2b73e8b26d9ae9#file-map-geojson


geo_h3cell_to_polygon()


Calculates the polygon that represents the H3 Cell rectangular area (doc).


H3 to polygon: https://gist.github.com/cosh/2c22c1ccf673f2af1dc44aa764887c4b#file-map-geojsonH3 to polygon: https://gist.github.com/cosh/2c22c1ccf673f2af1dc44aa764887c4b#file-map-geojson

MS Learn: Introduction to Azure Data Explorer

MS Learn: Introduction to Azure Data Explorer

This article is contributed. See the original author and article here.

The first MS Learn Module was published at Microsoft Learn, and you are welcome to start your journey.


Learn to describe the ingestion, query, visualization, and data management features that Azure Data Explorer provides to help you make sense of the data flowing into your business. Determine the types of data analysis for which Azure Data Explorer is a good data management platform.


Learning objectives


By the end of this module, you’ll be able to:


  • Evaluate whether Azure Data Explorer is appropriate to process and analyze your big data.

  • Describe how the features of Azure Data Explorer work to turn your data streams into meaningful insights.


Start here


overview-architecture.png


The following flowchart table summarize the key questions to ask when you’re considering using Azure Data Explorer.


when-to-use-adx.png