by Contributed | Jun 15, 2021 | Technology
This article is contributed. See the original author and article here.
Background
Over the years, the size of SAP BW system database grew exponentially, which leads to increase in hardware cost when running the system on HANA. To reduce the size of HANA hardware, customer can leverage an option to migrate their data to near-line storage (NLS). The adapter of SAP IQ as a near-line solution is delivered with the SAP BW system. The integration of SAP IQ makes it possible to separate frequently accessed data from the infrequently accessed data, thus resulting in less resource demands for the BW system.
SAP IQ supports both a simplex and a multiplex architecture. But for the NLS solution, only the simplex architecture is available/evaluated. Technically SAP IQ high availability can be achieved using the IQ multiplex architecture, but the multiplex architecture does not suffice our requirement for NLS solution. On the other side, SAP does not provide any features or procedures to run the SAP IQ simplex architecture in a high availability configuration. But SAP IQ NLS high availability can be achieved using custom solutions, which may require additional configuration or open-source component like Pacemaker, Microsoft Windows Server Failover Cluster, shared disk etc.
This blog discusses a SAP IQ NLS high available solution using Azure shared disk on Windows Server 2016.
Solution Overview
This blog will provide insights into a SAP IQ NLS high availability architecture on Windows Server. Windows Server Failover Cluster (WSFC) is the foundation of a high availability for critical applications on Windows. A failover cluster is a group of 1+n independent servers (nodes) that work together to increase the availability of applications, database, and services. If a node fails, WSFC calculates the number of failures that can occur and still maintain a healthy cluster to provide applications and services.
Traditionally for SAP NetWeaver running on highly available WSFC, a SAP Resource type is implemented using a dynamic library plug-in DLL (saprc.dll) called cluster resource DLL, which is loaded by the Windows cluster resource monitor process. But for SAP IQ, there is no such dedicated resource type available. Instead Generic Service (clusres2.dll) resource type can be leveraged, which manages SAP IQ database service. To understand more about failover cluster resources/resources type and what they do, see Windows Server 2016/2019 Cluster Resource / Resource Types.
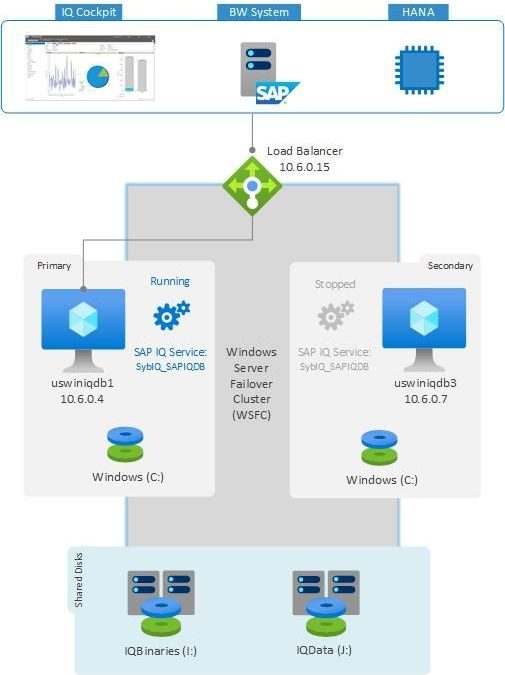
In this example, two virtual machines (VMs) with Windows Server 2016 (uswiniqdb1 and uswiniqdb3) are configured with Windows Server Failover Cluster. Azure shared disk is a new feature on Azure managed disks that enables attaching an Azure managed disk to multiple VMs simultaneously. Attaching a managed disk – IQBinaries (I:) and IQData (J:) to multiple VMs allows you to deploy a highly available clustered application to Azure. An Azure load balancer is required to use a virtual IP address that will be attached to primary node. The Azure load balancer will move this virtual IP to secondary node during failover. All the client connections to SAP IQ will happen through this Azure load balancer.
The SAP IQ database instance will be registered and started as Windows service. The role containing the SAP IQ service (SybIQ_SAPIQDB), the shared cluster disks (I: and J:), and client access point (10.6.0.15) are configured for high availability. The cluster role will monitor the SAP IQ Service (SybIQ_SAPIQDB), and shared disks. If any of the component in the cluster role is crashed or host is restarted, the cluster will failover the entire role to the secondary node and start the SAP IQ Service on it.

CURRENT CLUSTER SETUP CONSTRAINT: The cluster setup using the Generic Service resource type will only failover the resources in case of host failure or service crash. The cluster does not monitor the accessibility of SAP IQ database. For example, it might happen that the SAP IQ database service is running but the user/system is not able to communicate to database. In such a case, the cluster thinks that the service is running, so it will not failover the database. To achieve a failover in such scenarios, you need to design a highly available solution using the Generic Script resource type, which allows you to achieve high availability for SAP IQ that can be controlled using a custom script. You can run SAP IQ as a scripted resource, which will stop, start, and monitor SAP IQ database using the custom script. For more details, see Creating and Configuring a Generic Script Resource.
Infrastructure Preparation
This section describes the infrastructure provisioning for a SAP IQ deployment on Windows server with high availability. This blog is not intended to replace the standard SAP IQ deployment practices, rather it complements SAP’s documentation, which represent the primary resources for installation and deployment of SAP IQ NLS solution.
Refer SAP Note 2780668 – SAP First Guidance – BW NLS Implementation with SAP IQ for the information about SAP nearline storage implementation (NLS) for SAP BW, SAP BW on HANA and SAP BW/4HANA.
Consideration for High Availability on Windows
Windows Server Failover Cluster
Windows Server Failover Cluster with Azure virtual machines (VMs) requires additional configuration steps. When you build a cluster, you need to set several IP addresses and virtual host names for SAP IQ database.
The Azure platform does not offer an option to configure virtual IP addresses, such as floating IP addresses. You need an alternate solution to set up a virtual IP address to reach the cluster resources in the cloud. Azure load balancer service provides an internal load balancer for Azure. With the internal load balancer, clients reach the cluster over the cluster virtual IP address.
Deploy the internal load balancer in the resource group that contains the cluster nodes. Configure all necessary port forwarding rules by using the probe ports of the internal load balancer. Clients can connect via the virtual host name. The DNS server resolves the cluster IP address, and the internal load balancer handles port forwarding to the active node of the cluster.
Azure shared disk
Azure shared disk is a feature for Azure managed disk that allows you to attach a managed disk to multiple VMs simultaneously. Azure shared disks do not natively offer a fully managed file system that can be accessed using SMB/NFS protocol, instead you need to use a cluster manager like Windows Server Failover Cluster (WSFC) or Pacemaker to handle the cluster node communication and write locking.
Few things to consider, when leveraging Azure shared disk for SAP IQ high availability –
- Currently Azure shared disk is locally redundant, which mean you will be operating Azure shared disk on one storage cluster. Azure managed disks with zone redundant storage (ZRS) is available in preview.
- Currently the only supported deployment is with Azure shared premium disk in availability set. Azure shared disk is not supported with Availability Zone deployments.
- Make sure to provision Azure premium disk with a minimum disk size as specified in Premium SSD ranges to be able to attach to the required number of VMs simultaneously.
- Azure shared Ultra disk is not supported for SAP workloads, as it does not support deployment in Availability set or zonal deployment.
For more details and limitation of Azure shared disk, kindly review Share an Azure managed disk documentation.
IMPORTANT: When deploying SAP IQ on Windows server failover cluster with Azure shared disk, be aware that your deployment will be operating with a single shared disk in one storage cluster. Your SAP IQ instance would be impacted, in case of issues with the storage cluster where the Azure shared disk is deployed.
With above consideration and pre-requisites, below are the host names and IP addresses of the scenario presented in this blog.
Host name role
|
Hostname
|
Static IP address
|
Availability Set
|
SAP IQ primary node in a cluster
|
uswiniqdb1
|
10.6.0.4
|
sapiq-db-as
|
SAP IQ secondary node in a cluster
|
uswiniqdb3
|
10.6.0.7
|
sapiq-db-as
|
Cluster network name
|
wiqclust
|
10.6.0.20
|
N/A
|
SAP IQ cluster network name
|
sapiq
|
10.6.0.15
|
N/A
|
Virtual machine deployment
- Create a resource group.
- Create a virtual network.
- Create an availability set.
– Set the max update domain.
- Create virtual machines – uswiniqdb1 and uswiniqdb3.
– Select the supported Windows image for SAP IQ from the Azure marketplace. In this example, Windows Server 2016 is used.
– Select the availability set created in step 3.
Create Azure load balancer
To use a virtual IP address, an Azure load balancer is required. It is strongly recommended to use standard load balancer SKU.
IMPORTANT: Floating IP is not supported on a NIC secondary IP configuration in load-balancing scenarios. For details see
Azure Load balancer Limitations. If you need an additional IP address for the VM, deploy a second NIC.
For a standard load balancer SKU, follow these configuration steps:
- Frontend IP configuration
– Static IP address 10.6.0.15
- Backend pools
– Add the virtual machines that should be part of SAP IQ cluster. In this example, VMs uswiniqdb1 and uswiniqdb3
- Health probes (Probe port)
– Protocol: TCP; Port: 62000; keep default value for Interval and Unhealthy threshold.
- Load balancing rules
– Select the frontend IP address configured in step 1 and select HA ports.
– Select the backend pools and health probe configured in step 2 and 3.
– Keep session persistence as none, and idle timeout as 30 minutes.
– Enable floating IP.
Add registry entries on both cluster nodes
Azure load balancer may close connections, if the connections are idle for a period and exceed the idle timeout. To avoid the disruption for these connections, change the TCP/IP KeepAliveTime and KeepAliveInterval on both cluster nodes. The following registry entries must be changed on both cluster nodes:
Path
|
Variable name
|
Variable type
|
Value
|
Documentation
|
HKLMSYSTEMCurrentControlSetServicesTcpipParameters
|
KeepAliveTime
|
REG_DWORD (Decimal)
|
120000
|
KeepAliveTime
|
HKLMSYSTEMCurrentControlSetServicesTcpipParameters
|
KeepAliveInterval
|
REG_DWORD (Decimal)
|
120000
|
KeepAliveInterval
|
Add Windows VMs to the domain
Assign static IP addresses to the VMs and then add both the virtual machines to the domain.

Configure Windows Server Failover Cluster
Installing failover clustering feature
You will first need to install the Failover-Clustering feature on each server that you want to include in the cluster. Once the feature installation is completed, reboot both cluster nodes.
# Hostname of windows cluster for SAP IQ
$SAPSID = “WIQ”
$ClusterNodes = (“uswiniqdb1″,”uswiniqdb3”)
$ClusterName = $SAPSID.ToLower() + “clust”

# Install Windows features.
# After the feature installs, manually reboot both nodes
Invoke-Command $ClusterNodes {Install-WindowsFeature Failover-Clustering, FS-FileServer -IncludeAllSubFeature -IncludeManagementTools}
Test and configure Windows Server Failover Cluster
Before you can create a cluster, you need to conduct preliminary validation tests to confirm that your hardware and settings are compatible with failover clusters. These tests are broken into categories such as inventory, system configuration, network, storage and many more. At this time, SAP IQ 16.x is not supported on Windows server 2019
# Hostnames of the Windows cluster for SAP IQ
$SAPSID = “WIQ”
$ClusterNodes = (“uswiniqdb1″,”uswiniqdb3”)
$ClusterName = $SAPSID.ToLower() + “clust”

# IP adress for cluster network name is needed ONLY on Windows Server 2016 cluster
$ClusterStaticIPAddress = “10.6.0.20”

# Test cluster
Test-Cluster -Node $ClusterNodes -Verbose

$ComputerInfo = Get-ComputerInfo

$WindowsVersion = $ComputerInfo.WindowsProductName

if($WindowsVersion -eq “Windows Server 2019 Datacenter”){
write-host “Configuring Windows Failover Cluster on Windows Server 2019 Datacenter…”
New-Cluster -Name $ClusterName -Node $ClusterNodes -Verbose
}elseif($WindowsVersion -eq “Windows Server 2016 Datacenter”){
write-host “Configuring Windows Failover Cluster on Windows Server 2016 Datacenter…”
New-Cluster -Name $ClusterName -Node $ClusterNodes -StaticAddress $ClusterStaticIPAddress -Verbose
}else{
Write-Error “Not supported Windows version!”
}
Configure cluster cloud quorum
If you are using Windows Server 2016 or higher, we recommend configuring Azure cloud witness as cluster quorum. The Cloud Witness is a type of Failover Cluster quorum witness that uses Microsoft Azure to provide a vote on cluster quorum.
To set up a Cloud Witness as a quorum witness for your cluster, complete the following steps:
- Create an Azure Storage Account to use as a Cloud Witness.
- Configure the Cloud Witness as a quorum witness for your cluster. Run below command –
$AzureStorageAccountName = “clustcloudwitness”
Set-ClusterQuorum -CloudWitness -AccountName $AzureStorageAccountName -AccessKey <YourAzureStorageAccessKey> -Verbose
Check the article view and copy storage access keys for your Azure storage account to get access key for above command.
NOTE: Azure cloud witness is not supported on Windows server 2012.
Tuning Windows Server Failover Cluster thresholds
After you successfully install the Windows Server Failover Cluster, you need to adjust some thresholds, to be suitable for clusters deployed in Azure. The parameters to be changed are documented in Tuning failover cluster network thresholds. If your two VMs that make up the Windows cluster configuration for SAP IQ are in the same subnet, change the following parameters to these values:
- SameSubnetDelay = 2000
- SameSubnetThreshold = 15
- RouteHistoryLength = 30
PS C:> (get-cluster).SameSubnetThreshold = 15
PS C:> (get-cluster).SameSubnetDelay = 2000
PS C:> (get-cluster).RouteHistoryLength = 30

PS C:> get-cluster | fl *subnet*
# CrossSubnetDelay : 1000
# CrossSubnetThreshold : 20
# PlumbAllCrossSubnetRoutes : 0
# SameSubnetDelay : 2000
# SameSubnetThreshold : 15

PS C:> get-cluster | fl *RouteHistory*
# RouteHistoryLength : 30
Configure Azure shared disk
Before provisioning Azure shared disk, refer and review the Azure shared disk section above.
Create and attach Azure shared disk
Run this command on Azure cloud PowerShell. You will need to adjust the values for your resource group, Azure region, SAPSID, and so on.
# Create Azure Shared Disk
$ResourceGroupName = “win-sapiq”
$location = “westus2”
$SAPSID = “WIQ”

$DiskSizeInGB = 512
$DiskName1 = “$($SAPSID)IQBinaries”
$DiskName2 = “$($SAPSID)IQData”

# With parameter ‘-MaxSharesCount’, we define the maximum number of cluster nodes to attach the shared disk
$NumberOfWindowsClusterNodes = 2

$diskConfig = New-AzDiskConfig -Location $location -SkuName Premium_LRS -CreateOption Empty -DiskSizeGB $DiskSizeInGB -MaxSharesCount $NumberOfWindowsClusterNodes

$dataDisk = New-AzDisk -ResourceGroupName $ResourceGroupName -DiskName $DiskName1 -Disk $diskConfig
$dataDisk = New-AzDisk -ResourceGroupName $ResourceGroupName -DiskName $DiskName2 -Disk $diskConfig

# Attach the disk to cluster VMs
# SAP IQ Cluster VM1
$IQClusterVM1 = “uswiniqdb1”

# SAP IQ Cluster VM2
$IQClusterVM2 = “uswiniqdb3”

# Add the Azure Shared Disk to Cluster Node 1
$vm = Get-AzVM -ResourceGroupName $ResourceGroupName -Name $IQClusterVM1
$vm = Add-AzVMDataDisk -VM $vm -Name $DiskName -CreateOption Attach -ManagedDiskId $dataDisk.Id -Lun 0
$vm = Add-AzVMDataDisk -VM $vm -Name $DiskName -CreateOption Attach -ManagedDiskId $dataDisk.Id -Lun 1
Update-AzVm -VM $vm -ResourceGroupName $ResourceGroupName -Verbose

# Add the Azure Shared Disk to Cluster Node 2
$vm = Get-AzVM -ResourceGroupName $ResourceGroupName -Name $IQClusterVM2
$vm = Add-AzVMDataDisk -VM $vm -Name $DiskName -CreateOption Attach -ManagedDiskId $dataDisk.Id -Lun 0
$vm = Add-AzVMDataDisk -VM $vm -Name $DiskName -CreateOption Attach -ManagedDiskId $dataDisk.Id -Lun 1
Update-AzVm -VM $vm -ResourceGroupName $ResourceGroupName -Verbose
Format Azure shared disk
- Get the disk number. Run these PowerShell commands on one of the cluster nodes:
Get-Disk | Where-Object PartitionStyle -Eq “RAW” | Format-Table -AutoSize
# Example output
# Number Friendly Name      Serial Number HealthStatus OperationalStatus Total Size Partition Style
# —— ————-      ————- ———— —————– ———- —————
# 2      Msft Virtual Disk                Healthy      Online            512 GB     RAW
# 3      Msft Virtual Disk                Healthy      Online            512 GB     RAW
- Format the disk.
# Format SAP ASCS Disk number ‘2’, with drive letter ‘S’
$SAPSID = “WIQ”
$DiskNumber1 = 2
$DiskNumber2 = 3
$DriveLetter1 = “I”
$DriveLetter2 = “J”
$DiskLabel1 = “IQBinaries”
$DiskLabel2 = “IQData”

Get-Disk -Number $DiskNumber1 | Where-Object PartitionStyle -Eq “RAW” | Initialize-Disk -PartitionStyle GPT -PassThru | New-Partition -DriveLetter $DriveLetter1 -UseMaximumSize | Format-Volume -FileSystem ReFS -NewFileSystemLabel $DiskLabel1 -Force -Verbose
# Example outout
# DriveLetter FileSystemLabel FileSystem DriveType HealthStatus OperationalStatus SizeRemaining Size
# ———– ————— ———- ——— ———— —————– ————- —-
# I           IQBinaries      ReFS       Fixed     Healthy      OK                504.98 GB     511.81 GB
Get-Disk -Number $DiskNumber2 | Where-Object PartitionStyle -Eq “RAW” | Initialize-Disk -PartitionStyle GPT -PassThru | New-Partition -DriveLetter $DriveLetter2 -UseMaximumSize | Format-Volume -FileSystem ReFS -NewFileSystemLabel $DiskLabel2 -Force -Verbose
# Example outout
# DriveLetter FileSystemLabel FileSystem DriveType HealthStatus OperationalStatus SizeRemaining Size
# ———– ————— ———- ——— ———— —————– ————- —-
# J           IQData          ReFS       Fixed     Healthy      OK                504.98 GB     511.81 GB
- Verify that the disk is now visible as a cluster disk.
Get-ClusterAvailableDisk -All
# Example output
# Cluster : wiqclust
# Id : 7e5e30f6-c84e-4a23-ac2a-9909bc03eee2
# Name : Cluster Disk 1
# Number : 2
# Size : 549755813888
# Partitions : {?GLOBALROOTDeviceHarddisk2Partition2}
- Register the disk in the cluster.
Get-ClusterAvailableDisk -All | Add-ClusterDisk
# Example output
# Name           State   OwnerGroup        ResourceType
# —-           —–   ———-        ————
# Cluster Disk 1 Online  Available Storage Physical Disk
# Cluster Disk 2 Online  Available Storage Physical Disk
SAP IQ Configuration on Windows cluster
SAP IQ installation and configuration
This section does not cover the end-to-end installation procedure and database configuration for SAP IQ. For most up-to-date information, follow SAP’s documentation for SAP IQ on Windows.
In this example, we had installed SAP IQ 16.1 SP04 PL04 on a Windows Server 2016 with 8 vCPU and 64 GB RAM. SAP IQ installation path is I:SAPIQ. Using utility database, a new SAPIQDB database is created, which will be used for NLS configuration.
To start SAPIQDB database, a configuration file SAPIQDB.cfg is created and placed in the database directory (J:SAPIQdatadb). Using the configuration file (SAPIQDB.cfg) and database file (SAPIQDB.db), we will start SAPIQDB database.
I:SAPIQIQ-16_1Bin64> start_iq.exe @J:SAPIQdatadbSAPIQDB.cfg J:SAPIQdatadbSAPIQDB.db
Register SAP IQ as Windows service on primary node
Run SAP Sybase IQ as a Windows service to start the server. Services run in the background as long as Windows is running. We will be configuring high availability of SAP IQ using “Generic Service” role in Windows Cluster. The cluster software starts the service, and then periodically queries the Service Controller to determine whether the service appears to be running. If so, it is presumed to be online, and it is not restarted or failed over. For more information, see Creating a New Windows Service.
Perform below steps on which your Azure shared disk is mounted. Below steps are performed in uswiniqdb1. The same steps need to be followed in uswiniqdb3 in later part.
- Start SAP IQ Service Manager. On the server where you have performed SAP installation, it can be found under Start > SAP > SAP IQ Service Manager.
- Choose Create a New Service.
- Name the new service. In this example, we named it as SAPIQDB.
- Add the appropriate start-up parameters.
Include the full path to the database file. The server cannot start without a valid database path name.
Service Name: SAPIQDB
Startup Parameters: @J:SAPIQdatadbSAPIQDB.cfg J:SAPIQdatadbSAPIQDB.db
- Click Apply.
- Restart Windows. On restart, Azure shared disk will move to another node (uswiniqdb3).
Because Windows service manager reads environmental variables only at system startup, you must restart Windows after you configure SAP IQ as a Windows service.
- In services.msc, “Sybase IQ SAPIQDB” service gets created.
Set environment variables in secondary server
The installation of SAP IQ is performed on primary node, which means all environment variables are set on primary node. We do no install SAP IQ system on the secondary server. Instead it is used as failover server which will take over all the cluster disks and resources during a failure. For failover to happen smoothly, we need to configure the same environment variables on the secondary server as that are set in primary server.
On primary node (uswiniqdb1), open Control Panel > System and Security > System > Advanced system settings > Environment Variables.
Under System Variables, below SAP IQ parameters are set. Kindly check in your system all SAP IQ parameters.
System Variables
|
Value
|
COCKPIT_JAVA_HOME
|
I:SAPIQSharedSAPJRE-8_1_062_64BIT
|
INCLUDE
|
I:SAPIQOCS-16_0include;
|
IQDIR16
|
I:SAPIQIQ-16_1
|
IQLOGDIR16
|
C:ProgramDataSAPIQlogfiles
|
LIB
|
I:SAPIQOCS-16_0lib;
|
Path
|
I:SAPIQCOCKPIT-4bin
I:SAPIQOCS-16_0lib3p64
I:SAPIQOCS-16_0lib3p
I:SAPIQOCS-16_0dll
I:SAPIQOCS-16_0bin
I:SAPIQIQ-16_1Bin64
I:SAPIQIQ-16_1Bin32
|
SAP_JRE8
|
I:SAPIQSharedSAPJRE-8_1_062_64BIT
|
SAP_JRE8_32
|
I:SAPIQSharedSAPJRE-8_1_062_32BIT
|
SAP_JRE8_64
|
I:SAPIQSharedSAPJRE-8_1_062_64BIT
|
SYBASE
|
I:SAPIQ
|
SYBASE_OCS
|
OCS-16_0
|
SYBROOT
|
I:SAPIQ
|
Login to secondary server (uswiniqdb3) and configure all the environment variable that are set in primary server (uswiniqdb1). You can use below PowerShell command to set environment variable or manually configure each variable on secondary system.
[Environment]::SetEnvironmentVariable(‘COCKPIT_JAVA_HOME’,’I:SAPIQSharedSAPJRE-8_1_062_64BIT’,[System.EnvironmentVariableTarget]::Machine)
[Environment]::SetEnvironmentVariable(‘INCLUDE’,’I:SAPIQOCS-16_0include;’,[System.EnvironmentVariableTarget]::Machine)
[Environment]::SetEnvironmentVariable(‘IQDIR16′,’I:SAPIQIQ-16_1’,[System.EnvironmentVariableTarget]::Machine)
[Environment]::SetEnvironmentVariable(‘IQLOGDIR16′,’C:ProgramDataSAPIQlogfiles’,[System.EnvironmentVariableTarget]::Machine)
[Environment]::SetEnvironmentVariable(‘LIB’,’I:SAPIQOCS-16_0lib;’,[System.EnvironmentVariableTarget]::Machine)
[Environment]::SetEnvironmentVariable(‘PATH’, $env:Path + ‘;I:SAPIQCOCKPIT-4bin;I:SAPIQOCS-16_0lib3p64;I:SAPIQOCS-16_0lib3p;I:SAPIQOCS-16_0dll;I:SAPIQOCS-16_0bin;I:SAPIQIQ-16_1Bin64;I:SAPIQIQ-16_1Bin32’,[System.EnvironmentVariableTarget]::Machine)
[Environment]::SetEnvironmentVariable(‘SAP_JRE8′,’I:SAPIQSharedSAPJRE-8_1_062_64BIT’,[System.EnvironmentVariableTarget]::Machine)
[Environment]::SetEnvironmentVariable(‘SAP_JRE8_32′,’I:SAPIQSharedSAPJRE-8_1_062_32BIT’,[System.EnvironmentVariableTarget]::Machine)
[Environment]::SetEnvironmentVariable(‘SAP_JRE8_64′,’I:SAPIQSharedSAPJRE-8_1_062_64BIT’,[System.EnvironmentVariableTarget]::Machine)
[Environment]::SetEnvironmentVariable(‘SYBASE’,’I:SAPIQ’,[System.EnvironmentVariableTarget]::Machine)
[Environment]::SetEnvironmentVariable(‘SYBASE_OCS’,’OCS-16_0′,[System.EnvironmentVariableTarget]::Machine)
[Environment]::SetEnvironmentVariable(‘SYBROOT’,’I:SAPIQ’,[System.EnvironmentVariableTarget]::Machine)
After the environment variables are configured in secondary server (uswiniqdb3), restart the secondary server for environment variable to be effective.
Register SAP IQ as Windows service on secondary server
On the secondary node, we need to register SAP IQ as Windows service as our cluster roles is configured for the SAP IQ service. During the failover, Azure shared disk will move to the secondary node and the resource will start SAP IQ service on failover node. It will only start if SAP IQ Windows service is registered on secondary as well.
To register the SAP IQ service on secondary node, follow these steps –
- Stop the SAP IQ service on primary node (uswiniqdb1).
- If you Azure shared disk is running on primary node (uswiniqdb1), move shared disks to secondary node. Execute below PowerShell command
PS C:> Get-ClusterGroup
# Name                OwnerNode   State
# —-                ———   —–
# Available Storage   uswiniqdb1  Online
# Cluster Group       uswiniqdb3  Online
PS C:> Get-ClusterGroup -Name ‘Available Storage’ | Get-ClusterResource
# Name           State  OwnerGroup        ResourceType
# —-           —–  ———-        ————
# Cluster Disk 1 Online Available Storage Physical Disk
# Cluster Disk 2 Online Available Storage Physical Disk
PS C:> Move-ClusterGroup -Name ‘Available Storage’ -Node uswiniqdb3
# Name OwnerNode State
# —- ——— —–
# Available Storage uswiniqdb3 Online
- Start the SAP IQ Service Manager. On the secondary node, the SAP IQ Service manager will not be visible via start menu, instead navigate to part I:SAPIQIQ-16_1Bin64 and open SybaseIQservice16.exe.
- Choose Create a New Service.
- Name the new service. In this example, we named it as SAPIQDB.
- Add the appropriate start-up parameters.
Include the full path to the database file. The server cannot start without a valid database path name.
Service Name: SAPIQDB
Startup Parameters: @J:SAPIQdatadbSAPIQDB.cfg J:SAPIQdatadbSAPIQDB.db
- Click Apply.
Restart Windows. On restart, Azure shared disks will move to another node (uswiniqdb3).
Because Windows service manager reads environmental variables only at system startup, you must restart Windows after you configure SAP IQ as a Windows service.
In services.msc, “Sybase IQ SAPIQDB” service gets created.
Try to start ‘Sybase IQ SAPIQDB’ service in respective node each time after registering, to check the service get started without any issue.
Configure SAP IQ role – Windows failover cluster
Before running below commands, make sure you have configured cluster as described in above “Configure Windows server failover cluster” section.
# Check where you Azure shared disk is running
PS C:> Get-ClusterGroup
# Name              OwnerNode   State
# —-              ———   —–
# Available Storage uswiniqdb1  Online
# Cluster Group     uswiniqdb3  Online
# Check the cluster disk name of your azure shared disk
PS C:> Get-ClusterGroup -Name ‘Available Storage’ | Get-ClusterResource
# Name           State  OwnerGroup        ResourceType
# —-           —–  ———-        ————
# Cluster Disk 1 Online Available Storage Physical Disk
# Cluster Disk 2 Online Available Storage Physical Disk
# Command to get service name for “Sybase IQ SAPIQDB” service
PS C:> Get-Service ‘Sybase IQ SAPIQDB’
# Status  Name            DisplayName
# ——  —-            ———–
# Running SybIQ_SAPIQDB   Sybase IQ SAPIQDB
# Command to create generic service role
# StaticAddress is the IP address of your Internal Load Balancer
PS C:> Add-ClusterGenericServiceRole -ServiceName “SybIQ_SAPIQDB” -Name “sapiq” -StaticAddress “10.6.0.15” -Storage “Cluster Disk 1″,”Cluster Disk 2”
# Name    OwnerNode   State
# —-    ———   —–
# sapiq   uswiniqdb1  Online
The internal load balancer IP address 10.6.0.15 will not reach until we set probe port for it. Execute below command to set probe port 62000 to IP address 10.6.0.15.
PS C:> Get-ClusterGroup
# Name                OwnerNode   State
# —-                ———   —–
# Available Storage   uswiniqdb1  Offline
# Cluster Group       uswiniqdb3  Online
# sapiq               uswiniqdb1  Online
PS C:> Get-ClusterGroup -Name ‘sapiq’ | Get-ClusterResource
# Name                 State  OwnerGroup ResourceType
# —-                 —–  ———- ————
# Cluster Disk 1       Online sapiq      Physical Disk
# Cluster Disk 2       Online sapiq      Physical Disk
# IP Address 10.6.0.15 Online sapiq      IP Address
# sapiq                Online sapiq      Network Name
# Sybase IQ SAPIQDB    Online sapiq      Generic Service
PS C:> Get-ClusterResource ‘IP Address 10.6.0.15’ | Get-ClusterParameter
# Object                   Name                     Value                       Type
# ——                   —-                     —–                       —-
# IP Address 10.6.0.15     Network                  Cluster Network 1           String
# IP Address 10.6.0.15     Address                  10.6.0.15                   String
# IP Address 10.6.0.15     SubnetMask               255.255.255.0               String
# IP Address 10.6.0.15     EnableNetBIOS            0                           UInt32
# IP Address 10.6.0.15     OverrideAddressMatch     0                           UInt32
# IP Address 10.6.0.15     EnableDhcp               0                           UInt32
# IP Address 10.6.0.15     ProbePort                0                           UInt32
# IP Address 10.6.0.15     ProbeFailureThreshold    0                           UInt32
# IP Address 10.6.0.15     LeaseObtainedTime        1/1/0001 12:00:00 AM        DateTime
# IP Address 10.6.0.15     LeaseExpiresTime         1/1/0001 12:00:00 AM        DateTime
# IP Address 10.6.0.15     DhcpServer               255.255.255.255             String
# IP Address 10.6.0.15     DhcpAddress              0.0.0.0                     String
# IP Address 10.6.0.15     DhcpSubnetMask           255.0.0.0                   String
PS C:> Get-ClusterResource ‘IP Address 10.6.0.15’ | Set-ClusterParameter -Name ProbePort -Value 62000
# WARNING: The properties were stored, but not all changes will take effect until IP Address 10.6.0.15 is taken offline and then online again.
PS C:> Stop-ClusterGroup -Name ‘sapiq’
# Name   OwnerNode   State
# —-   ———   —–
# sapiq  uswiniqdb1  Offline
PS C:> Start-ClusterGroup -Name ‘sapiq’
# Name   OwnerNode   State
# —-   ———   —–
# sapiq  uswiniqdb1  Online
Bind the internal load balancer IP address (10.6.0.15) to sapiq.internal.contoso.net hostname in DNS.
C:>ping sapiq.internal.contoso.net

Pinging sapiq.internal.contoso.net [10.6.0.15] with 32 bytes of data:
Reply from 10.6.0.15: bytes=32 time=1ms TTL=128
Reply from 10.6.0.15: bytes=32 time=1ms TTL=128
Reply from 10.6.0.15: bytes=32 time<1ms TTL=128
Reply from 10.6.0.15: bytes=32 time<1ms TTL=128
For all client connection strings, sapiq.internal.contoso.net hostname should be used.
The service “Sybase IQ SAPIQDB” must start only after the resource “sapiq, cluster disk 1 and cluster disk 2” are online. The dependency report can be found as below –


If the dependency is not set, you can open the properties of “Sybase IQ SAPIQDB” role and set below dependency.

Test SAP IQ cluster
For this failover test, our SAP IQ instance is running on node A (uswiniqdb1). You can either your “Failover cluster manager” or “PowerShell” to initiate a failover. Here in this example, node A represent uswiniqdb1 and node B represent uswiniqdb3.
- Move the cluster group to node B.
Get-ClusterGroup ‘sapiq’
# Name  OwnerNode  State
# —-  ———  —–
# sapiq uswiniqdb1 Online
Move-ClusterGroup -Name ‘sapiq’
# Name  OwnerNode  State
# —-  ———  —–
# sapiq uswiniqdb3 Online
Get-ClusterGroup ‘sapiq’ | Get-ClusterResource
# Name                 State  OwnerGroup ResourceType
# —-                 —–  ———- ————
# Cluster Disk 1       Online sapiq      Physical Disk
# Cluster Disk 2       Online sapiq      Physical Disk
# IP Address 10.6.0.15 Online sapiq      IP Address
# sapiq                Online sapiq      Network Name
# Sybase IQ SAPIQDB    Online sapiq      Generic Service
C:> hostnameuswiniqdb3 C:> tasklist /FI “IMAGENAME eq iqsrv16.exe”
# Image Name                     PID Session Name        Session#    Mem Usage
# ========================= ======== ================ =========== ============
# iqsrv16.exe                  16188 Services                   0    798,340 K
- Kill ‘iqsrv16.exe’ process running on node B.
PS C:> hostname
uswiniqdb3
PS C:> tasklist /FI “IMAGENAME eq iqsrv16.exe”
# Image Name                     PID Session Name        Session#    Mem Usage
# ========================= ======== ================ =========== ============
# iqsrv16.exe                  16188 Services                   0    798,340 K
PS C:> taskkill /F /PID 16188
SUCCESS: The process with PID 16188 has been terminated.
PS C:> tasklist /FI “IMAGENAME eq iqsrv16.exe”
INFO: No tasks are running which match the specified criteria.
PS C:> tasklist /FI “IMAGENAME eq iqsrv16.exe”
# Image Name                     PID Session Name        Session#    Mem Usage
# ========================= ======== ================ =========== ============
# iqsrv16.exe                   6956 Services                   0    740,624 K
Here we killed iqsrv16.exe, but it got started on the same node B again as the response to resource failure for ‘Sybase IQ SAPIQDB’ is set a below. With below setting, the resource will be restarted on the same server before the resource failover to node A. If you want resource to failover and do not want to restart on the same node, you can set the value of “Maximum restarts in the specified period” to 0.

- Restart node where iqsrv16.exe process is running.
PS C:> hostname
uswiniqdb1
PS C:> tasklist /FI “IMAGENAME eq iqsrv16.exe”
# Image Name                     PID Session Name        Session#    Mem Usage
# ========================= ======== ================ =========== ============
# iqsrv16.exe                  18025 Services                   0    798,340 K
PS C:> shutdown /r
On restart of node A, the resource failover to node B.
PS C:> hostname
uswiniqdb3
PS C:> Get-ClusterGroup ‘sapiq’ | Get-ClusterResource
# Name                 State  OwnerGroup ResourceType
# —-                 —–  ———- ————
# Cluster Disk 1       Online sapiq      Physical Disk
# Cluster Disk 2       Online sapiq      Physical Disk
# IP Address 10.6.0.15 Online sapiq      IP Address
# sapiq                Online sapiq      Network Name
# Sybase IQ SAPIQDB    Online sapiq      Generic Service
References
by Contributed | Jun 15, 2021 | Technology
This article is contributed. See the original author and article here.
We just added new APIs in preview in the Azure IoT SDK for C# that will make it easier for device developers to implement IoT Plug and Play, and we’d love to have your feedback.
Since we released IoT Plug and Play back in September 2020, we provided the PnP-specific helpers functions in the form of samples to help demonstrate the PnP convention eg. how to format PnP telemetry message, how to ack on properties updates, etc.
As IoT Plug and Play is becoming the “new normal” for connecting devices to Azure IoT, it is important that there is a solid set of APIs in the C# client SDK to help you efficiently implement IoT Plug and Play in your devices. PnP models expose components, telemetry, commands, and properties. These new APIs format and send messages for telemetry and property updates. They can also help the client receive and ack writable property update requests and incoming command invocations.
These additions to the C# SDK can become the foundation of your solution, taking the load off your plate when it comes to formatting data and making your devices future proof. We introduced these functions in preview for now, so you can test them in your scenarios and give us feedback on the design.. As long we are in preview, it is easy to change these APIs, so it is the right time to give it a try and let us know if that fits your needs or if you see some improvements.
The NuGet package can be found here: https://www.nuget.org/packages/Microsoft.Azure.Devices.Client/1.38.0-preview-001
We have created a couple of samples to help you get started with these new APIs, have a look at:
https://github.com/Azure/azure-iot-sdk-csharp/blob/preview/iothub/device/samples/convention-based-samples/readme.md
In these new APIs, we introduced a couple of new types to help with convention operations. For telemetry, we expose TelemetryMessage that simplifies message formatting for the telemetry:
// Send telemetry "serialNumber".
string serialNumber = "SR-1234";
using var telemetryMessage = new TelemetryMessage
{
    MessageId = Guid.NewGuid().ToString(),
    Telemetry = { ["serialNumber"] = serialNumber },
};
await _deviceClient.SendTelemetryAsync(telemetryMessage, cancellationToken);
and in the casehere thermostat1) you can prepare the telemetry message this way:
using var telemetryMessage = new TelemetryMessage("thermostat1")
{
    MessageId = Guid.NewGuid().ToString(),
    Telemetry = { ["serialNumber"] = serialNumber },
};
await _deviceClient.SendTelemetryAsync(telemetryMessage, cancellationToken);
For properties, we introduced the type ClientProperties TryGetValue.
With this new type, accessing a device twin property becomes:
// Retrieve the client's properties.
 ClientProperties properties = await _deviceClient.GetClientPropertiesAsync(cancellationToken);

// To fetch the value of client reported property "serialNumber" under component "thermostat1".
bool isSerialNumberReported = properties.TryGetValue("thermostat1", "serialNumber", out string serialNumberReported);

// To fetch the value of service requested "targetTemperature" value under component "thermostat1".
bool isTargetTemperatureUpdateRequested = properties.Writable.TryGetValue("thermostat1", "targetTemperature", out double targetTemperatureUpdateRequest);
Note that in that case, we have a component named thermostat1, first we get the serialNumber and second for a writable property, we use properties.Writable.
Same pattern for reporting properties, we have now the ClientPropertyCollection, that helps to update properties by batch, as we have here a collection and exposing the method AddComponentProperty:
// Update the property "serialNumber" under component "thermostat1".
var propertiesToBeUpdated = new ClientPropertyCollection();
propertiesToBeUpdated.AddComponentProperty("thermostat1", "serialNumber", "SR-1234");

ClientPropertiesUpdateResponse updateResponse = await _deviceClient
    .UpdateClientPropertiesAsync(propertiesToBeUpdated, cancellationToken);
long updatedVersion = updateResponse.Version;
With this, it became much easier to Respond to top-level property update requests even for a component model:
await _deviceClient.SubscribeToWritablePropertiesEventAsync(
    async (writableProperties, userContext) =>
    {
        if (writableProperties.TryGetValue("thermostat1", "targetTemperature", out double targetTemperature))
        {
            IWritablePropertyResponse writableResponse = _deviceClient
                .PayloadConvention
                .PayloadSerializer
                .CreateWritablePropertyResponse(targetTemperature, CommonClientResponseCodes.OK, writableProperties.Version, "The operation completed successfully.");

            var propertiesToBeUpdated = new ClientPropertyCollection();
            propertiesToBeUpdated.AddComponentProperty("thermostat1", "targetTemperature", writableResponse);

            ClientPropertiesUpdateResponse updateResponse = await _deviceClient.UpdateClientPropertiesAsync(propertiesToBeUpdated, cancellationToken);
        }
As long as we stay in preview for these APIs, you‘ll find the set of usual PnP samples, migrated to use these news APIs in the code repository, in the preview branch:
https://github.com/Azure/azure-iot-sdk-csharp/tree/preview/iothub/device/samples/convention-based-samples
See project Thermostat for the non-component sample and TemperatureController for the component sample.
Again, it is the right time to let us know any feedback and comments on these APIs. Contact us, open an issue, and help us providing the right PnP API you need.
Happy testing,
Eric for the Azure IoT Managed SDK team


Recent Comments