![[Guest Blog] Coding Education for All – Empowering Youth to be Future Ready](https://www.drware.com/wp-content/uploads/2021/06/fb_image-112.jpeg)
by Contributed | Jun 16, 2021 | Technology
This article is contributed. See the original author and article here.
This blog was written by Simran Makhija, Gold Microsoft Learn Student Ambassador. Simran shares their story of building a Tech For Good solution to empower low access communities with coding education to be future ready.
Hi! My name is Simran Makhija, and I am a third year Computer Science Engineering student and a Gold Microsoft Learn Student Ambassador. I have done most of my work in Web Development and JavaScript with a recent interest in product design! Aside from that, I am always up to talk about all things literature and music, and I am a STEMinist, a feminist that believes in the upliftment of women and other underrepresented communities in STEM, and works for the same in Tech.
My Coding Learning Journey
Pursuing Computer Science Engineering in my bachelor’s was a decision that came naturally to me. I had been exposed to the wondrous world of computers from an early age. My first exposure to programming was a robotics lab in 7th grade. It was in this lab that I coded my first line follower! This was by far the most fascinating experience! In 8th grade, I tried my hands on QBASIC and absolutely loved it. Unfortunately, I moved the following year, and my new school curriculum did not have coding education. Due to inaccessibility of computer systems outside of school, I was unable to learn coding on my own at the time. Nevertheless, these experiences led me to choose Computer Science Engineering as my major in college.
The Visual Studio Code Hackathon
In June 2020, Microsoft and MLH organized the Visual Studio Code Hackathon. I got to know about the opportunity through a post on the Microsoft Learn Student Ambassadors Teams by Pablo Veramendi, Program Director. So, I teamed up with my fellow Student Ambassadors from different corners of the country for the hackathon.
The challenge presented to us was “to build an extension to help new coders learn. For students, by students”. We were new coders ourselves not too long ago and together we figured out a shared struggle in our learning – pen-paper coding assignments and assessments. Even in college, we had all started to learn on pen and paper and could seldom test our programs on a machine, either due to a lack of access or because of time management issues as transferring code to an IDE from paper is cumbersome and time-consuming process. So we decided to make an extension that we wish we had had as new coders – “Code Capture”. This extension allowed you to select an image of handwritten code and populated it to a new code file in the VS Code IDE. It was a weekend spent learning, getting mentorship, coding, debugging and creating a solution we wish we had.
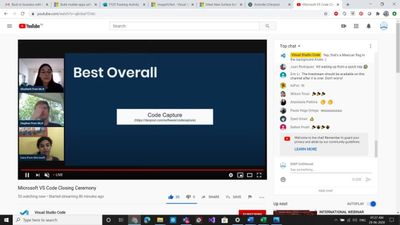
We were passionate about the cause and creating a Tech for Good solution – a passion that was reflected in our submission and we won the “Best Overall” prize. We were ecstatic, we had won a pair of Surface Earbuds each (allegedly the first few people in the country to have them!) and most importantly we won a mentorship session with Amanda Silver, Corporate Vice President at Microsoft.
Mentorship Sessions – Finding Direction
Almost a month after the hackathon, and equipped with our prized Surface Earbuds, we had our mentorship session with Amanda Silver.
During the session, different possible directions we could work in with our project and decided to create an application based on the concept as an activity for Hour of Code during Computer Science Education Week.
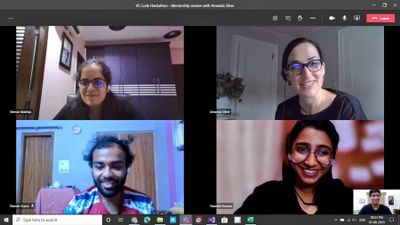
Amanda further connected our team with Travis Lowdermilk, UX Researcher at Microsoft and Jacqueline Russell, Program Manager for Microsoft MakeCode and they were kind enough to set time aside to meet with us.
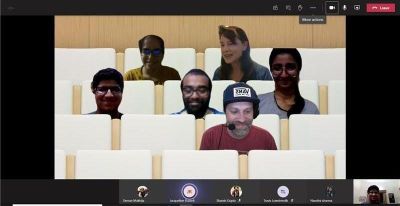
In the meeting with Travis and Jacqueline, they shared their experiences and insights on product development and with the Hour of Code. We discussed our plans for the Hour of Code activity and the possible options we could explore. It was a very insightful and enlightening session. We also got signed copies of the Customer-Driven Playbook as a gift from the author himself.
What is Hour of Code?
The Hour of Code started as a one-hour introduction to computer science, designed to demystify “code”, to show that anybody can learn the basics, and to broaden participation in the field of computer science. It has since become a worldwide effort to celebrate computer science, starting with 1-hour coding activities but expanding to all sorts of community efforts.
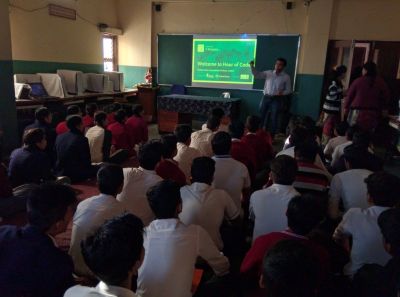
I first came across Hour of Code(HoC) initiative in 2019 when my local community released a call for volunteers for HoC – CS Education Week 2019. Learning more about the initiative, I wanted to contribute to it as much as I could because this was a session that I wish I had attended when I was in school. I joined the organizing committee and led the school onboarding effort. I volunteered in various sessions with middle school and secondary school students, giving them an introduction to the marvelous world of Computer Science.
Hour Of Code – Computer Science Education Week 2020
Following the mentorship sessions and various rounds of brainstorming, we decided to develop an introductory JavaScript tutorial on a web application designed to allow students to easily click a picture of their code, extract to an editor and compile it on their browser.
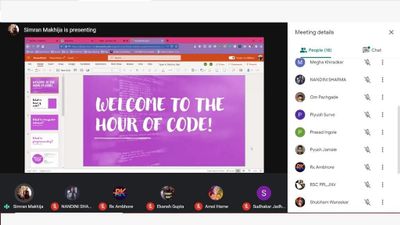
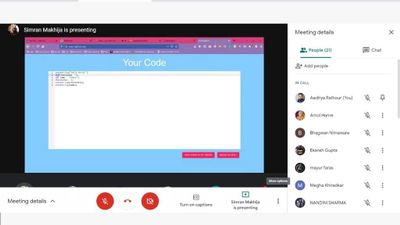
Our team collaborated with folks all over the country to conduct HoC sessions in schools and colleges during CS Education Week 2020. We conducted sessions with over 250 learners who did not have access to computers. This was a heartwarming experience as I was able to give young learners an opportunity to learn to code that I wish I had in school.
by Contributed | Jun 16, 2021 | Technology
This article is contributed. See the original author and article here.
To add to the list of exciting announcements for Azure Sentinel, we are happy to announce that Watchlists now support ARM templates! Moving forward, users will be able to deploy Watchlists via ARM templates for quicker deployment scenarios as well as bulk deployments.
What Does It Look Like?
The template format is similar to regular ARM templates for Azure Sentinel. The template contains a few variables that are set upon creation and deployment:
Workspace Name: The workspace name is required so that ARM knows the workspace that Azure Sentinel is using. This is used for deploying the content and function to the workspace.
Watchlist Name: Name for the Watchlist in both Azure Sentinel and in the workspace when calling it via the _getWatchlist function. This should reflect what the Watchlist is for.
SearchKey Value: Title of a column that will be used for performing lookups and joins with other tables. It is recommended to choose the column that will be the most used for joins and lookups.
Watchlist Name and SearchKey should be set when creating the template as this value will be static. The name should reflect the purpose or topic of the Watchlist. The SearchKey is meant to be used as the reference column. The purpose of this column is to make lookups and joins more efficient. The section that those variables are set in appears as so:
name": "[concat(parameters('workspaceName'), <-- set at deployment '/Microsoft.SecurityInsights/PUTWATCHLISTNAMEHERE')]",
        "type": "Microsoft.OperationalInsights/workspaces/providers/Watchlists",
        "kind": "",
        "properties": {
            "displayName": "PUTWATCHLISTNAMEHRE",
            "source": "PUTWATCHLISTNAMEHERE.csv",
            "description": "This is a sample Watchlist description.",
            "provider": "Custom",
            "isDeleted": false,
            "labels": [
            ],
            "defaultDuration": "P1000Y",
            "contentType": "Text/Csv",
            "numberOfLinesToSkip": 0,
            "itemsSearchKey": "PUTSEARCHKEYVALUEHERE",
Within the body is the content that would normally be found within the CSV file that is uploaded to Azure Sentinel. This data is found under “rawContent”.
For the content of the csv that will be generated, the columns and values must be specified. The columns will appear first, followed by the data. An example appears as so:
"rawContent": "SEARCHKEYCOLUMN,SampleColumn1,SampleColumn2rn
Samplevalue1,samplevalue2,samplevalue3rnsamplevalue4,samplevalue5,samplevalue6rn"
The columns that should be used are listed first in this example (SearchKey, SampleColumn1, SampleColumn2). Once the columns are listed, “rn” needs to be used to signal that a new row needs to be started. This is used throughout the template. This lets ARM know that the row has ended and the next row of the CSV should begin.
Note: The column being used for the SearchKey does not always need to be listed first.
When it comes to values that should be under the column, each value should be separated by a comma. The comma is interpreted as the end of that cell. As shown in the example, samplevalue1 is one cell, samplevalue2 is a different cell. When all of the values have been added for the row, rn needs to be used in order to start the next row.
An example of how that might look would be:
"rawContent": "SEARCHKEYCOLUMN, Account, Machinern123.456.789.1, Admin, ContosoMachine1rn
    123.456.789.2, LocalUser, ContosoMachine2rn"
Note: These values are space sensitive. If spaces are not needed, please avoid using them as it could lead to inaccurate values.
This example shows that the columns will be an IP (used as the search key value), an account, and a machine. The rows below the columns will contain those types of values in the CSV file. In this case, the CSV will only have 3 columns and 2 rows of data.
Use Cases:
ARM template deployments will provide the most value when looking to deploy Watchlists in bulk or along with other items. For example, deploying a Watchlist upon the creation of a custom analytic rule, deploying a Watchlist based on TI posted by Microsoft, and more.
As an example, an
ARM template has been posted within the Azure Sentinel GitHub that lists the Azure Public IPs. These IPs can be found online and downloaded but in this case, the IPs are ready to be deployed as a Watchlist for usage. This Watchlist can then be used to lower false positives for detections that pick up the IP or to be used as enrichment data for investigating activities within the environment. Additionally, a
template that consists of threat intelligence from the Microsoft Threat Intelligence Research Center for the recent NOBELIUM attacks has been posted within the GitHub for usage. This template allows for a file upload of threat intelligence without having to manually type each value into a CSV or the Azure portal.
To help users get started, a
Watchlist template example has been posted within GitHub for reference. This template is meant to serve as the building block for custom templates and can be used as needed.
Time to get creative and start building custom Watchlists today!
by Contributed | Jun 16, 2021 | Technology
This article is contributed. See the original author and article here.
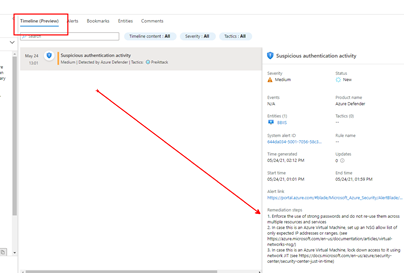
Microsoft’s Azure Sentinel now provides a Timeline view within the Incident where alerts now display remediation steps. The list of alerts that have remediations provided by Microsoft will continue to grow. As you can see in the graphic below, one or more remediation steps are contained in each alert. These remediation steps tell you what to do with the alert or Incident in question.
However, what if you want to have your own steps, or what if you have alerts without any remediation steps?
Now available to address this is the Get-SOCActions Playbook found in GitHub (Azure-Sentinel/Playbooks/Get-SOCActions at master · Azure/Azure-Sentinel (github.com)). This playbook uses a .csv file uploaded your Azure Sentinel instance, as a Watchlist containing the steps your organization wants an analyst to take to remediate the Incident they are triaging. More on this in a minute.
Below is an example of a provided Remediation from one of the Alerts:
Example Remediation Steps Provided by Microsoft
- Enforce the use of strong passwords and do not re-use them across multiple resources and services
- In case this is an Azure Virtual Machine, set up an NSG allow list of only expected IP addresses or ranges. (see https://azure.microsoft.com/en-us/documentation/articles/virtual-networks-nsg/)
- In case this is an Azure Virtual Machine, lock down access to it using network JIT (see https://docs.microsoft.com/en-us/azure/security-center/security-center-just-in-time)

Remediation steps were added to the Timeline View recently in Azure Sentinel, as shown above
We highly encourage you to look at the SOC Process Framework blog, Playbook and the amazing Workbook; you may have already noticed the SocRA Watchlist which was called out in that article, it is a .csv file that Rin published, and is the template you need to build your own steps (or just use the enhanced ones provided by Rin).
It’s this .csv file that creates the Watchlist that forms the basis of enhancing your SOC process for remediation, its used in the Workbook and Playbook. The .csv file has been used as it’s an easy to edit format (in Excel or Notepad etc…), you just need to amend the rows or even add your own rows and columns for new Alerts or steps you would like. There are columns called A1, A2 etc… these are essentially Answer1 (Step1), Answer 2(Step2) etc…
Example of a new Alert that has been added.

You can also in the last column add a DATE (of when the line in the watchlist was updated). Note that any URL link will appear its own column in the [Incident Overview] workbook – we parse the string so it can be part of a longer line of text in any of the columns headed A1 thru A19 (you can add more answers if required, just inset more columns named A20, A21 etc…after column A19). Just remember to save your work as a .CSV.
Then when you name the Watchlist, our suggestion is “SOC Recommended Actions”, make sure you set the ‘Alias’ to: SocRA
Important: SocRA is case sensitive, you need an uppercase S, R and A.

You should now have entries in Log Analytics for the SocRA alias.
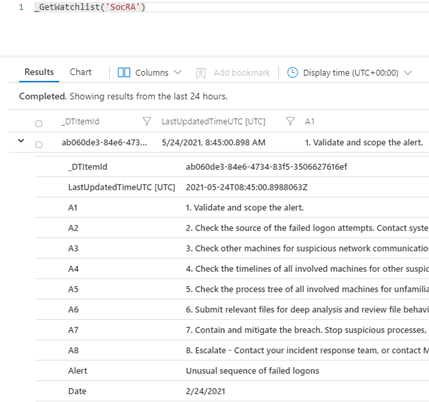
The SocRA watchlist .csv file serves both the Incident Overview Workbook and supports the Get-SOCActions Playbook, should you want to push Recommended Actions to the Comments section of the Incident your Analyst is working on. You will want to keep this in mind when you edit the SocRA watchlist. The Get-SOCActions Playbook leverages the formatting of the SocRA watchlist, i.e. A1 – A19, Alert, Date when querying the watchlist for Actions. If the alert is not found, or has not been onboarded, the Playbook then defaults to a set of questions pulled from the SOC Process Framework Workbook to help the analyst triage the alert & Incident.
Important – Should you decide to add more steps to the watchlist .csv file beyond A1-A19 you will need to edit the Playbooks conditions to include the additional step(s) you added both in the JSON response, the KQL query, and the variable HTML formatting prior to committing the steps to the Incidents Comments section.
Incident Overview Workbook
To make Investigation easier, we have integrated the above Watchlist with the default “Investigation Overview” Workbook you see, just simply click on the normal link from within the Incident blade:
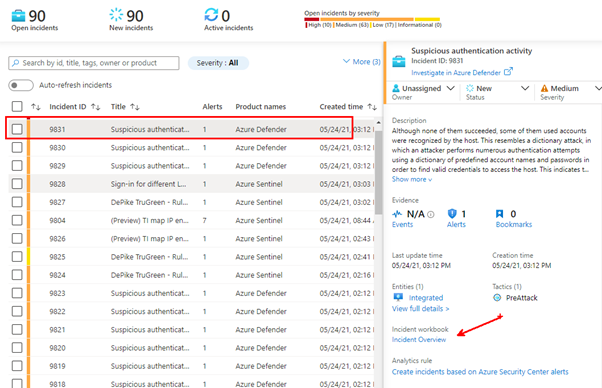
This will still open Workbook as usual. Whist I was making changes, I have also colour coded the alert status and severity fields (Red, Amber and Green), just to make them stand out a little, and Blue for new alerts.
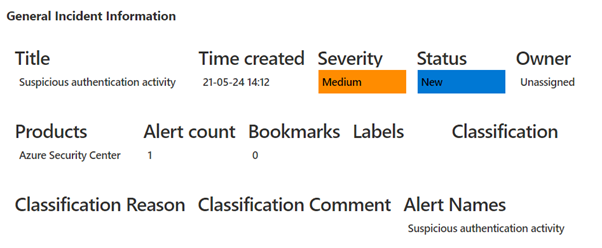
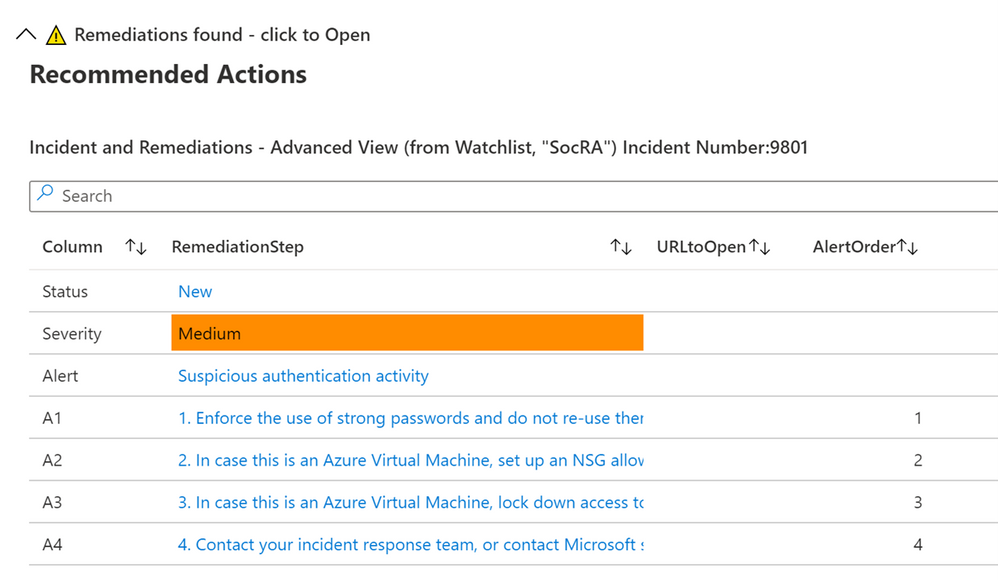
If an alert has NO remediations, nothing will be visible in the workbook. However, if the alert has a remediation and there is no Watchlist called: SocRA then you will be able to expand the menu that will appear:

This will show the default or basic remediations that the alert has, in this example there are 3 remediation steps shown.

If you have the SocRA watchlist installed, then you will see that data shown instead (as the Watchlist is the authoritative source, rather than the steps in the alert). In this example there is a 4th step (A4) shown, which is specific to the Watchlist and the specific alert called “Suspicious authentication activity”.
Conclusion
In conclusion, these Workbooks, the Playbook, and Watchlist all work together in concert to provide you with a customized solution to creating remediation steps that are tailored to a specific line of business. As you on-board custom analytics/detections that are pertinent to your business, you will have actions you will want an analyst to take and this solution provides a mechanism for delivering the right actions per analytic/use-case.
Thanks for reading!
We hope you found the details of this article interesting. Thanks Clive Watson and Rin Ure for writing this Article and creating the content for this solution.
And a special thanks to Sarah Young and Liat Lisha for helping us to deploy this solution.
Links
by Contributed | Jun 16, 2021 | Technology
This article is contributed. See the original author and article here.

Hi IT Professionals,
While working on a Customers ‘requests on Windows Defender Application Guard related to Microsoft Endpoint Manager – Attack Surface Reduction Policies, I could not find an up-to-date and detailed document from internet search. I have ended up digging more on the topic and combining the WDAG information.
Today we would discuss about all things related to Windows Defender Application Guard included features, advantages, installation, configuration, testing and troubleshooting.
Application Guard features could be applied to both Edge browser and Office 365 applications.
- For Microsoft Edge, Application Guard helps to isolate enterprise-defined untrusted sites from trusted web sites, cloud resources, and internal networks defined by administrator’s configured list. Everything not on the lists is considered to be untrusted. If an employee goes to an untrusted site through either Microsoft Edge or Internet Explorer, then Microsoft Edge is kicked in and Edge opens the site in an isolated Hyper-V-enabled container.
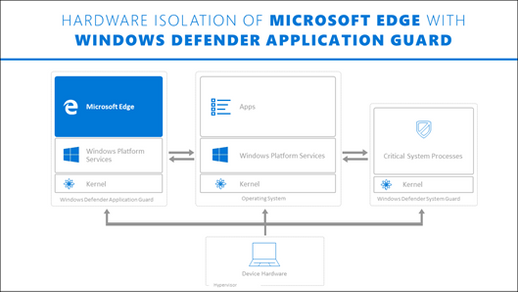
- For Microsoft Office, Application Guard helps prevents untrusted Word, PowerPoint and Excel files from accessing trusted resources. Application Guard opens untrusted files in an isolated Hyper-V-enabled container. The isolated Hyper-V container is separate from the host operating system. This container isolation means that if the untrusted site or file turns out to be malicious, the host device is protected, and the attacker can’t get to your enterprise data.
Application Guard Prerequisite for Windows 10 systems:
- For Edge Browser
- 64 bit CPU with 4 cores
- CPU supported for virtualization, Intel VT-x or AMD-V
- 8GB of RAM or more.
- 5GB of HD free space for Edge
- Input/Output Memory Management Unit (IOMMU) is not required but strongly recommended.
- Windows 10 Ent version 1709 or higher, Windows 10 Pro version 1803 or higher, Windows 10 Pro Education version 1803 or higher, Windows 10 Edu version 1903 or higher.
- Office: Office Current Channel and Monthly Enterprise Channel, Build version 2011 16.0.13530.10000 or later
- Intune or any other 3rd party mobile device management (MDM) solutions are not supported with WDAG for Professional editions.
- For Office
- CPU and RAM same as Application Guard for Edge Browser.
- 10GB of HD free space.
- Office: Office Current Channel and Monthly Enterprise Channel, Build version 2011 16.0.13530.10000 or later.
- Windows 10 Enterprise edition, Client Build version 2004 (20H1) build 19041 or later
- security update KB4571756
Application Guard Installation
Windows 10 Application Guard feature is turned off by default.
§ To enable Application Guard by using the Control Panel-features
> Open the Control Panel, click Programs, and then click Turn Windows features on or off.
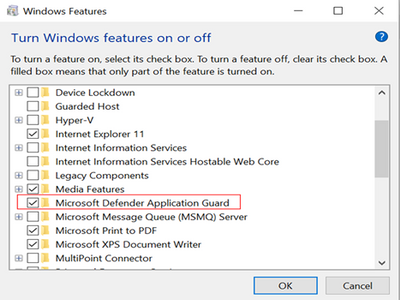
> Restart device.
§ To enable Application Guard by using PowerShell
> Run Windows PowerShell as administrator.
Enable-WindowsOptionalFeature -online -FeatureName Windows-Defender-ApplicationGuard
> Restart the device.
§ To deploy Application Guard by using (Intune) Endpoint Manager
- Go to https://endpoint.microsoft.com and sign in.
- Choose Enpoint security > Attack surface reduction > + Create profile, and do the following:
- In the Platform list, select Windows 10 and later.
- In the Profile list, select App and browser isolation.
- Choose Create.
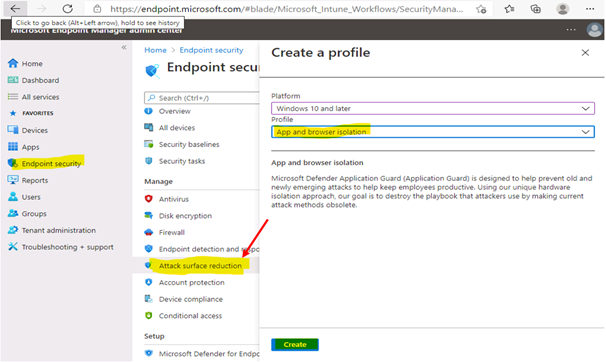
- Specify the following settings for the profile:
- Name and Description
- In the Select a category to configure settings section, choose Microsoft Defender Application Guard.
- In the Application Guard list, choose: “Enable for Edge” or “Enable for isolated Windows environment” or “Enable for Edge AND isolated Windows environment”
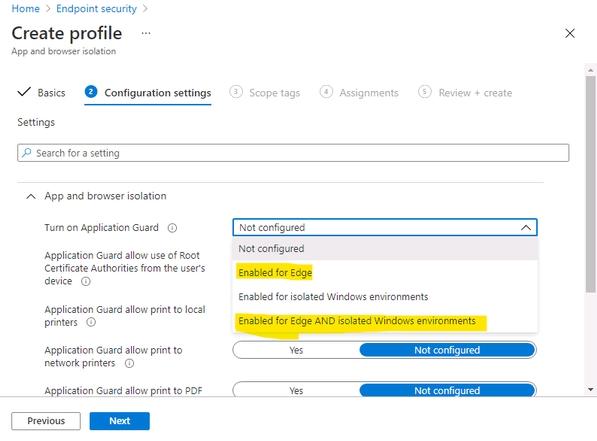
4. Choose your preferences for print options,

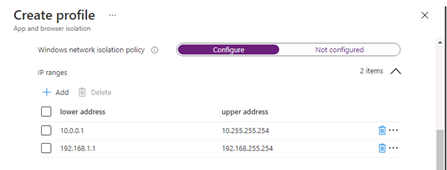
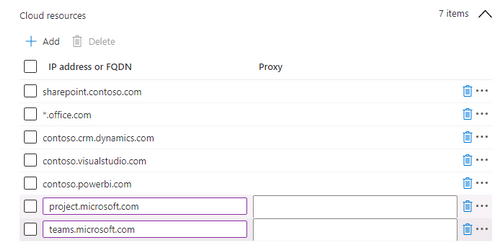
5. Define Network boundaries: internal network IP ranges, Cloud Resources IP ranges or FQDNs, Network Domains, Proxy Server IP addresses and Neutral resources ( e.g Azure signin URLs)
- Internal network IP range example:

- Neutral resources example:

- Review and Save
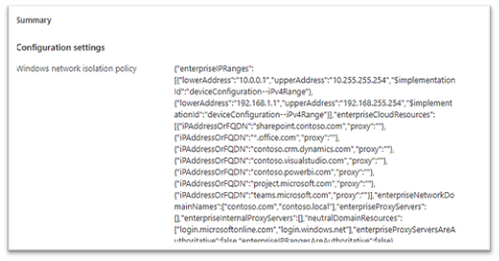
- Save, Next.
- Scope Tags, … Next
- Choose Assignments, and then do the following:
- On the Include tab, in the Assign to list, choose an option.
- If you have any devices or users you want to exclude from this endpoint protection profile, specify those on the Exclude tab.
- Click Save, Create.
After the profile is created, and applied to Windows 10 mobile systems, users might have to restart their devices in order for protection to be in place.
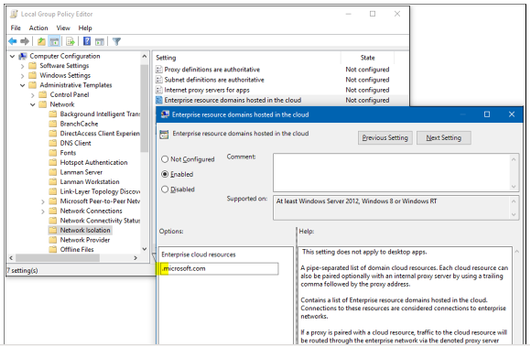
§ To Enable Application Guard using GPO
Microsoft Defender Application Guard (Application Guard) works with Group Policy to help you manage the following settings:
Computer ConfigurationAdministrative TemplatesNetworkNetwork Isolation, wildcard “.” could be used
- Application Guard settings (clipboard copying, printing, non-enterprise web content in IE and Edge, Allowed persistent container, download file to OS Host, Allow Extension in Container, Allow Favorite sync, …)
Computer ConfigurationAdministrative TemplatesWindows ComponentsMicrosoft Defender Application Guard
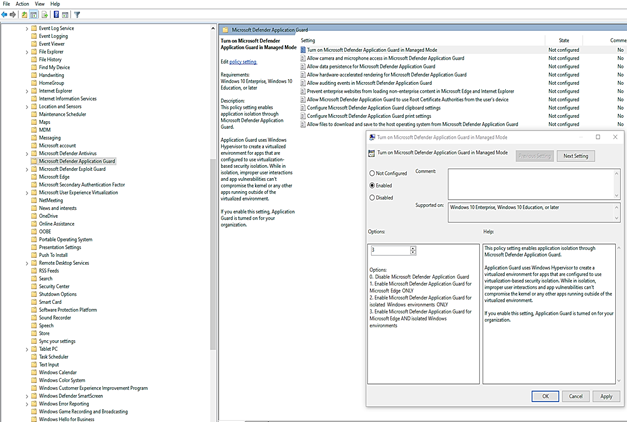
After the profile is created, and applied to client systems, users might have to restart their devices in order for protection to be in place.
Testing Application Guard
- Testing for Office application.
You could refer to techblog article named “Microsoft Defender Application Guard for Office” of John Barbe for information and testing steps.
- Testing for Edge Browser.
You could test application guard on Standard mode for home users or Enterprise mode for domain users. We are focusing on Enterprise mode testing:
- Start Microsoft Edge and type https://www.microsoft.com.
After you submit the URL, Application Guard determines the URL is trusted because it uses the domain you’ve marked as trusted and shows the site directly on the host PC instead of in Application Guard.
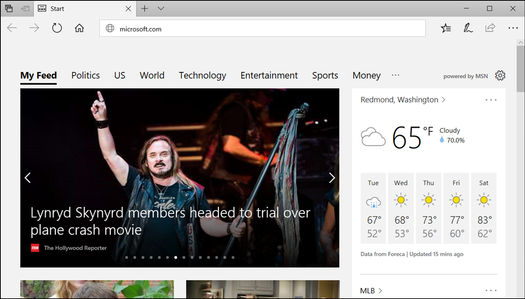
- In the same Microsoft Edge browser, type any URL that isn’t part of your trusted or neutral site lists.
After you submit the URL, Application Guard determines the URL is untrusted and redirects the request to the hardware-isolated environment.
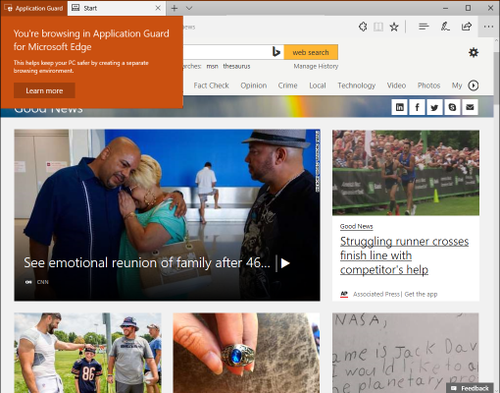
Tips:
- To reset (clean up) a container and clear persistent data inside the container:
- Open a command-line program and navigate to Windows/System32.
2. Type wdagtool.exe cleanup. The container environment is reset, retaining only the employee-generated data.
3. Type wdagtool.exe cleanup RESET_PERSISTENCE_LAYER. The container environment is reset, including discarding all employee-generated data.
- Starting Application Guard too quickly after restarting the device might cause it to take a bit longer to load. However, subsequent starts should occur without any perceivable delays.
- Make sure to enable “Allow auditing events” for Application Guard if you want to collect Event Viewer log and report log to Microsoft Defender for Endpoint
- Configure network proxy (IP-Literal Addresses) for Application Guard:
Application Guard requires proxies to have a symbolic name, not just an IP address. IP-Literal proxy settings such as 192.168.1.4:81 can be annotated as itproxy:81 or using a record such as P19216810010 for a proxy with an IP address of 192.168.100.10. This applies to Windows 10 Enterprise edition, version 1709 or higher. These would be for the proxy policies under Network Isolation in Group Policy or Intune.
Application Guard Extension for third-party web browsers
The Application Guard Extension available for Chrome and Firefox allows Application Guard to protect users even when they are running a web browser other than Microsoft Edge or Internet Explorer.
Once a user has the extension and its companion app installed on their enterprise device, you can run through the following scenarios.
- Open either Firefox or Chrome — whichever browser you have the extension installed on.
- Navigate to an enterprise website, i.e. an internal website maintained by your organization. You might see this evaluation page for an instant before the site is full loaded.
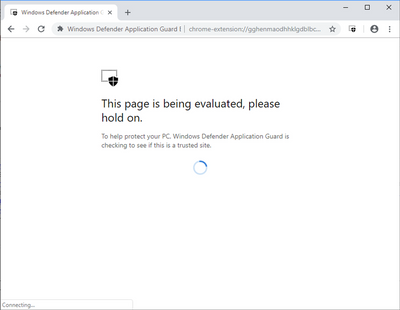
- Navigate to a non-enterprise, external website site, such as www.bing.com. The site should be redirected to Microsoft Defender Application Guard Edge.
More detail on Extension for Chrome and Firefox browser is here: Microsoft Defender Application Guard Extension – Windows security | Microsoft Docs
Troubleshooting Windows Defender Application Guard
The Application Guard known issues are listed in the following table:
Error message
|
Root Cause and Solution
|
0x80070013 ERROR_WRITE_PROTECT
|
An encryption driver prevents a VHD from being mounted or from being written to, Application Guard does not work because of disk mount failure.
|
ERROR_VIRTUAL_DISK_LIMITATION
|
Application Guard might not work correctly on NTFS compressed volumes. If this issue persists, try uncompressing the volume.
|
ERR_NAME_NOT_RESOLVED
|
Firewall blocks DHCP UDP communication
You need to create 2 Firewall rules for DHCP Server and Clients, detail is here
|
Can not launch Application Guard when Exploit Guard is enabled
|
if you change the Exploit Protection settings for CFG (Control Flow Guard) and possibly others, hvsimgr cannot launch. To mitigate this issue,
> go to Windows Security
> App and Browser control
> Exploit Protection Setting, and then switch CFG to use default.
|
Application Guard Container could not load due to Device Control Policy for USB disk
|
Allow installation of devices that match any of the following device IDs:
· SCSIDiskMsft____Virtual_Disk____
· {8e7bd593-6e6c-4c52-86a6-77175494dd8e}msvhdhba
· VMS_VSF
· rootVpcivsp
· rootVMBus
· vms_mp
· VMS_VSP
· ROOTVKRNLINTVSP
· ROOTVID
· rootstorvsp
· vms_vsmp
· VMS_PP
|
Could not view favorites in the Application Guard Edge session.
|
Favorites Sync is turned off
Enable Favorite Sync for Application Guard from host to virtual container, need Edge version 91 or later.
|
Could not see Extension in the Application Guard Edge session.
|
Enable the extensions policy on your Application Guard configuration
|
Some lingual keyboard may not work with Application Guard
|
The following keyboard currently not supported:
· Vietnam Telex keyboard
· Vietnam number key-based keyboard
· Hindi phonetic keyboard
· Bangla phonetic keyboard
· Marathi phonetic keyboard
· Telugu phonetic keyboard
· Tamil phonetic keyboard
· Kannada phonetic keyboard
· Malayalam phonetic keyboard
· Gujarati phonetic keyboard
· Odia phonetic keyboard
· Punjabi phonetic keyboard
|
Could not run Application Guard in Enterprise mode
|
When using Windows Pro you have access to Standalone Mode.
However, when using Enterprise you have access to Application Guard in Enterprise-Managed Mode or Standalone Mode.
|
I would hope the information provided in this article is useful.
Until next time.
Reference:
by Contributed | Jun 16, 2021 | Technology
This article is contributed. See the original author and article here.
Unboxing
As an MVP in the UK and after a fair bit of complaining and questioning of the Microsoft IOT team about the release dates of the Azure Percept into the UK/EU markets they offered to loan me one. Obviously I said YES! and a few days later I got a nice box.
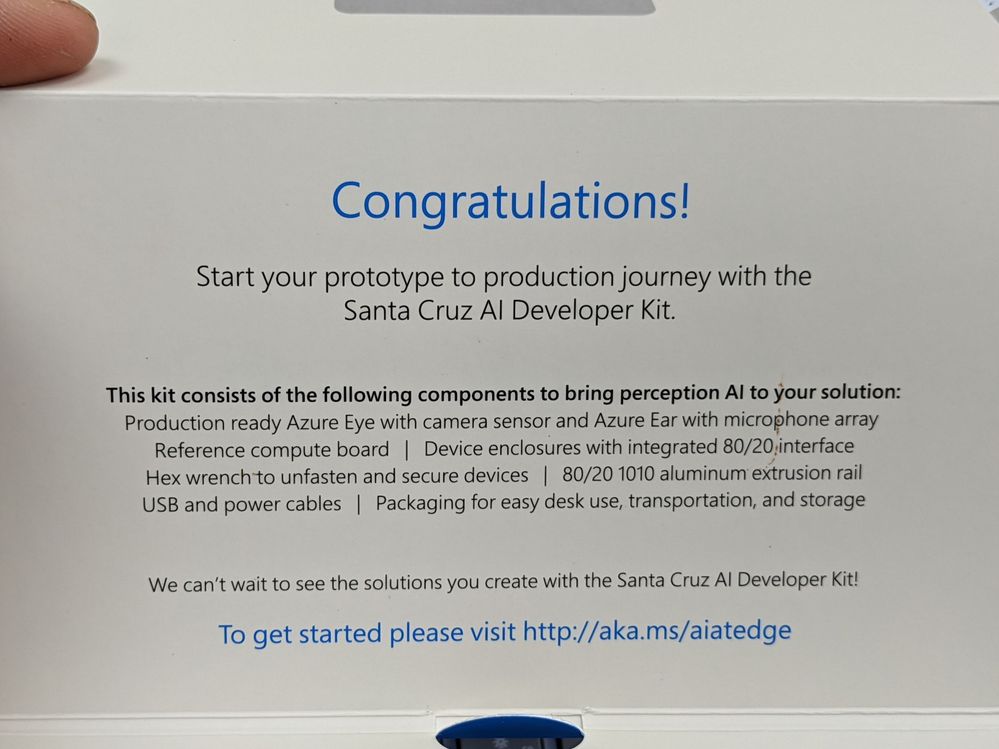
So opening the box for a look inside and you are presented with a fantastic display of the components that make up the Azure Percept Developer Kit (DK). This is the Microsoft Version of the Kit and not the one available to buy here from the Microsoft Store which is made by Asus. There are a few slight differences but I am told by the team they are very minor and won’t affect it’s use in any way, but the kit you get and it’s abilities for such a low cost is very impressive.
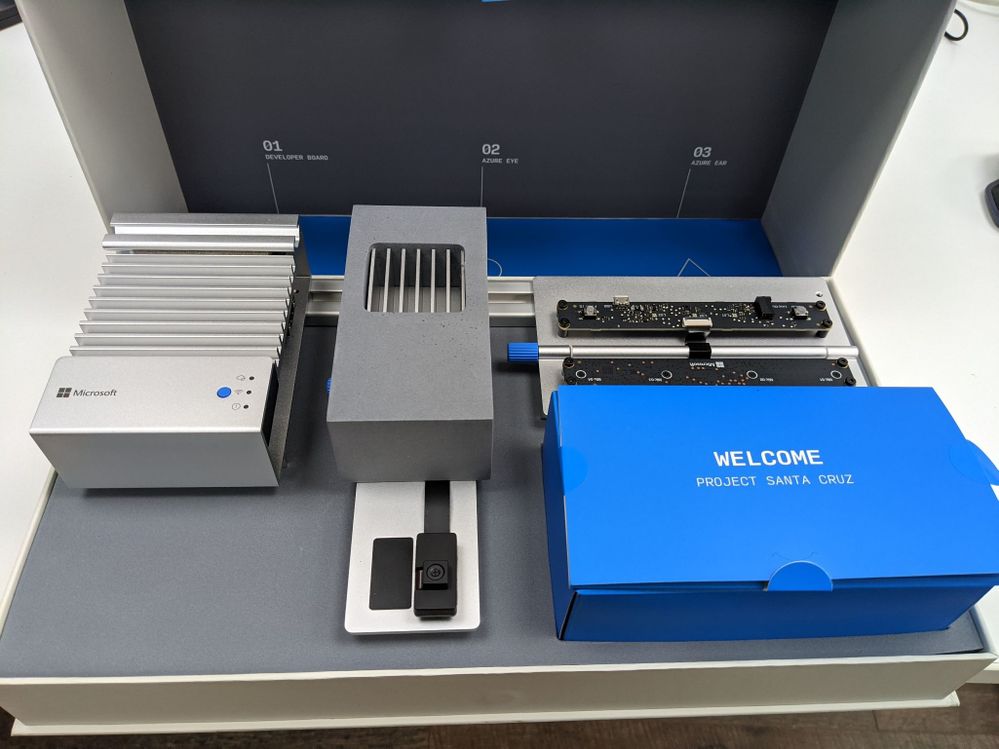
Lifting the kit out of the box and removing the foam packaging for a closer look we can see that it’s a gorgeous design and with my Surface Keyboard in the back of the image you can see that the design team at Microsoft have a love of Aluminium (Maybe that’s why there is a delay for the UK they need to learn to say the AluMINium correctly :beaming_face_with_smiling_eyes:).
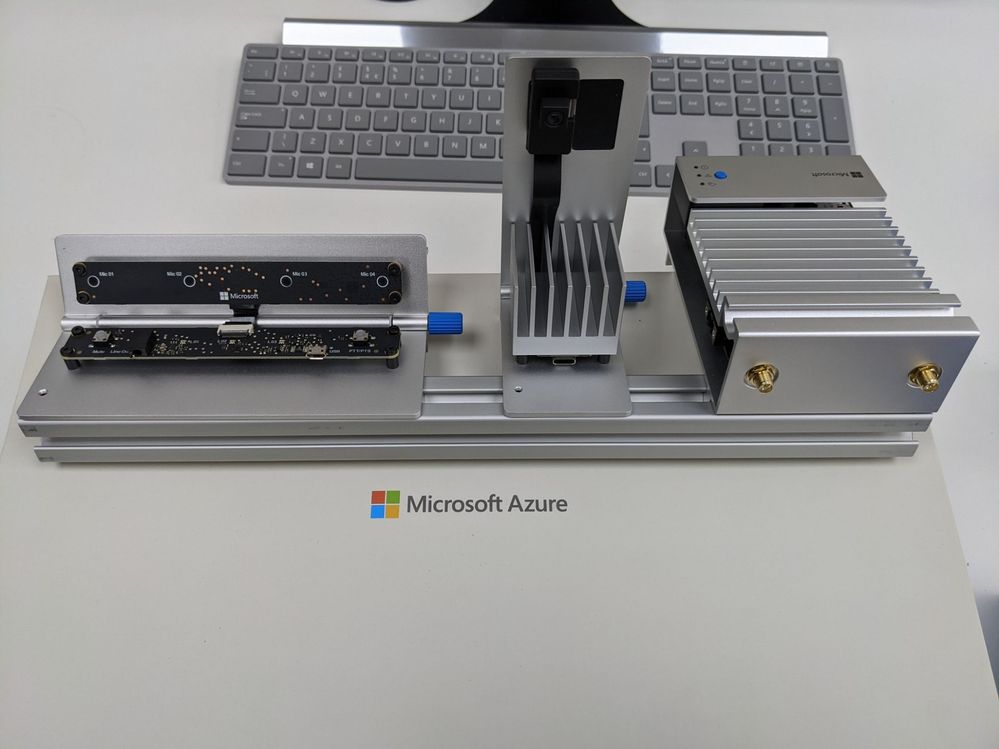
80/20 Rail
The kit is broken down into 3 sections all very nicely secured to an 80/20 Aluminium rail, now as an engineer that spent many years in the Automotive industry this shows the thought put into this product. 80/20 is an industry standard rail which means that when you have finish playing with your Proof Of Concept on the bench you can easily move to the factory and install with ease and no need for special brackets or tools.
Kit Components
Like I said the kit is made up of 3 sections all separate on the rail and with the included Allen key you can loosen the grub screws and remove them from the rail if you really want. Starting with the main module this is called the Azure Percept DK Board and is essentially the compute module at will run the AI at the edge, the next along the rail is the Azure Percept Vision SoM (System on a Module) and this is the camera for the kit and lastly is the Azure Percept Audio Device SoM.
Azure Percept DK Board
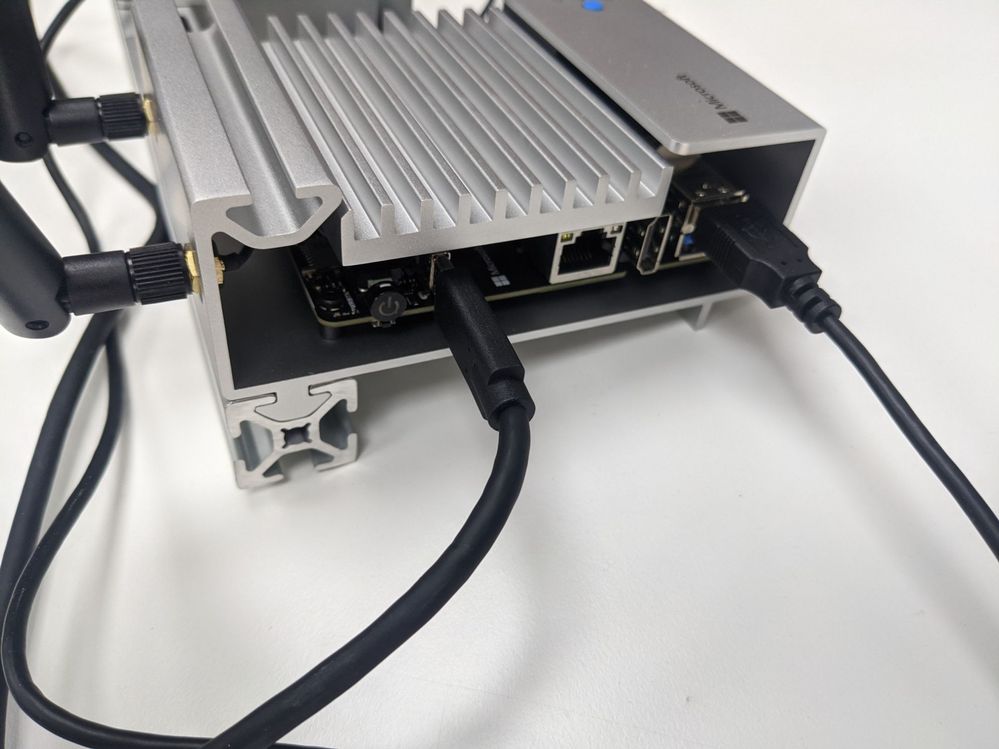
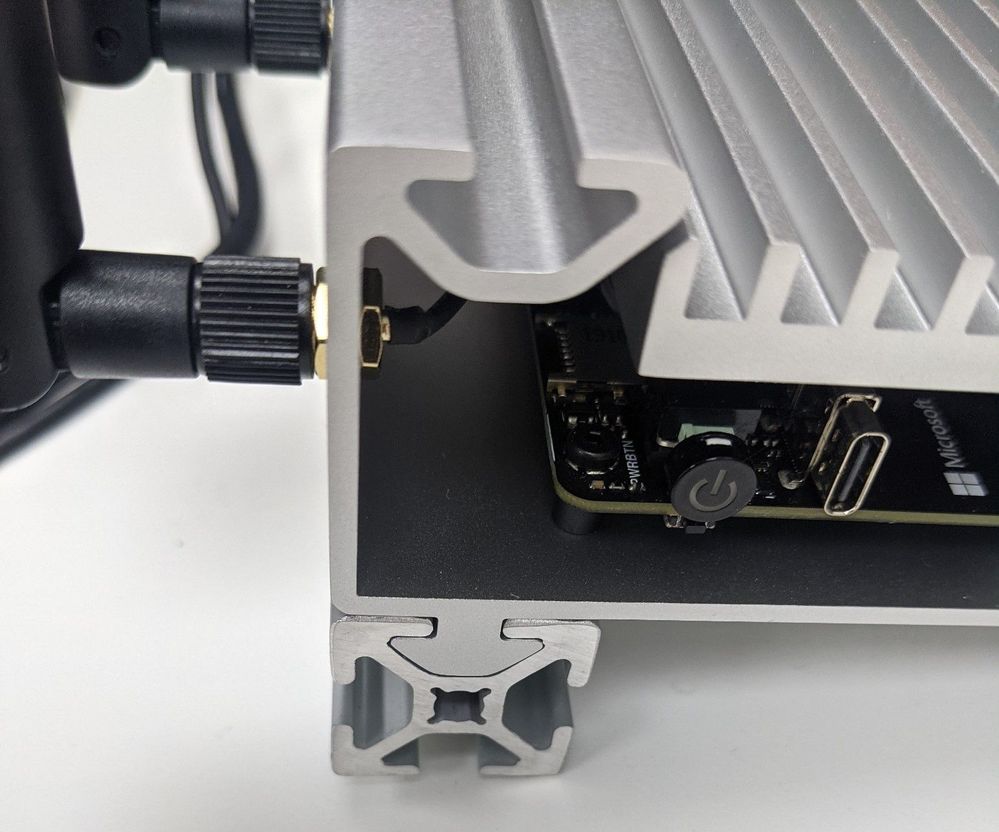
The DK board is an NXPiMX8m processor with 4GB memory and 16GB storage running the CBL-Mariner OS which is a Microsoft Open Source project on GitHub Here on top of this is the Azure IoT Edge runtime which has a secure execution environment. Finally on top of this stack is the Containers that hold your AI Edge Application Models that you would have trained on Azure using Azure Percept Studio
The board also contains a TPM 2.0 Nuvoton NCPT750 module which is a Trusted Platform Module and this is used to secure the connection with Azure IoT Hub so you have Hardware root of trust security built in rather than relying on CA or X509 certificates. The TPM module is a type of hardware security module (HSM) and enables you to the IoT Hub Device Provisioning Service which is a helper service for IoT Hub that means you can configure zero-touch device provisioning to a specified IoT hub. You can read more on the Docs.Microsoft Page
For connectivity there is Ethernet, 2 USB-A 3 ports and a USB-C port as well as WiFi and Bluetooth via Realtek RTL882CE single-chip controller. The Azure Percept can also be used as a WiFi Access Point as part of a Mesh network which is very cool as your AI Edge Camera system is now also the factory WiFi network. There is a great Internet of Things Show explaining this in more detail than I have space here.
Although this DK board has WiFi and Ethernet connectivity for running AI at the edge it can also be configured to run AI models without a connection to the cloud, which means your system keeps working if the cloud connection goes down or your at the very edge and the connection is intermittent.
You can find the DataSheet for the Azure Percept DK Board Here
Azure Percept Vision
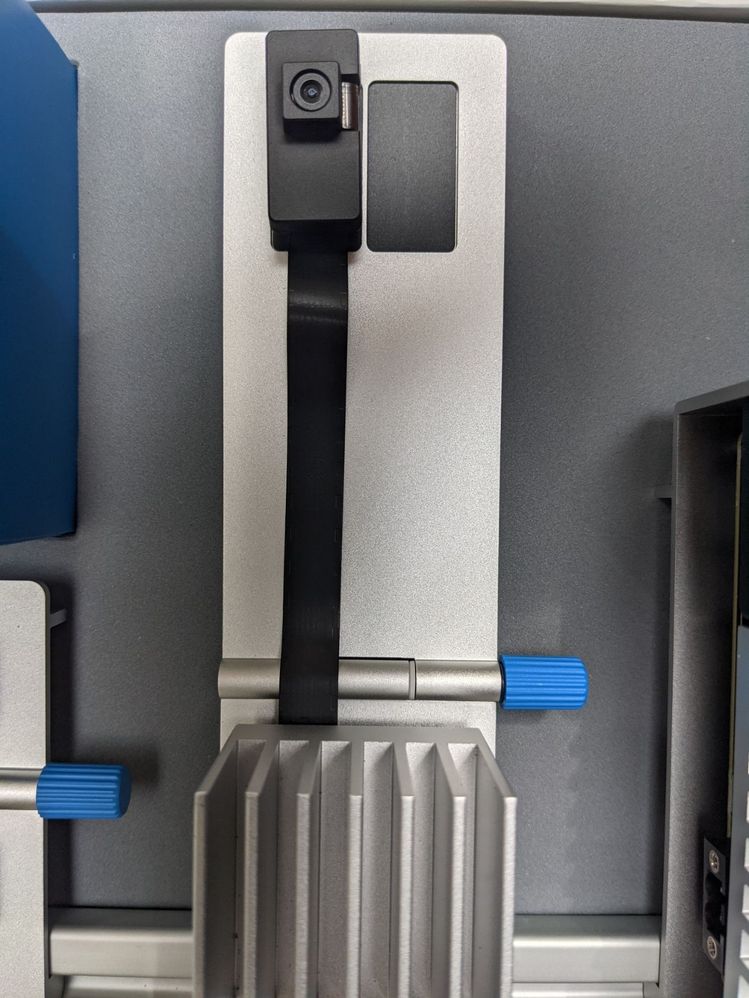
The image shows the Camera as well as the housing covering the SoM which can be removed, however it will then have no physical protection so not the best idea unless your fitting into a larger system like say a Kiosk. However if you need to use it in more extreme temperature environment removing the housing does improve the Operating temperature window by a considerable amount 0 -> 27C with Housing and -10 -> 70C without! remember that on hot days in the factory but also consider this when integrating into that Kiosk…
The SoM includes Intel Movidius Myriad X (MA2085) Vision Processing Unit (VPU) with Intel Camera ISP integrated, 0.7 TOPS and added to this is a ST-Micro STM32L462CE Security Crypto-Controller. The SoM has onboard 2GB memory as well as a Versioning/ID Component that has 64kb EEPROM which I believe is to allow you to configure the device ID at a Hardware level (please let me know if I am way off here!) this means the connection from the module via the DK Board all the way up to Azure IoT Hub is secured.
The Module was designed from the ground up to work with other DK boards and not just the NXPiMX8m but the time of writing this is the reference system, but you can get more details from another great Internet of Things Show
As for ports it has 2 camera ports but sadly only one can be used at present and I am not sure at the time of writing if the version from ASUS has 2 ports but looking at images it looks identical, I am guessing the 2nd port is a software update away allowing 2 cameras to be connected maybe for a wider FoV or IR for night mode.
Also on the SoM are some control interfaces which include:
2 x I2C

2 x SPI

6 x PWM  (GPIOs: 2x clock, 2x frame sync, 2x unused)

2 x Spare GPIO

1 x USB-C 3 used to connect back to the Azure Percept DK Board.

2 x MIPI 4 Lane(up to 1.5 Gbps per lane) Camera lanes.
At the time of writing I can not find any way to use any of these interfaces so I am assuming as this is a developer kit they will be enabled in future updates.
The Camera Module that is included is a Sony IMX219 Camera sensor with 6P Lens that has a Resolution of 8MP at 30FPS at a Distance of 50 cm -> infinity, the FoV is a generous 120-degrees diagonal and the RGB sensor colour is Wide Dynamic Range fitted with a Fixed Focus Rolling Shutter. This sensor is currently the only one that will work with the system but the SoM was designed to use any equivalent sensor like say an IR sensor or one with a tighter FoV with minimal hardware/software changes, Dan Rosenstein explains this in more detail in the IOT Show linked above.
The Blue knob you can see at the side of the module is so that with the DK you can adjust the angle of the Camera sensor which is held onto the aluminium upstand with a magnetic plate so that it’s easy to remove and change.
You can find the DataSheet for the Azure Percept Vision Here
Azure Percept Audio
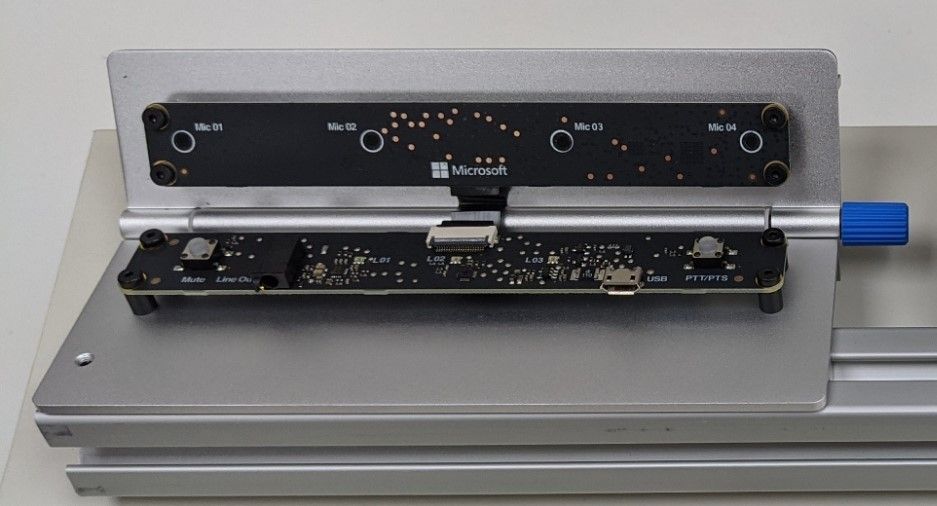
The Percept Audio is a two part device like the Percept Vision, the lower half is the SoM and the upper half is the Microphone array consisting of 4 microphones.
The Azure Percept Audio connects back to the DK board using a standard USB 2.0 Type A to Micro USB Cable and it has no housing as again it’s designed as a reference design and to be mounted into your final product like the Kiosk I mentioned earlier.
On the SoM board there are 2 Buttons Mute and PTT (push-To-Talk) as well as a Line Out 3.5mm jack plug for connecting a set of headphones for testing the audio from the microphones.
The Microphone array is made up of 4 MEM Sensing Microsystems Microphones (MSM261D3526Z1CM) and they are spaced so that they can give 180 Degrees Far-field at 4 m, 63 dB which is very impressive from such a small device. This means that your Customizable Keywords and Commands will be sensed from any direction in front of the array and out to quite a distance. The Audio Codec is XMOS XUF208 which is a fairly standard codec and there is a datasheet here for those interested.
Just like the Azure Percept Vision SoM the Audio SoM includes a ST-Microelectronics STM32L462CE Security Crypto-Controller to ensure that any data captured and processed is secured from the SoM all the way up the stack to Azure.
There is also a blue knob for adjusting the angle the microphone array is pointing at in relation to the 80/20 rail and the modules can of course be removed and fitted into your final product design using the standard screw mounts in the corners of the boards.
You can find the DataSheet for the Azure Percept Audio Here
Connecting it all together
As you can see in the images all 3 main components are secured to the 80/20 rail so we can just leave them like this for now while we get it all set-up.
First you will want to use the provided USB 3.0 Type C cable to connect the Vision SoM to the DK Board and the USB 2.0 Type A to Micro USB Cable to connect the Audio SoM to one of the 2 USB-A ports.
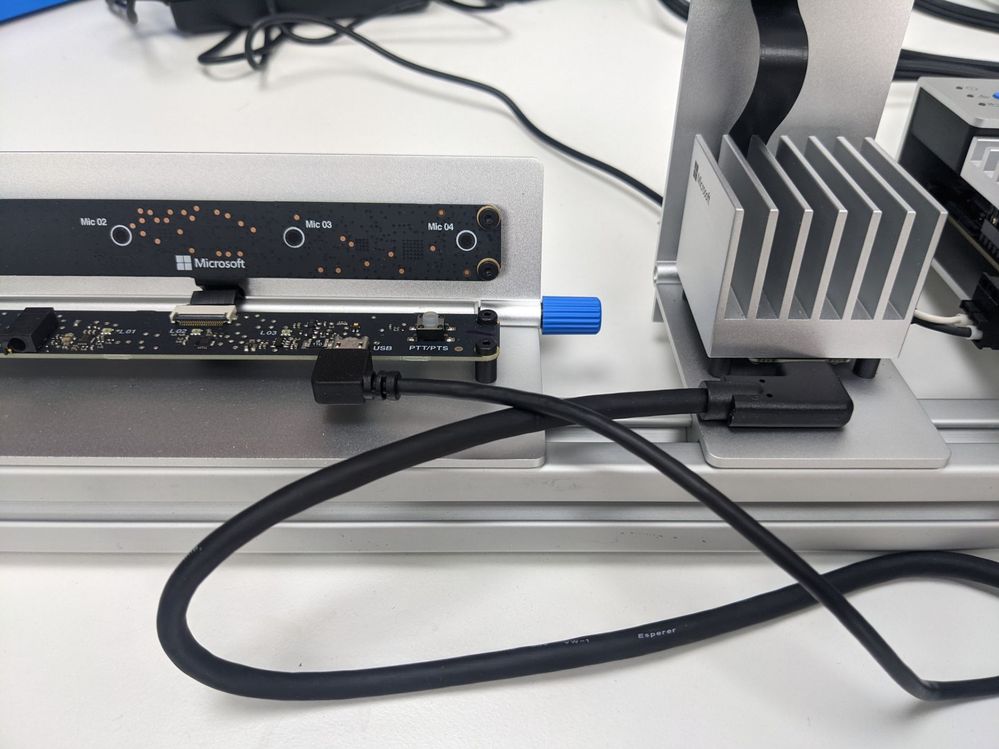
Next take the 2 Wi-Fi Antennas and screw them onto the Azure Percept DK and angle them as needed, then it’s time for power the DK is supplied with a fairly standard looking power brick or Ac/DC converter to be precise. The good news is that they have thought of the world use and supplied it with removable adapters so you can fit the 3-Pin for the UK rather than looking about for your travel adapter. The other end has a 2-pin keyed plug that plugs into the side of the DK.
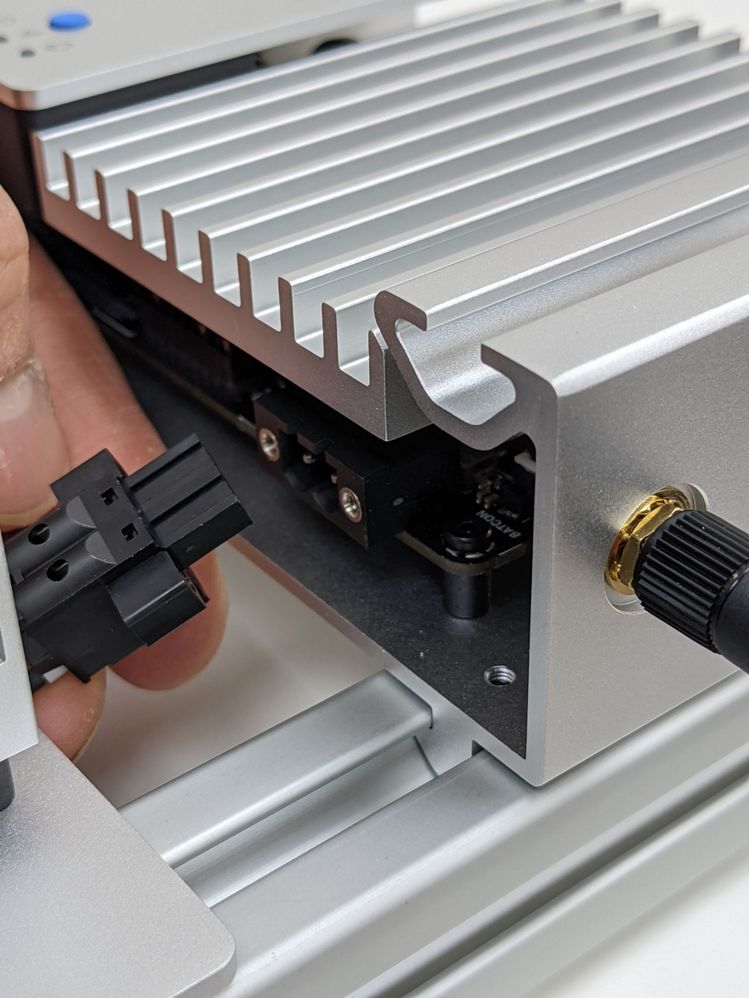
Your now set-up hardware wise and ready to turn it on…
Set-up the Wi-Fi
Once the DK has powered on it will appear as a Wi-Fi access point, inside the welcome card is the name of your Access point and the password to connect. On mine it said the password was SantaCruz and then gave a future password, it was the future password I needed to use to connect.
Once connected it will take you thru a wizard to connect the device to your own wi-fi network and thus to the internet, sadly I failed to take any images of this set as I was too excited to get it up and running (Sorry!).
During this set-up you will need your Azure Subscription login details so that you can configure a New Azure IoT Hub and Azure Percept Studio. This will then allow you to control the devices you have and using a No-Code approach train your first Vision or Audio AI Project.

Training your first AI Model
Clicking the Vision link on the left pane to start training our first vision model.
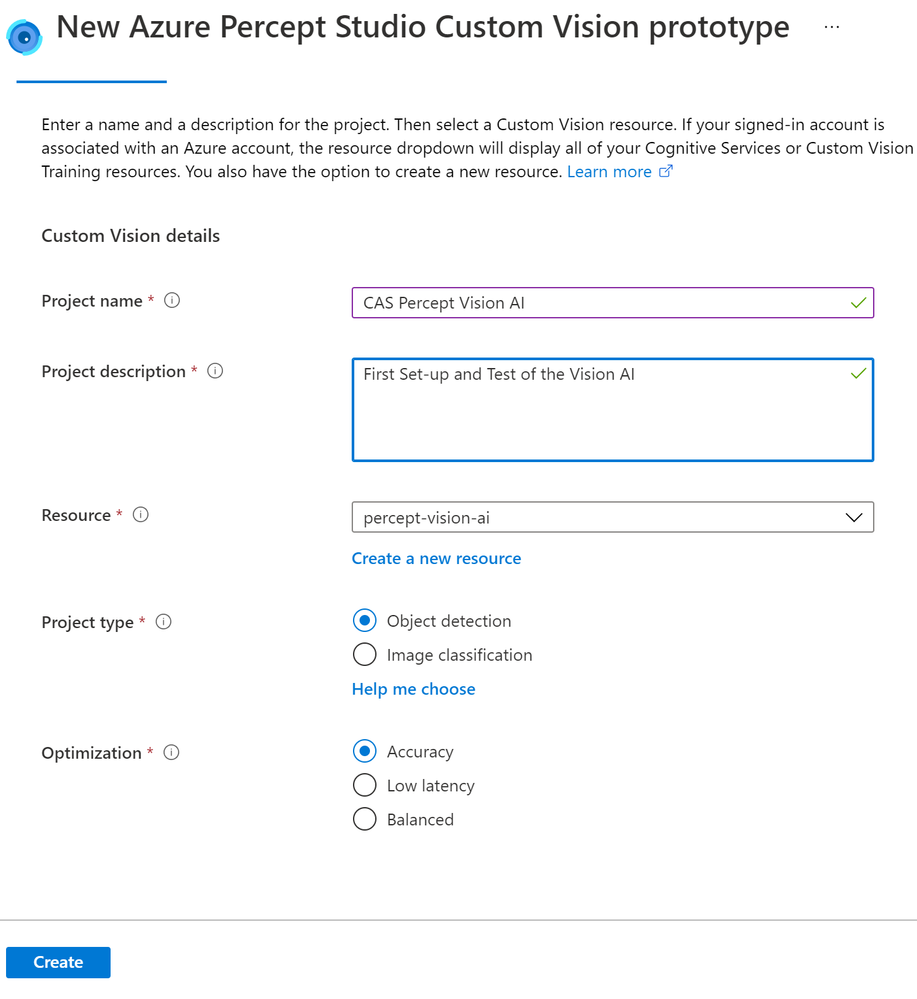
Once this is created you will be shown the Image Capture pane where you can set-up the capturing of images, as you can see here I have set-up the IoT Hub to use and the Percept device to use on that Hub. I have then ticked the Automatic Image Capture and set this to capture an image every 30 seconds until it has taken 25 image. This means that rather than clicking the Take Photo button I can just wave my objects front of the Camera and it will take the images for me, I can then concentrate on the position of the objects rather than playing with the mouse to click a button. Also the added advantage is that when you have the Vision Device mounted in your final product and it’s out at the Edge in your Factory or store you can remotely capture the images over a given timespan.
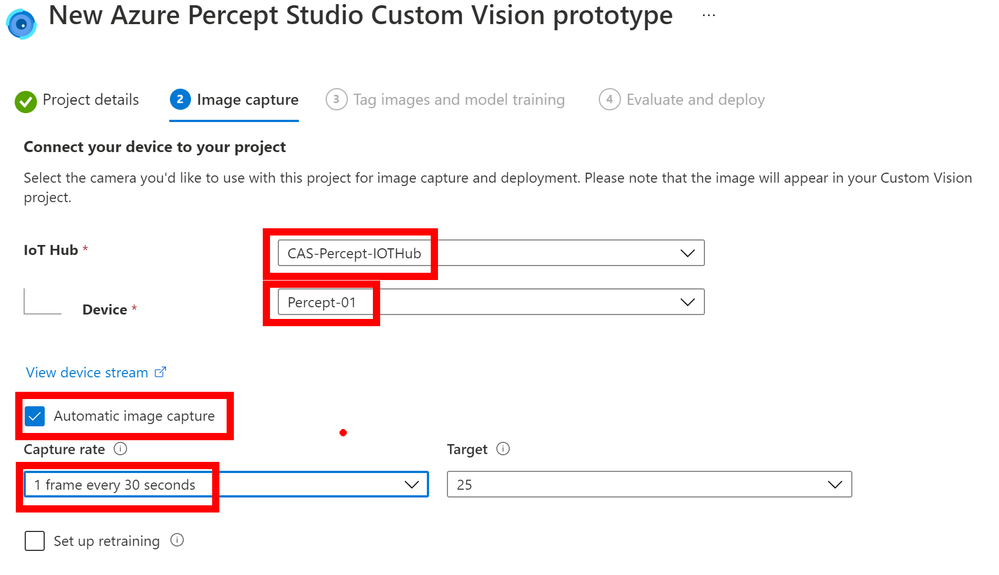
The next pane will show a link out to your new Custom Vision project and it’s here that you will see the images captured and you can tag them as needed.
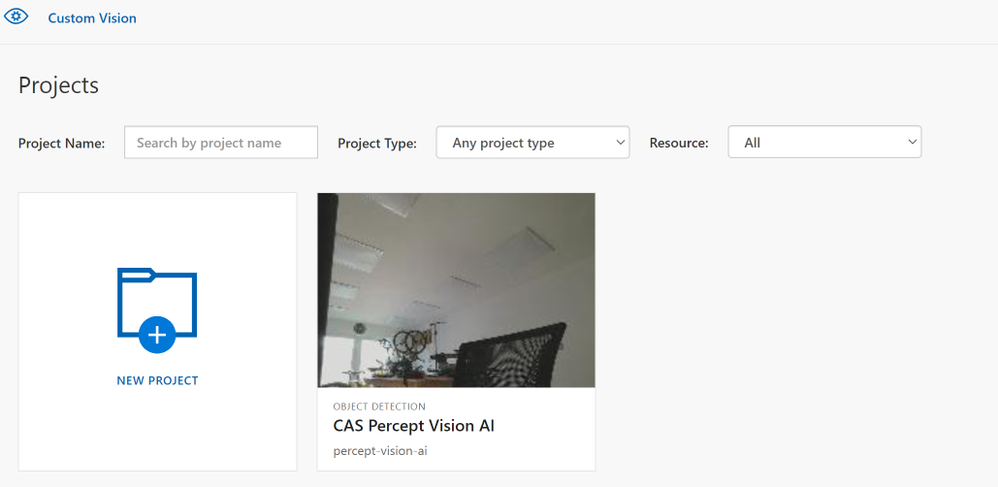
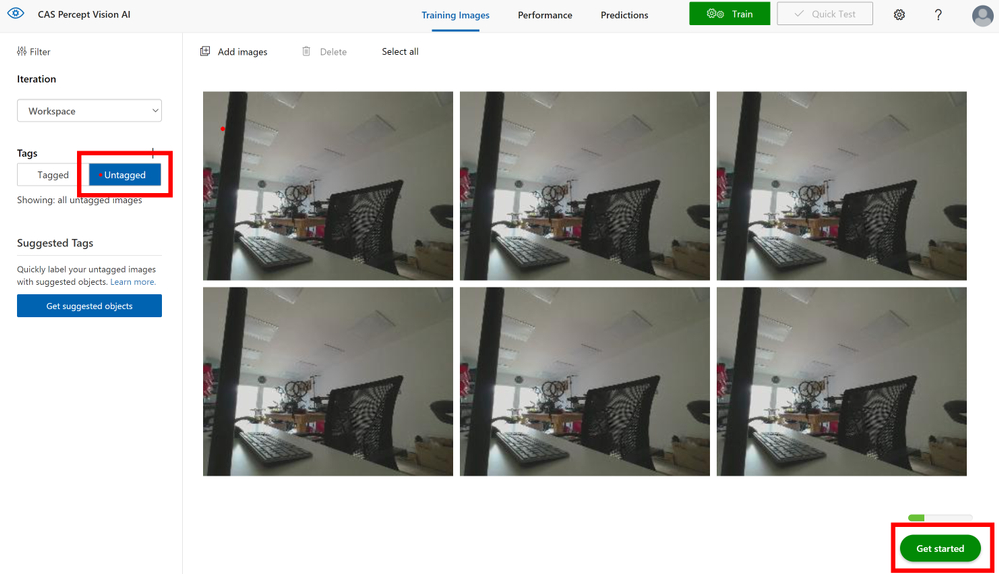
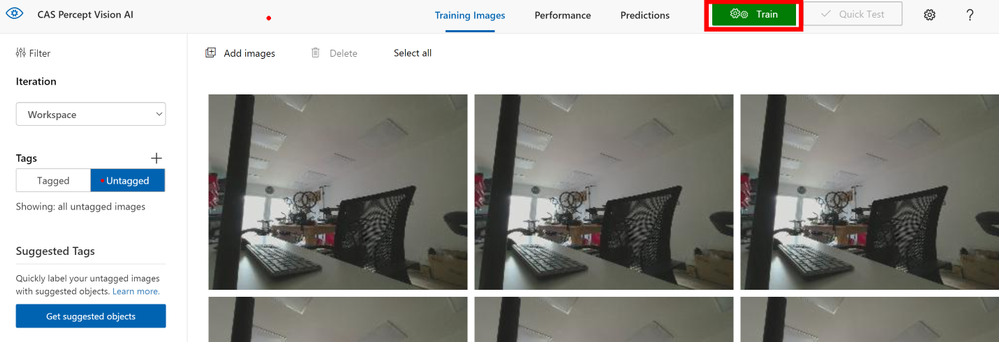
If you click into the project you will then be able to select Un-Tagged and Get Started to tag the images and train a model. I have just got the camera pointing into space at the moment for this post but you get the idea.
Now you click into each of the images in turn and as you move the mouse around you will see it generates a box around objects it has detected, you can click one of these and give that object a name like say ‘Keyboard’ once you have tagged all the objects of interest in that image move onto the next image.
If however the system hasn’t created a region around your object of interest don’t fret just left mouse click and draw a box around it, then you can give it a name and move on.
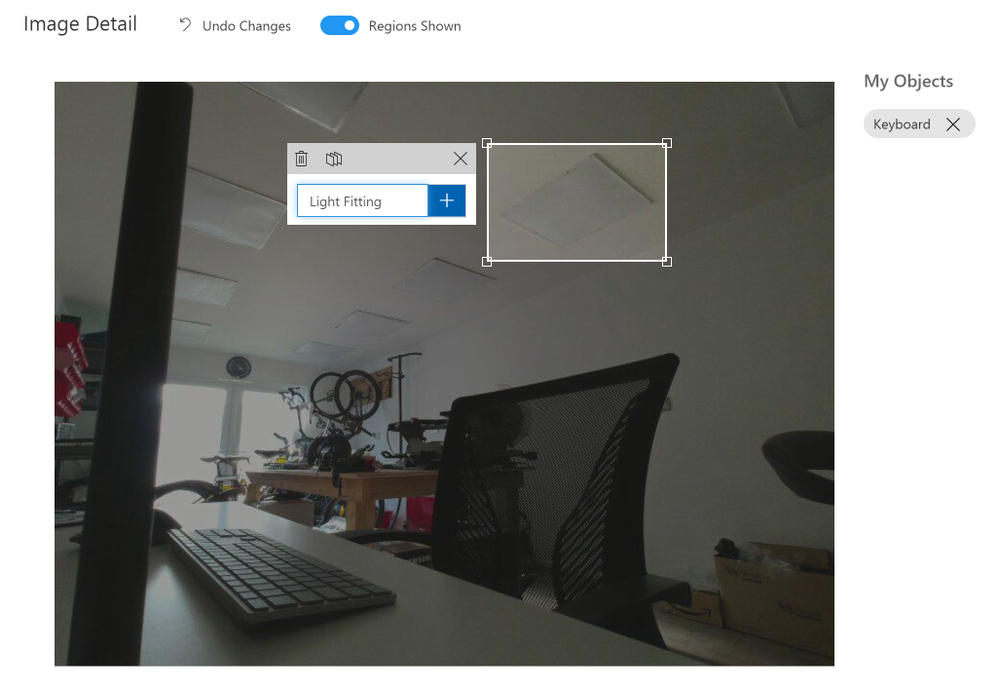
On the right of the image you will see the list of objects you have tagged and you can click these to show those objects in the image to check your happy with the tagging.
When you move to the next image and select a region you will notice the names you used before appear in a dropdown list for you to select, this ensures you are consistent with the naming of your objects in the trained model.
When you have tagged all the images and don’t forget to get a few images with none of your objects in so that you have no trained Bias in your AI model you can click the Train button at the top of the page.
It seems tedious but you do need 15 images tagged for each object minimum but ideally you will want many more than that, it’s suggested 40 to 50+ is best and from many angles and in many lighting conditions for the best trained model. The actual training takes a few minutes so an ideal time for that Coffee break you have earned it!.
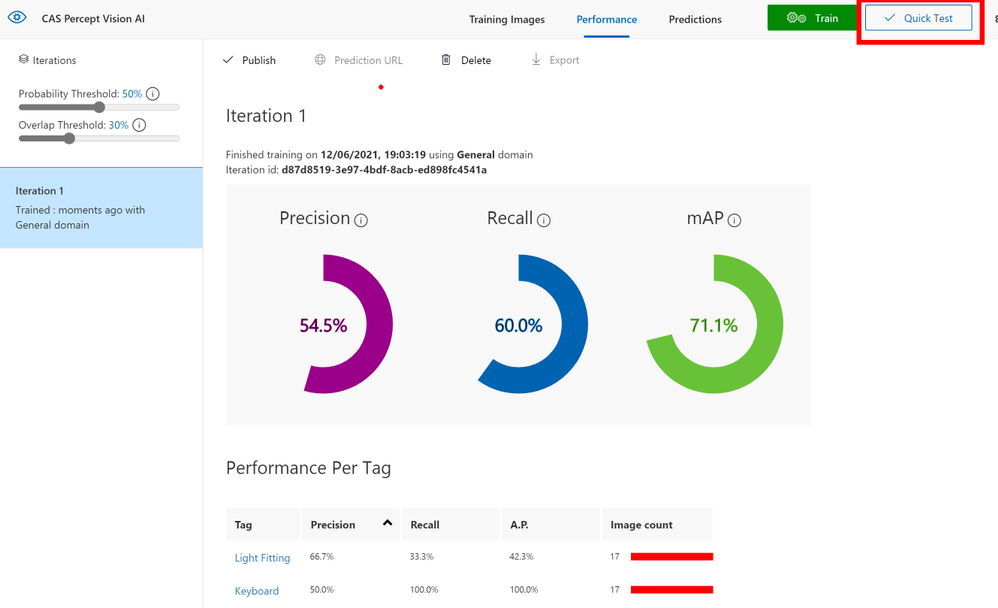
When the training is complete it will show your some predicted stats for the model, here you can see that as I have not provided many images the predictions are low so I should go back and take some more pictures and complete some more tagging.
At the top you can see a Quick Test button that allows you to provide a previously unseen image to the model to check that it detects your objects.
Deploy the Trained Model
Now that we have a trained model and you are happy with the prediction levels and it’s tested on a few images you can go back to the Azure Percept Studio and complete the deploy step. This will send the Model to the Percept device and allow it to use this model for image classification.
You can now click the View Device Video Stream and see if your new Model works.
Final Thoughts
Well hopefully you can see the Azure Percept DK is a beautifully designed piece of kit and for a Developer Kit it is very well built. I like the 80/20 system and this make final integration super easy and I hope the Vision SoM modules allow the extra camera soon as a POC I am looking at for a client using the Percept will need a night IR camera so seems a shame to need 2 DK’s to complete this task.
The unboxing to having a trained and running model on the Percept is less than 20 minutes, I obviously took longer as I was grabbing images of the steps etc but even then it a pain free and simple process. I am now working on a project for a client using the Percept to see if the Audio and Vision can solve a problem for them in their office space, assuming they allow me I will blog about that project soon.
The next part of this series of blogs will be updating the software on your Percept using the OTA (Over-The-Air) update system that is built into the IoT Hub for Device Updates so come back soon to see that.
As always any questions or suggestions if you have spotted something wrong find me on Twitter @CliffordAgius
Happy Coding.
Cliff.
![[Guest Blog] Coding Education for All – Empowering Youth to be Future Ready](https://www.drware.com/wp-content/uploads/2021/06/fb_image-112.jpeg)


Recent Comments