Migration of HDInsight HBase Cluster with Custom Ambari Database

Migration of HDInsight HBase Cluster with Custom Ambari Database

This article is contributed. See the original author and article here.

This article explain Migration of HBase 1.1 (HDI 3.6) Accelerated Write Cluster with Default Ambari Meta DB to HBase 2.1 (HDI 4.0) Accelerate write Cluster with custom Ambari Meta DB. In normal cluster creation, as described in other articles such as Set up clusters in HDInsight, Ambari is deployed in an S0 Azure SQL Database that is managed by HDInsight and is not accessible to users.


Also Starting July 1st 2021 , Microsoft will offer only Basic support plan for certain HDInsight 3.6 cluster types. This plan will be available till April 3rd 2022. So it is recommended to migrate to HDInsight4.0 at the earliest.


Understanding the Use Case:


HDInsight allows you to take control of your data and metadata with external data stores. This feature is available for Apache Hive metastore, Apache Oozie metastore, and Apache Ambari database. Here we will focus on Apache Ambari database. Ambari is used to monitor HDInsight clusters, make configuration changes and store cluster management information as well as job history. HDInsight provides a default SQL Database for each cluster which is good for test work load. For Production usage it is recommended to use Custom SQL Database to handle the load of cluster according to the business growth requirements. It is also possible to start with a basic database and upgrade later.
In this example We will create a Custom Meta DB and configure it to HDI4.0 HBase cluster and migrate the Data from HDI3.6 to HDI4.0 followed by validation.


somnathghosh_1-1621280486941.png


Below are the steps for Migration.


Source and Destination Cluster setup


Step 1 : Create a source HBase HDI 3.6 with Default meta DB


 HDInsight Cluster Setup


Step 2: Create a Destination HBase HDI 4.0 clusters with a custom Ambari DB


   Step 2.1: From Azure Portal Create an External SQL Database.


   HDInsight Custom Ambari DB Setup


   Step 2.2: Choose the right DTU based on the Nodes.


somnathghosh_2-1621280486947.png


somnathghosh_3-1621280486958.png


    Step 2.3: Choose the above Database while Creating HDInsight Cluster as Ambari Meta DB.


somnathghosh_4-1621280486966.png


Once the cluster is ready follow the below steps to Migrate:


Steps to be followed on Source Cluster HDInsight 3.6


Step 1: Login to Source Cluster and Create Sample Table using HBase perf.


somnathghosh_5-1621280486969.png


Step 2: Flush the Table Data


somnathghosh_6-1621280486971.png


Step 3: Stop the HBase from Ambari.


somnathghosh_7-1621280486982.png


Step 4: Backup WAL folder


somnathghosh_8-1621280486983.png


Steps to be followed on Destination Cluster HDInsight 4.0


Step 1: Stop the HBase from Ambari


somnathghosh_9-1621280487002.png


Step 2: Under Services > HDFS > Configs > Advanced > Advanced core-site, change the fs.defaultFS HDFS setting to point to the source cluster’s container name, for example cluster1testhbase-2021-05-12t07-23-50-453z


somnathghosh_10-1621280487019.png


Step 3: Under Services > HBASE > Configs > Advanced > Advanced hbase-site change the hbase.rootdir path to point to the container of the source cluster.


somnathghosh_11-1621280487034.png


Step 4: Clean the Zookeeper data on the destination cluster by running the following commands in any of the Zookeeper nodes or worker nodes:


somnathghosh_12-1621280487034.png


somnathghosh_13-1621280487035.png


Step 5: Restart all the component required restart from Ambari.


Step 6: Clean the WAL FS data for the destination cluster, and copy the WAL directory from the source cluster into the destination cluster’s HDFS. Copy the directory by running the following commands in any of the Zookeeper nodes or worker nodes:


somnathghosh_14-1621280487036.png


somnathghosh_15-1621280487040.png


Step 7: Copy apps folder from destination container to source container


somnathghosh_16-1621280487042.png


Step 8: Restart all the component required restart from Ambari.


Step 9: Validation


Validation of the table and count of record in source cluster


somnathghosh_17-1621280487044.png


Count:


somnathghosh_18-1621280487045.png


Validation of the table and count of record in destination cluster


somnathghosh_19-1621280487046.png


Count:


somnathghosh_20-1621280487047.png


Control & Management of Microsoft Viva Topics

Control & Management of Microsoft Viva Topics

This article is contributed. See the original author and article here.

Take a deep dive on Microsoft Viva Topics, which uses AI to organize information into accessible knowledge within the apps and services you use every day. Walk through the admin experience for setup, as well as the controls available to publish and curate topic pages and ensure content accuracy. CJ Tan, Lead Program Manager, joins host Jeremy Chapman to cover the overall experience for users, knowledge managers, and admins.


Screen Shot 2021-05-17 at 3.21.26 PM.png


If you’re new to Microsoft Viva, it comprises four modules that deliver new employee experiences across knowledge, communications, resources, learning and insights. These leverage the foundational technologies of Microsoft 365, Microsoft Graph, and AI to deliver a modern employee experience platform.


Viva Topics builds a system that transforms information into knowledge and actively delivers it to you in the context of your work. As many of us are working remotely or in more hybrid office environments, it can be harder to stay informed. With Topics, we connect you to the knowledge and the people closest to it.


QUICK LINKS:


01:45 — See how Topics works


03:46 — AI behind the scenes


04:57 — Knowledge manager experience


07:47 — User experience


09:25 — Admin experience- how to set it up


10:58 — Protect sensitive information


12:01 — Scope who can contribute


13:37 — Manually create topics immediately


Link References:


Watch our Essentials episode at https://aka.ms/VivaEssentials


Find additional tutorials and guidance at https://aka.ms/vivatopics


Unfamiliar with Microsoft Mechanics?


We are Microsoft’s official video series for IT. You can watch and share valuable content and demos of current and upcoming tech from the people who build it at Microsoft.


Keep getting this insider knowledge, join us on social:


Video Transcript:


– Up next, I’m joined by Lead Program Manager, CJ Tan, to go deeper on Viva Topics, which uses AI to organize information into accessible knowledge, within the apps and services you use every day. And we’re going to walk through the admin experience for setup, as well as the controls available to publish and curate topic pages and ensure content accuracy. So CJ, welcome to Microsoft Mechanics.


– Thank you for having me.


– Thanks for joining us today. So of course, before we get into Viva Topics, if you’re new to Microsoft Viva, it comprises four modules that deliver new employee experiences across knowledge, communications, resources, learning, and insights, all in the context of your work. Now, these leverage the foundational technologies of Microsoft 365, Microsoft Graph and AI to deliver a modern employee experience platform. In fact, you can learn more by watching our Essentials episode at aka.ms/VivaEssentials. And one of the foundational experiences in the new Viva platform is Topics. So CJ, can you explain what we’re solving for here?


– Of course, so the premise of Topics is to build a system that transforms information into knowledge and actively delivers it to you in the context of your work. This is particularly important, as many of us especially now, are working remotely or in more hybrid office environments. So it can be harder to stay informed. In any work environment, there are really two currencies. On one side, there is the data and information itself where you want to discover when you need it. On the other side, there are the people who have worked on content with their expertise, knowledge, and skills. So with Topics, we bring these two currencies together, So no matter where you are or whatever relationships you have, we can connect you to the knowledge and the people closest to it.


– Right, and one of the key things here is that the knowledge comes to you without having to search for it all in the context of what you’re doing every day. So can you show us an example?


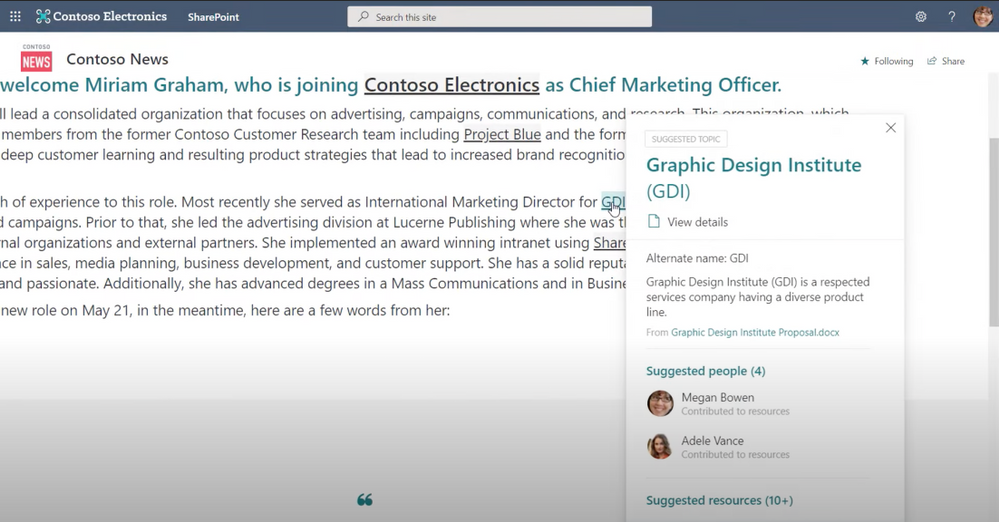
– Yes, so we can all relate to the experience of either being in a new job or a new role, and you have to get up to speed quickly. And there are terms, project names, or acronyms that feel like a foreign language. For example, here’s a news post on a SharePoint site that includes internal project names and terms like Project Blue and GDI, without any context.


– Right, and we’ve all been there where it takes time to acclimate. And some of this might be tribal knowledge, because no one’s really thinking about or explaining some of the terms and acronyms especially if you’re new to a role. So what you’ve got to do in these cases is a bunch of homework and really everything you can to avoid looking uninformed to your peers.


– Right, so now you don’t need to chase things down like an outsider. You can directly get insider knowledge to save you time and without needing to even search in many cases. So for example, I’ll hover over GDI and you’ll see a nice summary of what it is, who’s connected to it and suggested resources, right in the context of where that term came up. What I see here might be enough context and information, but if I want to go deeper, I can simply click in and find a topic page. And here you’ll see a lot more detail like the description, people who are domain experts related to this topic, and in suggested files and pages, I can see a lot of great documents here and sites related to the topic. One important thing to note is that it is only showing me resources that I have access to based on my individual permissions. This means there are no dead links and I don’t need to request permissions to anything I see. And conversely, I don’t see anything I shouldn’t see. All the content you see in this case was automatically discovered with the built-in AI and I was able to get up to speed quickly. That said, if I wanted to, I could also search for a topic. You’ll remember the other topic on the news post was called Project Blue. So here on office.com, I’ll search for that. And you’ll see, it brings up an answer card for that topic. And I can click in to see the topic page.


– Okay, so what’s happening behind the scenes to make all this possible?


– Yeah, there’s definitely a lot of magic through AI going on behind the scenes. So Viva Topics looks for nouns or acronyms being mentioned through the work that people are doing. The AI builds connections and inferences to content that lives inside of Microsoft 365. For example, it’s looking at SharePoint profiles. Microsoft Graph can see activity around the content and associated people to determine who may be connected to a given topic. So using natural language understanding with entity recognition, Viva is able to extract a summary description of the topic, AI infers the files, pages, and sites suggestions for the topic. And additionally, the people who have collaborated on these resources are selected and ranked based on their contribution as well. And you can think of the output as equivalent to posting to a Wikipedia page on the topic.


– What controls exist then to ensure both the accuracy and appropriateness then of the information and the knowledge that’s associated with that topic?


– Yeah, so here AI takes the first draft of bringing this material together and your domain knowledge experts review and edit the content on those topic pages, ensuring its accuracy while AI continues to suggest content to keep it up to date.


– So in other words, for this to work well, you need experts close to the content to review those topic pages, versus say just the people in the IT department?


– Yeah, right, you’ll want to assign knowledge managers who can guide the crowdsourcing efforts of your experts. In fact, let me walk you through the experience that we give you as a knowledge manager. So in the Viva Topics center, under Manage Topics, you can see the AI has suggested 98 topics. Next to each of these is a quality score, which is a rough gauge of how complete of a job the AI has done to start building that page; whether it has a topic summary, found resources, or related people. And second you’ll see impressions, which measures how frequently the topic has appeared to users. These two metrics combined can help you to prioritize where you want to place your review and curation efforts, or reach out to one of the suggested people listed to review and curate. Again, this is permission space. So even as a knowledge manager, I can only see topics that I personally have access to. For example, a knowledge manager in the human resources team would see different suggested topics than a knowledge manager in the research and development team. Now, if I click into one of these topics, for example, Rainier Project, you’ll see the AI has started a basic page with the information it could extract. From here, I can edit all of these web parts on the page. Here for example, I can edit the topic description. I’ll just add a word here, modern. Then I can add people. So I’ll go ahead and add Nester since he’s Lead Project Manager. You’ll see suggested people on the page discovered by AI as contributors to the topic. And the same thing goes for files. I can add additional files directly by hitting add or pin a file so it appears at the top for those who see the topic. I can also remove content by clicking on the X for each of the items. AI isn’t perfect, so this easy action makes it simple to guide the AI. I’ll remove this one. Next I can add related sites and resources for people. I’ll add the landing site in this case. And one of the things I love as a knowledge manager is I can also connect a topic to related topics that AI may not already have found. So here I’ll add Project Mu and say it is the precursor to the Rainier project. Next, comments are enabled by default. This is great for people to provide feedback and can create more engagement, but I can also disable them if I want to. And then once I’m happy, I can publish the topic page. And that will take just a few moments. Once I’m back in the knowledge manager experience, you’ll see the topic now appears in the published tab. Of course, as with any other SharePoint page, I can go back and review these entries at any time to make sure everything stays up to date, or unpublish and remove entries if I need to.


– And because the topic page is like a Wiki, as you showed, kind of benefit from user contribution, is there anything that users themselves can do to really add to the accuracy of your information?


– Yes, absolutely. As a user, you play a very important role here. For example, in the Viva Topics Center in SharePoint, as a topic contributor, you can see the topics where you’ve been suggested as a person who is knowledgeable about the topic. You can tap through to the page to contribute directly to the topic content, or you can quickly elect to remove yourself if you are not the right person to be listed. I’ll do that here for service revitalization. Also, you can manually create topics, as you can see here, with the new Topic Page, where if you have the right permissions, you can contribute topics from scratch. Let me show you something else. I’ll jump into SharePoint. You can manually use hashtags as you edit content to insert a topic highlight onto your page. This highlight will then show a topic card for your reader. Here I’m editing a page. And if I paste in a few words, then start typing a hashtag, it will list matching topics. So here I want to add Rainier Project. And after typing R-A-I, it finds it, and I can choose it from the dropdown. And one important thing to mention: as Viva Topics is a knowledge system, it’s important to take the time to make sure that as you create content in SharePoint, you aren’t default sharing with everyone and that you are setting the right permissions for who can view your content as you create it. That way, people can only see what they should have permissions to.


– Great, so the AI is saving a ton of time and it’s using the graph to discover and then build out those baseline topic pages. But ultimately it’s the knowledge managers who have control over the content on those pages. So what steps then does IT need to take in order to get the service up and running?


– Well, if you have Microsoft 365 running, it’s pretty straightforward to set up. First, you need to have access to the service itself. So here you can start with a trial. To find it, just go to billing, search for Viva and click on details. Here you’ll find the link to the free trial. So I’ll click on that, then I’ll select try now. So now Viva Topics is available to my tenant, but off by default. As soon as I configure the settings in admin set up, the topic discovery and experiences will be activated. So I’ll go to setup and I’ll scroll down to files and content, and then I’ll choose connect people to knowledge and click get started to get to our setup wizard. You’ll see the first page configures how Viva Topics finds topics using its built-in AI. Here I can choose all sites or all sites except the sites I want to opt out of. Here you’ll see there’s an option to upload a CSV for cases when you have dozens or hundreds of sites you want to exclude here. CSVs are found throughout setup to help with bulk entry. Moving down the other options, I can specifically choose the sites I want or choose no sites. I’ll stick with the recommendation of all sites.


– Great, and this step here, by the way, is foundational to AI then being able to find all that relevant content?


– Right, and something else coming soon, if you’ve invested in managed metadata services, you’ll be able to select term sets and use them to see topics in your knowledge base.


– Nice, but that said, I know a lot of people are wondering what controls exist over what information then ultimately gets indexed?


– Yeah, we get that question a lot. And here’s where you can work with team leaders and knowledge managers to protect sensitive information. This next control allows you to exclude specific keywords or topic names. These could be private code names that need to remain confidential. Once you exclude them, knowledge indexing will not identify this as a topic. You can also choose if the keyword needs to exactly or partially match the topic name you enter. Here again, working with your knowledge managers, you can figure out what needs to be excluded. For now, I’ll stick with don’t exclude any topics and hit next. Now I need to choose who can see topics. Importantly, if I choose only selected people or security groups, I can target this rollout. I might start with a pilot group then expand it over time and I can do that here. But in my case, I’ll keep the default, everyone in my organization, then hit next.


– So in addition then to protecting sensitive information, can you scope if people are able to contribute to the topics themselves, and how do you designate knowledge managers in this case?


– Yeah, you definitely can scope who can contribute. The whole idea around Viva Topics is to build this knowledge platform for your organization, but you have the full spectrum of control under permissions for topic management. Here, for example, if my organization favors a crowdsourcing approach, I can allow everyone to create and edit new topics. I can also choose specific groups of people and only allow them to create and edit topics. And to answer your question on assigning knowledge managers to manage topics, this next control is where you would do that. This lights up the managed topics experience that I just showed you in the topicscenter. In my case though, I’ll keep the defaults and hit next. Now the last step is to create the topic center in SharePoint. Here, I’ll give it a name and I will call this Infopedia, but I’ll leave the description and hit next. Finally, I can review these settings or make further edits. It’s important to point out that these initial settings can be modified. As new sites are built, new people join the organization or new code names are generated. So you’re not bound to what was just configured. The last step you’ll do is hit activate, and now the Topics service is live and running in my tenant.


– Okay, so now the AI can kind of start to do its thing, and then find all the topics in your Microsoft 365 environment. But how long does it take then before the service starts to find topics?


– It can take a few days, depending on the scope you’ve set, before you’ll see these initial set of AI-discovered topics. You can, however, manually create new topics immediately. And then once everything is set up, back on the Connect People to Knowledge page in the admin center, you can go in and change your settings at any time here with the manage button and it also links you directly to your topic center in the SharePoint right here with the Viva Topics dashboard link. And of course, Viva Topics will abide by the policies you have in place for information protection within your organization. So you have everything you need to safely connect people to knowledge for your organization. And we showed you the user experience in SharePoint and search today. We’ll be lighting up integrated experiences for Viva Topics across Microsoft 365, like Yammer, Outlook, and Microsoft Teams soon. And by the way, today you can already experience Viva Topics in Office clients by selecting a term and searching.


– Okay, so now we’ve covered the overall experience for users, knowledge managers, and the admin experience, and we’ve shown how you’re in complete control over your information and how it’s discovered. So what’s the best way then to get started?


– Yeah, so Viva Topics is generally available and ready for production use today. You can go ahead and activate the trial and try it out. Also, to help you adopt Viva Topics in your organization, under the Get Started tab in the topic center there are also best practices to help you to identify the right stakeholders in your organization and the workflow across executive sponsors, knowledge managers, and IT. And you can find additional tutorials and guidance at aka.ms/vivatopics.


– Thanks again CJ for joining us today and stay tuned also to the next episode in our series on Microsoft Viva. Of course, keep watching Microsoft Mechanics for the latest updates. Subscribe if you haven’t yet and we’ll see you soon.


Video Tutorial: Endpoint Protection Part 2 – Antimalware Policies

This article is contributed. See the original author and article here.

Hello everyone, here is part 2 of a series focusing on Endpoint Protection integrations with Configuration Manager. This series is recorded by @Steve Rachui, a Microsoft principal premier field engineer.


This session focuses on how Configuration Manager can be used to manage Antimalware Policy settings for the Endpoint Defender client built into Windows.


Next in the series Steve focuses on the BitLocker management capabilities integrated into Configuration Manager.


Posts in the series


  • Introduction

  • Antimalware policies (this post)

  • BitLocker integration and management

  • Firewall policies

  • Windows Defender Advanced Threat Protection (ATP) policies

  • Windows Defender Exploit Guard policies

  • Windows Defender Application Guard policies

  • Windows Defender Application Control (WDAC) policies


Go straight to the playlist

Where to run your Azure Stream Analytics job?

This article is contributed. See the original author and article here.

Azure Stream Analytics is generally available across Azure ecosystem – global Azure, Azure IoT Edge and Azure Stack Hub. It allows developers to build architectures for stream processing in different scenarios using the same tools and query language. This blog will provide common scenarios recommendation to help to make the best choice for deliver near-real-time analytical intelligence for your organization.


Azure Cloud


Azure Stream Analytics on global Azure provides large-scale analytics in the cloud. It is designed to analyze and process high volumes of fast streaming data from multiple sources simultaneously. Patterns and relationships can be identified in information extracted from several input sources including devices, sensors, clickstreams, social media feeds, and applications. These patterns can be used to trigger actions and initiate workflows such as creating alerts, feeding information to a reporting tool, or storing transformed data for later use.


The following scenarios are examples of when you can use Azure Stream Analytics:


  • Real-time analytics on Point of Sale for inventory control and anomaly detection.

  • Remote monitoring and predictive maintenance of high value assets.


For more details about Stream Analytics on cloud, please see here.


Azure IoT Edge


Azure Stream Analytics on IoT Edge extends the streaming capabilities and analytics from the cloud to the device level. It is designed for scenarios where customers need low latency command control, have limited cloud connectivity or bandwidth, or require regulatory compliance. An Edge job is created in the Azure portal and then deployed as an IoT Edge module without additional code. By processing telemetry streams at the edge, customers can reduce the amount of uploaded data and reduce the time it takes to react to actionable insights.


The following scenarios are examples of when you can use Azure Stream Analytics on IoT Edge:


  • Local real-time analytics and decision making for vessel managements.

  • Analyze and anonymize telemetry streams before sending it to the cloud.


 Visit Stream Analytics Edge to get started.


Azure Stream Analytics is built into Azure SQL Edge to provide capabilities to stream, process, and analyze relational and non-relational such as JSON, graph and time-series data. It uses the same constructs and capabilities as Azure Stream Analytics on IoT Edge. Customers can pull and run the container image without interacting with the cloud, which allows customers to set up Stream Analytics and stay fully disconnected to the Internet.


More details are available on the product documentation page.


Azure Stack Hub


Azure Stream Analytics is a hybrid service on Azure Stack Hub. It is an IoT Edge module which is configured in Azure but can be run on Azure Stack Hub. Internet connection is needed when creating ASA Edge job and deploying the module. It provides customers with the ability to build truly hybrid architecture for stream processing in their own private and autonomous cloud.


The following scenarios are examples of when you can use Azure Stream Analytics on Azure Stack Hub:


  • Real-time analytics on large amounts of confidential data in a facility with top level security.

  • Process stream data from financial reporting on-premises to meet regulatory requirements.


Learn more at the tutorial page.


Here are the features and limitations in different environments:


ASA on Cloud


ASA on IoT Edge


ASA on Azure Stack Hub


SQL Edge


Internet Connection


All the time


Yes, during job creation and deployment


Yes, during job creation deployment


no


Maximum SUs


192


6 per container


6 per container


6 per container


Input Adapters


IoT Hub


Event Hub


Azure Storage


Data Lake Gen 2


Edge Hub


Event Hub


IoT Hub


Edge Hub


Event Hub


Edge Hub


Kafka


Output Adapters


Event Hub


Azure Functions


Power BI


Azure Synapse Analytics


Cosmos DB


SQL DB


Blob Storage


Edge Hub


SQL Database/DW


Event Hub


Blob Storage


Edge Hub


Event Hub


Blob Storage


Edge Hub


SQL Database


Time Windowing function


Yes


Yes (no late arrival policy)


Yes (no late arrival policy)


Yes (no late arrival policy)


UDF C#


Yes


Yes


Yes


No


UDF JavaScript


Yes


No


No


No


Machine Learning


Yes


No


No


Yes


Anomaly Detection


Yes


Yes


Yes


Yes


Geospatial Analytics


Yes


Yes


Yes


Yes


Reference Data


SQL


Blob Storage


Static local file


Static local file


No


Operator: PARTITION BY


Yes


No


No


No


Replay from checkpoint


Yes


No


No


No


Increase customer satisfaction and agent productivity with unified routing

Increase customer satisfaction and agent productivity with unified routing

This article is contributed. See the original author and article here.

Customer service managers are constantly searching for more efficient ways to streamline management of incoming service requests, and the backbone of any customer service center operation is routing and assigning cases efficiently. Connecting customers to the agent most qualified to resolve their issue is a foundational element of improving customer satisfaction.

Organizations typically use queue-based routing, directing customers to the relevant queue to resolve their request. A work item rarely arrives in the queue with all the information required to route it to the best-suited agent, which can result in misroutes and longer response and resolution times. To address this, an organization must create custom logic to update work items or manually add classification data to incoming cases.

With traditional queue-based routing, assigning cases requires organizations to create custom workflows that periodically move work from queues to their agents. Or some organizations have dedicated staff who try to manually distribute work across their agents equally and fairly. Both approaches require continuous queue supervision. Tracking the lifecycle of a work item through the system, either in custom workflows or manual human decisions, is inefficient and error prone.

The unified routing capability in Dynamics 365 Customer Service transforms routing and assignment for your organization by leveraging rules and machine learning models to automatically find the best-suited agent for new work items, and then prioritizing and assigning the work to your agents based on skills, current workloads, the type of customer, priority, urgency, and more.

Unified routing is truly omnichannel. It can route service requests on all channels, ensuring that work items are handled consistently and giving you a unified view of workforce utilization across multiple channels. Most importantly, it lets you continue to serve your customers wherever their preferred channels happen to be.

Work classification and assignment

The unified routing capability reimagines the routing pipeline into two broad stages: classification and assignment. During the classification phase, organizations create rules and machine learning models to embellish incoming work items with details such as skills, issue severity, relevant support center location, and language. During the assignment phase, work items are prioritized and assigned to agents based on the nature of the work, stage of the customer journey, agent skills, and the current state of the agent workforce in terms of shift, availability, and workload.

For every work item that gets routed, the two stages are tracked in diagnostics, helping organizations minimize misroutes and achieve more efficient work distribution.

Unified routing flowchart

Six benefits of unified routing

1. Drive higher satisfaction by assigning customers to the appropriate agent.

One of the most common customer pain points is waiting for a long time to reach an agent, only to find out that the agent is unable to solve their issue, so they are transferred to a different agent. Unified routing evaluates the static characteristics of the workforce, such as skills and working hours, as well as the dynamic characteristics of real-time capacity, to assign incoming service requests from all channels to the best-suited agent. It achieves this goal by matching the aspects of incoming work (for example, answers to pre-chat questions, virtual agent interactions, customer journey context, or required skills) to the attributes of the agents (for example, their skills, proficiency, or location).

Read more about the assignment stage.

2. Achieve higher employee engagement with omnichannel work distribution.

Unified routing provides an automatic work distribution service, minimizing the need for constant queue supervision and manual work distribution. Agents today are expected to multitask (working with case records, email messages, chat, digital messages, or voice). Agents work on tasks and cases, respond to emails, engage with customers on chats and digital messages, and pick up phone calls. Unified routing provides real-time presence and enhanced capacity management for the work assigned to these “blended” agents on all channels. It ensures that the agents are not burdened with a workload beyond their capacity and working hours.

Read more about capacity management.

3. Boost contact center performance with skills-based routing.

Traditional queue-based routing solutions do not scale up to the needs of delivering personalized customer service for enterprises with diverse product lines and a global customer base. With skills-based routing, customer service managers can consolidate queues to minimize supervision. Work items are assigned to agents in the same queue based on their skills and proficiency. Connecting customers with agents who can solve specific issues boosts customer satisfaction and loyalty. Agents also benefit because they work on issues that they are skilled at resolving, and therefore they have higher engagement.

The efficiency of such a system depends upon how well the skills needed to fulfill the incoming service request are identified. With an intelligent skill finder, machine learning models identify the skills needed to fulfill incoming work items.

Read more about the intelligent skill finder and skills-based routing.

4. Attain higher service levels with work prioritization.

With unified routing, you can ensure that work is assigned in order of defined priorities. For example, you can author rules to prioritize service requests for premium customers.

Read more about work prioritization and how prioritization rulesets work.

5. Improve routing precision with multi-stage classification.

The customer of today interacts on multiple platforms. Service requests may originate from a social media post, a direct message, or an email. To ensure that the work is assigned to the most appropriate agent, work items must include the right details. Organizations can use unified routing to streamline the classification, such as identifying the incident category, calculating its severity and priority, identifying the best support center from the customer location, and identifying related records.

Read more about work classification rulesets.

6. Enhance operational efficiency with insights from unified routing diagnostics.

Unified routing provides detailed diagnostic traces for each work assignment. You can look at how a certain work item was classified, how it was routed to a certain queue, and how it was prioritized and assigned. You get insights into why certain work items are taking longer to assign or getting assigned incorrectly.

Read more about diagnostics for unified routing.

Next steps

With the 2021 release wave 1, take advantage of the benefits of unified routing in Dynamics 365 Customer Service. Check out the system requirements and availability in your region. Also, read more in the documentation:

This post is the first in a series of deep dives that will help you implement and use unified routing at your organization. Check back frequently for updates.

The post Increase customer satisfaction and agent productivity with unified routing appeared first on Microsoft Dynamics 365 Blog.

Brought to you by Dr. Ware, Microsoft Office 365 Silver Partner, Charleston SC.