by Contributed | Mar 16, 2021 | Technology
This article is contributed. See the original author and article here.
Azure Firewall Premium, which entered Public Preview on February 16th, introduces some important new security features, including IDPS, TLS termination, and more powerful application rules that now handle full URLs and categories. This blog will focus on TLS termination, and more specifically how to deal with the complexities of certificate management.
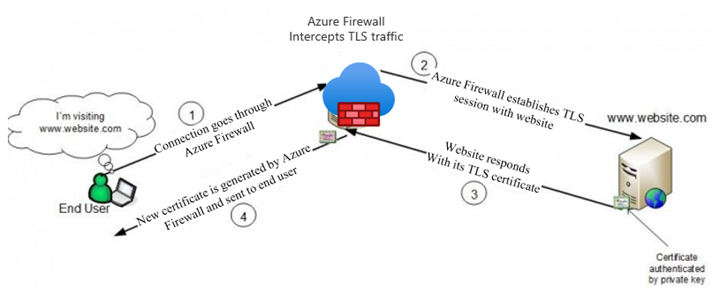
There is an overview of the TLS certificates used by clients, websites, and Azure Firewall in a typical web request that is subject to TLS termination in our documentation (diagram below). In summary, a Subordinate (Intermediate) CA certificate needs to be imported to a Key Vault for Azure Firewall to use. To ensure a seamless experience for clients, they all must trust the certificate issued by Azure Firewall.
The rough steps for enabling TLS Inspection are:
- Issue and export a subordinate, or intermediate, CA certificate along with its private key.
- Save the certificate and key in a Key Vault.
- Create a Managed Identity for Firewall to use and allow it to access the Key Vault.
- Configure your Firewall Policy for TLS Inspection.
- Ensure that clients trust the certificate that will be presented by Azure Firewall.
The rest of the blog will walk through the different ways to accomplish steps 1 and 5.
General Certificate Requirements
From our docs, the certificate issued must conform to the following:
- It must be a single certificate, and shouldn’t include the entire chain of certificates.
- It must be valid for one year forward.
- It must be an RSA private key with minimal size of 4096 bytes.
- It must have the KeyUsage extension marked as Critical with the KeyCertSign flag (RFC 5280; 4.2.1.3 Key Usage).
- It must have the BasicContraints extension marked as Critical (RFC 5280; 4.2.1.9 Basic Constraints).
- The CA flag must be set to TRUE.
- The Path Length must be greater than or equal to one.
These requirements can be fulfilled by either generating self-signed certificates on any server, or by using an existing Certificate Authority, possibly as part of a Private Key Infrastructure (PKI). Public Certificate Authorities will not issue a certificate of this type because it will be used to issue other certificates on behalf of the root or issuing CA. Since most public CAs are trusted by default on client operating systems, allowing others to issue certificates on behalf of those would be a major security risk.
Self-Signed Certificates
The quickest and easiest method of generating a certificate for use on Azure Firewall is to generate root and subordinate CA certs on any Windows, Linux, or MacOS machine using openssl. This is the recommended method to use for testing environments, due to its simplicity.
There are scripts in our documentation that make this process very easy. If you are using these certificates in a production environment, be sure to secure the root CA certificate by storing it in a Key Vault.
Establishing Trust
If the certificate used on Azure Firewall is not trusted by the client making a web request, they will be met with an error, which would disrupt normal operations. The best way to establish trust is to add the Root CA that issued the Firewall certificate as a Trusted Root CA on every client device that will be sending traffic through the Firewall. You will need an exported .cer file from your Root CA.
Using Ubuntu as the example for Linux, this can be done using update-ca-certificates.
On Windows, you can use the UI or import using Powershell.
This process can be scripted and run remotely if the environment allows it.
PKI
A Private Key Infrastructure can be used by organizations to manage trust within an enterprise. There are several advantages to using this approach rather than self-signed certificates, including:
- CA infrastructure may already be in place in some environments, especially hybrid ones.
- Enterprise Root CA is automatically trusted by all domain-joined Windows computers. No extra steps are needed to establish trust.
- Certificate rotation and revocation can be done centrally via Group Policy, so changes are more easily managed.
Using PKI, you will not have to import your certificate on your Windows clients, since they will all automatically trust your Enterprise Root CA. The full process of generating, exporting, and configuring Azure Firewall to use a PKI certificate is documented in a new article here.
Intune
Intune does not generate certificates, but it can be a great tool to manage them on clients. If your Azure VMs are managed by Intune, you can use certificate profiles to add your chosen CA as trusted.
Custom Images
If your environment is not connected to or managed by Active Directory, Intune, MEM, or any other client management tool, you still have an option to deploy certificates at scale. Using custom images, you can install the trusted Root CA certificate, capture an image, and use that image to deploy or re-deploy your VM instances.
This process works best in environments where servers are treated as “cattle” rather than “pets,” meaning that they are spun up and down often and automatically configured, rather than manually configured and maintained for long periods of time.
Summary
This has been an overview of some different methods available to create certificates for use on Azure Firewall Premium and establish trust for those certificates on your clients. This is certainly not an exhaustive list of the options out there, so we would like to hear more from you. Please leave a comment telling us what methods you are currently using or would like to use. We will use your feedback to create more documentation and other instructional content.
by Contributed | Mar 16, 2021 | Technology
This article is contributed. See the original author and article here.
(part 3 of my series of articles on security principles in Microsoft SQL Servers & Databases)
Security concept: Delegation of Authority
To be precise from the beginning: Delegation is a process or concept rather than a principle. But it is a particularly useful practice to keep in mind when designing any security concept and it is strongly connected to the discussed security principles like the Principle of Least Privilege and Separation of Duties as you will find out.
So, what is it about? Delegation (of authority) is the process to pass on certain permissions to other users, often temporarily, without raising their overall privileges to the same level as the delegating account.
There are two slightly different approaches. Delegation can be done either..
1) at the Identity level: allowing Identity A to be used utilized by identity B. Here B assumes A’s identity and powers/permissions. Examples in Operating Systems are the “Runas” and “sudo”-commands in Windows, respectively Unix/Linux.
Or
2) it can be done at the Authorization level: essentially by passing on a specified set of permissions via a form of Role Based Access Control (RBAC*) to another identity.
When you look at two-tier application architectures and the authentication flows, you will probably notice that delegation is somewhat a common pattern.
OAuth and on-behalf-of token for authentication
For example, OAuth is an open standard for access delegation which is also utilized in Azure Active Directory (AAD). Using the OAuth 2.0 On-Behalf-Of flow (OBO) applications can invoke a service API, which in turn needs to call another service API – like SQL Server.
Instead of using the invoking application’s identity, the delegated user’s identity (and permissions) is propagated through the request chain. To do this, the second-tier application authenticates to the resource for example a SQL database, with its own token, a so called “on-behalf-of” token that originated from the first-tier application..
This is an example of delegation at identity level.
Delegation of Authority in the SQL realm
In SQL Server there are multiple options available to implement Delegation.
Azure AD User’s creation
One scenario where delegation is being used under the covers is the following:
Assume, an AAD principal, such as the AAD admin account for Azure SQL, wants to create an AAD user in the database (statement: CREATE USER <AADPrincipalName> FROM EXTERNAL PROVIDER).
In this case, the managed service identity (MSI) which is assigned to Azure SQL server is required. Using this MSI, Azure SQL server sends the information about the AAD user which the AAD admin account wants to create as a user inside SQL to AAD graph (in future: MS graph) for verification. Therefore, the MSI (and not the AAD admin account) requires the proper permission in Azure AD (such as the “Directory Readers” role).
GRANT WITH GRANT OPTION
This one may be a less widely known possibility in SQL: it is possible to Grant a permission to Users and to allow them to pass on this permission. This is what the “WITH GRANT OPTION” of the GRANT statement is for.
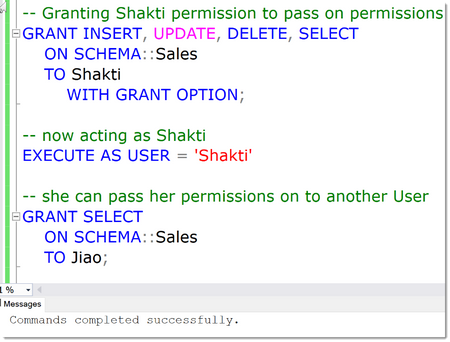
In the below example, a User Shakti has been granted the various privileges, INSERT, UPDATE, DELETE and SELECT a Schema named “Sales”. On top of that, by using the WITH GRANT OPTION, she is allowed to pass on those permissions.
This is demoed by impersonating her account using the EXECUTE AS clause (btw: this is also an example of using delegation at the identity level) and now “being” Shakti we can grant permissions to anyone else, Jiao in this case.
EXECUTE AS and privilege bracketing for temporarily delegating permissions
A powerful and commonly used technique is the possibility to run stored procedures under a separate user account for just the task at hand, no matter who the original caller is, and by that means use the privileges of the impersonated account for the runtime of the stored procedure.
This is typically used to delegate tasks that otherwise require high privileges in SQL Server.
Strictly speaking, the delegation happens when access to the stored procedure is granted. The use of a stored procedure is technically a separate concept, referred to as “privilege bracketing” which is somewhat in the same space as just-in-time privileges (JIT). JIT is yet another technique which allows the use of certain elevated permissions for a certain period of time (aka “time bound”) only.
Privileged Identity Management in Azure offers these capabilities: What is Privileged Identity Management? – Azure AD | Microsoft Docs
See the below example: ALTER is the minimal (“least”) permission necessary to Update Statistics on tables. But instead of granting ALTER on each table or the whole database, Jiao will only get permission to run this stored procedure which in turn runs under elevated permissions that are assumed for the runtime of the procedure only.

Note
If you are auditing User’s activities (which in general you should, but this is another topic coming up), you need to be aware that since Impersonation has the effect that the “current user” is not the actual User who is acting, looking only at Server or Database Principal ID’s does not give the right picture. Luckily, SQL Auditing by design always captures the session_server_principal_name. This contains the name of the principal who is connected to the instance of SQL Server originally, no matter how many levels of impersonations are done. This is the same like using the SQL Function ORIGINAL_LOGIN(), which you should use when implementing custom Logging solutions.
Signing Modules for temporarily delegating permissions
There is an alternative option when using modules for delegation to EXECUTE AS: signing the module. In SQL Server, modules (such as stored procedures, functions and triggers) can be signed with an asymmetric key or a certificate (technically just another form of asymmetric key).
The trick is that this key or certificate can be mapped to a database user. And when the module is executed, and the signature has been verified, the module will inherit the permissions of the mapped user. And here is the difference to the EXECUTE AS-clause: the permissions of the certificate-mapped user will be added to the permissions of the original caller, not replace them. This is because the execution context actually does not change. Which leads to the second big difference: All the built-in functions that return login and user names return the name of the caller, not the certificate user name.
In the resources you will find a couple of links with various examples.
Here is a diagram of how this can be used in a simple example:

In this example, Ben alone only has SELECT on the table Orders, but does not have access to the OrderDetails-tables. Instead, the intention is, that he can only access this table by using the specifically prepared stored procedure ProcAccountforInternalCalc.
Only at runtime of this procedure, the permissions of the original caller, Ben, are extended with the permissions of another user, ProcAccountforInternalCalc, which has been specifically created for this use-case: to grant the SELECT permission on the table OrderDetails only when the stored procedure sel_OrderDetails_with_margin is being used. For that, this user is mapped to a certificate, Cert
_ProcAccountforInternalCalc, which has been used to sign the stored procedure.
Now, anyone who has permission to execute this procedure, will inherit the additional permissions of ProcAccountforInternalCalc and can then see the data from the table – using the business logic from the procedure only.
Note
Module signing should only ever be used to GRANT permissions, and not be used as a mechanism to enforce DENY, let alone REVOKE permissions.
Most SQL Server environments I have seen already some use these concepts one way or the other. Delegation is a very powerful and useful technique that can also help ensuring the Principle of Least Privilege is adhered to and help implement Separation of Duties, which is why I felt it deserves a place in this article-series.
Happy delegating
Andreas
Thank you to my Reviewer:
Mirek Sztajno, Senior Program Manager in SQL Security and expert in Authentication
Resources
by Contributed | Mar 16, 2021 | Technology
This article is contributed. See the original author and article here.
Welcome to Bing Insiders Community. We’re excited to read about your experience with Bing! To make sure our space is a safe environment for all and that your comments don’t get lost check out these guidelines before you post.
Community Guidelines
Be respectful to Microsoft employees, Microsoft Valued Professionals (MVPs), moderators, and the other members of this community. Disrespectful behaviors include condescension, microaggressions, disrespectful language (being rude, insulting, berating, or commenting upon anything personal), etc…
Low quality or low effort posts, clickbait titles, and reposts are not allowed and will be removed. Topics with little discussion merit are considered low quality and may be removed. It is good etiquette to use the forum search feature for active discussions before posting a new topic.
Do not “bump” or double post in a topic unnecessarily or more than once in 48 hours. If you do this it will result in the bump post being deleted. Additionally, do not revive old threads. Instead of replying to an inactive conversation that was an issue in the past, create a new thread.
Post your comments, opinions, and ideas in a constructive and respectful way. Don’t be afraid to hop in and add to a conversation. Introduce yourself, meet people. If you think someone is wrong it may be because they are new; don’t jump on them, but try to be tactful and civil. Please do not try and provoke anyone into a fight. This includes following people to different sections of these forums and replying to them to fuel rivalry or continuing a discussion after it has gone downhill.
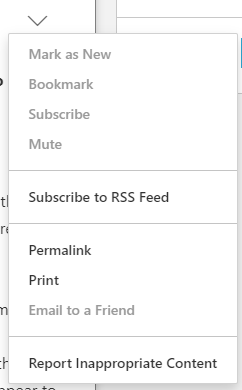
You should not post your or anyone else’s personal information on these forums including email or physical addresses, phone numbers, credit card numbers, or sensitive log-in information. Furthermore, if any user asks you for any of the information detailed above, do not provide it, and please immediately report the message to the moderators using the report feature. To report a message on these forums asking for your personal information, please click the down arrow in the top right of a comment box and select Report inappropriate content. If you need to share logs to troubleshoot further with the Microsoft employees or the MVPs, ensure that all personal information is stripped before sharing.
Please do not start a thread in one forum then cross-post in another forum to increase your chances for a quick reply. If you mistakenly post in the wrong forum, don’t worry, the moderators will be more than happy to move your post to the appropriate forum. Additionally, please post issues that you yourself are experiencing, not something you see someone else is experiencing; this ensures the community member who is experiencing the issue can get the direct help they are looking for.
Do not use any posting style that is disruptive and/or disrespectful, such as posting in ALL CAPS, l337speak, oVeRuSeD mEmEs, off-topic banter/phrases, etc…
Please do not discuss or post links to any topic that could violate the Terms of Use. Attempting to manipulate the forums, or other community features including ranking and reputation systems, by violating any of the provisions of this Code of Conduct, colluding with others on voting, or using multiple profiles, may result in a temporary or permanent suspension from these forums.
These guidelines are considered a warning. Failure to follow these guidelines may result in a temporary or permanent ban from the community. If you have an issue with a moderator action taken on these forums, please reach out to an employee or moderator privately. Do not repost content a moderator has removed or locked, remove a post edited by a moderator, or post about forum moderation decisions.
Alyxandria (she/her)
Community Manager – Bing Insiders
by Contributed | Mar 16, 2021 | Technology
This article is contributed. See the original author and article here.
Microsoft.Data.SqlClient 3.0 Preview 1 has been released. This release contains improvements and updates to the Microsoft.Data.SqlClient data provider for SQL Server.
Our plan is to provide GA releases twice a year with two preview releases in between. This cadence should provide time for feedback and allow us to deliver features and fixes in a timely manner. This first 3.0 preview includes many fixes and changes over the previous 2.1 GA release.
Notable changes include:
- Configurable Retry Logic
- The most exciting feature of this release, configurable retry logic is available when you’ve enabled an app context switch. Configurable retry logic builds significantly more transient error handling functionality into SqlClient than existed previously. It will allow you to retry connection and command executions based on configurable settings. Since it is even configurable outside of your code, it can help make existing applications more resilient to transient errors that you might encounter in real-world use.
For a detailed look into this feature, check out the blog post Introducing Configurable Retry Logic in Microsoft.Data.SqlClient v3.0.0-Preview1.
- Dropped support for .NET Framework 4.6. .NET Framework 4.6.1 is the new minimum requirement
- Added support for Event counters in .NET Core 3.1+ and .NET Standard 2.1+
- Added support for Assembly Context Unloading in .NET Core
- Performance increases
- Numerous bug fixes
For the full list of changes in Microsoft.Data.SqlClient 3.0 Preview 1, please see the Release Notes.
To try out the new package, add a NuGet reference to Microsoft.Data.SqlClient in your application and pick the 3.0 preview 1 version.
We appreciate the time and effort you spend checking out our previews. It makes the final product that much better. If you encounter any issues or have any feedback, head over to the SqlClient GitHub repository and submit an issue.
David Engel
by Contributed | Mar 16, 2021 | Technology
This article is contributed. See the original author and article here.
Microsoft 365 Defender simplifies and expands Microsoft security capabilities by consolidating data and functionality into unified experiences in the Microsoft 365 security center.
With advanced hunting, customers can continue using the powerful Kusto-based query interface to hunt across a device-optimized schema for Microsoft Defender for Endpoint. You can also switch to the Microsoft 365 security center, where we’ve surfaced additional email, identity, and app data consolidated under Microsoft 365 Defender.
Customers who actively use advanced hunting in Microsoft Defender for Endpoint are advised to note the following details to ensure a smooth transition to advanced hunting in Microsoft 365 Defender:
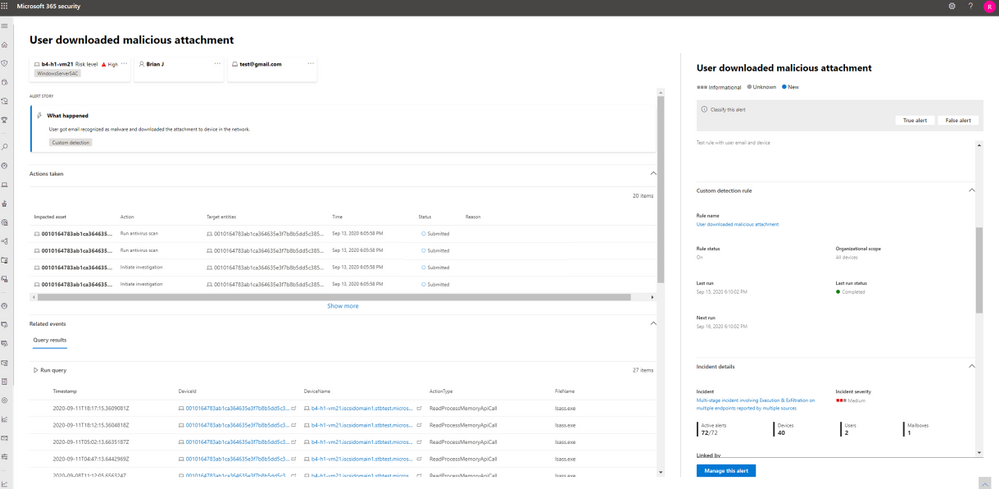
- You can now edit your Microsoft Defender for Endpoint custom detection rules in Microsoft 365 Defender. At the same time, alerts generated by custom detection rules in Microsoft 365 Defender will now be displayed in a newly built alert page that provides the following information:
- Alert title and description
- Impacted assets
- Actions taken in response to the alert
- Query results that triggered the alert (timeline and table views)
- Information on the custom detection rule
- With alert data consolidated from various sources in Microsoft 365 Defender, the contents of the DeviceAlertEvents table are surfaced using the AlertInfo and AlertEvidence tables. These replacement tables are not constrained to alerts on devices. Instead, they also cover alerts from Microsoft Defender for Office 365, Microsoft Defender for Identity, and Microsoft Cloud App Security, providing visibility over threat activity impacting emails, apps, and identities.
Read through the following sections for tips on how you can transition your Microsoft Defender for Endpoint rules smoothly to Microsoft 365 Defender.
Migrate custom detection rules
When Microsoft Defender for Endpoint rules are edited in Microsoft 365 Defender, they can continue to function as before if the resulting query looks at device tables only. For example, alerts generated by custom detection rules that query only device tables will continue to be delivered to your SIEM and generate email notifications, depending on how you’ve configured these in Microsoft Defender for Endpoint. Any existing suppression rules in Microsoft Defender for Endpoint will also continue to apply.
Once you edit a Microsoft Defender for Endpoint rule so that it queries identity and email tables, which are only available in Microsoft 365 Defender, the rule is automatically moved to Microsoft 365 Defender. Alerts generated by the migrated rule:
- Are no longer visible in the Microsoft Defender Security Center
- Will cease being delivered to your SIEM or generate email notifications. To work around these changes, configure notifications through Microsoft 365 Defender to get the alerts. You can use the Microsoft 365 Defender API to receive notifications for custom detection alerts or related incidents.
- Won’t be suppressed by Microsoft Defender for Endpoint suppression rules. To prevent alerts from being generated for certain users, devices, or mailboxes, modify the corresponding queries to exclude those entities explicitly.
If you do edit a rule this way, you will be prompted for confirmation before such changes are applied.
Write queries without DeviceAlertEvents
In the Microsoft 365 Defender, the AlertInfo and AlertEvidence tables are provided to accommodate the diverse set of information that accompany alerts from various sources. Once you transition to advanced hunting in Microsoft 365 Defender, you’ll need to make adjustments so your queries get the same alert information that you used to get from the DeviceAlertEvents table in the Microsoft Defender for Endpoint schema.
In general, you can get all the device-specific Microsoft Defender for Endpoint alert info by filtering the AlertInfo table by ServiceSource and then joining each unique ID with the AlertEvidence table, which provides detailed event and entity information. See the sample query below:
AlertInfo
| where Timestamp > ago(7d)
| where ServiceSource == “Microsoft Defender for Endpoint“
| join AlertEvidence on AlertId
This query will yield many more columns than simply taking records from DeviceAlertEvents. To keep results manageable, use project to get only the columns you are interested in. The query below projects columns you might be interested in when investigating detected PowerShell activity:
AlertInfo
| where Timestamp > ago(7d)
| where ServiceSource == “Microsoft Defender for Endpoint“
    and AttackTechniques has “powershell“
| join AlertEvidence on AlertId
| project Timestamp, Title, AlertId, DeviceName, FileName, ProcessCommandLine
Important note on the visibility of data in Microsoft Defender for Endpoint
Saved queries and custom detection rules that use tables that are not in Microsoft Defender for Endpoint are visible in Microsoft 365 security center(security.microsoft.com) only—you will not see them in the Microsoft Defender Security Center. In the Microsoft Defender Security Center, you will see only the queries and rules that are based on the tables available in this portal.
Let us know how we can help
While the move to Microsoft 365 Defender offers limitless benefits especially to customers who have deployed multiple Microsoft 365 security solutions, we understand how change can always present challenges. We’d like to encourage all customers to send us feedback about their experiences managing this change and suggestions on how we can help further. Send us feedback through the portals or contact us at ahfeedback@microsoft.com.

Recent Comments