by Contributed | Mar 17, 2021 | Technology
This article is contributed. See the original author and article here.
Final Update: Wednesday, 17 March 2021 22:01 UTC
We’ve confirmed that all systems are back to normal as of 03/17 21:21 UTC. Our logs show the incident started on 03/17 20:07 UTC and that during the timeline that it took to resolve the issue 10% of active customers in the East US region experienced data access issues and missed alerts.
- Root Cause: The failure was due to stability issues in one of our backend systems.
- Incident Timeline: 03/17 20:07 UTC through 03/17 21:21 UTC
We understand that customers rely on Application Insights as a critical service and apologize for any impact this incident caused.
-chandar
by Contributed | Mar 17, 2021 | Technology
This article is contributed. See the original author and article here.
March is Women’s History Month and what a more fitting time for our team, Microsoft Azure Engineering, to have our first post go up here on the Tech Community Blog.
As a woman working in tech, I’m proud to work for a company like Microsoft, where diversity and inclusion is celebrated. This mindset also shapes the way we build our products and services. That’s where a program like Microsoft Customer Co-creation comes into play. If you haven’t heard about it, I’d like to take this opportunity to tell you more.
Microsoft Customer co-creation connects you directly with engineers within the Cloud Engineering (C+ AI) organization so you can talk to them about the products you care about. Sometimes this could mean playing an early role in product and service development before a single line of code is even written. Ultimately, our hope is your feedback will result in the creation of something you’ll really love using.
You can start by filling out your profile and telling us about yourself and what you’re interested in.
When the right opportunity comes up, our team will contact you, let you know the topic, and ask your availability to participate in a feedback session.
Your voice matters and I hope you’ll consider joining the Microsoft Customer Co-creation program and help influence the services and products you use.
by Contributed | Mar 17, 2021 | Technology
This article is contributed. See the original author and article here.
Final Update: Wednesday, 17 March 2021 20:18 UTC
We’ve confirmed that all systems are back to normal as of 03/17, 19:54 UTC. Our logs show the incident started on 03/17, 19:14 UTC and that during this timeline subset of customers in East US experienced data access issues and possible missed alerts.
- Root Cause: The failure was due to backend component that needed to be restarted.
- Incident Timeline: 40 minutes – 03/17, 19:14 UTC through 03/17, 19:54 UTC
We understand that customers rely on Application Insights as a critical service and apologize for any impact this incident caused.
-Chandar
by Contributed | Mar 17, 2021 | Technology
This article is contributed. See the original author and article here.
Hi Teams Community,
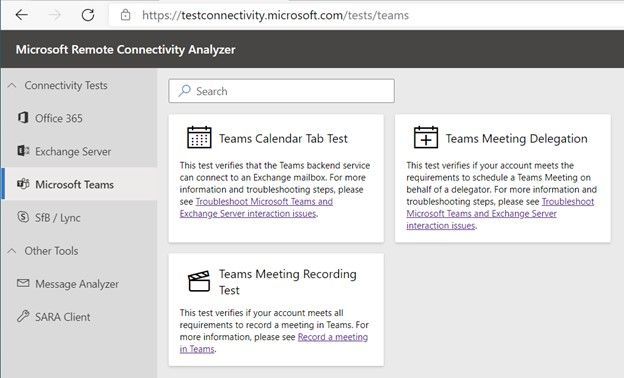
We’re back with another addition to Support Diagnostics for Microsoft Teams. @João Loureiro has written our third offering in the Microsoft Remote Connectivity Analyzer, the Meeting Recording test.
This new Diagnostic will help you troubleshoot and test if you meet requirements to record a Teams meeting. If you recently attempted to record a Teams meeting or group call and you were unable to, for example the Recording button was greyed out, you should use this diagnostic to help you troubleshoot.
To access the new diagnostic, navigate to Microsoft Remote Connectivity Analyzer, select Microsoft Teams, then click on the Teams Meeting Recording Test.
You’ll need to enter valid credentials of an affected account. Optionally you can specify the Teams Meeting URL you are planning to record. Keep in mind your end users can also perform these tests, you do not need to be an Administrator of your tenant. In some scenarios you’ll want to work with your impacted end user to run the tests and collect additional data for Microsoft Support.
At a high level the test checks a couple things:
- The user is licensed and fully provisioned for Teams
- The user is enabled for cloud meeting recording
- Recordings saved to OneDrive for Business and SharePoint or Microsoft Stream
- If recordings configured to use Stream will check if user is within valid region for streaming
- The user as permissions to record provided Teams Meeting URL
You’ll also want to go over the following documents carefully when configuring Teams cloud meeting recording
Teams cloud meeting recording
Use OneDrive for Business and SharePoint or Stream for meeting recordings
Record a meeting in Teams
Please give the new diagnostic a try if you’re having trouble with Teams Meetings Recording and let us know if it helped?
Thanks!
Microsoft Teams Support
by Contributed | Mar 17, 2021 | Technology
This article is contributed. See the original author and article here.
We have a guest post today from @thibaudcolas from our Services Team.
Disclaimer: With the introduction of cross platform co-auth support announced recently at Ignite (Announcing co-authoring on Microsoft Information Protection-encrypted documents and labeling updates), this capability will change in the future as the metadata location used to store the sensitivity label will change and not be readable by this approach, once co-auth support is enabled in your tenant (which is not the case by default).
The purpose of this process is to allow the re-classification of existing documents classified with a deprecated sensitivity label to a new one. This process mainly aims to reclassify files which have been manually classified and which are not reachable by the AIP scanner. Files not matching these criteria can also be addressed, but other solutions exist (e.g. MCAS).
A deprecated label is a label which cannot be used anymore for technical reasons. An example could be when a label used to classify documents becomes a top label (sub-labels have been introduced). Then, as documents cannot be classified with a top label, these legacy items may fail some mechanisms (e.g. attachment’s inheritance to mail or sensitivity labels as a condition with M365 DLP).
Notes:
- When possible, renaming the display name of a label should be preferred as it does not imply any significant configuration changes while still allowing changing the user interface.
- Keep in mind, Microsoft recommends implementing in production a classification taxonomy the most tailored to organizations’ needs from Day 1, avoiding having to deal with such situations.
Context:
Contoso had the following classification taxonomy:
General
|
Confidential
|
Highly Confidential
|
Contoso used to have a label “Confidential” which was set as a default label for all new documents. Therefore, a significant amount of newly created and edited documents has been classified as “Confidential”.
Then, the classification has been updated by the introduction of two sub-labels:
General
|
Confidential
|
Highly Confidential
|
All Employees
|
All Employees
|
User-Defined permissions
|
User-Defined permissions
|
To ensure “Confidential” documents can still be protected by M365 DLP or benefit the attachment’s inheritance to mail, they must be reclassified to “Confidential – All Employees”.
Requirements:
- Compliance admin role
- PowerShell module to access SCC
- Access to Microsoft Compliance portal
- Information in the matrix below
- AIP UL client
- This process is not supported with Office built-in labeling feature (Windows, Mac, Mobile devices, and Web).
“Confidential” label custom property*
|
MSIP_Label_<Confidential_ImmutableID>_Name
|
“Confidential” label custom property value*
|
Confidential
|
“Confidential-new” ImmutableID**
|
<Confidential-new_ImmutableID>
|
Sub-label 1 to migrate
|
All Employees
|
Sub-label 2 to migrate
|
User-Defined permissions
|
* : Open a “Confidential” document > click File > Info > Properties > Advanced Properties > Custom
** : Use “Get-Label -Identity “Confidential-new” | fl”
Note: This process relies on the utilization of the advanced setting “LabelByCustomProperties”. This one only works with properties it “does not know”, which includes metadata applied by the client. As long as the deprecated label will exist in the tenant, the advanced setting will not work as it “knows” its associated custom properties. For this reason, the deprecated label must be deleted.
Solution:
We will recreate the “Confidential” label and sub-labels structure with a new label which will looks identical for end-users.
Note: This process should be transparent for end-users if no one opens a new Office app during the process. However if it happens, the user will receive the policy as it is at this moment. Once the process completed, sensitivity labels will look identical for end-users.
- In SCC portal, change the display name of label “Confidential” to “Confidential.”
- This is to make the display name “Confidential” available again and minimizing impact on user experience.
- In SCC portal, create a new label “Confidential-new” with “Confidential” as Display name.
- All future mentions of labels in this process refers to Name and not DisplayName.
- In SCC portal, adjust the order of “Confidential-new” label to be located between “General” and “Confidential” labels.
- Click of the “…” button of the label “Confidential-new” and “move up or down”).
- In SCC portal, select the appropriate label policy(ies) and add the new label “Confidential” for publication.
- This is required to migrate sub-labels which are already published.
- Change the parent label of sub-labels “All Employees” and “User-Defined Permissions” from “Confidential” to “Confidential-new”.
- In a PowerShell session, connect to SCC and run below commands:
- Set-Label -Identity “All Employees” -ParentId $null
- Set-Label -Identity “All Employees” -ParentId <Confidential-new_ImmutableID>
- Set-Label -Identity “User-Defined Permissions” -ParentId $null
- Set-Label -Identity “User-Defined Permissions” -ParentId <Confidential-new_ImmutableID>
- In SCC portal, unpublish label “Confidential” from all policies.
- In SCC portal, delete the label “Confidential”.
- Before moving forward, ensure with below PowerShell cmd the label has correctly been deleted. It can take few minutes for a label to disappear
- Set the advanced setting “LabelByCustomProperties” to automatically reclassified “Confidential” documents as “Confidential-new / All Employees” when opened.
- Set-Label -Identity “All Employees” -AdvancedSettings @{LabelByCustomProperties=“reclassificationrule,MSIP_Label_<Confidential_ImmutableID>_Name,Confidential”}
- Verify the advanced setting has correctly been set
- (Get-Label -Identity “All Employees”).Settings
- The setting “labelbycustomproperties” should be listed.
- Try to consume a “Confidential” document in new Word session
- The label should be automatically updated to “Confidential-new / All Employees”, and it will work the same way for any documents classified “Confidential” and which be consumed with AIP UL client in future.
- If ever it does not work, it may be the client did not download the last policy version. In that case, try following options:
- Restart Word.
- Reset AIP UL client settings (Sensitivity > Help and Feedback > Reset Settings).
Note: This process should be transparent for end-users if no one opens a new Office app during the process. However if it happens, the user will receive the policy as it is at this moment. Once the process completed, sensitivity labels will look identical for end-users.
Thanks for reading and we hope you find this useful! If you haven’t already, don’t forget to check out our resources available on the Tech Community.
Thanks!
@Robin_Baldwin on behalf of the MIP and Compliance CXE team

Recent Comments