by Contributed | Mar 25, 2021 | Technology
This article is contributed. See the original author and article here.
Last year, we started requiring multi-factor authentication (MFA) in Microsoft Advertising online. Multi-factor authentication is a security process that requires you to verify your identity in two different ways.
Soon we will require multi-factor authentication for all users who sign in through any third-party application that uses the Bing Ads API, Content API, and Hotel APIs.
Over the last several months most API clients have prepared for the enforcement of MFA. Due to a new developer requirement as explained below, we are extending the deadline from April 1st to August 1st, 2021.
What users need to do
When you sign in and allow third-party applications to access your Microsoft Advertising account, you’ll be asked to provide a second form of verification that matches contact information in your Microsoft account profile. You’ll need to grant consent again for any third-party tools to access your Microsoft Advertising accounts.
What developers need to do
Update your application to use the new msads.manage scope (coming soon) via the Microsoft Identity endpoint. All application developers must take action to use the new scope.
- Prior to MFA enforcement the Microsoft Identity endpoint supports the ads.manage scope. Access tokens that you acquire for users via the ads.manage scope will no longer be authenticated.
- Prior to MFA enforcement the Live Connect endpoint supports the bingads.manage scope. The Live Connect endpoint is already deprecated and will no longer be supported. Access tokens that you acquire for users via the bingads.manage scope will no longer be authenticated.
Upon enforcement of the MFA requirement, we will only authenticate access tokens on behalf of a user who passed through MFA via the new msads.manage scope on the Microsoft Identity endpoint.
The new msads.manage scope requires renewed consent from all users of your application. You must prompt users for consent using the new msads.manage scope after they have turned on multi-factor authentication. We recommend that you inform and guide users of your application to set up MFA right away.
Additional resources
Support for the new msads.manage scope including SDKs is coming in April. We’ll share updates via the blog and documentation as soon as its ready.
The GetUserMFAStatus service operation is now available and can be used to estimate the progress of MFA adoption by users of your application. The operation returns true if within the last 90 days the user passed through MFA via Microsoft Advertising online, Microsoft Advertising Editor, or Microsoft Advertising mobile. This is only directional and cannot guarantee they will pass through MFA while granting consent to your application.
For more information, see our API documentation. As always please feel free to contact support or post a question in the Bing Ads API developer forum.
by Contributed | Mar 25, 2021 | Technology
This article is contributed. See the original author and article here.
Hello folks,
Following my recording with Shayoni Seth (Senior Program Manager on the Azure Monitor Agent team) regarding the use and deployment of the upcoming Azure Monitor Agent (AMA) currently in preview. We established that there are 2 key parts of the new agent:
- The Data Collection Rule
- The Agent deployment.
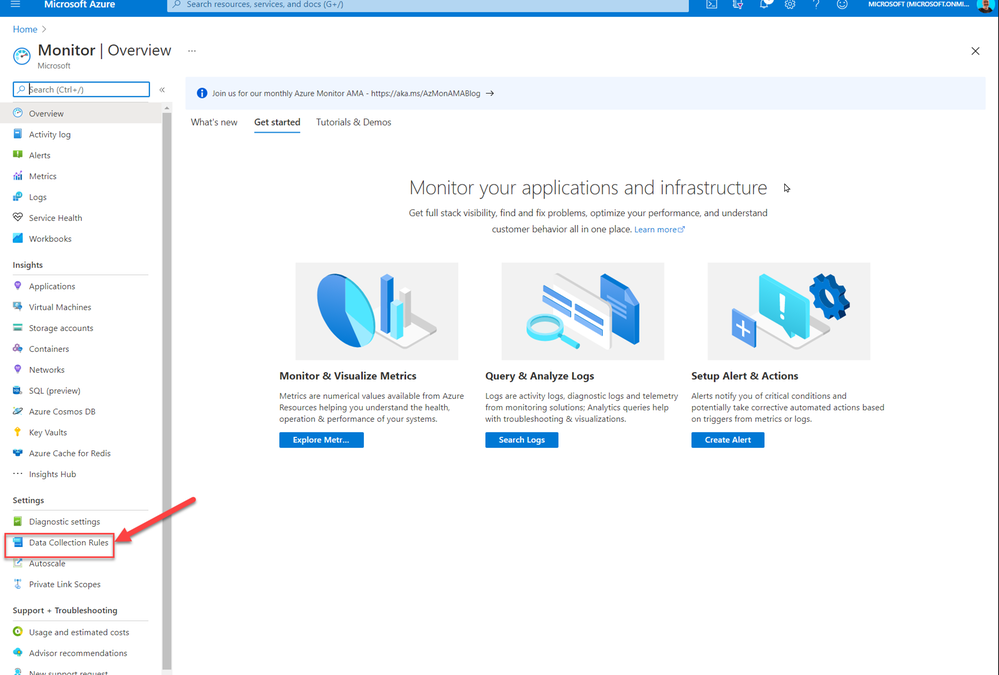
So, if you are testing this new Azure Monitor Agent and you want to avoid having to deploy the agent to each new VM individually in the portal, by navigating to Azure Monitor and selecting the Data Collection Rules (DCR)

And in the DCR menu select Resources, select the resources you need the agent deployed to, and associated with the DCR rule you created.

You can create an Azure Policy that will continuously evaluate if new VMs have the agent and the association with the DCR. If the resources are not compliant with the policy, a remediation task with force the agent extension to be installed and will create the association.
In Azure Policy, create a new Definition that validates and deploys if not present the agent and the assignment.
My policy for Windows is below:
{
"properties": {
"displayName": "Deploy new Azure Monitor Agent to Windows VMs and tie to DCR",
"policyType": "Custom",
"mode": "Indexed",
"description": "Deploy new Azure Monitor Agent to Windows VMs and tie to DCR",
"metadata": {
"version": "1.0.1",
"category": "Monitoring"
},
"parameters": {
"DCRResourceID": {
"type": "String",
"metadata": {
"displayName": "DCR resource ID",
"description": "Resource ID of the DCR that the VMs in scope should point to."
}
}
},
"policyRule": {
"if": {
"allOf": [
{
"field": "type",
"equals": "Microsoft.Compute/virtualMachines"
},
{
"anyOf": [
{
"allOf": [
{
"field": "Microsoft.Compute/imagePublisher",
"equals": "MicrosoftWindowsServer"
},
{
"field": "Microsoft.Compute/imageOffer",
"equals": "WindowsServer"
},
{
"field": "Microsoft.Compute/imageSKU",
"in": [
"2008-R2-SP1",
"2008-R2-SP1-smalldisk",
"2012-Datacenter",
"2012-Datacenter-smalldisk",
"2012-R2-Datacenter",
"2012-R2-Datacenter-smalldisk",
"2016-Datacenter",
"2016-Datacenter-Server-Core",
"2016-Datacenter-Server-Core-smalldisk",
"2016-Datacenter-smalldisk",
"2016-Datacenter-with-Containers",
"2016-Datacenter-with-RDSH",
"2019-Datacenter",
"2019-Datacenter-Core",
"2019-Datacenter-Core-smalldisk",
"2019-Datacenter-Core-with-Containers",
"2019-Datacenter-Core-with-Containers-smalldisk",
"2019-Datacenter-smalldisk",
"2019-Datacenter-with-Containers",
"2019-Datacenter-with-Containers-smalldisk",
"2019-Datacenter-zhcn"
]
}
]
},
{
"allOf": [
{
"field": "Microsoft.Compute/imagePublisher",
"equals": "MicrosoftWindowsServer"
},
{
"field": "Microsoft.Compute/imageOffer",
"equals": "WindowsServerSemiAnnual"
},
{
"field": "Microsoft.Compute/imageSKU",
"in": [
"Datacenter-Core-1709-smalldisk",
"Datacenter-Core-1709-with-Containers-smalldisk",
"Datacenter-Core-1803-with-Containers-smalldisk"
]
}
]
},
{
"allOf": [
{
"field": "Microsoft.Compute/imagePublisher",
"equals": "MicrosoftWindowsServerHPCPack"
},
{
"field": "Microsoft.Compute/imageOffer",
"equals": "WindowsServerHPCPack"
}
]
},
{
"allOf": [
{
"field": "Microsoft.Compute/imagePublisher",
"equals": "MicrosoftSQLServer"
},
{
"anyOf": [
{
"field": "Microsoft.Compute/imageOffer",
"like": "*-WS2016"
},
{
"field": "Microsoft.Compute/imageOffer",
"like": "*-WS2016-BYOL"
},
{
"field": "Microsoft.Compute/imageOffer",
"like": "*-WS2012R2"
},
{
"field": "Microsoft.Compute/imageOffer",
"like": "*-WS2012R2-BYOL"
}
]
}
]
},
{
"allOf": [
{
"field": "Microsoft.Compute/imagePublisher",
"equals": "MicrosoftRServer"
},
{
"field": "Microsoft.Compute/imageOffer",
"equals": "MLServer-WS2016"
}
]
},
{
"allOf": [
{
"field": "Microsoft.Compute/imagePublisher",
"equals": "MicrosoftVisualStudio"
},
{
"field": "Microsoft.Compute/imageOffer",
"in": [
"VisualStudio",
"Windows"
]
}
]
},
{
"allOf": [
{
"field": "Microsoft.Compute/imagePublisher",
"equals": "MicrosoftDynamicsAX"
},
{
"field": "Microsoft.Compute/imageOffer",
"equals": "Dynamics"
},
{
"field": "Microsoft.Compute/imageSKU",
"equals": "Pre-Req-AX7-Onebox-U8"
}
]
},
{
"allOf": [
{
"field": "Microsoft.Compute/imagePublisher",
"equals": "microsoft-ads"
},
{
"field": "Microsoft.Compute/imageOffer",
"equals": "windows-data-science-vm"
}
]
},
{
"allOf": [
{
"field": "Microsoft.Compute/imagePublisher",
"equals": "MicrosoftWindowsDesktop"
},
{
"field": "Microsoft.Compute/imageOffer",
"equals": "Windows-10"
}
]
}
]
}
]
},
"then": {
"effect": "deployIfNotExists",
"details": {
"type": "Microsoft.Insights/dataCollectionRuleAssociations",
"name": "association1",
"roleDefinitionIds": [
"/providers/microsoft.authorization/roleDefinitions/92aaf0da-9dab-42b6-94a3-d43ce8d16293"
],
"type": "Microsoft.Compute/virtualMachines/extensions",
"existenceCondition": {
"allOf": [
{
"field": "Microsoft.Compute/virtualMachines/extensions/type",
"equals": "AzureMonitorWindowsAgent"
},
{
"field": "Microsoft.Compute/virtualMachines/extensions/publisher",
"equals": "Microsoft.Azure.Monitor"
},
{
"field": "Microsoft.Compute/virtualMachines/extensions/provisioningState",
"equals": "Succeeded"
}
]
},
"deployment": {
"properties": {
"mode": "incremental",
"template": {
"$schema": "http://schema.management.azure.com/schemas/2015-01-01/deploymentTemplate.json#",
"contentVersion": "1.0.0.0",
"parameters": {
"resourceName": {
"type": "string"
},
"vmName": {
"type": "string"
},
"location": {
"type": "string"
},
"DCRResourceID": {
"type": "string"
}
},
"variables": {
"vmExtensionName": "AzureMonitorWindowsAgent",
"vmExtensionPublisher": "Microsoft.Azure.Monitor",
"vmExtensionType": "AzureMonitorWindowsAgent",
"vmExtensionTypeHandlerVersion": "1.0"
},
"resources": [
{
"name": "[concat(parameters('vmName'), '/', variables('vmExtensionName'))]",
"type": "Microsoft.Compute/virtualMachines/extensions",
"location": "[parameters('location')]",
"apiVersion": "2018-06-01",
"properties": {
"publisher": "[variables('vmExtensionPublisher')]",
"type": "[variables('vmExtensionType')]",
"typeHandlerVersion": "[variables('vmExtensionTypeHandlerVersion')]",
"autoUpgradeMinorVersion": true
}
},
{
"name": "[concat(parameters('resourceName'), '/', 'Microsoft.Insights/', 'association1')]",
"type": "Microsoft.Compute/virtualMachines/providers/dataCollectionRuleAssociations",
"location": "[parameters('location')]",
"apiVersion": "2019-11-01-preview",
"properties": {
"dataCollectionRuleId": "[parameters('DCRResourceID')]"
}
}
],
"outputs": {
"policy": {
"type": "string",
"value": "[concat('Enabled for VM', ': ', parameters('resourceName'))]"
}
}
},
"parameters": {
"resourceName": {
"value": "[field('name')]"
},
"location": {
"value": "[field('location')]"
},
"vmName": {
"value": "[field('name')]"
},
"DCRResourceID": {
"value": "[parameters('DCRResourceID')]"
}
}
}
}
}
}
}
}
}
And once you have the definition created you will need to assign it to your environment. When assigning it you will require the DCR resource ID. This can be found in the JSON section of the DCR Overview.


The rest of the policy assignment is the same as any other policy. Just don’t forget to check the box to create the remediation task.
That’s it. From now on, any new VMs deployed in scope of the policy will get the Agent and will be associated with the DCR rule you selected. Of course, you can have multiple DCR and corresponding policies for different VM types or workload definitions.
I hope this helps!
Cheers!
by Contributed | Mar 25, 2021 | Technology
This article is contributed. See the original author and article here.
Overview
The self-hosted gateway features expand API Management support for multi-cloud environments. You can place the gateway in their Docker, Kubernetes, or any other container orchestration solution which allows customers to optimize traffic flows, security, and compliance. However, you may wonder how to manage related logs and monitoring. Does the admin still need to connect to Azure? In this post, I would like to share how to configure Local logs or Azure API Management self-hosted gateway.
As mentioned in Microsoft Document: Configure local metrics and logs for Azure API Management self-hosted gateway | Microsoft Docs , self-hosted gateway output logs to stdout and stderr by default, and also supports multiple protocols. How can we view or get those logs? Let’s take a look!
Solutions
First, please follow the document here: Deploy a self-hosted gateway to Azure Kubernetes Service | Microsoft Docs to deploy a self-hosted gateway to Azure Kubernetes. There are some options to check local logs.
Option 1. Self-hosted gateway output logs to stdout and stderr on the host machine by default.
- Check stdout and stderr logs in Kubernetes
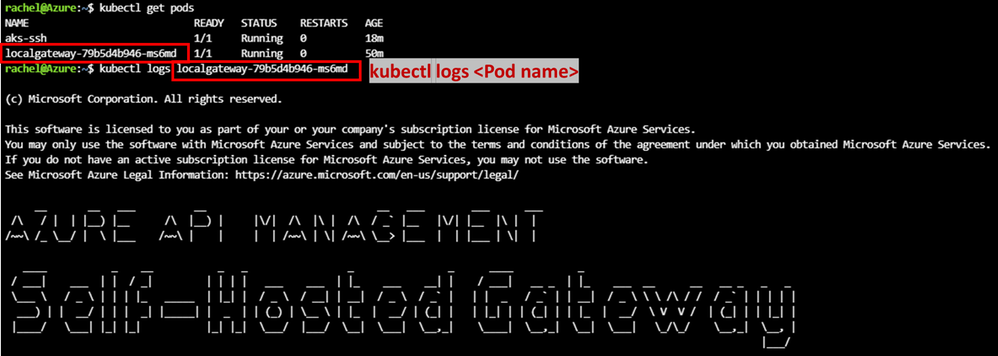
1) kubectl get pods: received pods name
2) kubectl logs <pod name>:check stdout and stderr logs
- In Docker, the stdout and stderr from each container are stored in /var/lib/docker/containers
In Kubernetes, it creates a directory structure to help you find logs based on Pods. You can find the container logs for each Pod running on a node at /var/log/pods/<namespace>_<pod_name>_<pod_id>/<container_name>/
ref: Logging Architecture | Kubernetes
Example.
1. After creating a self-hosting gateway, follow this doc SSH into Azure Kubernetes Service (AKS) cluster nodes – Azure Kubernetes Service | Microsoft Docs to SSH into the Kubernetes node.
2. Then you can find related logs in the folder:

Option 2. Use additional endpoints to realize local logging trough different protocols
Azure API Management self-hosted gateway also supports a number of protocols including localsyslog, rfc5424, and journal. To realize this feature, you need to mount /dev/log into a container from the host machine. It is because API Management does not log into files, but it logs into Syslog (local or remote), JournalD, or remote UDP endpoint in JSON format.
- telemetry.logs.local must be set to localsyslog to enable syslog logging
- To log into localsyslog – mount /dev/log from container host into the container.
- To log into remote Syslog – specify UDP endpoint instead.
- To log into journal – mount /var/run/systemd/journal/socket. To make localsyslog/journal work, you must mount host sockets into API Management ‘s container.
- To log into fluentd – specify remote UDP endpoint.
Sample yaml file:
Below is a complete sample yaml file for localsyslog
# NOTE: Before deploying to a production environment, please review the documentation -> https://aka.ms/self-hosted-gateway-production
---
apiVersion: v1
kind: ConfigMap
metadata:
  name: localgateway-env
data:
  config.service.endpoint: "https://<APIMname>.management.azure-api.net/subscriptions/<subscriptionID>/resourceGroups/APIM/providers/Microsoft.ApiManagement/service/<APIMname>?api-version=2019-12-01"
  telemetry.logs.std: "text"
  telemetry.logs.local: "localsyslog"
  telemetry.logs.local.localsyslog.endpoint: "/dev/log"
  telemetry.logs.local.localsyslog.facility: "7"
---
apiVersion: apps/v1
kind: Deployment
metadata:
  name: localgateway
spec:
  replicas: 1
  selector:
    matchLabels:
      app: localgateway
  strategy:
    type: RollingUpdate
    rollingUpdate:
      maxUnavailable: 0
      maxSurge: 25%
  template:
    metadata:
      labels:
        app: localgateway
    spec:
      terminationGracePeriodSeconds: 60
      containers:
      - name: localgateway
        image: mcr.microsoft.com/azure-api-management/gateway:latest
        volumeMounts:
        - name: logs
          mountPath: /dev/log
        ports:
        - name: http
          containerPort: 8080
        - name: https
          containerPort: 8081
        readinessProbe:
          httpGet:
            path: /internal-status-0123456789abcdef
            port: http
            scheme: HTTP
          initialDelaySeconds: 0
          periodSeconds: 5
          failureThreshold: 3
          successThreshold: 1
        env:
        - name: config.service.auth
          valueFrom:
            secretKeyRef:
              name: localgateway-token
              key: value
        envFrom:
        - configMapRef:
            name: localgateway-env
      volumes:
        - name: logs
          hostPath:
            path: /dev/log
            type: Socket
---
apiVersion: v1
kind: Service
metadata:
  name: localgateway
spec:
  type: LoadBalancer
  externalTrafficPolicy: Local
  ports:
  - name: http
    port: 80
    targetPort: 8080
  - name: https
    port: 443
    targetPort: 8081
  selector:
    app: localgateway
Lab
- In this lab, I deployed the yaml file above in my AKS service.
- After deployment, use kubectl get deployment to confirm the deployment is ready.

- Check the IP address of this service by the command kubectl get service.
- Send a few requests from the Postman.

- Logs can be found under /var/log/syslog.


by Scott Muniz | Mar 25, 2021 | Security
This article was originally posted by the FTC. See the original article here.
While everything about the past year has felt strange and new — I just can’t say unprecedented another time — we could see one thing coming: scammers seized any opportunity to take advantage of the confusion and heightened emotion surrounding COVID-19. So, the FTC sprang into action, suing companies that made deceptive claims and did not correct them, making sure that deceptive claims for hundreds of products were quickly removed, sending hundreds of warning letters, and creating a dedicated site to share information as quickly as possible. We kept moving on other issues, too, got back $483 million to consumers who lost money to frauds, and expanded our outreach. Here’s the highlight reel from 2020.
- Reporting for duty. The agency launched a new streamlined and user-friendly website, ReportFraud.ftc.gov, where you can easily report scams, frauds, and bad business practices. The FTC has long encouraged people to report these issues to the agency when they encounter them — whether or not they lost money to the fraud.
- Helping every community. The FTC kicked off a new initiative, the Community Advocate Center, aimed at partnering with community legal aid organizations to expand our outreach to lower-income communities to encourage them to report fraud and provide them with advice to help recover.
- Reaching out. Last year, the Commission published 470 consumer blog posts (243 in English, 227 in Spanish) sent to more than 367,000 subscribers: more than 312,000 in English and 55,000 in Spanish. The FTC’s blog posts from 2020 (in English) logged more than 7.9 million views.
- Just watch. FTC videos online logged 2 million views. The most viewed video was Your Source for a Truly Free Credit Report? Annual Credit Report.com; it got 140,600 views on the FTC’s websites and 74,300 views on YouTube. In 2020, the FTC’s YouTube channel gained 7,700 new followers (for a total of 22,400).
- You’ve got mail. In 2020, the Commission had a total of 2.2 million people who got the agency’s email updates.
- Social life. The FTC’s social networks had a healthy growth spurt last year: for Facebook, more than 10,000 new followers (for a total of 89,000); for Twitter, nearly 9,000 new followers (for a total of 78,000); and for LinkedIn, 3,900 new followers (for a total of 15,200).
Brought to you by Dr. Ware, Microsoft Office 365 Silver Partner, Charleston SC.
by Contributed | Mar 24, 2021 | Technology
This article is contributed. See the original author and article here.
The ability to Unhide multiple worksheets at once has been a popular request on UserVoice, and we’re excited to let you know that this feature is now available for Microsoft 365 Subscribers. To get it, you can update to version 16.0.13525 or greater on Windows, and it’s also available in Excel for the Web. On Mac, the feature is rolling out to full availability on versions 16.45 or greater.

To unhide more than one sheet, follow these easy steps in any workbook that contains hidden worksheets.
Step
|
|
Description
|
1
|
Excel, Excel on Mac, Excel on the Web
|
Right-click the Sheet tab at the bottom, and select Unhide.
|
2
|
Excel
|
In the Unhide dialog box,
– Press the Ctrl key and click the sheets you want to show, or
– Press the Shift + Up/Down Arrow keys to select multiple (or all) worksheets, and then press OK.
|
|
Excel on Mac
|
In the Unhide dialog box
– Press the Cmd key + Left click on the sheets you want to show, or
– Press Shift+Left click, or Shift+Down arrow to select multiple (or all) worksheets
|
|
Excel on the Web
|
In the Unhide dialog box
– Press Shift + Up/Down arrows to select multiple (or all) worksheets
– Press the Shift + Up/Down Arrow keys to select multiple (or all) worksheets, and then press OK.
– Press Ctrl+Space to select/deselect sheets.
|
If you have additional suggestions, please use the feedback button on the Help tab of the ribbon to let us know.


Recent Comments