by Contributed | Feb 9, 2021 | Technology
This article is contributed. See the original author and article here.
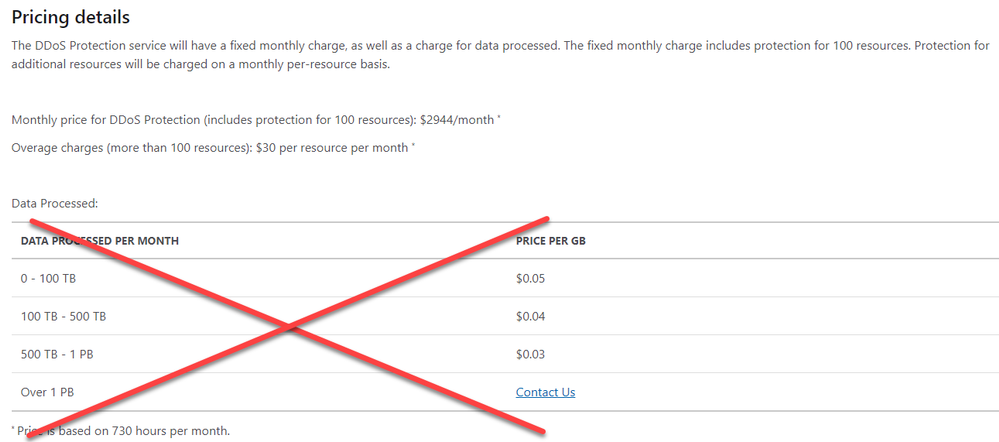
Changes were made recently to the pricing structure of Azure DDoS Protection Standard which amount to both less cost and more simplicity in understanding and estimating charges. In this post, we will discuss what specifically changed and refresh your understanding of how pricing is calculated.
What Changed?
We removed the data egress charge for DDoS Protection. This charge could be difficult to understand, and even more difficult to estimate across an environment protected by DDoS Protection. Even though the data charges only accounted for a small percentage of most customers’ costs, they tended to create an unnecessary hassle for cost management.
The old pricing model is pictured below:
The new, simpler model follows:

The Components of DDoS Protection Standard
Azure DDoS Protection Standard consists of the following direct and related components, which you should take some time to understand:
- DDoS Protection Plans – This is the primary component of the service. Most customers will only need one plan.
- Tenants – One DDoS Protection Plan can provide protection for an entire tenant. If you have multiple tenants, then you will need multiple plans.
- Subscriptions – Within the same tenant, any number of subscriptions can share the same plan.
- Virtual Networks (VNets) – VNets are the object to which plans are attached. Once VNets are attached to the plan, resources within those VNets are protected.
- Public IP Addresses – These are the resources that are being protected by the DDoS Protection plan.
Calculating Cost
It is always helpful to have a refresher for how to calculate costs before provisioning a DDoS Protection Plan and attaching it to VNets to start protecting resources.
The first step in cost calculation is to understand how many public IP addresses are associated to each protected VNet. Of course, public IP addresses do not exist on private virtual networks, but for eligible resources they are associated to other resources which are attached to the VNet.
Eligible public IP addresses include those attached to Application Gateways, Bastions, Load Balancers, Azure Firewalls, VPN Gateways, VMs, and virtual appliances. Unsupported resources include some PaaS services like API Management, Logic Apps, Event Hub, and App Service Environments.
Some examples include:
- An Azure Firewall has 3 public IP addresses (default is 1, but more can be added). The Azure Firewall subnet is part of a VNet which is associated with a DDoS Protection plan. This represents 3 protected IP addresses.
- A VM has a public IP address associated with its network interface. That network interface also has a private IP address in a VNet associated with a DDoS Protection plan. This represents 1 protected IP.
- An Azure Bastion instance has a public IP address, and the Bastion subnet is within a protected VNet. This represents 1 protected IP address.
- An Application Gateway v2 (with WAF of course) has 1 public IP address, and is configured to auto-scale to a maximum of 100 instances. The App Gateway subnet is in a VNet associated to the DDoS plan. This represents 1 protected IP.
An added benefit of the last scenario mentioned is that when Application Gateway with WAF is deployed in a DDoS protected VNet, there are no additional charges for WAF – you pay for the Application Gateway at the lower non-WAF rate.
Another key point to make is that billing is calculated hourly, not monthly. In other words, you can turn the service on for testing and pay only for what you use, not the whole month. For production deployments, it is best to leave the service active at all times due to its adaptive tuning.
Now that you have a sense of what counts as a protected IP address, and you know what the charges are (~$3,000/month for up to 100 protected IPs plus $30/month for each IP over 100), let’s consider some simple examples:
Tenants
|
Plans Required
|
Subscriptions
|
VNets
|
Protected IP Addresses
|
Cost/month
|
Math
|
1
|
1
|
10
|
50
|
25
|
$2944
|
|
1
|
1
|
150
|
400
|
100
|
$2944
|
|
1
|
1
|
150
|
400
|
150
|
$4444
|
2944 + (30 x 50)
|
2
|
2
|
100
|
200
|
100 (50 per tenant)
|
$5888
|
2944 x 2
|
2
|
2
|
150
|
300
|
150 (125/25)
|
$6638
|
2944 + (2944 + (25 x 30))
|
We hope this pricing change helps simplify the exercise of cost planning for a DDoS Protection Standard deployment.
by Scott Muniz | Feb 9, 2021 | Security, Technology
This article is contributed. See the original author and article here.
Microsoft has released a security advisory to address an escalation of privileges vulnerability, CVE-2021-1732, in Microsoft Win32k. A local attacker can exploit this vulnerability to take control of an affected system. This vulnerability was detected in exploits in the wild.
CISA encourages users and administrators to review Microsoft Advisory for CVE-2021-1732 and apply the necessary patch to Windows 10 and Windows 2019 servers.
by Contributed | Feb 9, 2021 | Technology
This article is contributed. See the original author and article here.
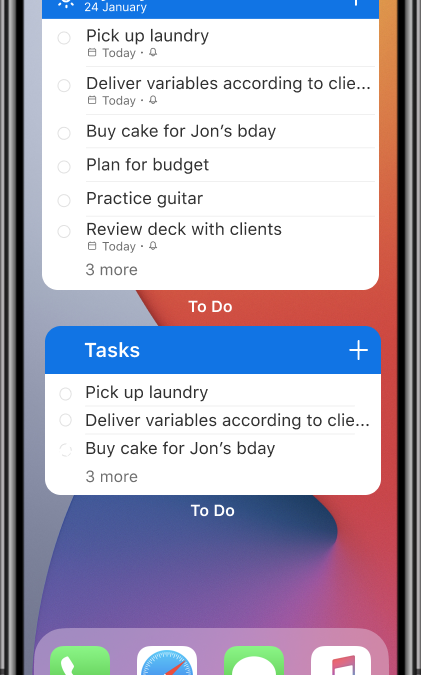
With the launch of iOS 14, you can now add widgets to your home screen. We’re excited to announce that To Do widgets for iOS 14 are now available! We’ve added three new types of widgets for you – read on to learn more.
Your Tasks Widget
The Your Tasks widget helps you select and view tasks from a list of your choice. The widget is available in two sizes: the medium widget shows a list of your tasks, while the large widget shows a list of your tasks along with due dates and other details. By default, the Your Tasks widget shows the Tasks list. To change the list it displays, long press on the widget and select Edit Widget, then select your list of choice.

Your Task widget
My Day Widget
In the My Day widget, you can view the first task on your My Day list. Want to see the rest of your list? Tap anywhere on the widget to open the My Day list in To Do.

My Day Widget
Add Task Widget
The Add Task widget allows you to quickly add a task to a list of your choice without having to open the To Do app. To add a task, tap anywhere on the widget. To pick which list your task is added to, long press on the widget and select Edit Widget.

Add Task Widget
How to get started with To Do’s widgets:
- Long press on any empty space on your home screen to enter the home screen edit mode, then tap the plus icon [+] to open the widgets menu.
- Search for To Do or scroll down to find Microsoft To Do, then add the widget of your choice. (You can also add multiple widgets!)
You can also create a widget stack with To Do and Outlook widgets to access your tasks and calendar all in one, or create stacks with multiple To Do widgets to keep track of all your tasks in one view.
We’d love to hear your feedback on the new widgets. What’s your favorite widget? Let us know in the comments below or connect with us on Twitter and Facebook. You can also write to us at todofeedback@microsoft.com.
by Contributed | Feb 9, 2021 | Technology
This article is contributed. See the original author and article here.
In the previous post in this series on DevOps for Data Science , I explained that it’s often difficult to try and implement all of the DevOps practices and tools at one time. I introduced the concept of a “Maturity Model” – a list of things you can do, in order, that will set you on the path for implementing DevOps in Data Science. The first thing you can do in your projects is to implement Infrastructure as Code (IaC).
Right away I may have put a few Data Scientists off. No, it isn’t that they can’t set up a server or components, it’s just that this isn’t normally their job. However, in a Data Science project, it’s often the case that you’re working with technologies that the other team members aren’t as familiar with, or perhaps you’re working on a cloud environment. In either case, the software, hardware configuration (virtual or otherwise), containers (if you use those, and yes, you should) Python environments, R libraries, and many other parameters affect the experiment. It’s essential that you’re able to duplicate all of that and store it in a source-control system so that you can re-create it for testing, deployment and the downstream phases.
That brings us to scripts. There are lots of ways to build a Virtual Server these days, both on and off premises. Containers are deployed with scripts. Python (using Anaconda) and R (using packrat or Checkpoint packages) environments can be set with dependency files or in the code itself, and both have ways of handling library and function versions. All of that can and should roll up into a repeatable set of steps so that you can re-deploy to that exact environment for accurate testing.
If you’re using Microsoft Azure, the Resource Manager is a method of gathering all of the pertinent resources for your solution under a single umbrella. After you create your storage, servers, services, networks and whatever else you need, a simple click of the “Properties” panel allows you to script out everything into a JSON file that you can edit, version, or save, and redeploy it with PowerShell, C#, Python or even the Azure Portal itself. Other cloud providers offer similar features to create artifacts from code. In any case, get whatever scripting artifacts that re-create your environment into your project at a given state.
Even if you don’t develop a full DevOps mindset at your organization, this is a skill you can and should learn. And if you do, you’re on your way to a better structured and managed project.
See you in the next installment on the DevOps for Data Science series.
For Data Science, I find this progression works best – taking these one step at a time, and building on the previous step. Here are the articles in this series on implementing DevOps in Data Science:
- Infrastructure as Code (IaC) (This article)
- Continuous Integration (CI) and Automated Testing
- Continuous Delivery (CD)
- Release Management (RM)
- Application Performance Monitoring
- Load Testing and Auto-Scale
In the articles in this series that follows, I’ll help you implement each of these in turn.
(If you’d like to implement DevOps, Microsoft has a site to assist. You can even get a free offering for Open-Source and other projects: https://azure.microsoft.com/en-us/pricing/details/devops/azure-devops-services/)
by Contributed | Feb 9, 2021 | Technology
This article is contributed. See the original author and article here.
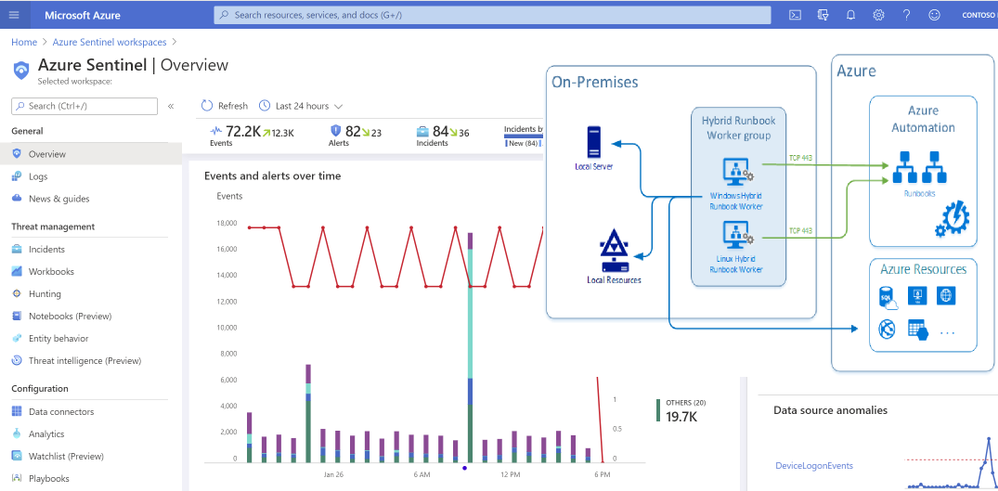
Many organizations have an on premises Active Directory infrastructure that is synced to Azure cloud. However, given that the on-prem side is the authoritative source of truth, any changes, such as disabling a user in the cloud (Azure AD), are overridden by the setting defined in the on-prem AD in the next scheduled sync. This presents challenges when you want to orchestrate a user property change from Azure that needs to persist even after the sync happens. To address the problem, this solution leverages Azure Automation Accounts and Hybrid Worker features across Windows & Azure. Automation Accounts are used to perform cloud-based automation across Azure and non-Azure environments. For non-Azure environments such as an On-Premises Active Directory, an Automation Hybrid Worker is required in addition to the Automation Account to be able to issue commands to the On-Premises Active Directory from Azure. Hybrid Workers can be used in Linux and Windows environments and if one has deployed Azure Arc , then they can also be used with the same OS types running in AWS or GCP so long as those machines are reporting to a Log Analytics workspace.
Deployment Steps
Create an Automation Account and link it with the Log Analytics Workspace
- Create an Automation Account from the Azure Portal

2. Deploy the Automation Hybrid Worker solution from the Azure Market place

Link a Log Analytics Workspace to your Automation Account.
Link the LA workspace to an automation account using the “Change Tracking” menu item on the list. If the Log Analytics workspace is in either East US or East US2 then you need to use the region mapping in the following link to select the location of your automation account: Supported regions for linked Log Analytics workspace | Microsoft Docs


From the same Automation Account menu, create a Hybrid Worker Group


To create a new PowerShell Runbook navigate to you Automation Account and select the Runbooks blade.
Select PowerShell from the Runbook type menu and paste the below script in the resulting window. Click save then publish to activate the Runbook.
Note: the script also includes code to report an error in case of a failure in the process of disabling the account:
Param (

[string] $SAMAccountName

)

if (Get-Module -ListAvailable -Name ActiveDirectory) {
    Write-Output "ActiveDirectory PowerShell module already exists on host."
}
else {
    Write-Output "ActiveDirectory PowerShell module does not exist on host. Installing..."
    try {
        Import-Module ActiveDirectory
    }
    catch{
        Write-Error "Error installing ActiveDirectory PowerShell module."
        throw $_
        break
    }

    Write-Output "ActiveDirectory PowerShell module installed."
}

Write-Output "Finding and disabling user $SAMAccountName"
try {
    Get-ADUser -Identity $SAMAccountName | Disable-ADAccount
}
catch {
    Write-Error "Error disabling user account $SAMAccountName"
    throw $_
    break
}
Write-Output "Successfully disabled user account $SAMAccountName"
The script takes in a SAMAccountName parameter which it uses to find the appropriate user and disable the account. This script can be modified to do a variety of other tasks, such as password resets, adding/removing users to/from groups, etc.
Create a test user in Active Directory then perform the steps in the on-prem machine to install the Hybrid Worker feature
Deploy the below script from this URL: PowerShell Gallery | New-OnPremiseHybridWorker 1.7 . Depending on the PowerShell module currently installed on your machine you may need manually download the file. If you do so, you will need to rename the extension to a .zip file first then extract to the directory where you’ll execute the script from.
This script performs the following actions:
1) Install the necessary modules
2) Login to an Azure account
3) Check for the resource group and automation account
4) Create references to automation account attributes
5) Create an Log Analytics Workspace if needed
6) Enable the Azure Automation solution in Log Analytics
7) Download and install the Microsoft Monitoring Agent
8). Register the machine as hybrid worker
To register your HybridWorker in Azure add the details of your hybrid runbook into the parameters to be passed to the creation command execute the below statement at your PowerShell prompt:
$NewOnPremiseHybridWorkerParameters = @{
AutomationAccountName = “iwauto”
AAResourceGroupName = “AD-Onprem”
OMSResourceGroupName = “AD-Onprem”
HybridGroupName = “AutoGroup”
SubscriptionID = “xxxxxxxxxxxxxxxx”
WorkspaceName = “iwautola”}
From the same PowerShell command prompt type: Install-Script -Name New-OnPremiseHybridWorker which will use parameters specified above
This command will open a log on screen to Azure Portal to register the Hybrid Worker in Azure.
The command will open a log on screen in Azure Portal to register the Hybrid Worker in Azure

To confirm successful registration, navigate to your automation account then select Hybrid worker groups. You should see the recently registered Hybrid Worker Group in the list per below screen shot.

If you get the error indicating that the PowerShell file is not digitally signed, then you will need to execute the command below:
Set-ExecutionPolicy RemoteSigned
You may still have to unblock the file in case changing the execution policy alone does not work. The command to do this is from a PowerShell prompt is:
Unblock-File -Path .New-OmPremiseHybridWorker.ps1
It is also recommended that you use TLS versions more recent than 1.0 and 1.1. For this reason you may be required to run the below command as well:
[Net.ServicePointManager]::SecurityProtocol = [Net.SecurityProtocolType]::Tls12
You can learn more about the process of deploying Hybrid Workers here:
On successful registration you should see an output similar to the below:
To confirm successful registration, navigate to your automation account then select Hybrid worker groups. You should see the recently registered hybrid worker group in the list per below screen shot.
Test the Runbook
To ensure the Runbook is working ok before integrating with a Logic App, execute the Runbook manually from the Azure Portal and specify a test account in the SAMAccountName box, select HybridWorker in the Run Settings section and then choose your Hybrid Worker group name from the drop-down list:
Steps to orchestrate from Azure Sentinel/Logic Apps
Below is the structure of the orchestration Logic App that triggers the runbook to disable qualifying accounts from the On-Prem AD. With this action the next on-prem to cloud AD sync will maintain the state on the account – in this case disabled, until the setting is reversed from the on-prem AD Users & Computers management console.
High-Level structure of the Playbook

Detailed structure of the Playbook:
Extract entity details (to capture user ID) following trigger execution

Parse the JSON output from the Entities-Get Actions step above in order to extract the Azure User ID and SAM Account name needed to perform disable operations-first on Azure then on the On-Prem Active directory.

Disable Account in Azure AD

Create Hybrid Automation Job
The string function below is contained in the ‘Runbook Parameter SamAccountName’ above and is needed to extract the SAMAccount from the UPN of the user as the On-Prem AD can only act on the User ID when specified in this format:
substring(body(‘Parse_JSON’)?[‘Name’], 0, sub(length(body(‘Parse_JSON’)?[‘Name’]),indexOf(body(‘Parse_JSON’)?[‘Name’],’@’)))
To simulate the block orchestration from Azure Sentinel, you may use the below sample query to create an Analytics rule that will detect a failed log on due to a wrong password entered on Azure AD portal. You can then simulate failed log on attempts with the account you wish to test with.
SigninLogs
| where Location == “KE” and Identity contains “mytestaccount” and ResultType ==”50126″
| extend AccountCustomEntity = AlternateSignInName
This Playbook can be deployed directly from GitHub on this link: Azure-Sentinel/Playbooks/Block-OnPremADUser at master · Azure/Azure-Sentinel (github.com)
Troubleshooting guide: Troubleshoot Azure Automation Hybrid Runbook Worker issues | Microsoft Docs
Special thanks to @haelshab for his valuable collaboration in this project & @YanivS for suggestions to enhance the solution


Recent Comments