by Contributed | Feb 9, 2021 | Technology
This article is contributed. See the original author and article here.
SAP NetWeaver migrations, whether they are between different datacenters/hosters or different OS/DB platforms are a known quantity in the SAP world. Many deeply experienced professionals are active in this field and have excellent understanding of the tools involved – DMO, R3load, migmon etc – as well as manual optimization techniques in order to get even the largest migrations done in least amount of downtime for their clients. What often however is not widely known are optimizations possible when migrating SAP NetWeaver systems to Azure to speed things up.
This blog assumes you have a basic understanding of SAP in Azure infrastructure and network, compute and storage concepts in public cloud. The blog also does not replace existing documentation, either from SAP or Microsoft, it merely supplements it and highlights how to squeeze more performance in Azure for your heterogenous SAP migration. Homogenous migrations – same OS/DB platform, no Unicode or Endian change – should be done through DB native methods – replication or backup/restore/log-shipping and thus technical downtime extremely short is possible.
Know your limits!
Let’s start with some not boring numbers and theory. You will see that in every section below, we will come back to reference this section.
In Azure all resources have their limits defined. This applies to virtual machines as well as disk storage and network throughput two key factors to be mindful when sizing SAP resources in Azure and particularly for migrations.
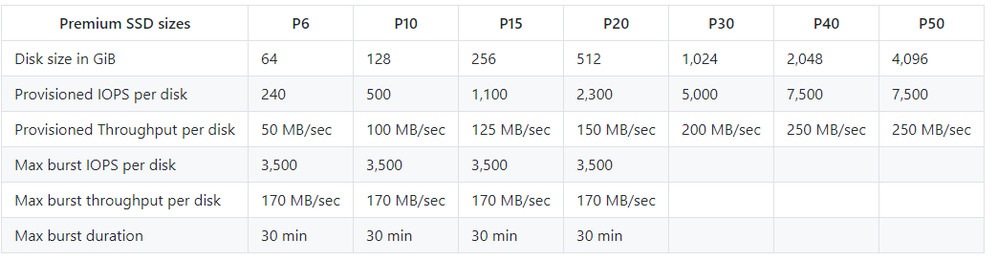
First the individual components, Azure managed disks. They are used to build your Azure infrastructure – for each database Azure has detailed documentation with optimal storage layout, filesystem mount points, disk striping information here. Each managed disk has its own quotas independently of the VM its attached to. That data is available here, below picture in shortened form.
Figure 1 Shortened table of premium SSD managed disks
A premium SSD between 65 and128GiB in size, with technical name P10, can provide you 500 IOPS and 100MB/s, with bursting available. A disk in the size between 513 and 1024GiB disk, P30, provides 5000 IOPS and 200MB/s, no bursting available.
Each disk is attached to the VM and the VM itself has performance quotas. For VM an aggregate disk quota exist and we can obtain this data from the documentation (here). Let’s choose the trusty Es_v3 VM family (details here) in shortened form in our example.

Figure 2 Shortened table of VM properties
Beyond the VM name and vCPU/memory, you outright see other quotas. How many IOPS and throughput can you obtain from the local temp drive, from disk storage and what’s the aggregate network throughput maximum you can hope to achieve. The potential VM I/O capping is described in more technical detail here.
Now you are aware of the limits and can calculate the values. Let’s take an example, a typical Oracle deployment optimized for storage performance.

Figure 3 Example Oracle DB disk setup in Azure
A DB VM, size E16s_v3, with 4x P40’s 2TB drives for Oracle sapdata holding the main tablespaces, another 3x P30 1TB drives for PSAPUNDO and PSAPTEMP, with smaller disks for online logs, ORACLE_HOME and thus binaries as well as one OS disk. Not depictive are some other disks, like oraarch and possibly mirrlog. Let’s focus on sapdata disks only next.
So you have 4x P40’s, each capable for providing 7500 IOPS and 250MB/s. Stripped across 4 such drives, the numbers quadruple to 30000 IOPS and 1000MB/s. However the VM, a E16s_v3, is only capable to provide 25600 IOPS and 384MB/s in aggregate over all disks hooked up to it. For our exercise let’s see such disk capping over the big sapdata disks. Each disk, at full speed, would be limited to 6400 IOPS and 96MB/s instead of 250MB/s the disk itself is capable of. The VM caps the speed of storage I/O, with nasty performance impact for SAP migration.

Figure 4 VM I/O capping, design courtesy of Microsoft
Vice versa, a large VM like E32s_v3 and its 768MB/s max disk throughput is no good if I have just 1x P20 disk in there, limited to 150MB/s, or a non-striped linear array limited to the throughput of a single disk since a non-stripped array performs I/O sequentially.
Know the limits of the infrastructure, something you often cannot control easily in on-premises situations.
Go big
You have done your sizing for your SAP resources in Azure, know which VMs you are going to be using and estimated the storage need and optimal managed disk sizes and amount to balance price and performance. However, why limit yourself during a downtime relevant time like migration? Go big, upsize that VM! Not only will you have more CPU power and memory to distribute to the database import, index creation sort operations or restore bottlenecked by storage throughput, you will also have raised networking and disk quotas. And since you upsize compute for just few days (or even just few hours, just before the technical downtime) the cost factor is negligible.
Practically there are no limits how large you can go, you might have sized a smaller VM like E8s_v3 (8vCPU, 64GB RAM) for your database and should be fine for normal production usage. However, why not have a E64s_v3 (64vCPU, 432GB RAM) or even larger for the migration or restore operation? The cost is just few hours, you resize down just before you start key user testing and let your users on the system. And the resize is just a reboot away. You can also resize between VM families, using for example M-series VMs in migration and E-series VMs during production, just stop/deallocate the VM before resizing. There is nothing stopping you using even the behemoth 416 vCPU, 11.7TB VMs for large systems, too, provided they are available for use in the Azure region of your choice and you configured a Gen2 VM type as otherwise you are limited to 4TB. Particularly M-Series with Write Accelerator are often the target VMs for large databases and they play an important role in I/O profile, accelerating I/O to transactional logs particularly for SQL Server.
When going big on compute, always choose the largest VM in the chosen VM family, due to how Azure virtualization shares resources. As the biggest VM, you have all the resources and don’t have to share and for a time-critical operation enjoy largely increased performance limits.
Since now the principle of going big for compute is understood, one paragraph one what happens after the technical migration. Typically you perform key-user testing, validation, opening the storm gates and users all keen on testing how the new system behaves in the cloud. It’s natural human reaction to look for downsides and negatives. Don’t let performance be a potential negative, keep the higher resources for few weeks and right-size to the planned VM size – while having actual usage metrics from running production to compare against your plans – only after few weeks. The added cost is, again, negligible in the big picture and the user base will be happy with excellent performance. As we know after every migration there is always some issue on Monday morning which causes slower performance.
Go big on storage, too
Same thinking as with compute (VM) part, for a migration or other high impact activity, simply supersize it. Its only temporary and you can do it very quickly.
First approach is to use much larger storage disks or LVM striped arrays than you’d need for normal production. You simply use larger than needed disks for your database sapdata, saptemp or other performance relevant volumes. At the end of migration, since you cannot reduce disk sizes in Azure block storage, you create a new disk/array and copy data quickly over, some time is lost but you gain a lot more by having more IOPS/throughput.
A new approach is to use performance tiers on disks, documented here. Performance tiers for managed disks allow you to use a disk with same capacity you require but said disk can take on the performance KPI’s of a much larger sibling. You no longer need to use larger disks to get higher performance, you assign your rightly sized disk the performance of a higher tier. A P10 disk can have performance characteristic of a P40, thus much higher IOPS and throughput. This way for SAP migration you keep the same capacity you require, get more disk performance and lower the performance tier back to baseline just before going productive. Again, very cost and time effective, change requiring VM to be deallocated buy you likely upsized it too so a single brief downtime before GoLive is acceptable.

Figure 5 Azure Portal showing a P20 disk with P40 performance tier assigned.
Sometimes it’s not the IOPS or throughput but latency which is causing your SAP system to suffer. PremiumSSD managed disks are plenty fast but cannot provide sub millisecond latency. For such requirements you can utilize Azure UltraDisk, again just temporary if its for the SAP migration, and have much better performance, for example transaction logs on SQL Server or some sort operations could be sped up. Remember for the cost optimization, you can change UltraDisk’s performance values for IOPS and throughput online and on-demand, through the Azure Portal or command line.
Use the temp drive
All VMs which are certified for use with SAP in Azure these days contain temporary storage, temporary disk. On Linux this is by default mounted in /mnt/resource, on Windows it’s the D: drive. The size of this temporary disk can be seen in the VM specs, see chapter ‘Know your limits’, and often is twice the RAM except for the largest VMs.
But this storage is ephemeral, its contents can be wiped if the VM moves to another host due to maintenance or other reason! Yes, that’s correct and is the reason this temporary drive is only used with SAP systems to store the swap area – swapdisk is created by the Linux waagent – and for some databases like SQL Server it can hold the tempdb as it can be re-created upon startup.
For SAP migrations, especially if we want to squeeze out the most performance out of it, if a VM would crash then likely the whole migration planning is forfeit and timelines cannot be met. And the temp drive is your tool to speed up certain operations where speed is of the essence.
WHY should we use the temp drive? As Azure explains in their documentation here, this drive is local to the server and is governed by different set of throughput and IOPS values! So you get faster storage (I/O access latency, it’s local to the server!) as well as additional IOPS/MBps to the normal path towards the managed disks, for free! How much space and how fast? Well, you read the ‘Know your limits’ section, right? Let’s pick some examples, our trusty Es_v3 VM series and then the new Eds_v4 as well the bigger beasts, Mv1 VM series for quick comparison. I have taken just the numbers about VM size and the temp drive into a table below.

Figure 6 Some KPIs around temp drive from 3 different VM families
Column ‘temp storage’ – the red value – shows how large the temp disk is and column ‘max cached and temp storage throughput – the blue value – shows what the storage quota is on this temp (and cache, ignore for now) drive is. So for example, on an E16s_v3 you get a 256GB temp disk providing 32000 IOPS and 256MBps throughput, in addition to the 25600 IOPS and 384MBps from managed disks. Capacity of temp drive too small? You can upsize the VM like you learned.
Alternatively, reading the spec sheet, you can utilize the newer Eds_v4 VMs which hold a bigger temp drive and provide extremely increased local drive throughput. Details for Eds_v4 here, a E16ds_v4 gives you already 600GB and 154000IOPS, 968MBps on temp drive. The largest SKU, E64ds_v4 gives you 615000 IOPS and 3872MBps throughput.
Or, last in the above figure, go with the M series VMs for the migration (here for details). A M32ts with just 1TB RAM provides you with a 2TB temp drive to fill. Have a super large database? Use a M128 (sans the s suffix, all M series always support premium storage). Baam and you have a 14TB temp drive with upto 250000 IOPS. Like we learned above, know the limits, and use them to your advantage.
Some further examples how you can utilize the temp drive and the additional quick, local storage. For most databases the temp drive can hold the temporary tablespace, where temporary results during index creation are stored. It can also hold online/transactional redo logs if there some I/O activity on logs which cannot be removed through nologging typically done during migrations.
Particularly for DB2 migration and split tables, R3load handles split tables sequentially if CLI LOAD is used. Often a faster approach is to use R3load SPLITTED_LOAD option for these tables (SAP note 1058437 – DB6: R3load options for compact installation) so that CLI LOAD can be done in parallel for the table splits. But with SPLITTED_LOAD, you must create another temporary tablespace, specified by env var DB6LOAD_TEMP_TBSPACE which holds these table fragments. At end of migration this temp tablespace is empty and should be thus created to be located on the temp drive. Other often accessed files could be placed here, as appropriate with databases. Finally, if everything for import is running on same VM including R3load accessing the copied export files, you could think of placing the exported data here.
The point is you have a fast, local storage which uses another storage path, with another and additional set of quotas which you can tune around, depending on your scenario.
Cache correctly
You know the temp drive now. Besides as a temporary data store, it is used by Azure for VM’s storage cache. For each managed disk allocated to the VM, you can specify the VM caching option. Typically, this is ReadWrite (default) or ReadOnly for OS disk or a choice between ReadWrite/ReadOnly/None for other – M-series also get write accelerator for optimal DB online log performance.
Azure has a great guidance on what to use when here and the respective RDBMS documentation in same location. For SAP migrations however, does this still apply? First, See how Azure VMs use the cache here in more detail. Below picture, courtesy of Azure, provide the path a cache-miss takes and how it counts against IOPS on both temp/cache drive as well as managed storage.

Figure 7 Storage path for read host caching (source: Azure documentation)
We don’t want to cache write operations, since migrations are mostly write transactions, and would very soon use the cache up and bring no benefit. ReadOnly caching might be of benefit during index creation but you don’t really create the same index twice so it only could help on a table with many indexes. The database itself does a far better job caching DB blocks than a dumb(er) I/O caching algorithm, thus you are better off simply turning off caching entirely on your DB data disks for the migration and use the IOPS of the temp/cache drive (shared between the two as per documented limits) to other purposes we mentioned in previous section. Caching type None is the right choice for migrations for managed disks holding database data. Only exception to this rule are disks for transaction logs if using M-Series VMs – then None+WriteAccelerator is the right choice, particularly important for SQL Server.
Once the migration completes, set the VM disk caching as Azure recommends for your database, ensure to restart the VM so all changes are activated correctly.
Setup your monitoring
Visibility into the performance during the import is another important area where public cloud shines. As per the introductory chapter about limits, we have some quotas set in stone. At same time we have a need to go as fast as possible during a SAP migration. Enter Azure Monitor!
One recommendation I make to every contact is to setup a quick dashboard in Azure Portal, which contains metrics of the import VM and its storage and share this dashboard with other members of the team, as applicable. OS level tools – nmon, iostat, iotop etc – are good but often are just indicators. A 100% disk utilization in iostat does not mean that’s the fastest she will go, but rather that 100% of cpu time the disk was occupied with at least one request. A disk can have 100% utilization and still have lot of room on IOPS/throughput side during a massive parallel activity like migration.
So, let’s build the dashboard. I like to start with the Azure portal’s VM view and monitor view. Here I can add metrics just recently added by Azure, which show me in percentages how much IOPS and disk throughput I’m consuming on the VM level (remember VM limits?). The metrics are:
- VM Cached IOPS Consumed Percentage
- VM Cached Bandwidth Consumed Percentage
- VM Uncached IOPS Consumed Percentage
- VM Uncached Bandwidth Consumed Percentage

Figure 8 Adding VM metrics to a new monitoring dashboard
I add these metrics to a new shared dashboard (step 4 above), which can be then used by other team members.

Figure 9 Creating new monitoring dashboard
In addition to the disks, you can add the VM network bandwidth ingress/egress, which is not a percentage value but absolute bytes/s.

Figure 10 Adding VM network metrics to previously created dashboard
Having covered the VM metrics in the dashboard, we move to the individual disks of the VM. For the VM, on the disks page, select the individual disks. Now you don’t have to add every disk to the dashboard, you can instead simply add one disk representing the stripe-set of disks for database data/log/temp/other, either if one disk represents this area on its own or is part of a stripe-set. E.g. if you have /db2/T07/sapdata logical volume on 3 disks, you just add metrics from just one of these disks since other disk in stripe set would have identical values. Add all 3 metrics visible on the disk’s overview page – throughput, IOPS and queue depth.
Now navigate to your created dashboard (services -> dashboard or just type its name in search bar), re-arrange the monitoring tiles on page and rename as you see fit.

Figure 11 Final dashboard, one page view on activity
I have now a one pane of glass to monitor both disk performance and VM performance, with filtering on a particular time stretch as needed. Example in picture shows at time I highlighted, the VM was closed to capping IO, at 95.8% VM throughput, barely any networking activity and disks forming /hana/data were writing at 163MB/s – quota for a single P20 disk is 150MB/s with burst upto 170MB/s so I’m close to the limit there too. Since I had 3 of those striped in a /hana/data array, I wrote at that time 3x 163MB/s = 489 MB/s. VM is a M32ls and VM throughput limit is 500MB/s off disks, that’s indeed just about 96-98% of the limit allowed. Finally, /hana/log were hit hard at other times but at timeframe I picked there was no activity at all.
All these details without having to trust OS tools – if you use one OS tools then use nmon and nmon_analyzer spreadsheet – and in a much easier to understand format on a single page for all data.
Transmit that data
In a typical SAP migration utilizing R3load on-premises, the data from export is either moved through a NFS/SMB share or memory pipes. Both approaches are not ideal for Azure, due to the distances and thus latency. NFS/SMB simply do not perform well enough over higher latency links in a WAN setup. Other ways to transmit data are needed.
SWPM/migmon offers natively the use of ftp, which can be used to saturate the network link. SAP SUM/DMO provides a native rsync script dmosystemmove.sh which moves data to the target VM. Either rsync or other options like robocopy for Windows are ideal for migration to Azure. Azcopy itself is not natively supported by SAP in the tools as it writes the full file immediately and fills it with content, something that doesn’t work with R3load/DMO natively. For rsync and DMO, there is a parameter DMO_SYSTEMMOVE_NPROCS with default value of 4 which can be increased to have multiple rsync processed, depending on transfer phase to speed things up.
Decide on the path your data takes when transferred to Azure. Expressroute or main VPN connection, already used for operations, is often the first choice. However, do consider that these links are a) often limited in bandwidth and b) already utilized by other, possibly productive workloads. One needs to avoid to fully saturate the main Azure link, to not impact other workloads. Options available are then rate-limiting the transfer, affecting your migration downtime, or to use other links for data transfer.
Dedicated Expressroute circuits and links or own VPN gateway (easier to setup) would be a first solution, something only used for the SAP migration. Often firewalls and VPN gateways limit single network links hence you want multiple transfer processes to fully utilize the bandwidth. Secondly, strongly consider using the copy method through Internet using azcopy manually. Azcopy does provide the best performance most often, executes parallel threads and can fully saturate your internet upload speeds and you have 10gbit/s speed on the storage account side in Azure. Downside is the need to manually prepare, execute copy operation and data must be copied twice – once from on-premise to Azure storage account (blob) and then from this blob to actual managed disk (OS) on the target R3load VM(s). However often the speed advantage makes this still the best performing transfer method. Do not be blocked by limitations on-premises through firewalls or other potential bottlenecks and use many parallel transfers if using rsync/robocopy or similar tools.
You might also start considering physical devices like Azure DataBox, however they are often not feasible for SAP migration as Azure might not have a SLA and 24/7 operation to copy data during a downtime weekend.
Right tool for the job
Typically for SAP migration one thinks of R3load and migmon, orchestrated through SWPM. When it comes to SAP HANA migrations, often DMO is used. However lately DMO can do a lot more than just SAP HANA as target.

Figure 12 Source/target database matrix support by SAP SUM DMO 2.0 SP9 (source: SAP note 2935107)
See the respective SAP note for DMO v1/2 linked at https://support.sap.com/sltoolset and depending on other criteria, you can often use it for DB2/Oracle/SAP ASE/MS-SQL as either source or target – while same DB can NOT be source and target, there needs to be a DB change. Also the non-SAP databases are currently on-request only. However if you do like the benefits DMO offers – integrated package split/order optimization, learning after each test-migration, possibility to add SAP update/upgrade to the mix – then see the SAP note if its available for your migration scenario.
Not to be forgotten for SAP S/4 1909 migrations is the released DoDMO – downtime optimized DMO using database triggers to substantially shorten your S/4 migration. See SAP note https://launchpad.support.sap.com/#/notes/2547309 for details.
DMO brings a different mechanism of transferring files to target, well documented and also briefly mentioned above is dmosystemmove.sh script and possibility to increase parallelism with env variable DMO_SYSTEMMOVE_NPROCS.
Of course should the migration be ‘just’ a homogenous system copy, re-using identical database and OS on-premises as on Azure, you are best served using database replication methods (Oracle DataGuard, DB2 HADR, etc) or simple backup/restore with log-shipping and apply to have extremely short technical downtimes. Keep in mind an OS change but same DB can mean heterogenous migration, if endianness changes and thus backup & restore or replication is not possible.
Right tool for the job is important, but so is the person handling the tool. Particularly for large system migration, DO NOT treat test migrations as learning exercise, instead do leverage some of the many very experienced consultants who can jump start your migration project right away with correct approach from day 1.
Scaling it out and very large databases
For very large databases the bottleneck often becomes the exporting side and the import DB server.
For the export side, often the hardware is 3-5years old, possibly end of support near or reached, and further resources are scares and even slower. Running everything on one server – the DB servers – steals the resources from the database which cannot be extended. Solution is to scale-out – provide more hardware resources, even if temporary purchased/borrowed hardware to run R3load on these separate systems. Through this scale-out approach you gain two benefits
- CPU power on DB load is no longer taken up by R3load processes
- Network and disk throughput to write the export files is now on the R3load server(s), again freeing up resources on central DB server
Similarly, to export, even with maximally upsized DB server, you hit certain limits. If your import DB server in Azure has to perform
- R3load import processes, migmon
- Network and storage I/O to write export data from on-premises, write it out
- I/O to read export data to feed the R3load processes
- Actual DB operations to write import data as well as sort operations of the database
Why not scale it out, with separate R3load server(s) to handle the first 3 points above and let the DB server handle the DB workload only, which is hard enough. All approaches mentioned above – know your limits, upsize, and configure correctly your storage apply also the R3load server.

Figure 13 Example with standalone R3load servers import/export and network transfer options
And you don’t have to stop at just 1 database on export side either! For very large databases and further SAP migration tips spend the time to read following excellent blog on this subject, depicting and explaining further means to optimize migration runtime to Azure: Very Large Database Migration to Azure – Recommendations & Guidance to Partners
Closing thoughts and further reading
In closing, hope you realize it’s all about knowing what limits are in place, how to monitor you nearing these limits and optimizing architecture. Rest is just a plain SAP migration you probably have done dozens of times. Just faster and more agile, which Azure allows.
Top 9 Do’s and Don’ts for Azure SAP migrations
Top topics to keep in mind:
- Don’t skimp on Azure resources which can speed up the migration, use big VMs. Largest VM type of chosen VM family or even all the way to M128s VMs.
- Data transmission to Azure is often the main reason for slow migration speed. Optimize the network path used and test whether a public network path using azcopy is not faster.
- Do consider the tooling used and whether there is another, faster way. Could perhaps SUM DMO be used, particularly if the migration team is not very experienced in R3load downtime optimization?
- Don’t utilize storage caching on any managed disk during the migration.
- Do supersize storage. Storage, besides the network transfer, is main cause for slower migration speeds.
- Do consider the role of Azure VM’s temp drive and how to use it to boost migration speed.
- Do go to a scale-out architecture for large migrations. Both on-premises as well as in Azure, to get out more performance beyond the limit of a single server.
- Gauge the experience of your team, a large migration is never a good time to start learning the ropes. If short downtime is critical to the success, call the A-Team.
- Don’t assume or guess, identify bottlenecks by leveraging Azure metrics. Azure platform exposes a lot of data than you’d never have on-premises.
Further reading and SAP notes
Azure sizes for virtual machines and their limits
Azure managed disks sizes and their limits
Azure performance tiers for managed disks
Very Large Database Migration to Azure – Recommendations & Guidance to Partners
SAP Note 2935107 – Database Migration Option (DMO) of SUM 2.0 SP09
DMO: downtime optimization by migrating app tables during uptime
SAP note 2293733 – Prerequisites and Restrictions of downtime-optimized conversion to SAP S/4HANA

by Contributed | Feb 9, 2021 | Technology
This article is contributed. See the original author and article here.
While healthcare organizations are working tirelessly to meet the daunting challenges of secure, safe, and equitable distribution vaccines, their patient and member populations are growing increasingly anxious about when it will be their turn for a vaccination, and how they will get access to the vaccine.
Payer and provider organizations are taking advantage of their existing Microsoft Cloud technologies to rapidly stand up a simple solution to this problem. If you also already use the Microsoft Cloud to manage any of your patient or member data or workflows, this solution will help you take advantage of your existing technology to accelerate and scale outreach for vaccine eligibility and scheduling.
What problem are we solving, and how?
THE CHALLENGE:
Accelerate and scale outreach to patients for vaccine eligibility and scheduling.
THE SOLUTION:
This solution, which takes advantage of Dynamics 365 Marketing many Microsoft customers already own, is fast and easy to deploy for low or no cost (depending on existing licensing and the size of the target community). To determine if your subscription includes the required licensing, or what you may need, see: What do you need to make this work?
Below is an example of what these Dynamics 365 customers are doing to be up and running in just a few days:
Step 1: Enable Dynamics 365 Marketing (if not already)
Step 2: Segment patient or member lists to create batches for vaccine eligibility
Step 3: Create communication templates and enable them to reach patient/member segments
See the Detailed Guidance section for how to complete these steps, or contact your Microsoft Account Team or Partner for assistance.
THE VALUE:
A large Health Provider who was already using Dynamics 365 for other workloads, was able to stand this Vaccine Engagement solution up quickly, and in their case adding SMS to email communications, and shared their early success with us:
The patient outreach solution was up and running in 3 days, used to contact patients through SMS and/or email to schedule their Covid-19 vaccine shots. Within two weeks, they were able to reach over 150,000 patients via SMS and email . This is directly impacting the patients they serve, improving their efficiency, and increasing patient satisfaction.
Additional communications could easily extend to messaging around home COVID-19 testing, second-dose reminders, employee eligibility education and scheduling, and beyond.
What do you need to make this work?
This simple patient outreach solution utilizes Dynamics 365 Marketing to segment, plan, and engage patients or members stored within Dynamics 365 or Dataverse. Some customers who have a Dynamics 365 subscription may already have access to the Marketing app with their existing licensing. For others, adding this tenant-wide license to an existing subscription can be a very low cost solution for significant value. For more information, contact your Microsoft Account Team or Partner. For complete licensing details, including specific quotas and other conditions, see the Microsoft Dynamics 365 Licensing Guide.
If you already have
|
You will need
|
Setup effort
|
Total Entitlements
|
Dynamics 365 Customer Engagement Plan
|
Nothing!
A single instance of the Marketing App is included
|
Minimal
|
· Unlimited users*
· 1 Production Marketing App**
· Outreach to 10k contacts included**
|
10+ Dynamics 365 App Users (Sales, Customer Service, Field Service, Supply Chain Management, Finance, and/or Commerce) ±
|
Dynamics 365 Marketing Attach subscription
|
Minimal
|
· Unlimited users*
· 1 Production Marketing App**
· Outreach to 10k contacts included**
· 1 Production Marketing App
|
Some Power Apps Premium
(with contacts already in the Dataverse Common Data Model)
|
Dynamics 365 Marketing Base subscription
(Users will not require Power Apps licensing)
|
Minimal
|
· Unlimited users*
· 1 Production Marketing App**
· Outreach to 10k contacts included**
· Database, Log & File Capacity
· Dynamics 365 Customer Voice (2k responses)
|
A Microsoft 365 tenant with no Dynamics 365 licensing
(No contacts already in Dataverse Common Data Model)
|
Dynamics 365 Marketing Base subscription
|
Minimal to Moderate
(add data ingestion)
|
· Unlimited users*
· 1 Production Marketing App**
· Outreach to 10k contacts included**
· Database, Log & File Capacity
· Dynamics 365 Customer Voice (2k responses)
|
*Unlimited users of the Dynamics 365 Marketing App only. Marketing licensing is tenant-wide rather than licensing each user. Use of other Dynamics 365 apps require licensing for those apps.
**Additional contacts packs and additional instances (production, sandbox, solution only) can be added as needed.
± At least one Base Dynamics 365 application, at least 10 users, either Professional or Enterprise
Detailed Guidance – how you can do it too!
Dynamics 365 or Power Apps Administrators can use the below detailed guidance to aide in setting up a simple patient outreach solution using Dynamics 365 Marketing to communicate via email. If admins for your tenant are not familiar with managing Dynamics 365 or Dataverse environments, or if more advanced use of the Marketing module are desired, a Dynamics 365 Microsoft Partner can assist you with this process.
Step 1: Enable Dynamics 365 Marketing
In an existing Dynamics 365 or Dataverse environment, enabling Dynamics 365 Marketing is as simple as running the Marketing Setup Wizard. The wizard is launched via the Power Platform Admin Center, from the Resources > Dynamics 365 apps area, by selecting Manage for the Dynamics 365 Marketing Application. This takes only a few minutes of attended time, and approximately three hours for the deployment to complete (unattended). Full instructions and details are available in documentation: Set up Dynamics 365 Marketing (Dynamics 365 Marketing) | Microsoft Docs.
Prerequisites:
Step 2: Segment patient or member lists to create batches for vaccine eligibility
The Dynamics 365 Marketing application enables powerful segmentation capabilities for contacts in Dataverse (the Dynamics 365 data platform). Segments let you create groups of related contacts that you can target with communications and journeys. For information about how to get contact data into Dynamics 365 see the Getting patient or member data into Dynamics 365 section.
High Level Steps:
- Open the Dynamics 365 Marketing App
- Navigate to the Segments area, create a New Dynamic Segment and Save it
- Go Live with the segment
Documentation: Create a marketing segment (Dynamics 365 Marketing) | Microsoft Docs
Accessing the Marketing App:
To find the Marketing App once enabled, go to the Office 365 waffle icon and select Dynamics 365 under Apps or All apps, or go directly to https://home.dynamics.com and click the Marketing tile.

Tips on Creating Segments:
The Segments area can be found in the Left Navigation pane of the Marketing App. Use the New menu item to create a new Dynamic Segment. In Dynamic segments, the member list changes as updates to contact records either qualify or disqualify them from the segment criteria.

One way to build segments is by using the segment designer. The example below shows a simple segment that groups all patients over the age of 75.

Another option is to change the pane at the bottom of the screen from Flow view to Query View, if you have predefined queries you’d like to paste in, as shown in the image above.
For ease, we have included some queries below as templates for segments based on CDC guidelines for vaccine distribution groups. For each of the below, you can create a new Dynamic Segment and then paste the below query into the Query view to quickly configure the segment. If desired, these can be used as starting points; you can always change or add additional criteria using the segment designer if desired.
Persons ≥ 75
PROFILE(contact, contact_1)
.FILTER(DATEDIFF(YEAR, DATETIMEUTCNOW(), contact_1.birthdate) <= -75)
Persons 65-74 years of age
PROFILE(contact, contact_1)
.FILTER(DATEDIFF(YEAR, DATETIMEUTCNOW(), contact_1.birthdate) <= -65 && DATEDIFF(YEAR, DATETIMEUTCNOW(), contact_1.birthdate) > -75)
Persons 16-64 years of age with high risk conditions
PROFILE(contact, contact_1)
.RELATE(msemr_condition_contact_msemr_subjecttypepatient, msemr_condition_1)
.FILTER(DATEDIFF(YEAR, DATETIMEUTCNOW(), contact_1.birthdate) <= -16 && DATEDIFF(YEAR, DATETIMEUTCNOW(), contact_1.birthdate) > -64 && (
msemr_condition_1.msemr_name CONTAINS ‘Cancer’ || msemr_condition_1.msemr_name CONTAINS ‘Chronic kidney disease’ || msemr_condition_1.msemr_name CONTAINS ‘COPD’ || msemr_condition_1.msemr_name CONTAINS ‘Down Syndrome’ || msemr_condition_1.msemr_name CONTAINS ‘Heart failure’ || msemr_condition_1.msemr_name CONTAINS ‘coronary artery disease’ || msemr_condition_1.msemr_name CONTAINS ‘cardiomyopathies’ || msemr_condition_1.msemr_name CONTAINS ‘weakened immune system’ || msemr_condition_1.msemr_name CONTAINS ‘obesity’ || msemr_condition_1.msemr_name CONTAINS ‘pregnancy’ || msemr_condition_1.msemr_name CONTAINS ‘sickle cell disease’ || msemr_condition_1.msemr_name CONTAINS ‘smoking’ || msemr_condition_1.msemr_name CONTAINS ‘type 2 diabetes mellitus’
))
Note: the example segment containing conditions references the Conditions entity, included in the Common Data Model for Health, which is a part of the Microsoft Cloud for Healthcare. The condition names may need to be changed to align with actual data in your environment.
If you do not have the Common Data Model for Health or the Microsoft Cloud for Healthcare, the same segment structure can be used with any related entity containing condition data.
Once a segment is configured, make sure you activate the segment for use by clicking Go Live in toolbar.

Step 3: Create communication templates, and enable them
Without any additional configuration or services, you can quickly configure Email Templates to reach your patient or member populations. No integration with your organization’s email service is required, as the Dynamics 365 Marketing service provides this out of the box.
High Level Steps:
- Open the Dynamics 365 Marketing App
- Navigate to the Marketing Email area, create a new Marketing Email and Save it and Go Live
- Create a Customer Journey and Go Live to dynamically send the email to target segment(s)
Documentation:
For help accessing the Marketing App see instructions in the Segment section.
Tips on Creating Marketing Emails:
The Marketing Email area can be found in the Left Navigation pane of the Marketing App. Use the New menu item to create a new Marketing Email.

The Marketing Email designer supports drag and drop for easy configuration, or HTML if utilizing templates created by partners or . You can also easily preview the formatting in various email clients, devices, and orientations. The email designer also includes an Accessibility checker, which will run your designed email against Microsoft Accessibility Standards. Don’t forget to activate the email for use with the Go Live button on the toolbar!

To support unsubscribe compliance, be sure you set the appropriate legal designation for the message.

After creating one of your Covid-19 emails, you can save that email as a template to start from with new emails to make minor adjustments to easily create different emails for targeted messaging for each subject and segment. You can also use dynamic content within an email to personalize it also.
For more detailed instructions or to explore all email design capabilities, see Overview of email marketing (Dynamics 365 Marketing) | Microsoft Docs
Tips on Creating Customer Journeys
Customer Journeys can automate the experience of a target audience throughout your engagement with them. The target audience is defined by the segment(s) associated with the journey. With Dynamic Segments, as created in step 2 of this guide, changes in data may qualify a contact into a segment targeted by an active Customer Journey – at which time that journey will automatically begin for that contact. This means that while a journey is active, different contacts can start the journey as time goes on. A simple customer journey could include a short interaction, such as a single email outreach.
The Customer Journeys area can be found in the Left Navigation pane of the Marketing App. Use the New menu item to create a new journey.

For simplicity, use the Simple Email Journey template. For this simple journey, set the audience to the desired segment(s) created in Step 2 , and in the email block choose the email created in Step 3.

Give the journey a descriptive name on the General tab of the form, save, and Go Live using the toolbar.
Security and PHI Considerations
While enabling the Marketing application, the admin enabling will be notified that data will be shared with Azure services to support the Marketing features and capabilities because the Marketing services are hosted on Azure. This notification is ensuring that you are aware that some data in Dataverse (the data platform for Dynamics 365) will leave that service and be processed in another Azure service. As Dynamics 365 and Dataverse are also hosted on Azure, the data never leaves the Azure ecosystem and is governed and protected by both the Microsoft 365 Security and Compliance infrastructure and policies, and your organization’s configurations and policies for those controls. In addition, all services in use for this solution are covered by your Microsoft HIPAA BAA.
If you do not already store patient or member data in Dynamics 365 or Dataverse, and achieving timely internal security and compliance approvals on doing so is of concern, the following is an excellent option that can be achieved more quickly:
- Create and export pre-filtered lists of patients/members from the source system with only contact and MRN, one for each desired segment. The data that defines the segment criteria never leaving the source system
- Import each list into Dynamics 365 associated to a static Marketing List, which can then be referenced by Segments
While this is a less dynamic option, with lists becoming outdated as time goes on, it can be very effective in the short term.
Additional Tips & Guidance
Getting patient or member data into Dynamics 365
If you do not already have your target contacts in Dynamics 365 or Dataverse, there are many ways to ingest this data. Some options are outlined in the references below. Contact your Microsoft Partner or Account Team for help in doing this quickly and efficiently for your situation.
Outreach via SMS
Many customers also want to communicate with SMS in addition to email, for maximum reach to their population, including older patients or members. While this blog focused on building a simple email marketing campaign, below are some options for enabling an SMS channel for use as well:
Conclusion
If you, like other organizations, need to engage quickly and easily with your patients or members about COVID-19 Vaccine eligibility and access, you may be able to use your existing Microsoft Cloud technologies to do this – or by complimenting your existing subscriptions with the easy-to-deploy Dynamics 365 Marketing application. If you would like guidance or additional help in deploying this solution, contact your local Microsoft rep or Account Team, or your Microsoft Partner.

Recent Comments