by Contributed | Feb 11, 2021 | Technology
This article is contributed. See the original author and article here.
How do you export QRadar offenses to Azure Sentinel?
Special thanks to @Hesham Saad from our Cybersecurity Technical Solutions Specialist team for collaborating on this blog post with me!
Customers are frequently inquiring on how to migrate smoothly from their current SIEM solution to Azure Sentinel.
A couple of weeks ago, we started with a solution to export data from Splunk to Azure Sentinel. Highly recommended to check out the blog post by our colleague @yokhaldi (How to export data from Splunk to Azure Sentinel), a logical sequence to his blog post is a walk-through explaining how to consume security telemetry data directly from QRadar to Azure Sentinel.
One of the key challenges in migrating to another SIEM is the intermediate phase. In this phase, both SIEMs are running side by side until the migration is complete. To keep a good overview (single pane of glass) of all the incidents in your deployment from both SIEMs, it is of utmost importance to have all your alerts and incidents in one place.
This blogpost will describe how you can forward all your QRadar offenses to your Azure Sentinel environment.
Let’s get started!
As highlighted in @Alp Babayigit’s post “Azure Sentinel Side-by-Side with QRadar”, there are many reasons why enterprises are using multiple SIEM products simultaneously. You can use various SIEM solutions at once as a permanent measure, for example, to correlate with available data sources while using Azure Sentinel as the single pane of glass to centralize all incidents). However, most of the time, the side-by-side architecture is used during a transition period for migrating from one SIEM to our SIEM and SOAR solution, Azure Sentinel.
Why do so many enterprises transition to Azure Sentinel?
The current trend in many businesses is the consumption of more and more cloud services, hence the huge ask for cloud-native SIEMs. This is where Azure Sentinel comes to the rescue with the following advantages:
- Easy collection from cloud sources
- Effortless infinite scale
- Integrated automation capabilities
- Continually maintained cloud and on-premises use cases enhanced with Microsoft TI (Threat Intelligence) and ML (Machine Learning)
- Github community
- Microsoft research and ML capabilities
- Avoid sending cloud telemetry downstream (send cloud data to on-premise SIEM)
There are several best practice integration options to operate Azure Sentinel Side-by-Side:
|
Alerts
|
Events
|
Upstream to Azure Sentinel
|
CEF
Logstash
Logic Apps
API
|
CEF
Logstash
API
|
Downstream from Azure Sentinel
|
Security Graph Security API
Powershell
Logic Apps
API
|
API
Powershell
|
This blog post will explain how to ingest QRadar offense data into an Azure Sentinel workspace. The solution will use the QRadar API and can be adapted to query event data from the QRadar event logs. That said, there is another solution for ingesting QRadar event log data: use routing rules and forwarding destinations in QRadar.
Scenario description
As mentioned, this blog post will focus on getting offenses from QRadar into Azure Sentinel as our primary SIEM.
There are two routes we can take to get offense data into Azure Sentinel:
- QRadar can notify us when a new offense is created, and as a response, we can pull the offense data into our log analytics workspace.
- Another route is to schedule the pulling of the QRadar offense data.
In this blog post, we will detail the second option’s implementation: Let’s assume that your SOC team wants to collect offense data from QRadar according to a specific schedule/timeframe. Azure functions will schedule API calls to QRadar to pull the desired data into our workspace. The response format when requesting data from QRadar via the API is in JSON.
The following guide will explain the process step by step.
Onboard Azure Sentinel
We assume the onboarding Azure Sentinel is completed.
If not; I would like to forward you to the following links for a quickstart on onboarding Azure Sentinel:
QRadar environment configuration
We also assume that you have an up and running QRadar environment.
(For those who want to replicate this walkthrough in a lab environment, here is a guide on how to install QRadar in Azure: Configuring a Console on Microsoft Azure (IBM) )
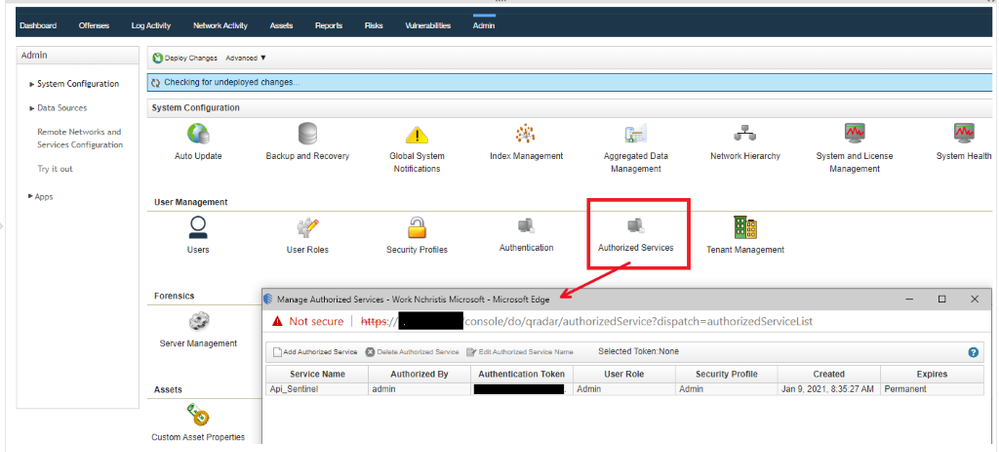
To accomplish the exporting of offense data from QRadar, we will invoke GET requests from the QRadar API. You will need an authentication token to authenticate the API calls that the Azure Function will make. To create an authentication token in QRadar, go to the “Manage Authorized Services” window and create a new token.
You also have to make sure the Azure Function (which we will create in a couple of steps) has HTTP access to the QRadar system to make the API calls. A guide on how to determine which IP addresses will be used by your Azure Function can be found here.
Let’s walk-through which QRadar API calls we used for this blogpost:
Use your https://<management_ip>/api_doc link to get to the interactive QRadar API documentation to access technical details for the QRadar RESTful API and then look under /siem/offenses for our get request for the offense data:

In the following screenshot, you can see which fields you can filter on in your GET request or specify the fields you want to retrieve as a response.
This blog post will not specify specific fields to retrieve; we will retrieve them all. We will, however, set a filter parameter in the API calls.

As we previously mentioned, we will schedule requests to get the offenses from QRadar into our Azure Sentinel environment. To make it more efficient (less data overhead), we will only ask for the offenses generated since the last scheduled request.
For example, we will schedule our Azure Function to perform an API request every 24 hours, and we will only retrieve the offenses created in the last 24 hours in QRadar.
We will filter on start_time: “The number of milliseconds since epoch when the offense was started”.
(Side note: you can also change the code to retrieve the offenses updated in the last 24 hours; you need to filter on last_updated_time in the API request instead of start_time).
PowerShell code
To export offense data from QRadar and import it into Azure Sentinel, we create a scheduled Azure Function invoking a GET request to the QRadar API via PowerShell code.
In the PowerShell code, we will perform the following steps:
- First, specify all the required inputs:
- QRadars management ip
- QRadar authentication token
- Azure Sentinel workspace id and shared key
- Trust the certificate of QRadar / ignore the certificate.
if ("TrustAllCertsPolicy" -as [type]) {} else {
        Add-Type "using System.Net;using System.Security.Cryptography.X509Certificates;public class TrustAllCertsPolicy : ICertificatePolicy {public bool CheckValidationResult(ServicePoint srvPoint, X509Certificate certificate, WebRequest request, int certificateProblem) {return true;}}"
        [System.Net.ServicePointManager]::CertificatePolicy = New-Object TrustAllCertsPolicy
}
Set-ExecutionPolicy -Scope Process -ExecutionPolicy Bypass
- Calculate the number of milliseconds since epoch when the offense was started
- Create the API call to QRadar to get all the offenses.
$headers = @{}
$headers.add("Version","12.0")
$headers.add("Content-Type","application/JSON")
$Headers.add("SEC",$token)
$url = ""https://" + $consoleIP + "/api/siem/offenses?filter=start_time%3E" + $unixTime
$OffenseInfo = Invoke-RestMethod -Method GET -Headers $headers -Uri $url
- Translate the received JSON response from QRadar to JSON allowed input for the Azure Sentinel API call
- Send the translated JSON information via API call to Azure Sentinel.
You can find the complete script code on Github.
Azure Function
The last step in this whole procedure is to run the PowerShell script in an Azure Function that will run on a schedule and push the QRadar offense data into our Azure Sentinel workspace.
In the following screenshot, you can see the configuration of the Azure Function:

Logs in Azure Sentinel
The logs will go to a custom Azure Sentinel table ‘QRadar_Offense_CL’ (if you specified the table as QRadar_Offense like in our code) as shown in the screenshot below.

And this example corresponds to the following fictional offense in QRadar:

Deploy this solution to your environment
An ARM template to automate the onboarding of the Azure Function can be found on Github.

Summary
To export offenses from QRadar and import to Azure Sentinel, we created a scheduled Azure Function that will invoke a GET request to the QRadar API via PowerShell and push the data into your Azure Sentinel workspace. We encourage you to try it yourself and leverage the next generation of SIEM for your environment. You can also contribute your new connectors, workbooks, analytics, and more in Azure Sentinel. Get started now by joining the Azure Sentinel Threat Hunters GitHub community.
by Contributed | Feb 11, 2021 | Technology
This article is contributed. See the original author and article here.
Intro
The Microsoft 365 PnP Community is the virtual home for everyone who wants to extend Microsoft 365 beyond the standard. We want to share knowledge, learn from each other and achieve more together.
This hub will be a part of the Microsoft 365 Patterns and Practices community and will complement our existing initiatives under the PnP umbrella, such as our open–source projects and Community Docs, where we explain how the different features of Microsoft 365 work and offer guidance on how to use them.
Mission:
Our mission is to create a single inclusive and welcoming place for everyone who wants to build on Microsoft 365.
Goals:
We do not want to distinguish between so-called developers and citizen developers or spend much energy putting people into boxes. We want to provide guidance, knowledge, and reusable patterns and practices for everyone who wants to build on top of Microsoft 365, regardless of their profession, role, technical background, approach, or skill level. By living our Sharing is Caring mission, everyone will benefit.
Having one community as a virtual home for everyone who wants to extend Microsoft 365 will break down information silos and broaden everyone’s horizon, which will lead to better outcomes and more connected solutions. Sharing ideas across products using no code, low-code, and coded solutions in one single place will bring our communities closer together.
We want to let our community grow and get new people involved, so we want to also cater to people who are not in that community right now and lower entry barriers. Helping everyone getting started rather than gatekeeping is one of our primary goals.
Appreciating people from all backgrounds and with different expertise will ensure inclusiveness and improve our ability to step outside of our comfort zones and respect diverse perspectives. Learning that there is no pecking order of power users, makers, and developers but that we will be most successful when we focus on a bettertogether approach will make a huge difference.
What can you expect in this community?
We learned that people build solutions that span multiple Microsoft products with varying degrees of complexity, and we shouldn’t compartmentalize communities. We like to bring people together by guiding and sharing knowledge and listening to understand people’s needs. Please expect blog posts, videos, and open discussion on all kinds of topics around building on Microsoft 365. We are here to help.
How can you get involved?
This community doesn’t have any entry barriers; it’s made for everyone who extends Microsoft 365, including no-code, low-code, or coded solutions.
- Join us for our community calls [link]
- Let us know what you’d like to know more about, please don’t be shy, all feedback is welcome.
- If you create (blog, vlog, code on GitHub) let us know where so that we can share it with others
- If you’d like to show your work, let us know and we’ll get you a slot on the community call
- Meanwhile, explore what we have to offer
#SharingIsCaring ❤
by Contributed | Feb 11, 2021 | Technology
This article is contributed. See the original author and article here.
It seems like JSON is everywhere these days. Adaptive cards, Microsoft Teams app manifests, and SharePoint list formats are all written in JSON. And JSON is the de-facto standard for REST APIs like Microsoft Graph; you can’t make a call without it. Power Apps, Power Automate, and Power BI can all handle JSON too. It really is everywhere except, it seems, in older products which were written when XML was king.
The intent of this article is to teach you what you need to know to use JSON in typical IT, low-code, or JavaScript development scenarios. It’s organized in order from simple to complex; if you don’t need some sections, just skip over them; you can always come back and read them later!
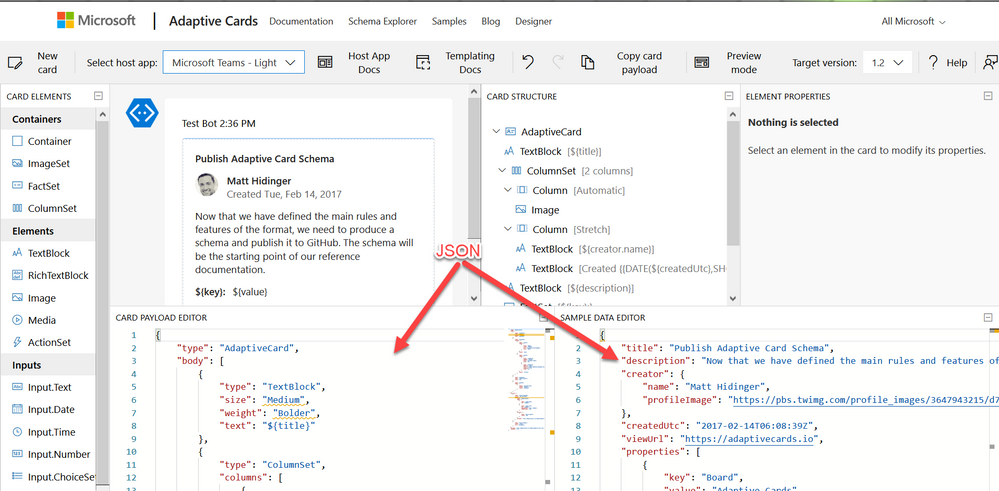
Working with JSON in the Adaptive Card Designer
What is JSON?
JSON is a standard format for representing structured data as text. JSON is commonly used to store data in text files and to exchange data between programs over a network. JSON files usually have a .json filename extension.
Geek Note: JSON serves more or less the same purpose as XML (eXtensible Markup Language) but it’s shorter and easier to read. CSV format serves a similar purpose as well, but it’s not a standard so the details tend vary, and it can only store tables (rows and columns) of data.
JSON data is organized as “objects” which contain name/value pairs. This simple example is the first step toward building a profile for Parker, the PnP mascot, who has kindly agreed to share personal information for this article.
JSON objects always begin with { and end with }; the very shortest valid JSON, {}, represents an empty object. This JSON contains a single name/value pair; the name is name and the value is “Parker”. As you can see, the name and value are separated by a :. Names are case sensitive and need to be enclosed in double quotes. In this case, since “Parker” is a text value, it’s enclosed in double quotes as well. Spaces, tabs, and newlines are ignored in JSON, but are helpful for readability.
The values can be simple things like text strings or numbers, collections of values (arrays), or more objects containing their own name/value pairs.
If you want to put more than one name/value pair in your JSON, separate them with commas like this:
{

  “name“: “Parker“,

  “species“: “porcupine“

}
Note that the order of the name/value pairs doesn’t matter; this JSON is equivalent to the one above:
{

  “species“: “porcupine“,

  “name“: “Parker“

}
The values don’t need to be text like “Parker”; they can also be numbers, booleans, collections, or more JSON objects. This allows you to have objects within objects.
Here’s a more complete description of the Quilled Crusader that uses all of the JSON data types:
{

  “name“: “Parker“,

  “species“: “porcupine“,

  “occupation“: “mascot“,

  “motto“: “Sharing is caring“,

  “centimeters“: 75,

  “kilograms“: 28.5,

  “quills“: 3.0e+4,

  “friendly“: true,

  “bossy“: false,

  “nicknames“: [

    “Quilled Crusader“,

    “Spike“

  ],

  “classification“: {

    “kingdom“: “animalia“,

    “phylum“: “chordata“,

    “class“: “mammalia“,

    “order“: “rodentia“,

    “suborder“: “hystricomorpha“,

    “infraorder“: “hystricognathi“

  },

  “dnaSequence“: null

}
These are all name/value pairs, but there are several kinds of values; the next few sections will explain each of them.
Geek note: Turning data objects into JSON is called “serialization”; turning JSON back into data objects is called “parsing” or sometimes “deserialization”.
Strings (Text)
Strings are just text that’s part of the data, such as “Parker” or “rodentia”, and they need to be enclosed in double quotes. That seems simple enough, but what if your string has a double quote in it? “Parker says “Sharing is caring”” is not valid JSON because the parser thinks the “ before Sharing is the end of the string, and then it gets really confused. (Computers are dumb, aren’t they?) So to put a “ within a string, you need to “escape” it by preceeding it with a
{

  “name“: “Parker“,

  “action“: “Parker says “Sharing is caring““

}
As you might expect, this escaping thing is a bit of a slippery slope, as the parser may now be confused by the
{

  “name“: “Parker“,

  “home“: “C:UsersParker“

}
While “ and
{

  “name“: “Parker“,

  “mood“: “?“

}
Numbers
Numeric values don’t get quotes around them. For example, Parker’s length and weight are expressed as numbers.
{

  “name“: “Parker“,

  “centimeters“: 75,

  “kilograms“: 28

}
Note that 75 is not the same as “75”; the quotes would indicate the characters 7 and 5 rather than a number.
Numbers are in decimal, and can contain a sign, decimal point, and exponent such as:
{

  “quills“: 3.0e+4,

  “damage“: -10

}
Boolean (True or False)
For boolean values, just use true and false with no quotes.
{

  “name“: “Parker“,

  “friendly“: true,

  “bossy“: false

}
Objects (name/value pairs)
All the JSON examples in this article so far have consisted of one JSON object with name/value pairs enclosed in a set of curly braces. But you don’t need to limit yourself to one object! You can have as many objects as you want as values inside other objects. This nesting allows you to create a hierarchy.
{

  “name“: “Parker“,

  “classification“: {

    “kingdom“: “animalia“,

    “phylum“: “chordata“,

    “class“: “mammalia“,

    “order“: “rodentia“,

    “suborder“: “hystricomorpha“,

    “infraorder“: “hystricognathi“

  }

}
The top-level object has two name/value pairs, “name” and “classification”, and the value of “classification” is itself an object with several name/value pairs of its own. This is very convenient for organizing the data and, when combined with arrays, allows creating lists, tables, and all sorts of other data structures.
Arrays (collections)
An array is an ordered set of values enclosed in square braces [ and ] and separated by commas, such as:
{

  “name“: “Parker“,

  “nicknames“: [

    “Quilled Crusader“,

    “Spike“

  ]

}
or, more succinctly,
{

  “name“: “Parker“,

  “nicknames“: [ “Quilled Crusader“, “Spike“ ]

}
Mascots could have any number of nicknames or none at all, and an array allows you to list them. Parker’s sister Penny doesn’t have any nicknames.
{

  “name“: “Penny“,

  “nicknames“: []

}
Arrays of objects are especially useful. For example, suppose you wanted to compile a list of Microsoft developer mascots:
{

  “mascots“: [

    {

      “name“: “Bit“,

      “species“: “raccoon“,

      “team“: “Microsoft Developer Advocates“

    },

    {

      “name“: “G-raffe“,

      “species“: “giraffe“,

      “team“: “Microsoft Graph“

    },

    {

      “name“: “Parker“,

      “species“: “porcupine“,

      “team“: “Microsoft 365 PnP“

    }

  ]

}
Remember that spaces, tabs, and newlines are ignored, so this the same data could be written more compactly like this. Suddenly it starts to look a little bit like a table!
{

  “mascots“: [

    { “name“: “Bit“, “species“: “raccoon“, “team“: “Microsoft Developer Advocates“ },

    { “name“: “G-raffe“, “species“: “giraffe“, “team“: “Microsoft Graph“ },

    { “name“: “Parker“, “species“: “porcupine“, “team“: “Microsoft 365 PnP“ }

  ]

}
MIND THE COMMAS! There must be exactly one (1) comma between name/value pairs and array elements. It’s really easy to misplace a comman in JSON, especially if you’re copying and pasting. Some people like to leave an extra comma after the last name/value pair or array element to make it easier to re-arrange things, but that’s cheating; it’s not part of the JSON standard and some applications won’t accept it.
Dates and other things
Unfortunately, there is no standard way to express a date in JSON. In practice, dates are passed in string values, but different applications use different date formats, which can be a bit maddening at times. The Microsoft Graph API uses ISO 8601 format.
Images and other binary objects are rarely included in JSON, but if you wanted to do that you’d need to turn them into strings somehow, perhaps by Base64 encoding them.
Null
To indicate an empty value, use null. For example, Parker hasn’t had his DNA sequenced, so there is no value for that in his profile.
{

  “name“: “Parker“,

  “dnaSequence“: null

}
Note that [], an empty array, and {}, an empty object, are different than null. They’re empty containers whereas null is really nothing at all.
Comments
If only JSON supported comments, we could write much more readable code! Officially there are no comments in JSON, but some products (like the SharePoint Framework) seem to encourage using JavaScript style comments in JSON. It seems harmless but it’s not proper JSON, and most applications will choke on them.
One trick that’s usually OK is to just add a few extra name/value pairs in lieu of comments; most software will simply ignore the extra data. For example:
{

  “name“: “Parker“,

  “classification“: {

    “comment“: “This is the biological taxonomy“,

    “kingdom“: “animalia“,

    “phylum“: “chordata“,

    “class“: “mammalia“,

    “order“: “rodentia“,

    “suborder“: “hystricomorpha“,

    “infraorder“: “hystricognathi“

  }

}
While it’s not recommended, it is legal to have duplicate names in a JavaScript object, so you could have more than one “comment” if you’re daring. This is valid JSON:
{

  “name“: “Parker“,

  “comment“: “Great mascot but gets a bit prickly at times“,

  “comment“: “Check out “Parker’s Place“ online apparel shop“

}
Tools
There are a lot of web sites out there that will format and validate your JSON; this one does both.
NOTE: Remember to remove any personal or confidential data before using online JSON tools!
Schema support
It’s often helpful to impose some structure on your JSON, specifying which name/value pairs are required and what value types they should contain. That’s the role of JSON Schema. This allows validating the JSON and offering features such as intellisense.
A JSON Schema describes a specific JSON structure. For example, all animal mascots need to have a name and zero or more nicknames with an optional value for quills, such as:
{

  “name“: “Parker“,

  “nicknames“: [

    “Quilled Crusader“,

    “Spike“

  ],

  “quills“: 30000

}
This would be expressed in JSON Schema as:
{

	“definitions“: {},

	“$schema“: “http://json-schema.org/draft-07/schema#“,

	“$id“: “https://example.com/object1607485037.json“,

	“title“: “Root“,

	“type“: “object“,

	“required“: [

		“name“,

		“nicknames“

	],

	“properties“: {

		“name“: {

			“$id“: “#root/name“,

			“title“: “Name“,

			“type“: “string“,

			“default“: ““,

			“examples“: [

				“Parker“

			],

			“pattern“: “^.*$“

		},

		“nicknames“: {

			“$id“: “#root/nicknames“,

			“title“: “Nicknames“,

			“type“: “array“,

			“default“: [],

			“items“:{

				“$id“: “#root/nicknames/items“,

				“title“: “Items“,

				“type“: “string“,

				“default“: ““,

				“examples“: [

					“Quilled Crusader“

				],

				“pattern“: “^.*$“

			}

		},

		“quills“: {

			“$id“: “#root/quills“,

			“title“: “Quills“,

			“type“: “integer“,

			“examples“: [

				30000

			],

			“default“: 0

		}

	}

}
If this looks complicated, don’t worry; there are many tools that will generate a schema from sample JSON. This is built into Power Apps and Power Automate, and you can generate a schema online using the JSON Schame Validator and Generator; it was used to generate the schema above.
Why bother with a schema? Well once you have one, you can get syntax checking and intellisense in tools like Visual Studio Code. Power Apps and Power Automate use schemas to determine what name/value pairs to expose as properties in your project, and what data types they should be.
You can add a property to your JSON to indicate the URL of the JSON schema; for example, to indicate that a file is a Microsoft Teams manifest, include this schema URL:
{

  “$schema“: “https://developer.microsoft.com/en-us/json-schemas/teams/v1.2/MicrosoftTeams.schema.json“

}
When a $schema property is present, Visual Studio and Visual Studio Code will validate your JSON automatically and provide Intellisense. There are a ton of schemas available at https://www.schemastore.org/json/ for you to reference. You can even reference a JSON schema in your own project by just specifying a relative path:
{

  “$schema“: “./myschema.json“

}
OData
You may notice some name/value pairs in your JSON which look kind of odd and begin with @odata. For example, here’s the beginning of the data returned by the Microsoft Graph call https://graph.microsoft.com/v1.0/me/messages (returns messages in the user’s inbox):
{

  “@odata.context“: “https://graph.microsoft.com/v1.0/$metadata#users(‘19671429-1359-457f-bfc1-1be1ee65d4d9’)/messages“,

  “@odata.nextLink“: “https://graph.microsoft.com/v1.0/me/messages?$skip=10“,

  “value“: [

      {

          “@odata.type“: “#microsoft.graph.eventMessage“,

          “@odata.etag“: “W/“DQAAABYAAADcd/V5PKGOSLpB9pjjNuVqAALT5+Dw““,

          “id“: “AAMkADIxMjk0NDNjLTJmNWItNDYzNy04MmQ2LTQyMjhkM2FjOWE3MQBGAAAAAAA7bH43fGymSJWqX6oeXPByBwDcd-V5PKGOSLpB9pjjNuVqAAAAAAEMAADcd-V5PKGOSLpB9pjjNuVqAALV0JNVAAA=“,

          “createdDateTime“: “2020-12-16T00:14:19Z“,

          …
OData is a standard for doing Create, Read, Update, and Delete (CRUD) operations on tabular data using a REST web service, and the Microsoft Graph uses it where appropriate. A folder of email messages is easily expressed as tabular data, so it’s no surprise that the Graph uses OData to work with them.
The name/value pairs beginning with @odata. are OData control information used to control the flow of data. For example the value of @odata.nextLink is the URL to retrive the next set of rows in a large dataset. You can find details on all the OData Control Information here in the OData documentation.
JSON and JavaScript
Although JSON stands for “JavaScript Object Notation”, and was inspired by the format JavaScript uses for object literals, they are not the same. Indeed, JSON is intended to be language independent. Some major differences between JSON and JavaScript are:
- In a JavaScript object literal, the names only need to be enclosed in quotes if they are reserved words like
for or if in JavaScript. Furthermore, you can use either single or double quotes. In JSON, names always need to be enclosed in double quotes.
- JavaScript strings can be contained in single or double quotes; JSON strings must be contained in double quotes
- JavaScript numbers can be in octal (using a leading 0) or hexadecimal (using a leading 0x) as well as decimal; JSON numbers must be in decimal.
- JavaScript objects can contain values such as dates, regular expressions, and HTML elements, whereas JSON values are limited to strings, numbers, boolean, objects, arrays, and null.
- JavaScript allows comments; JSON does not.
Bottom line: all JSON objects are valid JavaScript object literals but not all JavaScript object literals are valid JSON.
To convert between JSON and objects, use the JSON object that’s built into JavaScript. This is preferable to using eval which is prone to security issues.
To convert JSON to a JavaScript object:
var json = ‘{“name”: “Parker”}’;

var o = JSON.parse(json);
console.log(o.name); // Parker
To convert a JavaScript object to JSON:
var o = new Object();

o.name = “Parker”;

var json = JSON.stringify(o);
console.log(json);  // {“name”:”Parker”}
When you make a REST call, you end up using JSON as well. Here’s a call to the Microsoft Graph:
// Assume Parker has logged in and a variable called accessToken contains

// a valid Azure AD access token for Parker to call the Microsoft Graph

const response = await fetch(“https://graph.microsoft.com/v1.0/me/”,

    {

        method: ‘GET’,

        headers: {

            “accept”: “application/json”,

            “authorization”: “bearer “ + accessToken,

        }

    });
if (response.ok) {

    const profile = await response.json();

    const name = profile.displayName;   // Parker

}
Notice that to ask the service for a JSON response, the HTTP header is set to accept “application/json”, which is the MIME type for JSON. And the response object returned by fetch() has a json() function built right in to turn the returned JSON into a JavaScript object.
Conclusion
Learning to work with JSON is an important skill for both low-code and full stack developers, as well as for many IT Pro tasks. Here’s hoping this article has helped you to understand and use JSON in your next project!
(This article is cross-posted here on the author’s blog)

Recent Comments