
by Contributed | Feb 12, 2021 | Technology
This article is contributed. See the original author and article here.
This article shall give you guidance and inspiration on how to turn your classic boring lists into interactive modern list experiences, which will wow your users, let them get information at first sight, and increase overall productivity. This post is not about the Microsoft 365 list templates; I will cover them in one of the next blog posts.
If you never heard anything about modern SharePoint list formatting, don’t worry; I will guide you through this.

Why would we use SharePoint lists
First things first: Why should we use SharePoint lists and not use – for instance – an Excel spreadsheet? Because we don’t need to hide information in cascading folders, that should be at the user’s fingertips. The beauty of lists lies in their simplicity and flexibility to organize work and track the information that matters most to our businesses.
Creating, sharing, and tracking lists is easy and available on any device; everyone stays in the loop, and we can use lists for all kinds of purposes like tracking issues, assets, routines, contacts, inventory, and more. Lists can easily be customized to make them visually more appealing.
How can we turn on modern experience
Now that we are teased into modern lists and libraries in SharePoint, it’s time to turn on modern experiences. We can do it like this in the classic experience:
- select Library Settings or List Settings on the ribbon
- select Advanced settings and select List experience
- select New experience
- save with Ok
How can we change the look and feel of a list in the UI
Lists can contain different columns, and each column has a certain column type, depending on the kind of value we want to store in that column like text, numbers, dates, choice, persons, locations, links, or images. As lists can contain much information, its brilliant if we emphasize crucial parts by formatting them in a way that they are
- easier to read
- give a grasp on what is going on
- are mobile-friendly
Already built-in, we will find options to format columns and views. Formatting a view means modifying the way the entire list is displayed. Formatting a column means changing the way this particular column looks like.
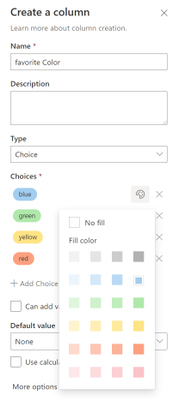
Formatting Views
- We can change the format view
- and also display a gallery view
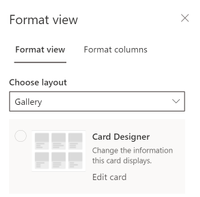
Formatting columns
- If we want to change the column’s appearance, we can do that very end-user-friendly directly in the UI:

* and even with rules like if – then – else:
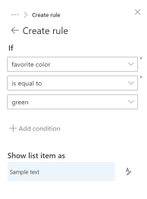
How can I apply conditional formatting, aka rules
Rules are a powerful feature to determine how a column should look like. Let’s say we want to apply a background color depending on a number value. If the number is below 30, the field should be red; between 30 and 70, it should yellow, and above 70, it should be green. Let’s see how this looks like:
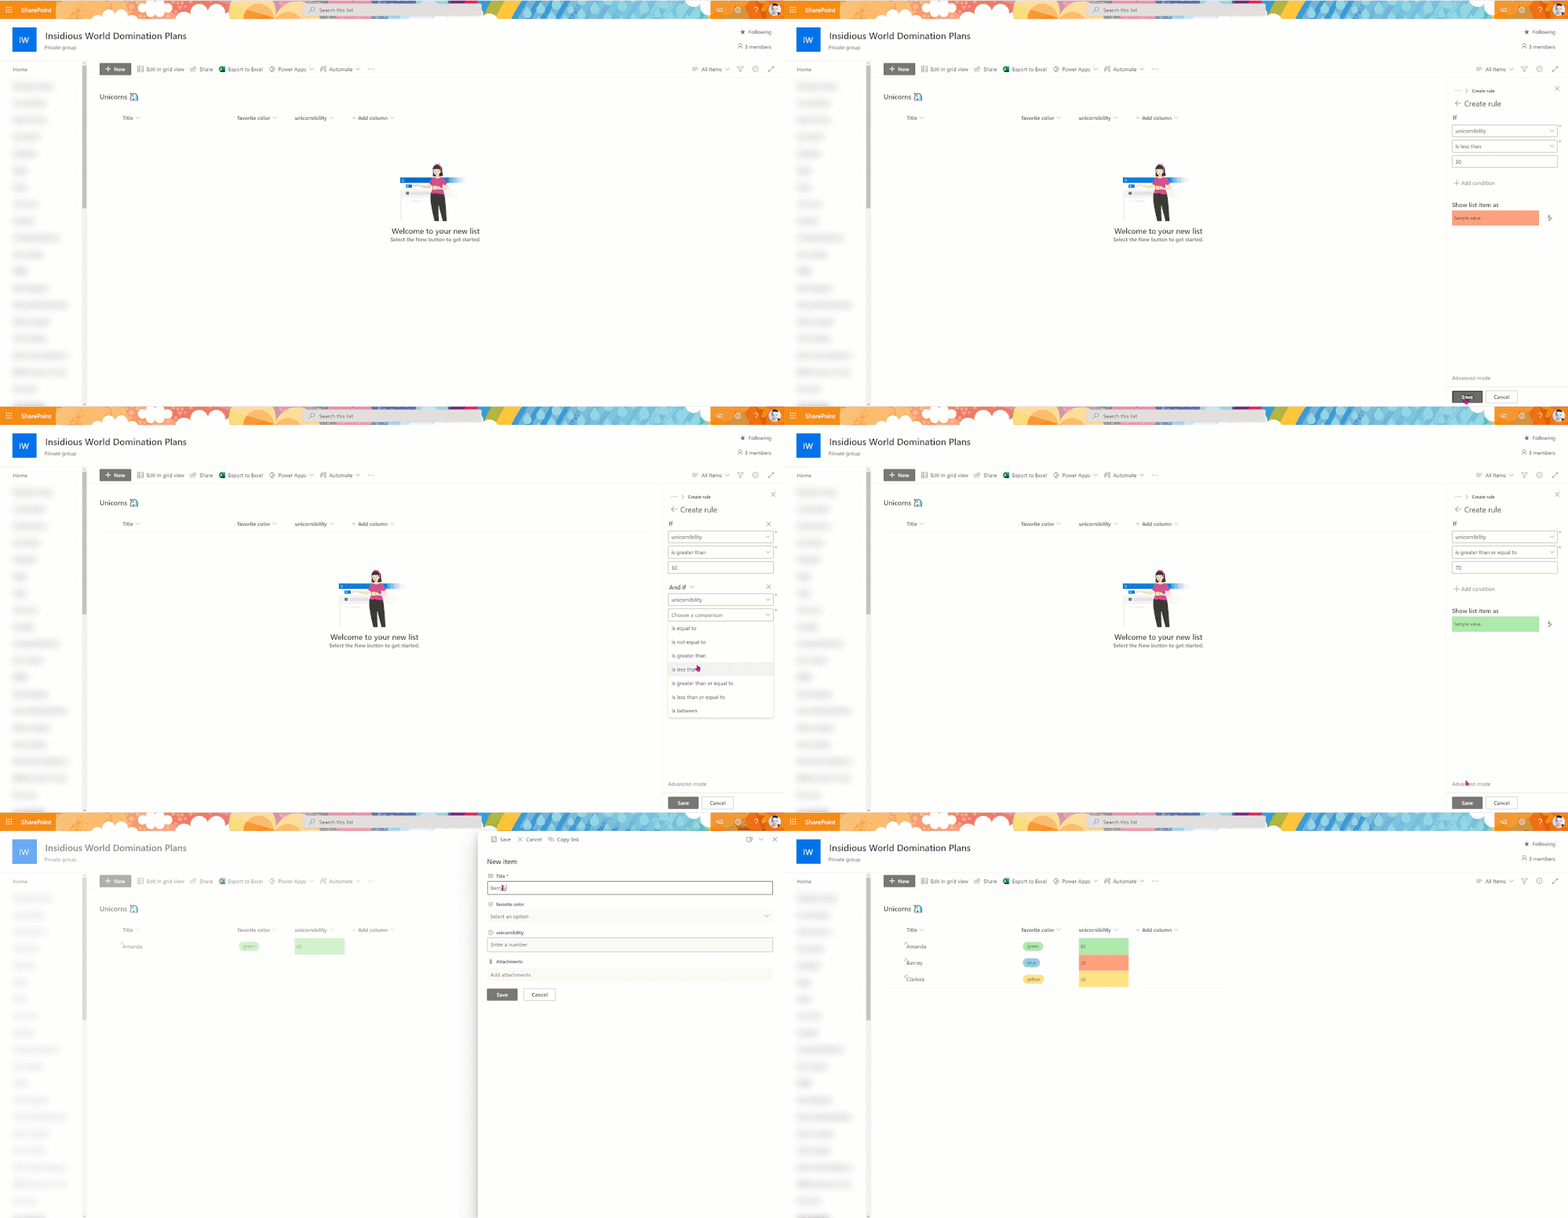
How can we change the look and feel of a list with JSON
Sometimes, even if those options are already cool, we need some more flexibility.

There is a way to format both columns and views beyond what is already offered, as seen above. Perhaps you might have noticed the little link Advanced mode? This is where we will find the cool tools to play with!
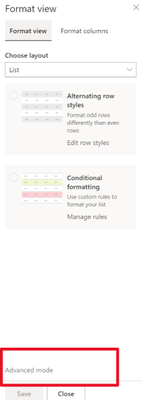
This field expects you to put some JSON code in it to format this column. If you never heard about JSON, you can quickly get started with Intro to JSON by Bob German, this video, or you can learn more at w3schools.
Samples
We will browse to the Microsoft 365 PnP List formatting repository on GitHub and open the folder column samples. In here, we will find free-to-use samples to make our lists look fantastic.
Instead of having a list like this:

we can now look at a list like that:

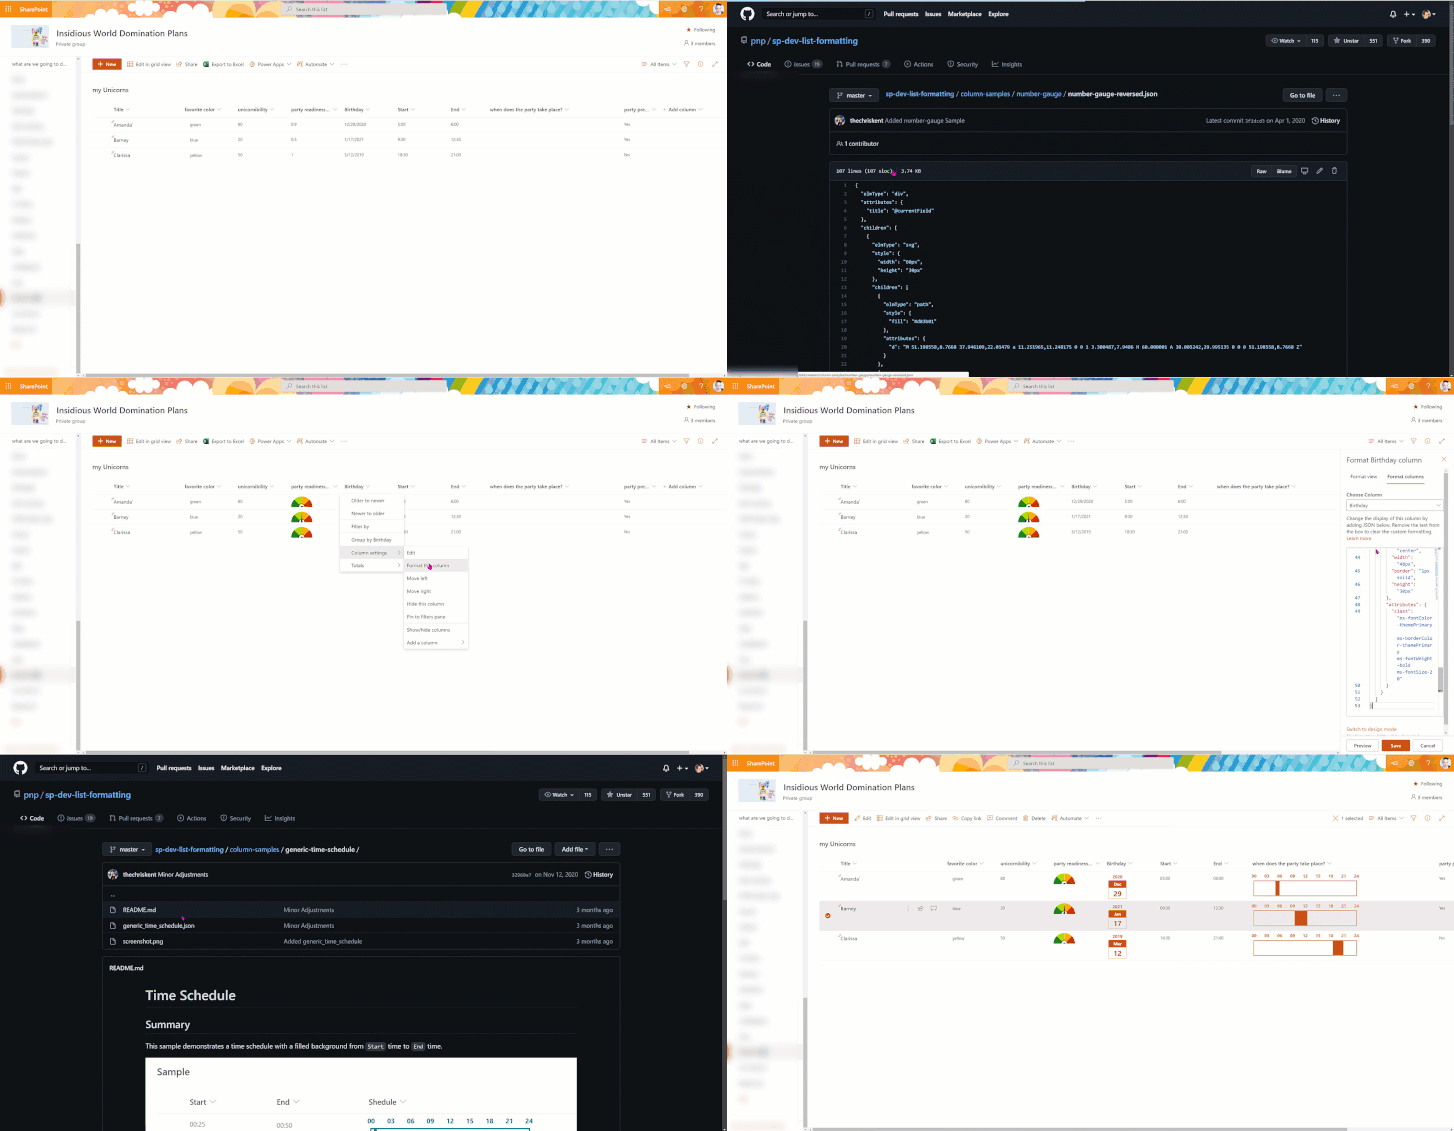
How can we apply a sample?
- Get familiar with the samples that are available on GitHub
- regularly check for new ones / pin the repo
- select the one that is interesting for you
- read the
readme.md file to know the requirements for your column. Some samples only work with choice, text, or number columns
- open the JSON file
- copy the code to your clipboard
- go to your SharePoint list
- go to column settings –> format this column
- click on Advanced mode
- paste the code
- click Save
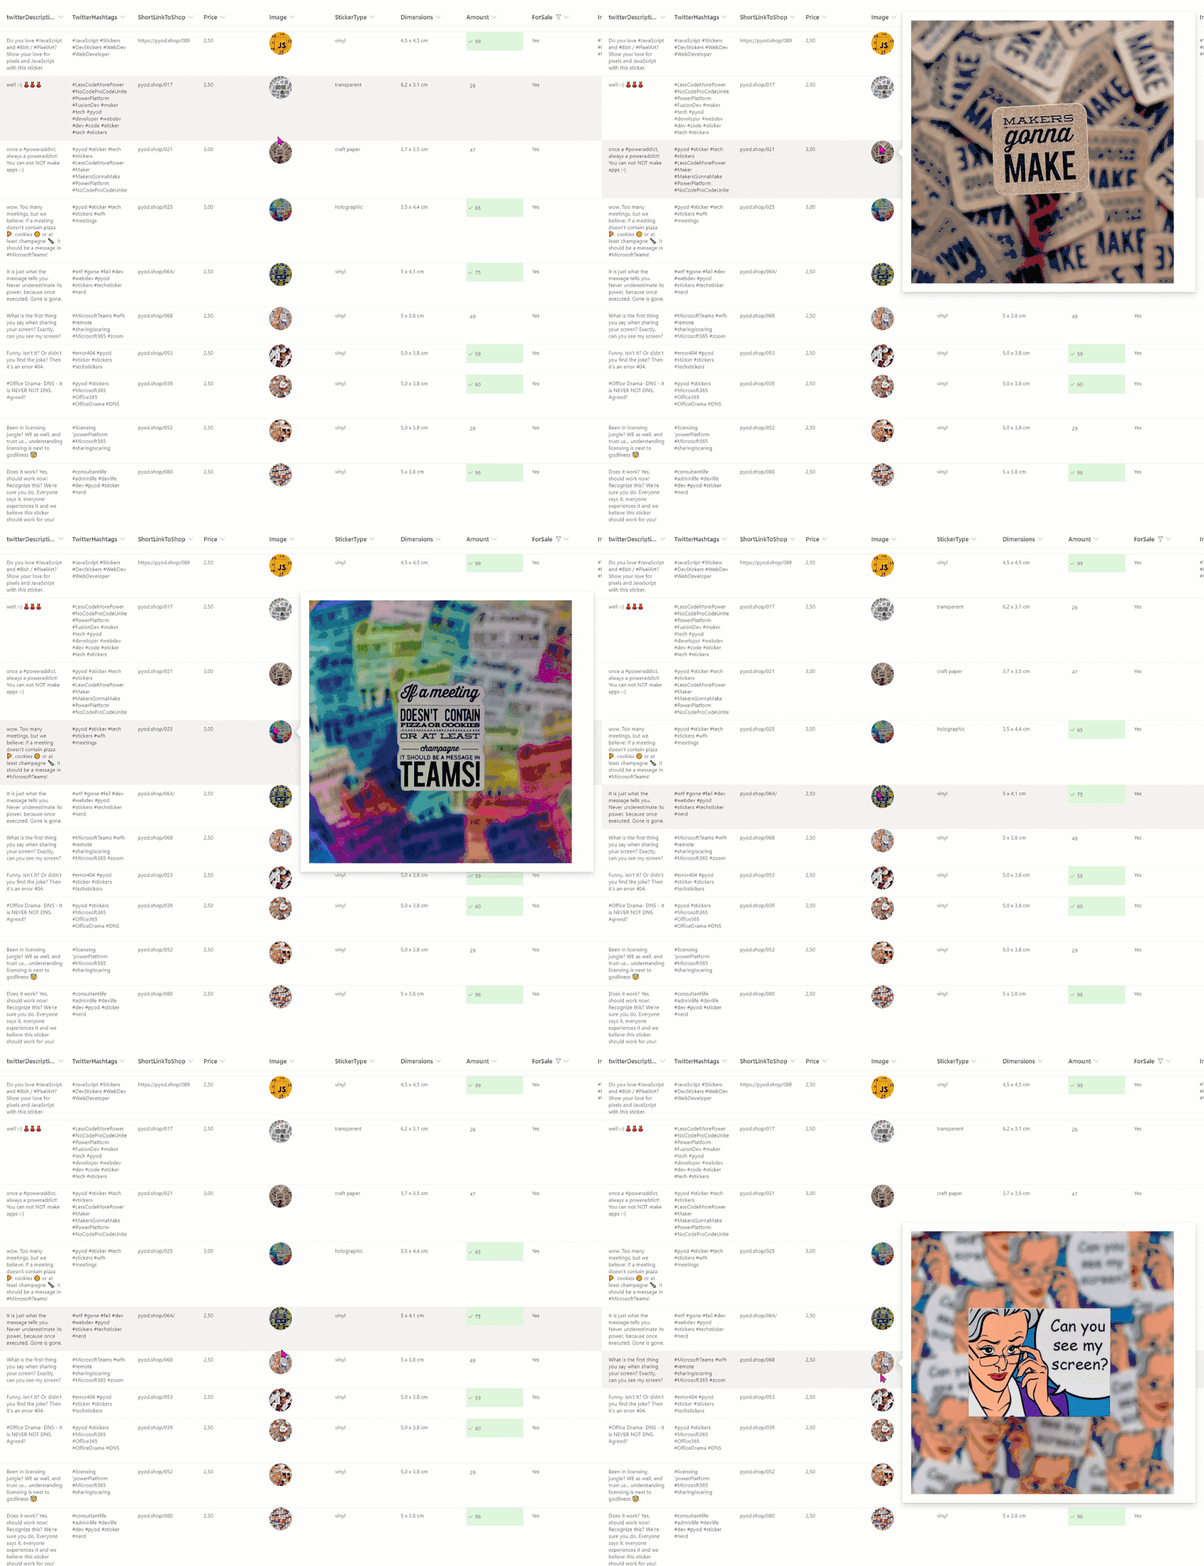
One more example how amazing a list can look like? I run a the PimpYourOwnDevoce.com sticker store together with Elio Struyf and we use a SharePoint list as our inventory (Elio blogged about the whole architecture here. With this sample we can hover over our images to have a big preview:
That’s it!
We will find view samples in the same GitHub repository.
Want to learn more?
You can find helpful resources to learn more here:
Have fun and happy Modern SharePoint list formatting – #SharingIsCaring ❤
PS: Did you like this post? I wrote even more about list formatting
First published on m365princess.com
by Contributed | Feb 12, 2021 | Technology
This article is contributed. See the original author and article here.
Welcome to the first of the “Azure Data Factory and Azure Purview integration” blog series!
Many enterprise customers and ISVs are using Azure Data Factory for their data integration and transformation needs. We are excited to see how ADF is making modeling and operating ETL flows more efficient and scalable for organizations worldwide! To make that experience even better, we are integrating ADF with Azure Purview to bring more customer values around lineage, policy management, and data governance.
In this blog series we will share scenarios, use cases, and how-to instructions on integration between ADF and Azure Purview. Each post will take 5-10 minutes to read.
As enterprises bring into more siloed data into their data lake and enterprise data warehouse, the data integration processes become more complex. As a result, it gets increasingly harder for users to track the freshness of the produced data and to analyze and optimize the existing ETL process. For example, when user needs to modify some data sources, it is very difficult to know how much impact it has on the ETL and downstream analytical process.
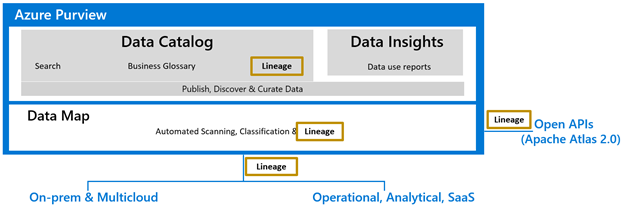
Azure Purview is a new cloud service for data users to centrally manage and govern data across their data estate spanning cloud and on-prem environments.

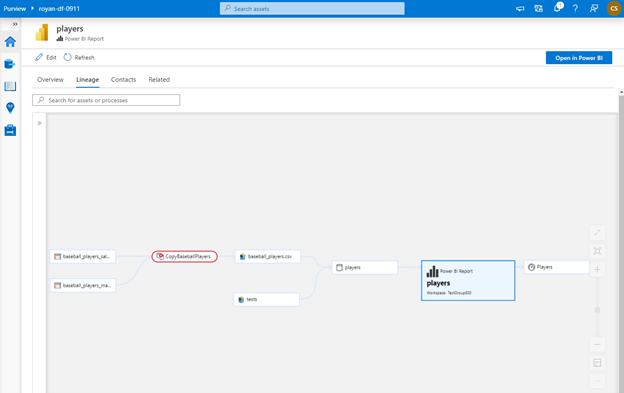
You can connect one or more data factories to an Azure Purview account, and the connection allows Data Factory to automatically publish lineage data for Copy, Data flow and SSIS package execution into Azure Purview. Data Factory Lineage in Azure Purview provides detailed information for root cause analysis and impact analysis.
Scenarios 1: Root cause analysis
Data Engineers own data sources within a data estate. In situations when a data source has incorrect data due to upstream issues, the data engineers have no centralized place to identify the issues.
Using catalog lineage, the data engineers can understand upstream process failures and be informed about the reasons for their data sources discrepancy.
Scenario 2: Impact analysis
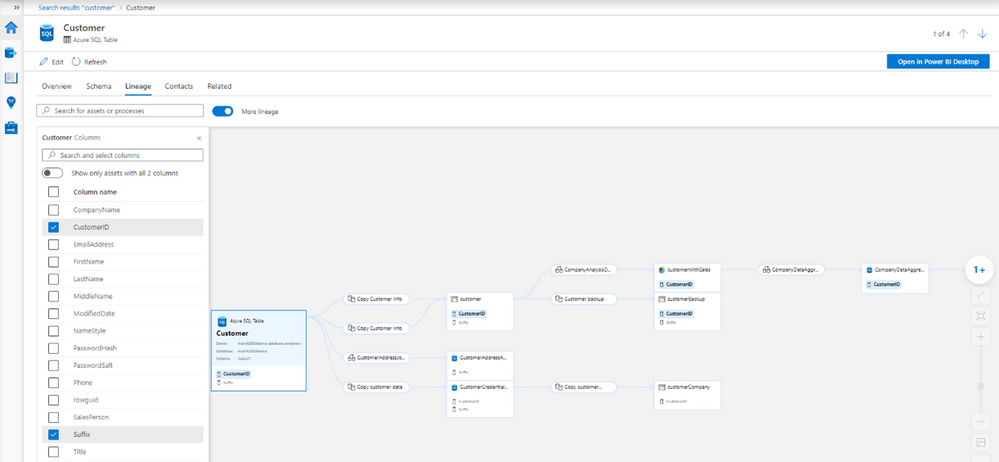
If data Producers want to change and deprecate a column in a data source they own, and they want to know who are being impacted upon making such a change. There isn’t a centralized place a data producer can know all the downstream consumers of their data sources.
Using catalog lineage, a data producer can easily understand the impact of the downstream assets upon changing the attributes of the data source.
Next steps

by Contributed | Feb 12, 2021 | Technology
This article is contributed. See the original author and article here.

Build your own random Twitter Bot by Azure Logic Apps and Azure Table Storage
Noriyuki Takei is an Azure MVP from Japan who specializes in Azure Cloud Native Service. An avid writer, Noriyuki posts about 100 blogs annually to present technical information at Azure Communities for all beginners of Azure. For more, check out Noriyuki’s Twitter @Noriyukitakei

GitHub Actions & Security: Best practices – Forking Action repositories
Rob Bos is a Developer Technologies MVP and DevOps consultant from The Netherlands. Rob is typically working with anything DevOps related to improve flow. As a Global DevOps Bootcamp team member, he loves to automate large setups for the yearly event and uses any tool to get things done. For more on Rob, check out his Twitter @robbos81

Load test with Apache JMeter™ against Azure Media Services
Kuniteru Asami is an Azure MVP and core staff member of the Japan Azure User Group. Kuniteru has been providing technical consulting for Microsoft Azure for more than 10 years since its initial release. Moreover, the Japanese Azure expert is the CEO of a company with six Azure MVPs on its staff. Follow him on Twitter @kunyami

Step by Step Azure Stack Edge – Azure Data Box Gateway for a Hybrid Cloud
Robert Smit is a EMEA Cloud Solution Architect at Insight.de and is a current Microsoft MVP Cloud and Datacenter as of 2009. Robert has over 20 years experience in IT with experience in the educational, health-care and finance industries. Robert’s past IT experience in the trenches of IT gives him the knowledge and insight that allows him to communicate effectively with IT professionals. Follow him on Twitter at @clusterMVP

How to make your Teams bots richer with markdown
Vesku Nopanen is a Principal Consultant in Office 365 and Modern Work and passionate about Microsoft Teams. He helps and coaches customers to find benefits and value when adopting new tools, methods, ways or working and practices into daily work-life equation. He focuses especially on Microsoft Teams and how it can change organizations’ work. He lives in Turku, Finland. Follow him on Twitter: @Vesanopanen
by Contributed | Feb 12, 2021 | Technology
This article is contributed. See the original author and article here.
We are all there during some days: Power Automate Premium is the key to the next level but there is no way we could justify that licensing – the ROI is simply not enough. Have you thought that you could be utilizing a Azure Logic App instead?

Following my earlier post ( How to: initiate a document approval directly in team files tab (using Power Automate) ) that required a Power Automate Premium license I recreated that with Azure Logic Apps solution. Please do refer and compare to that blog post these steps to see how they differ. For later mentioned parts you need to follow steps in that post.
What are Azure Logic Apps and do they cost?
First: what are Logic Apps? Let’s take a snippet from Microsoft Azure Logic Apps documentation here.
Azure Logic Apps is a cloud service that helps you schedule, automate, and orchestrate tasks, business processes, and workflows when you need to integrate apps, data, systems, and services across enterprises or organizations. Logic Apps simplifies how you design and build scalable solutions for app integration, data integration, system integration, enterprise application integration (EAI), and business-to-business (B2B) communication, whether in the cloud, on premises, or both.
In short: you are create something almost like a Power Automate Cloud Flow but you do that in the Azure. The user interface is slightly different but almost all essential parts are there: triggers, actions, connections and of course various connector.
The big difference is that you will be paying for all Logic App runs but the bright side is that you don’t have to purchase Power Automate Premium. Of course it pays to do some rough calculation on Logic Apps. In my demos for a week I accumulated less than one euro on Logic Apps costs.. If something you construct is used repeatedly and has lots of loops costs can build up. But if you have a random need for a Premium or custom connector requirements Logic Apps might be a perfect solution. This also depends on number of users you would have to license Premium Power Automates to: yearly investment counts.
Read more about Logic Apps pricing here.
I suggest to start with
- Create a resource group for Logic Apps so you can easily keep on track of the costs – and also manage your apps
- Put a budget to Azure in place so your costs don’t suddenly skyrocket
- Follow costs and cost estimate
Creating Azure Logic Apps -process for file approval requests
Now that we have that householding taken care of we can finally create the Logic App.
Navigate to your Resource Group and click on Add.
Add a Logic App. Use search to narrow the list down.
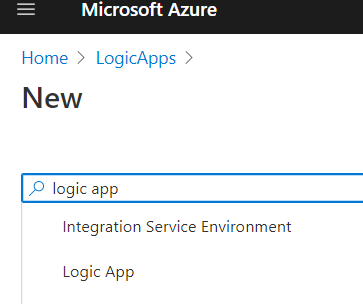
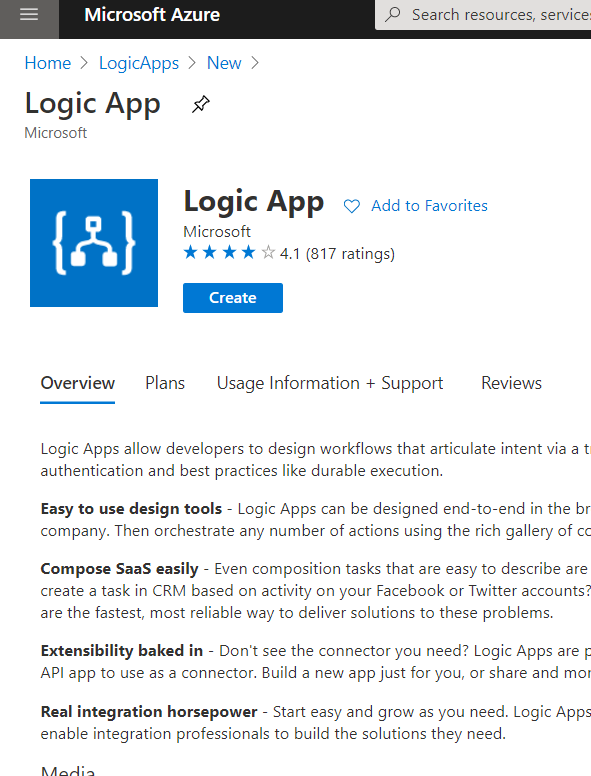
Note: Be careful how you name your Logic App in the next step because you won’t be able to change it later!
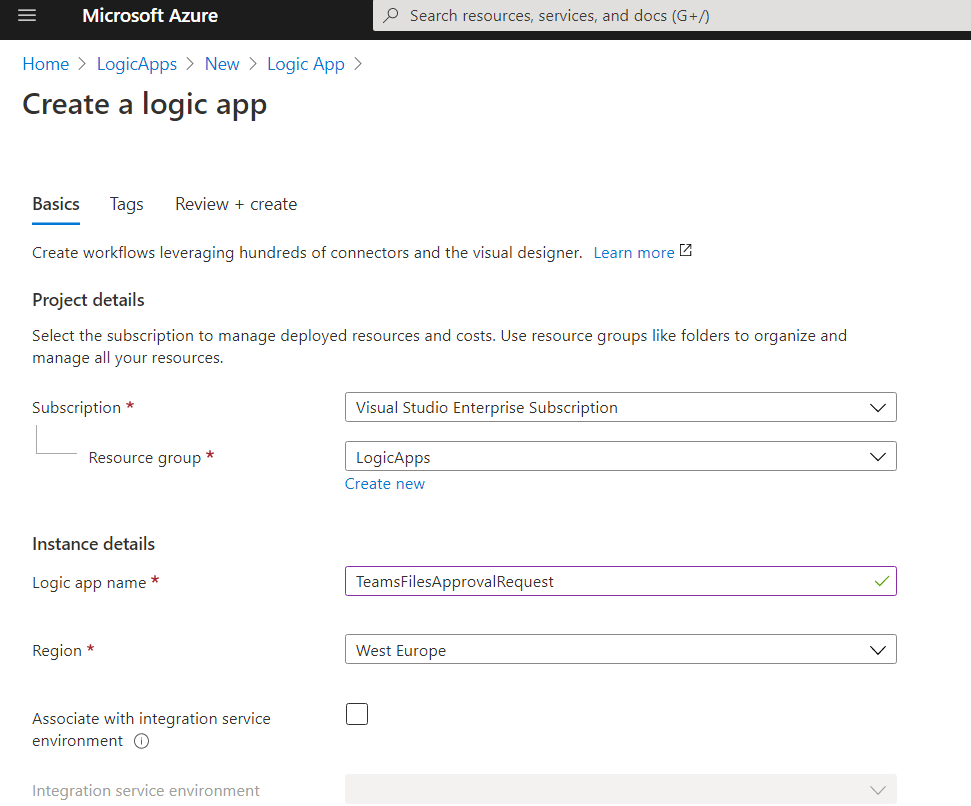
Add Tags if you use them, Review and Create the App. The Logic App is deployed rather quickly and you can then go to the Resource.
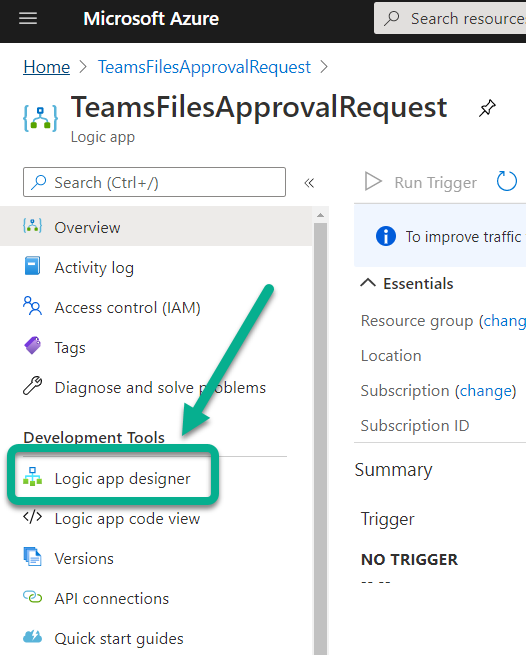
Go to Logic App Designer
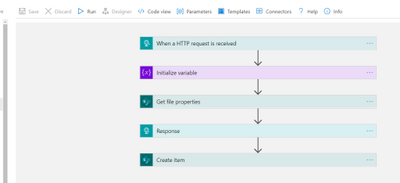
From there you can start selecting your trigger how the Logic App is activated. Since we are duplicating the earlier post functionality with Azure Logic Apps we choose “When a HTTP request is received”
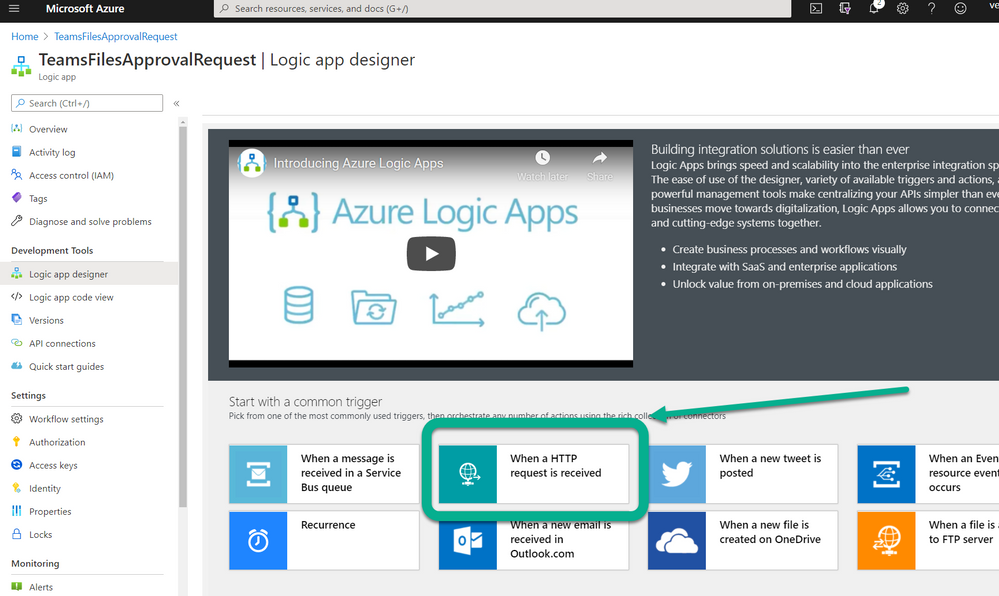
And now the UI starts to look very Power Automatish
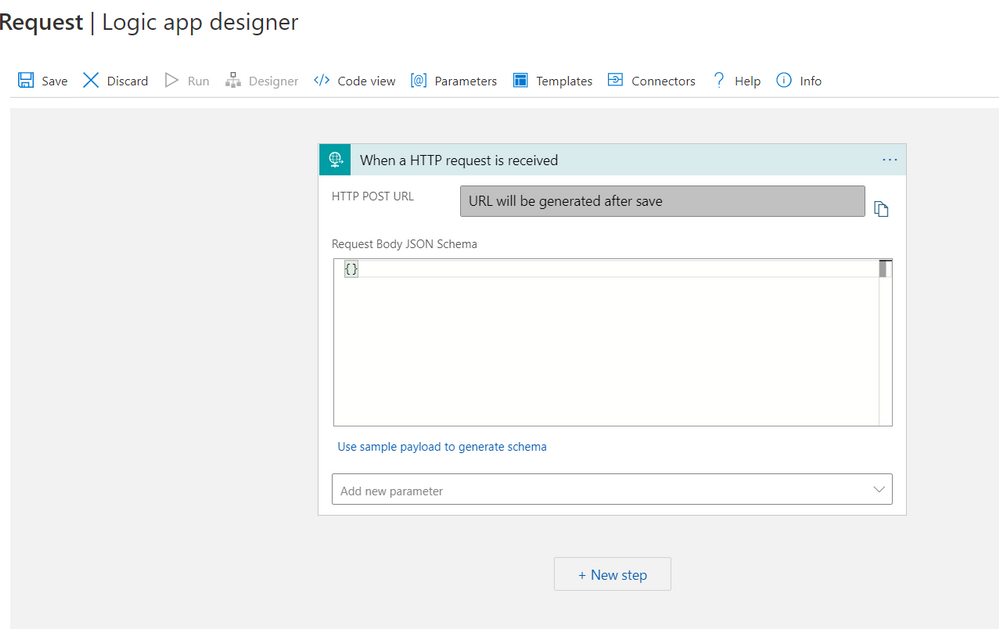
The difference is about available parameters. You need to click on Add new parameter to open menu that is in this (and in many other actions) not visible unlike at Power Automate designer.

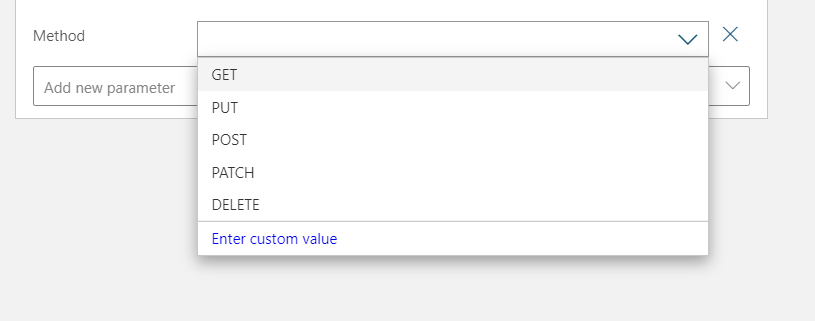
Check Method

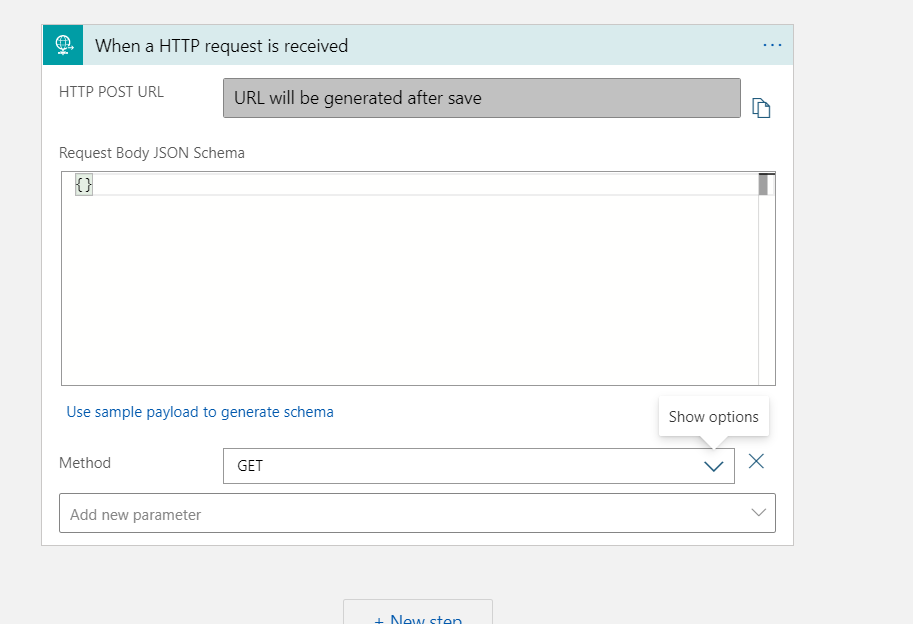
And you can choose Get from the list.
And now we have the trigger part ready (waiting for a save)!
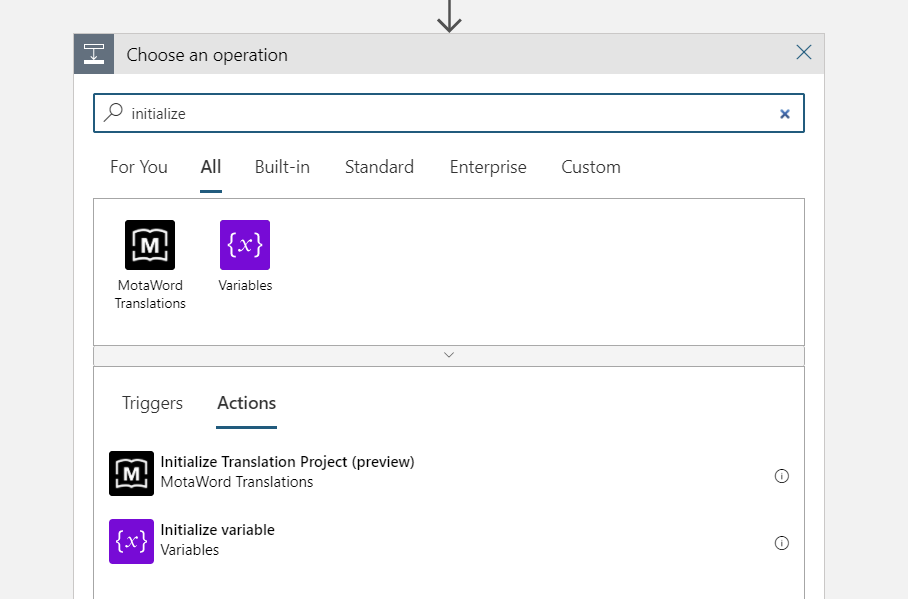
Then we add other parts. The search for actions is not as good as in Power Automate Cloud Flows but keep on trying – the actions are there!
Let’s populate that with triggerOutputs()[‘queries’][‘FileID’] just like in the earlier blog post.

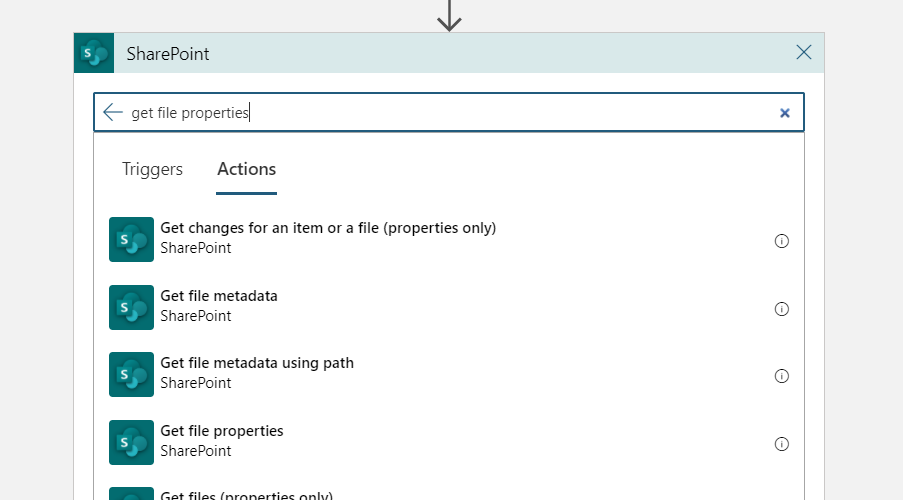
Add there Get File Properties from SharePoint. In this point we need to add a connection to the SharePoint. Use credentials that you seem to be fit.

Once you have signed in you can define the information how to get file properties.
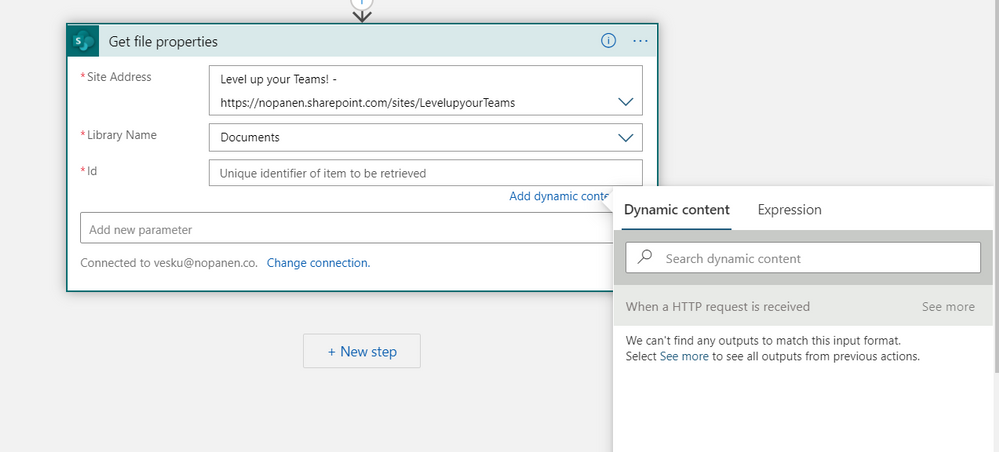
The FileID is missing. You need to do a bit trick here:
- Change parameter to integer
- add it to the Get file properties
- Change parameter back to string
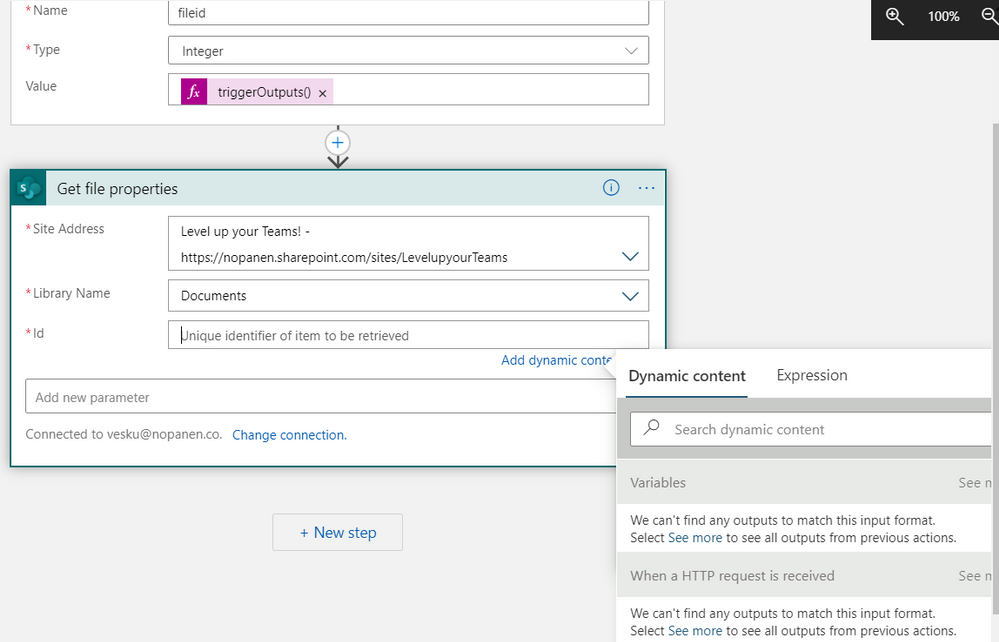
And click on see more at Variable section in Dynamic content

Choose fileid. And yes! (don’t forget to change the fileid parameter back to string)
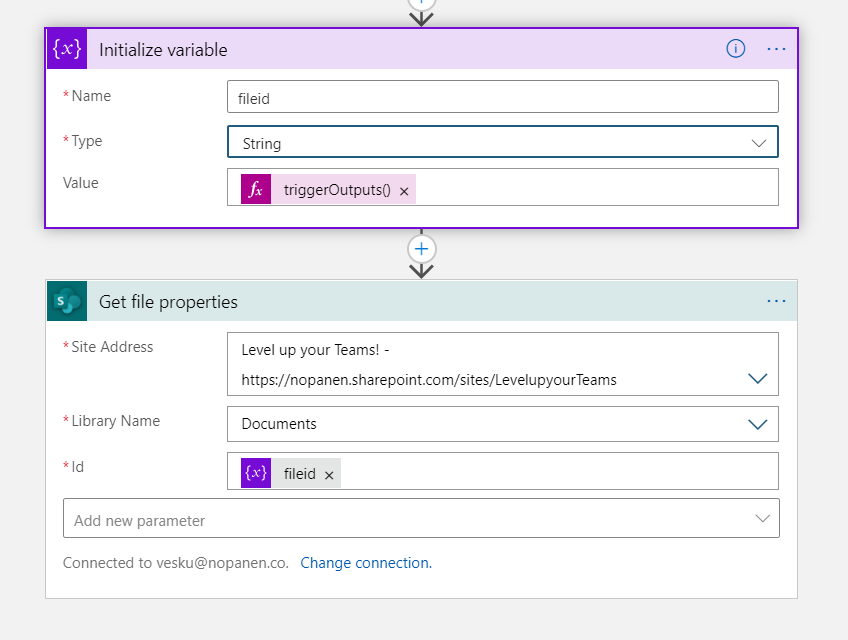
At this point we have
- FileID
- All file properties
- Open HTTP request..
Let’s close that HTTP request first. Add Response-action and instruct to close the tab.
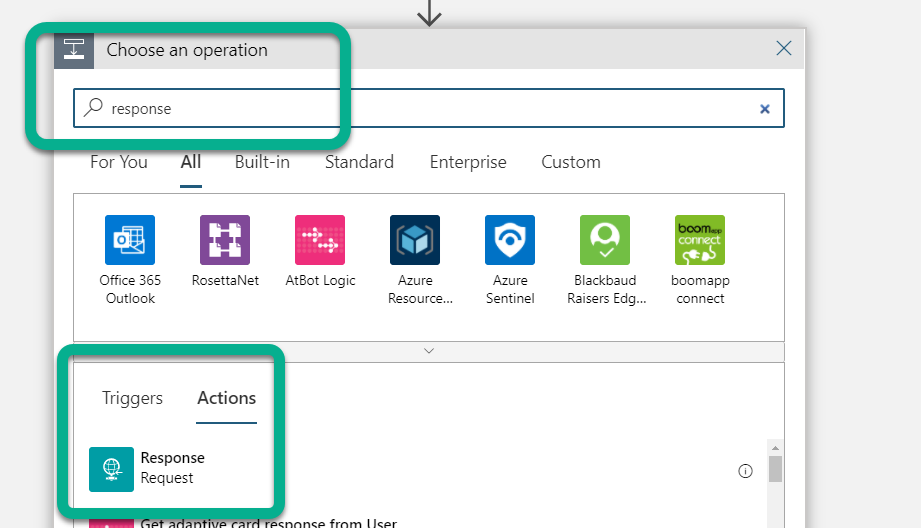
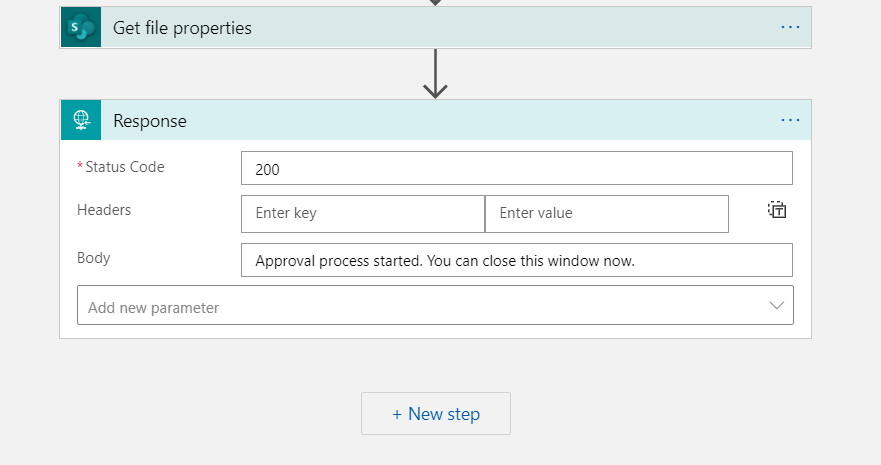
Note: here is when you need to progress differently than with Power Automate Cloud Flow approval
This is because Azure Logic Apps doesn’t have Approval-connection. In this phase I decided to make the demo easily: writing the approval request to a SharePoint list in the tenant and and creating a another Power Automate with a when item is inserted trigger there.
First – let’s create that list where we can write the information to. We can use Teams Lists -app for that.

Search for the action in Azure Logic Apps and add Create Item
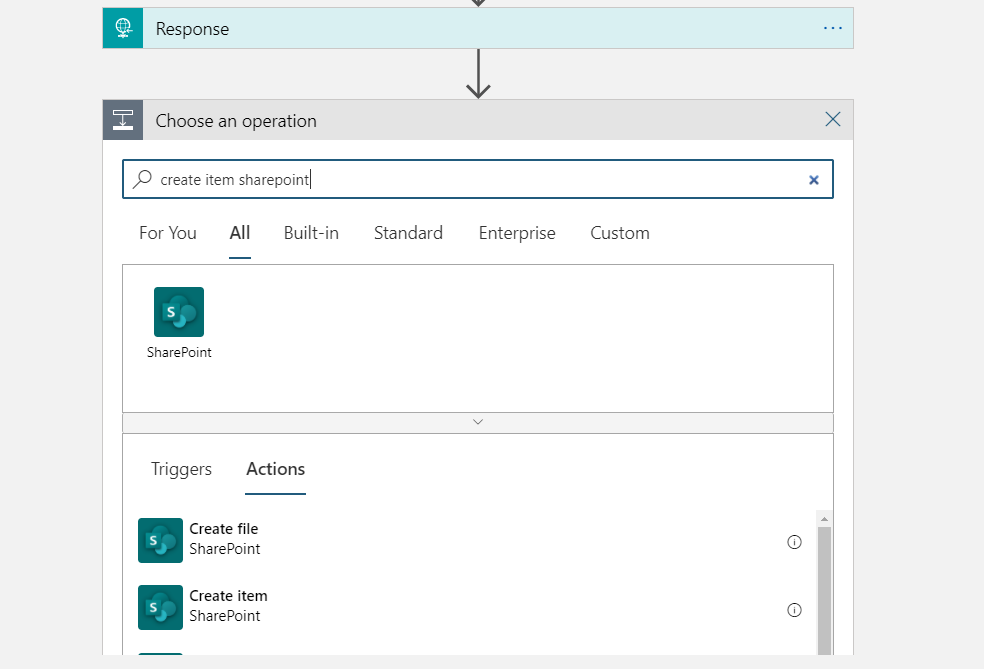
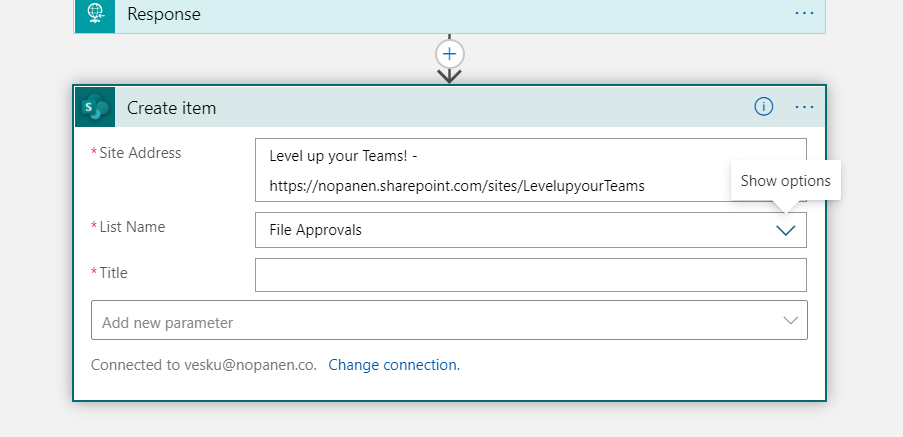
Now, we need to click on Add new parameter to add list columns to the action.
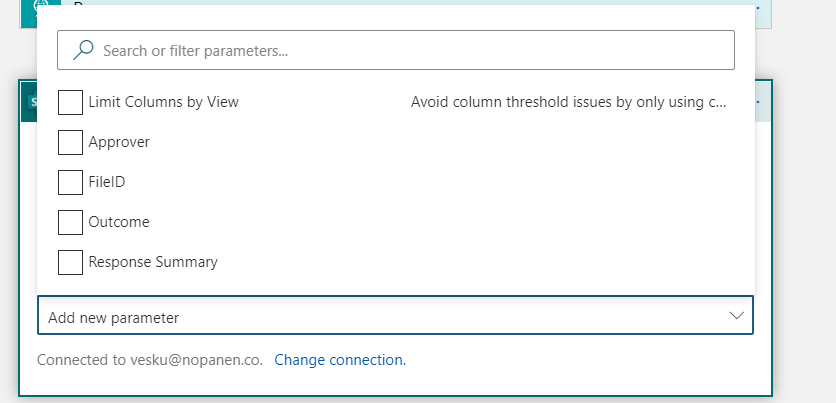
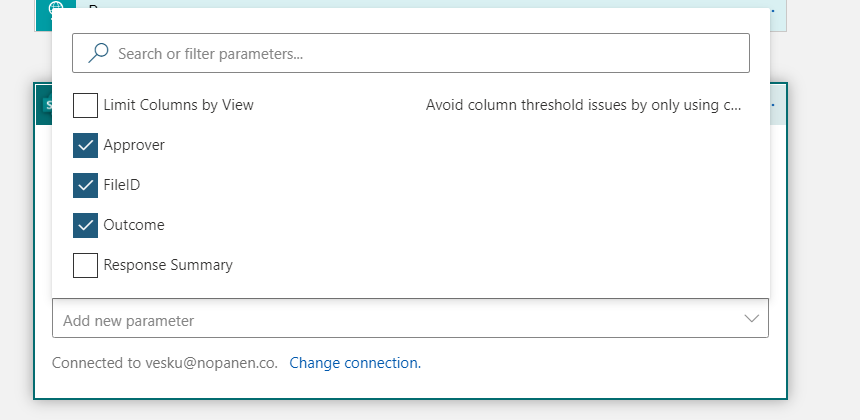
Choosing Approver, FileID, and Outcome. I actually should have named Approver as Approval Requestor but hopefully it doesn’t confuse too much.
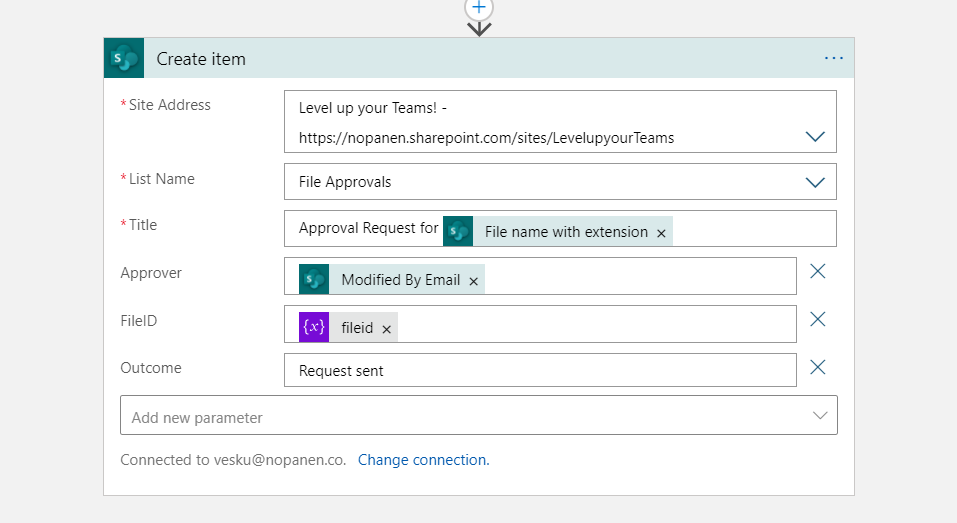
When filling up information you can use Dynamic values from Get file properties. Since we don’t really know who clicked that request approval button we just assume it was the person who did changes the last time.
And that’s it!
Hit save (if you haven’t already) and you have the URL in the trigger action available. Proceed with column formatting as stated in previous post.
Fast forwarding the Power Automate that is created as a trigger to the File Approvals -list looks like this:
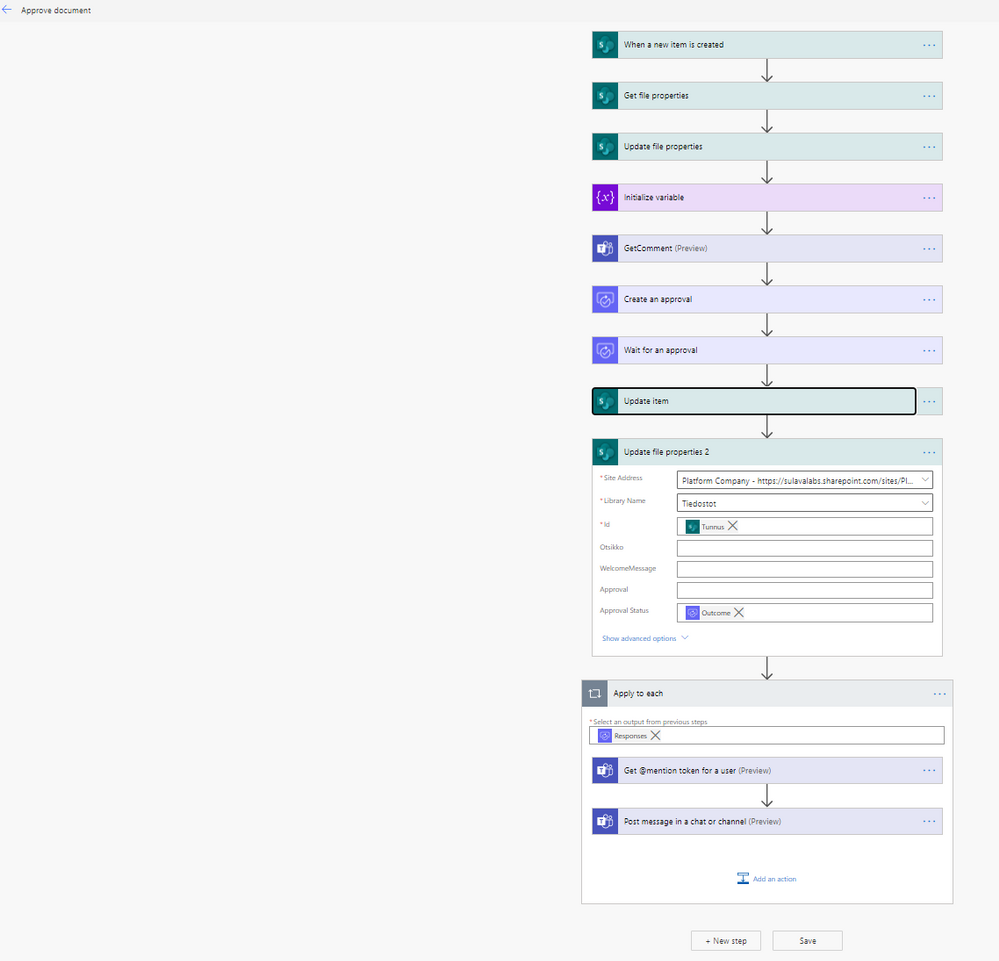
Steps are roughly similar to the ones as in the earlier post.
- The new item is inserted trigger
- Getting file properties from the Documents (based on the fileID )
- Updating that file that Approval is processing
- Storing the file name into a variable
- Getting a comment from the user that last modified the file why this document needs approving
- I didn’t add this one but you could figure out who is really the document approver. Perhaps there is metadata that can define that one – or the library / folder itself is tied to a structure that defines the real approver
- Create the approval request
- Wait for the approval to conclude. I have found out that it is better to use Create + Wait combination in separate actions compared to the Start & Wait single action. If you need to count your Power Automate executions then a single action might make more sense..
- Add also the check is it approved or rejected. I didn’t add this either to this demo but this is definitely needed if you are taking any real action after the approval process!
- Updated the outcome to the list and then to the file itself to a dedicated columns
- Added a information about approval request to be sent to a channel
Conclusion
With Azure Logic Apps it is possible to go the next level without paying for Premium Power Automates. There are also other create features in Logic Apps that I didn’t even touch on this one: ability to modify the app in Visual Studio for example. And that means it is easy to add to a version control as well..
You need to pay attention to the execution costs and make sure that your Logic Apps stay in the budget. This suits extremely well for low-medium usage actions.
You may have to switch from a Logic App to Power Automate at some point – like we did in this example. Plan carefully how you do the data exchange and where do you store the information & who can access it. The HTTP trigger in this example isn’t the safest one to use (it lacks security) so you need to plan how you either add some security to it or secure it in some other way. In my earlier post I also made some pointers about this: look them up.
Not all connectors / actions are in the Logic Apps but many of them are.
Azure Logic Apps are a great way to extend Microsoft Teams and integrate it to different systems – inside and outside of Microsoft 365 cloud.
This blog article is a repost from MyTeamsDay.Com.

by Scott Muniz | Feb 12, 2021 | Security
This article was originally posted by the FTC. See the original article here.
Leaving broken hearts and empty bank accounts, romance scammers give love a bad name. Now that you know how many people experience romance scams, and how to spot the scams, take some anti-scam action this Valentine’s Day. Whether you’re wondering if that interesting person who just messaged you is for real, looking forward to February 15 discounts on chocolates, or thinking about friends who are out in the online dating world, here are some messages to know and share about romance scams.
- If an online love interest you’ve never met in person asks you for money, that’s a scam. No matter what story they tell you.
- Never send money or gifts to anyone you haven’t met in person — even if they send you money first.
- Only scammers tell you to buy gift cards, wire money, or buy cryptocurrency. And once you send that money, you won’t get it back.
- Talk to someone you trust about your new love interest, and pay attention if they’re concerned.
- Report romance scams to the dating or social networking site, and to the FTC at ReportFraud.ftc.gov.
Learn more at ftc.gov/romancescams. And share this blog series, video, and graphics with people who might need it — even if you don’t.


Brought to you by Dr. Ware, Microsoft Office 365 Silver Partner, Charleston SC.
![]()


Recent Comments