by Contributed | Feb 17, 2021 | Technology
This article is contributed. See the original author and article here.
The first refresh release for the Azure Service Fabric managed clusters preview is now available in all supported regions (centraluseuap, eastus2euap, eastasia, northeurope, westcentralus, and eastus2).
With this release, customers can now:
To utilize the new features in this refresh, the API version for Service Fabric managed clusters must be updated to “2021-01-01-preview”. For more information, see the release notes.
Try it out
Start out with our Quickstart or head over to the Service Fabric managed clusters documentation page to get started. You can find many resources including documentation, and cluster templates. You can view the feature roadmap and provide feedback on the Service Fabric GitHub repo.

by Contributed | Feb 17, 2021 | Technology
This article is contributed. See the original author and article here.
One of the biggest challenges organizations face in ensuring compliant and governed data usage is knowing where and what types of sensitive data exists in their environment. Data continues to grow at exponential rates as does the demand for data-driven business insights. Concurrently, the rising slate of industry regulations and security threats makes this understanding a critical requirement for businesses to survive and thrive in these unprecedented times!
Sensitive information could live in a PDF or a Word document file, within SharePoint or OneDrive; or in operational and analytical data stores. Until the advent of Azure Purview, sensitivity labels in Microsoft Information Protection was a reliable way to tag and protect your organization’s productivity data, such as emails and files, while making sure that user productivity and their ability to collaborate isn’t hindered.
With Azure Purview, you can now extend the reach of Microsoft 365 sensitivity labels to operational and analytical data! Label Power BI workspaces and database columns with the same ease as labelling a word doc, thanks to Azure Purview!
Interested in getting started? Read on!
Page 1: Define labels in Microsoft Information Protection.
1. If your organization is a Microsoft 365 E5 customer, you already have the right licenses in place. Also likely that your compliance team already has a set of sensitivity labels defined that you can find in the Microsoft 365 Compliance Center.
2. In Microsoft 365 there are 5 system defined Sensitivity Labels as Personal, Public, General, Confidential, Highly Confidential:

3. Once labels are published through a policy for all or certain users, they can assign them to the files and emails.

You can also edit or remove existing labels or create your own custom labels such as Highly ConfidentialContoso FTE and Highly ConfidentialSensitive and Secret in the example below.

While you can give the option to users to assign published labels to their files themselves, you can also configure auto-labeling rules to assign a label to a file based on certain conditions. For example, make the file labeled as Sensitive if they contain Credit Card Number. You can also define priority for your labels, the most generic labels on the top of the list and more restrictive labels on the bottom.
Page 2: Extend M365 Sensitivity Labels in Azure Purview
1. Prerequisites
- An Azure Active Directory tenant
- A Microsoft M365 E5 active license
- An Azure Purview Account in your Azure Subscription
2. To start using your M365 Sensitivity Labels in Azure Purview, you need to follow few steps.
- In Azure Portal: Make sure you have an Azure Purview account or create a new Azure Purview Account in your Azure Subscription.
- In Azure Purview Studio: Register your data sources. Common supported data sources in Azure Purview that also support automatic labeling are:
- On-premises SQL Servers
- Azure SQL Database
- Azure Storage
- Azure Data Lake Storage Gen 1 and Gen 2
To apply Labels to OneDrive and SharePoint you still need to use Microsoft 365 Sensitivity Labels directly.
3. After registering your data sources you should be able to see existing sources and update your data catalog through Azure Purview Studio.

4. In Microsoft 365 Security and Compliance Center consent extending labels to Azure Purview. This is a one-time action and needed before any labels can be used in Purview:
 5. In Microsoft 365 Security and Compliance Center create and publish at least one sensitivity label. If you have any existing labels, you can edit these labels to extend them to Azure Purview. Select Azure Purview Assets.

6. Configure Auto-labeling Rules

7. Turn on Auto-labeling for database columns

8. In Azure Purview Studio, Start a new scan of your assets in Azure Purview. The new scan is needed so Azure Purview can detect and automatically assign the labels to the metadata if they meet the extended any Sensitivity Labels conditions. You can launch a manual scan or schedule a regular scan of your data sources. It is highly recommended to schedule regular automatic scans, so any changes in data state is detected by Azure Purview and reduce manual overhead for your data curators.
9. Search the Azure Purview Data Catalog or use Sensitivity Labels Insights to view data assets and their assigned sensitivity labels.
Page 3: Explore Sensitivity Labels in Azure Purview
We are now set up and ready to navigate data and their Sensitivity Labels in Azure Purview Studio. Azure Purview Data Map powers the Purview Data Catalog and Purview data insights as unified experiences within the Purview Studio.
Option 1: Search the Azure Purview Data Catalog
Once you register your data sources and the scan is completed, you can use Search Data Catalog from Azure Purview Studio to lookup for data assets using any terms or keywords. Let’s take a look and search for data. As you type the characters, the data map provides recent searches and a list of matching search terms as Search Suggestions.

Awesome! There are over 12,000 results and it took just few seconds to get the results. To narrow down the search, you can apply one or multiple filters using any of these categories:
- Asset Type
- Classification
- Label
- Contact
- Glossary term
For subject matter experts, data stewards and officers, the Purview Data Catalog provides data curation features like ability to search and browse assets by any business or technical terms in the organization and gain visibility across data assets in your organization quickly!

Narrowing down the filter you can select any listed label and the search result automatically gets updated accordingly.
Let’s select a label such as Secret and then select one of the assets from the results to navigate into its metadata. The data is automatically labeled as Secret and the reason is because it contains a piece of information that matches with the M365 labeling rule. In this case Credit Card Number. You can use Edit button to modify the Classifications, Glossary terms and Contact, however you cannot modify labels as they are assigned automatically based on the condition. Please note that Labels for files are only applicable in the catalog and not in the original location at this point!

Option 2: Use Sensitivity Labels Insights
If you are looking for a bird’s eye view of your data estate, you can use Azure Purview Insights. Data and security officers can get an overview and telemetry around data sources and sensitivity labels across data estate and get an answer for these questions:
- How many unique labels are found?
- How many sources, files and tables are labeled?
- What are the top sources with labeled data?
- What data types labels are applied to?
- What are the common labels used across data?

You can also view quickly what the trend related to label assignments is over the last 24 hours, 7 or 30 days on your files and tables.

To obtain more detailed information, you can click on view more on any of the titles.

Supported data types for Sensitivity Labels in Azure Purview
We currently support Automatic Labeling in Azure Purview for the following data types:
Data type
|
Sources
|
Automatic labeling for files
|
– Azure Blob Storage
– Azure Data Lake Storage Gen 1 and Gen 2
|
Automatic labeling for database columns
|
– SQL server
– Azure SQL database
– Azure SQL Database Managed Instance
– Azure Synapse
– Azure Cosmos DB
|
You can review the list later as we will add support for more data types in near future.
Summary and Call to Action
Through close integration with Microsoft Information Protection offered in Microsoft 365 Azure Purview enables direct ways to extend visibility into your data estate, and classify and label your data.
We would love you hear your feedback and know how Azure Purview helped tracking your sensitive data estate using automatic labeling.
- Create an Azure Purview account now and extend your M365 Sensitivity Labels across your files and database columns in Azure Purview.
- Use Sensitivity Labels Insights to get a bird’s eye view of your data estate by the sensitivity labels.
- Learn more about Azure Purview Autolabeling and Sensitivity Label Insights.
- Provide your feedback.
by Contributed | Feb 17, 2021 | Technology
This article is contributed. See the original author and article here.
The Azure Service Fabric 7.2 sixth refresh release includes stability fixes for standalone, and Azure environments and has started rolling out to the various Azure regions. The updates for .NET SDK, Java SDK and Service Fabric Runtime will be available through Web Platform Installer, NuGet packages and Maven repositories in 7-10 days within all regions.
- Service Fabric Runtime
- Windows – 7.2.457.9590
- Ubuntu 16 – 7.2.456.1
- Ubuntu 18 – 7.2.456.1804
- Service Fabric for Windows Server Service Fabric Standalone Installer Package – 7.2.457.9590
- .NET SDK
- Windows .NET SDK – 4.2.457
- Microsoft.ServiceFabric – 7.2.457
- Reliable Services and Reliable Actors – 4.2.457
- ASP.NET Core Service Fabric integration – 4.2.457
- Java SDK – 1.0.6
Key Announcements
- This release introduces a fix to an issue identified in 7.2CU4 and 7.2CU5 in which deleted services were recreated and appear in an error state. With this fix the replica deleted state will now be correctly persisted on the node in all scenarios preventing services from entering an error state upon node restart. If you were impacted by this issue, you can reduce the value of the cluster configuration FailoverManager::DroppedReplicaKeepDuration to mitigate the issue, and update to CU6 to resolve the issue.
- Key Vault references for Service Fabric applications are now GA on Windows and Linux.
- .NET 5 apps for Windows on Service Fabric are now supported as a preview. Look out for the GA announcement of .NET 5 apps for Windows on Service Fabric.
- .NET 5 apps for Linux on Service Fabric will be added in the Service Fabric 8.0 release.
For more details, please read the release notes.
by Contributed | Feb 17, 2021 | Technology
This article is contributed. See the original author and article here.
We are announcing Document Translation, a new feature in Azure Translator service which enables enterprises, translation agencies, and consumers who require volumes of complex documents to be translated into one or more languages preserving structure and format in the original document. Document Translation is an asynchronous batch feature offering translation of large documents eliminating limits on input text size. It supports documents with rich content in different file formats including Text, HTML, Word, Excel, PowerPoint, Outlook Message, PDF, etc. It reconstructs translated documents preserving layout and format as present in the source.
Standard translation offerings in the market accept only plain text, or HTML, and limits count of characters in a request. Users translating large documents must parse the documents to extract text, split them into smaller sections and translate them separately. If sentences are split in an unnatural breakpoint it can lose the context resulting in suboptimal translations. Upon receipt of the translation results, the customer has to merge the translated pieces into the translated document. This involves keeping track of which translated piece corresponds to the equivalent section in the original document.
The problem gets complicated when customers want to translate complex documents having rich content. They convert the original file in variety of formats to either .html or .txt file format and reconvert translated content from html or txt files into original document file format. The transformation may result in various issues. The problem gets compounded when customer needs to translate a) large quantity of documents, b) documents in variety of file formats, c) documents while preserving the original layout and format, d) documents into multiple target languages.
Document Translation is an asynchronous offering to which the user makes a request specifying location of source and target documents, and the list of target output languages. Document Translation returns a job identifier enabling the user to track the status of the translation. Asynchronously, Document Translation pulls each document from the source location, recognizes the document format, applies right parsing technique to extract textual content in the document, translates the textual content into target languages. It then reconstructs the translated document preserving layout and format as present in the source documents, and stores translated document in a specified location. Document Translation updates the status of translation at the document level. Document Translation makes it easy for the customer to translate volumes of large documents in a variety of document formats, into a list of target languages thus eliminating all the challenges customers face today and improving their productivity.
Document Translation enables users to customize translation of documents by providing custom glossaries, a custom translation model id built using customer translator, or both as part of the request. Such customization retains specific terminologies and provides domain specific translations in translated documents.
“Translation of documents with rich formatting is a tricky business. We need the translation to be fluent and matching the context, while maintaining high fidelity in the visual appearance of complex documents. Document Translation is designed to address those goals, relieving client applications from having to disassemble and reassemble the documents after translation, making it easy for developers to build workflows that process full documents with a few simple steps.”, said Chris Wendt, Principal Program Manager.
To learn more about Translator and the Document Translation feature in the video below
References
Send your feedback to translator@microsoft.com
by Contributed | Feb 17, 2021 | Technology
This article is contributed. See the original author and article here.
This article explains how to manually configure database migration from SQL Server 2008-2019 to SQL Managed Instance using Log Replay Service (LRS). This is a cloud service enabled for managed instance based on the SQL Server log shipping technology in no recovery mode. LRS should be used in cases when Azure Data Migration Service (DMS) cannot be used, when more control is needed or when there exists little tolerance for downtime.
When to use Log Replay Service
In cases that Azure DMS cannot be used for migration, LRS cloud service can be used directly with PowerShell, CLI cmdlets, or API, to manually build and orchestrate database migrations to SQL managed instance.
- You might want to consider using LRS cloud service in some of the following cases:
- More control is needed for your database migration project
- There exists a little tolerance for downtime on migration cutover
- DMS executable cannot be installed in your environment
- DMS executable does not have file access to database backups
- No access to host OS is available, or no Administrator privileges
Note: Recommended automated way to migrate databases from SQL Server to SQL Managed Instance is using Azure DMS. This service is using the same LRS cloud service at the back end with log shipping in no-recovery mode. You should consider manually using LRS to orchestrate migrations in cases when Azure DMS does not fully support your scenarios. |
How does it work
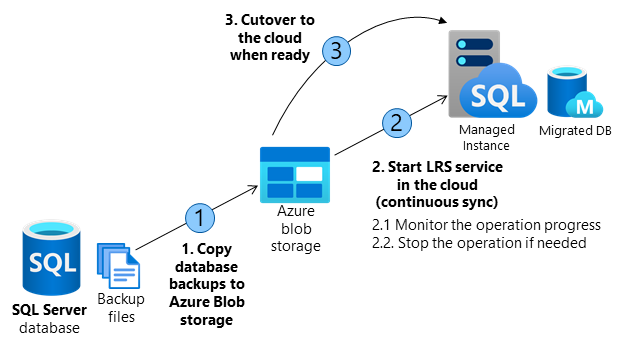
Building a custom solution using LRS to migrate a database to the cloud requires several orchestration steps shown in the diagram and outlined in the table below.
The migration entails making full database backups on SQL Server and copying backup files to Azure Blob storage. LRS is used to restore backup files from Azure Blob storage to SQL managed instance. Azure Blob storage is used as an intermediary storage between SQL Server and SQL Managed Instance.
LRS will monitor Azure Blob storage for any new differential, or log backups added after the full backup has been restored, and will automatically restore any new files added. The progress of backup files being restored on SQL managed instance can be monitored using the service, and the process can also be aborted if necessary. Databases being restored during the migration process will be in a restoring mode and cannot be used to read or write until the process has been completed.
LRS can be started in autocomplete, or continuous mode. When started in autocomplete mode, the migration will complete automatically when the last backup file specified has been restored. When started in continuous mode, the service will continuously restore any new backup files added, and the migration will complete on the manual cutover only. The final cutover step will make databases available for read and write use on SQL Managed Instance.
Operation |
Details |
1. Copy database backups from SQL Server to Azure Blob storage. |
– Copy full, differential, and log backups from SQL Server to Azure Blob storage using Azcopy or Azure Storage Explorer.
– In migrating several databases, a separate folder is required for each database. |
2. Start the LRS service in the cloud. |
– Service can be started with a choice of cmdlets:
PowerShell start-azsqlinstancedatabaselogreplay
CLI az_sql_midb_log_replay_start cmdlets.
– Once started, the service will take backups from the Azure Blob storage and start restoring them on SQL Managed Instance.
– Once all initially uploaded backups are restored, the service will watch for any new files uploaded to the folder and will continuously apply logs based on the LSN chain, until the service is stopped.
|
2.1. Monitor the operation progress. |
– Progress of the restore operation can be monitored with a choice of or cmdlets:
PowerShell get-azsqlinstancedatabaselogreplay
CLI az_sql_midb_log_replay_show cmdlets. |
2.2. Stopabort the operation if needed. |
– In case that migration process needs to be aborted, the operation can be stopped with a choice of cmdlets:
PowerShell stop-azsqlinstancedatabaselogreplay
CLI az_sql_midb_log_replay_stop cmdlets.
– This will result in deletion of the being database restored on SQL Managed Instance.
– Once stopped, LRS cannot be continued for a database. Migration process needs to be restarted from scratch.
|
3. Cutover to the cloud when ready. |
– Once all backups have been restored to SQL Managed Instance, complete the cutover by initiating LRS complete operation with a choice of API call, or cmdlets:
PowerShell complete-azsqlinstancedatabaselogreplay
CLI az_sql_midb_log_replay_complete cmdlets.
– This will cause LRS service to be stopped and database on Managed Instance will be recovered.
– Repoint the application connection string from SQL Server to SQL Managed Instance.
– On operation completion database is available for R/W operations in the cloud.
|
Requirements for getting started
SQL Server side
- SQL Server 2008-2019
- Full backup of databases (one or multiple files)
- Differential backup (one or multiple files)
- Log backup (not split for transaction log file)
- CHECKSUM must be enabled as mandatory
Azure side
- PowerShell Az.SQL module version 2.16.0, or above (install, or use Azure Cloud Shell)
- CLI version 2.19.0, or above (install)
- Azure Blob Storage provisioned
- SAS security token with Read and List only permissions generated for the blob storage
Best practices
The following are highly recommended as best practices:
- Run Data Migration Assistant to validate your databases will have no issues being migrated to SQL Managed Instance.
- Split full and differential backups into multiple files, instead of a single file.
- Enable backup compression.
- Use Cloud Shell to execute scripts as it will always be updated to the latest cmdlets released.
- Plan to complete the migration within 47 hours since LRS service has been started.
Important: Database being restored using LRS cannot be used until the migration process has been completed. This is because underlying technology is log shipping in no recovery mode. Standby mode for log shipping is not supported by LRS due to the version differences between SQL Managed Instance and latest in-market SQL Server version.
|
Steps to execute
Copy backups from SQL Server to Azure Blob storage
The following two approaches can be utilized to copy backups to the blob storage in migrating databases to Managed Instance using LRS:
Create Azure Blob container and SAS authentication token
Azure Blob storage is used as an intermediary storage for backup files between SQL Server and SQL Managed Instance. Follow these steps to create Azure Blob storage container:
- Create a storage account
- Crete a blob container inside the storage account
Once a blob container has been created, generate SAS authentication token with Read and List permissions only following these steps:
- Access storage account using Azure portal
- Navigate to Storage Explorer
- Expand Blob Containers
- Right click on the blob container
- Select Get Shared Access Signature
- Select the token expiry timeframe. Ensure the token is valid for duration of your migration.
- Ensure Read and List only permissions are selected
- Click create
- Copy-paste the token starting with “?sv=” in the URI
Important: Permissions for the SAS token for Azure Blob storage need to be Read and List only. In case of any other permissions granted for the SAS authentication token, starting LRS service will fail. This security requirements is by design.
|
Log in to Azure and select subscription
Use the following PowerShell cmdlet to log in to Azure:
PowerShell
|
Login-AzAccount
|
Select the appropriate subscription where your SQL Managed Instance resides using the following PowerShell cmdlet:
PowerShell
|
Select-AzSubscription -SubscriptionId <subscription ID>
|
Start the migration
The migration is started by starting the LRS service. The service can be started in autocomplete, or continuous mode. When started in autocomplete mode, the migration will complete automatically when the last backup file specified has been restored. This option requires the start command to specify the filename of the last backup file. When LRS is started in continuous mode, the service will continuously restore any new backup files added, and the migration will complete on the manual cutover only.
Start LRS in autocomplete mode
To start LRS service in autocomplete mode, use the following PowerShell, or CLI commands. Specify the last backup file name with -LastBackupName parameter. Upon restoring the last backup file name specified, the service will automatically initiate a cutover.
Start LRS in autocomplete mode – PowerShell example:
PowerShell
|
Start-AzSqlInstanceDatabaseLogReplay -ResourceGroupName “ResourceGroup01” `
-InstanceName “ManagedInstance01” `
-Name “ManagedDatabaseName” `
-Collation “SQL_Latin1_General_CP1_CI_AS” `
-StorageContainerUri “https://test.blob.core.windows.net/testing” `
-StorageContainerSasToken “sv=2019-02-02&ss=b&srt=sco&sp=rl&se=2023-12-02T00:09:14Z&st=2019-11-25T16:09:14Z&spr=https&sig=92kAe4QYmXaht%2Fgjocqwerqwer41s%3D” `
-AutoComplete `
-LastBackupName “last_backup.bak”
|
Start LRS in autocomplete mode – CLI example:
CLI
|
az sql midb log-replay start -g mygroup –mi myinstance -n mymanageddb -a –last-bn “backup.bak”
–storage-uri “https://test.blob.core.windows.net/testing”
–storage-sas “sv=2019-02-02&ss=b&srt=sco&sp=rl&se=2023-12-02T00:09:14Z&st=2019-11-25T16:09:14Z&spr=https&sig=92kAe4QYmXaht%2Fgjocqwerqwer41s%3D”
|
Start LRS in continuous mode
Start LRS in continuous mode – PowerShell example:
PowerShell
|
Start-AzSqlInstanceDatabaseLogReplay -ResourceGroupName “ResourceGroup01” `
-InstanceName “ManagedInstance01” `
-Name “ManagedDatabaseName” `
-Collation “SQL_Latin1_General_CP1_CI_AS” `
-StorageContainerUri “https://test.blob.core.windows.net/testing” `
-StorageContainerSasToken “sv=2019-02-02&ss=b&srt=sco&sp=rl&se=2023-12-02T00:09:14Z&st=2019-11-25T16:09:14Z&spr=https&sig=92kAe4QYmXaht%2Fgjocqwerqwer41s%3D”
|
Start LRS in continuous mode – CLI example:
CLI
|
az sql midb log-replay start -g mygroup –mi myinstance -n mymanageddb
–storage-uri “https://test.blob.core.windows.net/testing”
–storage-sas “sv=2019-02-02&ss=b&srt=sco&sp=rl&se=2023-12-02T00:09:14Z&st=2019-11-25T16:09:14Z&spr=https&sig=92kAe4QYmXaht%2Fgjocqwerqwer41s%3D”
|
Important: Once LRS has been started, any system managed software patches will be halted for the next 47 hours. Upon passing of this window, the next automated software patch will automatically stop the ongoing LRS. In such case, migration cannot be resumed and it needs to be restarted from scratch.
|
Monitor the migration progress
To monitor the migration operation progress, use the following PowerShell command:
PowerShell
|
Get-AzSqlInstanceDatabaseLogReplay -ResourceGroupName “ResourceGroup01” `
-InstanceName “ManagedInstance01” `
-Name “ManagedDatabaseName”
|
To monitor the migration operation progress, use the following CLI command:
CLI
|
az sql midb log-replay show -g mygroup –mi myinstance -n mymanageddb
|
Stop the migration
In case you need to stop the migration, use the following cmdlets. Stopping the migration will delete the restoring database on SQL managed instance due to which it will not be possible to resume the migration.
To stopabort the migration process, use the following PowerShell command:
PowerShell
|
Stop-AzSqlInstanceDatabaseLogReplay -ResourceGroupName “ResourceGroup01” `
-InstanceName “ManagedInstance01” `
-Name “ManagedDatabaseName”
|
To stopabort the migration process, use the following CLI command:
CLI
|
az sql midb log-replay stop -g mygroup –mi myinstance -n mymanageddb
|
Complete the migration (continuous mode)
In case LRS is started in continuous mode, once you have ensured that all backups have been restored, initiating the cutover will complete the migration. Upon cutover completion, database will be migrated and ready for read and write access.
To complete the migration process in LRS continuous mode, use the following PowerShell command:
PowerShell
|
Complete-AzSqlInstanceDatabaseLogReplay -ResourceGroupName “ResourceGroup01” `
-InstanceName “ManagedInstance01” `
-Name “ManagedDatabaseName” `
-LastBackupName “last_backup.bak”
|
To complete the migration process in LRS continuous mode, use the following CLI command:
CLI
|
az sql midb log-replay complete -g mygroup –mi myinstance -n mymanageddb –last-backup-name “backup.bak”
|
Disclaimer
Please note that products and options presented in this article are subject to change. This article reflects the user-initiated manual failover option available for Azure SQL Managed Instance in February, 2021.
Closing remarks
If you find this article useful, please like it on this page and share through social media.
To share this article, you can use the Share button below, or this short link: https://aka.ms/mi-logshipping.

Recent Comments