by Contributed | Feb 18, 2021 | Dynamics 365, Microsoft 365, Technology
This article is contributed. See the original author and article here.
Effectively managing fraud requires a multi-tiered strategy. It is essential to adopt a fraud prevention strategy with a broad view, encompassing multiple user interaction events, and phased decision-making points.
A user interacts in many ways on a merchant’s website, such as searching for products, updating account info, writing a review, adding or removing items from their cart, or signing up for events or newsletters. Each of these interactions provides tell-tale signs of their behavior and intent. Analyzing all of these interactions cohesively helps to identify fraud more accurately and provides a seamless experience to legitimate customers.
The classic approach to fraud is to look for specific events to identify certain types of fraud, like purchases with a stolen credit card or account takeovers. Most tools support this approach, to assess specific generic events such as purchases, sign-up, sign-in, or coupon redemption. Evolving beyond this classic approach requires tools that can help you tailor a fraud prevention strategy to best suit the unique interactions between your business and your customers.
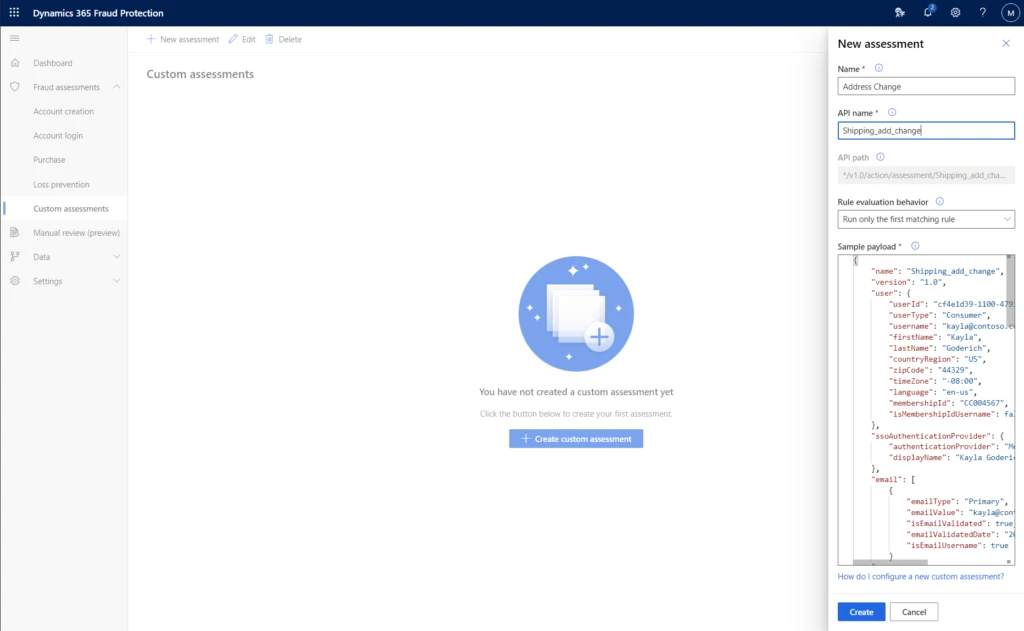
Custom assessments are available as part of Dynamics 365 Fraud Protection and enable you to tailor a fraud prevention strategy that best suits your business and customer needs.
Analyzing the customer journey in your business is the first step in understanding where to deploy custom assessments.
Identify key touchpoints of a user journey
Begin by identifying user actions that could indicate a high risk of fraud or help you track unusual behavior later in the user’s journey. These actions can vary by the type of business you run. For example, a user updates the physical address on their account. If a restaurant offers promotions for users from certain locations, an address change may indicate a risk of fraud or abuse of the promotion and you may choose to act immediately. In contrast, if you are an e-commerce merchant offering gifts and accessories, this event alone may not indicate risk, but subsequent actions may. In this case, you can add an additional check if the next action was updating the phone number, as it may indicate the risk of a compromised account.
Create custom assessments for these key touchpoints
After you have listed the touchpoints that are key indicators, you can add assessments to these events. Custom assessments have the flexibility to define every part of the assessment to match your business-specific scenario — including the API name, event name, and the payload. This helps you to easily manage all the assessments.
Using the rules engine to determine actions
After your custom assessments are created, you can use the rules engine to configure what actions you want to take on them. From the earlier example for a restaurant, you can create rules for the address change event to check the distance between both addresses or the history of orders from that user and return a reject decision to block the user. Or if you are the e-commerce merchant, return this event to a watch list for action later.
You can view the performance of your custom assessments, including the total volume of events and what rules were triggered if any, in the scorecard tab of the assessment.
Next steps
To learn more about custom assessments, check out the documentation. To see for yourself how Dynamics 365 Fraud Protection can help your business, get started today with a free trial.
The post Build a tailored fraud prevention strategy with custom assessments appeared first on Microsoft Dynamics 365 Blog.
Brought to you by Dr. Ware, Microsoft Office 365 Silver Partner, Charleston SC.
by Contributed | Feb 18, 2021 | Technology
This article is contributed. See the original author and article here.
Introduction
This is Andrew Coughlin and I am a Customer Engineer at Microsoft focusing on Azure IaaS. In this blog I will focus on how to upload a custom linux Hyper-V image for generation 2 virtual machines in Azure. Support for generation 2 virtual machines in Azure was released on November 4, 2019, these systems use UEFI boot, SCSI, supported on VMs that support premium storage compared to generation 1 which use PCAT boot, IDE and are available on all VM sizes. Generation 2 VMs provide for OS disk size greater than 2TB in size and build larger VMs, up to 12TBs. To get additional information about generation 2 virtual machines in Azure please visit this post.
If you have ever uploaded a custom image in Azure in the past you will notice the process is very similar. Are you looking for the process for Windows VMs, head over to my post here that covers this same process but for Windows VMs.
Prerequisites
- Review the Support for generation 2 VMs on Azure.
- Install Azure PowerShell as documented here.
- Create Hyper-V Gen 2 machine to be used as the image.
- Review Generic Linux image documentation here.
- Review the specific distribution preparation documentation:
- Debian is located here.
- Oracle Linux is located here.
- OpenBSD is located here.
- Redhat is located here.
- SUSE is located here.
- Ubuntu is located here.
- Convert VHDX to VHD as documented here.
- Download and Install azcopy as documented here.
- Sign in with Azure as documented here.
- Select Azure subscription to upload image as documented here.
Upload Hyper-V Image to Managed Disk
First you want to determine which resource group the image will reside in or if you will create a new resource group. As a reminder a resource group is a container that holds related solutions: virtual machines, storage accounts, disks virtual networks, etc. for your Azure solutions. A resource group can include all resources for your solutions or only those resources that you want to be managed together. For documentation on how to create a new resource group, this can be found on this page. In this example I’m going to use the resource group called “rg-images”.
First, we need to open an elevated PowerShell command prompt.

Next, we will set some variables as we will need these throughout the process, in this example. We are going to be creating this image in Central US, with the image name CentOS7-Image-V2, in the resource group called rg-images, with a disk image called CentOS7-Image-V2.
- $location = ‘Central US’
- $imageName = ‘Ubuntu1804-Image-V2’
- $rgName = ‘rg-images’
- $diskname = ‘Ubuntu1804-Image-V2’

Next, we want to create an empty managed disk, we will type the following commands:
$vhdSizeBytes = (Get-Item "<full File Path>").length
$diskconfig = New-AzDiskConfig -SkuName 'Standard_LRS' -OsType 'Linux' -UploadSizeInBytes $vhdSizeBytes -Location $location -CreateOption 'Upload'
New-AzDisk -ResourceGroupName $rgName  -DiskName $diskname -Disk $diskconfig

NOTE: You can replace the Standard_LRS, with Premium_LRS or StandardSSD_LRS. At the writing of this blog Ultra disks are currently not supported.
Next, we need to confirm the disk status is equal to “ReadyToUpload”, we will type the following:
$disk = Get-AzDisk -ResourceGroupName $rgName -DiskName $diskname
$disk.DiskState

NOTE: The disk status must be set to “ReadyToUpload”, if it is not you need to check what was typed in the “New-AzDiskConfig” command.
Now we want to create the writable shared access signature (SAS) for the managed disk we just created. Then we will get the disk status and make sure it is equal to “ActiveUpload”, to do this we will type the following:
$diskSas = Grant-AzDiskAccess -ResourceGroupName $rgName -DiskName $diskname -DurationInSecond 86400 -Access 'Write'
$disk = Get-AzDisk -ResourceGroupName $rgName -DiskName $diskname
$disk.DiskState

Now we are ready to upload our disk to Azure, to do this we will type the following and wait for the process to complete:
cd <location of Azcopy>
.azcopy.exe copy "<location of vhd>" $diskSas.AccessSAS --blob-type PageBlob

When the upload is completed you will get the following results:

After the upload has completed, we will revoke access from the disk as we no longer need the shared access signature we created above, we will type the following:
Revoke-AzDiskAccess -ResourceGroupName $rgName -DiskName $diskname

Create Image from Managed Disk
We now have the managed disk uploaded to the cloud. The next step is to create an image from that managed disk. When the image is created, we want to make sure to specify this image will be a V2 image. To do this we will type the following:
$imageConfig = New-AzImageConfig -Location $location -HypervGeneration V2
$imageConfig = Set-AzImageOsDisk -Image $imageConfig -OsState Generalized -OsType Linux -ManagedDiskId $disk.Id
$image = New-AzImage -ImageName $imageName -ResourceGroupName $rgName -Image $imageConfig

Verify in the portal that our image is now created from our managed disk. We can now start provisioning generation 2 virtual machines with this image.

Conclusion
There you have it; we have just uploaded a custom linux image and now we can use that image to deploy generation 2 virtual machines in your Azure environment. Thank you for taking the time to read this blog, I hope this helps you and see you next time.
Disclaimer
The sample scripts are not supported under any Microsoft standard support program or service. The sample scripts are provided AS IS without warranty of any kind. Microsoft further disclaims all implied warranties including, without limitation, any implied warranties of merchantability or of fitness for a particular purpose. The entire risk arising out of the use or performance of the sample scripts and documentation remains with you. In no event shall Microsoft, its authors, or anyone else involved in the creation, production, or delivery of the scripts be liable for any damages whatsoever (including, without limitation, damages for loss of business profits, business interruption, loss of business information, or other pecuniary loss) arising out of the use of or inability to use the sample scripts or documentation, even if Microsoft has been advised of the possibility of such damages.
by Contributed | Feb 18, 2021 | Technology
This article is contributed. See the original author and article here.
A team of Cloud Advocates have created a series of videos answering questions they’ve received from customers and member of the IT community covering off topics from Containers to Zero Trust Architectures.
Donovan Brown, Dean Byren, Jay Gordon, Sarah Lean, Steven Murawski, Thomas Maurer, Zachary Deptawa spent some time gathering and collating questions from their interactions with customers and the community and answered them for everyone’s benefit.
What I love about this video series is that the answers are in bitesize chunks, they get right to the heart of the answer. They are like quick how-to guides, or tutorials. No mess, no fuss.
There are over 40 videos within the video playlist on our YouTube channel.
https://youtube.com/watch?v=videoseries&list=PLjt5SKzX1iI_uqRk5ADrooAPG5FWqHes8
As mentioned the videos cover off a variety of topics. Be sure to check it out and see if any of the questions could help you and your organisation with your cloud journey. And if you have a burning question you’d love answered please do reach out to us and we can try and help!
by Contributed | Feb 18, 2021 | Technology
This article is contributed. See the original author and article here.
We are pleased to announce the availability of Flexible Deployment for Project for the web. As a part of the Microsoft Dataverse (formerly known as Common Data Service (CDS)) platform, Flexible Deployment enables you to create different environments based on organizational, business unit, or teams needs.
In addition to the existing Default environment, you now have more choices to spin up different kinds of Dataverse environments for the Project for the web: Production and Sandbox. With Production, your organization can create specific environments such as limiting access to data for the HR department, deploying different customizations for different sets of users, or staying compliant on data residency requirements if your users and tenant are not located in the same country. The Sandbox environment allows for Application Lifecycle Management to develop and test customized solutions for Project before rolling out to production.
You can use Flexible Deployment with Project Plan 1, Project Plan 3, and Project Plan 5. Each subscription comes with a certain amount of storage.
The choice of deployment gives you the flexibility and extensibility to stay on top of business needs while reducing complexity for your IT group. Please refer to the links below to find out more.
- Learn how to get started in Deploying Project.
- Help end users learn how to get started with the Project Power App.
- Learn about the new Project for the Web Security Roles.
- If you have additional questions, check out Frequently Asked Questions.
by Contributed | Feb 17, 2021 | Technology
This article is contributed. See the original author and article here.
Registration for Microsoft Ignite in March is open, but one event can’t contain all the activities we have organized to help you build your Microsoft Endpoint Manager skills and engage directly with the engineers creating the latest capabilities! In this post, you’ll find details on all these activities, links to save the date, and an opportunity to guide the topics of our upcoming Ask Our Experts sessions. Let’s jump in!
Endpoint Management Acceleration Day: March 9, 2021
You don’t want to miss this technical readiness event that will provide you with the information you need to accelerate your deployment and utilization of the latest endpoint management capabilities in this new world of remote and on-premises work using Microsoft Endpoint Manager.
Endpoint Management Acceleration Day will offer eight (yes, eight!) hours of technical training delivered across three time zones direct from our technical program managers. There will be two core tracks: mobile device management and Windows device management. Attend the four topics in any region and in any order, whatever suits your location and personal schedule best. Spend time with our Microsoft Endpoint Manager product group to learn and have your endpoint management questions answered.
Mobile device management
Hour 1
|
How to operate Microsoft Intune in the real world
|
Hour 2
|
How to secure your users with Microsoft Defender for Endpoint Mobile Threat Defense on iOS and Android
|
Hour 3
|
Deploying shared and frontline worker devices with Microsoft Endpoint Manager
|
Hour 4
|
Automate common Microsoft Endpoint Manager activities – a primer (Microsoft Graph, PowerShell and Power Platform)
|
Select the time that works best for you to save the date:
- Option 1 – 10:00 AEST | 00:00 UTC | 16:00 PT
- Option 2 – 18:30 AEST | 08:30 UTC | 00:30 PT
- Option 3 – 03:30 AEST | 17:30 UTC | 09:30 PT
Windows device management
Hour 1
|
Cloud attach your organization
|
Hour 2
|
Policy management on a cloudy day
|
Hour 3
|
Leveraging the cloud to update and secure your devices with Microsoft Endpoint Manager
|
Hour 4
|
Where are my logs? Troubleshooting a Windows MDM device
|
Select the time that works best for you to save the date:
- Option 1 – 14:30 AEST | 04:30 UTC | 20:30 PT
- Option 2 – 23:00 AEST | 13:00 UTC | 05:00 PT
- Option 3 – 08:00 AEST | 22:00 UTC | 14:00 PT
Microsoft Endpoint Manager 1:1 consultations: March 15-19, 2021
Want a one-on-one discussion with an expert? Our Microsoft Endpoint Manager product managers and engineers will be covering shifts around the clock around the world—just to talk with you! Bookmark this post for details about signups. Space is limited, so it will be first come, first served. Even better, join our Microsoft Endpoint Management Insiders community to get first choice of available times—just one of the perks of being a MEM Insider!
- Android device management
- iOS/iPad device management
- Intune App Protection for Mobile Apps
- Windows device management
- Endpoint Analytics
- Endpoint Security
- Windows Autopilot
- Endpoint Manager Configuration Manager
- Managing devices in education
- Intune support case & troubleshooting follow-up (Stuck on troubleshooting or have a tricky support case? Bring your details to our experts and see if they can unstick you!)
Microsoft Endpoint Manager Ask Our Experts
You can also join us for an Ask Our Experts series on Tech Community. We’re still working on dates and topics so answer our survey and tell us what you think! How many Ask Our Experts events do you want? Should we focus on a few key topics, or give you everything we can pack into three weeks? We’ll post dates (including calendar invitations) and topics in March, but here’s what you need to know about this opportunity:
- March 10, 2021 | 8:00 a.m. PT – We’re kicking off Ask Our Experts with the Configuration Manager team, led by David James, Jason Githens, and the program managers and engineers you know and love.
- March 10-25, 2021 – This year we are combining Ask Our Experts with our text-based Ask Me Anything (AMA) events on Tech Community, giving you a chance to post questions up to 24-hours in advance, and then engage with our experts in a Teams Live Event, both on camera and in text chat. Ask them ANYTHING about their subject areas! We’ll also post wrap-ups and recordings of the Teams Live Events on Tech Community in case you can’t be there live.
Stay tuned!
Microsoft Ignite is an exciting, but brief, moment! I’ll be posting a guide to all our Microsoft Endpoint Manager activities soon, but I invite you to join us for any and all of the activities I’ve outlined above. We also have some great resources on Microsoft Learn to help you keep developing your #MEMPowered skills and manage your devices more efficiently and effectively than ever.

Recent Comments