by Contributed | Feb 26, 2021 | Technology
This article is contributed. See the original author and article here.
In this series, Microsoft identity team members share their reasons for loving passwordless authentication (and why you should too!). Today, Alex Weinert continues this series.
In previous blogs in this series, we shared how passwords lead to breaches, lost productivity and support calls. I also shared how biometrics local to each device provide a secure and convenient way to authenticate with a simple gesture from the user.
Your identity companion, the Microsoft Authenticator app, is a great example. It allows you to sign into your Microsoft identities (personal, work or school) by responding to a notification with a quick scan of your face, swipe of your finger or entry of your phone passcode. By combining your device and the biometric, it is not just simpler than a password, but inherently multifactor.
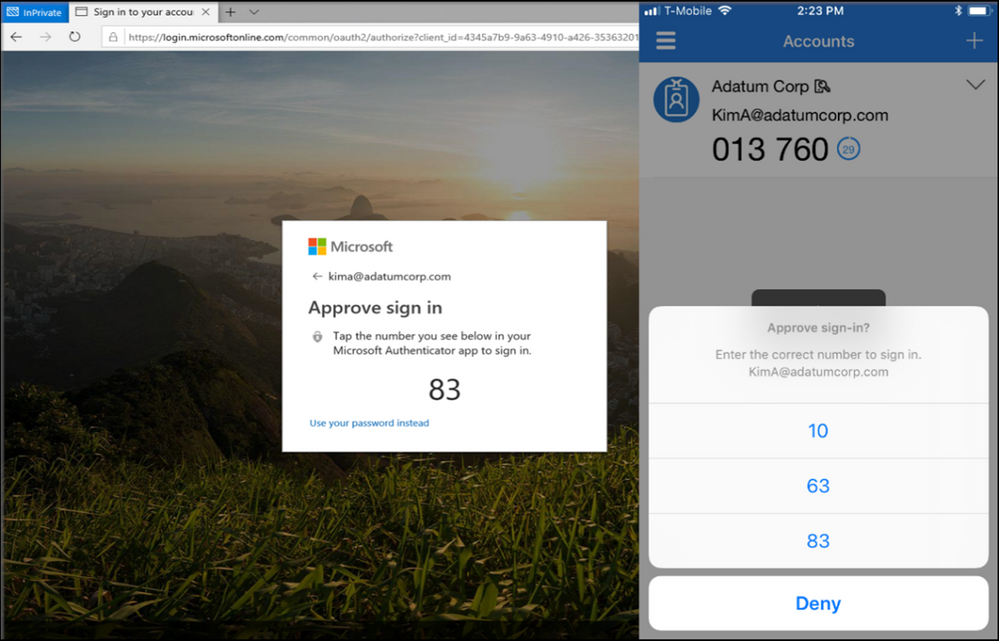
Most of us keep our mobile phone in easy grabbing distance, no matter what we’re doing. Using Authenticator on your mobile phone, you can easily approve sign-ins on any device and into any app. There is no password to type, SMS code to round-trip, or robocall to answer! Moreover, security measures such as matching a number at the time of approving a sign-in help prevent accidental approval, and the app can provide context and security notifications much richer than anything possible in text messages.
Figure 1: Number matching experience
If you have a smart watch, you don’t even have to take your phone out of while logging into your Microsoft account (Every time I approve on my watch I feel like I am an extra in a cool sci-fi series :smiling_face_with_smiling_eyes: – when my kid saw me do it, he finally thought Authentication was cool!)

For enterprises, when most of your workforce is remote, Microsoft Authenticator can be one of the easiest and fastest mechanisms to rollout. It is also the most cost effective. Users can download the app on their phones and setup an account in seconds. There is no additional hardware to carry and you can approve sign-ins in the world. Passwordless authentication with Microsoft Authenticator also meets NIST 800-63 Authentication Assurance Level 2.
For end-users, the authentication experience matters the most. Microsoft Authenticator is one of the most highly rated authenticator apps in the world. As of February 2021, it tops its peers with a rating of 4.8 stars on Apple App store and 4.7 stars on Google Play store. Authenticator provides users great security with convenience and we are constantly innovating it with new capabilities.
In summary, Microsoft Authenticator may be the easiest and most affordable way to go passwordless for you and your users. There is no additional hardware to carry, passwords to remember or type, SMS to copy or phone calls to attend while signing in. You tap a notification, provide your biometrics and you are logged into any device you want. All this with secure multifactor authentication.
Stay tuned for more in the series! We’ll share how passwordless credentials can protect you from top attacks and we’ll dive into setup and recovery of passwordless credentials.
Check out the other posts in this series:
Learn more about Microsoft identity:
Share product suggestions on the Azure Feedback Forum

by Contributed | Feb 26, 2021 | Technology
This article is contributed. See the original author and article here.
Now coming to you twice a year as a digital event, the Microsoft Ignite Conference takes place March 2 – 4, 2021. Join the Surface team and connect with Microsoft experts and technology professionals from around the globe.
Register now – it’s free to attend!
Ignite represents an opportunity for attendees to discover the latest developments in productivity, find innovative ways to build solutions, migrate and manage your infrastructure, all from the comforts of your own home.
Check Out Surface at Ignite
Content & Sessions
Below are the list of sessions from Windows + Devices where you can learn more about what’s coming from Microsoft Surface. Be sure to check out the Ignite session catalog to find a time that works best with your schedule.
Session Type
|
Session Title and Abstract
|
Microsoft Speakers
|
Interstitial
|
The heartbeat of modern work: A Windows fireside chat with Panos Panay & Roanne Sones
From the chip to the cloud, Windows is the heartbeat of modern work. Join Microsoft Chief Product Officer Panos Panay and Azure Edge + Platform CVP Roanne Sones for a quick, lively dialogue about the difference makers and the recent Windows innovations for commercial customers and the IT community. Start your Windows journey at Microsoft Ignite with us and let’s talk about the features and innovations coming to life across Microsoft experiences and services!
|
Panos Panay & Roanne Sones
|
Feature Session
|
Engineer to engineer: Let’s talk Windows!
Your feedback inspires our innovations. Join Windows CVP Aidan Marcuss and pivotal members of the Windows, security, and endpoint management engineering teams to discuss the features, capabilities, and shiny new things that will help prepare commercial organizations for the future and ensure that IT receives the hero’s welcome it deserves.
|
Aidan Marcuss, David Weston, Ramya Chitrakar, Gabe Frost
|
On Demand
|
Microsoft Surface | Delivering the Best in Modern End Point Security from Microsoft
In today’s hybrid workplace security is more important than ever. The Surface engineering team has been using a unified approach to firmware protection and device security since 2015 through complete end-to-end ownership of hardware design, firmware development, and device updates and management. Hear from subject matter experts across Microsoft, how Surface and Microsoft 365 give people the freedom to work their way from anywhere, protected by Microsoft security and modern manageability.
|
Sonia Dara, Frank Buchholz, Mary Beth Anderson, Katharine Holdsworth
|
Following the event, these sessions recordings will also be copied to the Surface YouTube channel.
Connect with Experts
In addition to great session content, Ignite also affords a number of opportunities for attendees to connect with subject matter experts. In partnership with the Windows & Devices team, Surface experts will be participating in several Ask the Experts and Tech Community sessions below.
*Note dates and times subject to change. Be sure to check the Ignite session catalog and tech community pages for latest updates.
**Office hours are text-based; there is no audio or virtual meeting component. To post a question, you just need to be a member of the Tech Community. If you haven’t already signed up, click Sign In in the top right corner of the Tech Community page to join the Tech Community today.
Get Registered
Don’t miss the digital-only Microsoft Ignite! There is no cost to attend and registration is now open for all attendees. Sign up today for full access to all the information and innovative content packed into our new two-day agenda.
Wherever you are, we’re coming to you! So get ready to connect with Microsoft experts, technology professionals and customers from around the world during this exciting digital event.
Event Details
Where: Digital Event
When: March 2 – 4, 2021
Why: Get a look on Microsoft latest technology
Link to Register: Microsoft Ignite Registration Login
Follow us on Social
During Ignite we will be sharing out the great content we are landing across sessions both in our joint Windows and Devices sessions as well as from Surface around the topic of security. Watch for Microsoft Ignite posts on Surface LinkedIn and Surface Twitter leading up to and throughout the global, digital event.
Be sure to amplify Surface news and Surface session details using the combination of these hashtags: #SurfaceForBusiness and #MSIgnite.

by Contributed | Feb 26, 2021 | Technology
This article is contributed. See the original author and article here.
By Luke Ramsdale – Service Engineer | Microsoft Endpoint Manager – Intune
This is the second in our five–part series about deploying BitLocker with Microsoft Endpoint Manager – Microsoft Intune. Catch up by reading the first post in this series: Enabling BitLocker with Microsoft Endpoint Manager – Microsoft Intune – Microsoft Tech Community. In this post, we’ll look at troubleshooting encryption settings for BitLocker using the Microsoft Intune Encryption report.
BitLocker encryption methods
By default, the BitLocker setup wizard prompts users to enable encryption. You can also configure a BitLocker policy that silently enables BitLocker on a device.
Note
Automatic encryption is not the same thing as silent encryption. Automatic encryption is performed during Out-Of-Box Experience (OOBE) mode on modern standby or on Hardware Security Test Interface (HSTI)-compliant devices. In silent encryption, Intune suppresses the user interaction through BitLocker configuration service provider (CSP) settings. Each method has different prerequisites.
Prerequisites for BitLocker silent encryption
- A Trusted Platform Module (TPM) chip (version 1.2 or 2.0) that must be unlocked.
- Windows Recovery Environment (WinRE) must be enabled.
- The hard disk must be partitioned into an operating system drive formatted with NTFS and a system drive of at least 350 MB must be formatted as FAT32 for Unified Extensible Firmware Interface (UEFI) and NTFS for BIOS.
- UEFI BIOS is required for TPM version 2.0 devices. (Secure boot is not required but will provide more security.)
- The Intune enrolled device is connected to Microsoft Azure hybrid services or Azure Active Directory (Azure AD).
Prerequisites for user-enabled encryption
- The hard disk must be partitioned into an operating system drive formatted with NTFS and a system drive of at least 350 MB formatted as FAT32 for UEFI and NTFS for BIOS.
- Intune enrolled device through hybrid Azure AD join, Azure AD registration, or Azure AD join.
Note
A TPM chip is not required but is highly recommended for increased security.
Identifying device status
Intune provides a built-in encryption report that presents details about the encryption status of devices across all managed devices. It is a very useful tool that provides an overview of the encryption status. You can use the report to identify and isolate BitLocker encryption failures, the TPM status, and encryption status of Windows devices.
Troubleshooting encryption failures
BitLocker encryption failures on Intune enrolled Windows 10 devices can fall into one of the following categories:
- The device hardware or software does not meet the prerequisites for enabling BitLocker.
- The Intune BitLocker policy is misconfigured, causing Group Policy Object (GPO) conflicts.
- The device is already encrypted, and the encryption method doesn’t match policy settings.
To identify the category a failed device encryption falls into, navigate to the Microsoft Endpoint Manager admin center and select Devices > Monitor > Encryption report.
The report will show a list of enrolled devices. You will be able to answer questions about their encryption status such as:
- Is the device encrypted?
- Does it have a TPM chip?
- Is the device ready for encryption?
Encryption report example
Note
If a Windows 10 device displays a Not ready status, it might still support encryption. For a Ready status, the Windows 10 device must have TPM activated. TPM devices aren’t required to support encryption but are highly recommended for increased security.
The above example shows that a device with TPM version 1.2 has been successfully encrypted. Additionally, you can see two devices not ready for encryption and will not be able to be encrypted silently and that one TPM 2.0 device is ready for encryption but not encrypted.
Common failure scenarios
Next, let’s look at a few common failure scenarios. Each scenario details the encryption report status.
Scenario 1 – Device is not ready for encryption and not encrypted
When you click on a device that is not encrypted, Intune displays a summary of its status. In the example below, there are multiple profiles targeting the device: an endpoint protection policy, a Mac operating system policy (which is not applicable to this device), and a Microsoft Defender Advanced Threat Protection (ATP) baseline.
 Scenario 1 – Device is not ready for encryption and not encrypted
Encryption status explained:
The messages under Status details are codes returned by the BitLocker CSP’s status node from the device. The encryption status is in an error state because the OS volume is not encrypted. Additionally, the BitLocker policy has requirements for a TPM that are not satisfied by the device.
The messages mean that the device is not encrypted because it doesn’t have a TPM present and the policy requires one.
Scenario 2 – Device is ready but not encrypted.
This example shows that the TPM 2.0 device is not encrypted.
 Scenario 2 – Device is ready but not encrypted.
Encryption status explained:
This device has a BitLocker policy that is configured for user interaction rather than silent encryption. The user has not started or completed the encryption process (the user receives a notification message), so the drive remains unencrypted.
Scenario 3 – Device is not ready and will not encrypt silently.
If an encryption policy is configured to suppress user interaction and encrypt silently and the encryption report Encryption readiness state is Not applicable or Not ready, it is likely the TPM is not ready for BitLocker.
 Scenario 3 – Device is not ready and will not encrypt silently.
Clicking on the device reveals the following reason:
 Scenario 3 – Device encryption status
Encryption status explained:
If the TPM is not ready on the device, it could be because it is disabled in the firmware or needs to be cleared or reset. Running the TPM management console (TPM.msc) from the command line on the affected device will help you understand and resolve the TPM state.
Scenario 4 – The device is ready but not encrypted.
There are several reasons that a device targeted with silent encryption is ready and not encrypted.
 Scenario 4 – The device is ready but not encrypted.
Encryption status explained:
One explanation is that WinRE is not enabled on the device, which is a prerequisite. You can validate the status of WinRE on the device using the reagent.exe/info command as an administrator:
 Command Prompt example of the reagent.exe/info command
If WinRE is disabled, run the reagenc.exe/info command as administrator.
 Enabling WinRE in Command Prompt
The Status details page will display the following information if WinRE is not configured correctly:
The user logged into the device does not have admin rights.
Another reason could be administrative rights. If your BitLocker policy is targeting a user who does not have administrative rights and Allow standard users to enable encryption during Autopilot is set to not configured, you will see the following in the encryption status:
 Device encryption status – User that does not have admin rights.
Encryption status explained:
Switching Allow standard users to enable encryption during Autopilot to Yes will resolve this issue for Azure AD joined devices.
Scenario 4 – The device is in an error state but encrypted.
In this common scenario, if the Intune policy is configured for XTS-AES 128-bit encryption and the device it is targeting is encrypted is using XTS-AES 256-bit encryption (or the reverse), you will receive the error shown below.
 Scenario 4 – The device is in an error state but encrypted.
Encryption status explained:
This happens when a device that has already been encrypted using another method—either manually by the user, with Microsoft BitLocker Administration and Monitoring (MBAM), or by the Microsoft Endpoint Configuration Manager before enrollment.
To rectify this, decrypt the device manually or by using Windows PowerShell. Then let the Intune BitLocker encrypt the device again the next time the policy reaches it.
Scenario 5 – The device is encrypted but the profile state is in error.
Occasionally a device appears encrypted but has an error state in the summary.
 Scenario 5 – The device is encrypted but the profile state is in error.
Encryption status explained:
This usually occurs when the device has been encrypted by another means (possibly manually). The settings match the current policy, but Intune has not initiated the encryption.
Conclusion
The encryption report is a useful starting point for troubleshooting encryption failures. In some cases, you will need to investigate the device further to understand the reasons for failure.
To take full advantage of this troubleshooting method and the error details available in the encryption report, you will need to configure a BitLocker policy. If you are currently using a device configuration policy, consider migrating the policy. To perform either task, navigate to the Microsoft Endpoint Manager admin center and select Endpoint security > Disk encryption.
More info and feedback
For further resources on this subject, please see the links below.
Encrypt Windows 10 devices with BitLocker in Intune
Intune endpoint security disk encryption policy settings
Microsoft Defender for Endpoint
BitLocker cannot encrypt a drive known TPM issues
Troubleshooting tips for BitLocker policies in Microsoft Intune
The next post will cover troubleshooting from the client side. Stay tuned! Here’s the series:
Let us know if you have any additional questions by replying to this post or reaching out to @IntuneSuppTeam on Twitter.

by Contributed | Feb 26, 2021 | Technology
This article is contributed. See the original author and article here.
Welcome to the monthly Healthcare and Life Sciences blog recap, February edition! Check out the highlights below:
Webcasts Recorded:
- Voices of #HealthcareCloud Vaccine Distribution: Want to learn more about how to leverage Microsoft technology to vaccinate your employees and patients? Senior Technical Specialist Shelly Avery and Customer Success Manager Josh Thompson demonstrate how you can manage employee vaccinations using Microsoft technology. Andor Health’s Sirini Surendranath also provides a great partner solution that leverages Microsoft technology to vaccinate patients and the general population. Click here to watch the webinar.
- Microsoft Teams 101 – Hospital Case Study: Want to learn practical tips on how to use Microsoft Teams effectively at your hospital? Mary Buonanno, Healthcare Chief Technology Officer at The Ergonomic Group, and Margaret Campbell, Director at HealthNET Consulting, share their real-world experience with Microsoft Teams during COVID-19 in a multi-facility acute care hospital environment. Check it out here.
- Azure API for FHIR – Role of FHIR in Modern Health Solutions: Join Senior Director Doug Seven as he explains what FHIR is and why it is the future of health data systems in this new webinar series. Click here to watch.
- Mid-Day Café Webcast:
Upcoming Webcast:
- Mid-Day Cafe – Engaging Employees Using Communities and Microsoft Yammer: Join us March 1st at 12 noon EST for Mid-Day Café where Microsoft’s Principal Program Manager Dan Holme will be talking all things Yammer and show how to engage employees using communities. Click here for more information.
Updated Solutions:
- MS Teams “Adoption App” Updates: The Adoption App is a great way to boost your technology adoption effort and now has even more features with its most recent update including a faster Bot and Government Community Cloud friendly status. Want to learn how to implement the app? Click here to learn more.
- Updated End-to-end Azure Synapse and Power BI CMS Medicare Solution: Microsoft Senior Technical Specialist Greg Beaumont and Kunal Jain have released new updates to the solution including several Power BI AI visuals and improved design of the Dimensions in Synapse. You can access the updates and the Github site here.
COVID 19:
- Accelerate and Scale Your Vaccine Patient Outreach: Customer Success Manager Camille Jetzer demonstrates how healthcare organizations are leveraging Microsoft Dynamics 365 Marketing to scale patient outreach for vaccine eligibility and scheduling. Interested in the solution? Click here to learn more.
- Scheduling Integration with the Azure Health Bot: Interested in leveraging the Azure Health Bot to schedule patient vaccination? Gregory Lisiak and Roshan Budathoki explain how you can integrate Bookings or Shifts into the Azure Health Bot to meet your needs. Check it out here.
Security & Compliance:
- Leveraging M365 Compliance to Reduce Risk Across Your Organization: Interested in learning how M365 Compliance can be leveraged in Healthcare? John “JD” DeNoy, Microsoft Modern Workplace Specialist, outlines how healthcare organizations can leverage the M365 Compliance capabilities and includes a link to a workshop hosted by Lighthouse. Read the post here.
January’s HLS Blog Contributors:

Shelly Avery, Senior Technical Specialist, Microsoft Teams

Michael Gannotti, Principal Technical Specialist, Microsoft Teams

Claire Bonaci, Director, Business Development, Health and Life Sciences

Greg Beaumont, Senior Technical Specialist, Intelligence

Linishya Vaz, Product Marketing Manager, Health and Life Sciences

Gregory Lisiak, Microsoft Health & Life Sciences Digital Advisor

Sam Brown, Technical Specialist, Microsoft Teams
Thanks for reading and let us know how else our Microsoft team can help!

Erin Spencer, Technical Specialist, Microsoft Teams
by Contributed | Feb 26, 2021 | Technology
This article is contributed. See the original author and article here.
Many of our customers use Azure DNS for name resolution when it comes to infrastructure they have in Azure. The setup with Azure DNS works like a charm and provides name resolution to Azure Infrastructure without doing any complex setup. One challenge you may have is that Azure DNS do not log DNS queries from your VM’s, which means you have no visibility into what endpoints their azure infrastructure is trying to connect to or the DNS name resolution queries being used.
In this blog, we will see how Azure Firewall can help our customers overcome this challenge and provide visibility not only to Azure DNS logging but also to control the traffic flows both east-west and to the internet for their Azure resources.
Azure Firewall recently added Custom DNS and DNS proxy capabilities which was a big ask from all of our customers and, these are the features which we will explore in this blog and how it can help you.
Azure DNS
Azure DNS provides name resolution and basic authoritative DNS capabilities of public DNS names. The Azure DNS IP address is 168.63.129.16. Azure DNS provides DNS name resolution for your Azure infrastructure if you do not have your own DNS server hosted. For example, when you setup a new VM in Azure, it can resolve the public names out of the box using Azure provided name resolution (Azure DNS).
Azure Firewall Custom DNS
By Default, Azure Firewall uses Azure DNS to ensure the service can reliably resolve internet based name resolution. Custom DNS allows you to configure Azure Firewall to use your own corporate DNS server or Azure DNS to resolve the DNS queries.
You may configure a single DNS server or multiple servers in Azure Firewall and Firewall Policy DNS settings. We will go through the setup in more detail later on in this blog.
Azure Firewall DNS Proxy
This feature enables Azure Firewall to act as a DNS forwarder for your Infrastructure. When DNS proxy is enabled, your clients can point to Azure Firewall to resolve the DNS queries and act as DNS servers for your infrastructure.
DNS Proxy logs all the queries coming from your infrastructure in Azure Firewall logs, and we will go through the logs in detail later on in this blog.
We hope the above gives you a good understanding of the components involved in the challenge we are trying to resolve. Let’s look at the solution now and see how Azure firewall Custom DNS and DNS proxy will help with getting visibility into Azure DNS logging.
Architecture
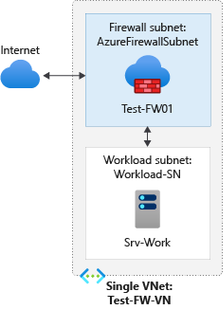
The problem we are trying to solve in this blog is even when UDR’s force all traffic to Firewall, DNS traffic goes straight to DNS which means you cannot log the DNS traffic or control the traffic flow going from your infrastructure to Azure DNS. With this architecture, you can centrally log all DNS traffic going to Azure DNS using Azure Firewall.
In this architecture/deployment we will use a hub and spoke model is recommended, where the firewall is in its own Virtual Network. For the purpose of the blog we will assume a simple architecture where both Workload VM and Azure Firewall is in the same Virtual network but deployed in two different subnets as represented in the below Diagram.
Azure Firewall Deployment
You can deploy azure firewall either from Azure Portal, ARM, REST or CLI. Here is the article which you can follow to setup the above configuration step by step using azure portal.
Tutorial: Deploy & configure Azure Firewall using the Azure portal | Microsoft Docs
From the above article, you only need to follow the first five steps
- Prerequisites
- Set up the network
- Deploy the firewall
- Create a default route
- Configure an application rule
- Configure a DNAT rule
Once you have followed the above steps, you have an Azure Firewall and you can connect to your workload VM using the Azure Firewall Public IP.
Custom DNS and DNS Proxy Configuration
We will now configure Custom DNS and DNS proxy in Azure Firewall.
Configure custom DNS servers and DNS Proxy – Azure portal
- Under Azure Firewall Settings, select DNS Settings.
- Under DNS servers, Select Default (Azure provided).
- Under DNS Proxy, Select Enabled
- Select Save.

Now the Azure firewall directs DNS traffic to Azure DNS for name resolution and Azure Firewall is configured as a DNS proxy.

Enable Diagnostic logs for Azure Firewall
- In the Azure portal, Select the Azure firewall.
- Under Monitoring, select Diagnostic settings.
For Azure Firewall, four service-specific logs are available:
- AzureFirewallApplicationRule
- AzureFirewallNetworkRule
- AzureFirewallThreatIntelLog
- AzureFirewallDnsProxy
- Select Add diagnostic setting. The Diagnostics settings page provides the settings for the diagnostic logs.
- In this example, Azure Monitor logs stores the logs, so type Firewall log analytics for the name.
- Under Log, select AzureFirewallApplicationRule, AzureFirewallNetworkRule, AzureFirewallThreatIntelLog, and AzureFirewallDnsProxy to collect the logs.
- Select Send to Log Analytics to configure your workspace.
- Select your subscription.
- Select Save.
Configure Azure Firewall as a DNS server
You can configure DNS server settings directly on the Network interface of virtual machine or you can specify directly at Virtual network. Below you can see both the methods.
Configure Azure Firewall as DNS server on your Workload Virtual Machine
- In the Azure portal, Select the Workload Virtual Machine.
- Under Settings, select Networking.
- The Networking page, click on Network Interface.
- This will open up the Network Interface page, under Settings, Select DNS servers.
- In DNS Server Page, Select Custom and enter the internal IP of the Azure Firewall.

Configure Azure Firewall as DNS Server directly on the Virtual network
- In the search box at the top of the portal, enter virtual networks in the search box. When Virtual networks appear in the search results, select it.
- From the list of virtual networks, select the virtual network for which you want to change DNS servers for.
- Select DNS servers, under SETTINGS. Select Custom and enter the internal IP of the Azure Firewall.

Now, we are all set up and will quickly review how azure firewall provides us the visibility of DNS logs from our Azure infrastructure going to Azure Provided DNS.
- Azure Firewall is set up and using its default Custom DNS configuration, which is Azure DNS.
- Azure Firewall is now configured as DNS proxy and acts as a DNS server for our workload VM.
- Workload VM is configured to use Azure Firewall as a DNS server.
- Azure Firewall Diagnostic settings are configured and logging to Log analytics workspace.
Connect to your workload client and access internet.
- RDP to your workload Virtual machine.
- Open browser and browse to www.google.com
Azure Firewall DNS log fields with explanations
Format: {remote}:{port} – {id} {type} {class} {name} {protocol} {size} {do} {bufsize} {rcode} {rflags} {rsize} {duration}
{remote}: client’s IP address, for IPv6 addresses these are enclosed in brackets: [::1]
{port}: client’s port
{id}: query ID
{type}: type of the request
{class}: class of the request
{name}: name of the request
{protocol}: protocol used (tcp or udp)
{size}: request size in bytes
{do}: is the EDNS0 DO (DNSSEC OK) bit set in the query
{bufsize}: the EDNS0 buffer size advertised in the query
{rcode}: response CODE
{rflags}: response flags, each set flag will be displayed, e.g. “aa, tc”. This includes the qr bit as well
{rsize}: response size
{duration}: response duration
Check the Azure Firewall DNS logs
- In the Azure portal, Select the Azure firewall.
- Under Monitoring, select Diagnostic settings.
- In Diagnostics settings page, Click on workspace name under Log Analytics Workspace which will open the Log analytics workspace blade for you.
- In the left Menu, select logs and copy/paste the following query and click on Run.
AzureDiagnostics

| where Category == "AzureFirewallDnsProxy"

| parse msg_s with "DNS Request: " ClientIP ":" ClientPort " - " QueryID " " Request_Type " " Request_Class " " Request_Name ". " Request_Protocol " " Request_Size " " EDNSO_DO " " EDNS0_Buffersize " " Responce_Code " " Responce_Flags " " Responce_Size " " Response_Duration

| project-away msg_s

| summarize by TimeGenerated, ResourceId, ClientIP, ClientPort, QueryID, Request_Type, Request_Class, Request_Name, Request_Protocol, Request_Size, EDNSO_DO, EDNS0_Buffersize, Responce_Code, Responce_Flags, Responce_Size, Response_Duration, SubscriptionId
- You will see an output like the one below and can see all the DNS queries your workload VM is making to Azure provided DNS.

As you can see that now your organization has visibility into all the DNS requests which your Azure Infrastructure is making to Azure Provided DNS and how you can utilize Azure Firewall to control traffic flows. We hope you find this blog useful.

Recent Comments