by Scott Muniz | Feb 24, 2021 | Security, Technology
This article is contributed. See the original author and article here.
This joint advisory is the result of a collaborative effort by the cybersecurity authorities of Australia,[1] New Zealand,[2] Singapore,[3] the United Kingdom,[4] and the United States.[5][6] These authorities are aware of cyber actors exploiting vulnerabilities in Accellion File Transfer Appliance (FTA).[7] This activity has impacted organizations globally, including those in Australia, New Zealand, Singapore, the United Kingdom, and the United States.
Worldwide, actors have exploited the vulnerabilities to attack multiple federal and state, local, tribal, and territorial (SLTT) government organizations as well as private industry organizations including those in the medical, legal, telecommunications, finance, and energy sectors. According to Accellion, this activity involves attackers leveraging four vulnerabilities to target FTA customers.[8] In one incident, an attack on an SLTT organization potentially included the breach of confidential organizational data. In some instances observed, the attacker has subsequently extorted money from victim organizations to prevent public release of information exfiltrated from the Accellion appliance.
This Joint Cybersecurity Advisory provides indicators of compromise (IOCs) and recommended mitigations for this malicious activity. For a downloadable copy of IOCs, see: AA21-055A.stix and MAR-10325064-1.v1.stix.
Click here for a PDF version of this report.
Accellion FTA is a file transfer application that is used to share files. In mid-December 2020, Accellion was made aware of a zero-day vulnerability in Accellion FTA and released a patch on December 23, 2020. Since then, Accellion has identified cyber actors targeting FTA customers by leveraging the following additional vulnerabilities.
- CVE-2021-27101 – Structured Query Language (SQL) injection via a crafted HOST header (affects FTA 9_12_370 and earlier)
- CVE-2021-27102 – Operating system command execution via a local web service call (affects FTA versions 9_12_411 and earlier)
- CVE-2021-27103 – Server-side request forgery via a crafted POST request (affects FTA 9_12_411 and earlier)
- CVE-2021-27104 – Operating system command execution via a crafted POST request (affects FTA 9_12_370 and earlier)
One of the exploited vulnerabilities (CVE-2021-27101) is an SQL injection vulnerability that allows an unauthenticated user to run remote commands on targeted devices. Actors have exploited this vulnerability to deploy a webshell on compromised systems. The webshell is located on the target system in the file /home/httpd/html/about.html or /home/seos/courier/about.html. The webshell allows the attacker to send commands to targeted devices, exfiltrate data, and clean up logs. The clean-up functionality of the webshell helps evade detection and analysis during post incident response. The Apache /var/opt/cache/rewrite.log file may also contain the following evidence of compromise:
[.'))union(select(c_value)from(t_global)where(t_global.c_param)=('w1'))] (1) pass through /courier/document_root.html[.'))union(select(reverse(c_value))from(t_global)where(t_global.c_param)=('w1'))] (1) pass through /courier/document_root.html['))union(select(loc_id)from(net1.servers)where(proximity)=(0))] (1) pass through /courier/document_root.html
These entries are followed shortly by a pass-through request to sftp_account_edit.php. The entries are the SQL injection attempt indicating an attempt at exploitation of the HTTP header parameter HTTP_HOST.
Apache access logging shows successful file listings and file exfiltration:
“GET /courier/about.html?aid=1000 HTTP/1.1” 200 {Response size}“GET /courier/about.htmldwn={Encrypted Path}&fn={encrypted file name} HTTP/1.1” 200 {Response size}
When the clean-up function is run, it modifies archived Apache access logs /var/opt/apache/c1s1-access_log.*.gz and replaces the file contents with the following string:
Binary file (standard input) matches
In two incidents, the Cybersecurity and Infrastructure Security Agency (CISA) observed a large amount of data transferred over port 443 from federal agency IP addresses to 194.88.104[.]24. In one incident, the Cyber Security Agency of Singapore observed multiple TCP sessions with IP address 45.135.229[.]179.
Organizations are encouraged to investigate the IOCs outlined in this advisory and in [AR21-055A]. If an Accellion FTA appears compromised, organizations can get an indication of the exfiltrated files by obtaining a list of file-last-accessed events for the target files of the symlinks located in the /home/seos/apps/1000/ folder over the period of malicious activity. This information is only indicative and may not be a comprehensive identifier of all exfiltrated files.
Organizations with Accellion FTA should:
- Temporarily isolate or block internet access to and from systems hosting the software.
- Assess the system for evidence of malicious activity including the IOCs, and obtain a snapshot or forensic disk image of the system for subsequent investigation.
- If malicious activity is identified, obtain a snapshot or forensic disk image of the system for subsequent investigation, then:
- Consider conducting an audit of Accellion FTA user accounts for any unauthorized changes, and consider resetting user passwords.
- Reset any security tokens on the system, including the “W1” encryption token, which may have been exposed through SQL injection.
- Update Accellion FTA to version FTA_9_12_432 or later.
- Evaluate potential solutions for migration to a supported file-sharing platform after completing appropriate testing.
- Accellion has announced that FTA will reach end-of-life (EOL) on April 30, 2021.[9] Replacing software and firmware/hardware before it reaches EOL significantly reduces risks and costs.
Additional general best practices include:
- Deploying automated software update tools to ensure that third-party software on all systems is running the most recent security updates provided by the software vendor.
- Only using up-to-date and trusted third-party components for the software developed by the organization.
- Adding additional security controls to prevent the access from unauthenticated sources.
Resources
- FireEye Blog – Cyber Criminals Exploit Accellion FTA for Data Theft and Extortion
- Center for Internet Security (CIS) Critical Security Controls for Effective Cyber Defense, known as “CIS Controls”
- Australia, Canada, New Zealand, the United Kingdom, and the United States Joint Advisory on Technical Approaches to Uncovering and Remediating Malicious Activity
- CISA and MS-ISAC’s Ransomware Guide
by Contributed | Feb 24, 2021 | Technology
This article is contributed. See the original author and article here.
There are different ways to manage your Azure resources depending on your specific needs. With automation tasks, Azure offers a simple way to manage a specific resource or resource group using automation task templates. These templates depend on the Azure resource. For example, for an Azure virtual machine, you can create an automation task that turns on or turns off that virtual machine on a predefined schedule or sends the resource’s monthly cost. This can be especially helpful if you are trying to reduce the cost of your Azure VMs.
An automation task is actually a workflow that runs on the Azure Logic Apps service behind the scenes. Automation tasks are currently in preview and support sending monthly cost for all Azure resources and special templates for Azure virtual machines, Azure Storage accounts, and Azure Cosmos DB.
You might now think how this is different from Azure Automation. For that, you can check out the following article on Microsoft Docs.
How to create an automation task
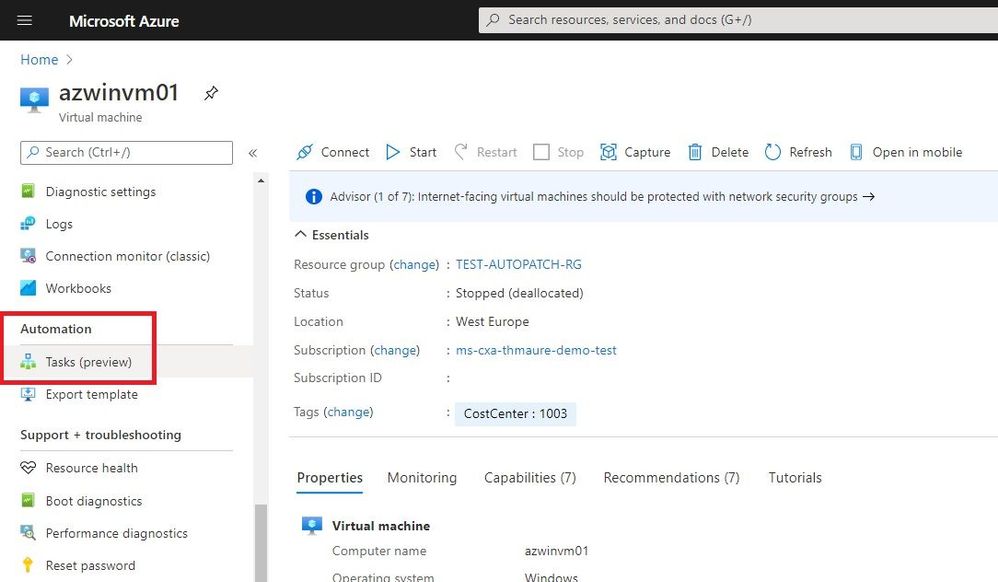
Creating an automation task is simple. In the Azure Portal, find the resource you want to manage, and on the resource menu, scroll to the Automation section and select Tasks.
Create automation task for an Azure resource
Now you will see the existing automation tasks, or you can click on Add to add a new automation task from a template.
 Add a Task
You can select the template you want to use. Under Authentication, the necessary connections for that specific task appear. You will need to create these connections.
 Authentication
In the configuration section, you can add additional information for the task. In this example, I start the virtual machine every day at 10 am.
 Task Configuration
After the automation task has been created, you can see it under Tasks. You can see the tasks and view the runs, as well as edit the task.
 View and edit automation tasks
You can do in-line editing to make simple changes, but you can also open it in the Logic Apps Designer.
 Logic Apps Designer
Conclusion
Automation Tasks is currently in preview and provides an easy and simple way to manage Azure resources. If you want to learn more, check out Microsoft Docs. If you want to provide feedback, report bugs, or ask questions, you can contact the Azure logic Apps team.
by Contributed | Feb 23, 2021 | Technology
This article is contributed. See the original author and article here.
Azure Service Bus queues and topic subscriptions provide a secondary subqueue, called a dead-letter queue(DLQ). The dead-letter queue need not to be explicitly created and can’t be deleted or otherwise managed independent of the main entity.
Azure Service Bus messaging overview – Azure Service Bus | Microsoft Docs
Messages that can’t be processed because of various reasons fall into DLQ. Below are few conditions where messages will fall into DLQ:
1. Not matching with the filter condition
2. TTL expired, header exceed
3. Quota exceed for header size
4. Max delivery count reached
5. Session enabled and sending messages without sessionID
6. Using more than 4 forward to
Case:
To receive DLQ messages from queue/subscription
Pre-Requisites:
1. Service Bus namespace
2. Already created queue/subscription
3. Should have messages in DLQ either for queue/subscription
4. Service Bus Explorer
We have multiple ways to receive messages from DLQ.
Using Service Bus Explorer:
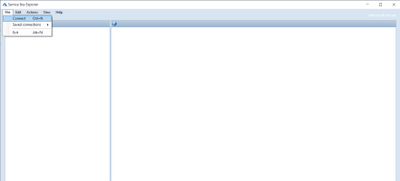
- Download the “Service Bus Explorer” from: https://github.com/paolosalvatori/ServiceBusExplorer
- Open service bus explorer and click File and connect it.
- From the drop down, select connection string and provide the connection string of the namespace level.

- Once it is successfully connected, you will see Service Bus Explorer shows the count of the DLQ message.
In the below screenshot, there are 11 messages currently in the DLQ for the queue “ankitatest“.
- To receive messages from DLQ through SB explorer, you need to click on that particular queue and then click on “Deadletter” tab then one dialogue box will pop up then you need to click on “Receive and Delete”. The default value is Top10 so top10 messages will be received from DLQ.
The updated DLQ message count is now 1.

Through C# Code:
In the given screenshot, we have 12 messages in DLQ for queue and we wanted to receive them.

I will run the below code which will receive the message from the mentioned queue. Once you run the code successfully, you will see the message ID in the console window as below.

Now, check on SB explorer and you will see 1 message has been gone from DLQ.

class Program
    {
        static void Main(string[] args)
        {
            RetrieveMessageFromDeadLetterForQueue();
            RetrieveMessageFromDeadLetterForSubscription();
        }
        public static void RetrieveMessageFromDeadLetterForQueue()
        {
            var receiverFactory = MessagingFactory.Create(
                 "sb://<ServiceBusNamespaceName>.servicebus.windows.net/",
                 new MessagingFactorySettings
                 {
                     TokenProvider = TokenProvider.CreateSharedAccessSignatureTokenProvider("RootManageSharedAccessKey", "<NamespaceLevelKey>"),
                     NetMessagingTransportSettings = { BatchFlushInterval = new TimeSpan(0, 0, 0) }
                 });
            string data = QueueClient.FormatDeadLetterPath("<QueueName>");
            var receiver = receiverFactory.CreateMessageReceiver(data);
            receiver.OnMessageAsync(
            async message =>
            {
                var body = message.GetBody<Stream>();
                lock (Console.Out)
                {
                    Console.WriteLine(message.MessageId);
                }
                await message.CompleteAsync();
            },
            new OnMessageOptions { AutoComplete = false, MaxConcurrentCalls = 1 });
        }
        public static void RetrieveMessageFromDeadLetterForSubscription()
        {
            var receiverFactory = MessagingFactory.Create(
                 "sb://<NS>.servicebus.windows.net/",
                 new MessagingFactorySettings
                 {
                     TokenProvider = TokenProvider.CreateSharedAccessSignatureTokenProvider("RootManageSharedAccessKey", "<NamespaceLevelSASKey>"),
                     NetMessagingTransportSettings = { BatchFlushInterval = new TimeSpan(0, 0, 0) }

                 });

            string data = SubscriptionClient.FormatDeadLetterPath("<TopicName>", "<SubscriptionName>");

            var receiver = receiverFactory.CreateMessageReceiver(data);

            receiver.OnMessageAsync(

            async message =>
            {
                var body = message.GetBody<Stream>();
                lock (Console.Out)
                {
                    Console.WriteLine("Message ID :" + message.MessageId);
                }
                await message.CompleteAsync();
            },
            new OnMessageOptions { AutoComplete = false, MaxConcurrentCalls = 1 });
        }
    }
by Contributed | Feb 23, 2021 | Technology
This article is contributed. See the original author and article here.
Final Update: Wednesday, 24 February 2021 00:59 UTC
We’ve confirmed that all systems are back to normal with no customer impact as of 2/24, 00:20 UTC. Our logs show the incident started on 2/23, 19:45 UTC and that during the ~4 hours 25 min that it took to resolve the issue customers in East US2 experienced intermittent data latency and incorrect alert activation.
- Root Cause: The failure was due to one of the backend services becoming unhealthy.
- Incident Timeline: 4 Hours & 25 minutes – 2/23, 19:45 UTC through 2/24, 00:20 UTC
We understand that customers rely on Azure Log Analytics as a critical service and apologize for any impact this incident caused.
-Anupama
by Contributed | Feb 23, 2021 | Technology
This article is contributed. See the original author and article here.
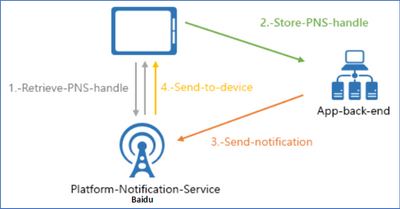
This article will introduce how to use Azure Notification Hub REST API to send a notification to device with Baidu Push. It provides an example of how to retrieve the PNS handle and send notification to device using REST API with Baidu Push.
Pre-requirement :
Before starting, you must setup a Baidu Push environment and create a application in Android Studio.
Getting started with Azure Notification Hub using Baidu
- Enter API Key and SECRET KEY in Azure Portal -> Notification Hub -> Baidu (Android China).

Note : Go to the Configuration page of the Baidu Push application and you can find API KEY and SECRET KEY.

- Execute your application in Android Studio and you should see below keywords in
 .
.
errorCode=0 : 0 means the device is registered successfully via Baidu SDK.
userId : copy this for next step
channelId: copy this for next step

- Create a registration for the device. This method generates a registration ID, which you can subsequently use to retrieve, update, and delete this registration.
– Request
Method
|
Request URI
|
POST
|
https://<notification_hub_namespace>.servicebus.windows.net/<notification_hub_name>/registrations/?api-version=2015-01
|
– Request Headers
– Request Body
XML
<?xml version="1.0" encoding="utf-8"?>
<entry xmlns=http://www.w3.org/2005/Atom>
    <content type="application/xml">
        <BaiduRegistrationDescription xmlns:i=http://www.w3.org/2001/XMLSchema-instance xmlns=http://schemas.microsoft.com/netservices/2010/10/servicebus/connect>
            <BaiduUserId>{userId}</BaiduUserId>
            <BaiduChannelId>{channelId}</BaiduChannelId>
        </BaiduRegistrationDescription >
    </content>
</entry>
– Response Code
Code
|
Description
|
200
|
Registration created successfully.
|
– Response Body
Upon success, a validated Atom entry is returned. It includes read-only elements such as ETag, RegistrationId, and ExpirationTime. For example:
XML
<entry a:etag="W/"1"" xmlns=http://www.w3.org/2005/Atom xmlns:a=http://schemas.microsoft.com/ado/2007/08/dataservices/metadata>
<id>https://notificationhubn.servicebus.windows.net/notificationhub1/registrations/{registerId}?api-version=2015-01</id>
<title type="text">{registerId}</title>
<published>2021-02-19T06:52:22Z</published>
<updated>2021-02-19T06:52:22Z</updated>
<link rel="self" href=https://notificationhubn.servicebus.windows.net/notificationhub1/registrations/{registerId}?api-version=2015-01/>
<content type="application/xml">
<BaiduRegistrationDescription xmlns=http://schemas.microsoft.com/netservices/2010/10/servicebus/connect xmlns:i=http://www.w3.org/2001/XMLSchema-instance>
<ETag>1</ETag>
<ExpirationTime>9999-12-31T23:59:59.999</ExpirationTime>
<RegistrationId>{registerId}</RegistrationId>
<BaiduUserId>{userId}</BaiduUserId>
<BaiduChannelId>{channelId}</BaiduChannelId>
</BaiduRegistrationDescription>
</content>
</entry>
- Use Test Send to check whether the device is registered successfully in the previous step.

- Sends a Baidu native notification through a notification hub.
– Request
Method
|
Request URI
|
POST
|
https://<notification_hub_namespace>.servicebus.windows.net/<notification_hub_name>/messages/?api-version=2015-04
|
– Request Headers
– Request Body
JSON
{"title":"Title","description":"Notification Hub test notification"}
– Response Code
Code
|
Description
|
201
|
Message successfully send to Baidu.
|
- Your device should receive the notification you send in previous step in few seconds.
Additional Reference :

Recent Comments