by Scott Muniz | Jan 5, 2021 | Security, Technology
This article is contributed. See the original author and article here.
The National Security Agency (NSA) has released a Cybersecurity Information (CSI) sheet on eliminating obsolete Transport Layer Security (TLS) configurations. The information sheet identifies strategies to detect obsolete cipher suites and key exchange mechanisms, discusses recommended TLS configurations, and provides remediation recommendations for organizations using obsolete TLS configurations.
CISA encourages administrators and users to review NSA’s CSI sheet on Eliminating Obsolete TLS Protocol Configurations for more information.

by Contributed | Jan 5, 2021 | Technology
This article is contributed. See the original author and article here.

TLDR; this article gives you a high-level view of configuration management for ASP .NET. It teaches you about various sources, providers and how to read config data. It also shows you how to make your config data type safe.
Why do we need configuration? Well, the answer is that we need our app to perform differently without necessarily recompile it. The reason for that is to make it flexible for different environments. It should be enough to just change a config value to get the app to go towards a completely new endpoint for example. ASP.NET has our back, it knows config data can come from a million different places, files, like JSON or ini, environment variables or even Azure. ASP .NET has a set of services, so called providers that reads out this config data for us.
What we need to know to work efficiently with it, is to know what providers exist (so we know where we can place our config data) and in what order the data is read, so we know what data will take effect. Also, it’s helpful to know that all data are key-value pairs. It doesn’t stop the data from being nested though. Don’t worry there are two different ways we can deal with nesting, untyped and typed.
Let’s just stress one more time some important dimensions on configuration management:
Config data can come from many sources. Data can be read from a number of different sources like JSON files, environment variables, Azure Services and more. Here’s a list of all the different sources:
- Settings files, such as appsettings.json
- Environment variables
- Azure Key Vault
- Azure App Configuration
- Command-line arguments
- Custom providers, installed or created
- Directory files
- In-memory .NET objects
Config data is read in a certain order. Host configuration is the first thing to be read followed by JSON data found in appsettings.json and an environment specific version. The complete read order looks like so:
ChainedConfigurationProvider : Adds an existing IConfiguration as a source. In the default configuration case, adds the host configuration and setting it as the first source for the app configuration.
App setttings JSON file. There’s an appsettings.json that is read using the JSON configuration provider.
Environment specific app settings JSON. After the initial appsettings.json is read it looks read from an environment specific app settings file. So essentially it’s looking for a file on this format appsettings.Environment.json using the JSON configuration provider. For example, appsettings.Production.json or appsettings.Development.json.
App secrets. If you are running in a dev environment it tries to read secrets next.
Environment variables. After that it reads any environment variables using the Environment Variables configuration provider.
Command-line arguments. Lastly it reads command line arguments using the Command-line configuration provider.
NOTE, if the same key exist in two different sources it’s the latter one that gets applied. For example i a key exist in appsetttings.json, that value will be overwritten if it also exist as an environment variable.
- Don’t place sensitive data as config data. You need to know what data is sensitive or not. As a rule of thumb, place sensitive data in a service like Azure Key Vault, avoid placing such data in configuration files! You can still read from Azure Key Vault using a configuration manager, so in theory it’s as straight forward as reading the data from a JSON file for example.
References
I’ve left some hopefully useful links so you can learn more about all the different providers and options. Hopefully this article gives you a good foundation to continue learning.
Read data
To read configuration data lets turn our attention to Program.cs and it’s constructor that should look like this:
public Startup(IConfiguration configuration)

{

    Configuration = configuration;

}
Here we are injecting an instance of IConfiguration. It will attempt to read data from appsettings.json file, so how do we access it? Looking at the content of appsettings.json we see that it looks like so:
{

  “Logging”: {

    “LogLevel”: {

      “Default”: “Information”,

      “Microsoft”: “Warning”,

      “Microsoft.Hosting.Lifetime”: “Information”

    }

  },

  “AllowedHosts”: “*”

}
To read a non-nested value like AllowedHosts we can type like so:
Configuration[“AllowedHosts”] // *
However, if we need a nested value like Logging->LogLevel->Default we need to access it with : as separator. We instead type like so:
var value = Configuration[“Logging:LogLevel:Default”];

Console.WriteLine(value); // Information
NOTE, you are likely to want to access this kind of data when setting up services so you are more likely to read from Configuration instance in ConfigureServices() method rather than the constructor, as is demonstrated above. With that said, all you need to do is to inject IConfiguration in any constructor where you might need it, like a controller for example, like so:
public IndexModel(ILogger<IndexModel> logger, IConfiguration configuration )

{

    _logger = logger;

    _configuration = configuration;
    var serviceConfig = new ServiceConfiguration();

    _configuration.GetSection(serviceConfig.Services).Bind(serviceConfig);

    Console.WriteLine(serviceConfig.CartServiceUrl);

    Console.WriteLine(serviceConfig.ProductsServiceUrl);

}
Demo, override a value
We stated earlier that the last provider to be read is the one that decided the value on the config data. Lets demo this by placing a setting API like so in appsetting.json:
“API”: “http://localhost:3000/api”
and now place a slightly different entry in appsettings.Development.json like so:
“API”: “http://localhost:5000/api”
Change the code in the Startup constructor to read API, like so:
var value = Configuration[“API”];

Console.WriteLine(value); // http://localhost:5000/api
As you can see, the last read source, appsettings.Development.json decided the value.
Bind data, make it type safe
At some point, you might loose track of what configuration you have. You might have 10-20 different keys, or more, at various levels of nesting. The problem with that is that it’s starting to get messy. Knowing what keys are actually used could be a combination of looking into JSON files, environment variables or even the source code. So how do you approach and manage such a mess?
The way to manage it is how you manage most things in .NET and C#, type it. The idea is to have variables or structures like classes for most things you plan to use, your config data shouldn’t be any different. So how do we type our config data then – use a class.
Let’s assume you have a few endpoints ProductsServiceUrl and CartServiceUrl that you want to keep track of and that they should be set to different values in different environment. You can create a class for that, like so:
class ServiceConfiguration

{

  public const string Services = “Services”;

  public string ProductsServiceUrl { get; set; }

  public string CartServiceUrl { get; set; }

}
The next thing we want to do is to tell ASP .NET to bind an instance of the above class to a specific section of our config. Imagine you know have a section in appsettings.json that looks like this:
“Services” : {

  “ProductsServiceUrl”: “http://localhost:3000/products”,

  “CartServiceUrl”: “http://localhost:3000/cart”

}
Once you’ve created a class for this and added the config data it’s time to read out the data. We can read the data like by locating the constructor of Startup class in Startup.cs and add the following code:
var serviceConfig = new ServiceConfiguration();

Configuration.GetSection(serviceConfig.Services).Bind(serviceConfig);

Console.WriteLine(serviceConfig.CartServiceUrl); // http://localhost:3000/cart

Console.WriteLine(serviceConfig.ProductsServiceUrl); // http://localhost:3000/products
The use of GetSection() enables us to drill down into the part of the config that’s interesting for us. Using bind() we bind the sections content to an instance of ServiceConfiguration and thereby populate the instance with the values from the config section.
Summary
You learned how config data can exist in various sources. You also learned how ASP .NET was able to read from these sources. Furthermore, you were shown various ways to read nested and un nested data. Lastly you looked at how to make your config data more type safe.
by Contributed | Jan 5, 2021 | Technology
This article is contributed. See the original author and article here.
It’s 2021. Want to learn webdev?
Here’s your chance. Microsoft created 24 lessons on Web Development. It covers HTML, CSS and JavaScript. There are also quizzed and challenges.
Web-Dev-For-Beginners
There are various projects in there so you can dive deeper on things such as:
- Typing game, this puts your skills to the test as it teaches you how to programmatically change CSS, keep track of time and also ensure you understand how HTML, CSS and JavaScript work together
- Space Game, it teaches you game development, using the Canvas and patternsns like pub-sub and composition
- Banking app, it’s possible to develop a SPA like application without a single framework using the template tag and more.
- Browser extension, have you ever considered writing an extension? It’s easier than it sounds.
by Contributed | Jan 5, 2021 | Technology
This article is contributed. See the original author and article here.
Why Use Tagging?
One important feature which often isn’t utilised correctly is the use of tags within Microsoft Defender for Endpoint. This is a functionality that was introduced to allow you to apply a granular level of control over how you manage your devices. In this blog we wanted to cover not only the primary uses for the tagging functionality, but also to explain some tips and tricks around how to effectively use this within your organisation. We have split this into three parts to cover the basics but also some advanced scenarios for how to use tagging in your environment, so make sure to stay tuned to the blog for the full series.
Role Based Access Control – RBAC
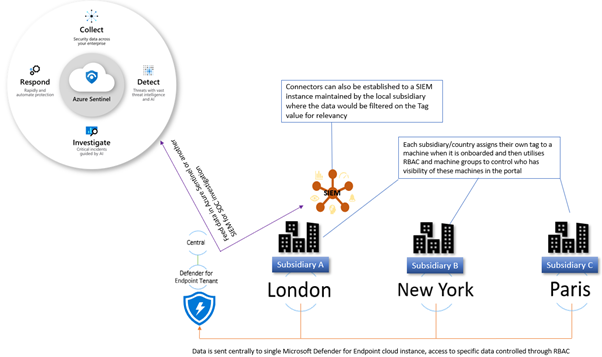
The primary use for tagging is to allow you to create machine groups that can then be used for applying RBAC permissions. Really the purpose of this is to enable a level of control such that different users can log into the portal and see only the machines that they are responsible for. For example, in a large organisation spanning multiple geos rather than each geo having their own instance of Microsoft Defender for Endpoint, you would have a single instance where access is controlled through the use of roles and machine groups. Having a single instance means that threat hunting and automation has full visibility of all devices across the entire organisation which is critical when a threat is hitting multiple endpoints.
The diagram below shows how you would break this down, and how you could further utilise this information to feed data into a SIEM where your SOC analysts can track threats across multiple areas of the infrastructure.
Later in this blog we will talk about the different ways you can apply tags to managed devices, but in order to utilise these tags you first need to create a machine group in Microsoft Defender Security Center portal and then apply specific security groups containing the user accounts of the devices you wish you manage. This is simple to do and the setting up of these machine groups is something you would typically do early on in the setup of the tenant, before you actually start doing any onboarding. This means that each time a machine is onboarded it goes straight into the appropriate group and only the correct people have visibility straight away.

Filtering
One of the great benefits of tagging is using them in machine views to present different views of machine lists. Below are some examples of why you would use tags in filtering include:
- Lab Machines – There is really no reason to have a separate tenant just for testing when the endpoints that report into Microsoft Defender for Endpoint can exist anywhere without any ties to a specific Azure AD or domain. In this scenario, you might want to identify the specific lab machines with a tag:

By using this tag to create a machine group you can then exclude these machines from your threat reports or from threat and vulnerability management.
- Decommissioned machines – Something we hear a lot from customers is that they have machines that they have decommissioned which they no longer want to see in their console; however, there is a very good reason why we don’t allow machines to be deleted. Just suppose there is a threat detected on the environment that originated some time back on a machine that had been decommissioned, if you deleted this from the tenant then you would have no way of understanding the source and techniques used in the breach. To address this, a machine record will remain in the tenant until the data retention period of the tenant expires.
We do understand though that you may not want to see these machines in the device list or have them show in the threat reports or threat and vulnerability management and so through the use of tags, and also machine groups, it is possible to effectively make these machines invisible.
The first stage of this would be to apply a tag against the machines, in the example below we have two machines tagged as “Decommissioned”. Once you have set this tag you can then use the filters to exclude these tagged devices from the Device Inventory view:

Using this method is a quick and simple way to filter on your device inventory but you cannot use tag-based filtering in your reports or in threat and vulnerability management. For this, you need to use machine groups so the next phase would be to create a machine group based on this tag, as described in the RBAC section above, at which point you can then exclude these groups from the threat and vulnerability management assessment:

It should be noted though that inactive machines are automatically excluded from threat and vulnerability management after 30 days anyway.
The use of machine groups in this scenario does open up another option which would then give you the desired result of removing a machine from the tenant whilst still maintaining the record for historical threat analysis; effectively hiding it.
To achieve this, create a user group with no members and then assign it to the Machine Group:

As there are no users assigned to this group, then any users who log into the portal (with the exception of Global Admin or Security Admin) will automatically have their view of any machines with the Decommissioned tag removed from all views, including threat and vulnerability management and reporting. Plus, simply adding the Decommissioned tag to a machine will effectively “delete” the machine from the portal.
Methods of Tag allocation
To utilise tags for RBAC and filtering you first need to make sure that the relevant machines have the tags applied and there are a number of methods to achieve this.
Registry tagging
This is via direct editing of the registry. By setting the tag value in the DeviceTagging key (HKLM:SOFTWAREPoliciesMicrosoftWindows Advanced Threat ProtectionDeviceTagging) you are assigning a value to the machine that is picked up by Microsoft Defender for Endpoint telemetry.

There are a couple of points to be aware of when you are using the registry to tag a machine:
- The tag is fixed and cannot be changed through the portal, it can only be changed by modifying the registry.
- Only one tag can be specified in the registry.
In the image above, you can see the relevant key as displayed in Regedit; however, if you are modifying the registry to assign tags to production machines it is unlikely that it is Regedit you will use to set this value. Instead, you are likely to use a script. Obviously when using a script, you can add a lot of variables to determine what the tag value should be, meaning you could have a single script for all tag values you want to create or have multiple scripts that you then use another method with to define the logic.
What we have seen with several large organisations is utilising the onboarding script and adding a “REG ADD” command to the script and then using different onboarding scripts for different groups of machines. The value that would need to be added is:
REG ADD “HKEY_LOCAL_MACHINESOFTWAREPoliciesMicrosoftWindows Advanced Threat ProtectionDeviceTagging” /v Group /t REG_SZ /d TAGNAME /f
You could use this script and have it as part of a GPO where you target it against an OU or use it in System Center Configuration Manager and target the script at different Collections.
However, if you wanted to keep the tagging separate from the onboarding then you may instead want to utilise a Powershell script which again you could apply via System Center Configuration Manager or another management tool.
To either have a specific script, or to add to another script, the lines you would need are:
New-Item -Path “HKLM:SOFTWAREPoliciesMicrosoftWindows Advanced Threat Protection” -Name DeviceTagging -force
New-ItemProperty -Path “HKLM:SOFTWAREPoliciesMicrosoftWindows Advanced Threat ProtectionDeviceTagging” -Name “Group” -Value “TAGNAME” -PropertyType “String”
Setting the tag via Intune
When using Intune, it is possible to utilise a custom policy to set the machine tag value in the registry via the WindowsAdvancedThreatProtection CSP (https://docs.microsoft.com/en-us/windows/client-management/mdm/windowsadvancedthreatprotection-csp)
This diagram shows the provider:

When setting the values in Intune you configure a custom profile and then define the URI to set the device tag.
These are the steps for configuring this:
- Create Custom profile:

- Give the profile a name and then add the URI value (./Device/Vendor/MSFT/WindowsAdvancedThreatProtection/DeviceTagging/Group), set a data type of “String” and then define the tag you want:

- Now you assign the profile. By assigning it to a specific group in Azure AD it means that you can base your tagging, and therefore RBAC and filtering on existing device groups you may already have in Azure AD:

- You can add Applicability Rules if you want, to target it at specific Windows versions/editions, but this shouldn’t really be necessary in the case of Machine Tagging. So then it is simply a case of reviewing the profile and applying it:

Manual tagging
One of the easiest ways to tag a device is to simply add a tag value through the machine page in the portal. Through this method you can add multiple tags or remove existing tags (although not if they have been defined in the registry).
Clicking onto the device page presents you with an option to “Manage Tags” where you can add and remove as required:

Tagging via API
While manual tagging is great and allows you to specify multiple tags against a device to assist with RBAC and filtering, however what if you have 100’s or 1000’s of devices that you want to assign the same tag value to? In this scenario, you can use the API to mass-assign tags, we will be covering this advanced use case in Part 3 of our blog.
Setting the tag on macOS
Obviously, you may not just be managing Windows endpoints in your environment. Microsoft Defender for Endpoint also supports tagging macOS machines. To apply tags on this platform, you can utilise the manual method or the API method. However, if you want to automate this process, then you can push out the settings as part of a Configuration Profile (a .plist file).
When you are creating the .plist file, you would need to add the following entry in order to configure the tag:
<dict>
<key>tags</key>
<array>
<dict>
<key>key</key>
<string>GROUP</string>
<key>value</key>
<string>ExampleTag</string>
</dict>
</array>
</dict>
You can find details of how to do that here: https://docs.microsoft.com/en-us/windows/security/threat-protection/microsoft-defender-atp/mac-jamfpro-policies#step-3-configure-microsoft-defender-atp-settings
This concludes Part 1 of our blog series on how to use tagging effectively. Please join us for Part 2 where Miriam Wiesner will guide you through applying tags based upon the Organisational Unit placement of the device within Active Directory.
We welcome your feedback and questions on this or any of the other parts of this tagging blog and look forward to hearing from you.
Steve Newby (@steve_newby) and Miriam Wiesner (@miriamxyra)
Program Managers @ Microsoft Defender for Endpoint Product Group
by Contributed | Jan 5, 2021 | Technology
This article is contributed. See the original author and article here.
Why Use Tagging?
One important feature which often isn’t utilised correctly is the use of tags within Microsoft Defender for Endpoint. This is a functionality that was introduced to allow you to apply a granular level of control over how you manage your devices. In this blog we wanted to cover not only the primary uses for the tagging functionality, but also to explain some tips and tricks around how to effectively use this within your organisation. We have split this into three parts to cover the basics but also some advanced scenarios for how to use tagging in your environment, so make sure to stay tuned to the blog for the full series.
Role Based Access Control – RBAC
The primary use for tagging is to allow you to create machine groups that can then be used for applying RBAC permissions. Really the purpose of this is to enable a level of control such that different users can log into the portal and see only the machines that they are responsible for. For example, in a large organisation spanning multiple geos rather than each geo having their own instance of Microsoft Defender for Endpoint, you would have a single instance where access is controlled through the use of roles and machine groups. Having a single instance means that threat hunting and automation has full visibility of all devices across the entire organisation which is critical when a threat is hitting multiple endpoints.
The diagram below shows how you would break this down, and how you could further utilise this information to feed data into a SIEM where your SOC analysts can track threats across multiple areas of the infrastructure.
Later in this blog we will talk about the different ways you can apply tags to managed devices, but in order to utilise these tags you first need to create a machine group in Microsoft Defender Security Center portal and then apply specific security groups containing the user accounts of the devices you wish you manage. This is simple to do and the setting up of these machine groups is something you would typically do early on in the setup of the tenant, before you actually start doing any onboarding. This means that each time a machine is onboarded it goes straight into the appropriate group and only the correct people have visibility straight away.
Filtering
One of the great benefits of tagging is using them in machine views to present different views of machine lists. Below are some examples of why you would use tags in filtering include:
- Lab Machines – There is really no reason to have a separate tenant just for testing when the endpoints that report into Microsoft Defender for Endpoint can exist anywhere without any ties to a specific Azure AD or domain. In this scenario, you might want to identify the specific lab machines with a tag:
By using this tag to create a machine group you can then exclude these machines from your threat reports or from threat and vulnerability management.
- Decommissioned machines – Something we hear a lot from customers is that they have machines that they have decommissioned which they no longer want to see in their console; however, there is a very good reason why we don’t allow machines to be deleted. Just suppose there is a threat detected on the environment that originated some time back on a machine that had been decommissioned, if you deleted this from the tenant then you would have no way of understanding the source and techniques used in the breach. To address this, a machine record will remain in the tenant until the data retention period of the tenant expires.
We do understand though that you may not want to see these machines in the device list or have them show in the threat reports or threat and vulnerability management and so through the use of tags, and also machine groups, it is possible to effectively make these machines invisible.
The first stage of this would be to apply a tag against the machines, in the example below we have two machines tagged as “Decommissioned”. Once you have set this tag you can then use the filters to exclude these tagged devices from the Device Inventory view:
Using this method is a quick and simple way to filter on your device inventory but you cannot use tag-based filtering in your reports or in threat and vulnerability management. For this, you need to use machine groups so the next phase would be to create a machine group based on this tag, as described in the RBAC section above, at which point you can then exclude these groups from the threat and vulnerability management assessment:
It should be noted though that inactive machines are automatically excluded from threat and vulnerability management after 30 days anyway.
The use of machine groups in this scenario does open up another option which would then give you the desired result of removing a machine from the tenant whilst still maintaining the record for historical threat analysis; effectively hiding it.
To achieve this, create a user group with no members and then assign it to the Machine Group:
As there are no users assigned to this group, then any users who log into the portal (with the exception of Global Admin or Security Admin) will automatically have their view of any machines with the Decommissioned tag removed from all views, including threat and vulnerability management and reporting. Plus, simply adding the Decommissioned tag to a machine will effectively “delete” the machine from the portal.
Methods of Tag allocation
To utilise tags for RBAC and filtering you first need to make sure that the relevant machines have the tags applied and there are a number of methods to achieve this.
Registry tagging
This is via direct editing of the registry. By setting the tag value in the DeviceTagging key (HKLM:SOFTWAREPoliciesMicrosoftWindows Advanced Threat ProtectionDeviceTagging) you are assigning a value to the machine that is picked up by Microsoft Defender for Endpoint telemetry.
There are a couple of points to be aware of when you are using the registry to tag a machine:
- The tag is fixed and cannot be changed through the portal, it can only be changed by modifying the registry.
- Only one tag can be specified in the registry.
In the image above, you can see the relevant key as displayed in Regedit; however, if you are modifying the registry to assign tags to production machines it is unlikely that it is Regedit you will use to set this value. Instead, you are likely to use a script. Obviously when using a script, you can add a lot of variables to determine what the tag value should be, meaning you could have a single script for all tag values you want to create or have multiple scripts that you then use another method with to define the logic.
What we have seen with several large organisations is utilising the onboarding script and adding a “REG ADD” command to the script and then using different onboarding scripts for different groups of machines. The value that would need to be added is:
REG ADD “HKEY_LOCAL_MACHINESOFTWAREPoliciesMicrosoftWindows Advanced Threat ProtectionDeviceTagging” /v Group /t REG_SZ /d TAGNAME /f
You could use this script and have it as part of a GPO where you target it against an OU or use it in System Center Configuration Manager and target the script at different Collections.
However, if you wanted to keep the tagging separate from the onboarding then you may instead want to utilise a Powershell script which again you could apply via System Center Configuration Manager or another management tool.
To either have a specific script, or to add to another script, the lines you would need are:
New-Item -Path “HKLM:SOFTWAREPoliciesMicrosoftWindows Advanced Threat Protection” -Name DeviceTagging -force
New-ItemProperty -Path “HKLM:SOFTWAREPoliciesMicrosoftWindows Advanced Threat ProtectionDeviceTagging” -Name “Group” -Value “TAGNAME” -PropertyType “String”
Setting the tag via Intune
When using Intune, it is possible to utilise a custom policy to set the machine tag value in the registry via the WindowsAdvancedThreatProtection CSP (https://docs.microsoft.com/en-us/windows/client-management/mdm/windowsadvancedthreatprotection-csp)
This diagram shows the provider:
When setting the values in Intune you configure a custom profile and then define the URI to set the device tag.
These are the steps for configuring this:
- Create Custom profile:
- Give the profile a name and then add the URI value (./Device/Vendor/MSFT/WindowsAdvancedThreatProtection/DeviceTagging/Group), set a data type of “String” and then define the tag you want:
- Now you assign the profile. By assigning it to a specific group in Azure AD it means that you can base your tagging, and therefore RBAC and filtering on existing device groups you may already have in Azure AD:
- You can add Applicability Rules if you want, to target it at specific Windows versions/editions, but this shouldn’t really be necessary in the case of Machine Tagging. So then it is simply a case of reviewing the profile and applying it:
Manual tagging
One of the easiest ways to tag a device is to simply add a tag value through the machine page in the portal. Through this method you can add multiple tags or remove existing tags (although not if they have been defined in the registry).
Clicking onto the device page presents you with an option to “Manage Tags” where you can add and remove as required:
Tagging via API
While manual tagging is great and allows you to specify multiple tags against a device to assist with RBAC and filtering, however what if you have 100’s or 1000’s of devices that you want to assign the same tag value to? In this scenario, you can use the API to mass-assign tags, we will be covering this advanced use case in Part 3 of our blog.
Setting the tag on macOS
Obviously, you may not just be managing Windows endpoints in your environment. Microsoft Defender for Endpoint also supports tagging macOS machines. To apply tags on this platform, you can utilise the manual method or the API method. However, if you want to automate this process, then you can push out the settings as part of a Configuration Profile (a .plist file).
When you are creating the .plist file, you would need to add the following entry in order to configure the tag:
<dict>
<key>tags</key>
<array>
<dict>
<key>key</key>
<string>GROUP</string>
<key>value</key>
<string>ExampleTag</string>
</dict>
</array>
</dict>
You can find details of how to do that here: https://docs.microsoft.com/en-us/windows/security/threat-protection/microsoft-defender-atp/mac-jamfpro-policies#step-3-configure-microsoft-defender-atp-settings
This concludes Part 1 of our blog series on how to use tagging effectively. Please join us for Part 2 where Miriam Wiesner will guide you through applying tags based upon the Organisational Unit placement of the device within Active Directory.
We welcome your feedback and questions on this or any of the other parts of this tagging blog and look forward to hearing from you.
Steve Newby (@steve_newby) and Miriam Wiesner (@miriamxyra)
Program Managers @ Microsoft Defender for Endpoint Product Group

Recent Comments