by Contributed | Jan 13, 2021 | Technology
This article is contributed. See the original author and article here.
After releasing many features/enablers that unblock and accelerate the migration of SQL Server Integration Services (SSIS) packages into Azure Data Factory (ADF), see https://techcommunity.microsoft.com/t5/sql-server-integration-services/blast-to-the-future-accelerating-legacy-ssis-migrations-into/ba-p/1792821, we’d like to show you how to use Azure-Enabled SQL Server Data Tools (SSDT) as an all-in-one SSIS migration tool.
Azure-enabling SSDT has allowed us to preserve the skillsets of our customers who are familiar with it as they’ve been using it for a while to design, debug, and deploy their SSIS packages to run on premises. Now, they can also use it to assess their existing packages for cloud compatibility, test their executions in Azure, and migrate/redeploy them to run in Azure.
This article illustrates how to perform cloud assessment, execution testing in Azure, and migration/redeployment to Azure of a typical ETL package, all using SSDT and without changing/modifying the original package.
Cloud Compatibility Assessment
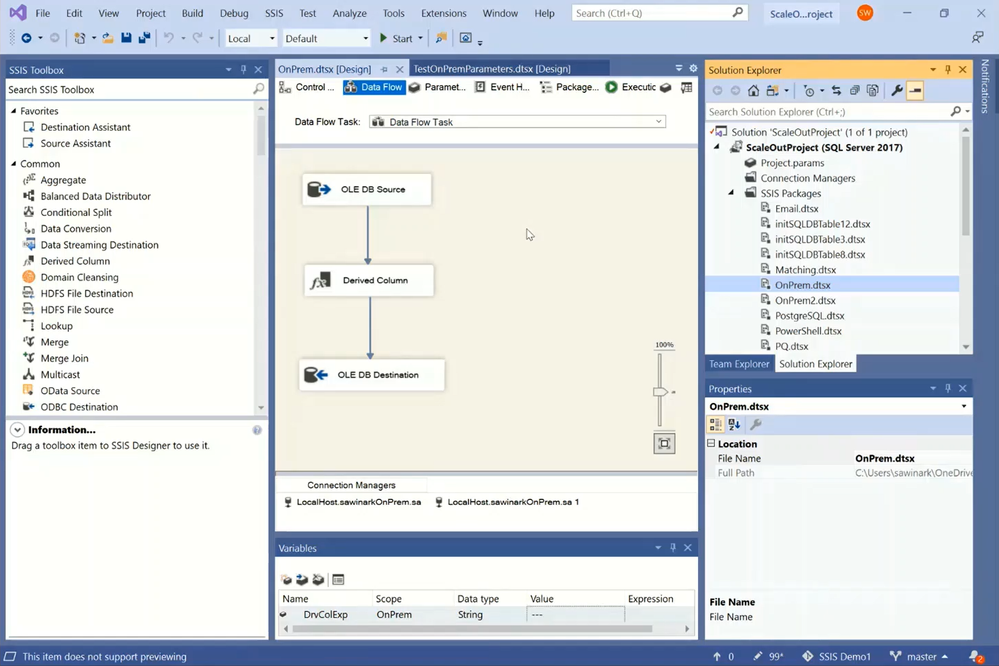
Let’s start by opening my existing on-premises SSIS project using the latest SSDT with SSIS Projects extension for Visual Studio (VS). The sample ETL package I use, OnPrem.dtsx, executes a Data Flow Task:
— It first extracts data from a database table in my SQL Server on premises using an OLEDB Source component that connects with Windows authentication.
— It then transforms the data using a Derived Column component that adds a new column filled by combining entries from other columns and a string user variable.
— It finally loads the transformed data into another database table in my SQL Server on premises using an OLEDB Destination component that connects with Windows authentication.
To assess the cloud compatibility of my sample package and test its execution in Azure, I need to Azure-enable my project in a VS configuration. I’ve already created five VS configurations to apply different package execution settings, one for executions on my local machine and four for executions on my SSIS Integration Runtime (SSIS IR) in Azure Data Factory (ADF). You can create new VS configurations using Configuration Manager.


You can Azure-enable your project using Azure-Enabled Project Wizard, where you’ll be guided to select your VS configuration, SSIS IR, and Azure Storage. In this way, when you execute your packages in Azure, SSDT will upload them to Azure Storage for your SSIS IR to fetch and run with the run-time settings from your selected VS configuration.


On Azure-Enabled Project Wizard, you can select your Azure subscription, under which you’ll then select your existing ADF and SSIS IR. If you don’t have any under your selected subscription, you can create new ones using Integration Runtime Creation Wizard.

On Integration Runtime Creation Wizard, you can select your Azure subscription, under which a new Azure Resource Group, ADF, and SSIS IR will be created, select an Azure region, where they’ll be created, and enter a prefix that will be used in their names.

After selecting your ADF and SSIS IR, you can select your Azure subscription, under which you’ll then select your existing Azure Storage. If you don’t have any under your selected subscription, you’ll be guided to create a new one. After selecting your SSIS IR and Azure Storage, you can connect them to your Azure-enabled project and assess its cloud compatibility, all packages at once or one by one.


Let’s assess the cloud compatibility of my sample package that was run on SSIS on premises to perform on-premises-to-on-premises ETL.


On the Assessment Report, you can observe six potential issues if my sample package is run on SSIS IR in ADF without any modifications:
— The first and second issues highlight the connection string property of source and destination connection managers that contains a host name.
— If the source and or destination stay on premises, then the host name can be resolved if this package runs on Self-Hosted IR as a proxy for SSIS IR or if a Domain Name System (DNS) server is configured for SSIS IR that joins a virtual network (VNet) connected to the on-premises network.
— If the source and or destination move to the cloud, for example to Azure SQL Database (DB)/Managed Instance (MI), then the connection string must be modified to use the appropriate data source, initial catalog, etc.
— The third and fourth issues highlight the connection string property of source and destination connection managers that uses Windows authentication.
— If the source and or destination stay on premises, then the Windows authentication feature of SSIS IR must be enabled.
— If the source and or destination move to the cloud, for example to Azure SQL DB/MI that don’t support Windows authentication, then the connection string must be modified to use SQL authentication or Azure Active Directory (AAD) authentication.
— The fifth and sixth issues highlight the connection string property of source and destination connection managers that uses a deprecated SQL Server Native Client (SQLNCLI) driver.
— If the source and or destination move to the cloud, for example to Azure SQL DB/MI, and I want to connect using AAD authentication, then the connection string must be modified to use the latest MSOLEDBSQL driver.
In order to run my sample package on SSIS IR in ADF, we can mitigate the compatibility issues in many ways, for example:
— We can mitigate the first, third, and fifth issues by keeping the source in SQL Server on premises and connecting to it using Windows authentication. This requires us to do the following:
— We need to configure Self-Hosted IR as a proxy for SSIS IR. I’ve done this when provisioning my SSIS IR, see https://docs.microsoft.com/azure/data-factory/self-hosted-integration-runtime-proxy-ssis.
— You can select your connected SSIS IR on SSDT to open its monitoring page in ADF portal, where you can see which Self-Hosted IR is configured as its proxy.


— You can also download, install, and register Self-Hosted IR on a local machine connected to the on-premises SQL Server. I’ve installed both Self-Hosted IR and SQL Server on my laptop.

— We also need to enable Windows authentication feature of SSIS IR:
— To do this in production, you can use Execute SSIS Package activities in ADF pipelines, SSIS catalog (SSISDB) stored procedures, or custom setups to run Windows cmdkey command, see https://docs.microsoft.com/azure/data-factory/ssis-azure-connect-with-windows-auth.
— To do this in testing from SSDT, you can use Azure-enabled settings on VS configuration.


— We finally need to enable the ConnectByProxy property of source connection manager:
— To do this in production without redesigning your existing packages, you can assign the appropriate values to your SSIS parameters, connection manager properties, or property overrides at run-time.
— To do this in testing from SSDT without redesigning your existing packages, you can use VS configurations with SSIS parameters/package configuration files on copies of your packages.
— We can also mitigate the second, fourth, and sixth issues by changing the destination to Azure SQL DB and connecting to it using AAD authentication with ADF managed identity. This requires us to do the following:
— We need to create a contained database user for ADF managed identity. You can do this on SQL Server Management Studio (SSMS), see https://docs.microsoft.com/sql/integration-services/connection-manager/ole-db-connection-manager?view=sql-server-ver15#managed-identities-for-azure-resources-authentication.
— We also need to modify the ConnectionString property of destination connection manager to use the appropriate data source, initial catalog, authentication method, and driver/provider, as well as to enable its ConnectUsingManagedIdentity property.
— To do this in production without redesigning your existing packages, you can assign the appropriate values to your SSIS parameters, connection manager properties, or property overrides at run-time.
— To do this in testing from SSDT without redesigning your existing packages, you can use VS configurations with SSIS parameters/package configuration files on copies of your packages.
Execution Testing in Azure
We can use VS configurations with SSIS parameters to mitigate the compatibility issues and test running my sample package on SSIS IR in ADF from SSDT.
— To avoid making any changes to the existing OnPrem.dtsx package, I’ve copied it as TestOnPremParameters.dtsx for testing.
— We can now parameterize the ConnectByProxy, ConnectionString, and ConnectUsingManagedIdentity properties of both source and destination connection managers.

— We can add those parameters to VS configurations and assign different run-time values to them for each configuration. I’ve already created five VS configurations:


— I have a Local configuration to run this package locally on my laptop and perform on-premises-to on-premises ETL:
— It will set the ConnectByProxy and ConnectUsingManagedIdentity properties of both source and destination connection managers to False.
— It will set the ConnectionString property of both source and destination connection managers to connect to SQL Server on premises using Windows authentication.
— I have an Azure configuration to run this package on SSIS IR in ADF and perform on-premises-to-cloud ETL:
— It will set the ConnectByProxy and ConnectUsingManagedIdentity properties of source and destination connection managers to True, respectively.
— It will set the ConnectionString property of source and destination connection managers to connect to SQL Server on premises using Windows authentication and to Azure SQL Database using AAD authentication with ADF managed identity, respectively.
— I have an Azure2 configuration to run this package on SSIS IR in ADF and perform cloud-to-on-premises ETL:
— It will set the ConnectUsingManagedIdentity and ConnectByProxy properties of source and destination connection managers to True, respectively.
— It will set the ConnectionString property of source and destination connection managers to connect to Azure SQL Database using AAD authentication with ADF managed identity and to SQL Server on premises using Windows authentication, respectively.
— I also have an Azure3 configuration to run this package on SSIS IR in ADF and perform on-premises-to-on-premises ETL:
— It will set the ConnectByProxy property of both source and destination connection managers to True.
— It will set the ConnectionString property of both source and destination connection managers to connect to SQL Server on premises using Windows authentication.
— And finally, I have an Azure4 configuration to run this package on SSIS IR in ADF and perform cloud-to-cloud ETL:
— It will set the ConnectUsingManagedIdentity property of both source and destination connection managers to True.
— It will set the ConnectionString property of both source and destination connection managers to connect to Azure SQL Database using AAD authentication w/ ADF managed identity.
Alternatively, we can use VS configurations with package configuration (dtsconfig) files to mitigate the compatibility issues and test running my sample package on SSIS IR in ADF from SSDT.
— To avoid making any changes to the existing OnPrem.dtsx package, I’ve copied it as TestOnPremConfiguration.dtsx for testing.
— We can now select the Configurations property of its Control Flow to open Package Configurations Organizer.

— On Package Configurations Organizer, you can open Package Configuration Wizard to create/edit a package configuration.

— On Package Configuration Wizard, you can select XML configuration file as the configuration type and enter the full path of your dtsconfig file.

— Next, you can select the package properties to be exported and configured in your dtsconfig file. In this case, these are the ConnectByProxy, ConnectionString, and ConnectUsingManagedIdentity properties of both source and destination connection managers.

— Finally, you can name, review, and generate your configuration.

Using XML editor app like XML Notepad, I’ve opened my dtsconfig file and enter the appropriate values for the selected package properties to perform on-premises-to-cloud ETL:

— It will set the ConnectByProxy and ConnectUsingManagedIdentity properties of source and destination connection managers to True, respectively.
— It will set the ConnectionString property of source and destination connection managers to connect to SQL Server on premises using Windows authentication and to Azure SQL Database using AAD authentication with ADF managed identity, respectively.
When I run TestOnPremParameters.dtsx/TestOnPremConfiguration.dtsx package on SSIS IR in ADF from SSDT using my Azure VS configuration with SSIS parameters/dtsconfig file, respectively, to perform on-premises-to-cloud ETL, the following happens:

— SSDT will upload it into Azure Storage for SSIS IR to fetch.
— SSIS IR will break it down into on-premises and cloud staging tasks.
— Self-Hosted IR will then run the on-premises staging task to extract data from on-premises SQL Server and stage it in Azure Storage blob container.
— SSIS IR will finally run the cloud staging task to move data from Azure Storage blob container, transform it, and load it into Azure SQL DB as the final destination.
Migration/Redeployment to Azure
After successfully assessing and testing all of your existing packages to run on SSIS IR in ADF from SSDT using VS configurations with SSIS parameters/package configuration files, you can migrate/redeploy them to Azure with no changes and run them in production by assigning the appropriate values to your SSIS parameters, connection manager properties, or property overrides at run-time.
Depending on your deployment model, you can use Integration Services Deployment Wizard on SSDT to deploy projects/packages into SSISDB hosted by Azure SQL DB/MI or dtutil command prompt utility to deploy packages into Azure Files or MSDB hosted by Azure SQL MI.
For more info, see the following docs:
https://docs.microsoft.com/sql/integration-services/packages/deploy-integration-services-ssis-projects-and-packages?view=sql-server-ver15
https://docs.microsoft.com/azure/data-factory/azure-ssis-integration-runtime-package-store#deploying-multiple-packages-with-dtutil
Alternatively, I can redeploy my existing OnPrem.dtsx package with no changes as an embedded package in ADF pipeline and assign the appropriate values to relevant connection manager properties at run-time to perform on-premises-to-cloud ETL.
For more info, see the following docs:
https://docs.microsoft.com/azure/data-factory/how-to-invoke-ssis-package-ssis-activity#package-location-embedded-package
https://docs.microsoft.com/azure/data-factory/how-to-invoke-ssis-package-ssis-activity#connection-managers-tab.
On ADF portal, I can select the Author hub to show my ADF pipeline with Execute SSIS Package activity, where on the Settings tab:

— I‘ve configured Windows authentication feature to access my SQL Server on premises.
— I‘ve configured Azure Key Vault (AKV) to store my password.
— I‘ve configured Embedded package as my package location to copy & paste/drag & drop OnPrem.dtsx into the activity payload.
On the Connection Managers tab:

— I‘ve configured ConnectByProxy, ConnectionString, and ConnectUsingManagedIdentity properties of both source and destination connection managers to assign the appropriate values to them at run-time to perform on-premises-to-cloud ETL.
On the Property Overrides tab:

— I‘ve configured a property override to assign new value to my string user variable at run-time.
I can now drag & drop the unchanged OnPrem.dtsx package into the activity payload and publish my pipeline.


When I run my pipeline with the embedded OnPrem.dtsx package on SSIS IR in ADF, the following happens:

— SSIS IR will break it down into on-premises and cloud staging tasks.
— Self-Hosted IR will then run the on-premises staging task to extract data from on-premises SQL Server and stage it in Azure Storage blob container.
— SSIS IR will finally run the cloud staging task to move data from Azure Storage blob container, transform it, and load it into Azure SQL DB as the final destination.
For more info on using Azure-enabled SSDT, see https://docs.microsoft.com/azure/data-factory/how-to-invoke-ssis-package-ssdt.
I hope you’ll find Azure-enabled SSDT useful for assessing the cloud compatibility of your existing packages, testing their executions in Azure, and migrating/redeploying them to run in Azure.
Please don’t hesitate to contact us if you have any feedbacks, questions, or issues, and we’ll follow up ASAP. Thank you as always for your support.
by Contributed | Jan 13, 2021 | Technology
This article is contributed. See the original author and article here.
Entering 2021, Microsoft Forms’ new features aim to streamline your experience of accessing, creating, and distributing forms. From text formatting, specific user sharing, and creating polls for form creators, to response downloads and immersive reader for form respondents, read on to learn about our latest updates.
Text Formatting in Forms
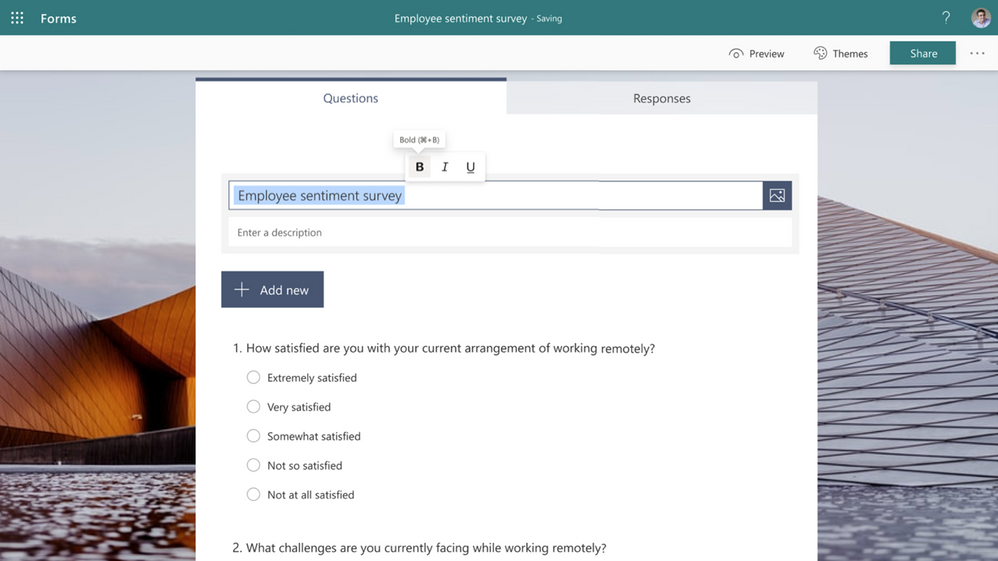
Bold, Italicize, or Underline Form Title
Soon, you can bold, italicize, or underline words in Forms, allowing you to create forms that emphasize and differentiate content with hierarchy. When composing any text content in your form, you can format the text via the floating tool bar that appears when you highlight the text. Or, format your text using the known keyboard shortcuts: control/command + B/I/U.
With a quick click or shortcut, you can highlight or lowlight information without leaving the current interface. Starting rollout soon, this feature will be generally available by late January.
 Bold, Italicize, or Underline Form Questions and Answer Choices
Specific User Sharing for Response Collection
With this feature, you can determine who within your organization is allowed to respond to a form or quiz you have created. Under the “Share” button, you can select “Specific people in my organization can respond” from the drop-down menu to activate this feature. Then, you can specify the particular individuals or groups by entering the individual or group email addresses.
 Specific People Can Respond – Desktop
This experience is just as intuitive on mobile, whether you are using the Office app or your mobile web browser. After tapping the paper airplane icon to share your phone, you will find the option to limit your respondent pool with “Specific people in my organization can respond.”
 Specific People Can Respond – Mobile
Download or Print Your Form Response
Soon, you can enable form respondents—both internal and external to your organization—to save or print a copy of their answers to your form or quiz. To enable this feature, head to “Settings” at the top right corner of your forms page, and select “Allow receipt of responses after submission.”
After completing the form, respondents will have the option to save or print a PDF of the form with their filled-in answers on the “Thank You” page. This feature is rolling out and will reach all users by the end of this month.
 Option to Print or Download Answers on Thank You page
Please note that selecting this setting still allows form respondents who are internal to your organization to ask for an email receipt of their form. For more information on this specific functionality, which was available since last January, please see our previous blog post.
New Forms Start Page Experience
If you have used Forms recently on either your desktop or mobile browser, you may have noticed that you land on a newly designed start page on Office.com. Whether you already access Forms from your sidebar on Office.com already, or you always visited forms.microsoft.com directly, you will experience this new interface as someone with an Enterprise, Business, Education, or Personal account.
 Office.com Forms Start Page
Right away, you can find your recently used forms. You can pin any of your forms for quick access under the “Pinned” tab. Under “Shared with me,” you’ll find all forms that have been shared with you as a collaborator. When you scroll to the bottom of the page, you can access group forms under the Microsoft 365 of which you are a part. Then, right above group forms, you can go to “All My Forms” to view a larger list of your forms. From there, you can find your deleted forms, as well as Copy, Move, and Delete any of your forms.
 Move, Copy or Delete Forms under “All My Forms”
Immersive Reader in Forms for Anonymous Users
Last year, we enabled immersive reader for students who are logged in to their Microsoft accounts to improve the readability and accessibility of Microsoft Forms on both desktop and mobile. Recently, we made Immersive Reader available to any respondents filling out a form, whether you are logged in to your Microsoft account or not. Simply click the “…” near the top of the form to enable Immersive Reader.
 Immersive Reader in Forms for All Respondents
Increased Capacity for Polls in Other Microsoft 365 Apps
With Polls in Teams Meetings becoming available in late November, we wanted to help you leverage polls not just in meetings, but across Outlook, PowerPoint Live Presentations, and Teams chat and channels too. Now, you have additional capacity to use polls in other apps: an additional 200 beyond the current 200-form limit. In other words, polls you create starting in January 2021 will count towards the new limit of 200; however, polls made before the end of December are still counted in the original 200-form limit.
We hope you explore and use these latest updates. If you have additional questions on Forms surveys, quizzes, or polls, please visit our Support page. To provide feedback, please visit our Forms UserVoice site. You can also join discussions in the Microsoft Forms Tech Community and follow the Forms Blog to stay updated in the future.


Recent Comments