by Contributed | Jan 30, 2021 | Technology
This article is contributed. See the original author and article here.
We had the wish to add native ReverseDsc support into SharePointDsc for over a year now, but technical issues prevented us from doing so. But I am glad to say that we have been able to resolve all issues and integrate the ReverseDsc orchestration script natively into SharePointDsc!! A huge thanks to Colin Hughes-Jones and Nik Charlebois for their help in solving these issues and achieving this milestone!
IMPORTANT: This does mean SharePointDsc now has a requirement for the ReverseDsc module to be installed as well. When installing from the PowerShell Gallery, this will be automatically installed.
But of course SharePointDsc v4.5 also contains a lot of bugfixes and even a new resource: SPDocIcon. With that resource you are able to manage the docicon.xml file in which icons are configured for various file types.
You can find the SharePointDsc v4.5 in the PowerShell Gallery!
NOTE: We can always use additional help in making SharePointDsc even better. So if you are interested in contributing to SharePointDsc, check-out the open issues in the issue list, check-out this post in our Wiki or leave a comment on this blog post.
Improvement/Fixes in v4.5:
Added
- SharePointDsc
- Added native support for ReverseDsc
- SPDocIcon
- SPUserProfileSyncConnection
- Added ability to update UseSSL and UseDisabledFilter parameters
- SPWordAutomationServiceApp
- Added ability to specify that the new service app should be added to the default proxy group
Changed
- SharePointDsc
- Updated pipeline build scripts
- SPProjectServerConnector
- Updated logic to check to required DLL file
- SPFarmAdministrators
- Update the event log messages so they are better formatted
- SPQuotaTemplate
- Updated resource to prevent errors when specified limits are conflicting configured values. E.g. new warning is high than the current max limit.
- SPTrustedIdentityTokenIssuer
- Do not set property ProviderSignOutUri in SharePoint 2013 as it does not exist
- SPUserProfileServiceApp
- Changed MySiteHostLocation to not be mandatory
- Added validation to Set function for testing if SiteNamingConflictResolution parameter is defined then also MySiteHostLocation parameters has to be because it is a mandatory parameter in the parameter set of New-SPProfileServiceApplication when SiteNamingConflictResolution is used.
- Added “MySiteHostLocation” to Test-SPDscParameterState function in Test-TargetResource
Fixed
- SPBlobCacheSettings
- Fixed issue where the Get method threw an error when the zone didn’t exist.
- SPTrustedIdentityTokenIssuer
- Do not set property ProviderSignOutUri in SharePoint 2013 as it does not exist
- SPWebAppPolicy
- Fixed a blocking issue introduced in version 4.4.0 when extracting cache accounts
Removed
- SharePointDsc
- Removed two old files from the previous CD/CI system
A huge thanks to the following guy for contributing to this project:
Colin Hughes-Jones, Nik Charlebois, Jens Otto Hatlevold, Yvan Duhamel and Petri Puustinen
Also a huge thanks to everybody who submitted issues and all that support this project. It wasn’t possible without all of your help!
For more information about how to install SharePointDsc, check our Readme.md.
Let us know in the comments what you think of this release! If you find any issues, please submit them in the issue list on GitHub.
Happy SharePointing!!
by Contributed | Jan 30, 2021 | Technology
This article is contributed. See the original author and article here.
Azure Data Lake Storage Gen2 (ADLS Gen2) is a set of capabilities dedicated to big data analytics, built on Azure Blob storage, so it supports Azure blob Storage API while also has its own File System API.
Blob Storage API: https://docs.microsoft.com/en-us/rest/api/storageservices/operations-on-blobs
File System API: https://docs.microsoft.com/en-us/rest/api/storageservices/data-lake-storage-gen2
These interfaces allow you to create and manage file systems, as well as to create and manage directories and files in file system. Azure Data Lake Storage Gen2 APIs support Azure Active Directory (Azure AD), Shared Key, and shared access signature (SAS) authorization.
In this blog, we will introduce how to use Azure AD service principal to upload file to ADLS gen2 through file system API using Powershell script.
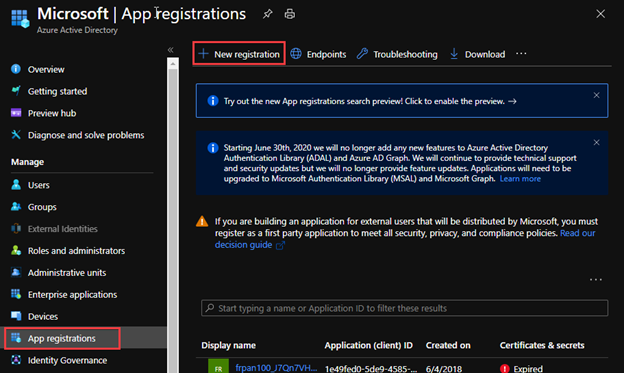
Part 1: Register an application with the Microsoft identity platform and apply the valid role assignment for access. https://docs.microsoft.com/en-us/azure/active-directory/develop/quickstart-register-app
1. Register a new application in Azure AD.
2. Select account type based on your business requirements.

3. Assign Storage Blob Data Owner role to the service principal, which grants the service principal full access to blob data rights. You may assign other blob data role according to your business requirements. For the details of built-in roles’ permissions please refer to the document https://docs.microsoft.com/en-us/azure/role-based-access-control/built-in-roles#storage-blob-data-owner.

Part 2: Generate an access token of the service principal for the Rest API calls. https://docs.microsoft.com/en-us/rest/api/azure/#client-credentials-grant-non-interactive-clients
1. In the Azure Portal application Overview, we can obtain the Application ID (client id) and Directory ID(tenant id).

2. In the Certificate & Secret, create a secret with an expiration time.


3. To generate an access token for the storage, we need to name the resource endpoint for storage resource provider as storage.azure.com.
In the document https://docs.microsoft.com/en-us/azure/active-directory/develop/v2-oauth2-client-creds-grant-flow#get-a-token, we can see how a token endpoint work in a common scenario.
Powershell function Example:
function Get-StorageAADAccessToken()
{
    param($TENANT_ID, $client_id, $client_secret)

    $URI="https://login.microsoftonline.com/$TENANT_ID/oauth2/v2.0/token" #We are using the oauth version 2
    $CONTENT_TYPE="application/x-www-form-urlencoded"

    $HEADERS = @{
        "Content-Type"=$CONTENT_TYPE
    }


    $grant_type="client_credentials"
    $resource="https://storage.azure.com/.default"

    $BODY="grant_type=$grant_type&client_id=$client_id&client_secret=$client_secret&scope=$resource"
    $ACCESS_TOKEN = (Invoke-RestMethod -method POST -Uri $URI -Headers $HEADERS -Body $BODY).access_token

    return $ACCESS_TOKEN
}
Part 3: Upload the file using File System interface.
To upload a file using file system interface will use the three APIs, Create File, Append Data and Flush Data. All APIs will use the *.dfs.core.windows.net endpoint instead of *.blob.core.windows.net endpoint.
Here is a logic flow to upload a large file.
- The first position is 0
- The next position is the last position plus the last content length.
- We can send multiple append data requests at the same time, but the position information needs to be calculated.

The Powershell methods example:
1. Create File is a Create API in the file system. By default, the destination is overwritten if the file already exists and has a broken lease.
function Create-AzureADLS2File()
{
    param($STORAGE_ACCOUNT_NAME, $ROOT, $PREFIX) ## storage account is the name of the ADLS gen2 account, root is the file system container, prefix is the path and file name of the storage account

    $URI="https://$STORAGE_ACCOUNT_NAME.dfs.core.windows.net/"+$ROOT+"/"+$PREFIX+"?resource=file"

    $DATE = [System.DateTime]::UtcNow.ToString("R")

    $ACCESS_TOKEN=Get-StorageAADAccessToken -TENANT_ID $TENANT_ID -client_id $CLIENT_ID -client_secret $CLIENT_SECRET

    $HEADERS = @{
        "x-ms-date"=$DATE
        "x-ms-version"="2019-12-12"
        "authorization"="Bearer $ACCESS_TOKEN"
    }
    Invoke-RestMethod -method PUT -Uri $URI -Headers $HEADERS
}
After create a file by the Powershell custom method below, you will get a zero size file.
Create-AzureADLS2File -STORAGE_ACCOUNT_NAME frankpanadls2 -ROOT test -PREFIX file1

2. Append Data is a part of Update API in the file system. “append” is to upload data by appending to a file.
function Upload-AzureADLS2File()
{
    param($STORAGE_ACCOUNT_NAME, $ROOT, $PREFIX, $POS, $BODY)

    $URI="https://$STORAGE_ACCOUNT_NAME.dfs.core.windows.net/"+$ROOT+"/"+$PREFIX+"?action=append&position=$POS"
    $DATE = [System.DateTime]::UtcNow.ToString("R")

$ACCESS_TOKEN= Get-StorageAADAccessToken -TENANT_ID $TENANT_ID -client_id $CLIENT_ID -client_secret $CLIENT_SECRET

    $HEADERS = @{
        "x-ms-date"=$DATE
        "x-ms-version"="2019-12-12"
        "authorization"="Bearer $ACCESS_TOKEN"
        "content-length"=0
    }

   Invoke-RestMethod -method PATCH -Uri $URI -Headers $HEADERS -Body $BODY
}
If we have content below, we can get a list of position and content length.
data row 1
data row 22
data row 333

Upload-AzureADLS2File -STORAGE_ACCOUNT_NAME frankpanadls2 -ROOT test -PREFIX file1 -POS 0 -BODY "data row 1`n"
Upload-AzureADLS2File -STORAGE_ACCOUNT_NAME frankpanadls2 -ROOT test -PREFIX file1 -POS 11 -BODY "data row 22`n"
Upload-AzureADLS2File -STORAGE_ACCOUNT_NAME frankpanadls2 -ROOT test -PREFIX file1 -POS 23 -BODY "data row 333`n"
There will be no data in the file until you flush all content in the file.

3. Flush Data is a part of Update API in the file system. “flush” is to flush previously uploaded data to a file. This request is similar to PutBlockList in the blob storage api, but will need to specify position.
function Flush-AzureADLS2File()
{
    param($STORAGE_ACCOUNT_NAME, $ROOT, $PREFIX, $POS)

    $URI="https://$STORAGE_ACCOUNT_NAME.dfs.core.windows.net/"+$ROOT+"/"+$PREFIX+"?action=flush&position=$POS"
    $DATE = [System.DateTime]::UtcNow.ToString("R")

    $ACCESS_TOKEN= Get-StorageAADAccessToken -TENANT_ID $TENANT_ID -client_id $CLIENT_ID -client_secret $CLIENT_SECRET

    $HEADERS = @{
        "x-ms-date"=$DATE
        "x-ms-version"="2019-12-12"
        "authorization"="Bearer $ACCESS_TOKEN"
        "content-length"=$POS
    }

    Invoke-RestMethod -method PATCH -Uri $URI -Headers $HEADERS
}
Flush-AzureADLS2File -AzureADLS2File -STORAGE_ACCOUNT_NAME frankpanadls2 -ROOT test -PREFIX file1 -POS 36
We will see the flushed file like below with all content.

by Contributed | Jan 30, 2021 | Technology
This article is contributed. See the original author and article here.
As a result of a government order, the Republic of South Sudan will move to Central Africa Time (UTC+02:00) at 00:00 AM local time on February 1, 2021.
Microsoft plans to release an update to support this time zone change; however, there is insufficient time to properly build, test, and release such an update before the change goes into effect. In the meantime, we recommend that individuals and organizations with devices in the Republic of South Sudan follow the interim guidance below.
Interim guidance
Microsoft recommends that users temporarily set the time zone on their devices to “(UTC+2:00) Harare, Pretoria” on February 1, 2021 at 00:00. Selecting this time zone will ensure that devices reflect the correct local time. (Note: events that have occurred in the past, before the update, will not show correctly.)
This can be done in one of the two ways:
- Select the Windows logo key, type “time zone”, and select Change the time zone. From the time zone dropdown, select “(UTC+2:00) Harare, Pretoria”.
- Navigate to Control Panel > Date and Time > Change time zone. From the time zone dropdown, select “(UTC+2:00) Harare, Pretoria”. Select OK to apply the change.
We recommend switching time zone settings to “(UTC+2:00) Juba” after the update from Microsoft has been released and installed.
For Microsoft’s official policy on DST and time zone changes, please see Daylight saving time help and support. For information on how to update Windows to use the latest global time zone rules, see How to configure daylight saving time for Microsoft Windows operating systems.
by Contributed | Jan 29, 2021 | Technology
This article is contributed. See the original author and article here.
Update 2101 for the Technical Preview Branch of Microsoft Endpoint Configuration Manager has been released. You can now download console extensions from the Community hub and have it applied to all consoles connected to a hierarchy. This improvement allows you to start managing the approval and installation of console extensions used in your environment.
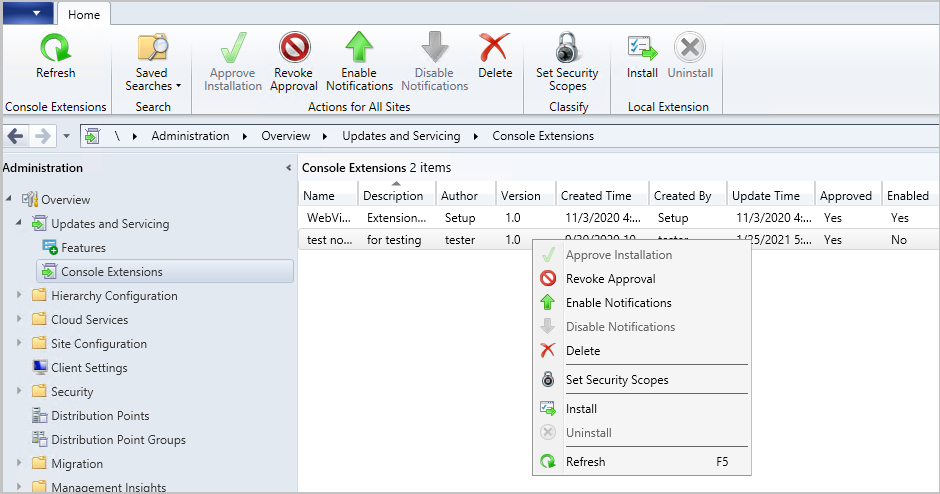
A new node has been added to the Configuration Manager console. The Console Extensions node is located under Administration > Overview > Updates and Servicing. Console extensions downloaded from the community hub will be located here. Actions for console extensions are grouped in the ribbon and the right-click menu.
Console extensions node
Actions include:
- Approve Installation: Approves the console extension for installation across all sites. An extension must be approved before notifications are enabled.
- Revoke Approval:
- Revokes the ability to install the extension from the Console Extensions node.
- Notifies then uninstalls existing instances of the extension across the hierarchy at the next launch of a locally installed console.
- Allows for reapproval of the extension at a later date.
- Enable Notifications: Upon next launch of the console, notifies users within the security scope that the extension can be installed.
- Disable Notifications: Disables the console notification messages for the extension. Users within the security scope can still install approved extensions from the Console Extensions node.
- Delete:
- Revokes the ability to install the extension from the Console Extensions node.
- Notifies then uninstalls existing instances of the extension across the hierarchy at the next launch of a locally installed console.
- Removes the extension from the Console Extensions node so it can’t be reapproved later.
- Set Security Scopes: Set the security scopes to secure the object and limit access.
- Install: Installs the selected extension for the current local console
- Uninstall: Uninstalls the selected extension from the current local console
Learn more about managing console extensions.
This preview release also includes:
Deploy a feature update with a task sequence – Based on your UserVoice feedback, you can now upgrade a client’s Windows OS by using a feature update deployed with a task sequence. This integration combines the simplicity of Windows servicing with the flexibility of task sequences. Servicing uses a single ESD file that you synchronize through the software update point. This process simplifies the need to manually get, import, and maintain the Windows image content used with a standard task sequence to upgrade Windows. The size of the ESD file is generally smaller than the WIM image file.
Tenant Attach: Required application deployments display in Microsoft Endpoint Manager admin center – Applications targeted to a device or a user with a required deadline will now show in the Applications view for a tenant attached device in Microsoft Endpoint Manager admin center. This improvement allows you to review when application installations are expected to occur on a device.
Client setting for displaying Software Center custom tabs – Technical preview version 2012 included an improved user experience and security with Software Center custom tabs. It required that you manually deploy the Microsoft Edge WebView2 browser control. Starting in this release, you can now configure a client setting to use the WebView2 control.
Simplified CMPivot permissions requirements – We’ve simplified the CMPivot permissions requirements. The following changes have been made:
- CMPivot no longer requires SMS Scripts read permission
- The administration service still requires this permission when falling back to use the SMS Provider when a 503 (Service Unavailable) error is received, as seen in the CMPivot.log
- The default scope permission isn’t required.
Allow exclusion of organizational units (OU) from Active Directory User Discovery – You can now exclude OUs from Active Directory User Discovery.
Changes to Support Center – Support Center is now split into the following tools:
- Support Center Client Data Collector: Collects data from a device to view in the Support Center Viewer. This separate tool encompasses the existing Support Center action to Collect selected data.
- Support Center Client Tools: The other Support Center troubleshooting functionality, except for Collect selected data.
Prerequisite rule for deprecated Azure Monitor connector – We continue to see broad adoption of native Azure Monitor log query groups as customers shift more of their workloads to the cloud. Because of this reason, starting in November 2020, the Configuration Manager feature to synchronize collections to Azure Monitor is deprecated. When you update to this release, a new prerequisite check warns about the presence of the Log Analytics connector for Azure Monitor. This connector is deprecated and will be removed from the product in a future release. At that time, this check will be an error that blocks upgrade.
Manage aged distribution point messages – In some environments, a small number of error status messages for a distribution point can cause the entire server status to show an error state. This behavior could be due to a known issue when failing to distribute content. To help you better manage the state of distribution points, this release includes the following improvements:
- Delete a specific distribution point status message.
- Delete aged status messages for a specific distribution point.
- Configure a site maintenance task to Delete Aged Distribution Point Messages.
Encryption algorithm to capture and restore user state – The task sequence steps to Capture User State and Restore User State always encrypt the USMT state store. Previously, Configuration Manager configured USMT to use the 3DES algorithm. Starting in this release, both steps now use the highest supported encryption algorithm, AES 256.
PowerShell release notes preview – These release notes summarize changes to the Configuration Manager PowerShell cmdlets in technical preview version 2101.
Update 2101 for Technical Preview Branch is available in the Microsoft Endpoint Configuration Manager Technical Preview console. For new installations, the 2010 baseline version of Microsoft Endpoint Configuration Manager Technical Preview Branch is available on the Microsoft Evaluation Center. Technical Preview Branch releases give you an opportunity to try out new Configuration Manager features in a test environment before they are made generally available.
We would love to hear your thoughts about the latest Technical Preview! Send us Feedback about product issues directly from the console and use our UserVoice page for ideas about new features.
Thanks,
The Configuration Manager team
Configuration Manager Resources:
Documentation for Configuration Manager Technical Previews
Try the Configuration Manager Technical Preview Branch
Documentation for Configuration Manager
Microsoft Endpoint Manager announcement
Microsoft Endpoint Manager vision statement
Configuration Manager Forums
Configuration Manager Support
by Contributed | Jan 29, 2021 | Technology
This article is contributed. See the original author and article here.
Howdy folks,
We continue to hear from you that hybrid identity is as important as ever, even as more apps move to the cloud. In Azure AD, our key hybrid identity tool is Azure AD Connect. This comes in two flavors based on your use case needs: Azure AD Connect sync which lives on-premises, and Azure AD Connect cloud sync which is powered by the cloud. We are constantly improving these capabilities based on your feedback, to make it easier to deploy and configure while also improving security, scale and throughput.
Today we’re announcing Azure AD Connect cloud sync is generally available! This was formerly known as Azure AD Connect cloud provisioning during its preview. We have also made significant updates to our classic Azure AD Connect sync tool with improved scale and performance.
Azure AD Connect cloud sync general availability
Azure AD Connect cloud sync is the future of our hybrid identity sync capabilities. It moves all the heavy-lifting of the transform logic to the cloud. It also reduces the on-premises footprint with light-weight agents that can be distributed for enterprise-grade availability. Customers can deploy this either standalone, or even alongside Azure AD connect sync. When deployed together, it allows you to connect disconnected AD forests that arise from merger and acquisition or remote office location scenarios. To see the differences in the sync capabilities within Azure AD Connect, check our comparison chart.
Since our public preview, we’ve introduced some additional capabilities:
- Enhanced security with support for gMSA: Using the group Managed Service Account (gMSA), you no longer need to provide domain admin credentials to run the sync agent. You can either use your own custom gMSA account or the one defined by us.
- Ability to sync large directories with up to 150,000 directory objects per configuration and large groups with up to 50,000 members.
- Prevent accidental deletes by configuring a threshold for deletes beyond which you get notified to take action.
- Health features that allow you to monitor your sync service and resolve common data issues such as duplicate attribute values.
- Advanced troubleshooting tools that helps your organization easily find out if something goes wrong with your sync configuration.
To get up and running with Azure AD Connect cloud sync today, check out our documentation.
Azure AD Connect sync updates
Many of you have been using classic Azure AD Connect sync for years as the primary means to bridge your hybrid identity. We’ve heard that as your business and teams grow, you need higher throughput on syncs as well as be able to sync larger groups. With the general availability of our v2 end point and latest build of Azure AD Connect sync, you can now sync groups of up to 250,000 members and customers who previewed the new end point saw 3 to 10x improvement in performance on average on their sync times. One customer told us that this update “has resulted in dramatic performance improvements on our delta synchronizations. Before, during the work week, the average was constantly around 5 hours. This week it is 25 minutes.”
To try the v2 end point and make sure you’re using the latest build of Azure AD Connect sync, check out our documentation.
As always, we’d love to hear from you. Please let us know what you think in the comments below or on the Azure AD feedback forum.
Best regards,
Alex Simons (twitter: @alex_a_simons)
Corporate Vice President Program Management
Microsoft Identity Division

Recent Comments