Teams Direct Routing and Local Media Optimization

Teams Direct Routing and Local Media Optimization

This article is contributed. See the original author and article here.

Teams Phone System and Direct Routing is more important than ever because it helps companies and their employees to stay connected with their office number even if they are working from home.
To gain best audio quality in a PSTN phone call it is important to understand how local media optimization can support this scenario and how to configure it.


With Teams Phone System in general companies can close the gap between working from anywhere and still stay connected with the office phone number. This is an often-underestimated scenario. Users can use legacy technologies like VPN securely to get a company access from home. They can use Office 365 services like Exchange Online and SharePoint Online to collaborate with colleagues and get work done. But one missing piece is most often left out: the desk phone in the office. With a legacy PBX system, it is difficult to bring the office phone number at home to the user. Here Microsoft Teams Phone System can help and support you. The Microsoft Teams Client will be extended by PSTN calling and the user is reachable under the office number in their home office or wherever they like to work.
But as often: there is no joy without sorrow. The network part and especially the WAN connection is critical. If the roundtrip time for the audio packages in the network is not optimal, users are complaining about bad audio quality and the well-intended solution can turn into a fiasco.


To offer the best experience for your users, Microsoft provides several techniques and features to optimize the media flow for this scenario.


Media Flow in Microsoft Teams– some basics
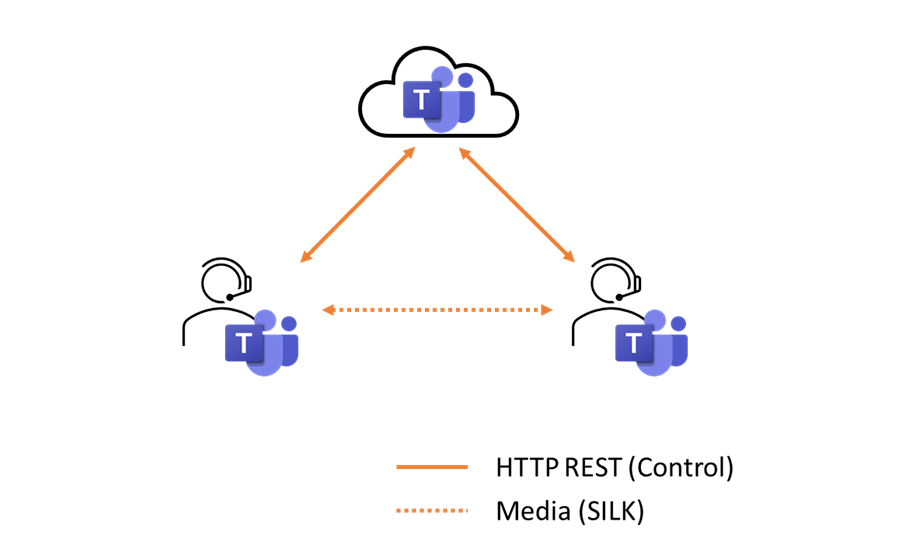
In case of Microsoft Teams, we must two types of media flow. The first scenario is a 1:1 scenario. Microsoft Teams always tries to use the shortest network path for transmitting the data packages. In this 1:1 scenario this is a direct connection between the two endpoints. To optimize the flow even further, Microsoft Teams will try to establish a UDP connection first and will switch to a TCP connection if the first one is not possible.

Figure 1 - Media flow 1:1 callFigure 1 – Media flow 1:1 call


The second scenario is the Meeting scenario. A meeting scenario can be a scheduled online meeting, but also when you start a one on one conversation and add a third person to it, it will be turned into a meeting. And in case of a meeting, the media flow is always to the Office 365 platform as the central meeting platform.

Figure 2 - Media Flow in Teams MeetingFigure 2 – Media Flow in Teams Meeting


In case of PSTN Calling with Teams Direct Routing a session border controller is required. A session border controller (SBC) terminates the PSTN connection from the provider and routes inbound calls to the Teams platform and vice versa. Therefor the media flow for a PSTN call is slightly different because there is at least one more hop: the SBC itself where the audio packages will be routed through.


Media Flow and Microsoft Teams Direct Routing – default scenario
In a default scenario without Media Optimization, the audio packages will be routed from the SBC to the Microsoft Teams platform and from there to the Teams endpoint. In case of an employee inside the company, the media stream traverses the firewall twice: first time from the SBC to Office 365 and for a second time from the Office 365 platform to the user. As you can imagine this costs bandwidth and, of course, package runtime.

Figure 3 - Default Media Flow with Teams Direct RoutingFigure 3 – Default Media Flow with Teams Direct Routing


How to optimize Media Flow with Teams Direct Routing – Media Bypass
The first step to optimize the media flow is a well know technique from Microsoft Lync and Skype for Business deployments: Media Bypass.

Figure 4 - Media Flow with Teams Direct Routing and Media BypassFigure 4 – Media Flow with Teams Direct Routing and Media Bypass


If the Microsoft Teams endpoint can communicate directly to the SBC external IP address, the call is established with Media Bypass. This means that the audio data are transmitted directly between the Teams endpoint and the SBC itself. The audio data does not traverse the firewall and the routing is optimized. Additionally, you have the option to prioritize Microsoft Teams audio data in your network with Quality of Service.


With a current firmware release installed on the SBC and Local Media Optimization, you can configure the SBC to provide an internal facing network adapter to use for Media Bypass, too. The Teams client will send and receive the audio packages to and from an internal IP address of the SBC directly.
In the past, you had to configure the external interface with the public IP address for Media Bypass, so that internal clients use the external IP for a direct connection. This made it very hard and complex because your firewall had to support this scenario.


The advantages are very simple: the media flow stays in your local network and you can control it better with Quality of service. Also, the firewall configuration is much simpler for this scenario.


Local Media Optimization with Centralized SBC for Branch Offices
For your branch offices you can use Media Bypass as a centralized SBC, too. In this scenario the different phone number ranges for your offices will terminate on one SBC in your datacenter. The SBC will do the routing between the users in the branch offices and the Microsoft Teams platform.

Figure 5 - Media Flow with Media Bypass from the Branch OfficeFigure 5 – Media Flow with Media Bypass from the Branch Office


Local Media Optimization with Proxy SBC
A second option for your branch office can be to implement a Proxy SBC in your main datacenter and local SBC systems on site. In this scenario, the Proxy SBC is used for the central communication to the Microsoft Teams platform. The SBC in the branch site is responsible for the local PSTN connection and will route calls over the Proxy SBC to Microsoft Teams and vice versa.


In this scenario a Proxy SBC can help to reduce the requirements to your infrastructure. Only a single SBC instance must be configured to work with Microsoft Teams. Also, it is often used where a centralized SBC is not possible when there are some regulatory or the onsite SBC does not meet the technical requirements.

Figure 6 - Proxy SBC for the Branch OfficeFigure 6 – Proxy SBC for the Branch Office


Can Home Office users participate from Media Bypass?
Of course, Media Bypass and local Media Optimization also provides some benefits for your home office and mobile users.


Microsoft provides several Transport Relay servers in their worldwide datacenters. Best practice is to allow the Teams subnet networks to communicate to the public SBC IP address for media traffic. It is also possible to open the SBC public IP address to your mobile worker, but it is quite difficult to manage this. Each time they connect to the internet, they will use another public IP address. Therefor my recommendation is to allow only the Teams subnet networks to your SBC public IP and to benefit from the Microsoft Global Network.


If you are doing so, the audio data from the home user will be transmitted to one of the nearest Transport Relay server of the Microsoft Global Network. Pay attention that your users can use a local internet break out and reach the nearest egress point to the Microsoft Global Network. The Microsoft Transport Relay server will connect to the SBC directly and will establish a communication. And here is the same behavior: the path from the Microsoft Global Network to your SBC will be shorten to the most necessary. That is why even your home user will benefit from Media Bypass. The runtime of the audio packages is optimized with the help of the Microsoft Global network.

Figure 7.png


How to configure Media Bypass and local Media Optimization
To configure Media Bypass and Local Media Optimization you must check if your installed SBC firmware already supports this feature. If not, ask your vendor for a current release and install it on the SBC.


Then you must configure your network topology in the Microsoft Teams Admin Center, so the Teams platform is aware of your network infrastructure. You can allow or decline Media Bypass in two ways, as we already know from the good old times: Always ByPass or Local Only.


In case of Always ByPass the Microsoft Teams endpoint tries to connect directly to the SBC every time, regardless of where the user is located in your network.


When you configure Local Only, Media Bypass will only be used, if the user is in the same network site as the SBC. If each one is in a separate network site, the media flow is routed to a Microsoft Transport server and then to the SBC.


Therefor you must configure Regions and Sites in the Teams Admin Center or with PowerShell. Next you assign your networks to a site. You must configure the trusted WAN IP addresses as well. Theses are the public IP addresses used by your users to connect to Microsoft Teams. According to this information and the network topology, Microsoft Teams will allow to use Media Bypass for the endpoint.


The last step is to enable Media Bypass on the SBC level in the Teams Admin Center or on the PowerShell.


More information can be found on Microsoft Docs Configure Local Media Optimization for Direct Routing


Get started with PowerShell on Microsoft Learn!

This article is contributed. See the original author and article here.

Over the last couple of years, the use of PowerShell became more and more important. I remember running my first commands and building my first automation using Windows PowerShell back in 2006. Since then, PowerShell became one of my daily tools to build, deploy, manage IT environments. With the release of PowerShell version 6 and now PowerShell 7, PowerShell became cross-platform. This means you can now use it on even more systems like Linux and macOS. With PowerShell becoming more and more powerful (you see what I did here ;)), more people are asking me how they can get started with PowerShell. Luckily we just released a new module called “Introduction to PowerShell” on Microsoft Learn.


In this module, you will learn about the basics of PowerShell. This cross-platform command-line shell and scripting language is built for task automation and configuration management. You’ll learn basics like what PowerShell is, what it’s used for, and how to use it. 


After you have completed this module, you will be able to understand what PowerShell is and what you can use it for, explore different cmdlets, construct a sequence of cmdlets in a pipeline, and apply sound filtering and formatting principles to your commands. 


The Introduction to PowerShell module includes 9 units:


I hope this helps you get started with PowerShell! If you have any questions feel free to leave a comment!


Self-restore Deleted APIM Service

Self-restore Deleted APIM Service

This article is contributed. See the original author and article here.

In November 2020, we released a new feature that allows Users to restore the accidentally deleted API Management service using the corresponding REST APIs. Users shall use these new APIs to restore an accidentally deleted service only if the API Management service has been deleted with REST API version 2020-06-01-preview or higher.


Currently if user deletes their API Management service from Azure Portal under “All Resources” page or if they delete the Resource Group where API Management service exists, Azure Resource Manager will send a DELETE request to API Management service with API version 2020-06-01-preview. In this case, the service will be placed in a “soft deleted” state.  We are planning to make all the “delete API Management” operation consistent with API version 2020-06-01-preview throughout Azure portal soon.


Purge API Management Service at “soft deleted” state


If you accidentally delete the API Management Service with the API version before 2020-06-01-preview, the deleted API Management service name will be immediately release and you will be able to re-create a new service with same name. if you want to restore the services, please contact support.


If the API Management service was deleted with API version 2020-06-01-preview or higher, then the API Management service will be left in a “soft deleted” state and you will be able to restore the service yourself. However, you cannot create an APIM with the same name immediately, if you want to create a new APIM service with same name, you can purge the “soft deleted” state APIM, please note that we cannot undelete a purged API Management service.


Please see examples below and I will use my APIM “jiaapim-testdelete” as an example.


Purge the APIM by using API: Deleted Services – Purge (Azure API Management) | Microsoft Docs


gujia93_0-1607484841237.png


The response will return the deleted service name and the date that the APIM service was purged. 


gujia93_1-1607484884018.png


Prerequisites of restore APIM


Please see examples below and I will use my APIM “jiaapim-external” as an example.


A deleted API Management service can be restored by yourself ONLY if the following conditions are TRUE:


  1. The API Management service was deleted with API version 2020-06-01-preview or higher and currently in a “soft deleted” state. When the API Management service is deleted, we keep the service in a “soft deleted” state for 2 days. This is subject to change without notice.


gujia93_2-1607484967428.png


gujia93_3-1607485024622.png


  1. The resource group where the original service resided at the time of being deleted still exists in your subscription. If you had deleted the resource group, you must re-create it with the same name for the restore operation to be successful.


Please note that we CANNOT:


  1. Restore a service that has been permanently deleted (the service is no longer in “soft deleted” state)


  1. Restore only certain entities of a given service. For example, if a user accidentally deletes an API or Operation from a service, we cannot restore those entities. We can only restore a deleted service.


  1. Rename the service upon or during restore, move it to a different resource group or a subscription. The service will always be restored with the same name, to the same resource group and in the same subscription.


Restore APIM services


After going the prerequisites of restoring APIM above, then let’s see how to restore an API Management service at “soft deleted” state. You can simply use this API Api Management Service – Create Or Update (Azure API Management) | Microsoft Docs. The request URL should contain the original APIM service name, resource group name. The request body should contain the retore property and setting it to true


Example of request body shown below:


{

    “properties”: {

        “publisherEmail”“gujia@microsoft.com”,

        “restore”true

    },

    “sku”: {

        “name”“Premium”,

        “capacity”1

    },

    “location”“australia east”


gujia93_4-1607485120612.png


Response payload returned means the API Management service is being restored. Please see example below:


gujia93_0-1607483196504.png


Additional Considerations


The Public VIP (I.P. Address) of the service will change after the restore. If your backend service was configured to only allow traffic from certain I.P. addresses, you may have to change the configuration to allow the new I.P. address (I.P. address can be obtained from the “Overview” blade of the Azure Portal).


gujia93_2-1607483963658.png


If the service was in an external/internal VNET and the VNET/subnet has also been deleted, the service will be restored as if it is not in a VNET (this operation may fail, retry will help). If you need to add this restored API Management service to a VNET, then you will need to create a new VNET and add the restored APIM service to the VNET.


Top 5 new features coming from Microsoft Surface Hub

Top 5 new features coming from Microsoft Surface Hub

This article is contributed. See the original author and article here.

On the Surface Marketing team we’re often asked for a concise highlight of features and functionalities of our products.  With all the new things rolling out for Surface Hub 2S — Proximity Join, Coordinated Meeting with Microsoft Teams Room, the latest Windows 10 Team 2020 Update, the upcoming arrival of the Surface Hub 2S 85″ and running Windows 10 Pro on Surface Hub 2S — we decided to create a Top 5 feature list.  We also tried to make it as light hearted as possible and have some fun with it.


So check it out and let us know what you think…


top-5-surface-hub-features.png

OpenSSL Releases Security Update

This article is contributed. See the original author and article here.

Original release date: December 8, 2020

OpenSSL has released a security update to address a vulnerability affecting all versions of 1.0.2 and 1.1.1 released before version 1.1.1i. An attacker could exploit this vulnerability to cause a denial-of-service condition.

The Cybersecurity and Infrastructure Security Agency (CISA) encourages users and administrators to review the OpenSSL Security Advisory and apply the necessary update.

This product is provided subject to this Notification and this Privacy & Use policy.