by Contributed | Dec 10, 2020 | Technology
This article is contributed. See the original author and article here.
By Jason Sandys – Sr. Program Manager | Microsoft Endpoint Manager
Two significant actions on Windows devices require code-signing using a trusted, code-signing certificate:
In the case of third-party application updates, the tool used to inject the updates into the WSUS catalog signs the updates using a code-signing certificate that you provide. This signing is strictly required and enforced by Windows.
You must manually sign PowerShell scripts; this is also strictly required and enforced by Windows if the system’s execution policy mandates this. See about signing in the PowerShell documentation for more details on script signing and the execution policy. See Hey, Scripting Guy! How Can I Sign Windows PowerShell Scripts with an Enterprise Windows PKI? for a detailed step-by-step of signing a script.
In addition to Windows trusting the code-signing certificate used to sign third-party application updates and PowerShell scripts, the certificate must also exist in the Trusted Publishers certificate store on systems installing the third-party update or running the PowerShell script. Adding a certificate to the Trusted Publishers store for a Windows device using Intune is straight forward but involves a few steps as outlined below.
What’s needed
You need the following three items to add a certificate to the Trusted Publishers store using Intune.
- The code-signing certificate you wish to add.
- The base-64 encoded version of the code-signing certificate.
- The thumbprint of the code-signing certificate.
You do not require the private key for the certificate; you only need the private key when signing a file including scripts and third-party updates.
The code-signing certificate
If you do not have a copy of the code-signing certificate, you can extract it from a file previously signed by the certificate using the following steps:
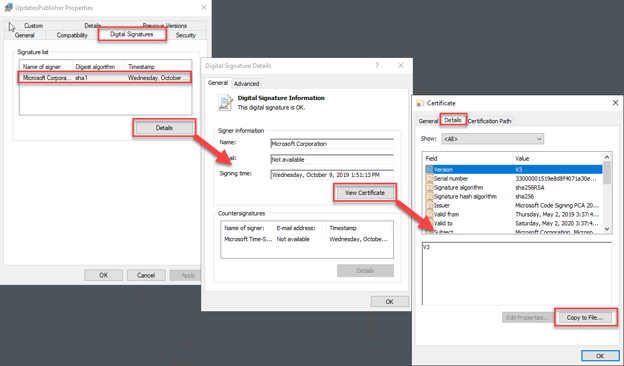
Right-click on the signed file and choose Properties.
Choose the Digital Signatures tab. If this tab does not appear, then the file is not signed.
Choose the appropriate signature from the Signatures list and then press the Details button. Most files will only have a single signature.
In the Digital Signature Details dialog, choose View Certificate.
In the Certificate dialog, choose the Details tab and press Copy to File.
Complete the Certificate Export Wizard to create a CER file containing the certificate. Choose Base-64 encoded x.509 (.CER) for the Export File Format.
Press OK on the three open dialogs.
Code-signing certificate dialog boxes
Thumbprint of the certificate
A certificate’s thumbprint is a dynamically computed identifier that uniquely distinguishes it from other certificates. You can retrieve the thumbprint of a certificate in various ways, including the following:
- From the properties of the certificate. You can do this for either a certificate stored in a file (like the .CER file extracted above) or a certificate stored in the Windows certificate store:
- Open the certificate by double-clicking the file or the certificate’s entry in the MMC Certificates snap-in. You can also right-click on the certificate and choose Open from the context menu.
- On the Details tab, scroll down to and select the Thumbprint item in the list box.
- Copy the thumbprint from the details pane in the dialog.
- Press OK to close the open Certificate dialog.
- Using PowerShell:
- For a certificate stored in a file (like the .CER file extracted above):
[System.Security.Cryptography.X509Certificates.X509Certificate2]::new("<path_to_certificate>")).thumbprint
 PowerShell terminal displaying the thumbprint of certs stored in a file
- For a certificate stored in your Personal certificate store:
Get-ChildItem -Path Cert:CurrentUserMy | Format-Lis
 PowerShell terminal displaying the thumbprint of certs stored in a Personal certificate store
Base-64 encoded version of the certificate
The base-64 encoded version of a certificate is a string-based representation of the certificate. This version contains the complete certificate but in a more portable format that is not bound to a file. Similar to the thumbprint, you can obtain the base-64 encoded version of a certain in several ways, including the following:
- From a base-64 encoded .CER file (like the .CER file extracted above):
- Open the created .CER file with Notepad.
- Copy the lines between —–BEGIN CERTIFICATE—– and —–END CERTIFICATE—–.
- Close Notepad.
- Using PowerShell:
- For a certificate stored in your Personal certificate store:
[System.Convert]::ToBase64String((Get-Item -Path Cert:CurrentUserMy<thumbprint>).RawData, 'InsertLineBreaks')
 PowerShell terminal displaying the thumbprint of Base-64 certs stored in a Personal certificate store
- For a certificate stored in a .CER file:
System.Convert]::ToBase64String(([System.Security.Cryptography.X509Certificates.X509Certificate2]::new("<path_to_certificate>")).Export('Cert'), 'InsertLineBreaks')
 PowerShell terminal displaying the thumbprint of Base-64 certs stored in a .CER file
The Step-By-Step Guide
To add a certificate to the Trusted Publishers store using Intune, use a custom profile and an OMA-URI to apply a setting from the RootCATrustedCertificates CSP.
- Follow the instructions at Create a profile with custom settings in Intune to create a new, custom, Windows 10 device configuration profile.
- Use the following values for the fields in the custom profile:
- Name: The name of the certificate.
- OMA-URI: ./Device/Vendor/MSFT/RootCATrustedCertificates/TrustedPublisher/<thumbprint>/EncodedCertificate
- Data type: String
- Value: The base-64 encoded version of the certificate.
 Intune – OMA-URI policy settings
- Add scope tags and assignments as necessary.
Additional Notes
- Windows systems should already trust certificates issued by a public CA. When using a certificate from an alternate source for any purpose, including those listed in this article, you need to add the root certificates for the PKI that issued the certificate to your managed Windows devices. See Create trusted certificate profiles in Microsoft Intune for steps to do this using Intune.
- Through the magic of Authenticode, a signature is still valid even if the code-signing certificate used to sign a file is past its expiration date. As long as the certificate was valid when it was used to sign a file, then the expiration of the certificate itself does not impact the validity of the signature.
- Driver and Windows update installation also require signing using a trusted code-signing certificate, however, either Microsoft or the hardware vendor that creates and supplies the associated files signs them. Administrators do not have to add any certificates to the Trusted Publishers store and no additional action is necessary to install either of these.
- If you’re not signing your PowerShell scripts and configuring an execution policy to require signing of PowerShell scripts, you should strongly reconsider your practices as this is a very important safety measure (more on this in a follow-up post).
- You can also use certutil.exe for all of the operations above. Official documentation on certutil.exe is sparse, though, so this is left as an exercise for the reader if desired.
Let us know if you have any additional questions on this by replying back to this post or tagging @JasonSandys or @IntuneSuppTeam out on Twitter.
by Contributed | Dec 10, 2020 | Technology
This article is contributed. See the original author and article here.
The Data Hub in Azure Synapse is a central place where you can view and interact with your data sources and, most importantly, query across all of your data sources. Combine this with the Azure Open Datasets found in the Knowledge Center; you can augment your organizational data in a matter of seconds. Azure Open Datasets includes sample data important to business trends; here, you will find data relative to COVID-19, transportation, weather, economic indicators, and more.
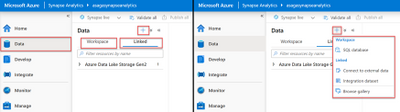
Anatomy of the Data Hub
The Data Hub is available from the Synapse Studio left menu and is represented by the database cylinder icon. There are two tabs in the Data Hub blade, Workspace and Linked. The Workspace tab is where you will find your workspace databases for both SQL and Spark. The Linked tab is where you find linked external datasets and integration datasets used in data flows and pipelines. There are over 95 connectors to various data-centric storage technologies. It is also in this linked area where you will find sample data obtained from Azure Open Datasets.
In the header of the Data Hub blade, you will find the + menu. This menu provides the ability to add a new SQL database, connect to external data, create integration datasets, or browse the Knowledge Center gallery.
Image of the Data Hub tabs and + menu
The Data Hub blade provides quick access to your workspace and linked data stores through convenient Action (context) menus. For example, if you select the Views folder of a SQL pool, the context menu provides an option to create a New SQL Script with the option to scaffold a Create View query.

The Actions menu for a SQL pool Views folder is displayed
For linked storage accounts, the context menu gives you the choice of interacting with data via scaffolded SQL scripts or Apache Spark notebooks. In addition to this, when browsing a storage container, a handy data explorer tab will open. The data explorer’s taskbar provides even more actions directly at your fingertips, including the ability to upload and download files, manage ACL access, create an integration dataset, and more!

A data explorer tab is displayed
Creating a serverless SQL pool
Let’s create a serverless SQL Pool from within the Data Hub and observe how it gets added to the Workspace tab. Expand the + menu on theData Hub blade and select SQL database beneath the Workspace heading. To the right, a Create SQL database blade appears where you have the choice to create either a serverless or dedicated SQL pool type. In this case, we desire a serverless SQL pool type. We also need to name a database associated to that serverless pool. Select the Create button to deploy the serverless SQL Pool. After a few minutes, refresh the Workspace tab in the Data Hub blade to view the newly created database.

The Create SQL database form is displayed alongside the refreshed Data Hub blade showing the newly created serverless SQL database
Leveraging HTAP capabilities with Azure Synapse Link for Azure Cosmos DB
If you have an analytical store hosted in Azure Cosmos DB, you can connect to it directly from Azure Synapse Analytics through Azure Synapse Link. This connection enables data to flow from Azure Cosmos DB to Azure Synapse without the use of any ETL (Extract-Transform-Load) mechanisms. Azure Synapse Link provides a cloud-native hybrid transactional and analytical processing (HTAP) capability. This HTAP capability offers the benefit of delivering near-real-time data into analytical queries, Power BI dashboards, machine learning pipelines, and more without impacting the transactional workloads in Azure Cosmos DB.
To enable Azure Synapse Link, open your Cosmos DB resource in the Azure Portal. From the left menu, select the Features item from beneath the Settings heading. From the Features listing, select Azure Synapse Link. At this time, the Azure Synapse Link blade will appear on the right side of the screen. Select the Enable button to enable this feature.

The Azure Cosmos DB Features screen is shown along side the Azure Synapse Link form
In Synapse Studio, return to the Data Hub, expand the + menu, and select the Connect to external data item located in the Linked section of the menu.

The Data Hub + menu is expanded with Connect to external data selected
The Connect to external data blade will appear on the screen’s right. Select one of Azure Cosmos DB API options. In this case, we’ll be using the SQL API. Next, the New linked service form will display. Name the linked service and connect to your Azure Cosmos DB resource and analytical store container using your desired authentication method. Once complete, refresh the Data Hub screen to see your HTAP enabled container located in the Linked tab under the Azure Cosmos DB section. Query this data quickly by selecting a collection and expanding the Actions menu and selecting New SQL script, then Select TOP 100 rows.

The Azure Cosmos DB HTAP collection
In the generated SQL script, you will need to supply either a key or credential before executing the query. From the top taskbar, we can select the Sales Team serverless SQL database that we created earlier. Select the Run button to execute the query and see the sales transaction data.

A SQL script tab is shown with a query against Azure Cosmos DB and its tabular results. The Sales Team database selected
Augmenting existing data with Azure Open Datasets
Now that we have the Azure Cosmos DB linked to Azure Synapse, we can augment the sales data with COVID-19 data obtained from Azure Open Datasets. We will use the Knowledge Center to add this dataset to Azure Synapse. In the Data Hub, expand the + menu and select Browse gallery. With the Datasets tab selected in the gallery, choose the Bing COVID-19 Data card, then select the Continue button.

The Knowledge Center Gallery is shown with the Bing COVID-19 Data card selected
An informational screen then displays along with a preview of the data you should expect in the dataset. Select the Add dataset button to include this data in Azure Synapse.

An informational screen is displayed describing the COVID-19 dataset and providing a preview
The COVID-19 data is now available in the Data Hub under the Linked tab beneath the Azure Blob Storage heading. Expand the Actions menu next to the bing-covid-19-data folder, and choose New SQL script, then Select TOP 100 rows.

In the Linked tab of the Data Hub, the Azure Blob Storage item is expanded and the actions menu is expanded for the bing-covid-19-data folder. From the actions menu, new SQL Script and Select TOP 100 rows is selected
In the SQL script tab toolbar, choose the Sales Team serverless SQL pool and execute the query with the Run button.

The COVID data query is shown with tabular results
Let’s now combine the COVID-19 data with the data from the Azure Cosmos DB analytical store.

A query combining both the COVID-19 data and the Azure Cosmos DB sales data is shown with its results in tabular format
At the top of the results view of the query, toggle the View to Chart. Here you can adjust the chart settings and visualize the data in an instant.

The combined query is shown again but this time with the View set to chart. A chart representing the data is shown
Clean up
You can remove the items created in this post through the Data Hub. On the Workspace tab of the Data Hub blade, expand the Databases section. Expand the actions menu next to the Sales Team (SQL) serverless SQL database and select Delete.

On the Workspace tab of the Data Hub blade, the Databases section is expanded, and the Sales Team SQL pool is shown with the Delete item highlighted
Next, select the Linked tab on the Data Hub blade. Expand the Azure Blob Storage section along with the Sample Datasets item. Open the actions menu next to the bing-covid-19-data folder and select Delete.

On the Linked tab of the Data Hub blade the Azure Blob Storage section and Sample Datasets items are expanded. Next to the bing-covid-19-data folder the actions menu is shown with the Delete item highlighted
The last item to remove is the connection to Azure Cosmos DB. Remain on the Linked tab in the Data Hub and expand the Azure Cosmos DB section. Open the actions menu next to the Azure Cosmos DB service and select Delete.

On the Linked tab of the Data Hub blade, the Cosmos DB section is expanded. Next to the Cosmos DB service, the actions menu is shown with the Delete menu item highlighted
Conclusion
In this blog post, we learned about the Data Hub in Azure Synapse Analytics. We connected to Azure Cosmos DB through Azure Synapse Link and quickly added COVID-19 data from the Knowledge Center Gallery. We then combined the sales data from Azure Cosmos DB with the COVID-19 data and visualized the results in both tabular and chart format.
Quick get started with Azure Synapse and try this tutorial with these resources:

by Scott Muniz | Dec 10, 2020 | Security, Technology
This article is contributed. See the original author and article here.
Original release date: December 10, 2020
This Joint Cybersecurity Advisory was coauthored by the Federal Bureau of Investigation (FBI), the Cybersecurity and Infrastructure Security Agency (CISA), and the Multi-State Information Sharing and Analysis Center (MS-ISAC).
The FBI, CISA, and MS-ISAC assess malicious cyber actors are targeting kindergarten through twelfth grade (K-12) educational institutions, leading to ransomware attacks, the theft of data, and the disruption of distance learning services. Cyber actors likely view schools as targets of opportunity, and these types of attacks are expected to continue through the 2020/2021 academic year. These issues will be particularly challenging for K-12 schools that face resource limitations; therefore, educational leadership, information technology personnel, and security personnel will need to balance this risk when determining their cybersecurity investments.
Click here for a PDF version of this report.
This product is provided subject to this Notification and this Privacy & Use policy.

by Contributed | Dec 10, 2020 | Technology
This article is contributed. See the original author and article here.
Now is the time to bring some holiday fun to your Microsoft Teams meetings. There are many new features in teams that are perfect for your holiday gathering. Plus we’ve launched a Microsoft Teams background page that will give you some fun holiday backgrounds to use to dress up your next virtual meeting.
It’s time to bring people together to do something other than work. Below you’ll find some ideas for making your virtual holiday gathering fun, but remember a party is about the people not the technology! Whatever you do just make sure you remember that and enjoy this holiday season!
Set the stage for a great holiday themed meeting
Festive attire: Part of the fun of a holiday party is dressing up. This doesn’t have to be forgone just because the party is virtual. In your invite, suggest a dress code. Maybe your office vibe is to go all out with a more formal look, or if going more casual, ask the team to wear their favorite ugly holiday sweater.
Dress up your background: You can bring a festive atmosphere to any meeting by using our holiday themed backgrounds every day. We’ve also created a set of new holiday-themed custom backgrounds for standard meetings and video calls. Visit our Microsoft Teams custom background page (http://aka.ms/TeamsCustomBackgrounds) and pick one, or a few, that are good for you. While you’re setting up your video and audio before joining a meeting, select Background effects, click Add new, and then select a background to upload from your computer. More detailed guidance can be found here.
Submit your background for our library
Our community is diverse and we’d like to show that by expanding our library of holiday themed backgrounds! Don’t see the background you want? Have one that you think is fantastic? Submit your background here to be included in our library of backgrounds from around the world.
Plan some fun holiday activities in Teams with some unique activities and new features
Food and drinks: Ahead of your party, send your team the recipe—and the ingredients if you’re feeling extra festive—for a food, cocktail, or mocktail you can enjoy together during the party. You can also turn this into an activity by making a special drink or meal together over Microsoft Teams, led by one of your talented chef or mixologist teammates.
Photobooth: To recreate the classic holiday party photobooth in Microsoft Teams, ask the team to go on a scavenger hunt at their home or office for a few fun items to use as props—a hat, sunglasses, feather boa, their daughter’s princess tiara—the crazier the better. Ask the team to pose, then take a few screenshots to share in your Microsoft Teams team to commemorate the moment. For a cohesive look, you can ask team members to choose the same custom background, or better yet, use our new winter wonderland Together mode scene in Microsoft Teams.
Use our new together mode scenes Whether you are playing some fun holiday games together like the scavenger hunt or just spending time together our new together mode scenes can bring some holiday cheer to your party. Our new winter wonderland Together mode scenes add a dash of holiday spirit that’s perfect for hosting a virtual holiday party with your team.
You’d be surprised how it lightens a mood to show up with some festive holiday cheer in your meeting!

In addition to these we are announcing additional Together mode scenes, rolling out now, that you can use any time of the year that transport your team to a variety of settings including a coffee shop, conference room, classroom, and more. Read more about this and other features in our Microsoft 365 blog post.
To get started, once you are in your Microsoft Teams meeting, select Together mode from the drop-down menu, then click the small pencil in the left-hand corner of the screen to choose a scene (Together mode requires at least five people in your meeting).
Breakout rooms
We are excited to share that breakout rooms are generally available in Microsoft Teams today. Breakout rooms make it easy to divide your meetings into sub-groups to facilitate smaller discussions, brainstorming sessions, learning groups, and even holiday mixers.
Organizers can jump in between meetings on their own, deliver announcements to all breakout rooms at once, and bring everyone back to the main meeting at any time. And unique to Microsoft Teams, breakout rooms can be initiated both in Microsoft Teams channels and in Microsoft Teams meetings to give you flexibility on how you want to meet. Breakout rooms are especially great this time of year for mixing and mingling and playing games during a virtual holiday party. Learn how to get started with breakout rooms here.
Games: There are a variety of great online party games that are easy to play with your team using screensharing in Microsoft Teams. Kahoot offers engaging quizzes and challenges. Jackbox Games are the makers of several party games that are great to play together virtually. From speech games like Talking Points to drawing games like Drawful—there are a wide variety of games to suit every taste. Learn more about using Kahoot and Jackbox Games in Microsoft Teams.
Have a PowerPoint Party: Holiday parties are often a chance to mix and mingle with people outside of your immediate team. To do so virtually, use new Breakout rooms in Microsoft Teams to split up into smaller groups and get to know each other. To help break the ice, we recommend jumping on a popular trend, the PowerPoint Party. Have the team break out into groups of three or four and ask them to create the funniest, most insightful, or interesting presentation they can think of in just 15 minutes. Then present to the team in just three minutes and the best presentation gets a prize. Learn more about hosting a virtual PowerPoint party.
White elephant gift exchange: Take your white elephant gift exchange virtual using White Elephant Online. It’s a simple way to reimagine the age-old tradition in a Microsoft Teams meeting. It brings the fun of buying a wild and wacky gift and stealing gifts from your teammates, all from the comfort of your home.
Happy holidays from the Microsoft Teams team. We hope these new experiences and tips bring joy to your workplace and make meetings and office parties more festive this holiday season. And we’d love to hear how you’re celebrating the holidays on Microsoft Teams. Share your holiday spirit and ideas using #HolidaysWithTeams and submit your background today!

Recent Comments