MCAS Data Protection Blog Series: Do I use MCAS or MIP?
This article is contributed. See the original author and article here.
Microsoft Cloud App Security (MCAS) versus Microsoft Information Protection (MIP): Do I use MCAS or MIP?
December 2020
Hi everyone! Welcome to the third blog of my MCAS Data Protection Blog Series! If this is your first time seeing this blog, check out my landing page for some more information about me and what I’ll be covering!
Well, Happy December! For this month, I won’t be focusing on a specific app but more so on deciding when to use our information protection services. There’s a lot of overlap, integration, and separate components that go into these two services.
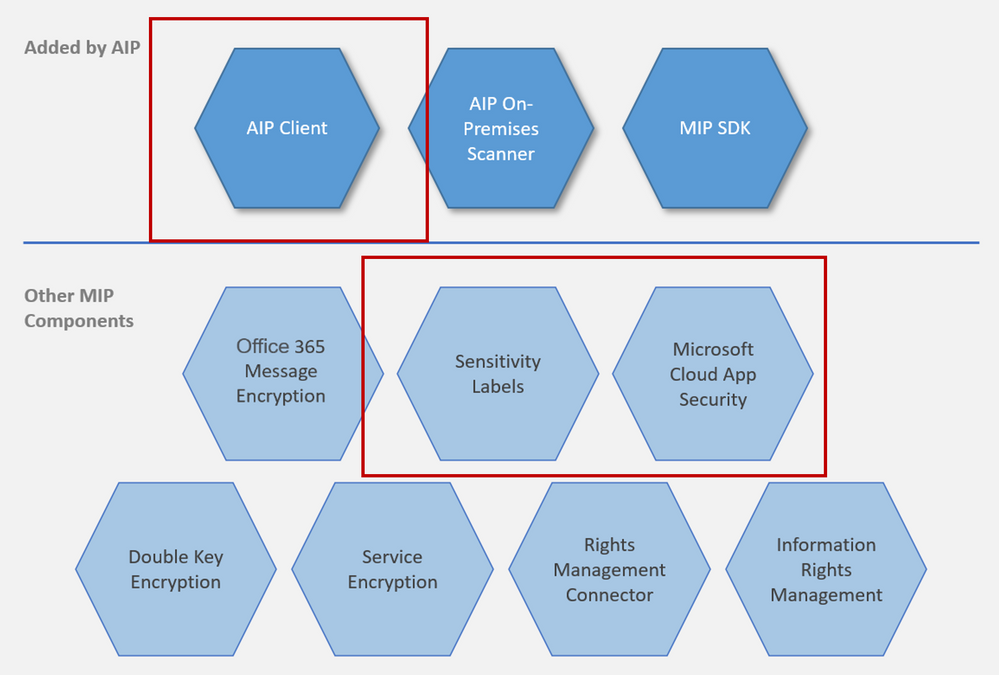
Overview: At a high level, AIP is a cloud-based solution that enables organizations to discover, classify, and protect documents and emails by applying labels to content. AIP is part of the Microsoft Information Protection (MIP) solution, and extends the labeling and classification functionality provided by Microsoft 365. MIP is the common information protection stack that’s leveraged by AIP’s unified labeling client. For more information, see the Microsoft 365 documentation. For information on AIP versus MIP, please check out our documentation.
MCAS and AIP are both a part of our MIP Offering. For this blog, I’ll be using MIP to identify all the non-MCAS components.

NOTE: To provide a unified and streamlined customer experience, AIP client (classic) and Label Management in the Azure Portal are being deprecated as of March 31, 2021. This timeframe allows all current AIP customers to transition to our unified labeling solution using the Microsoft Information Protection Unified Labeling platform. Learn more in our official deprecation notice.
NOTE: This blog is also relevant for Office 365 unified sensitivity labels if you already migrated your classification labels for the Office 365 Security and Compliance Center. If you did not migrate your existing classification labels, and you begin to create new labels in the Office 365 Security and Compliance Center, Microsoft Cloud App Security will only use the preexisting labels configured in the Azure Information Protection portal.
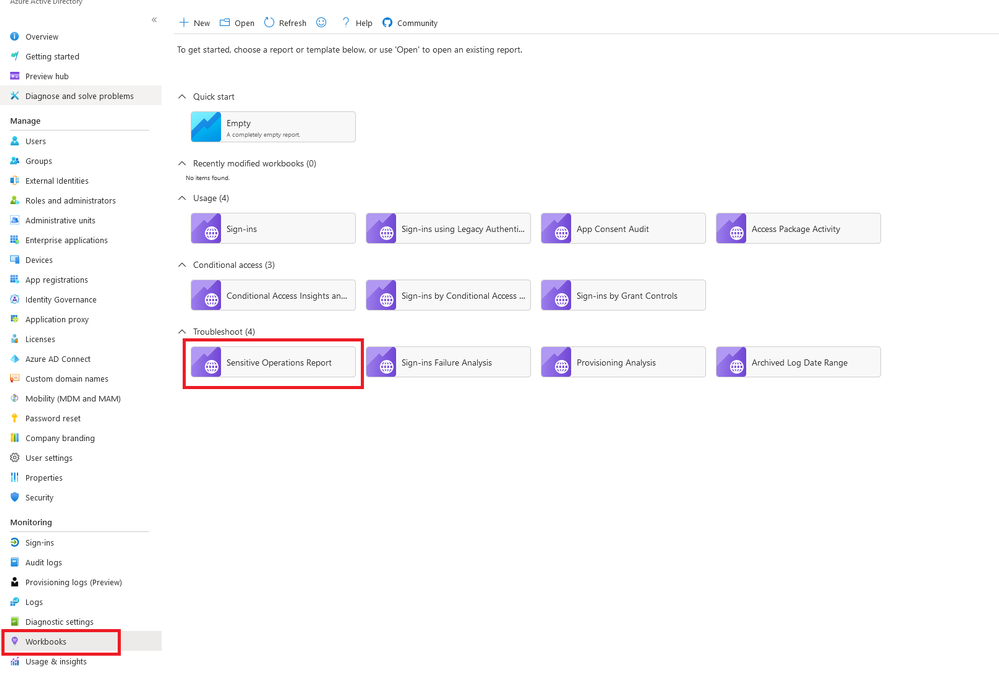
Before we begin, it is important to know that we love our portals and you can do quite a few of the same activities on each of these portals. This can get confusing for a lot of folks. For the purpose of the integration of MCAS with AIP, I’ve called out some of the capabilities within these portals that have been of importance for many of my customers. In additional, the portals have different links based on if you’re using non-commercial instances.
Important Portals
| Name | Portal | Colloquial Names | What can you access? (Non-Exhaustive List) |
| Office 365 Security and Compliance Center | Protection.office.com
GCC-High: scc.office365.us
DOD: scc.protection.apps.mil | SCC, Security and Compliance Center, Unified Labeling portal, New AIP Portal |
|
| Microsoft 365 Security Center | Security.microsoft.com
GCC-High: security.microsoft.us
DOD: security.apps.mil | Security Center, Security Portal |
|
| Microsoft 365 Compliance Center | Compliance.microsoft.com
GCC-High: compliance.microsoft.us
DOD: compliance.apps.mil | Compliance Center, Compliance Portal |
|
| Azure Information Protection Portal | Portal.azure.com -> Azure Information Protection | AIP Portal |
|
| Microsoft Cloud App Security | Portal.cloudappsecurity.com
GCC-High: portal.cloudappsecurity.us | MCAS, Microsoft CAS, Microsoft CASB |
|
In addition, to see more guidance on integrating MCAS with AIP, check out our documentation.
MCAS has two different ways of inspecting data in your environment. You have the built-in inspection as well as the Data Classification Service (our example is using AIP Classification Labels or Sensitivity Labels from MIP). When you set up the integration between AIP and MCAS, there are a few dependencies.
NOTE: If you’re using the classic AIP client, those labels will populate in MCAS. If you’ve migrated over to unified labeling, you’ll be using the sensitivity labels from the Security and Compliance Center (protection.office.com) or the Compliance Center (see above for a high-level overview of a few portals).
The MCAS integration with AIP enables an added level of protection by automatically encrypting files. When AIP encrypts files, applications that support AIP like Office 365, know how to open the files and honors permissions set in the classification labels. Use labels to apply specific protection rules. For example, set a file that can be opened but not shared, printed, forwarded, or edited.
This strong level of protection travels with the file. The file is still protected if you send the file, copy it, or store it in your online storage app. If one of your employees loses a thumb drive with the file on it, the file will be locked. Should someone try to open the file, the file owner will receive an alert. With MCAS, you can apply protection automatically. For example, set all files that have credit card numbers, or were uploaded by the finance department and are shared externally, to be automatically protected with a classification label.
Please see below for some of the limitations and the most asked questions regarding these two service offerings. I’ve put together the product to use and some deployment guidance.
Scenarios
| Scenario | MCAS or MIP? | Deployment Guidance |
| I want to label all the files in a specific folder. | Depends on number of files being labeled | MCAS has a limitation of 100 labels per app per tenant per day (can be increased through a support ticket). If this specific folder is from SPO or ODFB, the recommendation is to use MIP to create the auto-labeling policies, especially if you’re labeling thousands of files. SCC has a “Sensitive by default” setting that would take care of this situation. An exception to this recommendation would be with having multiple sensitive information types as one sensitive information type. For example, you want to find the files that have credit card data, social security numbers, AND a custom information type. This example would be MCAS as the engine. |
| I want to search EDM in non-365 data repositories (Box, Dropbox, G-Suite). | MCAS | You would use MIP to create your EDM information type (General availability of EDM user interface in Microsoft 365 compliance center) and then create a file policy in MCAS to search this information type in your connect apps that support files. |
| I want to create a custom sensitive information type. | MIP | Please use the Security and Compliance center to create a custom information type. |
| Where can I see the custom information type I created in SCC in MCAS? | MCAS | After creating your custom information type in SCC, you should see it populate in MCAS within hours. You would go to a file policy, click “Data Classification Service” for inspection type, click “Sensitive Information Type” to see all the information types from SCC, and then filter on “Custom” to see what you created. |
| I want to find all files with labels in my third party applications. | MCAS | The MCAS Automatic scan does not scan existing files until they are modified again. To scan existing files for Azure Information Protection classification labels, you must have at least one File policy that includes content inspection. If you have none, create a new File policy, delete all the preset filters, under Inspection method select Built-in DLP. In the Content inspection field, select Include files that match a preset expression and select any predefined value, and save the policy. This enables content inspection, which automatically detects Azure Information Protection classification labels. MCAS can find files with labels if the connected app has an API that supports pulling this information (i.e. Box). |
| I want to label 15,000+ files in SPO or ODFB. | MIP | MCAS has a limitation of 100 labels per app per tenant per day. For SPO or ODFB, the recommendation is to use MIP to create the auto-labeling policies, especially if you’re labeling thousands of files. |
| I want to add a label to files downloaded on unmanaged devices. | MCAS | MCAS Conditional Access App Control (Protect on download): Instead of blocking the download of sensitive documents, you can require documents to be labeled and protected with Azure Information Protection. This action ensures the document is protected and user access is restricted in a potentially risky session (unmanaged device). |
| I want to create a sensitive type with multiple “and” components instead of “or” components. | MCAS | Although you’re not creating a sensitive information type with multiple “and” properties, you are able to search for all files within your connected apps that support file APIs for matches when multiple information types are found in one file. When choosing your sensitive information types for a file policy, choose all the sensitive information types you want to find in the files (example: credit card data, social security numbers, AND a custom information type). |
| How do scanner nodes play into my strategy and when should I set them up? | MIP | The AIP scanner is for on-prem (local drives and shares) labeling. You should set these up if you want to label files or discover sensitive information for on-prem. |
| How can I label PDFs? | MIP or MCAS | PDFs require Sensitive Labels and can only be used with unified labeling. |
| How does protection work in Teams (chat and channel messages)? | Depends | MCAS protects using our reverse proxy for browser based sessions (uploads, downloads, messages, and copy/pasting). If your browser-based session is being proxied (you should see your URL being suffixed), MCAS will be able to proxy both the channels and messages. MCAS can only control access to the thick client (Access Policies). Thick client protection comes from MIP DLP. |
| When do I use MIP versus using MCAS? | Depends | MCAS is mainly for the cloud and for third party applications. MIP is for 365 or endpoint DLP. MCAS is for comb |
| Is MCAS the AIP scanner for the cloud? | MCAS | Yes, it can only scan files in your files repository (Investigate -> Files). These files are pulled from the file APIs from your connected apps in MCAS. If you use the MCAS Reverse Proxy, MCAS does real time scanning of your files when they’re being uploaded or downloaded. |
| Can MCAS apply more than one label to a file? | Users can select just one label at a time for each file, this then results in just one classification. If a sublabel is applied, this actually applies two labels at the same time; a primary label and a secondary label. By using sublabels, a file can have two classifications that denote a parentchild relationship for an additional level of control. | |
| Can MCAS remove labels that were applied by MIP/AIP? | MIP | No, it can only remove labels applied by MCAS. |
Limitations
| Behavior/Limitation | Additional Information/Mitigation |
| Cloud App Security currently supports applying Azure Information Protection classification labels for the following file types: Word: docm, docx, dotm, dotx Excel: xlam, xlsm, xlsx, xltx PowerPoint: potm, potx, ppsx, ppsm, pptm, pptx PDF (Unified Labeling Required) | Please turn on the integration between MCAS and AIP to enable labels in MCAS. |
| Labeling is is currently available for files stored in Box, G Suite, SharePoint Online, and OneDrive for Business. | More cloud apps will be supported in future releases. |
| Files that were labeled with protection outside of Cloud App Security can’t be changed by Cloud App Security. | You can scan these files by granting permissions to inspect content for protected files. |
| Cloud App Security retrieves the list of all the classification labels used in your tenant. This action is performed every hour to keep the list up-to-date. | |
| External labels, classification labels set by someone external to your tenant, are added to the list of classification labels. | If you don’t want to scan for these, select the Only scan files for Azure Information Protection classification labels from this tenant check box. |
| Automatic scan does not scan existing files until they are modified again. | To scan existing files for Azure Information Protection classification labels, you must have at least one File policy that includes content inspection. |
| By default, Cloud App Security scans classification labels that were defined in your organization as well as external ones defined by other organizations. | You can ignore external labels by configuring your MCAS Information Protection settings. If you’re unsure of which route to take, a good question to ask is “when external files enter my information boundary, is my company responsible for the protection of that file?” |
| The file exceeded the maximum of 1 million characters. For the part of the content that was scanned, relevant policy matches were applied. | |
| Cloud App Security can apply Azure Information Protection on files that are up to 50 MB | |
| You can remove labels only if they do not include protection, and they were applied from within Cloud App Security, not labels applied directly in Information Protection. | MCAS cannot remove labels applied by Azure Information Protection (the client or another app). |
| To protect customers from mistakenly applying a label to a large number of files, as a safety precaution there is a daily limit of 100 Apply label actions per app, per tenant. | After the daily limit is reached, the apply label action pauses temporarily and continues automatically the next day (after 12:00 UTC). To raise the limit for your tenant, open a support ticket. |
| When Azure Information Protection labels are disabled on a file, the disabled labels appear as disabled in Cloud App Security. | Deleted labels are not displayed. |
| When a document is labeled by using Cloud App Security, visual markings are not immediately applied but are applied when that document is opened in an Office app and the document is first saved. | For more information, see How to configure a label for visual markings for Azure Information Protection. |
| Azure Information Protection cannot classify and protect structured data such as database files, calendar items, Yammer posts, Sway content, and OneNote notebooks. | |
| Power BI now supports classification by using sensitivity labels and can apply protection from those labels to data that is exported to the following file formats: .pdf, .xls, and .ppt. | For more information, see Data protection in Power BI. |
| Sublabels are actually 2 labels. | MIP: For example, the label Confidential might contain sublabels such as Legal and Finance. You can apply different classification visual markings and different Rights Management templates to these sublabels. A user cannot select the Confidential label by itself; only one of its sublabels, such as Legal. As a result, the label that they see set is Confidential Legal. The metadata for that file includes one custom text property for Confidential, one custom text property for Legal, and another that contains both values (Confidential Legal). When you use sublabels, don’t configure visual markings, protection, and conditions at the primary label. When you use sublevels, configure these setting on the sublabel only. If you configure these settings on the primary label and its sublabel, the settings at the sublabel take precedence. |
| How do we regain access to files that were protected by an employee who has now left the organization? | MIP: Use the super user feature, which grants the Full Control usage rights to authorized users for all documents and emails that are protected by your tenant. Super users can always read this protected content, and if necessary, remove the protection or reprotect it for different users. This same feature lets authorized services index and inspect files, as needed. |
| By not granting the Copy usage right, Rights Management can prevent screen captures from many of the commonly used screen capture tools on Windows platforms (Windows 7, Windows 8.1, Windows 10, Windows 10 Mobile) and Android. However, iOS and Mac devices do not allow any app to prevent screen captures. In addition, browsers on any device cannot prevent screen captures. Browser use includes Outlook on the web and Office for the web. | MIP: Preventing screen captures can help to avoid accidental or negligent disclosure of confidential or sensitive information. But there are many ways that a user can share data that is displayed on a screen, and taking a screenshot is only one method. For example, a user intent on sharing displayed information can take a picture of it using their camera phone, retype the data, or simply verbally relay it to somebody. As these examples demonstrate, even if all platforms and all software supported the Rights Management APIs to block screen captures, technology alone cannot always prevent users from sharing data that they should not. Rights Management can help to safeguard your important data by using authorization and usage policies, but this enterprise rights management solution should be used with other controls. For example, implement physical security, carefully screen and monitor people who have authorized access to your organization’s data, and invest in user education so users understand what data should not be shared. |
Please let me know if you have any questions regarding MCAS vs MIP in the comments. I’ll do my best to answer and provide you with additional resources.
This blog will also be a part of our newly published MCAS Ninja Training, check it out at aka.ms/MCASNinja (Update Coming January/February 2021).


Recent Comments