This article is contributed. See the original author and article here.
How to set up new password for the cluster certificate to connect to Service Fabric Cluster in the VSTS Pipeline
This article helps you to set up new password for the cluster certificate which one can use in release pipeline to deploy your application to SF cluster.
Scenario : Adding the base-64 encoding of the client certificate file which is NOT PASSWORD protected when setting up the “New Service Fabric Connection” in the release pipeline will lead to deployment failure.
Below is the sample of the error:
“2020-10-15T20:58:45.3232533Z ##[debug]System.Management.Automation.RuntimeException: An error occurred attempting to import the certificate. Ensure that your service endpoint is configured properly with a correct certificate value and, if the certificate is password-protected, a valid password. Error message: Exception calling ‘Import’ with ‘3’ argument(s): ‘The specified network password is not correct.”
Steps to set new password for Cluster certificate:
Download the relevant cluster certificate from the Key vault to local machine.
Install the certificate to local machine store with marking key as exportable.
To set up new password, follow below PowerShell Script:
a. # Retrieve the Certificate object from the certificate store $SelfSignedCert = Get-ChildItem Cert:LocalMachineMy -DnsName “<clustername>.<clusteregion>.cloudapp.azure.com”
Note: Now the Client/ Cluster certificate is password protected, one can convert into base-64 encode(Step 4) to use in the Release pipeline
Convert the certificate into base-64 encoded representation of the certificate using PowerShell.
This article is contributed. See the original author and article here.
Background/Scenario
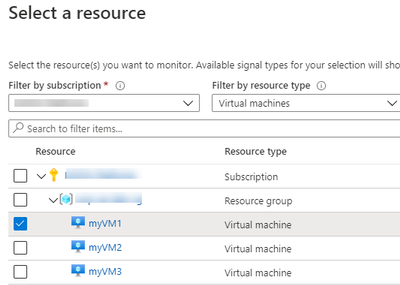
Azure Alerts can be used to proactively notify you when important conditions are found in your monitoring data. After setting up either metric alerts or log alerts for your workloads, specifically IaaS workloads, there may be times when you need to disable those alerts during a maintenance window.
Depending on the size of your environment and the number of alerts you’ve created, it might be quite a chore to go through each one to disable/enable.
The following will demonstrate how to setup an Azure Automation Runbook to quickly set the status of our IaaS Alerts to either Enabled or Disabled via a webhook. The webhook will allow us to execute the Azure Automation Runbook from anywhere, like an on-premises workstation, to set the alert status. The runbook will also take advantage of Azure Resource Graph as a mechanism to search for alerts across all of the available subscriptions.
Grant the run as account, at a minimum, the ability to manage Alerts. By default, the AAA run as account is granted contributor rights at the subscription it’s deployed into. In production, granting access to the AAA run as account at a Management Group is recommended.
Step 2b: Create an Automation Account – Manually Method
Grant the AAA run as account, at a minimum, the ability to manage Alerts. By default, the AAA run as account is granted contributor rights at the subscription it’s deployed into. In production, granting access to the AAA run as account at a Management Group is recommended.
Import PowerShell Gallery modules (Az.Accounts, Az.Monitor, Az.ResourceGraph) into the AAA
Under Shared Resources, select Modules.
Select Browse gallery, and then search the Gallery for a module.
From the Runbooks page in the Azure portal, click the runbook that the webhook starts to view the runbook details. Ensure that the runbook Status field is set to Published.
Click Webhook at the top of the page to open the Add Webhook page.
Click Create new webhook to open the Create Webhook page.
Fill in the Name and Expiration Date fields for the webhook and specify if it should be enabled. See Webhook properties for more information about these properties.
Click the copy icon or press Ctrl+C to copy the URL of the webhook. Then record it in a safe place.
Please save your webhook URL. Once you create the webhook, you cannot retrieve the URL again.
Click Parameters, leave it blank, press OK.
Click Create to create the webhook.
Step 4: Test your Automation Account Runbook via webhook
The sample scripts are not supported under any Microsoft standard support program or service. The sample scripts are provided AS IS without warranty of any kind. Microsoft further disclaims all implied warranties including, without limitation, any implied warranties of merchantability or of fitness for a particular purpose. The entire risk arising out of the use or performance of the sample scripts and documentation remains with you. In no event shall Microsoft, its authors, or anyone else involved in the creation, production, or delivery of the scripts be liable for any damages whatsoever (including, without limitation, damages for loss of business profits, business interruption, loss of business information, or other pecuniary loss) arising out of the use of or inability to use the sample scripts or documentation, even if Microsoft has been advised of the possibility of such damages.
If Azure Event Grid is the only system which consumes and posts cloud events in your environment, Azure Event Grid SDK should be chosen. However, if several systems which consume and post cloud events have already existed in your environment and you plan to introduce Azure Event Grid, you would look for ways to interact with Azure Event Grid using industry standard APIs. In this article, I describe how to interact with Azure Event Grid using CloudEvents APIs.
Prerequisites and basic information
What is CloudEvents?
If you are not familiar with CloudEvents, please check the following URL.
As of now, Azure Event Grid supports Structured Content mode only (Binary Content mode is not supported). We have to follow JSON Event Format specification in case of creating events.
CloudEvents SDKs are provided in several languages. In this article, sample applications are created with Java APIs for CloudEvents. Json EventFormat implementation with Jackson and HTTP Protocol Binding APIs for Jakarta RESTful Web Services allows us to create applications easier than using core APIs.
According to this document, we can post events to Azure Event Grid topic with the following URL (Access key or Shared Access Signature is required). We can get the access key in Azure Portal and via Azure CLI.
https://{topic-endpoint}?api-version=2018-01-01
Shared Access Signature is similar to access access key, but it can be configured with an expiration time. It might be suitable if access restriction to a topic or domain is required. The following URL describes how to create Shared Access Signature.
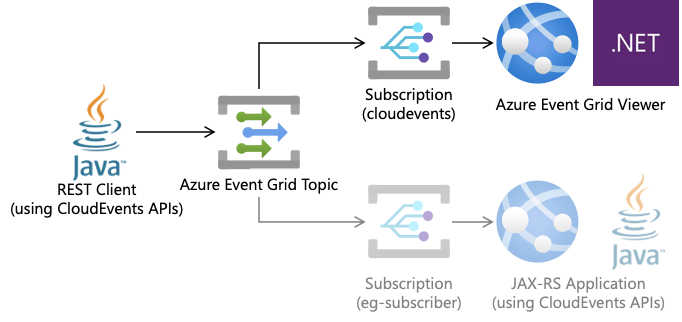
In this part, a REST client application which uses CloudEvents APIs is created in order to post events to Azure Event Grid topic. Azure Event Grid Viewer application verifies and shows these events. This viewer application is described in the following URL.
CloudEvents::v1() method allows us to create events. JSON is used as a format of custom data, and we use the withDataContentType() method to specify application/json as Content-Type.
JsonObject jsonObject = Json.createObjectBuilder()
                            .add("message", "Using CloudEvents.io API to send CloudEvents!!")
                            .build();

CloudEvent ce = CloudEventBuilder.v1()
        .withId("A234-1234-1234")
        .withType("io.logico-jp.ExampleEventType")
        .withSource(URI.create("io/logico-jp/source"))
        .withTime(OffsetDateTime.now(ZoneId.ofOffset("UTC", ZoneOffset.UTC)))
        .withDataContentType(MediaType.APPLICATION_JSON)
        .withData(jsonObject.toString().getBytes(StandardCharsets.UTF_8))
        .build();
Serialization
Serialization of created JSON formatted events is required. To do so, we use “Json EventFormat implementation with Jackson” APIs. Steps for creating a client application are completed.
EventFormat format =EventFormatProvider
        .getInstance()
        .resolveFormat(JsonFormat.CONTENT_TYPE);

byte[] serialized = format.serialize(ce);
Create REST Client
We can follow typical ways to creating REST client. No special configuration is required. Access key of Event Grid should be set to HTTP Header. Note that not application/json but application/cloudevents+json should be set as Content-Type.
In this part, a JAX-RS application is created to subscribe the Event Grid topic. As Azure Event Grid send events using webhook, the JAX-RS application requires a POST endpoint to listen events.
Event Grid topic which we use is already configured in the previous section (precisely, the Event Grid topic should have been already configured).
Dependencies
In this case, Helidon MP is chosen to create JAX-RS application. Needless to say, you can choose any development framework freely.
We can create a JAX-RS applications without special configuration. As Azure Event Grid supports Structured Content mode only, event format is JSON. So, the sample application waits for events using JsonObject. AndEventFormat::deserialize() method is used for deserialization of events.
@Path("/updates")
@POST
public Response receiveEvent(Optional<JsonObject> obj) {
        if(obj.isEmpty()) return Response.noContent().status(Response.Status.OK).build();

    EventFormat format = EventFormatProvider
            .getInstance()
            .resolveFormat(JsonFormat.CONTENT_TYPE);

    CloudEvent ce = format.deserialize(obj.get().toString().getBytes(StandardCharsets.UTF_8));
    JsonObject customData = JsonUtil.toJson(new String(ce.getData())).asJsonObject();
    // output to console
    System.out.println("Received JSON String -- " + obj.get().toString());
    System.out.println("Converted to CloudEvent -- " + ce.toString());
    System.out.println("Data in CloudEvent -- " + customData.toString());
    return Response.noContent().status(Response.Status.ACCEPTED).build();
}
Configure OPTIONS method for enabling webhook
When configuring Azure Event Grid integration through webhook, subscriber (i.e. this JAX-RS application) has to respond to Azure Event Grid using OPTIONS method.
We can observe each event was successful delivered to each subscription in Azure Portal.
Azure Event Grid Viewer also shows delivered events.
And from JAX-RS application side, we can observe each delivered event in App Service console log. Three logs appears per each event.
Conclusion
CloudEvents APIs allow us to post structured events to Azure Event Grid, and to handle structured events delivered from Azure Event Grid. CloudEvents APIs support various languages, and especially Java, if you are familiar with JAX-RS and Jackson, you would easily create applications with these APIs.
If Azure Event Grid were the only system which consumes and posts cloud events in your environment, Azure Event Grid SDK would be the best APIs. However, if Azure Event Grid is one of services which consume and post cloud events, industry standard APIs is often more suitable than Azure Event Grid SDK.
This article is contributed. See the original author and article here.
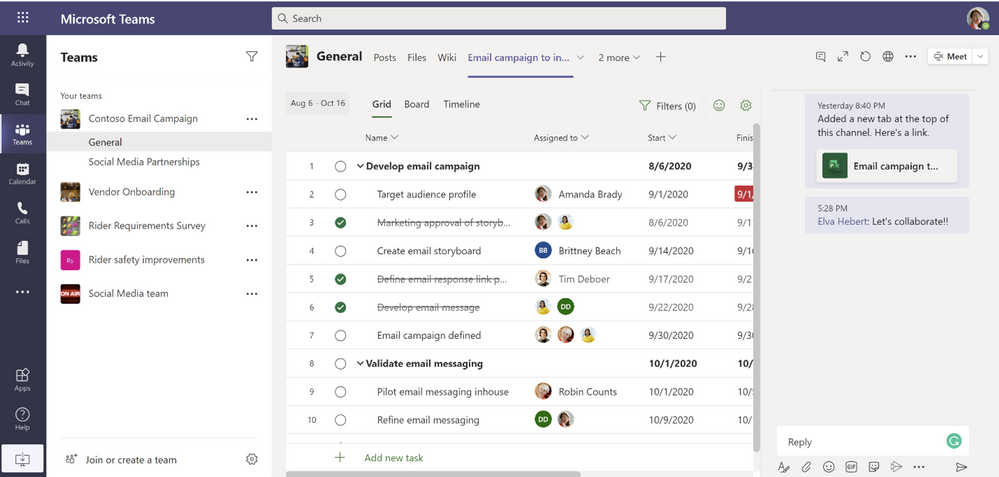
We are pleased to announce the release of the Project and Roadmap apps in Microsoft Teams. Connecting directly to Project from within Teams has been one of the major requests from Project users, and these apps will make it easy to manage, track, and collaborate on all aspects of a team’s project in one place. This brings content and conversation side-by-side in one integrated experience.
Team members can create new projects or roadmaps, or open existing ones, in Microsoft Teams and keep communications within the context of work and collaboration within Office 365. The Project and Roadmap apps can be added as tabs in any channel by selecting the “+” icon at the top of a channel. Anyone who has access to that channel can also access that tab.
Microsoft Teams ♥Microsoft Project
Today, each one of us has become a project manager. To stay on top of the ever-shifting requirements of our jobs, we need tools that are simple yet robust enough to support any requirement, flexible enough to support any project type, and, most importantly, easy enough to collaborate with anyone no matter where they are or what device they are using.
The Project app in Teams helps you tackle anything from small projects to large initiatives and is designed for just about any role, skill level, or project type. You can access the features and capabilities, of the Project for the web experience such as the automated scheduling engine to set effort, duration, and resources from inside Teams.
Microsoft Teams ♥ Roadmap
If your group runs multiple projects at the same time and needs visibility across all the work being done, Roadmap provides a visual and interactive way to connect these projects and show their status in a transparent way across the organization.
The Roadmap – Microsoft Project app will give you a cross-functional, big picture view of the work that is most important to you. You can create a consolidated timeline view of projects from Microsoft Project and Azure Boards and plan larger initiatives across all of them – complete with key dates and milestones – so that all the work is visible.
Note: All Office 365 users will be able to view Projects/Roadmaps shared within Teams in a read-only mode. Users with appropriate Project for the Web licenses to create and edit Projects/Roadmaps will be able to do the same from within Teams as well. Learn more about Project for the Web licenses here.
If you want to learn more, see Use Project or Roadmap in Microsoft Teams. Next, notifications in Teams will be added so that users can see what’s important to them within Project and Roadmap in their team’s activity feed.
We love hearing from you. Please tell us how we can improve your Project experience in Teams through our UserVoice site. You can also leave a comment below to engage with us directly to provide feedback.
Keep checking our Tech Community site for the latest feature releases and Project news.
This article is contributed. See the original author and article here.
ADF has added the ability to now cache your data streams to a sink that writes to a cache instead of a data store, allowing you to implement what ETL tools typically refer to as Cached Lookups or Unconnected Lookups.
The ADF Data Flow Lookup Transformation performs a left outer join with a series of options to handle multiple matches and tags rows as lookup found / no lookup found. What the cached lookup enables is a mechanism to store those lookup streams in caches and access them from your expressions.
Many powerful use cases are enabled with this new ADF feature where you can now lookup reference data that is stored in cache and referenced via key lookups with different values, multiple times, without the need to specify separate Lookup transformation calls. Now you can simply use a lookup() function to grab additional specific columns as in: lookup().myColumn1.
Additionally, you can use the new function outputs() to grab an entire matrix of rows and columns from cache and iterate through an array of rows, picking your specific columns to reference.


Recent Comments