Deploying and Managing Azure Sentinel – Ninja style
This article is contributed. See the original author and article here.
Back in January 2020, Javier and Philippe wrote a great blog on how to deploy, configure and maintain Azure Sentinel through Azure DevOps with IaC using the Sentinel API, AzSentinel and ARM templates. We are now a several months further and more and more functions are integrated in AzSentinel. So, I decided to create a new Azure DevOps Pipeline which covers more than only the “deployment” part. I want to show that Pipelines are more than only deployment ‘tools’ and they need to be implemented the right way with the right DevOps mindset for the best result. Or as I call it in this blog post: Ninja style.
If you prefer to skip the reading and get started right away then you can find all the code examples on my GitHub Repository and all the steps at the end of this blog post.
The story behind DevOps and Pipelines
Before we go deeper into the technical side, I first like to mention the idea behind it all. The reason I’ve invested the time in building AzSentinel and DevOps pipelines. The main reason was to implement the “shift left” Way of Working (Wow). The term ‘shift left’ refers to a practice in software development, in which teams focus on quality, work on problem prevention instead of detection, and begin testing earlier than ever before. The goal is to increase quality, shorten long test cycles and reduce the possibility of unpleasant surprises at the end of the development cycle—or, worse, in production.
Azure Portal is a great portal, but when you log in and by accident remove or change for example an Analytic rule without any testing, approving or 4-eye principle, then you really have a challenge. You will probably find out something went wrong when you are troubleshooting to see why nothing happened in first place. And don’t we all know that’s way too late…
Shifting left requires two key DevOps practices: continuous testing and continuous deployment. Continuous testing involves automating tests and running those tests as early and often as possible. Continuous deployment automates the provisioning and deployment of new builds, enabling continuous testing to happen quickly and efficiently.
Azure Sentinel deployment Ninja style
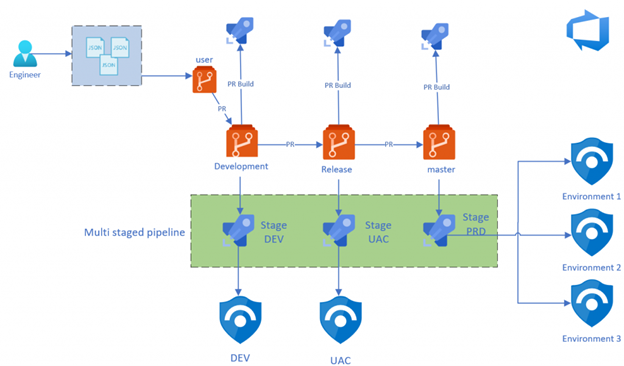
Based on the shift left and DevOps WoW, I made the design below on how I think the process should look like. I will explain the design in different parts. But first, let’s start with the underlying requirements.

Infrastructure as Code
Before we can start implementing shift left for Azure Sentinel, we need to implement an Infrastructure as Code deployment model. Infrastructure as Code (IaC) is the management of infrastructure (networks, virtual machines, load balancers, even your Azure Sentinel rules and settings) in a descriptive model, using the same versioning as DevOps teams use for source code. Like the principle that the same source code generates the same binary, an IaC model generates the same environment every time it is applied.
To be able to manage Azure Sentinel through an IaC model, I build AzSentinel that functions as a translator. The JSON or YAML format that you use to store your Analytic rules or Hunting rules, will be translated into the rules you see in Azure Portal.
This is the first step in our journey to shift left. Having our configuration in a descriptive model gives us also the opportunity to analyze and test this to see if it’s compliant to what and how we want it. For example, do you have a naming convention for your rules? Then now you can easily test that to see if it is compliance to what you want. Or just deploy the rules to a dev environment to see if all the properties are set correct.
Repository
So now we know why and how we store our changes in a descriptive model, it’s time to see where and how we store our configuration. For this we use Git technology. Git is a free and open source distributed version control system, designed to handle everything from small to very large projects with speed and efficiency. For the repository design, I have made the choice to implement a four branch strategy model, which I will explain below. A branch represents an independent line of development. Branches serve as an abstraction for the edit/stage/commit process. You can think of them as a way to request a brand new working directory, staging area, and project history. You can read more about this if you like.

Below a short description of the three main repository’s:
- Master – The Master (also called main) branch contains all the configuration that is deployed to our production environment. The code here has passed all the checks through PR process and is deployed to dev and staging environment before. This is also our point of truth, that means that what is configured here is equal to what’s deployed in Azure
- Release – The Release branch contains all the configuration that is ready to be deployed to our Sentinel staging environment. The changes are already tested through our PR pipelines and is deployed to dev environment before being merged here. Sentinel Staging environment most of the time contains production or preproduction data so that the changes can be tested against real world data.
- Development – The Development branch contains all the small changes that are proposed by the engineers. This changes are tested by PR Build validation and deployed to Sentinel dev environment. The changes are only tested to see if there are no braking changes/configuration. Changes are not tested against real world data.
The three branches above belong to our ‘standard’ branches and are used for automation purposes. The fourth branching is actually the ‘User branch’. The User branch is mostly a copy of all the configuration in the Development branch and only contains the changes that an engineer is working on. For example, if an engineer is working on a specific playbook or Analytic rule, then the branch where he is working in only contains changes that are related to that work. If he wants to work on something new then he can create a new branch.

Working with multiple branches means that changes from one branch to another branch are only imported through a Pull request (PR). A PR means that you create a request to merge your code changes to the next branch, for example from development to release .When you file a PR, all you’re doing is requesting that another developer (e.g., the project maintainer) pulls a branch from your repository into their repository. Click here to read more about this.
Branch Policies
The great advantage is that a PR moment gives as the opportunity to configure ‘Branch Policies’. Branch policies help teams protect their important branches of development. Policies enforce your team’s code quality and change management standards. Click here to read more about this.
Keep in mind that each branch needs to have it’s own policy set and the policy can be different for each branch. For example, you can have one reviewer when something is getting merged in the Development branch, but two reviewers when you merge your changes to the Release branch. The idea is to come up with a policy that works for the team and doesn’t slow the efficiency of the team. Having a minimum of two reviewers in a three members team is often overkill because then you normally need wait longer before your PR gets approved.
Below a couple of the policies that from my opinion are a good start to configure:
- Require a minimum number of reviewers – Require approval from a specified number of reviewers on pull requests.
- Check for linked work items – Encourage traceability by checking for linked work items on pull requests.
- Build Validation – Validate code by pre-merging and building pull request changes (more about this in the next post).


Pipeline
Now we have our configuration stored in a descriptive model and have the branches configured correctly, it’s time to implement our automatic test and deployment through Pipelines. Azure Pipelines is a cloud service that you can use to automatically build and test your code project and make it available to other users. It works with just about any language or project type.
Azure Pipelines combines Continuous Integration (CI) and Continuous Delivery (CD) to constantly and consistently test and build your code and ship it to any target. Click here to read more about this.
For this post I will be using Azure DevOps pipelines but you can achieve the same results with GitHub Actions.
Build Validation pipeline
As mentioned earlier shifting left requires two key DevOps practices: continuous testing and continuous deployment. Continuous testing involves automating tests and running those tests as early and often as possible. Build validation is part of the CI, where we test our changes very early and as often possible.
As I described in chapter Branch Policy, one of the options when configuring Branch Policy is to configure Build Validation. Here you can set a policy requiring changes in a pull request to build successfully with the protected branch, before the pull request can be completed. If a build validation policy is enabled, a new build is queued when either a new pull request is created, or if changes are pushed to an existing pull request targeting the branch. The build policy then evaluates the results of the build to determine whether the pull request can be completed.
For this post I have decided to create some example tests to show you what the possibilities are. For this I am using Pester: a testing and mocking framework for PowerShell.
Pester provides a framework for writing and running tests. Pester is most commonly used for writing unit and integration tests, but it is not limited to just that. It is also a base for tools that validate whole environments, computer deployments, database configurations and so on. Click here to read more about it.
The below Pester test is created to test an Analytic Rules JSON file, to see if it converts from JSON. If this test fails that means that there is a JSON syntax error in the file. Then it will test to see if the configured rule types contain the minim required properties. Please keep in mind this is just an example to demonstrate the possibilities. You can extend this by validating values of certain properties or by even deploying the rule to Azure Sentinel to validate that it doesn’t contain any errors.
Build validation pipeline:
# Build Validation pipeline
# This Pipeline is used to trigger teh Pester test files when a PR is created

trigger: none

pool:
  vmImage: 'ubuntu-latest'

steps:

- task: PowerShell@2
  inputs:
    targetType: 'inline'
    script: 'Invoke-Pester *.tests.ps1 -OutputFile ./test-results.xml -OutputFormat NUnitXml'
    errorActionPreference: 'continue'
    pwsh: true

- task: PublishTestResults@2
  inputs:
    testResultsFormat: 'NUnit'
    testResultsFiles: '**/test-results.xml'
    failTaskOnFailedTests: true
PowerShell Pester test:
Describe "Azure Sentinel AlertRules Tests" {

    $TestFiles = Get-ChildItem -Path .SettingFilesAlertRules.json -File -Recurse | ForEach-Object -Process {
        @{
            File          = $_.FullName
            ConvertedJson = (Get-Content -Path $_.FullName | ConvertFrom-Json)
            Path          = $_.DirectoryName
            Name          = $_.Name
        }
    }

    It 'Converts from JSON | <File>' -TestCases $TestFiles {
        param (
            $File,
            $ConvertedJson
        )
        $ConvertedJson | Should -Not -Be $null
    }

    It 'Schedueled rules have the minimum elements' -TestCases $TestFiles {
        param (
            $File,
            $ConvertedJson
        )
        $expected_elements = @(
            'displayName',
            'description',
            'severity',
            'enabled',
            'query',
            'queryFrequency',
            'queryPeriod',
            'triggerOperator',
            'triggerThreshold',
            'suppressionDuration',
            'suppressionEnabled',
            'tactics',
            'playbookName'
        )

        $rules = $ConvertedJson.Scheduled

        $rules.ForEach{
            $expected_elements | Should -BeIn $_.psobject.Properties.Name
        }
    }

    It 'Fusion rules have the minimum elements' -TestCases $TestFiles {
        param (
            $File,
            $ConvertedJson
        )
        $expected_elements = @(
            'displayName',
            'enabled',
            'alertRuleTemplateName'
        )

        $rules = $ConvertedJson.Fusion

        $rules.ForEach{
            $expected_elements | Should -BeIn $_.psobject.Properties.Name
        }
    }

    It 'MLBehaviorAnalytics rules have the minimum elements' -TestCases $TestFiles {
        param (
            $File,
            $ConvertedJson
        )
        $expected_elements = @(
            'displayName',
            'enabled',
            'alertRuleTemplateName'
        )

        $rules = $ConvertedJson.MLBehaviorAnalytics

        $rules.ForEach{
            $expected_elements | Should -BeIn $_.psobject.Properties.Name
        }
    }

    It 'MicrosoftSecurityIncidentCreation rules have the minimum elements' -TestCases $TestFiles {
        param (
            $File,
            $ConvertedJson
        )
        $expected_elements = @(
            'displayName',
            'enabled',
            'description',
            'productFilter',
            'severitiesFilter',
            'displayNamesFilter'
        )

        $rules = $ConvertedJson.MicrosoftSecurityIncidentCreation

        $rules.ForEach{
            $expected_elements | Should -BeIn $_.psobject.Properties.Name
        }
    }
}
Build validation test Results
Below you can see an example where the validation failed and blocked our PR from merging to ‘develop’ branch because the Pester tests didn’t pass all the tests.

When you click on the test results you see that there are two errors found in our AlertRules.json file

As you can see below our test expects the property “Displayname” but found instead “DisplayNameeee“.

Deployment pipeline
As mentioned earlier Shifting left requires two key DevOps practices: continuous testing and continuous deployment. Continuous deployment automates the provisioning and deployment of new builds, enabling continuous testing to happen quickly and efficiently.
For the deployment I have made the choice to use a multi staged pipeline. Azure DevOps multi stage pipelines is an exciting feature! Earlier, it was possible to define CI pipelines in Azure DevOps using YAML formatted files. With multi stage pipelines, it is also possible to define CI and CD pipelines as code and version them the same way code is versioned. With this we can author a single pipeline template that can be used across environments. What’s also a really nice feature of multi staged pipeline, is that you can configure environment policies for each stage. Environments are the way how Multistage YAML Pipelines handle approvals. I will explain environments in more detail below.

Pipeline Environment
An environment is a collection of resources, such as Kubernetes clusters and virtual machines, that can be targeted by deployments from a pipeline. Typical examples of environment names are Dev, Test, QA, Staging, and Production.
Environments are also the way Multistage YAML Pipelines handle Approvals. If you are familiar with the Classic Pipelines, you know that you can set up pre- and post-deployment approvals directly from the designer.
For this pipeline I have created three environments in Azure DevOps, with each representing an Azure Sentinel environment. You can of course have more environments, for example for each customer.
With environments we can for example configure that all the deployment to Dev environment doesn’t require any approval. When you are deploying to staging, however, one person needs to approve the deployment and when you are deploying to production two people need to approve the deployment.
Approvals and other checks are not defined in the YAML file to avoid that users modifying the pipeline YAML file could modify also checks and approvals.
How to create a new environment
Go to your Azure DevOps project and click on Environment under the Pipelines tab, here click to create a new Environment. Enter the Name that you want to use and select None under Resource.
After creating the environment, click on the environment and then click on the three dots in the right corner above. Here you can select “Approvals and checks” to configure users or groups that you want to add, that need to approve the deployment.


Click on see all to see an overview of all the other checks that you can configure

Multistaged pipeline
Below is our main pipeline which contains all the stages of the deployment. As you can see, I have configured three stages, each stage representing an Azure Sentinel environment in this case. Stages are the major divisions in a pipeline: ‘build this app’, ‘run these tests’, and ‘deploy to pre-production’ are good examples of stages. They are a logical boundary in your pipeline at which you can pause the pipeline and perform various checks.
Every pipeline has at least one stage, even if you do not explicitly define it. Stages may be arranged into a dependency graph: ‘run this stage before that one’. In this case it’s in a sequence, but you can manage the order and dependency’s through conditions. The main pipeline is in this case only used to define our stages/environments and store the specific parameter for each stage. In this Pipeline you don’t see the actual tasks, this is because I’m making use of Pipeline Template. Below you can read more about this great functionality.
In the example below you also see that I have configured conditions on Staging and Production Stage. This condition checks if the pipeline is triggered from the Release or Master branch. If not then those stages are automatically skipped by the pipeline.
Tip: if you name your main template ‘Azure-Pipeline.yml’ and put it in the root of your branch, then Azure DevOps will automatically create the pipeline for you
# This is the main pipelien which covers all the stages
# The tasks are stored in pipelines/steps.yml

stages:
  - stage: Dev
    displayName: 'Deploying to Development environment'
    jobs:
      - template: pipelines/steps.yml
        parameters:
          environment: Dev
          azureSubscription: ''
          WorkspaceName: '' # Enter the Azure Sentinel Workspace name
          SubscriptionId: 'cd466daa-3528-481e-83f1-7a7148706287'
          ResourceGroupName: ''
          ResourceGroupLocation: 'westeurope'
          EnableSentinel: true
          analyticsRulesFile: SettingFiles/AlertRules.json # leave empty if you dont want to configure Analytic rules
          huntingRulesFile: SettingFiles/HuntingRules.json # leave empty if you dont want to configure Hunting rules
          PlaybooksFolder: Playbooks/ # leave empty if you dont want to configure Playbooks
          ConnectorsFile: SettingFiles/DataConnectors.json # leave empty if you dont want to configure Connectors
          WorkbooksFolder: Workbooks/
          WorkbookSourceId: '' # leave empty if you dont want to configure Workbook

  - stage: Staging
    displayName: 'Deploying to Acceptance environment'
    condition: and(succeeded(), eq(variables['build.sourceBranch'], 'refs/heads/release'))
    dependsOn: Dev    # this stage runs after Dev
    jobs:
      - template: pipelines/steps.yml
        parameters:
          environment: Staging
          azureSubscription: ''
          WorkspaceName: '' # Enter the Azure Sentinel Workspace name
          SubscriptionId: 'cd466daa-3528-481e-83f1-7a7148706287'
          ResourceGroupName: ''
          ResourceGroupLocation: 'westeurope'
          EnableSentinel: true
          analyticsRulesFile: SettingFiles/AlertRules.json # leave empty if you dont want to configure Analytic rules
          huntingRulesFile: SettingFiles/HuntingRules.json # leave empty if you dont want to configure Hunting rules
          PlaybooksFolder: Playbooks/ # leave empty if you dont want to configure Playbooks
          ConnectorsFile: SettingFiles/DataConnectors.json # leave empty if you dont want to configure Connectors
          WorkbooksFolder: Workbooks/
          WorkbookSourceId: '' # leave empty if you dont want to configure Workbook

  - stage: Production
    displayName: 'Deploying to Production environment'
    condition: and(succeeded(), eq(variables['build.sourceBranch'], 'refs/heads/master'))
    dependsOn: Dev    # this stage runs after Dev
    jobs:
      - template: pipelines/steps.yml
        parameters:
          environment: Production
          azureSubscription: ''
          WorkspaceName: ''  # Enter the Azure Sentinel Workspace name
          SubscriptionId: 'cd466daa-3528-481e-83f1-7a7148706287'
          ResourceGroupName: ''
          ResourceGroupLocation: 'westeurope'
          EnableSentinel: true
          analyticsRulesFile: SettingFiles/AlertRules.json # leave empty if you dont want to configure Analytic rules
          huntingRulesFile: SettingFiles/HuntingRules.json # leave empty if you dont want to configure Hunting rules
          PlaybooksFolder: Playbooks/ # leave empty if you dont want to configure Playbooks
          ConnectorsFile: SettingFiles/DataConnectors.json # leave empty if you dont want to configure Connectors
          WorkbooksFolder: Workbooks/
          WorkbookSourceId: '' # leave empty if you dont want to configure Workbook
Below you see an example when the pipeline is triggered from the ‘master’ branch, it firsts deploys to the dev branch and then to the production environment but skips the ‘staging’ environment

Below you see another example where the pipeline is triggered from a branch other than ‘release’ or ‘master’. in this case the changes are only deployed to the development environments and are the other environments skipped automatically:

Pipeline Template
Pipeline Templates let us define reusable content, logic, and parameters. Templates function in two ways. You can insert reusable content with a template, or you can use a template to control what is allowed in a pipeline.
If a template is used to include content, it functions like an include directive in many programming languages. Content from one file is inserted into another file. When a template controls what is allowed in a pipeline, the template defines logic that another file must follow. Click here to read more about this.
In our case the stages define our Azure Sentinel environments, so the biggest differences are things like subscription name, Sentinel workspace name, etc.
Because most of the steps are the same for all the environments, we can keep all the steps standardized and simplified for usage. This way it’s also easier to update our pipelines. For example, you decide to add an additional step which need to be implemented for all your environments/customers. This way, you only need to update only the steps.yml file instead of (all) your pipelines. This reduces code duplication, which makes your pipeline more resilient for mistakes. Also this way you are sure that if you add a new step it is also first tested in dev stage before going to prod. So to sum it up, now you have a CI/CD process for your pipeline too.
What you also see here is that I have configured conditions for all the steps. This makes the template much more dynamic for usage. For example if you haven’t provided a template for Hunting Rules, which means you don’t want to configure Hunting rule. So the importing Hunting rules step will be automatically skipped. This way we can configure our customers with the same template file but with different input.
# This is the Template that is used from the Main pipeline
# This template contains all the required steps

parameters:
  - name: environment
    displayName: environment name
    type: string

  - name: azureSubscription
    displayName: Enter the Azure Serviceconntion
    type: string

  - name: SubscriptionId
    displayName: Enter the Subscription id where the Azure sentinel workspace is deployed
    type: string

  - name: WorkspaceName
    displayName: Enter the Azure Sentinel Workspace name
    type: string

  - name: EnableSentinel
    displayName: Enable Azure Sentinel if not enabled
    type: boolean

  - name: analyticsRulesFile
    displayName: path to Azure Sentinel Analytics ruile file
    type: string

  - name: huntingRulesFile
    displayName: path to Azure Sentinel Hunting ruile file
    type: string

  - name: PlaybooksFolder
    displayName: The path to the fodler with the playbook JSON files
    type: string

  - name: ConnectorsFile
    displayName: The path to DataConnector json file
    type: string

  - name: WorkbooksFolder
    displayName: The path to the folder which contains the Workbooks JSON files
    type: string

  - name: WorkbookSourceId
    displayName: The id of resource instance to which the workbook will be associated
    type: string

  - name: ResourceGroupName
    displayName: Enter the Resource group name for Playbooks and Workbooks
    type: string

  - name: ResourceGroupLocation
    displayName: Enter the Resource group location for Playbooks and Workbooks
    type: string

jobs:
  - deployment: 'Sentinel'
    displayName: DeploySentinelSolution
    pool:
      vmImage: 'ubuntu-latest'
    environment: ${{ parameters.environment }}
    strategy:
      runOnce:
        deploy:
          steps:
            - checkout: self
            - task: PowerShell@2
              displayName: 'Prepare environemnt'
              inputs:
                targetType: 'Inline'
                script: |
                  Install-Module AzSentinel -Scope CurrentUser -Force
                  Import-Module AzSentinel
                pwsh: true

            - ${{ if eq(parameters.EnableSentinel, true) }}:
              - task: AzurePowerShell@5
                displayName: 'Enable and configure Azure Sentinel'
                inputs:
                  azureSubscription: ${{ parameters.azureSubscription }}
                  ScriptType: 'InlineScript'
                  Inline: |
                    Set-AzSentinel -SubscriptionId ${{ parameters.SubscriptionId }} -WorkspaceName ${{ parameters.WorkspaceName }} -Confirm:$false
                  azurePowerShellVersion: 'LatestVersion'
                  pwsh: true

            - ${{ if ne(parameters.PlaybooksFolder, '') }}:
              - task: AzurePowerShell@4
                displayName: 'Create and Update Playbooks'
                inputs:
                  azureSubscription: ${{ parameters.azureSubscription }}
                  ScriptType: 'InlineScript'
                  Inline: |
                    $armTemplateFiles = Get-ChildItem -Path ${{ parameters.PlaybooksFolder }} -Filter *.json

                    $rg = Get-AzResourceGroup -ResourceGroupName ${{ parameters.ResourceGroupName }} -ErrorAction SilentlyContinue
                    if ($null -eq $rg) {
                      New-AzResourceGroup -ResourceGroupName ${{ parameters.ResourceGroupName }} -Location ${{ parameters.ResourceGroupLocation }}
                    }

                    foreach ($armTemplate in $armTemplateFiles) {
                      New-AzResourceGroupDeployment -ResourceGroupName ${{ parameters.ResourceGroupName }} -TemplateFile $armTemplate
                    }
                  azurePowerShellVersion: LatestVersion
                  pwsh: true

            - ${{ if ne(parameters.analyticsRulesFile, '') }}:
              - task: AzurePowerShell@5
                displayName: 'Create and Update Alert Rules'
                inputs:
                  azureSubscription: ${{ parameters.azureSubscription }}
                  ScriptType: 'InlineScript'
                  Inline: |
                    Import-AzSentinelAlertRule -SubscriptionId ${{ parameters.SubscriptionId }} -WorkspaceName ${{ parameters.WorkspaceName }} -SettingsFile ${{ parameters.analyticsRulesFile }}
                  azurePowerShellVersion: 'LatestVersion'
                  pwsh: true

            - ${{ if ne(parameters.huntingRulesFile, '') }}:
              - task: AzurePowerShell@5
                displayName: 'Create and Update Hunting Rules'
                inputs:
                  azureSubscription: ${{ parameters.azureSubscription }}
                  ScriptType: 'InlineScript'
                  Inline: |
                    Import-AzSentinelHuntingRule -SubscriptionId ${{ parameters.SubscriptionId }} -WorkspaceName ${{ parameters.WorkspaceName }} -SettingsFile ${{ parameters.huntingRulesFile }}
                  azurePowerShellVersion: 'LatestVersion'
                  pwsh: true

            - ${{ if ne(parameters.ConnectorsFile, '') }}:
              - task: AzurePowerShell@5
                displayName: 'Create and Update Connectors'
                inputs:
                  azureSubscription: ${{ parameters.azureSubscription }}
                  ScriptType: 'InlineScript'
                  Inline: |
                    Import-AzSentinelDataConnector -SubscriptionId ${{ parameters.SubscriptionId }} -Workspace ${{ parameters.WorkspaceName }} -SettingsFile ${{ parameters.ConnectorsFile }}
                  azurePowerShellVersion: LatestVersion
                  pwsh: true

            - ${{ if ne(parameters.WorkbooksFolder, '')}}:
              - task: AzurePowerShell@4
                displayName: 'Create and Update Workbooks'
                inputs:
                  azureSubscription: ${{ parameters.azureSubscription }}
                  ScriptType: 'InlineScript'
                  Inline: |
                    $armTemplateFiles = Get-ChildItem -Path ${{ parameters.WorkbooksFolder }} -Filter *.json

                    $rg = Get-AzResourceGroup -ResourceGroupName ${{ parameters.ResourceGroupName }} -ErrorAction SilentlyContinue
                    if ($null -eq $rg) {
                      New-AzResourceGroup -ResourceGroupName ${{ parameters.ResourceGroupName }} -Location ${{ parameters.ResourceGroupLocation }}
                    }

                    foreach ($armTemplate in $armTemplateFiles) {
                      New-AzResourceGroupDeployment -ResourceGroupName ${{ parameters.ResourceGroupName }} -TemplateFile $armTemplate -WorkbookSourceId ${{ parameters.WorkbookSourceId }}
                    }
                  azurePowerShellVersion: LatestVersion
                  pwsh: true
Getting started
So now that we have discussed all the important topics, we can start creating things in Azure DevOps. This is a high-level list of tasks that we will perform.
Steps:
- Create an Azure DevOps organization – link
- Create an Azure DevOps Project – link
- Create a service connection to your Azure environment/s – link
- Get the code in your repository by importing it from GitHub – link
- Update the “Azure-Pipeline.yml” file and fill in all the applicable parameters
- Create and configured the environments – link
- Create Build validation pipeline from YAML by importing Build.Validation.yml
- Create the 3 default branches (copy from master) – link
- Configure Git branch policies for all 3 branches – link
- Create Deployment pipeline from YAML by importing Azure-Pipeline.yml
The end..
Finally! We’ve reached the end of this blog. If you read all of it: thank you for your dedication! I know it took some time. Anyway, I hope that the blog has taught you something about DevOps and the ‘why’ behind this way of working with Azure Sentinel.
Do you still have any questions regarding this subject? Know that you can always hit me up ;).
All the code is published on my GitHub and is free for use. Do you have any ideas or contributions? Please add this on the GitHub project. This way we can spread our knowledge and make the community better!


Recent Comments