by Scott Muniz | Nov 30, 2020 | Security
This article was originally posted by the FTC. See the original article here.
Thanks to COVID-19, many charitable organizations are faced with greater demand for their services, but less in donations as people have less to give. Now, more than ever, it’s important to make sure that your donation will be used wisely and well. Tomorrow is Giving Tuesday, and as you consider new places to send your donations, now and throughout the holiday season, don’t forget these four tips for giving wisely:
Brought to you by Dr. Ware, Microsoft Office 365 Silver Partner, Charleston SC.
by Contributed | Nov 29, 2020 | Technology
This article is contributed. See the original author and article here.
Hello everyone, this is Ingmar Oosterhoff, a Customer Engineer at Microsoft. In an earlier post I described how to set up an environment for a bulk conversion of .msi and .exe installers. But what about App-V? In this blog I will explain how easy it is to batch convert your App-V 5 packages to MSIX.
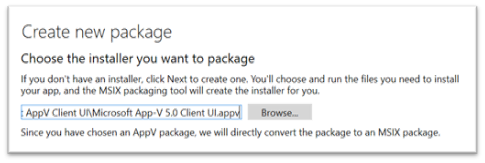
Create new MSIX package
The MSIX packaging tool natively converts a single App-V package to MSIX, removing the requirement to re-package them and a feature we will make use of.
Let us start by preparing the host machine. In this case, my laptop. Components needed are contained in the shopping list below.
The shopping list:
- MSIX Packaging tool
- Folder containing App-V packages.
- A Signing certificate.
- Signtool.exe
- Conversion script
- Xml template
The MSIX Packaging Tool is free and can be installed from the Microsoft Store, so that is an easy step.
For the folder containing App-V packages, I am going to use my App-V Content Share. However, any folder that contains App-V packages will suffice.
Please keep in mind that User- and/or DeploymentConfig files of the App-V packages will be ignored.
Signing Certificate
I will need to sign the newly created MSIX packages with a certificate, so on my laptop on my C: drive I have created a folder named MSIX. In this folder I have created a folder Signing, this folder contains the certificate, used to sign the packages, and signtool.exe, which is part of the Windows 10 SDK (Software Developer Kit). (Have a look at our earlier post on how to set that up) |
 |
The Script and xml template
In the MSIX folder I created earlier on the C: drive, I have a folder BatchConversion from my last post, and created an additional PowerShell file named batch_convert_appv.ps1, and the template file MsixPackagingToolTemplate.xml
|
 |
batch_convert_appv.ps1
The script below was created together with my fellow Customer Engineer Ryan Cobb. This script iterates through the list of App-V packages and converts them to MSIX. All that is needed is to copy the script and xml template from below, modify the following parameters within the script.
|
The location containing the App-V packages |
|
Certificate Publisher information must match the signing certificate. Have a look at my earlier post on how to retrieve that |
|
The Certificate friendly name |
|
The path to the signing certificate
|
|
The password to use with the certificate
|
$AppvContentStore = "C:repositoryApp-VPackages"
$PublisherName = "CN=Contoso Software (FOR LAB USE ONLY), O=Contoso Corporation, C=US"
$PublisherDisplayName = "Contoso"
$counter = 1
$Certificate = "C:MSIXSigningContosoLab.pfx"
$CertificatePassword = "notreallythecertificatepassword"
# Creating a folder to store the template files used for the conversion
New-Item -Force -Type Directory ([System.IO.Path]::Combine($workingDirectory, "MPT_Templates"))
# Creating a folder to store the MSIX packages
New-Item -Force -Type Directory ([System.IO.Path]::Combine($workingDirectory, "MSIX"))
# get all the App-V packages from the ContentStore
get-childitem $AppvContentStore -recurse | Where-Object { $_.extension -eq ".appv" } | ForEach-Object {
    $Installerpath = $_.FullName
    $filename = $_.BaseName
    write-host "starting the conversion of: " $Installerpath
    # MSIX package name cannot contain spaces, dashes or dots, so replacing these
    $packageStrippedName = $filename -replace 's+', '' -replace '.', '' -replace '-', ''
    $job = "job" + $counter

    # get the contents of the template XML
    [String]$newXml = Get-Content -path $PSScriptRootMsixPackagingToolTemplate.xml | Out-String
    # Replace the placeholders with the correct values
    $newXml = $newXml.Replace("[Installer]", "$Installerpath")
    $newXml = $newXml.Replace("[SaveLocation]", "$SaveLocation")
    $newXml = $newXml.Replace("[PackageName]", "$packageStrippedName")
    $newXml = $newXml.Replace("[PackageDisplayName]", "$filename")
    $newXml = $newXml.Replace("[PublisherName]", "$PublisherName")
    $newXml = $newXml.Replace("[PublisherDisplayName]", "$PublisherDisplayName")
    # saving the newly created template
    $newXml | out-File $MPTtemplateMsixPackagingToolTemplate_$job.xml -Encoding Ascii -Force
    # Starting the conversion
    MsixPackagingTool.exe create-package --template "$MPTtemplateMsixPackagingToolTemplate_$job.xml"
    MsixPackagingTool.exe cleanup
    $counter = $counter + 1
}
# App-V packages converted to MSIX. Signing the new MSIX packages
Get-ChildItem $msixFolder | foreach-object {
    $MSIXpackage = $_.FullName
    C:MSIXSigningsigntool.exe sign /a /v /fd SHA256 /f $Certificate /p $CertificatePassword "$MSIXpackage"
MsixPackagingToolTemplate.xml
Below the contents of the xml template file
<MsixPackagingToolTemplate
    xmlns="http://schemas.microsoft.com/appx/msixpackagingtool/template/2018"
    xmlns:mptv2="http://schemas.microsoft.com/msix/msixpackagingtool/template/1904">
<Installer Path="[Installer]"/>
<SaveLocation PackagePath="[SaveLocation]" />
<PackageInformation
    PackageName="[PackageName]"
    PackageDisplayName="[PackageDisplayName]"
    PublisherName="[PublisherName]"
    PublisherDisplayName="[PublisherDisplayName]"
    Version="1.0.0.0">
</PackageInformation>
</MsixPackagingToolTemplate>
Once all the changes have been made and the script saved Batch Conversion can begin.
Open a PowerShell window as an administrator and change location to the Batch Conversion folder where the script is stored.
Type .batch_convert_appv.ps1 and press enter
The script will convert all the App-V packages to signed MSIX packages and store them in a subfolder named MSIX.
Happy converting! Let me know how it went!
Ingmar Oosterhoff, Ryan Cobb, and Matthias Herfurth
Disclaimer
The sample scripts are not supported under any Microsoft standard support program or service. The sample scripts are provided AS IS without warranty of any kind. Microsoft further disclaims all implied warranties including, without limitation, any implied warranties of merchantability or of fitness for a particular purpose. The entire risk arising out of the use or performance of the sample scripts and documentation remains with you. In no event shall Microsoft, its authors, or anyone else involved in the creation, production, or delivery of the scripts be liable for any damages whatsoever (including, without limitation, damages for loss of business profits, business interruption, loss of business information, or other pecuniary loss) arising out of the use of or inability to use the sample scripts or documentation, even if Microsoft has been advised of the possibility of such damages.
by Contributed | Nov 29, 2020 | Technology
This article is contributed. See the original author and article here.
Season’s greetings, my fellow IT Pros of the world!
As you know, M365 is a set of services for business productivity, security and compliance. Across those services, Microsoft has interwoven an information protection ‘platform,’ which is referred to as Microsoft Information Protection, or MIP.
I was bit confused when I first heard about MIP because it looks/sounds/reads/seems alot like ‘AIP’ (Azure Information Protection). My first thought was “Oh, we re-named AIP to MIP.” However, that’s not right – AIP and MIP are two different types of things – but both are related to information protection.
- AIP is a ‘thing.’ A product you can purchase, deploy and setup. There is a Windows client and the service has numerous capabilities to label and protect information. You should be aware that AIP end of life is planned for March 2012.
- MIP is not a thing – it’s a collective set of information protection capabilities (including most of what AIP can do) across other things. It’s not a product, per se. There is a Windows client but there are also capabilities built-in to the Office desktop/web/mobile apps, as well as the M365 services (think not only Exchange Online, SharePoint Online/OneDrive for Business but also Teams, PowerBI, MCAS, etc.). Further, these MIP capabilities are ever-expanding – there are ideas afoot to extend this into Azure and even 3rd party services.
It is Thanksgiving here in the US and I spent some quality time in my lab over the holiday, going through an “end-to-end scenario” with a part of that MIP platform – our recently-released Endpoint DLP .
I was moved by how cool this capability is, so I thought I’d share some screenshots/pictures of what moved me – some ‘moving pictures,’ if you will (a not-so-subtle reference to one of my favorite bands, Rush, their great album – Moving Pictures – and a sad-nod to the departed drummer/lyricist Neil Peart).
- Consider this post ‘inspirational’ … it is not intended to be all-inclusive of configuring EDLP. Use the docs to perform all the steps. For example, I don’t cover device on-boarding at all here – but it needs to be done.
Let’s roll …
Portal/service settings:
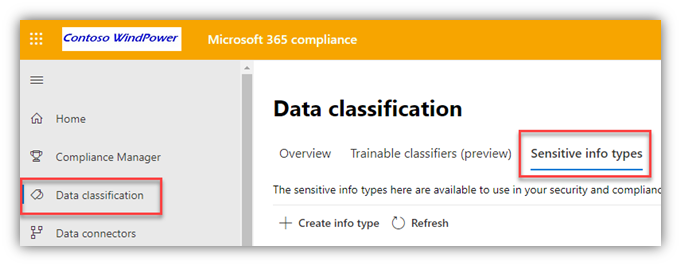
- Select a Sensitive Information Type
- From the Data Classification page in the M365 Compliance portal, select one of the built-in Sensitive Information Types (SIT) or create a ‘custom’ one to use for the DLP policy. Here, I created one that has a keyword string of ‘Gizmo’

- Create a Sensitivity Label
- From the Information Protection page in the M365 Compliance portal, I created a Sensitivity Label that automatically labels files and emails that have 3 or more instances of the “Gizmo” Sensitive Information Type


- Configure Endpoint DLP Settings
- From the Data Loss Prevention page in the M365 Compliance portal, I selected the Endpoint DLP Settings tab and entered a few “service domains” which I set to “Block.” This will block uploads from the Edge browser (which is enlightened for EDLP – another feature of Edge) to both G-drive and OneDrive personal cloud services.
- The keen eye will notice I also added Firefox as an ‘unallowed browser’ – this doesn’t block the use of the browser full-stop; rather, it only blocks labeled/sensitive files from being accessed from Firefox.

- Create a DLP Policy
- From the same Data Loss Prevention page in the M365 Compliance portal, on the Policies tab, I created a DLP Policy, scoped to “Devices,” that is triggered by the “Gizmo” Sensitivity Label


- The DLP Policy has the below restrictions defined and I also enabled “User notifications” (with custom text for the notification email subject/body) and “Incident reports” with admin email alerts:

Admin Recap
- I created a custom Sensitive Information Type that is keyed on the text string ‘Gizmo’
- I created a Sensitivity Label that looks for 3+ instances of that “Gizmo” Sensitive Info Type in a file or email and automatically applies that label to the file
- I configured Endpoint DLP Settings to block un-managed browsers (Firefox in this case) and to restrict several activities, including: copy/paste, print, upload to specified blocked cloud services, and saving the file to a USB drive
- I created a DLP Policy that applies to Devices and triggers on files or emails with the “Gizmo” Sensitivity Label
End-user Experience
What does this look like for an end user? Let’s take a look…
- First, the user first creates and saves a Word doc w/ 3 (or more) instances of the ‘Gizmo’ text string.
- Once the file is labeled (manually or, in the case of this specific Label, automatically), the Sensitivity Label settings apply to the file:
- The yellow ‘Policy Tip’ banner informs the user
- The visual markings apply to the file – a GIZMO! header and watermark
- The status bar at the bottom shows the Label name – Gizmo in this case

- Now, the user does a ‘Select all’ on the text and a Copy … at this point, the Copy action is NOT blocked. This is because the EDLP system allows the content to be copied/pasted into another file within the same process (i.e. another Word file in this case).
- However, the user then launches Notepad … at that point, the copy/clipboard action IS blocked – and a UI ‘toast’ is popped. This prevents the content from being copied out of process (i.e. into PowerPoint, or Notepad in this case).

- The user now tries to print the file … that, too, is met with a block and a Toast:

- So, the user tries to upload to a personal G-Drive via Edge … Nope.

- So, the user tries to upload to a personal OneDrive via Edge … Negatory.

- Not easily deterred, the user tries to save the file to a USB stick … care to guess if it worked?

- Finally, our user tries to dodge the DLP rule by using Firefox to upload the content to G-Drive… “Would you like butter with that toast?”

A few FAQs:
- “Does this only work on Windows?”
- Yes, today, this is only possible on Windows 10 but since this capability leverages aspects of the Microsoft Defender for Endpoint (MDE) client, which is cross-platform, other platforms are being explored (i.e. MacOS).
- “Do we need to be using Microsoft Defender for Endpoint for PC protection? Today, we use a 3rd party product for endpoint protection.”
- No, you don’t need to be running MDE actively on your endpoints to be able to use EDLP, you can on-board the devices into the EDLP service without on-boarding them into MDE.
So, there you have it folks … a quick run through of Microsoft Endpoint DLP.
Hopefully, this post helped clarify the difference between AIP and MIP, illustrated how several components of the MIP platform can be combined to provide effective endpoint DLP controls – and I hope the pictures “moved” you enough to get you started with this in your environment.
Cheers and Happy Holidays!
Hilde
by Contributed | Nov 28, 2020 | Azure, Microsoft, Technology
This article is contributed. See the original author and article here.
Initial Update: Saturday, 28 November 2020 05:02 UTC
We are aware of issues within Application Insights and are actively investigating. Due to power outage in data center, some customers may experience delayed or missed Log Search Alerts, Latency and Data Loss in South Africa North region.
- Work Around: none
- Next Update: Before 11/28 17:30 UTC
We are working hard to resolve this issue and apologize for any inconvenience.
-Vyom
by Contributed | Nov 27, 2020 | Technology
This article is contributed. See the original author and article here.
Customer failed to apply patch. SQL Service cannot start. They received below errors in SQL Error logs.
2020-11-24 20:09:21.59 spid5s Configuration option ‘show advanced options’ changed from 1 to 1. Run the RECONFIGURE statement to install.
2020-11-24 20:09:21.59 spid5s Error: 574, Severity: 16, State: 0.
2020-11-24 20:09:21.59 spid5s CONFIG statement cannot be used inside a user transaction.
2020-11-24 20:09:21.59 spid5s Error: 912, Severity: 21, State: 2.
2020-11-24 20:09:21.59 spid5s Script level upgrade for database ‘master’ failed because upgrade step ‘msdb110_upgrade.sql’ encountered error 574, state 0, severity 16. This is a serious error condition which might interfere with regular operation and the database will be taken offline. If the error happened during upgrade of the ‘master’ database, it will prevent the entire SQL Server instance from starting. Examine the previous errorlog entries for errors, take the appropriate corrective actions and re-start the database so that the script upgrade steps run to completion.
2020-11-24 20:09:21.60 spid5s Error: 3417, Severity: 21, State: 3.
2020-11-24 20:09:21.60 spid5s Cannot recover the master database. SQL Server is unable to run. Restore master from a full backup, repair it, or rebuild it. For more information about how to rebuild the master database, see SQL Server Books Online.
2020-11-24 20:09:21.60 spid5s SQL Server shutdown has been initiated
Just before ‘Error: 574’, I noticed ‘show advanced options’ in SQL Error log. I suppose it failed in ‘sp_configure’ scripts. I made below test to reproduce this error.
Open a new query window. Run begin tran first, then run sp_configure query. We can reproduce the same error.
begin tran
sp_configure ‘show advanced options’,1
go
reconfigure
go
According to the test, we felt sure that there was an uncommitted transaction when running ‘msdb110_upgrade.sql’. But where has it come from ? I read SQL Error logs again and found below information:
2020-11-24 20:09:19.52 spid5s Granting login access’DomainUserA’ to msdb database…
2020-11-24 20:09:19.55 spid5s A problem was encountered granting access to MSDB database for login ‘(null)’. Make sure this login is provisioned with SQLServer and rerun sqlagent_msdb_upgrade.sql
2020-11-24 20:09:19.80 spid5s Granting login access’DomainUserB’ to msdb database…
2020-11-24 20:09:19.80 spid5s A problem was encountered granting access to MSDB database for login ‘(null)’. Make sure this login is provisioned with SQLServer and rerun sqlagent_msdb_upgrade.sql
Even though, there are no error code, but those information indicates ‘msdb110_upgrade.sql’ encountered an issue before Error: 574. According to ‘msdb110_upgrade.sql’ scripts, I found below part
——————————————————————————–
–wals thru all non sysadmin job owners
DECLARE job_nonsysadmin_owners_cursor CURSOR LOCAL FOR
SELECT DISTINCT j.owner_sid FROM sysjobs j
FOR READ ONLY
OPEN job_nonsysadmin_owners_cursor
FETCH NEXT FROM job_nonsysadmin_owners_cursor INTO @owner_sid
WHILE (@@fetch_status = 0)
BEGIN
SELECT @owner_name = SUSER_SNAME(@owner_sid)
IF @owner_name IS NOT NULL
BEGIN
–is job owner member of sysadmin role?
BEGIN TRY
EXECUTE AS LOGIN=@owner_name — impersonate
SELECT @is_sysadmin = ISNULL(IS_SRVROLEMEMBER(‘sysadmin’),0) — check role membership
REVERT — revert back
END TRY
BEGIN CATCH
SET @is_sysadmin = 0
END CATCH
IF @is_sysadmin = 0
BEGIN
–add job_owner to the SQLAgentUserRole msdb role in order to permit the job owner to handle his jobs
–has this login a user in msdb?
IF NOT EXISTS(SELECT * FROM sys.database_principals WHERE (sid = @owner_sid) OR (LOWER(name collate SQL_Latin1_General_CP1_CS_AS) = LOWER(@owner_name collate SQL_Latin1_General_CP1_CS_AS)))
BEGIN
PRINT ”
PRINT ‘Granting login access”’ + @owner_name + ”’ to msdb database…’
BEGIN TRY
EXEC sp_grantdbaccess @loginame = @owner_name
END TRY
BEGIN CATCH
RAISERROR(‘A problem was encountered granting access to MSDB database for login ”%s”. Make sure this login is provisioned with SQLServer and rerun sqlagent_msdb_upgrade.sql ‘, 10, 127) WITH LOG
END CATCH
END
PRINT ”
PRINT ‘Adding user ”’ + @owner_name + ”’ to SQLAgentUserRole msdb role…’
BEGIN TRY
EXEC sp_addrolemember @rolename = ‘SQLAgentUserRole’, @membername = @owner_name
END TRY
BEGIN CATCH
RAISERROR(‘A problem was encountered adding user ”%s” to SQLAgentUserRole. Make sure this is a valid user in MSDB database and rerun sqlagent_msdb_upgrade.sql ‘, 10, 127) WITH LOG
END CATCH
END
END
FETCH NEXT FROM job_nonsysadmin_owners_cursor INTO @owner_sid
END
DEALLOCATE job_nonsysadmin_owners_cursor
It seems this scripts will find out non sysadmin Agent job owners. Grant msdb access to those job owner accounts. However, ‘DomainUserA’ and ‘DomainUserB’ were not logins of this SQL instance. But they are still job owners. This is the reason above ‘try…catch’ block throw out below messages:
2020-11-24 20:09:19.55 spid5s A problem was encountered granting access to MSDB database for login ‘(null)’. Make sure this login is provisioned with SQLServer and rerun sqlagent_msdb_upgrade.sql
I consulted below official document. ‘try…catch’ block may cause an uncommitted transaction.
https://docs.microsoft.com/en-us/sql/t-sql/language-elements/try-catch-transact-sql?view=sql-server-ver15
Uncommittable Transactions and XACT_STATE
If an error generated in a TRY block causes the state of the current transaction to be invalidated, the transaction is classified as an uncommittable transaction. An error that ordinarily ends a transaction outside a TRY block causes a transaction to enter an uncommittable state when the error occurs inside a TRY block.
Now we found root cause. Customer removed ‘DomainUserA’ and ‘DomainUserB’ from job owners. Patch upgrade was successful.

Recent Comments