by Contributed | Nov 12, 2020 | Technology
This article is contributed. See the original author and article here.
Terminology
Architecture
Implementation strategy
Deploying and running the AIP scanner
Capacity planning
Accounts and permissions
Installing an AIP scanner node
Network scan job
Content scan job
Keeping scanners up to date
Reporting
Frequently asked questions
In this article we would like to summarize what we know about the AIP scanner and share lessons learned while helping our enterprise customers deploy the AIP scanner to production, so that you can avoid possible pitfalls and make your implementation of the AIP scanner easier, faster, more efficient, and get the most out of your investments. We are going to keep this post up to date as we add new features and capabilities to the AIP scanner, so bookmark this page and come back regularly.
Note: In this article we cover only the Unified Labeling (UL) AIP scanner since this is the recommended solution
for all new deployments.
Let’s start off by reviewing the scanner related terminology.
Terminology
- The AIP UL scanner is a service that runs on Windows Server and lets you discover, classify, and optionally label/protect files on network shares and SharePoint document libraries.
- A cluster (profile) is a logical grouping of multiple scanner servers (nodes) that share the same configuration (database, content, and network scan jobs) in order to distribute load. Please note that every node can be a member of only one cluster.
- Scanner DB is a configurational and operational SQL database responsible for storing information about previous scan results, load distribution across cluster nodes and scan jobs orchestration.
- Content scan job is a set of rules used by all nodes of the same cluster to scan, inspect and optionally label files within one or more repositories, which can be a SMB file share or a SharePoint document library.
- Network scan job allows you to scan a range of IP addresses to discover existing file shares, that can be later added to a content scan job, as well as report on permissions used to control access to those shares.
Architecture
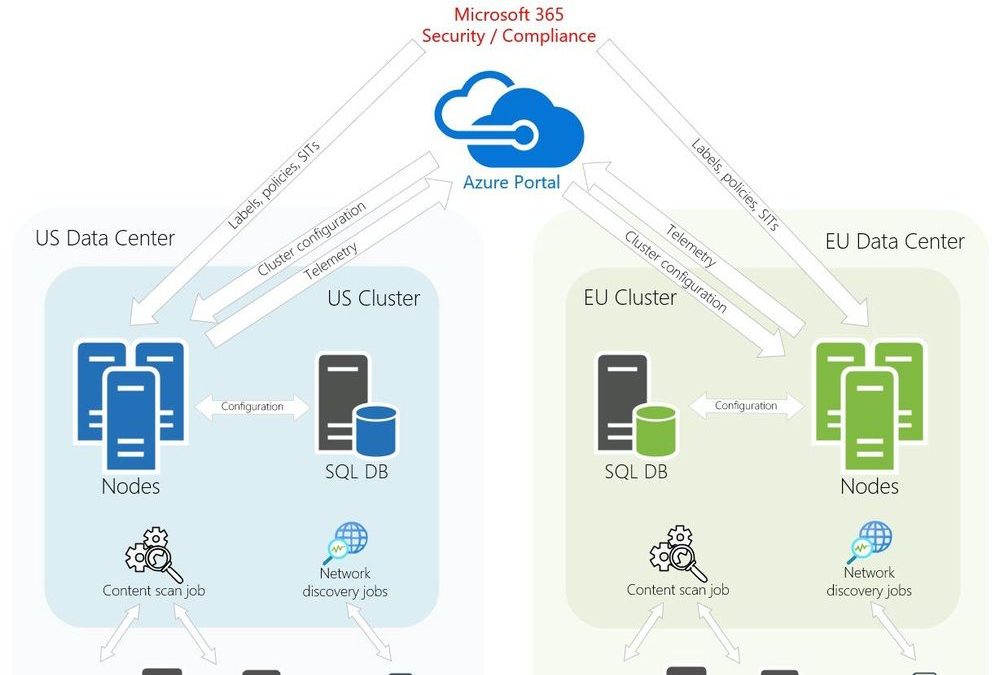
The following diagram represents a production AIP scanner deployment architecture of a fictious company which has two data centers: one in the USA and one in Europe. It also depicts the most recommended design and implementation approach based on our experience working with enterprises of all sizes around the world.
 Figure 1: Typical AIP scanner architecture with dedicated SQL servers.
There might be a variation of this architecture depending on whether you want to utilize your existing SQL environment or deploy dedicated SQL servers for the AIP scanner clusters.
 Figure 2: Typical AIP scanner architecture with a highly available shared SQL environment.
To minimize network performance impact on the scanning process, it is highly recommended to install the scanner nodes as physically close to data sources as possible.
Implementation strategy
 Figure 3: AIP scanner role in on-premises data governance.
- Automate discovery of potentially insecure file shares containing sensitive information by scanning IP ranges using the network discovery feature of the scanner and prioritize the scan of overshared or publicly accessible shares.
- Inspect the content of file shares found in the previous step as well as SharePoint libraries to discover sensitive information.
- Apply sensitivity labels to the content containing important information based on the previously defined policies, rules, and conditions.
- Wherever appropriate, in addition to labeling, apply protection to the files by enforcing encryption and access control restrictions.
Based on experience gained while helping our customers successfully deploy the AIP scanner at scale, we recommend that all new implementations are planned with the “Crawl, Walk, Run” strategy in mind.
Crawl: Use the network discovery to create a list of available network shares. Don’t attempt to scan your company’s entire set of file shares or encrypt files on your first attempt. Instead, first focus on discovery of a smaller data repository with a well-known set of files. Perform an initial discovery scan to determine what kinds of sensitive information types a new data store might contain. The AIP scanner has an option to discover all sensitive information types without having to configure any labels – a key feature when you need to scan large amounts of disparate data.
Walk: Review the results of your initial scans with the appropriate data custodian to identify false positives and fine-tune the data store’s search parameters. Select the sensitive information types you’re interested in and then map them to any custom labels that are relevant for the data store. After your information types and labels are set correctly, you can elevate your scan actions from simple discovery to programmatically applying labels to the files that need them. You can also change the labels of those files that appear to be incorrect.
Run: When you’re comfortable with the efficacy of the labels that are being applied to your data store, work with your data custodian and other stakeholders to onboard additional data stores and determine which files, if any, should be automatically encrypted during subsequent scans.
Capacity planning
Hardware and software requirements for the AIP scanner deployment components are very well documented here. Latest versions of the scanner allow you to tweak scanners performance by limiting CPU consumption and number of simultaneously scanned files.
“How many nodes do we need to scan XX shares and YY SharePoint sites containing ZZZ TB of data?” – is arguably the most asked question we hear when we talk about the AIP scanner deployment.
While there is no precise answer to this question, we have created a calculator (an excel spreadsheet you can find attached to this article below) that can give you a rough estimate based on your sample test results and objectives. There are many variables to keep in mind that may affect the results, such as the scanner servers’ specifications, network and storage performance, etc. To help you better understand how to use the calculator, let’s review the following example together.
For this test we created a cluster with a single node, and we used a file share located on the same network containing 100GB of different file types.
 Figure 4: Sample scan results.
These results tell us that:
- our initial discovery scan (just content inspection and sensitive information discovery) of 100GB took 68 min and a subsequent discovery “delta” scan, after we added additional 1GB of data, took 2 min.
- our initial enforcement scan (content was inspected and sensitivity labels were applied based on conditions defined in the policy) of 100GB took 425 min and a subsequent enforcement “delta” scan, after we added additional 1GB of data, took 6.5 min.
You can find scan duration in either the Azure Portal or in the scan summary file on the scanner server itself:
 Figure 5: Sample scan duration on the content job page.
 Figure 6: Sample scan duration in the scan summary file.
This information gives us an idea of our scans’ performance:
 Figure 7: Sample scan rates.
Our next step is to decide what is more important for us to find out given our current business objectives and/or limitations:
- How long will it take to scan XX amount of data if I can only deploy YY scanner nodes?
- How many nodes do I need to scan XX amount of data to make sure the initial scan will not take longer than YY hours?
Scenario #1.
Let’s say we have 100TB of initial data and our information workers produce additional 10GB every day. We have decided to deploy 10 scanner nodes for our initial full scan and keep just 4 nodes for subsequent incremental scans.
 Figure 8: Entering input parameters.
Considering these inputs and our scan rates we can estimate duration of the scans.
 Figure 9: Reviewing estimates.
Scenario #2.
Let’s say we have 100TB of initial data and our information workers produce additional 10GB every day. We need to ensure that our initial scan won’t take longer than 5 days for just a discovery scan, and no longer than a month if you decide to label and protect files.
 Figure 10: Entering input parameters.
Considering these inputs and our scan rates we can estimate number of nodes required to complete the scans in time.
 Figure 11: Reviewing estimates.
The calculator would do all the math for you based on your inputs. But once again, we would like to iterate that these calculations are approximate and your mileage might vary.
Accounts and permissions
Depending on your deployment scenario and your organization’s security requirements you might need to create and use several user accounts to install, configure, maintain, and use the AIP UL scanner.
User account for scanner installation and configuration. This is an Active Directory account used to install the AIP scanner binaries on a Windows Server and run the installation scripts. This account needs to have the following permissions:
- Local Administrator on the scanner server.
- Sysadmin role on the SQL server where the scanner database will be hosted.
Service account for the scanner service. This is an Active Directory account used to run the AIP scanner service and access the data repositories. This account has the following requirements:
- Log on as a service user right assignment. This right is automatically granted to the service account during the scanner installation and this right is required for the operation of the scanner. Please make sure you have updated you Group Policies, if you centrally enforce user right assignments, to include this account(s).
- Permissions to the data repositories:
- File shares or local files: Grant Read, Write, and Modify permissions for scanning the files and then applying classification and protection as configured.
- SharePoint: You must grant Full Control permissions for scanning the files and then applying classification and protection to the files that meet the conditions in the Azure Information Protection policy.
- Discovery mode: To run the scanner in discovery mode only, Read permission is sufficient.
Cloud account. This is an Azure Active Directory (AAD) account that can either be a synchronized from on-premises Active Directory or a cloud-only account. This account needs to be added to a label policy that publishes all labels you intend to use for scanner content scan jobs. It’s highly recommended to create a dedicated policy and scope it to just this cloud account.
Important: We currently do not support Multi-factor Authentication (MFA) for this account. Please exclude it
from any enforcement policies you might have in place.
Note: To be able to access and inspect (and optionally change or remove protection) already protected files,
the scanner cloud (AAD) account would need to get the super user roles assigned.
Network discovery service accounts:
When you install and configure the Network Discovery service you need to provide the following Active Directory credentials:
- ServiceUserCredentials – specifies a PSCredential object for the service account to run the Azure Information Protection Network Discovery service. This account needs Log on as a service user right. Depending on your security policy, this can be either a separate/dedicated account or you can re-use the scanner service account we discussed earlier.
- StandardDomainsUserAccount – the user impersonated by the Network Discovery service when scanning the configured network locations to understand whether public access is available on each location. This Active Directory user account should be just member of the Domain Users group (which is by default), so that the network discovery service can find misconfigured (or intentionally configured) insecure file shares (e.g. granting “Everyone” or “Authenticated Users” access to the content)
- ShareAdminUserAccount – the user impersonated by the Network Discovery service when scanning the configured network locations to understand whether admin access is available on each location. An ideal candidate for this would a member of the Domain Admins group because this group by default has administrative privileges of every domain-joined machine. These credentials are used to also collect information about NTFS and Share permissions configured on a discovered repository.
Installing the AIP UL scanner
Please review our previous blog post that covers the installation process in very details. Here we are just going to highlight installation nuances you need to be aware of.
Note: Please avoid using “-“ (hyphen) sign in a cluster name. There is a known issue that will be fixed
in the next release of the AIP scanner.
Network scan jobs
If you know all the locations where your sensitive data can possibly reside, that is great, you can just add those shares to the content scan jobs and the scanner will do the rest. But what if you do not have this visibility? What if no one in your organization remembers about those file servers you adopted as part of that merger 3 years ago?
This is exactly when one of the latest scanner features – network discovery – comes in handy. It allows you to scan your local network, discover file shares, and report on their accessibility (Share and NTFS permissions). The resulting list can be analyzed by the administrators and added to the existing content scan jobs for a subsequent content analysis (inspection, labeling, protection).
Let’s review the installation and configuration process.
Note: One of the pre-requisites for using the network discovery feature is to have AIP Analytics configured. While
this is not a hard requirement, it is highly recommended to have to in place to be able to use all the features
available. If you can’t enable AIP Analytics in your tenant, you still can run the scans, but you will have to use
locally generated log files to review the scan results.
First, you need to decide which servers you would like to use for network scanning. This is very important because you would need to coordinate this decision with other teams, as scanning will likely require changing firewall rules, configuring IDS/IPS and other security tools which otherwise might generate a lot of security alerts. It’s possible to use your existing scanner nodes as well.
You can install the network discovery service on more than one server to enable fault tolerance, but, unlike the situation with content scan jobs when all active nodes share the load and scan simultaneously, only one node scans the network at any given time (aka “active-passive” configuration).
Once you have identified servers, you need to download and install the latest AIP client and scanner installation package from here and you need version 2.8.85 or later. The next step is to install the AIP Network Discovery service.
Please review our documentation for details. Here is an example of the installation script (we discussed accounts needed for this service earlier):
$ServiceAccount = Get-Credential contososvc_aipscanner_us
$ShareAdminAccount= Get-Credential contososhare_admin_us
$StandardUserAccount= Get-Credential contosostandard_user_us

Install-MIPNetworkDiscovery -SqlServerInstance AIPSCNRSQL -Cluster AIPSCANNER_PROD_US -ServiceUserCredentials $ServiceAccount -ShareAdminUserAccount $ShareAdminAccount -StandardDomainsUserAccount $StandardUserAccount
 Figure 12: Verifying that the AIP Network Discovery service has been installed and is running.
After that you should be able to see your newly registered server on the “Nodes” dashboard warning about a missing network scan job.
 Figure 13: A new scanner node on the nodes dashboard.
Our next step is to create one and assign it to the appropriate cluster.
 Figure 14: Adding a new network scan job.
 Figure 15: Configuring a new network scan job.
 Figure 16: Network scan jobs dashboard.
 Figure 17: Scanner nodes dashboard showing assigned network scan jobs.
 Figure 18: A network scan job running on a cluster node.
Note: When you run a network scan for the first time, a new table (NetworkScan_CL) is created in the Azure Log
Analytics Workspace you have configured for AIP Analytics, so it might take up to 24 hours before you can see
the scan results on the “Repositories” page. All subsequent scan results should be available in a matter of minutes.
Once the network scan job is complete, you can review the scan results on the “Repositories” dashboard.
 Figure 19: Reviewing file shares discovered by a network scan job.
And with just few clicks you can easily add desired repositories to a content scan job for a subsequent content inspection and classification. When you do that, ensure that the scanner has required access to that repository (you might need to enable “Scanner Access” column to see this information), “Read” for just inspection, or “Read & Write” if you are planning to apply labels to the content in that repository.
 Figure 20: Assigning a discovered file share to a content scan job.
As we mentioned earlier, if you can’t enable AIP Analytics in your tenant, you still can run network scans, but in this case, you would need to use local log files to see the scan results. Here is an example:
 Figure 21: Network scan results.
 Figure 22: Detailed network scan report.
Content scan jobs
Even though creating and configuring a content scan job is a pretty straightforward process, you may find some settings a little confusing, let’s try to make this clearer.
 Figure 23: Configuring content scan job settings.
Schedule: Manual vs Always. This options allows you to control behavior of your content scan jobs, whether they are going to scan configured repositories continuously or the administrators will have to initiate the scans manually. If it is configured as “Always”, the scanner process crawls all jobs’ repositories looking for new or changed files. Once it reaches the last file of the last repository, it starts this process again. That means that discovery of a new file depends on a number of repositories, the scan performance, number of changes users make to the content of those repositories, as well as where the crawler was, in terms of list of repositories, when the file was created/updated.
Info types to be discovered: Policy only vs All. This option allows you to configure what Sensitive Information Types (SITs) you are interested in scanning your documents for. “All” refers to 100+ built-in Microsoft provided SITs, as well as your own custom ones. “Policy only” means the scanner should be searching for only SITs you have defined in auto-labeling conditions for the labels published to the scanner account. It’s recommended to use “All” to automatically include all newly added/created SITs in the scan.
Treat recommended labeling as automatic. When you create a sensitivity label, you have an option to configure auto-labeling to either automatically apply a label when certain conditions are met, or recommend the users to do that. Since the scanner runs in non-interactive mode, you have an option to configure the scanner to automatically apply a label, even though it was configured to “recommend” in the label properties.
Policy enforcement. If set to “Off” the scanner won’t apply any label or protection (a.k.a. “what-if” mode). This is a good options for the discovery phase when you just want to understand what sensitive information you have and where. “On” tells the scanner to apply, based on other options, either a default label or labels published to the scanner account.
Label files based on content allows you to either apply a default label without content inspection, or inspect files for the condition (SITs) you have specified for your labels.
Default label. It is possible to apply a default label specified in the policy or a custom one to all unlabeled files within a repository. It can also be used in combination with the previous option to apply a default label to the files that do not fall under autoclassification conditions.
Relabel files. This option allows the scanner to change labels of the previously labeled files. To change a label with protection the scanner service account might need to be assigned the super user role.
Currently you can create and assign only one content job per cluster. However, most settings specified for a scan job can be customized at the repository level that gives you flexibility to configure different rules for different repositories within the same content scan job.
Now let’s review several examples of different combinations of these settings and what the expected outcome of a scan would be.
 Figure 24: Set of options that tells the scanner to inspect files for all SITs available in the tenant, report results, but don’t apply any label.
 Figure 25: Set of options that tells the scanner to inspect files for SITs configured in the labels published to the scanner account and apply the corresponding label.
 Figure 26: Set of options that tells the scanner to inspect files for all SITs available in the tenant, apply the corresponding label based on the policy, and apply a default label to all other files.
Keeping scanners up to date
It is highly recommended to always update your scanners to the most recent version.
Important: During the update process the SQL DB schema may get updated as well. Thus, the only supported scenario is
to keep all nodes of the same cluster at the same version level.
Note: Please use this article to find out what the most recent version is, what is new, and what has changed.
The update process is straightforward and involves the following steps:
1. Identify clusters/nodes that require an update.
 Figure 27: Identifying clusters and nodes that require updates.
2. Stop the AIP scanner service on all nodes of the cluster.
 Figure 28: PowerShell commands to stop and verify the status of the AIP scanner service.
3. Download and install the latest generally available (GA) AIP client version.
4. Update configuration and database by running the following PowerShell command, please make sure that you use the proper cluster name that was used during the scanner installation:
 Figure 29: PowerShell command to update the AIP scanner.
5. Start the AIP scanner service.
 Figure 30: PowerShell commands to start and verify the status of the AIP scanner service.
6. Repeat steps 3-5 for all nodes of the cluster.
7. Review the update status in the Azure Portal.
 Figure 31: Cluster nodes after successful update.
You can find more information on the update process in our documentation.
Reporting
When it comes to reporting, there are two options available: AIP Analytics and local log files on the scanner server itself.
AIP Log Analytics.
Managing data, especially terabytes or even petabytes of unstructured data can be daunting. Using the AIP Log Analytics workspace makes managing your important data more achievable. Please take a moment to review our official documentation on central reporting for AIP.
Data that you scanned using the AIP UL Scanner from your on-premises file shares and SharePoint on-premises repository can be aggregated and displayed in the analytics reports. With the data being sent to AIP Log Analytics, administrators can now visualize the risk of their data and see recommendations based on content. It highly recommended to have AIP Analytics enabled to gain visibility to your environment. Please review the required permissions to access AIP Log Analytics.
Before you can see data in your Analytics workspace, it is a prerequisite to configure your workspace. There is a cost associated with utilizing the workspace based on amount of data uploaded and the retention period.
The AIP UL scanner sends information that has been collected to Log Analytics every 5 minutes so that you can view your results in near real time. By default, AIP Log Analytics collects sensitive information type whether it is custom or predefined. If you are interested in finding the content matches, you will have to enable this by clicking “Enable deeper analytics into your sensitive data” within the Azure Information Protection blade in the Azure Portal.
Note: It is important to note that administrators should check their regulations and privacy policies before turning
on this feature within their production environment.
 Figure 32: Enabling deeper analytics into your sensitive data within the Azure Information Protection blade.
Note: Information that is being collected and sent to the AIP Log Analytics workspace can found here
As your data is being scanned by the AIP UL scanner, you will start see data being populated in your Log Analytics workspace. This workspace provides several pages that administrator can use to deep dive into their data: Usage report, Activity logs, Data discovery, and Recommendations.
- Usage report – Label/Protect and User/Devices overview during a period time.
- Activity logs – Drilled down information of activity details.
- Data discovery – View of files that are on your scanned data repositories and endpoints.
- Recommendations – Identify unprotected files that contain a known sensitive information type and apply a policy.
 Figure 33: Activity logs being shown in AIP Log Analytics
 Figure 34: Data discovery dashboard being shown in AIP Log Analytics
Administrators have the option to scope their data using the built-in filter feature within log Analytics or they can go a step further and write their own Kusto Query Language (KQL) query within the console. Azure Information Protection tables are stored under InformationProtectionLogs_CL in Log Analytics. Once you have created your own custom query, you are able to export your data to a .csv file or PowerBI.
 Figure 35: Example Kusto query within Azure Information Protection logs workspace.
Reporting Locally.
As previously mentioned, it’s recommended to use AIP Log Analytics. For administrators that have not configured Log Analytics or using the scanner in offline mode, they can also look at the report generated by the AIP UL scanner locally.
Once a scan is completed, administers can review the results from the AIP Scanner in the %localappdata%MicrosoftMSIPScannerReports folder. This folder contains a .txt and .csv file.
The .txt file includes information about how long the scan took, the number of files that were scanned, and how many files matched based on the sensitive information types matched. The .csv have more details such as:
- Repository Location
- File Name
- Status
- Comment
- Current Label
- Applied Label
- Many more….
Previous summaries will be stored in a compressed zip folder.
 Figure 36: Scanner report location and files.
 Figure 37: Example scan summary.
 Figure 38: Example detailed report.
Frequently asked questions
Q: What kind of license is needed to benefit from the AIP scanner?
A: Please review our documentation to make sure you are properly licensed to take full advantage of the AIP scanner capabilities.
Q: Is it possible to run a manual content scan on a schedule?
A: If you want to only run scans outside of working hours or on weekends, to minimize potential impact on users productivity, you can create a schedule task and run PowerShell command Start-AIPScan. Just make sure the scanner service account has “Log on as a batch job” user right on the scanner server.
Q: Is it possible to install the scanner using a non-standard SQL port?
A: If your organization for some reason uses a non-default SQL port, e.g. 50000, the install command would be: Install-AIPScanner -SqlServerInstance “AIPSCNRSQL.contoso.com,50000” -ServiceUserCredentials $ServiceAccount -Cluster AIPSCANNER_PROD_US
Q: Can I use Azure SQL as a database backend for the AIP scanner?
A: AIP scanner works on SQL Enterprise, SQL Standard and SQL Express editions. It is highly recommended to install SQL Enterprise or Standard edition in a production environment and SQL Express edition in a test environment. Scanner supports both named & single instance; supports SQL hosted on windows failover cluster (active passive). Azure SQL is not supported at this point.”
Q: Is it possible to scan “cold” storage?
A: If you would like to scan file shares residing on a storage solution that offers different access tiers (hot, cold, archive, etc.) you need to keep in mind that the AIP scanner requires access to a file in order to scan its content. Rehydrating files from the archive tier can take time and significantly affect the scan time and storage access/usage cost.
You can skip such files by configuring the scanner’s label policy advanced settings.
Q: What kinds of files can I scan and what types of sensitive information can I identify?
A: You can find the full set of instructions on which files are included and excluded for scanning, along with inspection and more in our documentation.
Q: Can the scanner be used for scanning cloud repositories as well?
A: The AIP Scanner specifically scans your on-prem repositories such as SMB File shares and SharePoint Servers on-prem. For cloud-scanning please consider using MCAS file policies or service side auto-labeling for SPO.
Q: Can I identify sensitive information types outside of the out of the box list for the AIP Scanner?
A: You can leverage out-of-the-box sensitive information types as well as custom M365 regex patterns and keywords.
Q: So, I’ve scanned my on-prem repos and found the sensitive information in my environment…what now?
A: Discovering your data is the first step to the information protection framework of knowing your data, protecting your data, and governing your data. Once you have this information, it can then inform how your classification taxonomy should be structured, how the scope is determined, what a label means from a business standpoint, etc. This action of determining policy then moves into the technology implementation that reflects this using AIP/MIP where you can utilize other capabilities to secure your information worker data.
Q: How can I troubleshoot any issues or problems with my scanner deployment?
A: The best way to approach this is to make sure you are first leveraging a modern version of the UL Scanner that has the Start-AIPScannerDiagnostics PowerShell cmdlet. Please ensure you are utilizing the most modern scanner version when possible to avoid any issues.


Recent Comments