by Contributed | Nov 18, 2020 | Technology
This article is contributed. See the original author and article here.
When you think of “deep learning” you might think of teams of PhDs with petabytes of data and racks of supercomputers.
But it turns out that a year of coding, high school math, a free GPU service, and a few dozen images is enough to create world-class models. fast.ai has made it their mission to make deep learning as accessible as possible, and in this interview fast.ai co-founder Jeremy Howard explains how to use their free software and courses to become an effective deep learning practitioner.
Resources
Learn More about FastAi: https://docs.fast.ai/
Online Learning Course – Practical Deep Learning for Coders https://course.fast.ai/
Follow Jeremy https://twitter.com/jeremyphoward
Create a Free account (Azure for Student Account) https://aka.ms/azureforstudents
Deep Learning vs. Machine Learning https://docs.microsoft.com/en-us/azure/machine-learning/concept-deep-learning-vs-machine-learning
Get Started with Machine Learning https://azure.microsoft.com/en-us/overview/ai-platform/dev-resources/
Deep Learning for Coders with Fastai and PyTorch: AI Applications Without a PhD (Book) (FREE in Notebook format)
Microsoft AI Show https://channel9.msdn.com/Shows/AI-Show
Simple and easy distributed deep learning with Fast.AI on Azure ML https://techcommunity.microsoft.com/t5/ai-customer-engineering-team/simple-and-easy-distributed-deep-learning-with-fast-ai-on-azure/ba-p/1434685
Fast.ai on Microsoft Data Science Virtual Machine https://course.fast.ai/start_azure_dsvm
by Contributed | Nov 18, 2020 | Azure, Microsoft, Technology
This article is contributed. See the original author and article here.
MSTICPy, our CyberSec toolset for Jupyter notebooks, has supported VirusTotal lookups since the very earliest days (the earliest days being only around two years ago!). We recently had a contribution to MSTICPy from Andres Ramirez and Juan Infantes at VirusTotal (VT), which provides a new Python module to access the recently-released version 3 of their API.
As well as a Python module, which provides the interface to lookup IoCs via the API, there is also a sample Jupyter notebook demonstrating how to use it.
As a side note, we’re delighted to get this submission, not just because it brings support for the awesome new VirusTotal API, but it is also first substantial contribution to MSTICPy from anyone outside MSTIC (Microsoft Threat Intelligence Center). Big thanks to Juan and Andres!
The two biggest features of the API are:
- the ability to query relationships between indicators
- the ability to visualize these relationships via an interactive network graph.
There is also an easy-to-use Python object interface exposed via the vt_py and vt_graph_api Python libraries (these are both required by the MSTICPy vtlookup3 module). You can read more about the VT Python packages by following the links in the previous sentence.
Why you would want to use VTLookup3
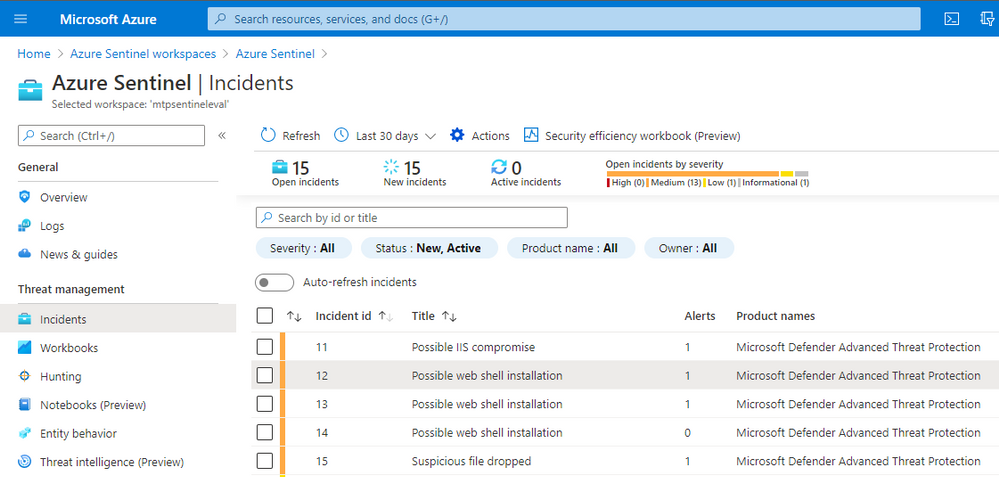
Alerts and incidents in Azure Sentinel will nearly always have a set of entities attached to them. These entities might be things like IP addresses, hosts, file hashes, URLs, etc. This is common to many SOC environments.
Let’s take an example of Microsoft Defender for Endpoint (MDE) alerts ingested into Azure Sentinel.
Note: MDE is the new name for Microsoft Defender Advance Threat Protection (MDATP) so you will probably see both terms kicking around for a while.

If we look at the incident detail and click on the Entities tab we see a list of entities related to the incident.

As part of your SOC triage you will want to check on whether any of these file hashes are known bad and possibly explore other related files, IPs. domains, etc. MSTICPy allows you to do custom correlation with arbitrary external data sources, including VT.
We will use one of the file hashes taken from this incident as we explore VT Lookup capabilities. Although our example below uses a file hash, you could use a URL, domain or IP Address as your starting point.
Getting started
There is a little bit of setup to do before you can get going.
Note: MSTICPy with extras
We’re in the process of moving a lot of the growing list of MSTICPy dependencies into optional installs. These are known as “extras” in the Python setup world. VirusTotal are the first to be “extra”d but we’re not picking on them. It was just, as a new package, it was easiest to start the dependency refactoring with a new library.
Install msticpy with the “vt3” extra
pip install msticpy[vt3]
or just install the vt_py and vt_graph_api packages directly:
pip install vt-py vt-graph-api nest_asyncio
Note: the nest_asyncio package is required for use in notebooks but not if you’re use the vtlookup3 module and VTLookup3 class in Python code.
In the notebook, import the modules:
from msticpy.sectools.vtlookupv3 import VTLookupV3
import nest_asyncio
And create an instance of the VTLookup3 class.
You need to supply your VirusTotal API key when you create the VTLookup3 instance. You can supply this as a string or store it in your msticpyconfig.yaml configuration file.
This code, taken from the notebook will try to find the VT API key in your configuration.
from msticpy.common.provider_settings import get_provider_settings
vt_key = get_provider_settings(“TIProviders”)[“VirusTotal”].args[“AuthKey”]
Note: in the configuration file you can specify that the API key value be retrieved from an environment variable or from an Azure Key Vault. See MSTICPy Package Configuration for more details.
Using VTLookup3
VTLookup3 has the following methods:
We’ll look at each of these in turn.
Note: we use the terms IoC (indicator of compromise) and observable interchangably in this article. They indicate data items such as IP addresses, URLs, file hashes etc. that may be observed during an attack and thus become indicators of compromise.
Looking up a single IoC/observable
lookup_ioc works much like the other TI providers in MSTICPy except that it returns the results as a pandas DataFrame, even for a single IoC query.
If an entry matching this ID is found in VT it is returned with some basic attributes such as submission times, name, and type.

Since the time stamp is returned as a Unix serial timestamp you might want to re-format into a more readable form using code like this.
example_attribute_df.assign(

    first_submission=pd.to_datetime(example_attribute_df.first_submission_date, unit=“s”, utc=True),

    last_submission=pd.to_datetime(example_attribute_df.last_submission_date, unit=“s”, utc=True)

)
This adds two columns to the data that display as human-readable datetimes
Note: we plan to change this soon so that the API will return datetime types directly.
We’ve added a convenience function to the notebook that allows you to return full details for a VirusTotal object. This isn’t done by default in the built-in methods but you can use this to query additional data for specific IDs.

Note: get_object will be exposed in the core VTLookup3 interface in a future version. This simply implements the vt_py client.get_object call. You can use the vt_py method directly or go the VirusTotal site to see the details rendered in a more consumable fashion.
Looking up IoC Relationships
The lookup_ioc_relationships method shows off some of the capability of the new API. From a single indicator you can retrieve any related IoCs (in this case we’re using the same file hash as above). In the example here we’re retrieving any known parent processes for the malware that we are investigating.
This returns a DataFrame with the IDs of any related IoCs, their types, and the relationship type to the original observable.

The source column is the ID of our original observable. The target column contains the known execution parents of this file. The results represent a simple graph with the nodes being the source and targets and edges being the relationship_type between them.
Use the limit parameter to this function to restrict how many related entities are returned.
You can look up details of any of the related parents using the get_object() function – but don’t do that just yet until you’ve read the next section.
Looking up multiple observables – lookup_iocs
You can use lookup_iocs to lookup multiple observables in a single call (e.g. IoCs extracted from a set of process events). Assuming that the observables are in a DataFrame called input_df, call lookup_iocs as follows:
results_df = vt_lookup.lookup_iocs(
    observables_df=input_df,
    observable_column=”colname_with_ioc”,
    observable_type_column=”colname_with_vt_type”
)
You can also submit the DataFrame that we generated earlier – example_relationship_df – directly as an input to lookup_iocs. In this case it will default to using the target and target_type columns for the observable_column and observable_type_column parameters, so these do not need to be specified as parameters.
Executing this brings back some basic details about each target item listed in our example_relationship_df DataFrame.

Expanding the Graph – looking up relationships for multiple IoCs
lookup_iocs_relationships is the equivalent of lookup_ioc_relationships but taking multiple IoC/observables as input.

The output from this is shown using the previously generated DataFrame as input. Like lookup_iocs, this is defaulting to using the target and target_type columns for the observable_column and observable_type_column parameters; so we haven’t needed to include these parameters in the call.
You can use this API with an arbitrary DataFrame as input, specifying the observable_column and observable_type_column parameters. The data in both columns must be in the correct format for submission with valid vt_type strings (see the documentation for further details)
Importing the data to networkx
Networkx is probably the most popular Python graphing library. It only includes basic visualization capabilities but it does support a rich variety of graphing analysis and query functions. Since the data structure of the VT relationships is a graph, you can easily import the data into a networkx graph (and also plot it). Having the ability to manipulate the graph in networkx allows you to apply graphing functions and analysis on the data, such as finding the most central nodes, or those having the most neighbors.
We’ve given a simple example of importing the relationships DataFrame into a networkx graph and plotting a simple view of it with Bokeh.
from bokeh.io import output_notebook, show
from bokeh.plotting import figure, from_networkx
from bokeh.models import HoverTool
graph = nx.from_pandas_edgelist(
example_multiple_relationship_df.reset_index(),
    source=”source”,
    target=”target”,
    edge_attr=”relationship_type”,
)
plot = figure(
    title=”Simple graph plot”, x_range=(-1.1, 1.1), y_range=(-1.1, 1.1), tools=”hover”
)
g_plot = from_networkx(graph, nx.spring_layout, scale=2, center=(0, 0))
plot.renderers.append(g_plot)
output_notebook()
show(plot)

While this may look cosmic, it isn’t hugely informative and isn’t interactive in any way. On to better things…
Displaying the VT Graph
To see the data in its full glory use the create_vt_graph and render_vt_graph methods:
graph_id = vt_lookup.create_vt_graph(
    relationship_dfs=[example_relationship_df, example_multiple_relationship_df],
    name=”My first Jupyter Notebook Graph”,
    private=False,
)
vt_lookup.render_vt_graph(
    graph_id = graph_id,
    width = 900,
    height = 600
)
You may need to be patient with these APIs since a complex graph can take a while to build and render. In a few moments you should see an interactive graph render into an IFrame in the notebook as seen in the screen shot below.

Exploring the graph on the VirusTotal site brings more capabilities such as being able to view further details about the graph entities, to search within the graph, and to search for, and add, additional nodes.
We very much appreciate this addition to MSTICPy. It brings a lot more of the power of VirusTotal data and exploration to the world of hunting and investigation in Jupyter notebooks.
by Scott Muniz | Nov 18, 2020 | Security
This article was originally posted by the FTC. See the original article here.
“It’s been almost a month and we still don’t have our money. We’re broke and putting groceries on credit cards . . . .” That’s just one of many customer reviews posted about the mobile banking app offered by Beam Financial Inc. and founder Yinan Du – the defendants in a lawsuit filed today by the Federal Trade Commission.
Brought to you by Dr. Ware, Microsoft Office 365 Silver Partner, Charleston SC.
![Build Bots for Microsoft Teams Using Power Automate in GCC – Getting Started with AtBot [Guest Blog]](https://www.drware.com/wp-content/uploads/2020/11/large-605)
by Contributed | Nov 18, 2020 | Technology
This article is contributed. See the original author and article here.
Build Bots for Teams Using Power Automate – Getting Started with AtBot

Note: This article applies to our Enterprise and US Government customers located in GCC.
Bots in Teams are a great way to provide your users with access to systems and information outside of Teams while keeping them in a single application to perform their jobs. This single-pane-of-glass concept is not new. In the past, this was always the goal of an organization’s intranet. Today, we see Teams as the new intranet and bots and applications integrated in Teams are the way forward with this paradigm shift.
How do I get started with bots?
As your organization begins to adopt Teams as the communication and collaboration platform, defining a strategy for integrations will become crucial. Fortunately, there is a freemium bot you can get from the Teams App Store that will let you dip your toe in the proverbial AI pool, with very little time investment, that you can train and build on without having to be a developer.
AtBot – The no-code bot building platform
AtBot is a SaaS-based solution for building bots without code, see www.atbot.io. These bots can be deployed to Teams, the web, Alexa, SMS, or any other custom application. As mentioned above, there is a free version that gives you the ability to try it out in Teams with no time or usage limits.
The rest of this article is going to detail how to get the free version AtBot for Teams and how to train it using Power Automate. If you are interested in more information about the premium version to build custom bots and its deep integration with Microsoft Cognitive Services, please reach out to hello@atbot.io.
Get AtBot from the Teams App Store
The first step toward becoming an AI master is to acquire the AtBot bot from the Teams App Store. This store is accessed from the Teams client on the left-hand side. Note: If you do not see the Apps button, your organization has blocked access to apps. For US Government customers, AtBot is available for Teams in GCC. Be sure to talk to your IT Administrator if you do not see it in the App Store.
With the App Store open, search for AtBot

Click on the AtBot app and the click Add. This will add the bot to a private chat where you can use it personally. You can also add the bot to a team, but this article focuses on adding the bot and using it in private chat.
AtBot will prompt you to type or click the Help button. Once you do that, it will prompt you to log in using the same Office 365 credentials you use in Teams. It’s important to note that AtBot uses Azure AD OAuth and will never receive or ask for your password.

After you log in, AtBot will tell you that it can’t do much yet and gives you a link to a getting started article. You can browse that article and follow the steps in it to get a better idea of how you build skills in Power Automate. In the next step we are providing a templated skill to deploy that is a bit more complex than the knock knock joke.

Building a COVID Check In skill
We built and templatized a skill that you can import and use in your bot. This skill runs the user through a set of questions, then sends the answers to a specified email recipient. You can download the template from the link below:
[TEMPLATE DOWNLOAD LINK]
Start off by logging in to Power Automate using the same Office 365 credentials you use in Teams. Once there, go to My Flows -> Import. Select the ZIP file you downloaded after you click the Upload button.

Scroll down to the connections and click the little wrench icon. You will now need to create a connection for each of the connectors that are used: AtBot Logic, Office 365 Outlook, and Office 365 Users. Start with AtBot Logic and click Create new.

From the Create Connection screen, find AtBot Logic and click the Add Connection button. This will prompt you to log in using your Office 365 Credentials. You may see an error message after first login attempt, just click Create again. Note: if you have previously used AtBot, you may not need to do this step, go on to the next.

Once you have created the connection successfully, you can now navigate back to the import screen and you should see the connection in the Import setup prompt. Select your connection and click Save. Repeat these steps for the other two connectors.

Once you have created connections, the Import button will become active and you can click Import. Once imported, it can take a minute or two before the flow is editable. Once it is, open the flow in edit mode.

It will look like this

The AtBot actions in this flow perform the conversation steps between the user. The Office 365 Users action gets the user profile, and the Outlook action performs the sending of the email. Take a few minutes to explore each action and how this flow works.
The trigger of the flow is called “When a keyword is used”. This AtBot trigger is fired when a user of the bot says the phrase in chat that matches with the keyword the trigger expects. Also note that this trigger is configured as Shared. This means that any user in your Office 365 tenant will have access to this skill when using the free version of AtBot. To avoid collision with other users that may be following this same tutorial, you may want to change this setting to Personal. That would mean that only you (the creator of the flow) will be able to access it from AtBot.

Next you will want to update the email address that the information is sent to. Click to expand the Outlook action and update the To value with the email address you wish to use. Once you are finished click Save to update the flow.

Testing the skill in Teams
Now that your flow has been imported and updated, it’s time to test it in the bot. Note: Any flow that is created using an AtBot trigger is considered a skill. Go back to Teams and type “Help” to the AtBot Bot. This will now display your newly created skill and also tell you what keyword to use to execute it.

Type “Check in” to the bot and this will start the skill and walk you through the steps of the flow.

The skill will end with the following and you should see an email in the inbox you specified. Note: the interstitial advertisements are removed once you upgrade to premium.

Troubleshooting
If you are having issues with the skill, Power Automate does a really good job of showing you where the failure is occurring. From the My Flows screen, click to open the flow for this skill. You will see the 28-day run history. Any failed skill will show as a failed run which you can open and inspect to see where it went wrong.
Conclusion
We hope this presents you with an opportunity to build on top of what you learned in this tutorial. Please explore the AtBot actions and what you can do conversationally, as well as the Power Automate connectors and what data you can integrate with out-of-the-box.
Full documentation on AtBot can be found at https://admin.atbot.io/Docs
Additional videos and tutorials at https://www.youtube.com/channel/UCRUbWpikjmH9-zHeqSu8bzA
About the author
Joe Herres is an entrepreneur, patented inventor, and software developer. He has lead teams in the public sector doing app modernization, SharePoint intranet development and public-facing web development. As the Co-CEO of H3 Solutions and one of the developers of the AtBot platform, Joe has a wide range of knowledge in the AI and chat bot space as well as a deep understanding of Azure and Teams.


by Contributed | Nov 18, 2020 | Technology
This article is contributed. See the original author and article here.
Build Bots for Teams Using Power Automate – Getting Started with AtBot
Note: This article applies to our Enterprise and US Government customers located in GCC.
Bots in Teams are a great way to provide your users with access to systems and information outside of Teams while keeping them in a single application to perform their jobs. This single-pane-of-glass concept is not new. In the past, this was always the goal of an organization’s intranet. Today, we see Teams as the new intranet and bots and applications integrated in Teams are the way forward with this paradigm shift.
How do I get started with bots?
As your organization begins to adopt Teams as the communication and collaboration platform, defining a strategy for integrations will become crucial. Fortunately, there is a freemium bot you can get from the Teams App Store that will let you dip your toe in the proverbial AI pool, with very little time investment, that you can train and build on without having to be a developer.
AtBot – The no-code bot building platform
AtBot is a SaaS-based solution for building bots without code, see www.atbot.io. These bots can be deployed to Teams, the web, Alexa, SMS, or any other custom application. As mentioned above, there is a free version that gives you the ability to try it out in Teams with no time or usage limits.
The rest of this article is going to detail how to get the free version AtBot for Teams and how to train it using Power Automate. If you are interested in more information about the premium version to build custom bots and its deep integration with Microsoft Cognitive Services, please reach out to hello@atbot.io.
Get AtBot from the Teams App Store
The first step toward becoming an AI master is to acquire the AtBot bot from the Teams App Store. This store is accessed from the Teams client on the left-hand side. Note: If you do not see the Apps button, your organization has blocked access to apps. For US Government customers, AtBot is available for Teams in GCC. Be sure to talk to your IT Administrator if you do not see it in the App Store.
With the App Store open, search for AtBot
Click on the AtBot app and the click Add. This will add the bot to a private chat where you can use it personally. You can also add the bot to a team, but this article focuses on adding the bot and using it in private chat.
AtBot will prompt you to type or click the Help button. Once you do that, it will prompt you to log in using the same Office 365 credentials you use in Teams. It’s important to note that AtBot uses Azure AD OAuth and will never receive or ask for your password.
After you log in, AtBot will tell you that it can’t do much yet and gives you a link to a getting started article. You can browse that article and follow the steps in it to get a better idea of how you build skills in Power Automate. In the next step we are providing a templated skill to deploy that is a bit more complex than the knock knock joke.
Building a COVID Check In skill
We built and templatized a skill that you can import and use in your bot. This skill runs the user through a set of questions, then sends the answers to a specified email recipient. You can download the template from the link below:
[TEMPLATE DOWNLOAD LINK]
Start off by logging in to Power Automate using the same Office 365 credentials you use in Teams. Once there, go to My Flows -> Import. Select the ZIP file you downloaded after you click the Upload button.
Scroll down to the connections and click the little wrench icon. You will now need to create a connection for each of the connectors that are used: AtBot Logic, Office 365 Outlook, and Office 365 Users. Start with AtBot Logic and click Create new.
From the Create Connection screen, find AtBot Logic and click the Add Connection button. This will prompt you to log in using your Office 365 Credentials. You may see an error message after first login attempt, just click Create again. Note: if you have previously used AtBot, you may not need to do this step, go on to the next.
Once you have created the connection successfully, you can now navigate back to the import screen and you should see the connection in the Import setup prompt. Select your connection and click Save. Repeat these steps for the other two connectors.
Once you have created connections, the Import button will become active and you can click Import. Once imported, it can take a minute or two before the flow is editable. Once it is, open the flow in edit mode.
It will look like this
The AtBot actions in this flow perform the conversation steps between the user. The Office 365 Users action gets the user profile, and the Outlook action performs the sending of the email. Take a few minutes to explore each action and how this flow works.
The trigger of the flow is called “When a keyword is used”. This AtBot trigger is fired when a user of the bot says the phrase in chat that matches with the keyword the trigger expects. Also note that this trigger is configured as Shared. This means that any user in your Office 365 tenant will have access to this skill when using the free version of AtBot. To avoid collision with other users that may be following this same tutorial, you may want to change this setting to Personal. That would mean that only you (the creator of the flow) will be able to access it from AtBot.
Next you will want to update the email address that the information is sent to. Click to expand the Outlook action and update the To value with the email address you wish to use. Once you are finished click Save to update the flow.
Testing the skill in Teams
Now that your flow has been imported and updated, it’s time to test it in the bot. Note: Any flow that is created using an AtBot trigger is considered a skill. Go back to Teams and type “Help” to the AtBot Bot. This will now display your newly created skill and also tell you what keyword to use to execute it.
Type “Check in” to the bot and this will start the skill and walk you through the steps of the flow.
The skill will end with the following and you should see an email in the inbox you specified. Note: the interstitial advertisements are removed once you upgrade to premium.
Troubleshooting
If you are having issues with the skill, Power Automate does a really good job of showing you where the failure is occurring. From the My Flows screen, click to open the flow for this skill. You will see the 28-day run history. Any failed skill will show as a failed run which you can open and inspect to see where it went wrong.
Conclusion
We hope this presents you with an opportunity to build on top of what you learned in this tutorial. Please explore the AtBot actions and what you can do conversationally, as well as the Power Automate connectors and what data you can integrate with out-of-the-box.
Full documentation on AtBot can be found at https://admin.atbot.io/Docs
Additional videos and tutorials at https://www.youtube.com/channel/UCRUbWpikjmH9-zHeqSu8bzA
About the author
Joe Herres is an entrepreneur, patented inventor, and software developer. He has lead teams in the public sector doing app modernization, SharePoint intranet development and public-facing web development. As the Co-CEO of H3 Solutions and one of the developers of the AtBot platform, Joe has a wide range of knowledge in the AI and chat bot space as well as a deep understanding of Azure and Teams.

Recent Comments