This article is contributed. See the original author and article here.
We wanted to share some best practices to prepare the on-premises public folders for migration to Exchange Online. The document will walk you through the overview of process to migrate public folders to Exchange Online, using the native tools as well as talk about best practices and tools used for trouble free migration.
Public folder migration process overview
A quick overview of how the native migration process works follows. The intention here is not to walk through details of each step of native migration, that is already done here and here.
Preparation is the key step, and we will be spending majority of this post on that part, which will ensure you face minimal issues during the actual migration.
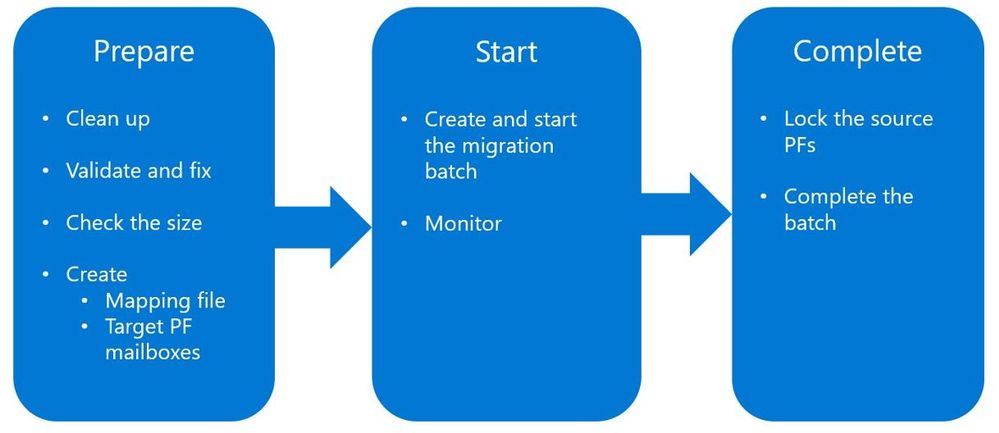
As part of preparation you will:
Find out stale/unwanted public folders and remove them
Validate existing public folders for known issues and fix any issues found
Check the size of existing public folders and public folder items and ensure they are not too large
Create the mapping file and target PF mailboxes
Out of scope of this post: once all the preparation is completed, creation of a migration batch using a mapping file and starting of the migration batch.
Before we dive into the details of preparation, here are some of the highlights of the native migration process:
There is no option to migrate only some public folders, therefore:
You must remove unwanted public folders if you don’t want them to be migrated.
If you wish to migrate some public folders to Microsoft 365 Groups, you should do this before you migrate the rest of your public folders to Exchange Online.
Only one migration batch is allowed – all public folders will be migrated in a single batch.
Once the migration is completed, no more data from source public folders can be copied over to Exchange Online public folders.
As the famous quote goes “By failing to prepare, you are preparing to fail”; this applies to public folder migration. Let us now explore detailed steps of preparing the public folders at source.
Cleanup
We need to start with inventory. This is the time to take inventory of public folder deployment at the source. Find out stale public folders out there and decide if those folders are really needed? Do you really need to migrate data that has not been accessed for years?
The following commands show public folders that do not have user activity for last two years:
Note: LastUserAccessTime is available only in Exchange 2010, not in later versions.
On public folder replicas (legacy public folders)
On a simple side of things, an organization might have a single (or two) public folder databases on two servers, with actual public folder data (replicas of actual content) on both servers. This can then scale to organizations that have 10s of public folders servers with complicated replication strategy.
The best chance of success to have timely migration can be achieved by having as few copies of same public folder data (replicas) as possible. Consider that during the migration stage, users are still using public folders as they currently are. The more replicas of public folder content there are, the more places we have where public folder data can be written to or changed. This then results in public folder replication process between different replicas. Many an Exchange administrator has spent lots of time troubleshooting legacy public folder replication – which can be challenging even if there is no migration going on at the same time!
Our recommendation therefore is to consider that in a large public folder environment, it might be worth it to consolidate / remove some folder replicas and therefore reduce complexity / data churn during the migration finalization stage. Also, you want to make sure that all the public folder databases are mounted (dismounting the database is not a way to try work around this complexity!)
Public folder size and item size
A lot of public folder migrations fail and get delayed because the individual items were too large, or a very large public folder was being migrated.
It is best to:
Keep the maximum individual public folder size between 15 to 25 GB.
Use Export-PublicFolderStatistics.ps1 to get public folder size information. If you have any public folders larger than 25 GB, you should break them up to be less than 25 GB.
If you are planning to migrate large public folders, ensure to change the default public folder post limit in Exchange Online.
For public folder items:
The default MaxReceiveSize on public folder mailboxes in Exchange Online is 35MB. You should find out the public folder item sizes at the source. The following command example can help:
$pf=Get-PublicFolder -Recurse -ResultSize unlimited;foreach ($i in $pf) {$s=Get-PublicFolderItemStatistics $i.EntryID;foreach ($r in $s) {if ($r -gt “38600”) {$r.MessageSize,$r.PublicFolderName}}}
If you have public folder items that are large then 35MB, change the MaximumSend/ReceiveSize on target public folder mailboxes, once they are created in Exchange Online.
If public folder items are larger than 150 MB, you must remove these items before migration. See “Message limits” here.
Validate – SourceSideValidation.ps1
The following are major causes for migration slowness or failures, when it comes to public folder data issues:
Bad ACLs
Issues related to Mail Enabled Public Folders (MEPF)
Health of dumpster folders
Source exceeding limitations (things like folder depth etc.)
The Source Side Validation (SSV) script was developed to analyze the on-premises public folder deployment and report issues found along with providing guidelines to fix them. The script must be run from Exchange 2010 or Exchange 2013+ server, depending on where the public folders are deployed. Use the script before the start of migration process but after you have cleaned up the source environment from folders you do not need to migrate.
To get the script to perform all the checks:
.SourceSideValidations.ps1
To get the script to perform only public folder permission related validations:
The following are common issues encountered during migration of MEPFs:
Orphaned MEPFs
Non_Ipm_Subtree public folder is mail enabled
The .ValidateMailEnabledPublicFolders.ps1 script will help you find such MEPFs and provide you readily usable output to fix such MEPFs.
Target public folder mailboxes
Planning how many public folder mailboxes you need in Exchange Online is a critical task as well. You don’t want to create a ton of unnecessary public folder mailboxes and at the same time you don’t want to overload each target mailbox so that it might fill up during the migration (or soon after).
Some guidelines to remember:
Do not place any content in the primary hierarchy mailbox, nor point any users directly to this mailbox. You can read more about public folder deployment best practices here.
Plan to fill up to 50% of maximum allowed size of PF mailboxes during migration. Current maximum size of PF mailbox is 100GB. So, the “Total public folder size at source in GB”/50 should give you an idea of how many public folder mailboxes you need in Exchange Online.
So, for example, if you have 2 TB (2000 GB) of public folder data at source, you will need around 40 public folder mailboxes in Exchange Online.
The .ModernPublicFolderToMailboxMapGenerator.ps1 file can help you get idea of how many PF mailboxes are required in Exchange Online and also provides you the mapping file.
Mapping file
The Mailbox Replication Service uses the mapping file to place source public folders into specific target public folder mailboxes. The following are some guidelines on well-defined mapping file:
Ensure the primary hierarchy mailbox is mapped to the root folder “”
If you wish to place specific folder into a specific public folder mailbox, add the entry exclusively
Once the entry is added, the folder and subfolders below it will be migrated to the target mailbox specified
Ensure each folder that is present directly on the root has explicit mapping in the file and is mapped to a non-primary hierarchy public folder mailbox; this ensures the primary hierarchy mailbox serves only hierarchy
Finally, ensure the target public folder mailbox names are correct
Connectivity
Migrations can fail or produce unexpected results if connectivity to source server is unreliable.
Migration from Exchange Server 2010 works using Outlook Anywhere (RPC/HTTP), even if you have Exchange Server 2013 (or higher) acting as a FrontEnd server.
It is best to ensure the service account being used to migrate public folders can access Exchange 2010 public folders from the internet using Outlook for desktop client or Microsoft Remote Connectivity Analyzer.
You can use the Test-MigrationServerAvailability command to ensure connectivity.
If your environment uses a load balancer, it is best not to use the load balancer for MRS related traffic as this is handled by EWS and the MRSProxyEnabled property on that Virtual Directory.
Finally, if you have a firewall with very stringent inbound connectivity, ensure that Exchange Online IP addresses are whitelisted.
Changing the default quota in Exchange Online
The default prohibit post quota to public folders in Exchange Online is 2GB. The migration may not fail if your individual public folders are larger than this size, but users might not be able to post or email items to public folders as soon as the migration is complete.
The default quota can be changed at organization level:
Note: Do not set the default quota above 25 GB as it may result in giant public folders, which might cause issues with the auto-split process in the future. You can read more about auto-split feature here.
Also by default, the MaxReceiveSize and MaxSendSize on public folder mailbox is configured at 35MB. You must increase this limit to accommodate largest public folder items from on-premises:
The deleted public folders are stored under Non_IPM_Subtree, also affectionately referred to as the Dumpster.
Excluding this data can help you scale your public folder migration if you do not need the data to come over. This will result in faster public folder migration as the amount of data that will need to be migrated is going to be smaller. In some cases, corrupted dumpster folders can cause migration to fail.
Migration of public folders in dumpsters can be skipped using ExcludeDumpsters parameter.
This option is available only for migrations from Exchange Server 2013+ to Exchange Online and must be specified at the time of batch creation.
The goal of this article was to ensure the source is prepared for a successful and hassle-free migration. Once you are done with preparation, we recommend you follow each of the migration steps from here for a trouble-free migration experience.
This article is contributed. See the original author and article here.
We are excited to share several new Azure Migrate-related assets to help you learn how to discover, assess, and migrate your workloads, and walk you through different migration scenarios.
Azure Migrate L100 deck Learn how to discover, assess, and migrate infrastructure, applications, and data to the cloud with Microsoft’s first-party migration service, Azure Migrate.
Azure Migrate L300 deck Take an in depth look at Azure Migrate use cases. This deck gives a more detailed description of different server migration scenarios – agentless VMware, agentless Hyper-V and agent-based migrations for physical servers, AWS servers and servers from other clouds.
We also have several click-through demos to walk you through various migration scenarios:
This article is contributed. See the original author and article here.
From new apps in Microsoft Teams meetings to Endpoint DLP—here’s what’s new to Microsoft 365 in November
By Jared Spataro, Corporate Vice President for Microsoft 365
As we enter the holiday season, it’s been inspiring to see organizations condense years of transformation into just a few short months. Many of you are adopting new digital technologies, transforming your business processes, and fundamentally rethinking how work will get done going forward. Throughout all of it, we’ve been focused on studying how work is changing and listening to you, our customers, so we can prioritize features and capabilities that will help you adapt to these changes and improve your workflows.
This month, we’re thrilled to announce that many of your top requested features—like background noise suppression in meetings—are coming to Teams and other Microsoft 365 services. Read on for details on those, plus the highly anticipated Microsoft Endpoint Data Loss Prevention and other new features across Microsoft 365 to help make it easier to pick up where you left off, keep track of your notes and tasks more easily, sketch out Amazon Web Services (AWS) application architectures in Visio for the web, and more.
New apps, noise suppression, and more for Teams
This month, we’re announcing the general availability of Teams apps for meetings, expanded Forms integration, and new capabilities that make it easier to build apps and bots right within Teams.
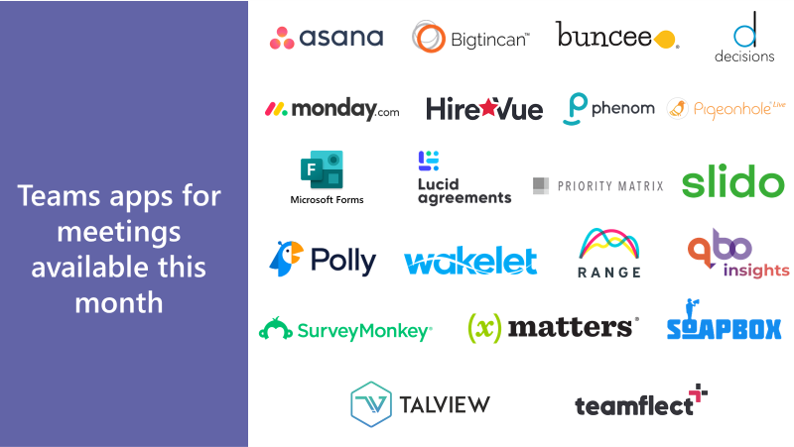
Enrich your meeting experience with Teams apps—Typically, collaborating with an app during a meeting required someone sharing their screen while they updated tasks, set reminders, managed requests, and more. This month, we’re excited to announce that you can now bring the capabilities of many of these apps directly into the meeting experience for everyone to interact with, making the time your team spends together more effective and collaborative before, during, and after your meetings. Checkout the new Teams apps for meetings now available in the Teams app store, including Asana, HireVue, Monday.com, Slido, and Teamflect (with more on the way), as well as familiar apps built by Microsoft such as Forms. If you’re a partner or developer, learn more about creating Teams apps for meetings in our documentation.
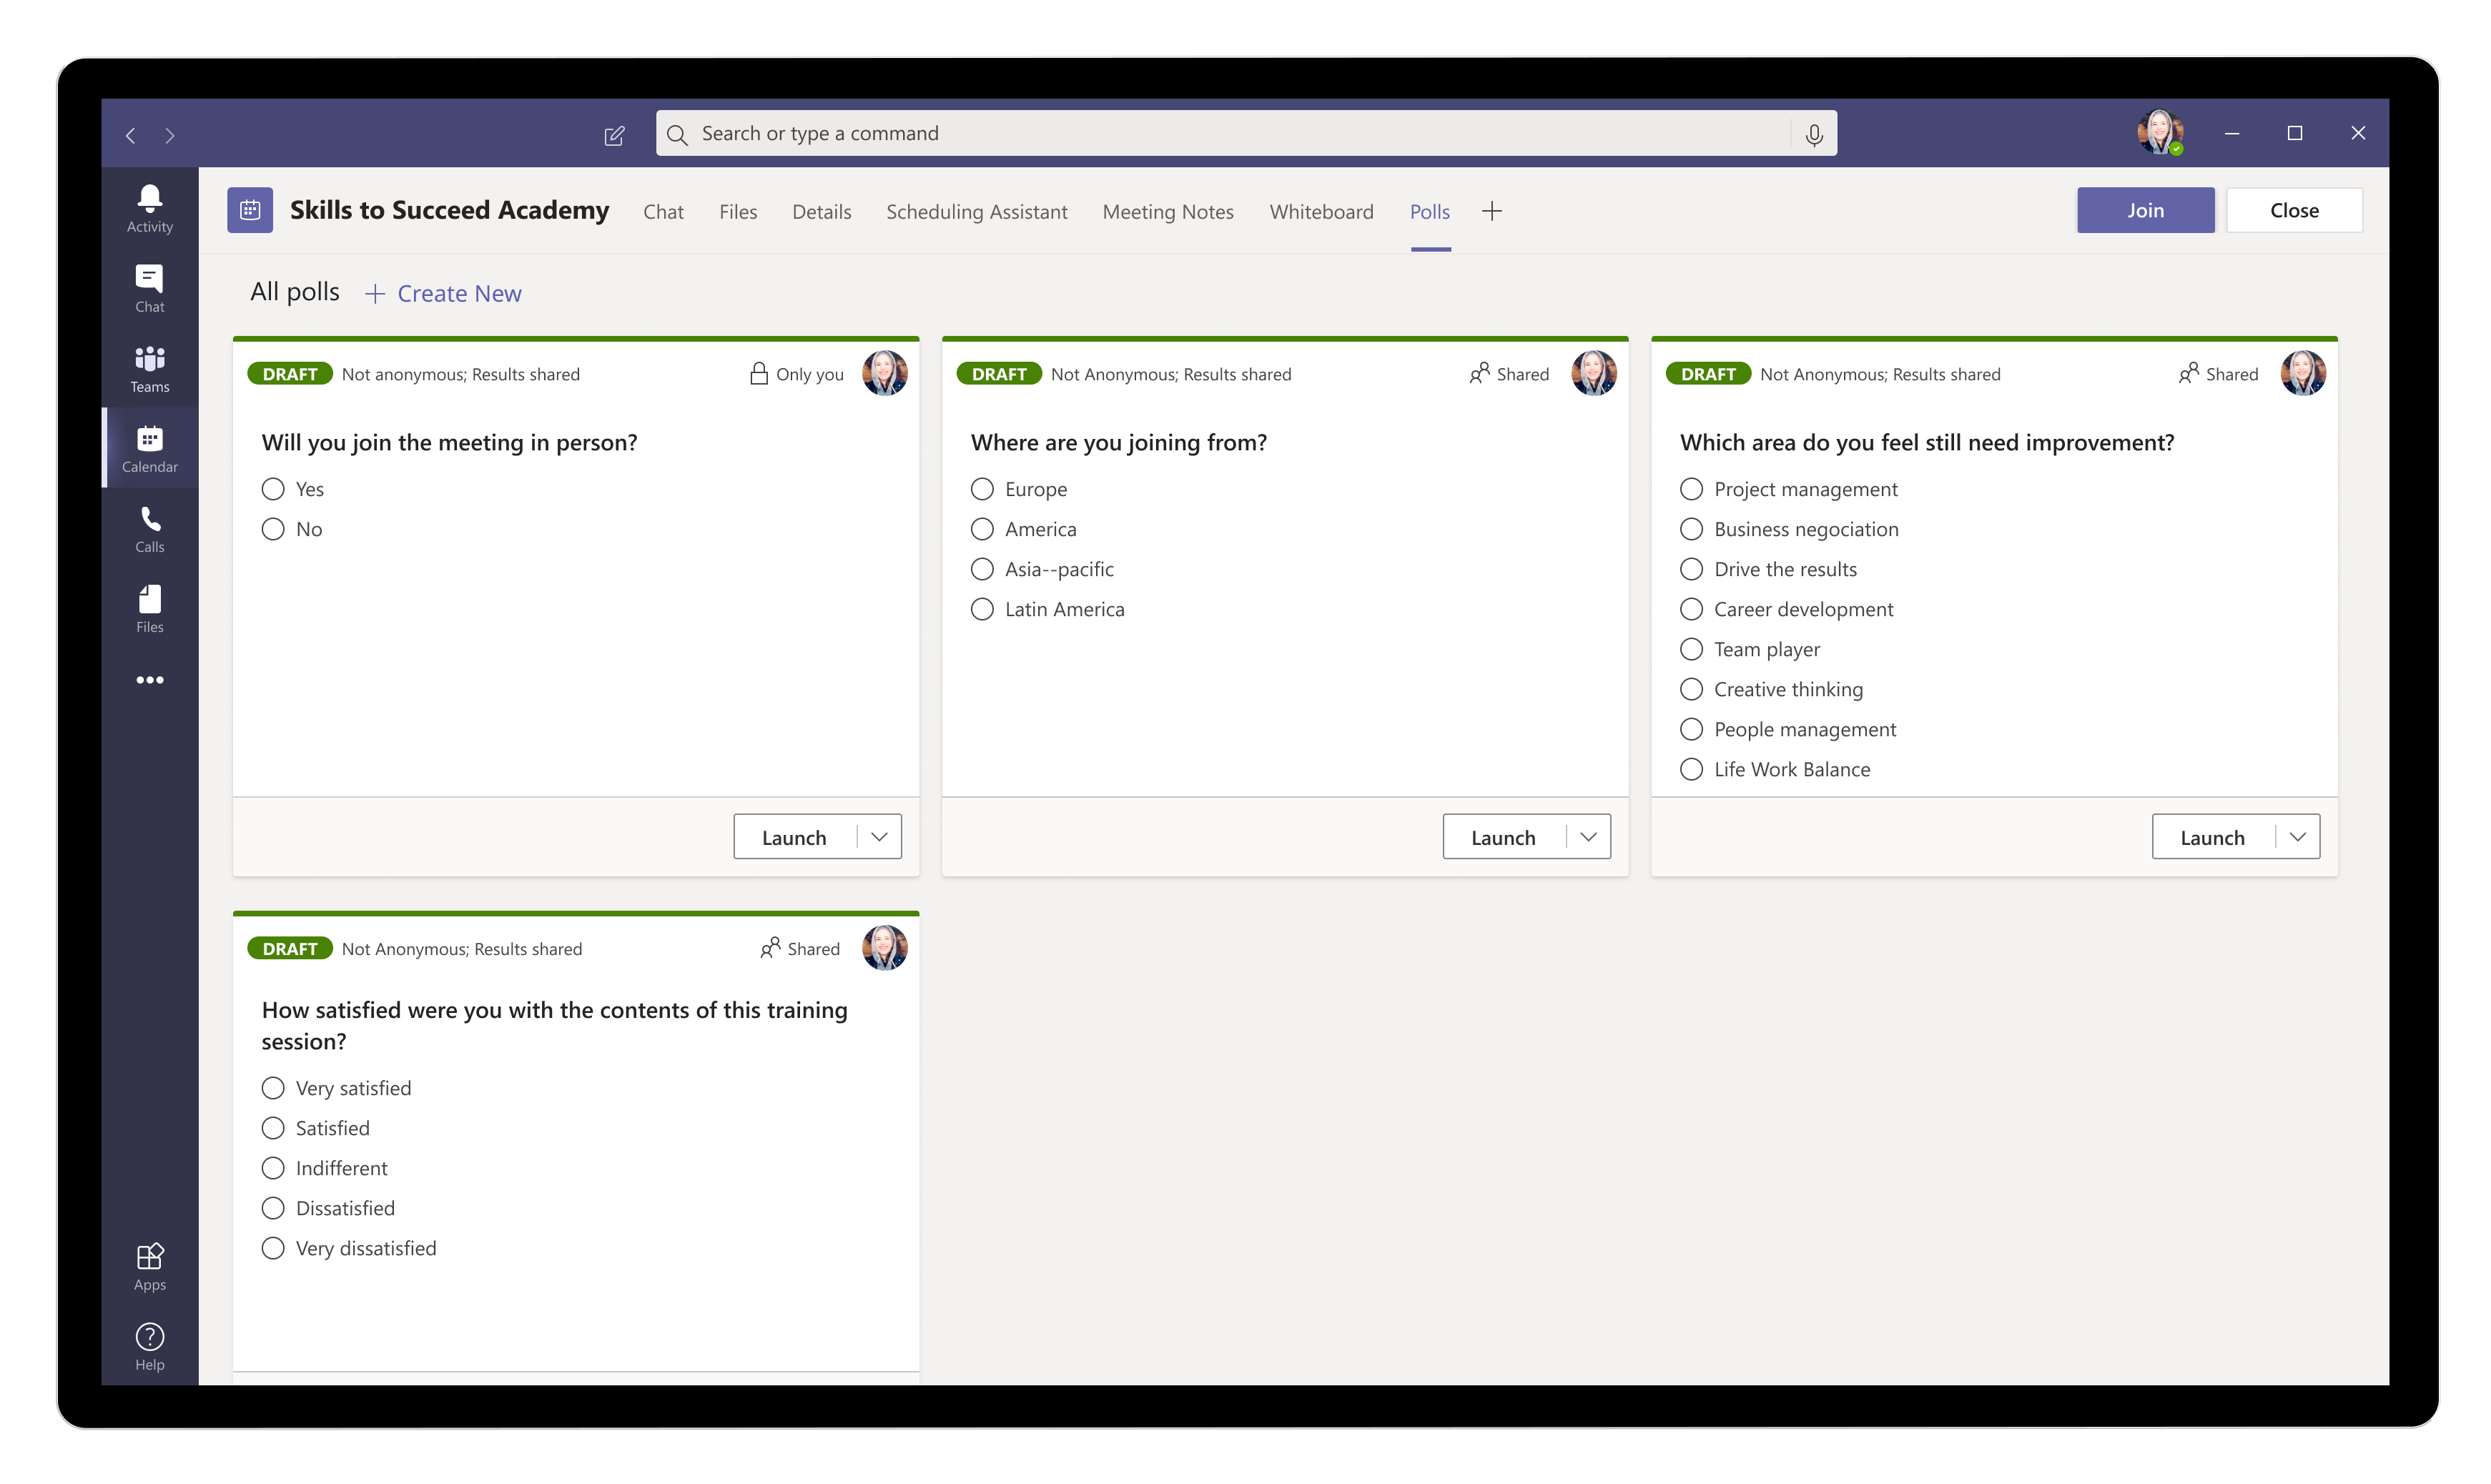
Quickly gather feedback in Teams meetings with polls—Polls are a great way to turn passive listeners into active participants. Forms’ integration with Microsoft Teams now brings the power of polls to meetings, helping you conduct more engaging, informative, and productive meetings. Meeting presenters can prepare polls in advance and launch the polls during meetings that attendees can easily view and answer. The new Forms polls for meetings is currently rolling out and will reach you soon. You can get started by updating your Teams app and adding the Forms app to your meeting tabs.
Remove unwelcome background noise in Teams meetings—Earlier this year, we released the ability to minimize distracting background noise in videos on Microsoft Stream. We are excited to share that we’re bringing this technology to Teams meetings. This real-time noise suppression will help remove unwelcome background noise during your meetings, making easier to hear speakers in loud and distracting environments. Noise suppression is rolling out to all users now.
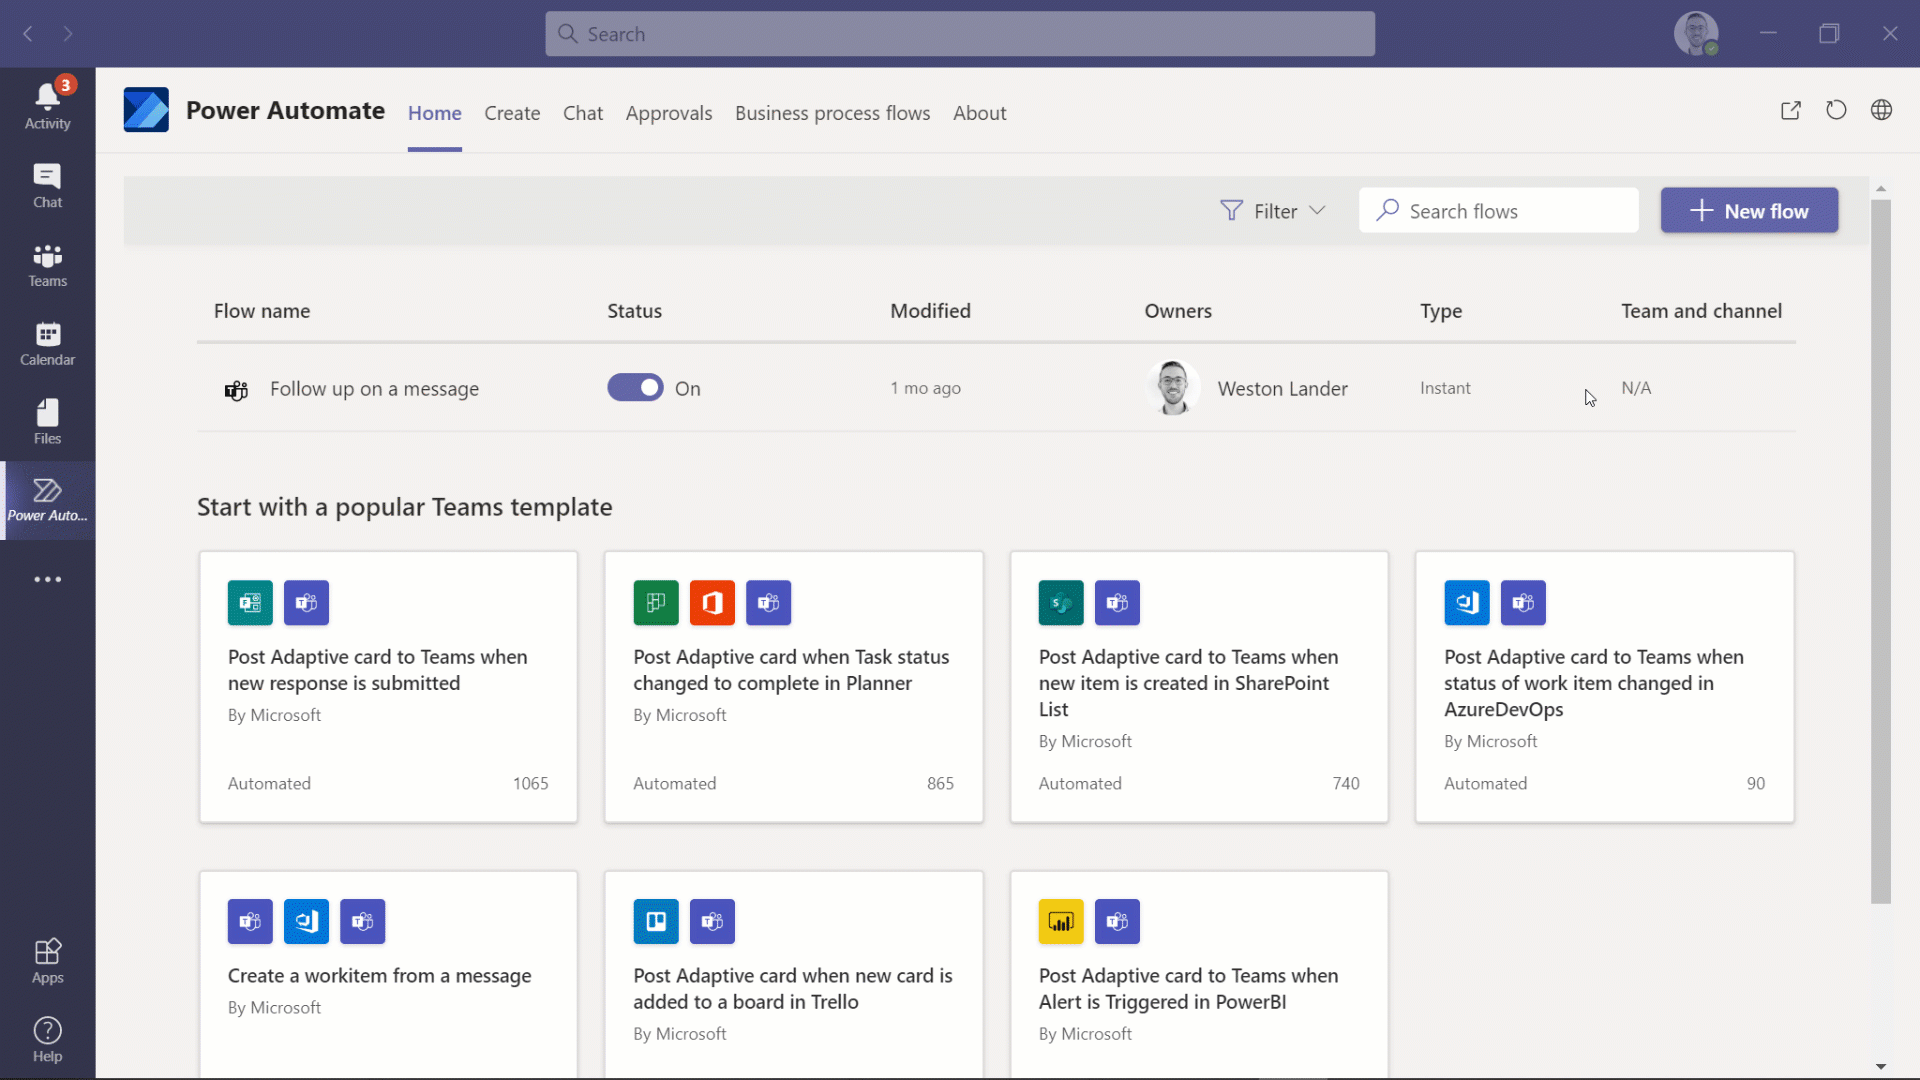
Automate routine tasks without leaving Teams—Also new this month is the Power Automate app for Teams. The app provides a lightweight designer experience and a number of templates to help you quickly get started building workflows right within Teams. This new app makes it even quicker and easier to automate routine tasks within Teams. To get started, make sure you’re running the latest version of Teams.
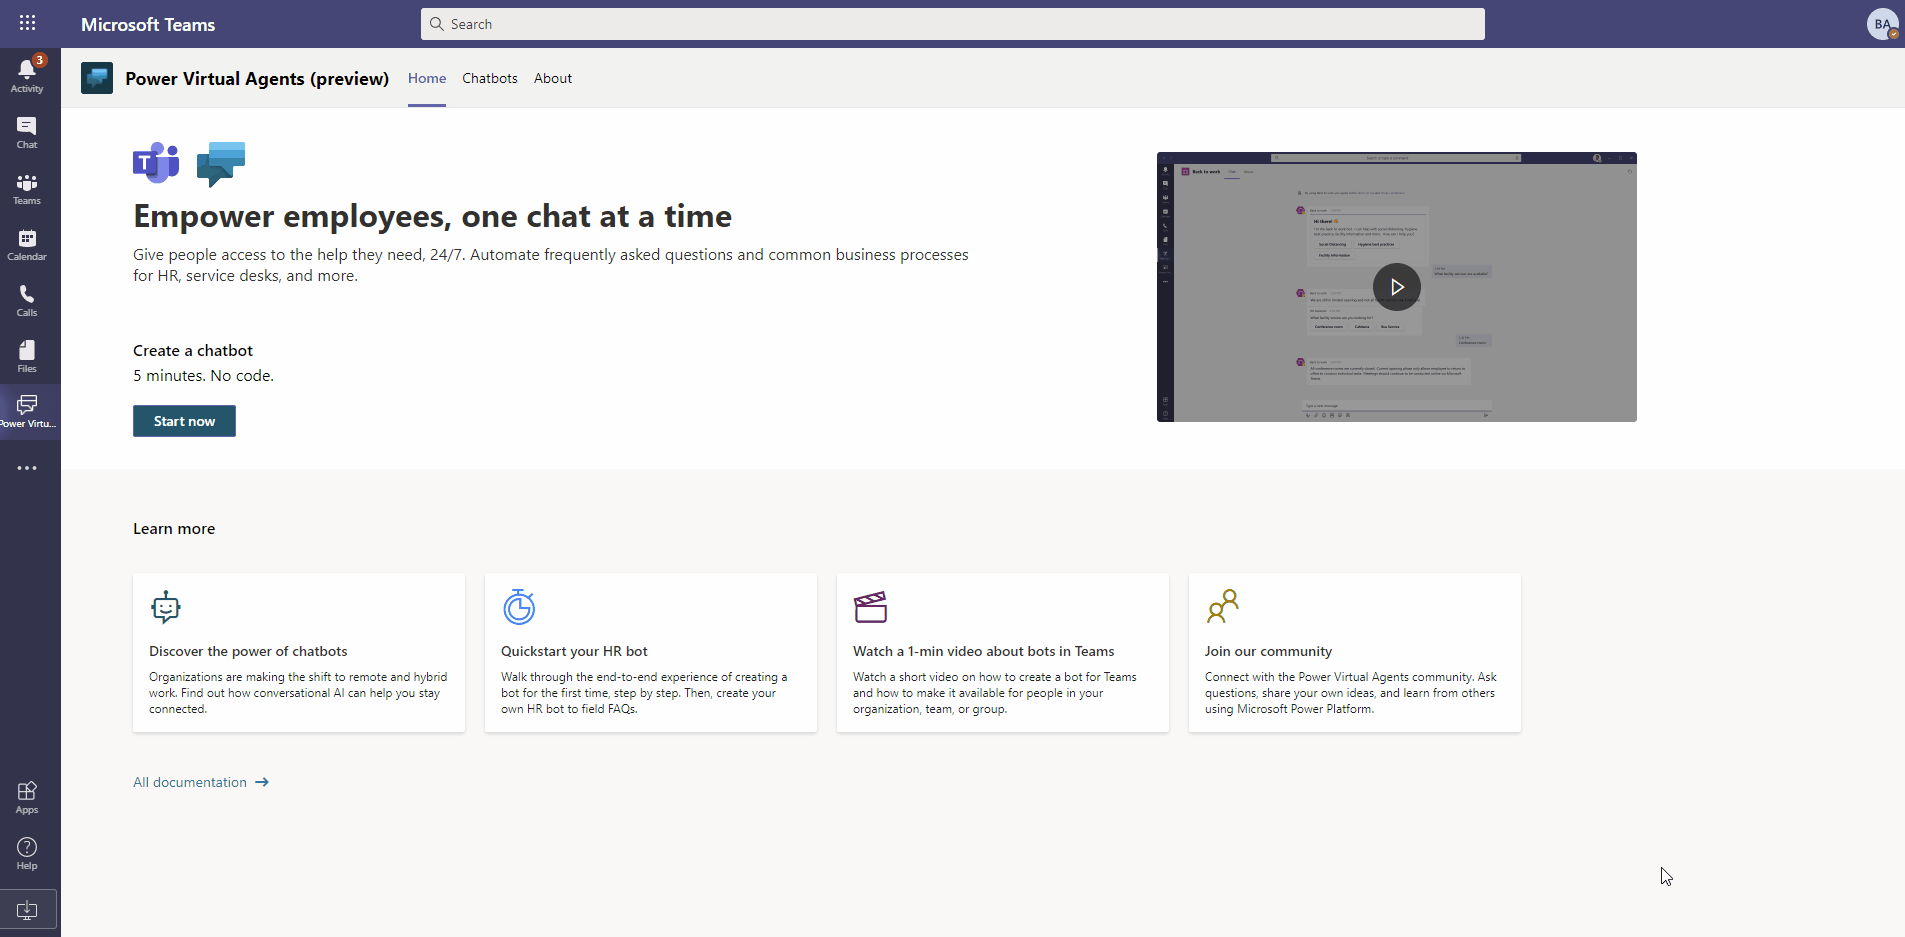
Easily build and deploy apps and intelligent chat bots in Teams—In September, we announced a new Power Apps and a new Power Virtual Agents app for Teams, running on a built-in low code data platform, now called Microsoft Dataverse for Teams— making it easy for creators to quickly build and deploy apps and bots for Teams—now those apps are generally available. Teams users can easily build applications and bots directly within Teams without needing to deal with connecting to storage, managing integrations, or switching applications. Dataverse for Teams makes the back-end tech logistics of creating and deploying business process solutions in Teams easier than ever. Built-in security and governance features provide seamless control of access to apps, bots, and flows, as well as their underlying data.
Find and share information more quickly
New capabilities help make it easier to find notes while working across Microsoft 365, capture and share content, and pick up where you left off.
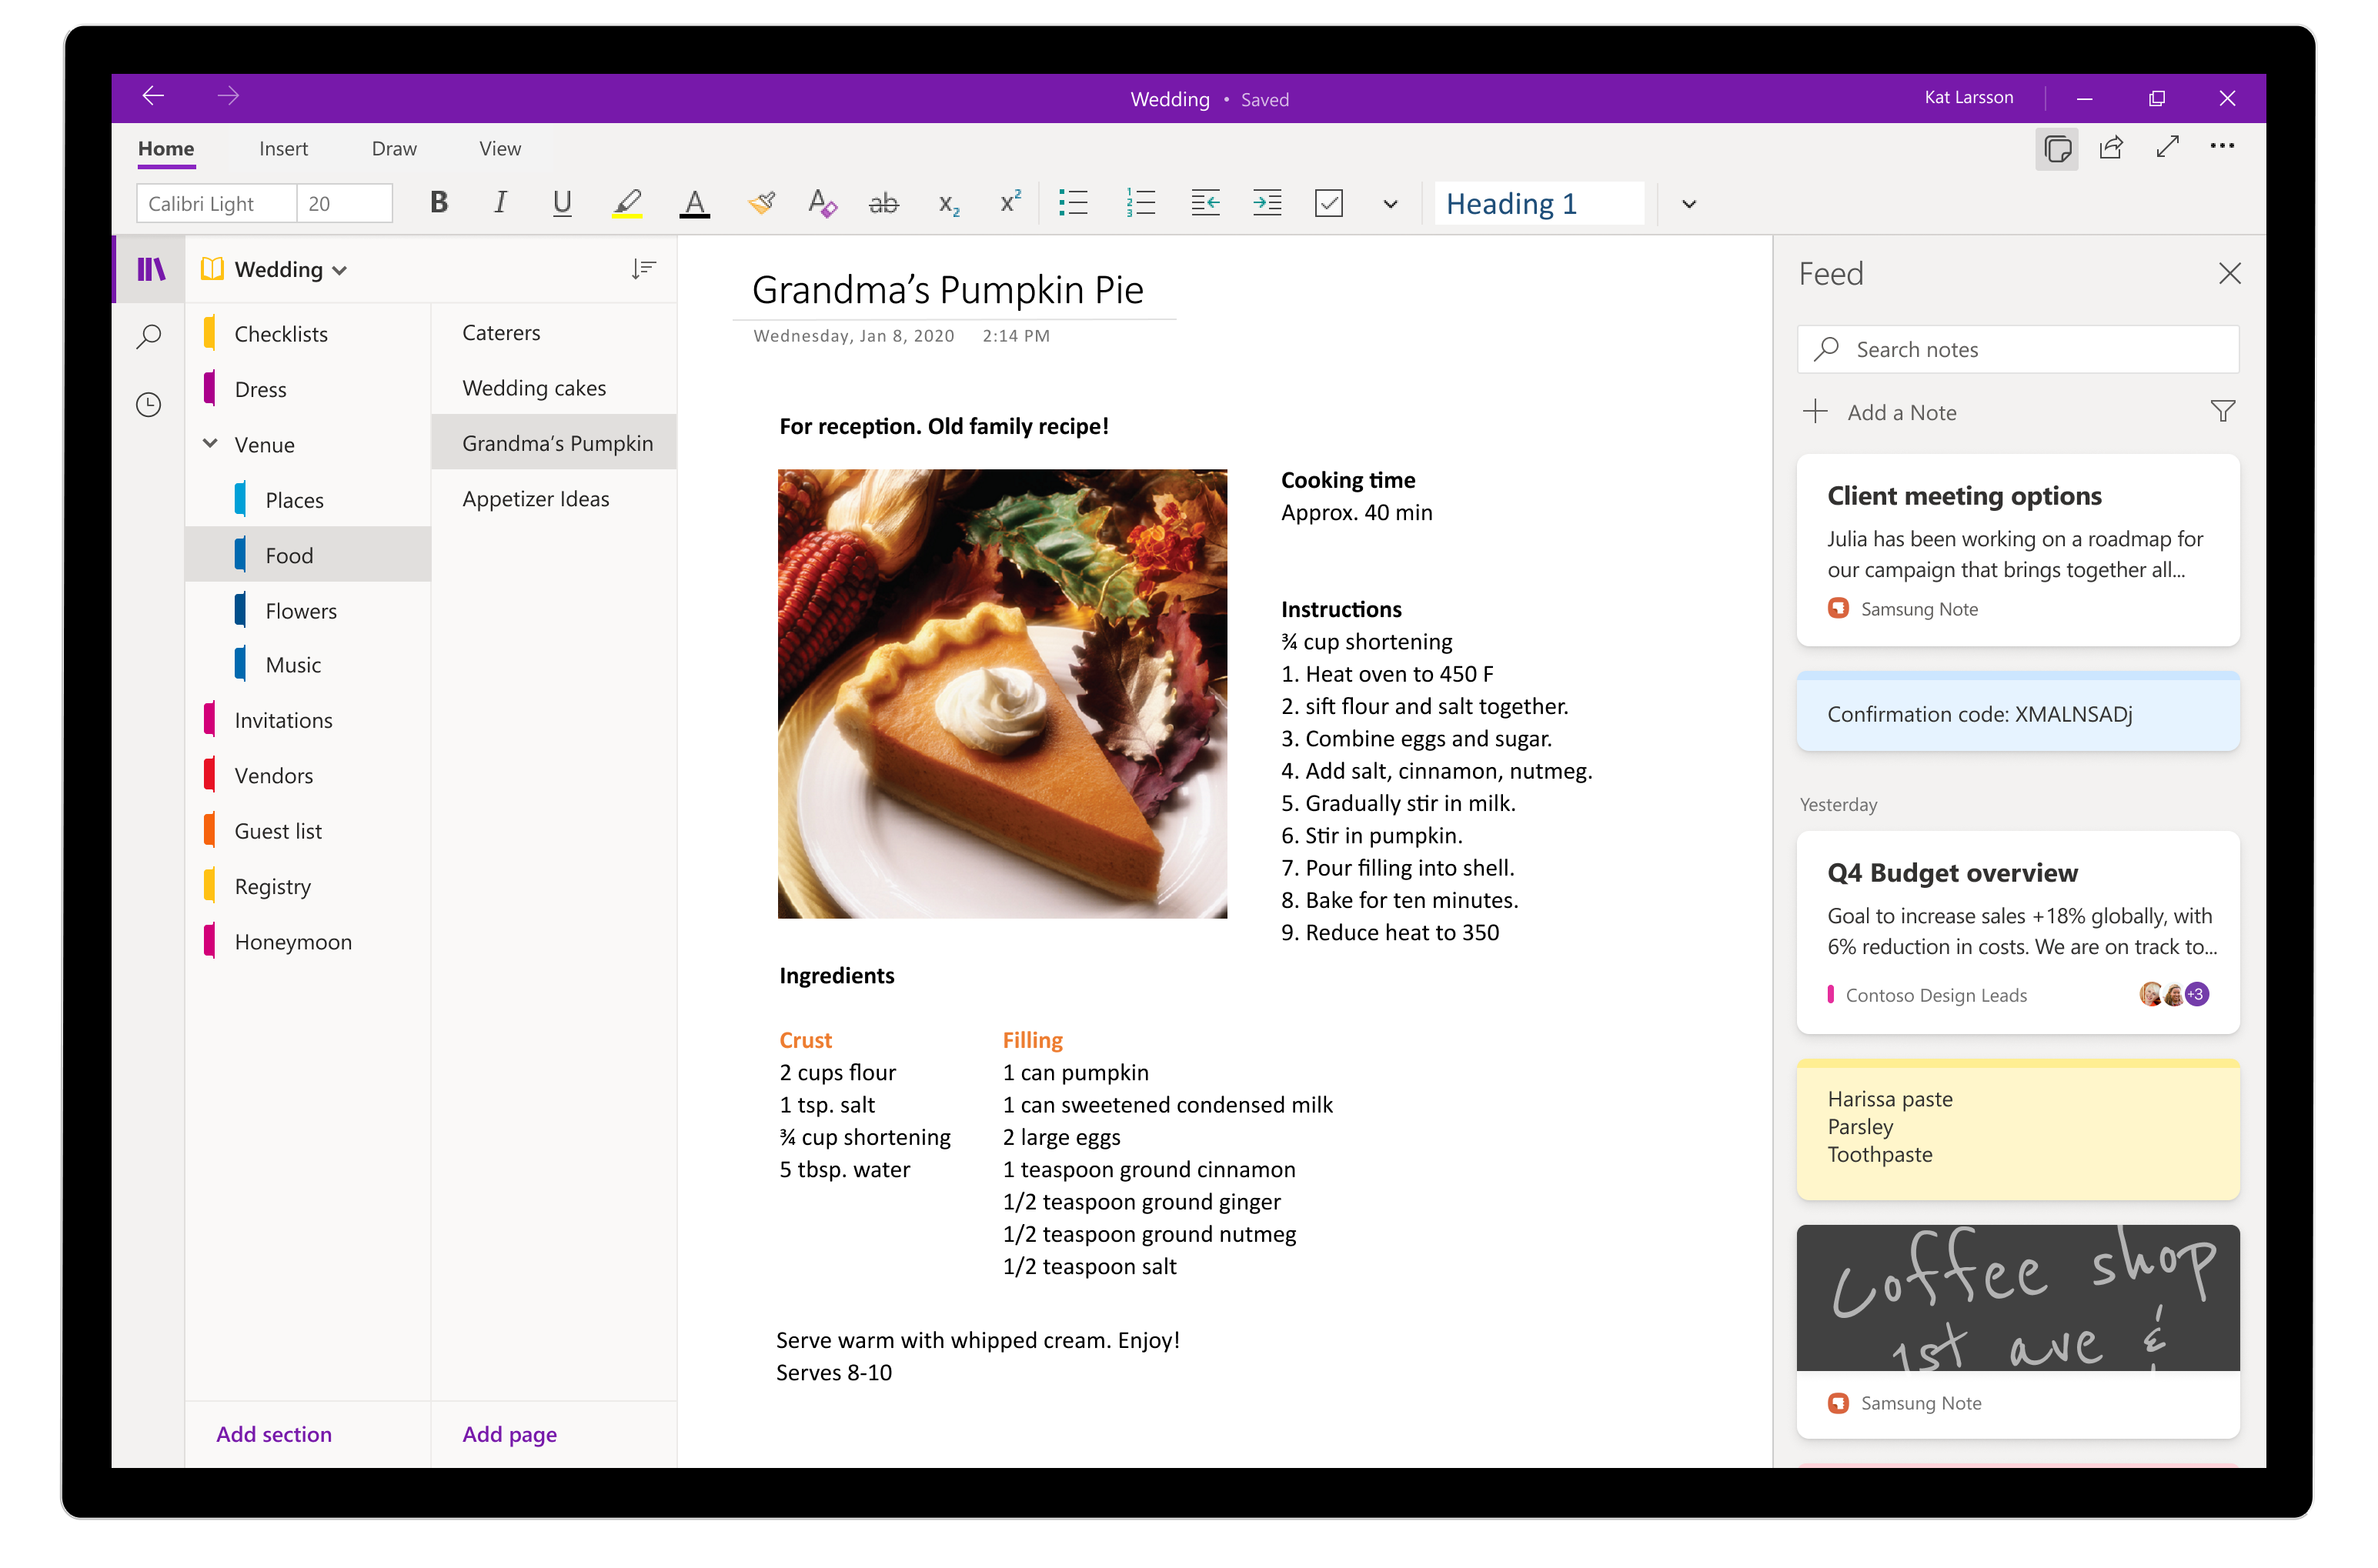
Easily reference your notes when working on a OneNote page—Last month, we announced the OneNote feed for Outlook on the web, which conveniently combines your notes across Sticky Notes, recent OneNote pages, and even Samsung Notes so you can easily reference them while composing your mail. This makes it easy to reference your notes when working in a OneNote page and capture any new thoughts you have by creating a Sticky Note in your feed without having to leave OneNote. The OneNote feed is available in OneNote, OneNote on the web, OneNote for Windows 10, Outlook on the web, and Outlook.com. To get started in OneNote, click the Open feed icon in the top right corner of the OneNote app window to display the feed pane.
Capture and share web content and more in Microsoft Edge—This month, we released two new features to help make you more productive and find information more easily. First, Web capture in Microsoft Edge lets you easily capture and mark up web content, and then save or share it—simply drag a box to select what you want to capture even if you need to scroll. Second, we’ve added news and information from your favorite content providers in a new “My Feed” section within the enterprise new tab page. This customizable feed sits alongside your Office 365 content and is designed to keep you connected to information most relevant to your industry or your company.
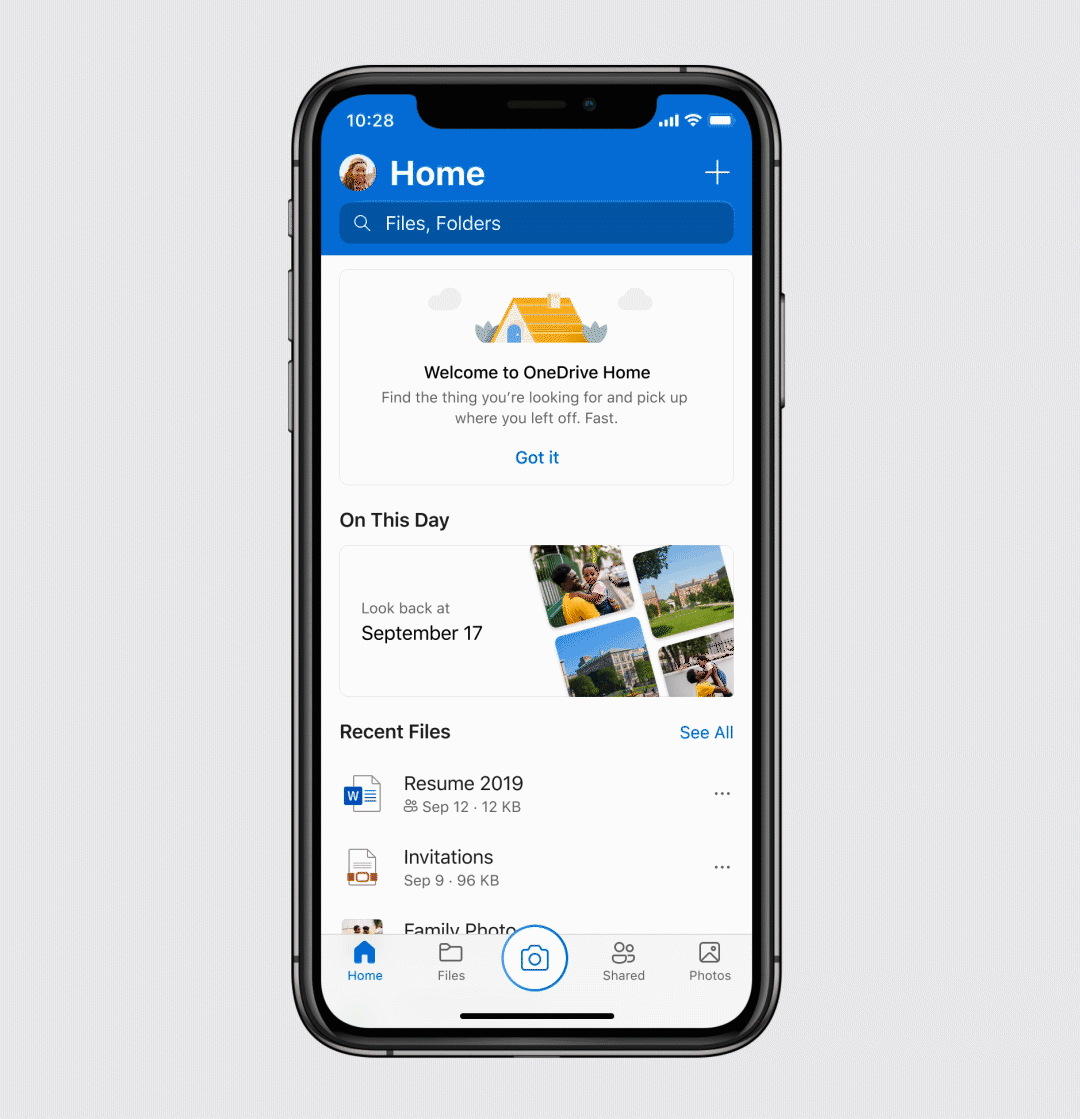
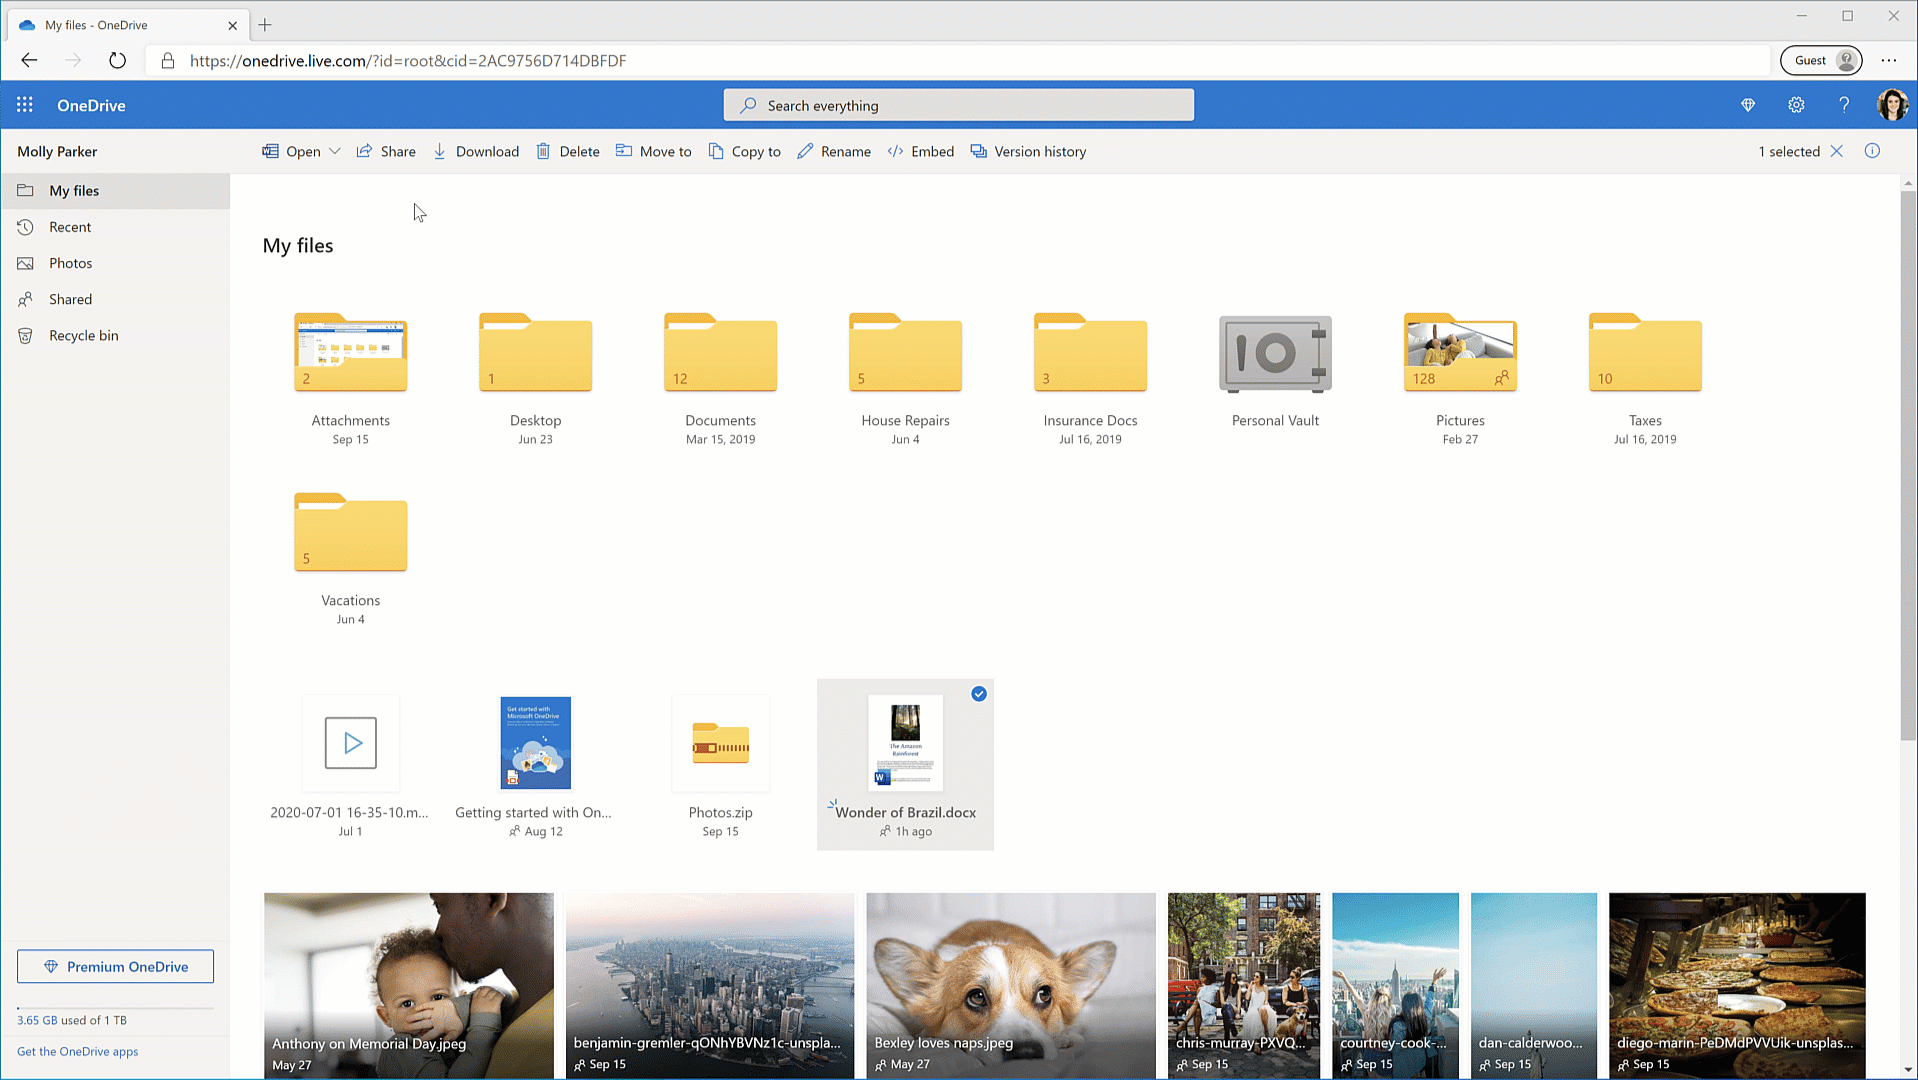
Quickly pick up where you left off on recent files and more in OneDrive for iOS—A new home experience on the iOS mobile app for OneDrive will help you quickly pick up where you left off on recent files and easily re-discover memories from the past. Plus, you can now add a OneDrive widget to your iPhone home screen that displays your photo memories on this day across previous years. See your recent files and On This Day photos as soon as you open the OneDrive app. To get started, update your OneDrive iOS app.
OneDrive family and group sharing now available
OneDrive family and group sharing now available—OneDrive has always made it easy to share docs, photos, videos, albums, and folders. But until now, sharing to a group of people meant typing in the names of all the people you wanted to share with. Last month, we simplified the process with one-click sharing to family and groups. Once you predefine your family or friend group, you’ll be able to share a photo, album, or important document to your group with one click. Family and group sharing are available in OneDrive for the web and included in all free and paid OneDrive consumer plans, as well in Microsoft 365 Personal and Family plans.
Hear Office documents read aloud to you on Android phones—As you move through your busy day, sometimes it’s easier to hear your document read aloud to you. Now you can use Read Aloud to do exactly that in Word for Android phone and in Word on the Office app for Android. New voices offer a more natural and pleasant listening experience. You can easily pause and resume Read Aloud as well as adjust the voice speed. To get started, open the Word or Office app on your Android phone, go to the Review tab, then tap Read Aloud.
Get Yammer notifications in your Teams activity feed and more—This month, we’re announcing several new and upcoming features in Yammer. Coming soon, notifications from your Yammer announcements and mentions will show up in your Microsoft Teams activity feed if you have the Communities app installed. We’re also now rolling out an updated experience in the Yammer Tab for Teams that brings modern capabilities like pinning, cover photos, live events, and more. Finally, also released this month is support for Yammer Q and A insights in Microsoft Productivity Score, an interactive guide to get the most out of Yammer, and an updated experience for topics and hashtags in Yammer.
Prevent data loss and diagram your IT solutions
New capabilities make it easier to prevent data loss on endpoints and sketch out IT solutions build on ASW.
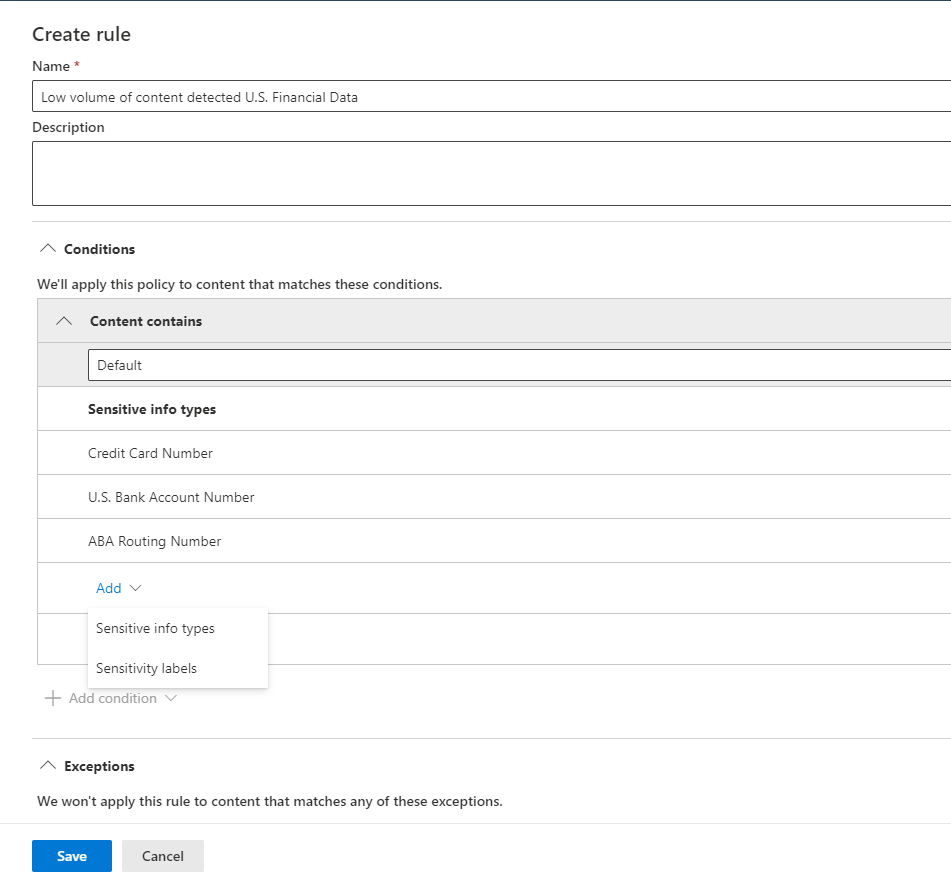
Protect sensitive information on your endpoints—In July, we announced the public preview of Microsoft Endpoint Data Loss Prevention (DLP) which extends our data protection capabilities to devices. Now generally available, Endpoint DLP enables organizations to enforce policies that identify and prevent risky or inappropriate sharing, transfer, or use of sensitive information consistently across cloud, on-premises, and endpoints. We’re also adding new capabilities to a public preview based on feedback from customers—such as adding enforcement actions and locations-based sensitivity, a new dashboard in Microsoft 365 compliance center to manage DLP alerts, and more.
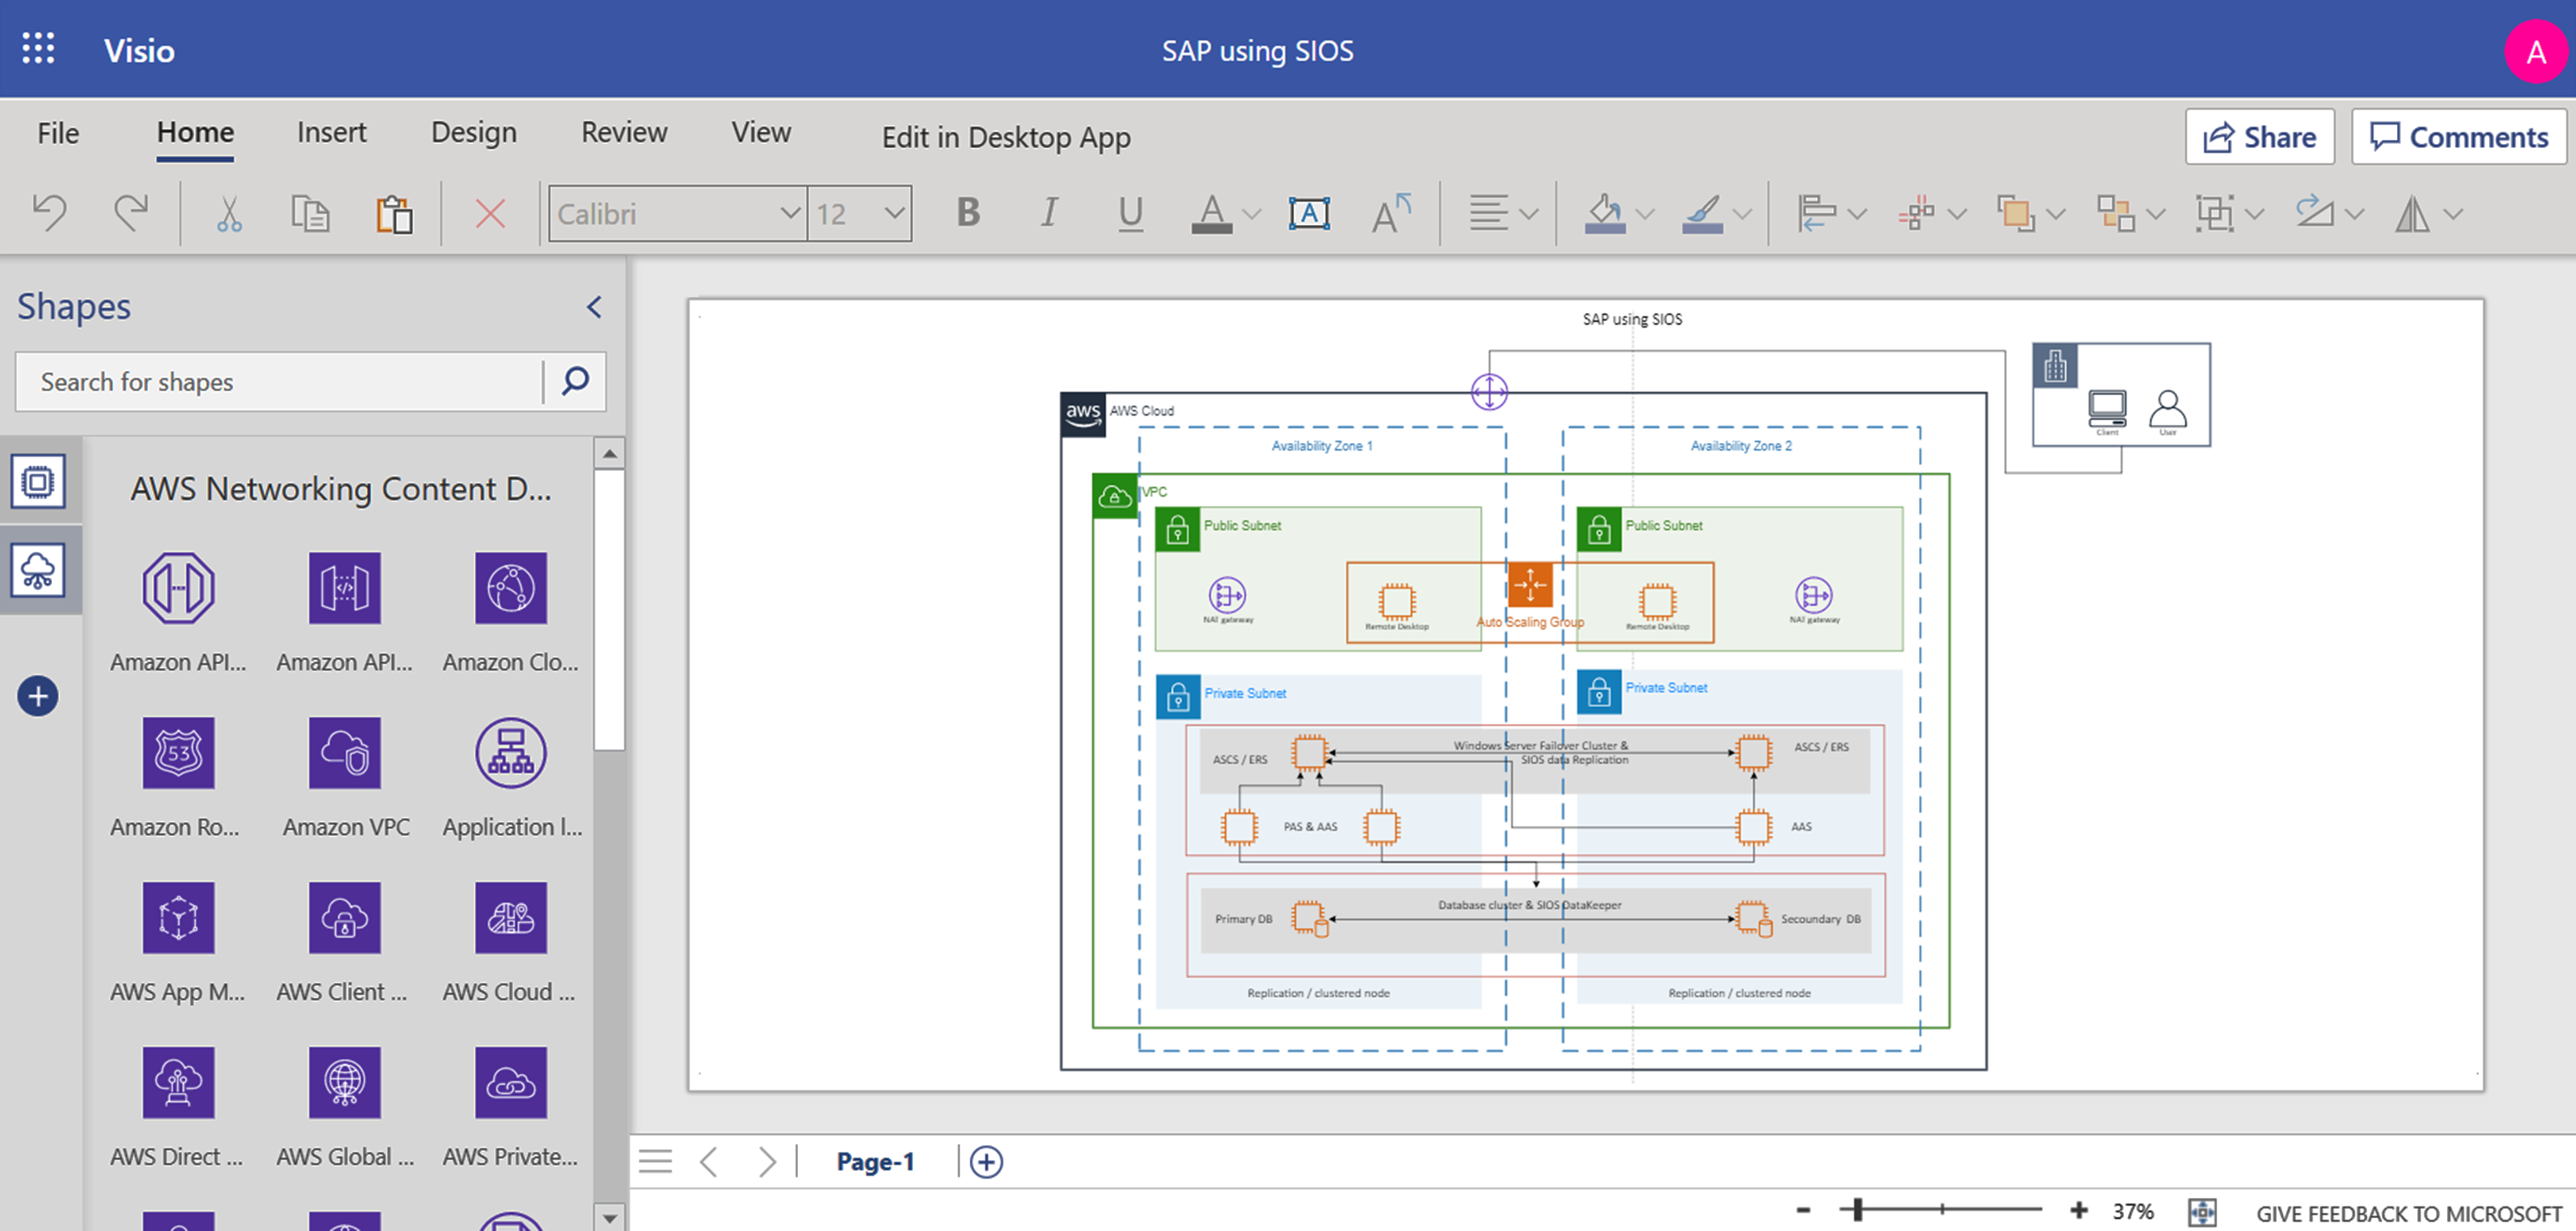
Sketch your Amazon Web Services (AWS) architecture in Visio for the web—Diagrams are a great way for cloud architects to visualize the design, deployment, and topology of IT solutions built on AWS. We’re excited to announce that we’ve added support to build AWS diagrams for various topologies and service interactions in Visio for the web. More than 400 shapes are available to help architects redesign existing infrastructure diagrams, conceptualize application architecture, or visualize the current state of your cloud environment and plan for the future. To help you get started easily, we’ve provided a few starter diagrams using various AWS services. Go to the Visio web app homepage and select your preferred diagram template to quickly start visualizing your AWS infrastructure.
As you continue your navigation to a more sustainable, hybrid workplace, we are committed to developing technologies that help your people and teams thrive. From building low code apps right within Teams to new AI capabilities to help you manage tasks more easily, all of these updates are aimed at enabling your people to collaborate productively, securely, and safely from anywhere.
Brought to you by Dr. Ware, Microsoft Office 365 Silver Partner, Charleston SC.
This article is contributed. See the original author and article here.
One of the top questions we hear from educators is “How do I know if my students are staying engaged”? Now, with new updates to Insights in Microsoft Teams for Education, there’s an easy way to see student behavior and take the action to support their learning, even if they’re at home, in the classroom or lecture hall, or going back and forth between the two.
Here are six ways you can use Insights to help your students achieve their learning goals: 1. See engagement across multiple classes
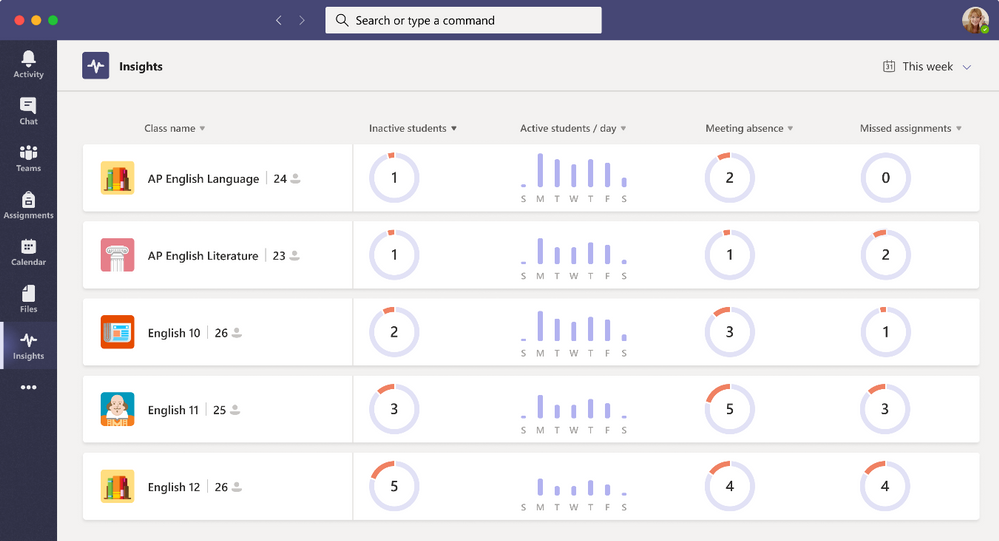
How this helps: When you’re teaching multiple classes it can be helpful to see how classes compare to one another and where your attention may be needed most. Now with Insights you can see a quick view of inactive students, active students/day, meeting absences and missed assignments across all your classes.
How to do this: If you already have Microsoft Teams for Education, click here to add the app to Teams. Or while in Teams click the More Options …, search for Insights, and add. Right-click on the Insights app on the left app bar and select Pin for easy access. When you click on the Insights app on the left, your classes will automatically populate to show the engagement across your different classes.
2. Drill down to specific activity within a class How this helps: If you’re only teaching one class, or you need to see how a specific class or student is doing, you can drill down and see that engagement for a specific class to know how your students are doing in their learning. This includes overall student activity, assignments, grades, meetings, communication and more.
How to do this: If you’re in the Insights app (image above), click on a class name section to see the specific classroom data. Or if you’d just like Insights within a particular class, click on Teams, choose your class, and in the General tab select the + sign to add a tab, search Insights and add.
3. Get spotlights of student behavior and individual habits
How this helps: Spotlight cards cut through the data to automatically show you trends, habits, and behaviors of students in your class. This helps to show new views of classroom activity that may not have been visible before. Whether there’s a student who turns in assignments early, students who work late in the evening, or students who show up to class late, these behaviors are highlighted to keep you informed and ready to take action.
How to do this: After adding the Insights tab to your class or clicking on a class name section in the left hand rail Insights app, check out the spotlight cards on Activity, Habits, Meetings and more. Click on bolded text showing a number of students to see individual names. Thumbs up to keep receiving similar information (and thumbs down to not receive that same kind of information). Click on the compass to see the filtered digital activity report for that time frame and behavior.
4. See overall student activity (or inactivity) on Teams
How this helps: When you’re teaching to a remote or hybrid class, it can be more difficult to connect with students and understand who is engaging in class and with class materials. By seeing whether students are on and using Teams for their classes and courses, you can make informed decisions to send a message to check in with the class or with specific students.
How to do this: If you’re in the left hand rail Insights app, click on a classes Inactive students. Or if you’re in the Insights tab within a team, from the main dashboard click on “Track student activity” to get to the Digital Activity view.
5. Drill down to see synchronous class behavior (aka Teams meeting behavior)
How this helps: If you’re not in person with your whole class, it’s helpful to gauge which students are attending class online. By seeing synchronous class or course activity, you’ll be able to better tell which students are showing up and which student may need reminders or extra help.
How to do this: From the Insights tab in a class, go to the Digital Activity report. Click on “All Activities” and select “Meetings”. (You can also select specific students and different time frames.) From this view, hover over the different bars to see specific student behavior. A red bar means a missed meeting, a red dot by the student’s name means they were not active during the selected timeframe.
6. Get quick access to class grades and grade distributions How this helps: Tracking a student’s grades over time can be a useful way to check in and see if they need help. By checking the distribution of grades – either for a specific assignment or overall for the class – you can help plan future assignments and assessments. It can also be helpful to determine if different groups of students within similar grade ranges need different help or different kinds of assignments.
How to do this: Within the Insights tab in a class, click on “View grade trends & distributions”. From there you can filter for different views, students, timeframes and assignments.
Looking for resources and training to get started?
FAQs Can I use Insights in Teams on my desktop app, web or mobile?
Insights is available for educators in Teams desktop app and web. It will be available soon on Teams mobile as well. Students’ engagement data collected from every device they use, including mobile. (Except for data on channel visits, which is only collected from desktop devices.)
How does student data get used in Insights?
Insights ensures security and protection of students’ sensitive information. Classroom data is only available to class team owners or approved staff members given permissions by the IT admin, and the information collected and shown meets more than 90 regulatory and industry standards, including GDPR and the Family Education Rights and Privacy Act (FERPA). Students do not have access to the Insights app, classroom data, or other student’s data. You can find more information on the Insights IT support page.
I use a Learning Management System (LMS) and I can’t see my LMS in Insights, why?
Insights currently shows data from the native Teams for Education experience including classes, Assignments, and other Teams activity. If you use Teams along with your LMS you’ll be able to see the Teams related engagement data in Insights.
We’re always looking for ways to make Insights better. Have questions, comments, or ideas? Let me know! Add your idea here, share your comment below, and find me on Twitter (@grelad).
Elad Graiver Senior Program Manager, Education Insights
This article is contributed. See the original author and article here.
In this episode with Amit Banerjee, you will review new Software Assurance core benefits for high availability and disaster recovery can make running SQL Server on Azure virtual machine cheaper than before. You will also see how all SQL Server releases can benefit from the FREE passive replica cores and help bring down the cost of running SQL Server on an Azure virtual machine.


Recent Comments