by Contributed | Nov 22, 2020 | Azure, Microsoft, Technology
This article is contributed. See the original author and article here.
Logic Apps connectors provide quick access from Logic Apps to events, data, and actions across other apps, services, systems, protocols, and platforms. By using connectors in your logic apps, you expand the capabilities for your cloud and on-premises apps to perform tasks with the data that you create and already have. Azure Logic Apps connectors are powered by the connector infrastructure that runs in Azure. A workflow running on the new runtime can use these connectors by creating a connection, an Azure resource that provides access to these connectors.
A key capability in the redesigned Logic Apps runtime introduces the extensibility to add built-in connectors. These built-in connectors are hosted in the same process as the Logic App runtime and it provides higher throughput, low latency, and local connectivity. The connection definition file also contains the required configuration information for connecting through these built-in connectors. The preview release comes with the built-in connectors for Azure Service Bus, Azure Event Hub and SQL Server. The extensibility framework that these connectors are built on can be used to build custom built-in connectors to any other service that you need.
In this blog post, I am showing how we can leverage this extensibility framework to create a built-in CosmosDB connector with a trigger and no actions. In this example, whenever the new document is added in the lease collection or container of Cosmos DB, the Logic Apps trigger will fire and execute the Logic App with the input payload as Cosmos document. This built-in connector leverages the functionality of Azure function capability for Cosmos DB trigger based upon the Azure Function trigger binding. In general, you can add any action or function trigger as part of your own built-in connectors. Currently trigger capabilities are limited to Azure Function specific triggers only, in future the Logic app will support non-Azure function triggers also.
Built-in connector plugin model
The Logic Apps built-in connector extensibility model leverages the Azure Functions extensibility model to enable adding built-in connector implementations like Azure Functions extensions. This allows developers to write their connectors as Azure Functions extensions, build and package them as a NuGet for anyone to consume.
There are mainly two operation parts that a developer would need to implement:
Operation descriptions are metadata about the operations that the custom built-in connector implements. These are primarily used by the Logic Apps designer to drive the authoring and monitoring experience related to these connectors’ operations. For example, designer uses operation descriptions to understand the input parameters required for a given operation as well as facilitate the generation of outputs property tokens based on the schema of the output of an operation.
Logic Apps runtime will use these implementations at runtime to invoke the specified operation in the workflow definition.
In order to hook up with function runtime the new built-in connector extension need to be registered with the Azure Function runtime extensions. The details are discussed later in this blog.
CosmosDB Built-in Connector
Here in this sample connector, I am developing the CosmosDB built-in custom connector which has only one trigger and no actions are available. The details of the operations are described below:
Logic App Operation
|
Operation details
|
Description
|
Trigger
|
Receive Document
|
The trigger is invoked when there are inserts or updates in the specified database and collection of CosmosDB.
|
Action
|
–
|
No action operation are defined for this connector
|
To develop your own built-in connector, you need to add the work flow webjob extension package. , I am creating the .NET Core 3.1 class library project in visual studio and added the Microsoft.Azure.Workflows.Webjobs.Extension package as Nuget reference to the project. The Service provider interface is implemented to provide the operations of the CosmosDB connector.
Service Provider interface implementation
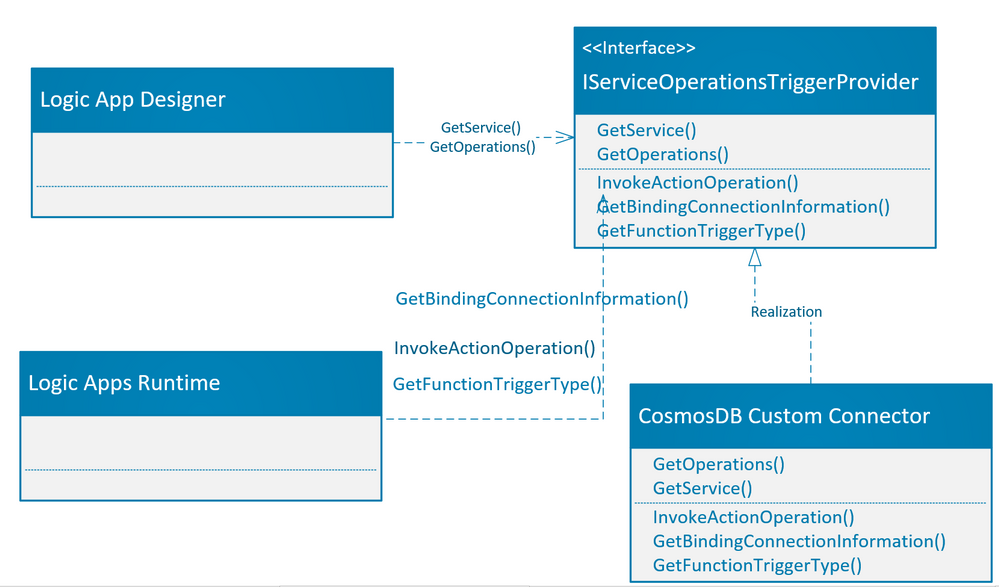
The webjob extension Nuget package which was added to the class library project provides the service provider interface IServiceOperationsTriggerProvider which needs to be implemented.
As part of operation description, the IServiceOperationsTriggerProvider interface provides methods GetService() and GetOperations() which are required to be implemented by the custom built-in connector. These operations are used by the logic app designer to describe the actions/triggers by the custom built-in connector on the logic app designer surface. Please note that the GetService() method also specifies the connection parameters needed by the Logic app designer.
For action operation, you need to implement the InvokeActionOperation() method, which is invoked during the action execution. If you would like to use the Azure function binding for azure triggers, then you need to provide connection information and trigger bindings as needed by Azure function. There are two methods which need to be implemented for Azure function binding, GetBindingConnectionInformation() method which provides the connection information to the Azure function binding and GetTriggerType() which is same as “type” binding parameter for Azure function.
The picture below shows the implementation of methods as required by the Logic app designer and Logic app runtime.

The details of the methods which are required to be implemented are tabulated below:
Operation Methods
|
Comments
|
Example
|
GetService()
|
This is needed by Logic app designer. This is the high-level description of your service, which includes the service descriptions, brand color, Icon URL, connection parameters and capabilities etc.
|
public ServiceOperationApi GetService()
{
  return this.CosmosDBApis.ServiceOperationServiceApi;
}
|
GetOperations()
|
This is needed by Logic app designer, to get the list of operations that your service has implemented. This is based upon a swagger schema.
|
public IEnumerable<ServiceOperation> GetOperations(bool expandManifest)
{
  return expandManifest ? serviceOperationsList : GetApiOperations();
}
|
InvokeActionOperation()
|
This is invoked for every action operation during runtime. Here you can use any client (FTPClient, HTTPCLient etc..) as needed by your custom built-in connector actions. If you are just implementing the trigger as in this case, then you do not need to implement this method.
|
using (var client = new HttpClient())
{
  response = client.SendAsync(httpRequestMessage).ConfigureAwait(false).ToJObject();
 }
 return new ServiceOperationResponse(body: response);
|
GetBindingConnectionInformation()
|
These are the required connection parameters by trigger binding in case you are using the Azure function trigger type.
|
return ServiceOperationsProviderUtilities
                    .GetRequiredParameterValue(
                        serviceId: ServiceId,
                        operationId: operationId,
                        parameterName: "connectionString",
                        parameters: connectionParameters)?
                    .ToValue<string>();
|
GetFunctionTriggerType()
|
If you are using the Azure function built-in triggers as Logic App trigger, then you need to return the string which is same as type in Azure function trigger binding.
“type”: “cosmosDBTrigger”,
|
public string GetFunctionTriggerType(){
  return "CosmosDBTrigger";
}
|
Function Extensions and registration:
The function extension registration needs to be added as a startup job and register the service provider as part of service provider list, so that the built-in connector extension can be loaded during the function runtime start process.
Adding the converter is optional depending upon the type of data you need as an input to the built-in trigger. In this example I am converting the Document data type for Cosmos DB Documents to JObject array.
- Create startup job: To register the custom built-in connector as function extension, you need to create a startup class using [assembly:WebJobsStartup] assembly attribute and implementing IWebJobsStartup interface, refer the function registration for more details. In the configure method you need to register the extension and inject the service provider as shown below:
    public class CosmosDbTriggerStartup : IWebJobsStartup
    {
        public void Configure(IWebJobsBuilder builder)
        {
            // Registering and extension
            builder.AddExtension<CosmosDbServiceProvider>();

            // DI the trigger service operation provider.
            builder.Services.TryAddSingleton<CosmosDbTriggerServiceOperationProvider>();
        }
    }
- Register service provider: We need to register the service provider implementation as function extension. We are using the built-in Azure function Cosmos DB Trigger as a new trigger. Here in this example, we register the new Cosmos DB service provider for an existing list of service providers which are already part of Logic App extension.
   [Extension("CosmosDbServiceProvider", configurationSection: "CosmosDbServiceProvider")]
   public class CosmosDbServiceProvider : IExtensionConfigProvider
   {
       public CosmosDbServiceProvider(ServiceOperationsProvider serviceOperationsProvider, CosmosDbTriggerServiceOperationProvider operationsProvider)
      {
            serviceOperationsProvider.RegisterService(ServiceName, ServiceId, operationsProvider);
      }
      public void Initialize(ExtensionConfigContext context)
      {
            // Converts Cosmos Document list to JObject array.
            context.AddConverter<IReadOnlyList<Document>, JObject[]>(ConvertDocumentToJObject);
      }
   }
- Add Converter: Logic app has implemented the generic way to handle any function built-in trigger using the JObject array, we may need (optional) to add a converter to convert the read only list of Azure Cosmos DB document into JObject array. Once the converter is ready as shown in above example, we need to register the converter as part of ExtensionConfigContext.
// Converts Cosmos Document list to JObject array.
context.AddConverter<IReadOnlyList<Document>, JObject[]>(ConvertDocumentToJObject);
The complete implementation of all three classes as mentioned above are given in the following code map diagram.

Testing the built-in connector:
You need to update the extensions.json in extension bundle to add the above NuGet reference. You can refer the deploy.ps1 script.
Update the extension bundle to include the custom built-in connector.
Create the Logic App project and install the extension package given below:
dotnet add package ServiceProviders.CosmosDb.Extensions --version 1.0.0 --source <ServiceProviders.CosmosDb.Extensions package path>
Once you open the workflow in designer (make sure you close any func.exe process in case if it already running before opening the designer), you should be able to see the newly added connector.

You can now add connection string of Azure cosmos DB and add new document in the database under collection or lease collection to test the trigger by creating a simple logic app using the CosmosDB trigger.
Specifying the connection string.

Specify the database name and collection name for the trigger.

Execute F5 in VS code and invoke trigger by adding a new item using data explorer of your CosmosDB account as shown below to trigger the workflow.

The sample code can be downloaded from the repository. https://github.com/praveensri/LogicAppCustomConnector/tree/main/ServiceProviders.CosmosDb.Extensions
by Contributed | Nov 21, 2020 | Technology
This article is contributed. See the original author and article here.
When writing data to Azure SQL DB as part of your Data Factory ETL job using data flows, there are a number of features available to you that can handle common constraints found in target tables including identity inserts (use sink scripts) , handling known constraints in your data flow logic, and the latest feature to trap, log, and continue on row-level errors in SQL DB.
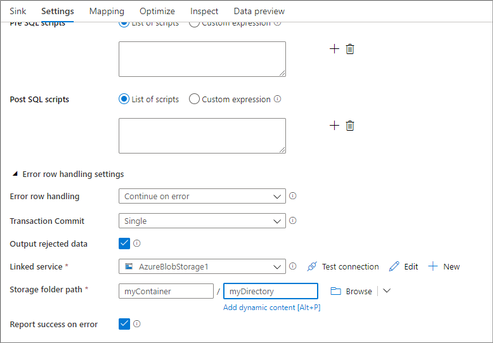
In your ADF Data Flow SQL DB Sink, you will see an option at the bottom for “Error row handling”. The default is the current behavior in ADF, which tells ADF to fail fast as soon as a target table constraint is encountered on the target table.

You can now optionally tell ADF to “Continue on Error” so that the ETL process will continue writing rows to the SQL DB sink even after error rows have been encountered. ADF does this through a 2-stage process which means that there is a small performance penalty incurred by choosing this option.
However, once you’ve decided to pass over error rows and continue writing using the Sink setting, you can now also tell ADF to automatically log those errors along with the error conditions and original data. This will allow you to view the error details as well as to have the opportunity to re-process those original rows, processing only the errored rows.

Once you’ve chosen to “continue on error”, you can then choose the return code status of the activity by setting “Report success on error”. When true, ADF will return a success code for your data flow even when rows errored. Optionally, set it to false to return a fail status. You will then see the results of the number of success vs. failed rows in the Sink details in the data flow activity monitoring view.


by Contributed | Nov 21, 2020 | Technology
This article is contributed. See the original author and article here.
Stored procedures are widely used in commercial relational databases. You write most of your application logic in PL/SQL and achieve notable performance gains by pushing this logic into the database. As a result, customers who are looking to migrate from other databases to PostgreSQL usually make heavy use of stored procedures.
When migrating from a large database, using the Citus extension to distribute your database can be an attractive option, because you will always have enough hardware capacity to power your workload. The Hyperscale (Citus) option in Azure Database for PostgreSQL makes it easy to get a managed Citus cluster in minutes.
In the past, customers who migrated stored procedures to Citus often reported poor performance because each statement in the procedure involved an extra network round trip between the Citus coordinator node and the worker nodes. We also observed this ourselves when we evaluated Citus performance using the TPC-C-based workload in HammerDB (TPROC-C), which is implemented using stored procedures.

The good news is that this all changed in Citus 9.0, which introduced a feature called “distributed functions.” Distributed functions can take away most of the network overhead in stored procedures for an important class of workloads—and we have further improved distributed Postgres functions in subsequent Citus releases. In HammerDB, these changes added up to give an order of magnitude speed up!
This blog post will show you how we achieved such a dramatic performance improvement in Citus—and why stored procedures are now a powerful technique for scaling transactional workloads on Postgres, with Citus.
 Figure 1: Performance of a Hyperscale (Citus) cluster on Azure Database for PostgreSQL as measured by the HammerDB TPROC-C benchmark. All these HammerDB benchmark results were run on Citus 9.4 using either a) regular Postgres tables & regular Postgres functions—only on coordinator; b) distributed tables & regular functions—faster by using worker nodes, but significant network overhead; c) distributed tables & distributed functions—ultra fast and scalable.
Why stored procedures might not be such a bad idea
Stored procedures have a poor reputation among some developers, which relates primarily to cases in which stored procedures are used to implement business logic. Business logic is certainly much easier to maintain outside the database where you have all your infrastructure for updates, logging, monitoring, debugging, testing, etc. However, using stored procedures and putting business logic in your database are really two different things.
Where stored procedures can be extremely useful is creating a well-defined API for your Postgres database. Having a well-defined API means that you decouple your application logic from your database schema and can update them independently. Without that, it’s super hard to do even simple things like changing a column name without downtime. In addition, the mapping between your application logic and your Postgres queries becomes very straight-forward, which helps you simplify your code. Most importantly, the efficiency gains you can realize with stored procedures are too big to ignore at scale.
Used correctly, stored procedures in Postgres give you a rare opportunity to simplify your code AND simplify operations AND get a significant performance and scalability boost.
Perhaps, as Rob Conery so eloquently put it, it’s time to get over that stored procedure aversion you have.
The challenge of stored procedures in a distributed database like Citus
Distributed database performance is a complex topic and stored procedures show why.
Consider the following scenario:
A stored procedure performs 10 queries. On a single Postgres server, the execution time of each query is 1ms, so the overall procedure takes 10ms.
We then decide to distribute the tables across a large Citus cluster, which means we can keep all data in memory and queries execute in 0.1ms on the Citus worker nodes, but now each query also involves a 1ms network round trip between the Citus coordinator and the worker node, which means the overall procedure takes 11ms, even with a lot of extra hardware.
To solve this problem, we looked more closely at customer workloads. We noticed that stored procedures on Citus very often make repeated network round trips to the same Citus worker node. For instance, a stored procedure in a SaaS / multi-tenant application typically only operates on a single tenant. That means that, in theory, all the work in the stored procedure could be delegated to the worker node that stores the data for that tenant in a single network round trip.
Delegating stored procedure calls using distributed functions
Delegating stored procedure calls to the node that stores the relevant data is not a new idea. VoltDB by Michael Stonebraker and PL/proxy were architected entirely around the idea of scaling the database by executing procedures within a partition boundary, but as database systems they are a lot more restrictive than Citus.
Citus users can write PL/pgSQL stored procedures (defined as a function or procedure) that contain arbitrary queries on distributed tables. As we mentioned, stored procedures often operate on a single Citus worker node, but nothing prevents them from operating across multiple worker nodes.
To achieve scalability without losing functionality, we introduced the concept of “distributed functions” which can be called on any worker node and can perform arbitrary queries. When you create a distributed function, the Citus coordinator node replicates all its metadata to the Citus worker nodes automatically, such that the worker can act as a coordinator for any procedure call it receives.
You can additionally give a distributed function a “distribution argument” which corresponds to the “distribution column” of distributed tables. In that case, when calling the function or procedure on the Citus coordinator node, the call is delegated to the worker node that stores the distribution column value (e.g. tenant ID) given by the distribution argument. The figure below shows an example where the call to the `delivery` function.
 Figure 2: The Citus worker node handles the delegated procedure call as if it were the Citus coordinator.
Ideally, the stored procedure uses the argument as a filter on the distribution column in all the queries, which means it only needs to access shards that are local to the worker node. If not, that’s ok, because each Citus worker node can initiate a distributed transaction involving other worker nodes.
Distributed functions can be creating by calling `create_distributed_function` on an existing function and procedure. For example, below are the complete set of steps we use to distribute tables and procedures generated by HammerDB when building the TPROC-C schema:
-- only needed if you're using Citus open source, to activate metadata replication:
set citus.replication_model = 'streaming';

-- distribute tables based on their warehouse ID columns (tables are automatically co-located)
SELECT create_distributed_table('customer', 'c_w_id');
SELECT create_distributed_table('district', 'd_w_id');
SELECT create_distributed_table('history', 'h_w_id');
SELECT create_distributed_table('warehouse', 'w_id');
SELECT create_distributed_table('stock', 's_w_id');
SELECT create_distributed_table('new_order', 'no_w_id');
SELECT create_distributed_table('orders', 'o_w_id');
SELECT create_distributed_table('order_line', 'ol_w_id');
SELECT create_reference_table('item');
…

-- distribute functions, using the first argument (warehouse ID) as the distribution argument, and co-locate with the warehouse table
SELECT create_distributed_function('delivery(int, int)', '$1', colocate_with := 'warehouse');
SELECT create_distributed_function('neword(int, int, int, int, int, int)', '$1', colocate_with := 'warehouse');
SELECT create_distributed_function('payment(int, int, int, int, numeric, int, numeric, varchar, varchar, numeric)', '$1', colocate_with := 'warehouse');
SELECT create_distributed_function('slev(int, int, int)', '$1', colocate_with := 'warehouse');
SELECT create_distributed_function('ostat(int, int, int, int, varchar)', '$1', colocate_with := 'warehouse');

-- just create this function on all the nodes (no distribution argument)
SELECT create_distributed_function('dbms_random(int,int)');
After these steps, every stored procedure call is delegated to the Citus worker node that stores warehouse ID specified in the first argument. Most of the time, the stored procedures pass on the argument as a filter to these distributed queries, which means almost all queries can be answered without network round trips.
The neword and payment procedures occasionally access multiple warehouses, which will result in the Citus worker node performing a distributed transaction.
When we first prototyped distributed functions in Citus, it still had one major performance issue: worker nodes were making TCP connections to themselves to query shards—causing significant overhead and limiting concurrency. We resolved that by introducing a complementary technique that we call “local execution.”
Local execution avoids connections for local shards
Before we explore how local execution works, you probably should understand how Citus handles queries on distributed tables.
The Citus query planner intercepts queries on distributed tables via the PostgreSQL planner hooks. The Citus distributed query planner detects which shards are accessed based on distribution column filters in the query, and then generates a query tree for each shard. Each query tree is then “deparsed” back to SQL text, and the Citus query planner hands over the query plan to the distributed query executor. The executor sends SQL queries to worker nodes using PostgreSQL’s standard connection library (libpq). Each Citus worker node executes its query and replies to the Citus coordinator node with the results.
This approach works well for most queries because only the coordinator connects to the worker nodes. However, with the distributed function approach, the Citus coordinator would connect to the Citus worker node and then the Citus worker node would connect to itself. Connections are a scarce resource in Postgres, so this approach limited achievable concurrency.
Fortunately, the Citus worker nodes do not really need a separate TCP connection to query the shard, since the shard is in the same database as the stored procedure. We therefore introduced local execution, to execute Postgres queries within a function locally, over the same connection that issued the function call. The following diagram outlines the Citus connection logic before and after the change.
 Figure 3: On the left: Before local execution, the worker connects to itself to query shards. On the right: After local execution, the Citus worker plans and executes a Postgres query on the shard in the same process.
By introducing local execution, distributed functions incurred less overhead and we could achieve higher concurrency since it kept all connection slots available for stored procedure calls. After this change in Citus, throughput was only limited by the number of worker nodes.
When running the HammerDB benchmark, we did find that the Citus worker nodes were relatively inefficient compared to a regular PostgreSQL server. We therefore implemented another optimization: plan caching.
Plan caching skips local planning overhead
PostgreSQL has the notion of prepared statements, which allow you to cache a query plan for multiple executions and skip the overhead of parsing and planning the same query many times. The Postgres planner tries to use a generic plan that works for any parameter value after exactly 5 executions, as shown in the diagram below:
 Figure 4: Prepared statement flow in Postgres, where E is the number of executions of the statement.
One of the benefits of writing a stored procedure in PL/pgSQL, is that Postgres automatically turns every SQL query into a prepared statement, but this logic did not immediately help Citus. The reason is that a Citus worker node contains multiple shards, and Citus does not know which one is going to be queried in advance.
The solution was simple: We cache the Postgres query plans for each of the local shards within the plan of the distributed query, and the distributed query plan is cached by the prepared statement logic. Since the number of local shards in Citus is typically small, this only incurs a small amount of memory overhead.
Plan caching in Citus 9.2 gives you another 30% performance improvement in HammerDB.
Stored procedure performance in Citus across releases
We released distributed functions and local query execution changes in Citus 9.0, plan caching in Citus 9.2, and additional performance improvements in the Citus 9.4 release.
The result: improved performance in the HammerDB benchmark by 9X overall!
Running the TPROC-C workload using the HammerDB benchmarking tool on a 10-node Hyperscale (Citus) cluster on Azure Database for PostgreSQL, with 16 vcores per node:
- In Citus 9.0, improved from ~50k to 320K NOPM when using distributed functions. The NOPM refers to new order transactions per minute (roughly 43% of the total number of transactions).
- In Citus 9.2 (same configuration), improved further from 320K NOPM to approx. 420K NOPM
- In Citus 9.4, additional performance improvements increased overall HammerDB performance to 450K NOPM.
The following chart of HammerDB TPROC-C performance visualizes how we’ve improved the Citus stored procedure performance across these different Citus open source releases, as measured on Hyperscale (Citus) in Azure Database for PostgreSQL.
 Figure 5: HammerDB TPROC-C performance across different Citus releases (using distributed functions from 9.0 onwards), measured on a 10-node Hyperscale (Citus) server group in Azure Database for PostgreSQL.
Stored procedures as a distributed database power feature
What is neat about all these changes is that we started from a place where stored procedures were best avoided in Citus and arrived at a place were stored procedures are a powerful way of scaling out Postgres OLTP workloads on Citus.
Stored procedures in PostgreSQL can be so helpful: they give you automatic plan caching, help you avoid network round trips in Citus, AND you can change your stored procedure along with your schema in a single distributed transaction (this last bit is still mind-blowing to me!). So, if you’re migrating your procedures from a commercial database to Postgres—or if you find Postgres stored procedures a useful primitive—and you need your stored procedures to be ultra-fast and scalable, we recommend you use the new distributed function feature in Citus  .
.
Special thanks to Splendid Data who helped us come up with the initial idea for distributed functions during a brainstorming session on Oracle->Citus migrations last year.
by Contributed | Nov 20, 2020 | Technology
This article is contributed. See the original author and article here.
Introduction
BizTalk artifacts are typically deployed in production once they have been thoroughly tested for functionality, stress, performance, integration, to name a few. Regardless of the amount of testing though, a system is vulnerable to the external data being received. Here, we consider what happens when BAPI transactions requests contain invalid data, such as fields that are not of the right formats or do not have expected values. The reader should be familiar with the orchestration presented in Debatching SAP BAPI Transaction Requests, which is augmented here for better error handling and fault-tolerant batch processing
Generally speaking, after the BAPI transaction requests are created, validation can happen:
(1) locally, in the BizTalk host instance, when the BAPI transactions are published and sent, and
(2) remotely, on the SAP server, when the transactions are received and processed.
Local failures result in the SAP adapter throwing such exceptions as:
“A message sent to adapter “WCF-SAP” on send port “…” with URI “…” is suspended. Error details: System.InvalidOperationException: The Inner Channel to use was not found for the key.”
or other exceptions documented in Exceptions and Error Handling with the SAP adapter.
Remote data failures correspond to the SAP server returning error messages in the RETURN elements of the BAPI responses.
The distinction local/remote is important because error handling is implemented differently depending on whether errors happen on outbound or inbound data flows. For instance, as we shall see, BAPI_TRANSACTION_COMMIT and BAPI_TRANSACTION_ROLLBACK are not always applicable depending on how validation fails. From a customer perspective though, errors from invalid data need to be surfaced consistently regardless of where the errors happen. Some may expect “fail fast”, where any invalid data should abort further processing. Others would rather handle invalid data with graceful error handling. This is especially relevant in the context of BAPI transactions where a Logical Unit of Work (LUW) may comprise a large number of transactions and the “one-fails/all-fail” behavior would be cost-prohibitive; In such cases, it would be preferable to keep the processing going rather than to suspend an orchestration instance for some invalid field in one out of many transactions (e.g., a vendor no longer exists but a request uses the vendor’s code).
Scenario
The first stage of the main orchestration is the debatching pipeline explained in detail in Debatching SAP BAPI Transactions and summarized below.
Orchestration receives…
|
Orchestration then produces…
|
<ns0:RequestsInfo xmlns:ns0=“”>
<ProcessErrors>true</IsCommit>
<Orders>
<ns2:Order xmlns:ns2=“”>
<ORDER_HEADER_IN>
<DOC_TYPE>TA</DOC_TYPE>
<SALES_ORG>1000</SALES_ORG>
<DISTR_CHAN>12</DISTR_CHAN>
</ORDER_HEADER_IN>
<ORDER_ITEMS_IN>
<MATERIAL>DPC1020</MATERIAL>
</ORDER_ITEMS_IN>
<ORDER_PARTNERS>
<PARTN_ROLE>AG</PARTN_ROLE>
<PARTN_NUMB>0000001012</PARTN_NUMB>
</ORDER_PARTNERS>
</ns2:Order>
</Orders>
</ns0:RequestsInfo>
|
<ns0:CREATEFROMDAT2 xmlns:ns0=“…” xmlns:ns3=“…”>
<ns0:ORDER_HEADER_IN>
<ns3:DOC_TYPE>TA</ns3:DOC_TYPE>
<ns3:SALES_ORG>1000</ns3:SALES_ORG>
<ns3:DISTR_CHAN>12</ns3:DISTR_CHAN>
<ns3:DIVISION></ns3:DIVISION>
</ns0:ORDER_HEADER_IN>
<ns0:ORDER_ITEMS_IN>
<ns3:BAPISDITM>
<ns3:MATERIAL>DPC1020</ns3:MATERIAL>
</ns3:BAPISDITM>
</ns0:ORDER_ITEMS_IN>
<ns0:ORDER_PARTNERS>
<ns3:BAPIPARNR>
<ns3:PARTN_ROLE>AG</ns3:PARTN_ROLE>
<ns3:PARTN_NUMB>0000001012</ns3:PARTN_NUMB>
</ns3:BAPIPARNR>
</ns0:ORDER_PARTNERS>
</ns0:CREATEFROMDAT2>
|

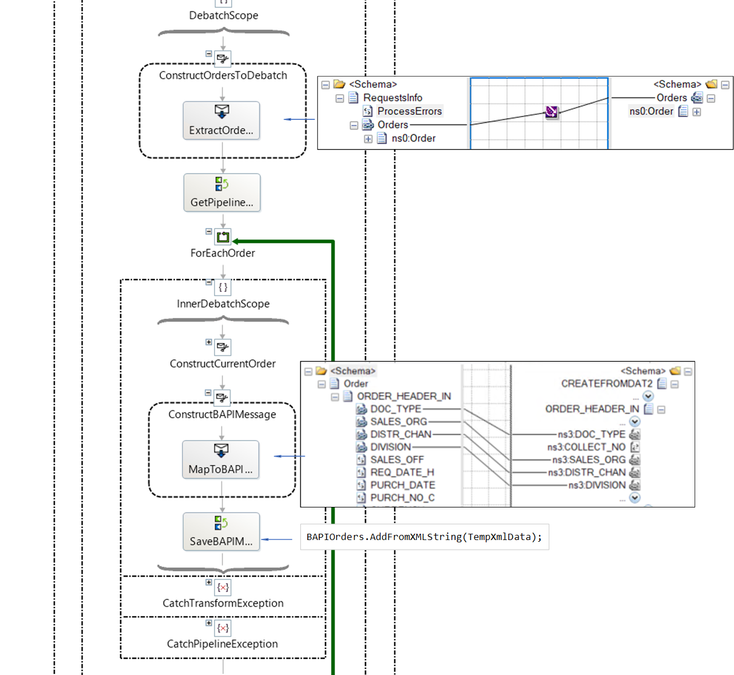
A few changes were made to the original pipeline. First, we introduced a Boolean element ProcessErrors to indicate the desired error behavior when BAPI transaction requests fail (“failure” being defined in the next section). If true, the orchestration will log the errors and continue processing the debatched transaction requests. If false, the orchestration will record the errors, roll back existing transactions, and exit. Orchestration instances are not suspended.
The idea of using ProcessErrors came out of consistency with the BAPI parameter BEHAVE_WHEN_ERROR, which is documented as a way to control order creation when some sale items within a transaction (BAPISDITM field) cannot be created. A value of “P” (Process) means that the order will be saved when errors occur and problematic items will not be saved.
Second, the helper class BAPIOrdersList used for caching debatched CREATEFROMDAT2 documents was modified to allocate a BAPIRET2[] array inside each CREATEDFROMDAT2, which is used on the SAP side as a return parameter (explained in the next section).
[Serializable]
    public class BAPIOrdersList : List<CREATEFROMDAT2>
    {
        public BAPIOrdersList() { }

        public void AddFromXMLString(XmlDocument document)
        {
            MemoryStream stream = new MemoryStream();
            document.Save(stream);
            stream.Flush();
            stream.Position = 0;

            XmlSerializer reader = new System.Xml.Serialization.XmlSerializer(typeof(CREATEFROMDAT2));
            StreamReader st = new StreamReader(stream);

            CREATEFROMDAT2 transact = (CREATEFROMDAT2)reader.Deserialize(st);
            transact.RETURN = new BAPIRET2[1]; // Allocate this structure to get the return values in the response.

            this.Add(transact);
            st.Close();
        }

        public CREATEFROMDAT2 Get(int index)
        {
            return this[index];
        }

        public int OrdersCount()
        {
            return this.Count;
        }

        public void Insert(BAPIOrdersList orders)
        {
            this.AddRange(orders);
        }
    }
Last, exception processing was introduced in the debatching process in order to catch errors that could happen during transforms from bad data. The details are covered in a separate article as they are not specific to BAPIs.
Invalid Data
We classified “invalid” data into two types based on where the error happen and the corresponding impact: value errors and format errors.
Invalid Values
Data value errors correspond to values that cause transaction errors on the SAP side. For instance, using a vendor or material that do not exist. In these cases, the CREATEFROMDAT2Response contains information in the BAPIRET2 structure parameter provided in the CREATEFROMDAT2 request. Example of data value error:
   <RETURN>
        <BAPIRET2 xmlns="http://Microsoft.LobServices.Sap/2007/03/Types/Rfc/">
            <TYPE>E</TYPE>
            <ID>CZ</ID>
            <NUMBER>95</NUMBER>
            <MESSAGE>Sales organization abcd does not exist</MESSAGE>
            <LOG_NO></LOG_NO>
            <LOG_MSG_NO>0</LOG_MSG_NO>
            <MESSAGE_V1>abcd</MESSAGE_V1>
            <MESSAGE_V2></MESSAGE_V2>
            <MESSAGE_V3></MESSAGE_V3>
            <MESSAGE_V4></MESSAGE_V4>
            <PARAMETER>SALES_HEADER_IN</PARAMETER>
            <ROW>0</ROW>
            <FIELD></FIELD>
            <SYSTEM>T90CLNT090</SYSTEM>
        </BAPIRET2>
        <BAPIRET2 xmlns="http://Microsoft.LobServices.Sap/2007/03/Types/Rfc/">
            <TYPE>E</TYPE>
            <ID>V4</ID>
            <NUMBER>219</NUMBER>
            <MESSAGE>Sales document  was not changed</MESSAGE>
            <LOG_NO></LOG_NO>
            <LOG_MSG_NO>0</LOG_MSG_NO>
            <MESSAGE_V1></MESSAGE_V1>
            <MESSAGE_V2></MESSAGE_V2>
            <MESSAGE_V3></MESSAGE_V3>
            <MESSAGE_V4></MESSAGE_V4>
            <PARAMETER></PARAMETER>
            <ROW>0</ROW>
            <FIELD></FIELD>
            <SYSTEM>T90CLNT090</SYSTEM>
        </BAPIRET2>
    </RETURN>
As explained in Using BAPIs in Distributed Systems (ALE), a value of “E” in any of the TYPE fields of BAPIRET2 indicates transaction failure and therefore, nothing to commit.
Invalid Formats
Format errors correspond to field values that do not abide by the metadata schemas provided by the SAP server and generated in Visual Studio (cf. SAP BAPI Transactions Walkthrough). Such errors cause exceptions in the SAP adapter before a BAPI transaction is even sent, which then results in the SAP channel being broken. For example, if we used a string of length greater than 4 in the SALES_ORG field, we would get the following error in the event log:
A message sent to adapter “WCF-SAP” on send port “BAPI2032SalesOrdersSP” with URI “sap://CLIENT=800;LANG=EN;@a/…” is suspended.
Error details: Microsoft.ServiceModel.Channels.Common.XmlReaderParsingException: An error occurred when trying to convert the XML string thisistoolong of RFCTYPE RFCTYPE_CHAR with length 4 and decimals 0 to a .NET type. Parameter/field name: SALES_ORG Error message: The length of the value for the field exceeds the allowed value. Value: 13 Field: SALES_ORG Allowed value: 4. —> Microsoft.ServiceModel.Channels.Common.XmlReaderParsingException: The length of the value for the field exceeds the allowed value. Value: 13 Field: SALES_ORG Allowed value: 4
at Microsoft.Adapters.SAP.SapMetadataUtilities.ConvertXmlStringToRfcStringNCo(String data, RfcTypes type, Int32 singleByteLength, Int32 decimals, String fieldname, Encoding encoding, Encoding realPartnerEncoding, Boolean padToExactLength, SAPConnection sapconnection)
|
Any further attempt to submit BAPI transactions in the same LUW would result in the dreaded “Inner Channel” exception which indicates that the connection to the server was already closed:
A message sent to adapter “WCF-SAP” on send port “BAPI2032SalesOrdersSP” with URI “sap://CLIENT=800;LANG=EN;@a/…” is suspended.
Error details: System.InvalidOperationException: The Inner Channel to use was not found for the key {0A73F66F-31FA-4E48-BAC5-14EAED9571D4}_{27D07099-1874-47C3-9E69-2AD1FA42DE8D};URI=sap://CLIENT=800;LANG=EN;@a/…. Specify a valid key.
|
We would see the “Inner Channel” error if a BAPI_TRANSACTION_COMMIT or BAPI_TRANSACTION_ROLLBACK was sent after the data format error. To make things worse, if we were to send a BAPI_TRANSACTION_ROLLBACK in an exception handler, we would then get:
A message sent to adapter “WCF-SAP” on send port “BAPI2032SalesOrdersSP” with URI “sap://CLIENT=800;LANG=EN;@a/…” is suspended.
Error details: System.ServiceModel.CommunicationException: The server did not provide a meaningful reply; this might be caused by a contract mismatch, a premature session shutdown or an internal server error.
|
The latter happens because the ABORT message of BAPI_TRANSACTION_ROLLBACK is sent as first message on a new connection and therefore produces undesirable results as documented in Run BAPI Transactions in SAP using BizTalk Server. As a side-note, this illustrates the point that BAPI_TRANSACTION_ROLLBACK is not particularly suited to an orchestration exception block, unlike what has been documented elsewhere.
Exceptions in the SAP adapter result in suspended messages, as shown below:

In the orchestration design presented next, such exceptions will not cause suspended orchestrations and related messages though.
Orchestration Overview
The logical flow through the orchestration was divided into four “tracks” based on ProcessErrors = true/false, and data error type = format/value. The following table provides the details: track name (a, b, c, d), ProcessErrors/Error type combination, example of message with error, and the processing steps.

Legends correspond to the flows presented in the overview below. The orchestration changes and additional stages for error handling are:
– Per-BAPI-transaction exception block (inner loop);
– Rollback exception block;
– Commit and Rollback logic including exception handling (presented later).

Processing Value Errors
Value errors are contained in the CREATEFROMDAT2Response messages received from the SAP server. They are extracted by the orchestration into a variable of type the following helper class:
 [Serializable]
    public class BAPIReturnValues : List<BAPIRET2>
    {
        public BAPIReturnValues() { }

        public void Set(XmlDocument document)
        {
            MemoryStream stream = new MemoryStream();
            document.Save(stream);
            stream.Flush();
            stream.Position = 0;

            XmlSerializer reader = new System.Xml.Serialization.XmlSerializer(typeof(CREATEFROMDAT2Response));
            StreamReader st = new StreamReader(stream);

            CREATEFROMDAT2Response transactResponse = (CREATEFROMDAT2Response)reader.Deserialize(st);

            this.InsertRange(0, transactResponse.RETURN);

            st.Close();
        }

        public BAPIRET2 Get(int index)
        {
            return this[index];
        }

        public bool IsError()
        {
            for (int i = 0; i < this.Count; i++)
            {
                if (this[i].TYPE == "E")
                {
                    return true;
                }
            }

            return false;
        }

        public string GetErrorString()
        {
            string errorString = string.Empty;

            for (int i = 0; i < this.Count; i++)
            {
                if (this[i].TYPE == "E")
                {
                    errorString += string.Format("Index {0}: {1}; ", i, this[i].MESSAGE);
                }
            }

            return errorString;
        }
    }
which is used in the expression:
BAPIResponseRetVal.Set(BAPIResponse);
where BAPIResponse is of type BUS2032.CREATEFROMDAT2Response and implicitly cast to XMLDocument.
The method BAPIReturnValues.GetErrorString() produces the error string logged to a file in the error branch of the orchestration. The string is saved as-is, by using the RawString class documented in sending string to file location in BizTalk. and included in the BizTalk code attached to this blog post.
DataValueErrorMessage = new Microsoft.Samples.BizTalk.XlangCustomFormatters.RawString(
    System.String.Format("Message {0}: {1}", BAPIOrdersCount, BAPIResponseRetVal.GetErrorString()));
Example of error output:
Message 1: Index 0: For sales org. abcd distribution channel 12 is not allowed; Index 1: Sales document was not changed; |
When ProcessError is set to false, the orchestration flow is interrupted with a System.Exception created to be caught later on in the rollback stage of the orchestration.
BAPIDataValueExceptionVar = new System.Exception(BAPIResponseRetVal.GetErrorString());
In every place in the orchestration where exceptions are logged, the exception error messages follow the schema:

and messages are created with:
DataFormatErrorMessageVar = new System.Xml.XmlDocument();
DataFormatErrorMessageVar.LoadXml(System.String.Format(
"<ns0:ExceptionInfo xmlns:ns0="http://SapBAPITxClientDebatching.ExceptionInfo"><Type>{0}</Type><Message><![CDATA[{1}]]></Message></ns0:ExceptionInfo>",
SystemException.GetType(),
SystemException.ToString()));
Note the use of CDATA to prevent parsing of characters that would otherwise invalidate the xml format. Example of output for the same data value error:
<ns0:ExceptionInfo xmlns:ns0="http://SapBAPITxClientDebatching.ExceptionInfo">
  <Type>System.Exception</Type>
  <Message><![CDATA[System.Exception: Index 0: For sales org. abcd distribution channel 12 is not allowed; Index 1: Sales document  was not changed;
   at SapBAPITxClientDebatching.BAPIOrchestration.segment12(StopConditions stopOn)
   at Microsoft.XLANGs.Core.SegmentScheduler.RunASegment(Segment s, StopConditions stopCond, Exception& exp)]]></Message>
</ns0:ExceptionInfo>
Detailed steps are shown in the following diagram:

Successful BAPI transactions are added to a list of BAPI orders to commit (highlighted in yellow). This will be clarified in the next sections.
Format Errors and Adapter Exceptions
Format errors – as well as any other adapter exception happening when sending the BAPI CREATEFROMDAT2 requests – are handled in a per-request catch block for System.Exception, which encompasses the System.Web.Services.Protocols.SoapException and Microoft.XLANGs.Core.XlangSoapException.

Similarly to the previous stage, error messages and faulty requests are logged. As previously mentioned, exceptions are logged in a specific schema. With our test data, exception info looked like:
<ns0:ExceptionInfo xmlns:ns0="http://SapBAPITxClientDebatching.ExceptionInfo">
<Type>Microsoft.XLANGs.Core.XlangSoapException</Type>
<Message><
at System.ServiceModel.Channels.ServiceChannel.SendAsyncResult.End(SendAsyncResult result)
at System.ServiceModel.Channels.ServiceChannel.EndCall(String action, Object[] outs, IAsyncResult result)
at System.ServiceModel.Channels.ServiceChannel.EndRequest(IAsyncResult result)
Exception rethrown at [0]:
at System.Runtime.Remoting.Proxies.RealProxy.HandleReturnMessage(IMessage reqMsg, IMessage retMsg)
at System.Runtime.Remoting.Proxies.RealProxy.PrivateInvoke(MessageData& msgData, Int32 type)
at System.ServiceModel.Channels.IRequestChannel.EndRequest(IAsyncResult result)
at Microsoft.BizTalk.Adapter.Wcf.Runtime.WcfClient`2.RequestCallback(IAsyncResult result)
at Microsoft.BizTalk.XLANGs.BTXEngine.BTXPortBase.VerifyTransport(Envelope env, Int32 operationId, Context ctx)
at Microsoft.XLANGs.Core.Subscription.Receive(Segment s, Context ctx, Envelope& env, Boolean topOnly)
at Microsoft.XLANGs.Core.PortBase.GetMessageId(Subscription subscription, Segment currentSegment, Context cxt, Envelope& env, CachedObject location)
at SapBAPITxClientDebatching.BAPIOrchestration.segment11(StopConditions stopOn)
at Microsoft.XLANGs.Core.SegmentScheduler.RunASegment(Segment s, StopConditions stopCond, Exception& exp)]]></Message>
</ns0:ExceptionInfo>
When ProcessErrors is set to true, transactions that have been successful are re-enqueued at the back of the BAPIOrders list to be resent. The assumption that in this particular scenario configuration, BAPIs can be submitted in any order, which is reasonable if one is willing to ignore errors and let the processing continue. The BAPIConnectionState is reset to “OPEN” so that a new connection to the SAP server may be open to replace the connection broken from the SAP adapter exception. The re-enqueueing expression is:
BAPIOrders.Insert(BAPIOrdersToCommit);
BAPIOrdersToCommit.Clear();
BAPIConnectionState = "OPEN";
SuccessCount = 0;
As can be seen in the figure below, iterations will continue until BAPIOrders.Count() has been reached, which will include re-enqueued requests.

BAPI_TRANSACTION_COMMIT and BAPI_TRANSACTION_ROLLBACK
Commit and Rollback stages are almost identical. The former happens when there is no error or if any error has been processed; the latter when execution is interrupted. In both cases, BAPI commit/rollback requests are sent only if there has been any successful transaction. In both cases, BAPI requests/responses are processed in their own scope for exception handling and logging as previously described.
Commit stage:
 BAPI_TRANSACTION_COMMIT Stage
Rollback stage:
 BAPI_TRANSACTION_ROLLBACK Stage
Deploying the Solution
All artifacts used in this article can be created with the bindings file provided in the attached archive. There is one file location per logical send port used for logging.

The SAP Static Solicit-Response port is configured with RetryCount = 0 and “propagate fault message” checked.
The archive also contain some sample input files and output illustrating the various logical flows through the orchestration with variations on batch size, error type, ProcessErrors flag, etc.
Concluding Remarks
There is surprisingly little BizTalk material on how to use error handling and rollback in BAPI transactions. Our aim here was to explore what can be done based on existing orchestrations such as the ones presented in this series of blog articles. Basically, what it would look like if we wanted to do more than “putting a BAPI_TRANSACTION_ROLLBACK in a catch exception shape”, while keeping things as simple as possible. This meant leaving some items intentionally out-of-scope for this article, and it is worth mentioning some of them here:
– Re-enqueuing may be expensive if “channel-ending “errors tend to happen at the end of a large batch of error-free transactions. It can be remedied by tuning the batch sizes, or by simply saving the transactions for later processing by a different orchestration instance.
– As previously mentioned, BAPI requests that could not be sent due to exceptions in the SAP adapter are suspended with resumable status. In the case of errors caused by the data in the messages, resuming is of limited use though. There are ways to flow these messages back into the orchestration so they don’t linger in the message box.
– Last, as we hinted at in Scatter-Gather Pattern with SAP BAPI Transactions, an interesting way to extend the topic presented here could be to combine error handling with asynchronous processing in multiple orchestrations..
References
SAP BAPI Transactions Walkthrough
Debatching SAP BAPI Transaction Requests
Exceptions and Error Handling with the SAP adapter
Old BAPI Transaction Model (with Commit)
BAPI Transaction Model (Without Commit)
BAPIs for Mass Data Transfer
Buffering with Write BAPIs
Using BAPIs in Distributed Systems (ALE)
Run BAPI Transactions in SAP using BizTalk Server
sending string to file location in BizTalk
Run BAPI Transactions in SAP using BizTalk Server
Scatter-Gather Pattern with SAP BAPI Transactions
by Contributed | Nov 20, 2020 | Azure, Microsoft, Technology
This article is contributed. See the original author and article here.
General
- Move resources from a resource group to another region
- Filter pills update
Intune
- Updates to Microsoft Intune
Let’s look at each of these updates in greater detail.
General
Move resources from a resource group to another region
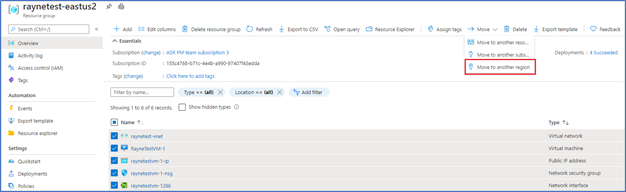
You can now navigate to a resource group and start the journey to move resources to another region. You will then be guided to the Azure resource Mover hub upon clicking a notification, where you can add missing dependencies, customize destination properties and track the progress of your moves. The experience also provides the ability for you to test the move by using the ‘discard’ option.
- In the Azure portal, open the relevant resource group.
- In the resource group page, select the resources that you want to move.
- Select Move > Move to another region.

- In Source + destination, select the target region to which you want to move the resources. Then select Next.
- In Resources to move, select Next.
- In Select resources, select resource you want to move. You can only add resources supported for move. Then select Done.
- In Move resources, select Next at the bottom of the screen.
- In Review + Add, check the source and target details.
- Select Proceed to begin adding the resources.
General
Filter pills update
To bring consistency to the filtering experience while also making it fully accessible and WCAG 2.1 compliant, we have enhanced the filter pills to now open dialogs. This new experience provides a consistent, intuitive approach for filtering as well as accessibility for all our users.
- Navigate to “All resources” and select “Location” filter

- Set “Operator” as “Contains” and Value as “US”, then select “Apply”

- The table is now updated to reflect the new filter (only locations with US in the name)
INTUNE
Updates to Microsoft Intune
The Microsoft Intune team has been hard at work on updates as well. You can find the full list of updates to Intune on the What’s new in Microsoft Intune page, including changes that affect your experience using Intune.
Azure portal “how to” video series
Have you checked out our Azure portal “how to” video series yet? The videos highlight specific aspects of the portal so you can be more efficient and productive while deploying your cloud workloads from the portal. Check out our most recently published video:
Next steps
The Azure portal has a large team of engineers that wants to hear from you, so please keep providing us your feedback in the comments section below or on Twitter @AzurePortal.
Sign in to the Azure portal now and see for yourself everything that’s new. Download the Azure mobile app to stay connected to your Azure resources anytime, anywhere. See you next month!

Recent Comments