Applications
|
 |
ACSIS Cloud Based Traceability Solutions: The ACSIS cloud platform provides traceability of products, inventory, and assets to enable real-time visibility and optimization across your organization’s extended supply chain.
|
 |
ADISIGHT-DDS: Designed for production planning personnel in the manufacturing industry, ADISIGHT-DDS calculates and simulates the delivery date of materials and parts based on demand prospects and priorities set for each order. This app is available only in Japanese.
|
 |
AUDIT MASTER: Available only in Japanese, AUDIT MASTER collects, monitors, and audits database operation logs, enabling users to manage multiple database environments, including Microsoft Azure SQL Database.
|
 |
Azure Sentinel-as-a-Service: AccountabilIT’s round-the-clock security operations center (SOC) connects to your Microsoft Azure Sentinel deployment to quickly strengthen your organization’s security posture and provide enhanced protection against threats.
|
 |
Azure Sentinel Cognitive SOC Service: Powered by Microsoft Azure Sentinel, Wipro’s Cognitive SOC-as-a-Service delivers managed detection and response from Wipro’s 15 global cyber defense centers. Rapid deployment with pre-built integrations and use cases helps customers realize value within days.
|
 |
B12 for K12: Tightly integrated with Microsoft Teams, B12 for K-12 is a communication platform for K-12 schools that links the four key stakeholders in education (student, educator, school management, and guardians) to support educational goals and outcomes.
|
 |
Bank-BI SAAS: Bank-BI is an enterprise-wide business intelligence and analytics solution that offers sophisticated capabilities for data modeling, reporting, query, and analysis while collecting data from numerous disparate sources in a central repository.
|
 |
Bever Pharmaceutical Manufacturing: Built on Microsoft Dynamics 365 and the Microsoft Power Platform, Bever Pharma is a process control system for the pharmaceutical and biotechnology industries. Facilitate digital transformation by boosting productivity, reducing ongoing costs, and increasing patient, doctor, and partner satisfaction.
|
 |
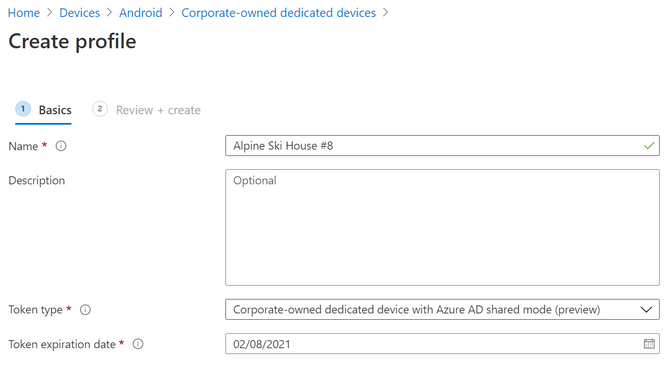
Billing subscription to Sepago for Nerdio Manager: Nerdio Manager for Windows Virtual Desktop enables you to deploy, manage, and autoscale your desktop environments. Operationalize large deployments, reduce Microsoft Azure costs with scheduled and event-driven autoscaling, and speed up deployments with Nerdio.
|
 |
Cerenade eCMS Offer: Cerenade’s eCMS is comprehensive case management software for attorneys and paralegals. The solution helps users manage cases, clients, forms, processes, reports, and billing to help their practices run more efficiently and effectively.
|
 |
Check-in & check-out online for hotels: The NeoCheck Onboarding platform enables customers to check in online from any device before arriving at a hotel. The process is simple, guided, and fast (approximately 40 seconds), and it complies with data collection security requirements.
|
 |
Claimbox: Claimbox provides scalable service to manage millions of claims for the insurance industry. Available only in Polish, Claimbox helps decrease the cost of indemnities and claims operations while delivering an outstanding digital experience for customers.
|
 |
Clobba: Clobba is a reporting and analytics module for monitoring call quality, user adoption, employee productivity, call costs, and SIP trunk utilization in Microsoft Teams. The solution is fully customizable for user requirements, whether they are IT administrators or business users.
|
 |
COVID-19 Health Check: Built on Microsoft Power Apps and SharePoint Online and integrated with Microsoft Teams, InfoTech’s COVID-19 Health Check application is designed to help companies cope with the COVID-19 pandemic within their walls, both physical and virtual.
|
 |
Dasha Voice AI Platform: Dasha.AI’s Voice AI Platform helps automate your business with conversational, human-like voice artificial intelligence. Deliver an exceptional customer experience while generating leads, gleaning actionable insights, and growing your sales pipeline.
|
 |
Document Management: Developed by SimbioX IT Consulting, GED Fast is a cloud or on-premises SharePoint-based solution that enables you to quickly scan, organize, and search business documents using any device. This app is available only in Portuguese.
|
 |
factoHR: Designed for organizations of any size across all industries, factoHR is a comprehensive human resources management system that covers recruitment, onboarding, time tracking, payroll and leave management, analytics, and more.
|
 |
Foglight for Databases: Quest’s Foglight for Databases helps users detect and resolve performance issues by providing a single view into complex environments and enabling database administrators to quickly pinpoint issues before they spiral out of control.
|
 for Teams.png") |
Gamma People Centric Security (DLP) for Teams: Gamma is a people-centric security solution that continuously monitors employee actions in real time and delivers event-driven security awareness training with patent-pending AI technology.
|
 |
Human Resources: SimbioX IT Consulting’s ContrataFast human resources solution helps reduce the time spent onboarding new employees by enabling them to submit all their documentation digitally from any device. This app is available only in Portuguese.
|
 |
Immuta: Immuta’s award-winning automated data governance platform creates trust across data security, legal, compliance, and business teams so that they can work together to ensure timely access to critical business data with minimal risks.
|
 |
iNeurons: Built on Microsoft Azure, iNeurons helps small and midsize manufacturing organizations with intelligent manufacturing and digital transformation services, data acquisition from machines and sensors, data calculation, and decision analysis. This app is available only in Traditional Chinese.
|
 |
Infosys Virtual Assistant: Infosys Virtual Assistant is a bot that features multiple artificial intelligence and natural language processing capabilities and uses a wide range of Microsoft services, including Bot Channels Registration, Azure App Service, Azure Application Insights, Azure Cognitive Services, Azure Cosmos DB, and Azure Storage.
|
 |
Insite LMS – The enterprise construction platform: The Insite LMS enterprise construction platform drives efficiency in industrial construction sites by supporting logistics, material tracking, site management, deviations, and project progress.
|
 |
Intranet Fast: Available only in Portuguese and integrated with Microsoft 365, SimbioX IT Consulting’s Intranet Fast is a cloud or on-premises SharePoint-based solution to help you engage employees across more than 30 communication, productivity, security, and governance capabilities.
|
 |
iREP Security: iREP Security is a mobile reporting, maintenance tracking, and monitoring system that uses GPS trackers and live image captures to enable your investigating officers and guards to write incident reports on-site.
|
 |
Knowledge Mining Solution: WinWire Technologies’ Knowledge Mining Solution for healthcare organizations uses Azure Cognitive Search, Azure Cognitive Services, and Azure Text Analytics for health to uncover latent insights. The solution ingests unstructured data and enriches medical terms with ICD-100-CM and RxNorm codes.
|
 |
Manapro Solutions: Manapro Consultants offers its Infrastructure Assurance service and other critical business services on Microsoft Azure. Available only in Spanish, this offering includes consulting on secure and scalable Azure deployments tailored to your organization’s remote growth needs.
|
 |
Markup ERVS – Electronic Remote Voting System: Markup ERVS is a secure electronic remote voting system that enables elected officials to record their vote in committee, council, or plenary proceedings from authenticated devices and from any location with a reliable internet connection.
|
 |
Mountable Hybrid Image Backup to Azure with BMR: UltraBac’s Hybrid Image Backup solution uses a mountable image format that can be written to any disk or online storage media type. Users can schedule backups at any required frequency, with no limit to the number of incremental backups between full backups.
|
 |
NCR Transaction Processing – Authentic: Whether you need to add mobile payment and e-commerce capabilities, build a multichannel payments solution, create a payments hub, or develop omnichannel payment services, NCR Corporation’s Authentic empowers you to deliver great customer-focused services now and in the future.
|
 |
NeoFace Reveal: NEC’s NeoFace Reveal is a latent facial recognition and identification application that enables government agencies to detect and identify facial images by quickly searching against small to very large image databases.
|
 |
NOREN: NOREN is a content management system (CMS) that supports day-to-day website operations with out-of-the-box CMS standards. This app is available only in Japanese.
|
.png") |
On-Shelf Availability Measurement (SaaS): Retail Solutions’ Retail Compass is an enterprise on-shelf availability measurement platform that enables almost real-time identification of macro and micro trends, allowing CPG suppliers and retailers to make strategic decisions that lead to optimized stock and the recapture of lost sales.
|
 |
On Shelf Availability Solution: Bee Solutions’ On Shelf Availability solution determines whether products are being replenished on store shelves, identifies phantom inventory, and determines when extra inventory needs to be sent to stores. This app is available only in Portuguese.
|
 |
OutBoard DataTiering: Datavard OutBoard is a comprehensive suite designed to help you manage your complete data lifecycle and keep your SAP data growth under control. Reduce operational efforts and expenses, easily access archived data, and boost system performance with OutBoard.
|
 |
Panzura: Panzura transforms cloud storage into high-performance enterprise file systems. Whether you have five locations or 500, Panzura delivers one authoritative data source for all users, one set of data to manage, one security policy to implement, and one view over your entire file network.
|
 |
Pass On Bag of Good – B2B: Repasses Intermediation of Payments Ltda drives sustainability in fashion and other industries by providing businesses with co-branded “bags of good,” encouraging shoppers to fill the bag with clothing they no longer use so it can be resold and worn again. This offering is available only in Portuguese.
|
 |
Socxo: Socxo helps organizations achieve a balanced blend of branded, industry, and user-generated content for highly effective internal and external communications. The gamified platform provides deep insights around social media reach, content performance, engagement, and lead generation.
|
.png") |
SOFTEL Cloud Security Management (Education): SOFTEL’s Cloud Security Management solution enables education industry users to identify shadow IT applications; run awareness, password security, and active antivirus campaigns; monitor, report, and score security; lock down desktop applications; and more.
|
.png") |
SOFTEL Cloud Security Management (Finance): SOFTEL’s Cloud Security Management solution enables finance industry users to identify shadow IT applications; run awareness, password security, and active antivirus campaigns; monitor, report, and score security; lock down desktop applications; and more.
|
.png") |
SOFTEL Cloud Security Management (Government): SOFTEL’s Cloud Security Management solution enables government industry users to identify shadow IT applications; run awareness, password security, and active antivirus campaigns; monitor, report, and score security; lock down desktop applications; and more.
|
.png") |
SOFTEL Cloud Security Management (Healthcare): SOFTEL’s Cloud Security Management solution enables healthcare industry users to identify shadow IT applications; run awareness, password security, and active antivirus campaigns; monitor, report, and score security; lock down desktop applications; and more.
|
.png") |
SOFTEL Cloud Security Management (Manufacturing): SOFTEL’s Cloud Security Management solution enables manufacturing industry users to identify shadow IT applications; run awareness, password security, and active antivirus campaigns; monitor, report, and score security; lock down desktop applications; and more.
|
.png") |
SOFTEL Cloud Security Management (Retail): SOFTEL’s Cloud Security Management solution enables retail industry users to identify shadow IT applications; run awareness, password security, and active antivirus campaigns; monitor, report, and score security; lock down desktop applications; and more.
|
.png") |
SOFTEL Microsoft User Adoption (Education): SOFTEL’s User Adoption and Change Management portal and training services enable education industry Office 365 administrators to provide customer-led user adoption for Office 365, monitor users’ Microsoft product utilization, and monitor and report on overall consumption.
|
.png") |
SOFTEL Microsoft User Adoption (Finance): SOFTEL’s User Adoption and Change Management portal and training services enable finance industry Office 365 administrators to provide customer-led user adoption for Office 365, monitor users’ Microsoft product utilization, and monitor and report on overall consumption.
|
.png") |
SOFTEL Microsoft User Adoption (Government): SOFTEL’s User Adoption and Change Management portal and training services enable government industry Office 365 administrators to provide customer-led user adoption for Office 365, monitor users’ Microsoft product utilization, and monitor and report on overall consumption.
|
.png") |
SOFTEL Microsoft User Adoption (Healthcare): SOFTEL’s User Adoption and Change Management portal and training services enable healthcare industry Office 365 administrators to provide customer-led user adoption for Office 365, monitor users’ Microsoft product utilization, and monitor and report on overall consumption.
|
.png") |
SOFTEL Microsoft User Adoption (Manufacturing): SOFTEL’s User Adoption and Change Management portal and training services enable manufacturing industry Office 365 administrators to provide customer-led user adoption for Office 365, monitor users’ Microsoft product utilization, and monitor and report on overall consumption.
|
.png") |
SOFTEL Microsoft User Adoption (Retail): SOFTEL’s User Adoption and Change Management portal and training services enable retail industry Office 365 administrators to provide customer-led user adoption for Office 365, monitor users’ Microsoft product utilization, and monitor and report on overall consumption.
|
.png") |
SOFTEL Skype for Business Auto Answer (Education): SOFTEL’s auto-answer solution for Skype for Business supports cases where education industry end users are not allowed to physically interact with the user interface to accept incoming calls. In most cases, this is to facilitate voice or video calls being instigated by external boards or examiners.
|
.png") |
SOFTEL Skype for Business Auto Answer (Finance): SOFTEL’s auto-answer solution for Skype for Business supports cases where finance industry end users are not allowed to physically interact with the user interface to accept incoming calls. In most cases, this is to facilitate voice or video calls in remote branches or secure locations.
|
.png") |
SOFTEL Skype for Business Auto Answer (Government): SOFTEL’s auto-answer solution for Skype for Business supports cases where government industry end users are not allowed to physically interact with the user interface to accept incoming calls. In most cases, this is to facilitate voice or video calls being instigated by judiciaries and other legal entities.
|
.png") |
SOFTEL Skype for Business Auto Answer (Healthcare): SOFTEL’s auto-answer solution for Skype for Business supports cases where healthcare industry end users are not allowed to physically interact with the user interface to accept incoming calls. In most cases, this is to facilitate voice or video calls in rural patient clinics or patient at-home services.
|
.png") |
SOFTEL Skype for Business Auto Answer (Manufacturing): SOFTEL’s auto-answer solution for Skype for Business supports cases where manufacturing industry end users are not allowed to physically interact with the user interface to accept incoming calls. In most cases, this is to facilitate voice or video calls in remote offices or overseas locations.
|
.png") |
SOFTEL Skype for Business Auto Answer (Retail): SOFTEL’s auto-answer solution for Skype for Business supports cases where retail industry end users are not allowed to physically interact with the user interface to accept incoming calls. In most cases, this is to facilitate voice or video calls being instigated in remote offices.
|
.png") |
SOFTEL Teams Direct Routing (Education): SOFTEL’s solution for the education industry supports direct routing and associated services in Microsoft Teams. The offering integrates with analog workflows and features SBC management and monitoring, user adoption, device management, and more.
|
.png") |
SOFTEL Teams Direct Routing (Finance): SOFTEL’s solution for the finance industry supports direct routing and associated services in Microsoft Teams. The offering integrates with analog workflows and features SBC management and monitoring, user adoption, device management, and more.
|
.png") |
SOFTEL Teams Direct Routing (Government): SOFTEL’s solution for government supports direct routing and associated services in Microsoft Teams. The offering integrates with analog workflows and features SBC management and monitoring, user adoption, device management, and more.
|
.png") |
SOFTEL Teams Direct Routing (Healthcare): SOFTEL’s solution for the healthcare industry supports direct routing and associated services in Microsoft Teams. The offering integrates with analog workflows and features SBC management and monitoring, user adoption, device management, and more.
|
.png") |
SOFTEL Teams Direct Routing (Manufacturing): SOFTEL’s solution for the manufacturing industry supports direct routing and associated services in Microsoft Teams. The offering integrates with analog workflows and features SBC management and monitoring, user adoption, device management, and more.
|
.png") |
SOFTEL Teams Direct Routing (Retail): SOFTEL’s solution for the retail industry supports direct routing and associated services in Microsoft Teams. The offering integrates with analog workflows and features SBC management and monitoring, user adoption, device management, and more.
|
 |
Spinify For Teams: Spinify for Microsoft Teams is a sales gamification solution designed to motivate, engage, and celebrate your teams. Motivate teams with instant recognition and productivity gains, and increase sales performance with real-time competitions.
|
 |
Symbio: Ploetz + Zeller GmbH’s Symbio SaaS offering goes beyond traditional business process management (BPM) to serve as a company-wide integrated management system. Available in German and English, Symbio helps organizations visualize, optimize, and automate all their processes.
|
 |
Teams Legacy Integration for Modern Workplace: Mercato Solutions Limited’s Microsoft Teams integration offering modernizes your legacy systems by enabling them to work in Teams in a highly scalable Microsoft Azure environment. Bridge the gap between third-party systems and Teams, ensuring legacy systems are no longer a costly problem.
|
 |
Thalamus: Thalamus is a web portal that provides interactive reporting to internal and external stakeholders. Designed for the healthcare sector, Thalamus meets the needs of those who want to keep their data private, while still being easy enough for anyone to use.
|
 |
The Illusive Platform and Azure Active Directory: The Illusive Platform enhances the visibility and monitoring of privileged identities in Microsoft Azure Active Directory by identifying and eliminating pathways and credentials that attackers might exploit to move toward critical data.
|
 |
Tiliter: The Tiliter Scan&Go Scale identifies products without barcodes to improve the self-checkout process. The solution uses artificial intelligence and computer vision to recognize any product without a barcode, including fresh produce, mixed nuts, dried fruit, candy, and bakery items.
|
 |
TrackIT – Fleet management solution: TrackIT is an innovative solution that facilitates the management of machine fleets. Using IoT, big data, business intelligence, and AI technologies, TrackIT combines operational and managerial demands in a single platform. This app is available only in Portuguese.
|
 |
Trio Enterprise: Empower your service teams by backing them up with subject matters specialists and other experts throughout your organization. With Enghouse Contact Center in Microsoft Teams, users can answer calls, search databases, join specialist teams, subscribe to statistics reports, and more.
|
 |
Violence detection: Oddity.ai B.V.’s deep learning algorithm accurately detects violence in live video content while accounting for anomalies and ensuring privacy by recording only activities, not human traits.
|
 |
Wood ENVision: Wood’s ENVision provides real-time insights into emissions and carbon releases by streamlining and automating diverse types of data to provide a clear, auditable, and accurate view of emissions from any asset, organization, or city.
|
Consulting services
|
 |
2 Day Azure Best Practices Assessment: This two-day assessment from AccessIT Group includes a test of your Microsoft Azure environment against industry benchmarks, including 900 tests and more than 300 rule validations via read-only API access.
|
 |
App Mod/New (.Net) App Service & SQL DB: 3wk Imp: InCycle Software’s .NET Application Modernization Accelerator for Microsoft Azure App Service and Azure SQL Database provides the key components for successful application modernization. Use cloud services and modern practices to drive business advantage with InCycle and Azure.
|
 |
Azure: 1-Wk POC_1: In this one-week proof of concept, Phidiax will assess your organization’s environment and provide you with guidance and recommendations via a collaborative approach, ensuring you have a clear understanding of the next steps toward cloud development.
|
 2 hour sessions.png") |
Azure Governance Workshops – (3) 2 hour sessions: Champion Solutions Group’s Azure GlidePath for Governance Jumpstart Service delivers three two-hour workshops to help you embrace access, security, and governance in your Microsoft Azure environment.
|
 |
Azure Synapse Analytics 1 Day Online Workshop: CLOUD SERVICES’ workshop contains theoretical and practical tasks designed to help you start working with Microsoft Azure Synapse Analytics, which combines enterprise data warehousing and big data analytics. Learn to solve analytics tasks more efficiently with CLOUD SERVICES.
|
 |
Azure WVD with Zero Trust Model 2Wk Implementation: This two-week implementation from Adfolks will quickly deploy and scale your Windows Virtual Desktops and applications on Microsoft Azure in a zero-trust security framework. Get built-in security and compliance features as well as simplified management with Adfolks and Azure.
|
 |
Cyber Defense 365: 2-Day Implementation: Protect your organization’s business data, operational infrastructure, and business identity against cyber threats with MICROSYS SRL’s Cyber Defense 365 enhanced security and data protection implementation.
|
 |
DaaS on Azure Cloud: 1 Week Implementation: Adfolks’ DaaS on Azure includes build, configure, manage, and store functions while delivering safe, secure, and intelligent desktops that are ready to use.
|
 |
Migrate on-premises SQL to Azure 1-Hr Briefing: In this free one-hour briefing, SSA Group will cover everything you need to know about migrating your on-premises Microsoft SQL Server database to Microsoft Azure. Deliverables include recommended steps you can take to start the cloud migration process.
|
 |
Virtusa SQL DB Migration Assessment in 4 weeks: Virtusa LTD’s accelerated assessment includes a report that will provide options to migrate your workloads to Microsoft Azure quickly and cost-effectively. This assessment also facilitates cloud migration at scale from multiple sources.
|


Recent Comments