by Scott Muniz | Sep 10, 2020 | Uncategorized
This article is contributed. See the original author and article here.
Hi Everyone,
Zoheb here again with my colleague Peter Chaukura from Microsoft South Africa and today we will be sharing some details on how we helped one of our SMC customers reduce the attack vector by enabling Azure AD Password Protection.
If you have not read the 1st blog which covers the background do give it a read now before continuing here. How the Microsoft Mission Critical Team helped secure AAD
Hope you found the initial blog a valuable read.
Let me continue our story about Protecting your Passwords in Azure AD.
The Problem:
Through internal audits our customer had found that there is a high usage of “Common Passwords” in their organization. They discovered that password spray attacks were on the rise and had no solution other than the “password meets complexity requirements” setting under the password policy in their Active Directory environment.
This SMC customer urgently needed a way to block weak passwords from the domain and understand the usage of these weak passwords across the organization as well as the impact these may have.
In other words, they were looking to find out how many users have weak passwords in the organization before enforcing Password Protection in their environment.
The Solution:
As the Mission Critical Trusted Advisor, we stepped in and informed our customer that it is possible to block weak passwords by using Azure AD Password Protection. We also had the answer to their more critical question “is it even possible to view how many users have weak password in my organization?”
Before I share details on how we helped implement this, let us try to understand the basics of this feature.
Azure AD Password Protection detects, and blocks known weak passwords and their variants from a global Microsoft curated list. In addition, you can specify custom banned words or phrases that are unique to your organization. The on-premises deployment of Azure AD Password Protection uses the same global and custom banned password lists that are stored in Azure AD, and it does the same checks for on-premises password changes as Azure AD does for cloud-based changes. These checks are performed during password changes and password reset events against on-premises Active Directory Domain Services (AD DS) domain controllers.
There are two modes in Azure AD Password Protection as described below:
AUDIT MODE: Microsoft recommends that initial deployment and testing always starts out in Audit mode.
- Audit mode is intended to run the software in a “what if” mode.
- Each DC agent service evaluates an incoming password according to the currently active policy.
- “bad” passwords result in event log messages but are accepted.
ENFORCE MODE: Enforce mode is intended as the final configuration.
- A password that is considered unsecure according to the policy is rejected.
- When a password is rejected by the Azure AD password protection DC (domain controllers) Agent, the end user experience is identical to what they would see if their password were rejected by traditional on-premises password complexity enforcement.
Read more details here. Ban-Weak-Passwords-on-premises
The Solution
Our SMC customer was specifically looking at enabling Password Protection and some mechanism which can give more details on the present weak password status before enforcing “Azure AD Password Protection” feature.
We told them events has more details. to see the sample events please refer the blog below. https://docs.microsoft.com/en-us/azure/active-directory/authentication/howto-password-ban-bad-on-premises-monitor

Peter also gave an option of Get-AzureADPasswordProtectionSummaryReport cmdlet generates a summary report as shown.

But customer was not happy with the above output and they were looking for something more and detailed, they asked Peter that they needed something with the below capabilities: –
- Status of Weak Passwords across Domains in Forest
- Password Compliance report based on Microsoft banned Password list.
- User details who have weak passwords
- Did users change Password or reset?
- Password Policy count
- Visual dashboard which can be updated regularly/Automatically.
Clearly nothing is built by default which can help us give a visual view of organization “Password compliance”.
So, Peter helped build PowerBI Dashboards to ingest data extracted from domain controller event logs Applications and Services LogsMicrosoftAzureADPasswordProtectionDCAgentAdmin.
NOTE: This dashboard gets fully populated only after all/most of the users have reset/Changed password at least once, so you can assume this may take a full Password Life cycle of your organization to get an overview of weak Passwords in your organization.
The Custom Azure AD Password Protection Power BI Dashboard
How do we collect the data and build the dashboard?
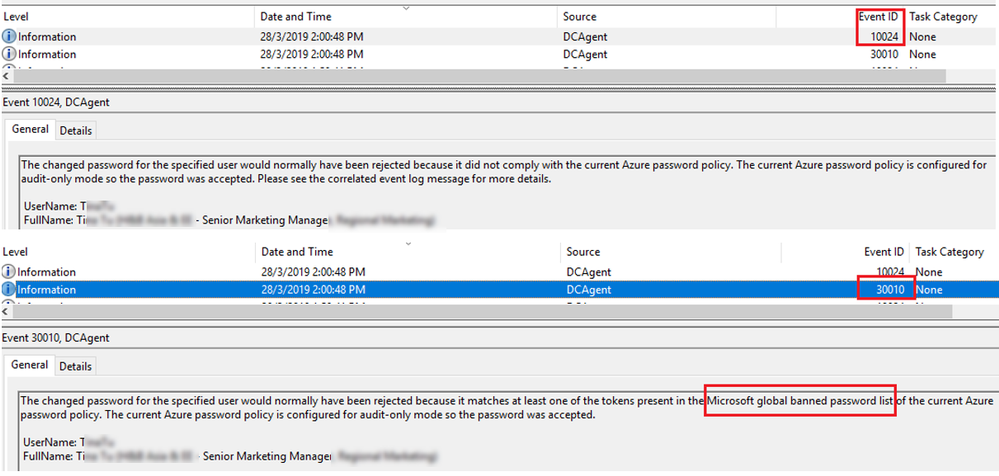
- We collected events(10024, 30010) from all domain controllers where the Azure AD Password Protection DC agent is installed and exported them into a csv file.
- The collection of event log entries is done via a PowerShell script that is configured to run a scheduled task.
- Further ingests the Csv into a Power BI dashboard.
- Build a dashboard view in Power BI using this data as shown below!
If you are new to Power BI and not sure how to create a dashboard using data from an Excel file, go check out this small video and the blog on step by step instructions to do this. https://docs.microsoft.com/en-us/power-bi/create-reports/service-dashboard-create

POWERB dashboard break down.
Result Count
The view shows the overall status in terms of total statistics relating to account with weak passwords and policy compliant passwords.
The default view shows the result without any filters turned on and will change when filters are applied, like the domain filter, as shown below.

Username Count by Operation
Azure AD Password Protection operations take place whenever a password is changed or reset and this view helps to draw a nice picture around how many passwords are being set and changed, as well as the total.
A password change is when a user chooses a new password after proving they have knowledge of the old password. For example, a password change is what happens when a user logs into Windows and is then prompted to choose a new password.
A password set (sometimes called a password reset) is when an administrator replaces the password on an account with a new password, for example by using the Active Directory Users and Computers management tool.
User details
This view shows all the details about the operations to answer questions like:
- Which user account?
- On which domain controller?
- At what time?
- What password policy applied for?
- Was it a password set or change operation?
The information can easily be exported to csv from the PowerBI to leverage the data for further analysis or targeting specific users for training around weak passwords.
Password Policy Count

Publishing the Dashboard
PowerBI allows you to publish the dashboard via the PowerBI gateway, which allows users and administrators with permission to view the dashboard from any location or device.
We assisted the customer to publish this Dashboard and with the data being updated daily via the scheduled task it allows for most recent data to viewed.
This can also be implemented on free Power BI Desktop version.
Indicators
- A lot of password sets operations resulting in failures to comply with policy might be an indicator that password adminsservice desk is setting initial weaker passwords for users.
- Many operations for password sets compared to password changes might be an indication that the Service Desk is resetting passwords and not checking the “change password at next logon” tick box.
- High failure rate means greater impact of Policy change in the environment, ideally try to reduce the failure count before changing AAD Password Protection to Enforce mode
- Many passwords matching the customer policy might indicate a greater risk of password spray attacks from internal bad actors using commonly used passwords in the environment.
CONCLUSION
In conclusion, we tremendously raised the awareness about Password Security at our customer and their Identity Admins can view the status on their Password Security from anywhere with our Power BI Dashboard.
If you want this to be implemented for you, feel free to contact your Microsoft Customer Success Account Manager (previously known as TAM) and someone can help you.
Hope this helps,
Zoheb & Peter
by Scott Muniz | Sep 10, 2020 | Uncategorized
This article is contributed. See the original author and article here.
Hello,
My name is Jeffrey Worline, and I am a Senior Support Escalation Engineer on the Windows Performance Team at Microsoft. This blog addresses troubleshooting leaks occurring in a process to include identifying and data collection. This article assumes that you have already identified the process that is leaking. If you have not yet been able to identify where your leak is, please see my blog: MYSTERY MEMORY LEAK: WHERE DID MY MEMORY GO!
First thing we need to determine is memory consumption being caused by private data, heap data or some other memory type. We need to address the memory types differently.
- Download a Windows Sysinternals tool called VMMap
VMMap is an utility application analyzing virtual and physical memory. It shows a breakdown of a process’s committed virtual memory types as well as the amount of physical memory (working set) assigned by the operating system to those types.
This tool is used to attach to an individual process allowing a snapshot to be taken to see the memory map for that process.
- Simply launch VMMap and from the process list it displays, pick the instance showing the high private working set.
If the high memory is being caused by Heap, you will need to enable User Stack Tracking (UST) against the process using gflags.exe which is part of the Debugging Tools for Windows.
Note: If the high memory shows as Private Data or some other type other than heap, simply continue with getting procdump when memory usage is high.
Scenario A: Uniquely named process with high memory by Heap
- Download Debugging Tools for Windows
Just need the standalone version since we only need the debugging tool and not the whole WDK package.
Note: If the high memory shows as Private Data or some other type other than heap, simply continue with getting procdump when memory usage is high.
Disclaimer: The intent of this blog is not to teach you how to debug. If you are not familiar with debugging process dumps, please open a case with Microsoft support for assistance.
- Go to the directory where you installed the tool and you will find gflags.exe as one of the files, right-click on it and select “Run as administrator.”
- Click on “Image File” tab.
- Type in the process name, for example notepad.exe

- Hit the keyboard TAB key to refresh
- Place check mark in “Create user mode stack trace database.”
Note: Be sure to reverse your gflag setting also by unchecking the “Create user mode stack trace database” when no longer needed.
- Click “OK”.
- The process or service will need to be restarted to put in to effect.
- Get procdump of process when memory is high.
Scenario B: High memory occurring in svchost.exe process by Heap
If the svchost process contains more than one service, you will need to break each service out to run in its own svchost process to determine which service is causing the high memory. Once that has been determined, then need to uniquely name that svchost process the service runs in and then enable UST against it. You do not want to enable UST globally against all svchost process as it will put a serious performance hit.
Note: We don’t ever want to enable UST against svchost.exe as that would enable against any and all instances of svchost.exe running and could cause a performance hit on the machine because of the overhead.
- Use Task Manager to document the PID of the service that is demonstrating high memory usage.
- From administrative command prompt run following command:
tasklist /svc
- Using PID you documented from Task Manager, locate that svchost process and document the services that it is hosting.
- Break each service out into its own svchost process if it is a shared svchost process hosting several services by running following command for each service:
sc config <service name> type= own
replace <service name> with actual service name
Note: there is no space in “type=” and there is a space between “= own”
- Restart the service for setting to take effect.
- Verify the services are running in their own svchost process by running tasklist /svc from command prompt again.
- At this point, you have broken each service out into its own svchost process; now identify which service was driving up memory usage before proceeding to next step.
- Once the service has been identified, from administrative command prompt change command focus to c:windowssystem32 folder if needed and run following command:
copy svchost.exe <unique name>
Replace <unique name> with something that represents the service. Example for wmi service – wmisvchost.exe
- Launch registry editor (Start > Run > “regedit.exe”) and navigate to HKLMSystemCurrentControlSetServices then the appropriate key for the service you are uniquely naming svchost process for.
- Modify existing ImagePath from %systemroot%system32svchost.exe -k netsvcs to %systemroot%system32<unique name> -k netsvcs
Replace <unique name> with that used in step 8. In this example that would be: %systemroot%system32wmisvchost.exe -k netsvcs
Note: Backup the registry key before modifying it
- Restart the service.
- Use gflags as noted earlier to enable “Create user mode stack trace database” against the uniquely name svchost process, then restart the service to apply the new settings.
Note: It is important that you go back and reverse what you did in step 4 and modify path back to original after you are no longer needing the service to be broken out and uniquely named as failure to do so can prevent future hotfixes from being installed associated with that service.
To reverse, replace sc config <service name> type= own with sc config <service name> type= share
Reverse your gflag setting also by unchecking the “Create user mode stack trace database”.
Reverse your setting in the registry under the service key for the ImagePath.
- Get a procdump of the process when memory is high.
Directions for Procdump
- Download Procdump tool from Sysinternals
Note: Use procdump if dumping 32-bit process and use procdump64 if dumping a 64-bit process
- From and administrative command prompt, navigate to the directory where you downloaded and unzipped procdump tool.
- Run the following command to dump a unique name process:
procdump -ma <process name>
The -ma switch is to perform a full memory dump of the process.
Replace <process name> with actual process name.
If there is more than one instance of a process running with the same name you must dump the process by PID as opposed to name.
e.g. procdump -ma <PID>
Replace <PID> with actual PID of the process.
Next Up: MYSTERY MEMORY LEAK: WHERE DID MY MEMORY GO!
– Jeffrey Worline
by Scott Muniz | Sep 10, 2020 | Azure, Technology, Uncategorized
This article is contributed. See the original author and article here.
Azure Lab Services provides many features that help you to minimize costs while providing students lab environments that they can access from anywhere, any time of day. These features are optimized when you structure your labs so that you use one lab per class. Adopting this lab structure when you move from a physical lab will also help you select the appropriate VM size to use.
Problem
Usually a physical lab is shared by students from multiple classes. As a result, all of the classes’ software applications are installed together at once on each computer. When a class uses the lab, students only run a subset of the applications that are relevant to their class.
This type of physical computer lab often leads to increased hardware requirements:
- A large disk size may be required to install the variety of applications that are needed by the classes that are sharing the lab.
- Some applications require a larger VM size compared to others. When all of these applications are installed together in the same lab, each computer must have sufficient hardware to run the most compute-intensive applications. This level of hardware is essentially wasted for classes that only use the lab to run applications that require less memory and compute power.
Solution
Azure Lab Services is designed to use hardware more efficiently so that you only pay for what your students actually need and use.
With Azure Lab Services, labs are structured to be more granular:
- One lab is created for each class (or session of a class).
- On the lab’s image, only the software applications that are needed by that specific class are installed.
This structure helps to lessen the disk size that is needed (Azure Lab Services’ currently supports a disk size of 127 GB). Also, this helps you identify the appropriate VM size based on the workloads that students are expected to perform for each class.
In addition, the following features are designed to minimize costs when you create one lab per class:
- Schedules are used to automatically start and stop all VMs within a lab according to each class’s schedule.
- Quotas allow you to control the amount of time that each class’s students can access VMs outside of their scheduled hours.
Last but not least, access to each individual lab is controlled – students are only granted access to labs for classes that they are enrolled in.
Example
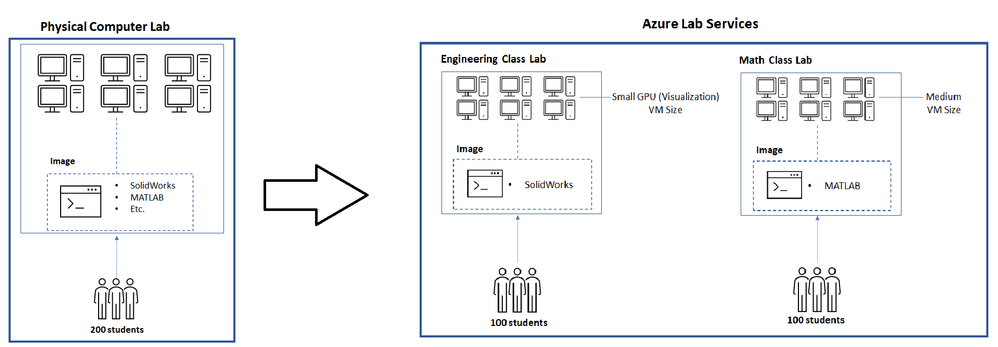
Let’s assume we’re moving a physical lab to Azure Lab Services and that the physical lab is shared by multiple classes such as:
- An engineering class that uses SolidWorks with 100 students enrolled.
- A math class that uses MATLAB that also has 100 students enrolled.
Since our physical lab is shared by the above two classes, each computer has both SolidWorks and MATLAB installed along with various other common applications, such as Word, Excel, etc. Also, it’s important to note that SolidWorks is more compute-intensive since it typically requires a GPU.
To move this physical lab to Azure Lab Services, we will:
- Create two labs; one for the engineering class and another for the math class.
- Create two images; one with SolidWorks installed and another with MATLAB.
Since SolidWorks requires a GPU, the lab for this uses the Small GPU (Visualization) VM size. However, MATLAB only requires a Medium VM size.
The image below shows how the structure changes when moving this physical lab to Azure Lab Services.

Cost Analysis
An important point from the above example is that the cost per usage hour for the two VM sizes is substantially different:
- Small GPU (Visualization) provides high compute-power and as a result, the cost is $1.60 per usage hour (or 160 lab units).
- Medium provides less compute power but is suitable for many types of classes; it costs only $0.55 per usage hour (or 55 lab units).
You save costs by creating separate labs using the smallest VM size that is needed for each class.
To see the savings, let’s estimate that each student will use their VM for a total of 10 hours and compare costs for using a single lab vs. separate labs.
A single lab using the Small GPU (Visualization) size that is shared by students from both the engineering and math classes is estimated to cost the following:
- 10 hours * 200 students * $1.60 = $3200
Separate labs that use the Small GPU (Visualization) size for engineering and Medium size for math are estimated to cost the following:
- Engineering class lab
- 10 hours * 100 students * $1.60 cost per hour for Small GPU (Visualization) = $1600
- Math class lab
- 10 hours * 100 students * $0.55 cost per hour for Medium = $550
The total of both the engineering and math labs is $2150.
By structuring the labs to be more granular, this results in a cost savings of $1050! Also, keep in mind that you only pay for the number of hours that your students actually use their VMs. If students use their VMs less than this, the actual costs will be lower.
Helpful Tips
When you start using Azure Lab Services, IT and faculty should coordinate early in the planning process to:
- Identify the specific software applications that each class requires.
- Understand the workloads that students will perform using the lab.
This information is needed to choose the appropriate VM size when you create a lab and to set up the image on the template VM.
To ensure that you choose the appropriate VM size, we recommend starting with the minimum VM size that meets the hardware requirements for your applications. Then, have faculty connect to a lab VM to validate common workloads that students will perform to ensure the performance and experience is sufficient. It’s helpful to refer to the Class Types which show real-world examples of how to set up applications for classes along with the recommended VM size.
Also, Shared Image Gallery is useful for creating and storing custom images. This allows you to create an image once and reuse it to create multiple labs.
We hope that you find this post helpful as you start moving your physical labs to Azure Lab Services.
Thanks!

by Scott Muniz | Sep 10, 2020 | Uncategorized
This article is contributed. See the original author and article here.

Keeping up with The Shiproom is always worthwhile, but I’m especially excited to share this episode highlighting IGM Financial and its path to modernization via Microsoft Managed Desktop.
Keran McGuire, VP of Infrastructure Services at IGM Financial, shares how the organization of 5,000 decided to outsource desktop management, and why user experience and security were essential to their vendor selection.
I helped introduce Microsoft Managed Desktop as a possible solution for IGM, so I’m biased, but any of our blog readers should make a point of watching this episode. And it’s not only because Brad Anderson interviews are both insightful and distinctly hilarious.
IGM exemplifies key market segments where the Microsoft Managed Desktop value prop resonates.
Starting fresh: We see traction among mergers, acquisitions, joint ventures, divestitures, and well-funded startups. IGM Financial was likewise divesting its IT services from a sister company, Canada Life, and had a chance to start fresh. These organizations typically have mature leadership, a desire to be modern from the start, and a strong preference to scale IT investments over time instead of incurring technical debt at the outset.
UX-obsessed: IGM’s prioritization of user experience in the managed desktop solution is a clear trend among a growing number of organizations that recognize device productivity as a driver of job satisfaction.
Security-minded: Highly-regulated market segments like financial services, healthcare, and government are rarely on the bleeding edge of technology adoption. But, as Keran describes with IGM, the unique combination of security and productivity is a game changer. I’ve been lucky to tap the expertise of my colleague, technical specialist Eric DeLorme, to help such customers evaluate Microsoft Managed Desktop against their stringent security requirements.
If your organization fits any of those trends, you owe it to yourself to learn about Keran’s experience leading IGM to Microsoft Managed Desktop.
What’s your favorite moment between Brad and Keran? Share your feedback in the comments, and be sure to subscribe to our blog for more great content about Microsoft Managed Desktop.
by Scott Muniz | Sep 10, 2020 | Uncategorized
This article is contributed. See the original author and article here.
Are you looking for work in the tech world—or do you know someone who is? If you’ve been economically displaced, laid off, or furloughed due to the COVID-19 crisis, we’re here to help.
On June 30, Microsoft announced an initiative to help people worldwide acquire new digital skills for the COVID-19 economy and beyond, using data to identify roles most in-demand, such as Software Developer, Data Analyst, and IT Administrator. Access free training content to help develop skills aligned to in-demand jobs and earn a Microsoft Certification to help you stand out to get back in the workforce. Schedule a discounted certification exam for USD15 by December 31, 2020 and take the exam by March 31, 2021.
Certification empowers workers
In a time of rapid digital transformation, getting trained and earning a Microsoft Certification can help accelerate your ability to land an in-demand role and grow your career. As business needs evolve, certification increases credibility, giving individuals a professional advantage by providing globally recognized, industry-endorsed evidence of mastering skills. It offers you the opportunity to demonstrate your technical abilities and willingness to embrace new technologies. Continue learning and earn a Microsoft Certification to achieve more business value, build a track record of increased productivity, and create a simplified way for others to identify your talent, skills, and experience.
“Microsoft role-based certifications are meaningful and relevant to people’s jobs. It doesn’t require learning all the arcane facts or bits of systems you hardly ever touch; it’s much more relevant to the role and therefore, has much more value to employers, to their managers, and to their peers.”
-Julian Sharp, Solutions Architect and Microsoft Certified Trainer
When you’ve successfully achieved your certification, you’ll be able to update your LinkedIn profile with certification information that can help you attract recruiters and potential employers.
Get started
Are you ready to skill up and prepare for in-demand tech roles? Learn about the Microsoft Certifications available through this offer, and find out how you can prepare and schedule an exam by checking out Become Microsoft certified and build your resilience for today’s and tomorrow’s digital economy.
Related announcement

Recent Comments