![[Updated 2020] Introducing the SensorExplorer App](https://www.drware.com/wp-content/uploads/2020/09/medium-94)
by Scott Muniz | Sep 17, 2020 | Uncategorized
This article is contributed. See the original author and article here.
How to get the app
1. From the Microsoft Store: Search “SensorExplorer” or follow this link https://aka.ms/sensorexplorer
2. From GitHub: Go to https://aka.ms/sensorstrace, the app package is available inside the SensorExplorer folder for sideloading.
* The source code is available at https://github.com/Microsoft/busiotools/tree/master/sensors/SensorExplorer/code/SensorExplorer
Overview
SensorExplorer is an app available on the Microsoft Store (https://aka.ms/sensorexplorer) and the app package can be accessed through GitHub (https://aka.ms/sensorstrace). The app offers tests that allow you to quickly verify the installation of supported sensors such as orientation sensors (accelerometer, simple orientation sensors, etc.), and detailed tables and plots that enable you to monitor different sensors. In addition, logs can be conveniently saved later for debugging.
There are three modes (menu bar on the left-hand side) in SensorExplorer:

1. Test: This mode is used for manual testing of supported sensors. The orientation test verifies orientation sensors are installed in the correct position and the sensor data is as expected. Other tests, such as frequency, offset and jitter test, are also available. The sensor data is read using the UWP Sensors API (Windows.Devices.Sensors: https://docs.microsoft.com/en-us/uwp/api/Windows.Devices.Sensors).
2. View: This mode is used for viewing sensor data and properties. In this mode, the app displays a data visualization from a variety of sensors (such as accelerometer, compass, gyrometer, inclinometer, light sensor, and orientation sensor, etc.), and shows detailed sensor information in tabular format. It can help you monitor the abnormal behaviors of the sensors, and you can also use this mode to set the report interval of sensors.
3. MALT: This mode is used for connecting to and controlling MALT (Microsoft Ambient Light Tool), a simple low-cost light testing apparatus. The tool combines a microcontroller, light sensors, and a controllable light panel to calibrate light sensors and visually measure a panel’s light curve.
How to test your sensors
You may explore what tests are available for each sensor on your system by scrolling the top menu bar (highlighted in the screen shot below as a red box).

1. Orientation test
This test asks you to orient the device in different directions and then checks the sensor reading accordingly.
A pass/fail result will be displayed at the end of the test.
1.1 Before you begin the tests
- Under the test mode, if you find that the display rotates when you rotate your device, please turn off auto-rotation on your device (Search “Rotation Lock” in Settings and turn it on). Otherwise, you do not need to turn off auto-rotation.
- Please refer to the Device Reference Frame section found in the whitepaper at https://msdn.microsoft.com/en-us/library/windows/hardware/dn642102(v=vs.85).aspx) for more information on orientation and reference frame.
1.2 During the tests
- Click the “Start” button to begin the tests.
- For each test, you have 10 seconds to orient your device so that the arrow on the screen is pointing down toward the ground.
Note:
(1).You may click the icon (highlighted in the screen shot below as a red box) to hide the menu bar during the test.
(2). The menu bar is disabled during the test and will be enabled once the test finishes.
(3). For the Simple Orientation Sensor, the four directions tested are face up, face down, left, and right. For all other sensors, the four directions tested are up, down, left and right.

- Once the sensor data reflects that your device is indeed in the desired orientation, a green checkmark will be displayed. And you will automatically move on to the next test.

- Otherwise, after 10 sec, a red x will be displayed as this round of tests has failed.

1.3 After the tests
- Click the “Save Log” button to save the log file(data for all rounds of tests will be saved).
- Or click the “Restart” button to start another test.
2. Frequency Test
This test calculates the number of sensor readings received/60 seconds.
A numeric value will be displayed at the end of the test.
3. Offset Test
This test calculates the average error in sensor readings compared with the expected value.
A numeric value will be displayed at the end of the test.
4. Jitter Test
This test calculates the maximum difference in sensor readings during a period of time, compared with the initial reading.
A numeric value will be displayed at the end of the test.
5. Resolution Noise Density Test
This test checks actual sensor resolution and noise of the physical accelerometer sensor in the device.
A numeric value will be displayed at the end of the test.
How to monitor your sensors
The View mode will automatically detect any sensors that are attached to or embedded in your platform. It will then display the information that it reads from the sensors.
1. View
- You may scroll the top menu bar (highlighted in the screen shot below as a red box) to change the sensor being displayed.
- For each sensor, the current data and properties are shown in a table and plotted as moving waveforms.
- The report interval of a specific sensor can be changed here.

More on Logging
When you click the “Save Log” button, you may choose the location to save the log file. The default name of the ETL (Event Trace Log) file is “SensorExplorerLog”, but you may change it.
To view the ETL file, you may use the tracerpt command (https://docs.microsoft.com/en-us/windows-server/administration/windows-commands/tracerpt_1).

1. Test
The following will be logged:
- Properties of the selected sensor
- Information about each test
- For orientation test:
- The sensor reading when you pass a test
- The last sensor reading before the countdown ends, in the case you fail the test
- For other tests:
- All sensor readings collected during the test
- The final result
Future Work
Some of the functionalities that we are planning to add to SensorExplorer include:
- Integrate all functions of MALT (Microsoft Ambient Light Tool)
- Other types of sensor tests
- Improve logging infrastructure
by Scott Muniz | Sep 17, 2020 | Uncategorized
This article is contributed. See the original author and article here.
In the modern workforce, the emergence of hybrid cloud deployments and collaborative applications make it easy for employees to share information, data, and files with other internal as well as external users, helping them collaborate easily with vendors, business partners, contractors and customers. Managing all the access across different resources – Office groups, Teams, SharePoint sites, as well as your own applications and SaaS applications – is challenging. As requirements change with new applications being added, or users needing additional access rights, IT staff may not know who should have access or to which applications. To succeed at scale, an identity governance process must enable all users’ access to be able to change with their needs, without burdening IT staff to be involved in each access request.
Azure AD entitlement management, a feature of Azure AD identity governance, helps organizations manage their access lifecycle at scale by automating request workflows, assignments, reviews, and expiration. You can empower users to request access to the resources they need. These requests and the resulting access can be approved and regularly reviewed by people across the organization who know whether someone should still have access
Here are some common questions we’ve received from customers about how to manage employee access.
Question 1. In the past we’ve configured that our AD- and ADFS-connected applications were open to everyone in the directory to access, as we only had employees and vendors in our AD. Now that we’ve moved these applications to Azure AD, we want to lock down access to those apps and move to app assignments so that users don’t inadvertently have access. What are the best ways to manage application assignments to make sure users don’t have access they don’t need?
Azure Active Directory (Azure AD) supports multiple approaches for access management for your own applications, including SaaS apps, cloud-based federation-based apps and on-premises AD-connected applications via the Azure AD app proxy, enabling organizations to easily achieve the right balance of access policies ranging including automatic, attribute-based assignment, as well as delegated assignment.
As described in the article managing access to apps, traditionally access management starts with either individual assignment, one for each user, or group-based assignment. Group–based assignment works well if you have an existing security group that you could re-use. However, keeping the membership consistent could be challenging if you have multiple applications. Suppose a user named Alice, and others in the same department as her, need access today to two apps. If there’s a group that has Alice and the other users as members, you could assign that group to those two apps. However, if Alice no longer needs one of the apps, that would require restructuring the groups to avoid audit findings of users having excessive access, and could lead to a proliferation of groups, potentially as many as there are apps.
Another way to manage access to applications is for the users to receive entitlement management assignments for an access package that includes those applications and have those assignments set to expire or be regularly reviewed. Through Azure AD entitlement management in the Azure portal, an administrator or a resource owner can create an access package with one or more applications. A user can request access to that access package through the myaccess.microsoft.com UI, or an access package catalog owner can assign access to users in the Azure portal. You can also have users request or create assignments programmatically, through Microsoft Graph, as shown in the tutorial for how to create an access package using Microsoft Graph APIs. When a user is approved for access to the access package, they are assigned to the application.
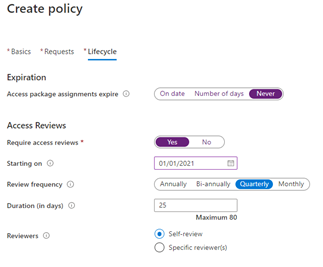
You can ensure that users do not have access indefinitely by configuring automatic access reviews as part of the policy. You could have different policies for different collections of users so that their review schedule is based on the likelihood of the user no longer needing access or the risk of inadvertent continued access. Each policy in an access package can have a different access review frequency for reoccurrence or different reviewers.
 The “Create policy” screen in the Azure portal for an Azure AD access package, showing the lifecycle tab in which quarterly reviewing access reviews are required.
For example, you could have one policy that gives users in the IT department a shorter maximum duration of access as they’re performing administrative tasks and another policy from users in other departments.
Question 2. What about giving users access to Office 365 and other Microsoft applications? Not everyone in the directory has a license, and we don’t have relevant data in our HR system to be able to create a dynamic group of just those people who need a license.
For applications in Office 365 or other paid suites, users can be granted access through license assignment either directly to their user account or through a group using the group-based license assignment.
Combining group-based licensing and entitlement management for users to request an access package that results in license assignments simplifies giving users licenses they need.
First, in the Azure portal, create an Azure AD security group, and configure that group to give license assignments.
Then, create an access package containing membership in that group as a resource. If you select to have the requestor’s manager as approver in the policy, then each requestor’s manager can decide if the requesting user has a need for the license for these applications.
 The “New access package” screen in the Azure portal, for a policy configuring manager as approver.
Once a user requests and is approved, they’re automatically added to the security group, and Group-based license assignment gives them a license.
In access packages which give licenses, you may wish to configure a long duration prior to access package expiration or a “Never” setting with access reviews to avoid a user inadvertently losing their access package assignment and their use of Office while on vacation or on leave.
Question 3. As we roll out Office groups and Microsoft Teams in our organizations, employees may inadvertently try to join public teams that sound relevant but aren’t the appropriate team for them. How can we cut down on unnecessary work for teams owners to approve requests and maintain their memberships?
An organization can publish a curated collection of teams that they want to make available for users to join by creating access packages for each one (they can include multiple teams in a single access package as well). They can then configure the requestor’s manager as needed for approval, approval by a departmental list of approvers, or both. Once approved, the user is then added to the Office group and team, and can collaborate.
For example, if it wasn’t known in advance everyone who might need to be a member of a team, such as for a marketing launch, the marketing department could create the team as private. Next, the team owners could manually add or share a code with those individuals who are known and likely to need to be part of that team.
To bring in the rest of the necessary members from other departments who aren’t known but avoid users being added who do not have a business requirement, they could create an access package for that team.
 The “New access package” screen in the Azure portal.
If there are additional resources, such as a SharePoint Online site or applications, those could be added to the access package as well.
The policies for the access package could scope to only allowing certain users to request access, and could also require approval by both the requestor’s manager, and by the members of a departmental group.
 The “New access package” screen in the Azure portal, creating a policy for all member users to be able to request.
The first stage would specify the manager as approver. You can also configure a fallback approver for requestors who don’t have a manager.
 The “New access package” screen in the Azure portal, setting the first approver stage in a multi-stage approval workflow.
And the second stage could have a different approver, such as members of a group.
The assignments created through that access package could also be set to expire automatically on a predefined date, to avoid users remaining in the team indefinitely.
 The “New access package” screen in the Azure portal, setting the access package assignment lifecycle for the policy.
Furthermore, additional resources that users might need access to,including access to SaaS applications, in-house developed applications, other existing security and Office groups, and SharePoint Online sites, can be added to the access package. Users with assignments to the access package will then automatically be given access to those resources as well.
To find out more about Azure AD identity governance, including access reviews, privileged identity management, and how to manage the lifecycle of business partner guests see What is Azure AD identity governance? and What is Azure AD entitlement management?. There are also case studies for how digital innovator Avanade chose Azure AD Identity Governance for streamlined, highly secure collaboration and how the leading energy and services company Centrica solved collaboration challenges with Azure Active Directory entitlement management.
by Scott Muniz | Sep 17, 2020 | Uncategorized
This article is contributed. See the original author and article here.
Experience a reimagined Microsoft Ignite as a digital event this year, Sep 22-24. Connect with Microsoft experts and your world-wide community like never before.
This year, we’re excited to share our modern Excel story in the context of insights, collaboration, hybrid work environment – and much more.
Check out a couple highlights from the session catalog:
Register now >
by Scott Muniz | Sep 17, 2020 | Uncategorized
This article is contributed. See the original author and article here.
We’ve been very busy getting ready for our first all-digital Microsoft Ignite, which starts Tuesday. In anticipation of the conference, our product marketing manager, Shin-Yi, posted a quick guide to all the sessions related to Microsoft Planner, Tasks in Microsoft Teams, and other task management capabilities across Microsoft 365. Check out the session videos and related resources in the Virtual Hub and the Microsoft Tech Community Video Hub. Links to all session videos, which will get posted once the conference kicks off, are in Shin-Yi’s post.
To tide you over for the next few days, we’ve got a pair of feature enhancements to announce that improve the Planner web and mobile experiences.
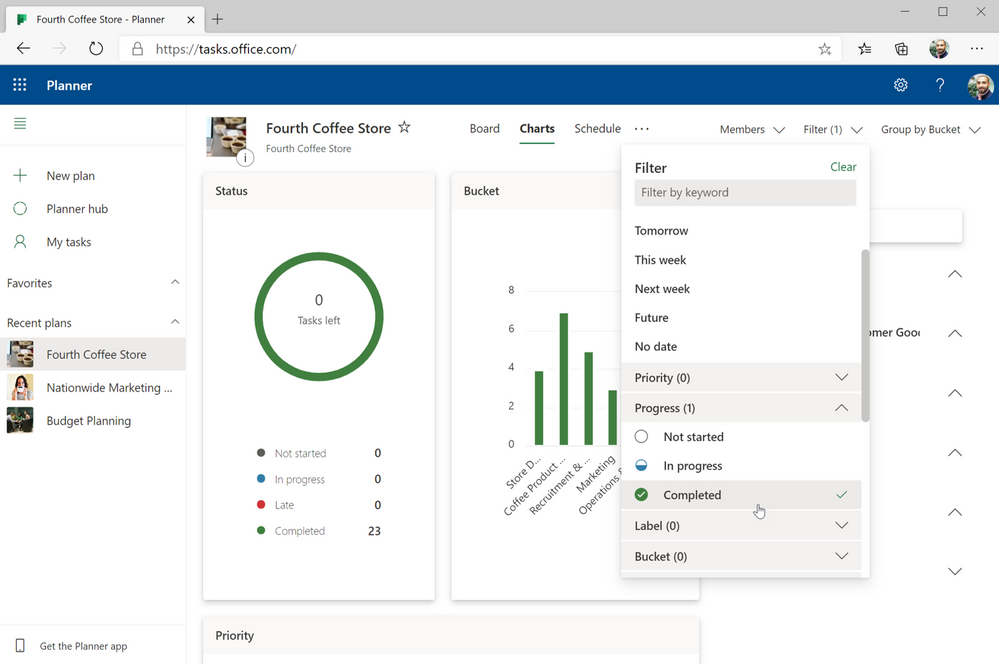
Planner web: Filter by Progress (Completed)
As you know, completed tasks in Planner get moved to the bottom of your plan board and hidden under a disclosure widget—the official name of that twisty triangle. But those same completed tasks disappeared entirely from the Schedule view, and you couldn’t filter on them in the Charts view.
We’ve now addressed both issues by adding completed tasks as a Progress filter option in both the Schedule and Charts view. In the Schedule view, completed tasks appear as a green bar; in the Charts view, you’ll see them in green in both the pie and bar chart. You can filter completed tasks alongside not started and in progress tasks, too, to see how your team is tracking against deadlines. You can also filter by completed tasks in the Board view.

This enhancement is currently only available in the Planner web experience and will be released soon for Planner in Microsoft Teams.
Planner mobile: Copy links
This feature works exactly like its name implies: in the Planner mobile app, you can copy a plan or task link and paste it anywhere else. This makes sharing your plans and tasks much easier, especially if you need input from others who aren’t actively members of your plan.
To copy links, tap the ellipses (…) in the upper right-hand corner of your plan board (to copy the plan link) or task (to copy the task link) and select the copy option. You can then paste that link just like you’d paste anything else—you might use CTL + V on your keyboard or select the Paste option from the ribbon—into an email, a Teams chat, or anywhere else you need it.

Don’t forget! Ignite runs from Sept. 22 through Sept. 24. If you can’t attend live, we’ll have plenty of Ignite content here and in the hubs mentioned at the beginning of this post. In the meantime, continue leaving your feedback on UserVoice and visiting Tech Community for all the latest Tasks and Planner news.

by Scott Muniz | Sep 17, 2020 | Uncategorized
This article is contributed. See the original author and article here.
Back to school is typically an exciting time of year. But uncertainty around what school will look like makes this year feel different. For some, going back to school will mean teaching or attending classes online from the desk in their bedrooms. Others will be splitting time between remote learning and the physical classroom. Either way, a top priority for teachers is helping students stay connected and engaged in what they’re learning. Here, technology plays a key role—it shifts from being a vehicle for delivery or transmission to something that helps teachers build a culture of collaboration and social connectedness. It must empower teachers to communicate broadly, share and find information and assignments quickly and easily, and collaborate seamlessly with students, parents, and administrators.
.png")
Teacher-student and peer interaction are incredibly important for learning. Many schools are using Microsoft Teams for Education to connect teachers, students, parents, and administrators. As a digital hub for remote learning, the Teams for Education ecosystem consists of Teams, Microsoft SharePoint, and Microsoft OneDrive, bringing apps, conversations, and content together in one place. It also integrates with supported learning management systems (LMS) to help create a connected and engaged school community. At the core, teachers and students use Office apps including Word, PowerPoint, Excel, or OneNote notebooks to create their work and store those files using OneDrive. OneDrive (whether it’s on the web, via the desktop client or on a mobile device) connects teachers and students to both their personal files and their Teams files. When teachers are ready to share assignments with students, or when students are ready to share their work with a study group or the teacher, they can upload their individual files from OneDrive into Teams. There, they can chat and collaborate together on files in real time. Everything in Teams is synced to the cloud and securely stored in OneDrive and SharePoint respectively.

Anytime, anywhere access to files on any device to keep learning on track
During any typical school year, assignments, tests, memos, and other information accumulate and need to be saved until school ends. Many schools provide shared network drives for students and teachers to store their files. But the abrupt shift to online school last spring meant that work stored on network drives was often inaccessible, disrupting the flow of learning. Suddenly, teachers and students were forced to save work on school-issued laptops or even personal or home computers, where they could quickly run out of storage space, especially if they share a family computer. This year many schools are implementing either online or hybrid models, where students are in physical classes part-time and working remotely the rest of the day. This means important information will continue to be stored across disparate locations, with all parties requiring anywhere access to files and a place with enough storage where they can securely store their work.
OneDrive connects teachers, students, and administrators to all their work in the cloud. It lets them store and protect files, share them with others within or outside their school, and get to them from anywhere using any device. Both the OneDrive web app and the OneDrive mobile app enables teachers and students to access, upload, and share files from anywhere. They can even save files offline to view or edit them when there’s no internet connection. All offline edits are automatically synced whenever the device they’re using reconnects to the internet.
.png")
And with OneDrive, low storage space on a device doesn’t have to be an issue. Using the OneDrive Files On-Demand feature, teachers and students can securely access and work on all their files stored in OneDrive without downloading them directly to their computers. Even as schools transition back to traditional classroom learning, storing files in the cloud with OneDrive removes the administrative burden of backups, expensive storage systems, and disaster recovery from IT. Using the Known Folder Move Group Policy, IT can also prompt teachers and students to automatically sync content stored in Windows Known folders (such as Desktop, Documents, Pictures) on their computers to OneDrive to ensure all their files are synced to the cloud.
.png")
Secure sharing and collaboration to protect teachers, students, and information
In the world of remote learning, teachers and students need an easy way to share work and collaborate together on assignments. Many resort to sending files as attachments via email or using a free online file sharing program. However, these methods can lead to data leakage, version control issues, and even “lost” homework assignments. In OneDrive or in files uploaded to Teams, teachers and students can securely share content as a link and set permissions for who can access that link. They can also set expiration dates (for teachers who don’t want students accessing files or folders past a certain date) or set passwords (for teachers who want to protect grades or exams, or for students who want to send their work to a family member or friend outside school for review). Blocking downloads on files also prevents recipients from saving files to their computers.
 Securely share your assignments with students and teachers across campuses and geographies.
When a teacher or student gets a link to a shared document, deep integration with Office also means they can start co-authoring a document by selecting from a variety of tools to annotate, highlight, and comment on content in real time. They can use @mentions to flag comments and tasks for co-authors or other reviewers, and they can also track version history and restore previous file versions as needed. And because all changes are synced and stored in the cloud, they can start editing a document on one device and finish it on another.
 Collaborate in real time on group essays.
A better way to organize learning materials and classwork
Keeping virtual school on track is a different ballgame. People rely on visual cues all the time to remind them of what needs doing. But now that administrators, teachers, and students can’t rely on seeing each other in the halls and classrooms, they also can’t rely on those quick reminders about test scores that need to be turned in, lesson plans that need to be reviewed, or class notes that need to be shared. However, using the Request file feature in OneDrive, a principal can create a link where teachers can upload standardized test results or a department head can share a link to request lesson plans to review. Students working together on group projects can use the Request file link to gather notes from group members and keep project materials organized. Anyone with a request link can only upload files—they cannot view or access the folder—ensuring that any other material the requestor has saved in the folder is protected.
Now, using Add to OneDrive in the OneDrive , teachers and students can also add shortcuts to folders others have shared with them in OneDrive, Teams, or SharePoint. This brings all their content into one place, so they can access everything they need to prepare for their classes. Using Add to OneDrive, teachers can create shortcuts to administrative folders that share school policy or guidelines for lesson plans, so they always have those documents for quick reference. To keep their class materials organized, students can add shortcuts to folders shared by their teachers to their own OneDrive for quick, easy access to reading assignments and other information.
 Add your important school/college folders directly to your OneDrive.
Likewise, when teachers are ready to share lesson plans with a broader group of collaborators, such as other teachers or school administrators, or when students are ready to share their individual contributions to a group project, they can upload their files to shared cloud libraries they’ve added to their OneDrive. These files are synced with the cloud libraries in SharePoint, which means the files are also accessible through Teams if the school is using it. Anyone who’s been granted access to a moved file maintains that permission and will receive a notification with a link to the new location. This content can also be synced, shared, and collaborated on, without losing any of its existing security and compliance policies.
Comprehensive administration monitoring to protect remote learning environments
Exposure of sensitive student or school information can have serious legal and compliance implications. Remote learning environments can heighten these worries, because information is shared outside the bounds of a protected IT environment. Microsoft is in compliance with the Family Educational Rights and privacy Act (FERPA), which is a US federal law that protects the privacy of students’ education records, including personally identifiable and directory information.
Having the right tools is a good first step toward protecting confidential or sensitive content. It can use Microsoft Information Protection to create policies for automatic classification of sensitive data. This means that if a teacher creates a document that contains sensitive student data, such as a Social Security number, that document will automatically be classified by the system and encrypted for additional protection. This takes the burden of worrying about security off teachers and administrators, who often work with sensitive student information, and lets them focus on education.
But knowing how administrators, teachers, and students interact with that content adds an extra layer of security and control. Microsoft 365 offers detailed audit logs and reports that enable IT to trace OneDrive activity at the folder, file, and user levels, so they can see at a glance if any unauthorized users have tried to access sensitive student information. That kind of transparency helps protect data while giving IT valuable user insights that could influence future IT decisions.
Audit logs and reports in Microsoft 365 Security and Compliance Center surface unprecedented levels of visibility into user and admin activities within OneDrive. Every user action, including changes and modifications made to files and folders, is recorded for a full audit trail. IT can also audit individual users to understand how teachers and students are sharing, requesting access, and syncing content in OneDrive. Audit logs also show IT admin activities, such as changing device access policies. Device visibility and control is especially important for thwarting the breach and ransomware attacks that educational institutions deal with almost on a daily basis. IT can also use advanced auditing capabilities such as log retention policies to retain all records for specific time periods to enable forensic and compliance investigations.
IT can create alert policies to help monitor activities performed by teachers and students using OneDrive, such as sharing files externally, assigning access permissions, or creating an anonymous link. Admins can define the alert conditions and policies that will best help them investigate, contain, and respond to any risks of data leakage outside the school, to help protect sensitive student information.
Learn more and stay engaged
Check out this pamphlet summarizing the top OneDrive tools for education for teachers, students and administrators.
Tune in to our latest episode of Sync Up- a OneDrive podcast to hear the experts on remote learning and how OneDrive and Microsoft 365 play a critical role in helping students and teachers stay connected and engaged.
We continue to evolve OneDrive as a place to access, share, and collaborate on all your files in Microsoft 365, keeping them protected and readily accessible on all your devices, anywhere.
You can stay up-to-date on all things via the OneDrive Blog and the OneDrive release notes.
Check out the new and updated OneDrive documentation.
Take advantage of end-user training resources on our Office support center.
Thank you again for your support of OneDrive. We look forward to your continued feedback on UserVoice and hope to connect with you at Ignite or another upcoming Microsoft or community-led event.
Thanks for your time reading all about OneDrive,
Ankita Kirti
OneDrive | Microsoft

Recent Comments