by Scott Muniz | Aug 7, 2020 | Uncategorized
This article is contributed. See the original author and article here.
This blog is co-written by Christian Holsing, Principal Product Manager – SAP on SUSE and Sameeksha Khare, Program Manager – Azure Monitor for SAP Solutions.
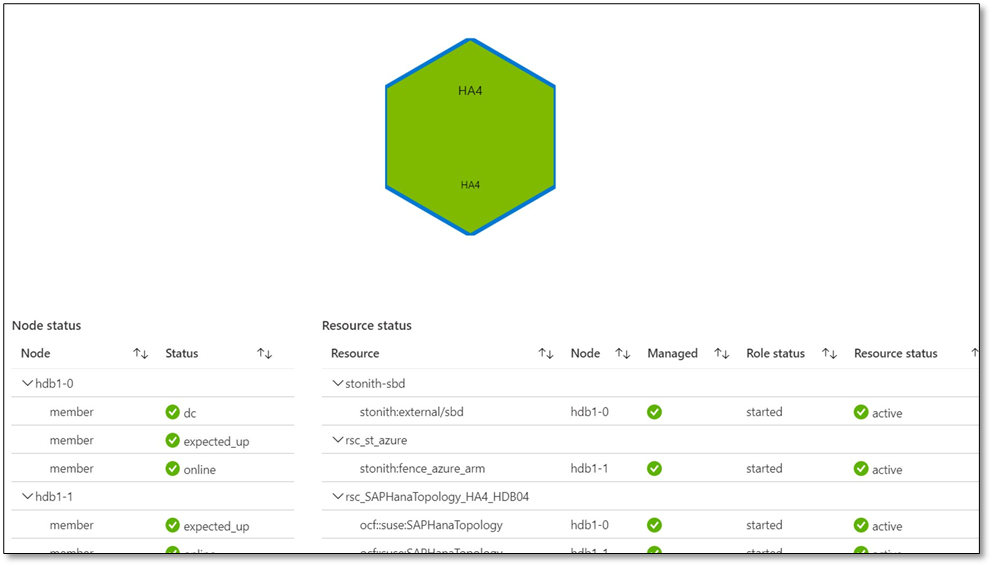
Microsoft and SUSE have collaborated to enable high availability cluster (Pacemaker) monitoring within Azure Monitor for SAP Solutions (AMS). Customers can view cluster health based upon underlying node and resource statuses within the Azure Portal.
High availability cluster telemetry is collected by configuring High availability cluster (pacemaker) ‘provider’ within AMS. As part of configuring the provider, customers are required to deploy ha_cluster_exporter on each of the cluster nodes. The ha_cluster_exporter is developed by SUSE as part of the new open source monitoring solution for SAP and is hosted on the Cluster Lab’s open source project.
SUSE and Microsoft are committed to serve our common customers and provide value to them through our growing partnership. In context of this collaboration, customers receive integrated support provided by SUSE and Microsoft with just one ticket to solution.
AZURE MONITOR FOR SAP SOLUTIONS
Microsoft recently announced the launch of Azure Monitor for SAP Solutions (AMS) in Public Preview– an Azure native monitoring solution for customers who run SAP workloads on Azure. With AMS, customers can view telemetry of their SAP landscapes within the Azure Portal and efficiently corelate telemetry between database and infrastructure. AMS can be used with both Azure Virtual Machine and SAP HANA on Azure (Large Instances). AMS is an available through Azure Marketplace; it provides simple and easy set-up and maintenance experience.
With AMS, customers can currently monitor the following components – SAP HANA DB telemetry: Customers can collect and view HANA Backup and HSR telemetry, in addition to the infrastructure utilization data from various SAP HANA instances in one location with the Azure portal. Microsoft SQL Server telemetry: Customers can get telemetry from Microsoft SQL Server, can visualize and correlate telemetry data—such as CPU and memory with top SQL statements—and can also get information about ‘Always On.’ High-availability (HA) cluster telemetry: Customers can get telemetry data from Pacemaker clusters and identify which clusters are healthy versus unhealthy and correlate this with the health of underlying node and resource health.

MONITORING CAPABILITIES BY SUSE
SUSE has included the monitoring capabilities (including the ha_cluster_exporter) as part of the recent Service Pack 2 of the SUSE Linux Enterprise Server for SAP Applications 15 (SLES for SAP 15). It is also backported to all supported SLES for SAP versions, it is available starting with SLES for SAP 12 SP3 and existing environments can also benefit from that.
As monitoring capabilities are part of the regular product, SUSE will provide full support to Azure Monitor for SAP Solutions customers in a seamless way together with the Microsoft experts. If customers want to extend their monitoring they can do so. The newly added SLES for SAP monitoring capabilities collect monitoring data not only on the operating system level but also provide data for SAP HANA, S/4 HANA, Netweaver, as well as the status of the High availability solution based on Pacemaker, latter is integrated with Azure Monitor for SAP Solutions.
SUSE plans to continue to enhance the capabilities even further – As the whole project is OpenSource and intended to be open in all directions, the integration of the component that provides the data – called Prometheus Exporter – can also be integrated with other OpenSource solutions based on Prometheus and Grafana. SUSE is already shipping a full solution in combination with the SUSE Manager and the first customers are live already. For the next releases of the SUSE Operating system the intention is to build upon this foundation and provide additional features around log data analysis and aggregation, as well as alerting.
Learn more about SUSE capabilities:
Deployment Automation and Monitoring in SLES for SAP Applications
SUSE Monitoring capabilities
SUSE on Azure
Learn more about Azure Monitor for SAP Solutions:
Announcement
Official Documentation
QuickStart video
Integration b/w Lighthouse & AMS
GitHub: Azure/AzureMonitorForSAPSolutions
Create your Azure free account today
by Scott Muniz | Aug 7, 2020 | Alerts, Microsoft, Technology, Uncategorized
This article is contributed. See the original author and article here.
Scenario:
Transport Layer Security (TLS) and its deprecated predecessor Secure Sockets Layer (SSL), are cryptographic protocols designed to provide communications security over a computer network. SSL/TLS have some available versions to use, but the newer versions were created because of the security issues found on the previous ones.
It’s important to use the latest TLS version to make sure to have a secure way to exchanging keys, encrypt data and authenticate message integrity during all the communications..
This means the client and server should support the same SSL/TLS version.
Azure Cache for Redis can currently support TLS 1.0, 1.1 and 1.2, but there are some changes planned on TLS version and cypher Suites supported by Azure Cache for Redis:
- Azure Cache for Redis will stop supporting TLS versions 1.0 and 1.1.
After this change, your application will be required to use TLS 1.2 or later to communicate with your cache.
- Additionally, as a part of this change, Azure Cache for Redis will remove support for older, insecure cypher suites. The supported cypher suites will be restricted to the following when the cache is configured with a minimum TLS version of 1.2.
- TLS_ECDHE_RSA_WITH_AES_256_CBC_SHA384_P384
- TLS_ECDHE_RSA_WITH_AES_128_CBC_SHA256_P256
These changes were announced more than one year ago, and should have already occurred but were postponed due to COVID 19. Please be updated on theses changes in this link:
Remove TLS 1.0 and 1.1 from use with Azure Cache for Redis
Actions:
As the client and server should support the same SSL/TLS version, the client application will be required to use TLS 1.2 or later to communicate with your cache.
1. Changing client application to use TLS 1.2
In StackExchange.Redis and in most of other client libraries you may need to change your connection string and add ssl=true and sslprotocols=tls12 parameters, but this may be a little bit different on each one of client libraries. Also some other changes may be needed.
You can follow this documentation Configure your application to use TLS 1.2 to verify what changed are needed and if some other client environment changes are needed to use the latest TLS version in your client application.
.NET Framework: StackExchange.Redis, ServiceStack.Redis
.NET Core: all .NET Core clients
Java: Jedis, Lettuce, and Redisson
Node.js: Node Redis, IORedis
PHP: Predis, PhpRedis
Python: Redis-py
GO: Redigo
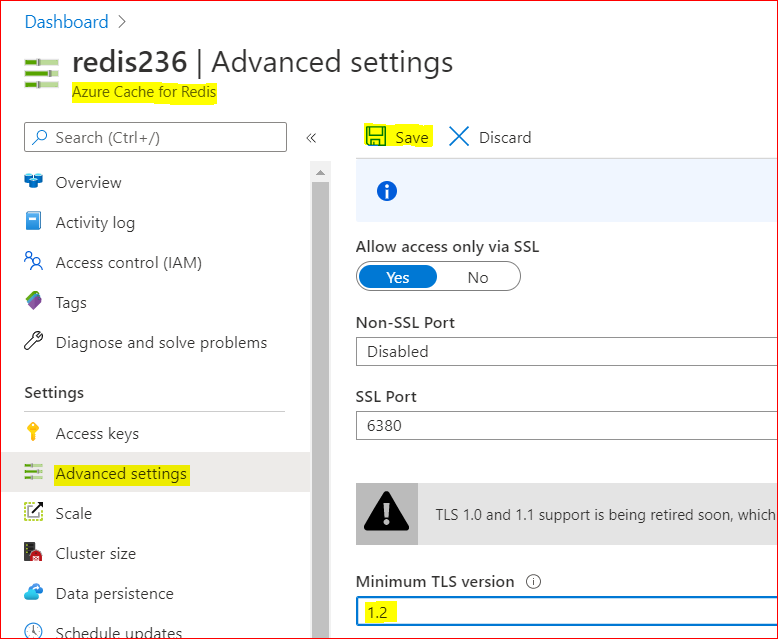
2. Changing Redis Minimum TLS version on Azure side
To disable old TLS versions on your Azure Redis instance, you may need to change the minimum TLS Version to 1.2.
This may take some minutes to be applied and you may use the Powershell script bellow to make sure the changes have been applied.
– Using Azure Portal :
– On Azure Portal, on your Azure Redis blade, choose Advanced Settings
– Change the minimum TLS Version to 1.2
– Save the changes

– Using PowerShell
You can do the same using PoweShell. You need the Az.RedisCache module already installed before run the command:
Set-AzRedisCache -Name <YourRedisName> -MinimumTlsVersion "1.2"
– Using CLI
Using CLI, the –minimum-tls-version are available only at Redis creation time and changing minimum-tls-version on an existing Azure Redis instance is not supported.
3. Check TLS versions supported by Redis endpoint
You can use this PowerShell script to verify what TLS versions are supported by your Azure Cache for Redis endpoint.
If your Redis instance have VNET integration implemented, you may need to run these PowerShell script from some VM inside your VNET, to have access to Azure Redis Instance:
param(
[Parameter(Mandatory=$true)]
[string]$redisCacheName,
[Parameter(Mandatory=$false)]
[string]$dnsSuffix = ".redis.cache.windows.net",
[Parameter(Mandatory=$false)]
[int]$connectionPort = 6380,
[Parameter(Mandatory=$false)]
[int]$timeoutMS = 2000
)
$redisEndpoint = "$redisCacheName$dnsSuffix"
$protocols = @(
    [System.Security.Authentication.SslProtocols]::Tls,
    [System.Security.Authentication.SslProtocols]::Tls11,
    [System.Security.Authentication.SslProtocols]::Tls12
)
$protocols | % {
    $ver = $_
    $tcpClientSocket = New-Object Net.Sockets.TcpClient($redisEndpoint, $connectionPort )
    if(!$tcpClientSocket)
    {
        Write-Error "$ver- Error Opening Connection: $port on $computername Unreachable"
        exit 1;
    }
    else
    {
        $tcpstream = $tcpClientSocket.GetStream()
        $sslStream = New-Object System.Net.Security.SslStream($tcpstream,$false)
        $sslStream.ReadTimeout = $timeoutMS
        $sslStream.WriteTimeout = $timeoutMS
        try
        {
            $sslStream.AuthenticateAsClient($redisEndpoint, $null, $ver, $false)
            Write-Host "$ver Enabled"
        }
        catch [System.IO.IOException]
        {
            Write-Host "$ver Disabled"
        }
        catch
        {
            Write-Error "Unexpected exception $_"
        }
    }
}
Conclusion:
Despite Azure Cache for Redis still currently support TLS 1.0, 1.1 and 1.2, it’s important to move only to TLS 1.2. Apart of the insecure TLS 1.0 and 1.1 versions, these versions will be deprecated soon from Azure Cache for Redis service.
For that reason is mandatory that all client applications can be adapted in advance to support TLS 1.2 on their Azure Cache for Redis connections, to avoid any downtime in the service.
Related documentation:
Remove TLS 1.0 and 1.1 from use with Azure Cache for Redis
PowerShell Az.RedisCache module
CLI Az Redis Create command
TLS security blog
I hope this can be useful !!!

by Scott Muniz | Aug 7, 2020 | Uncategorized
This article is contributed. See the original author and article here.
Scenario:
Sometimes we need to know what happened to some Redis keys. We expected to read the keys from Redis service, but the keys disappeared.
Some times the keys were deleted or evicted, other times the TTL expired and we are not aware of that.
In these cases to monitor operations in the keys, we can enable the Redis Keyspace Notifications as described here to receive a notification when something happen: https://redis.io/topics/notifications
There are a list of Redis events that can be monitored as described in Events generated by different commands section in the Redis.io documentation.
Keyspace notifications allow clients to subscribe to two channels in order to receive events affecting the Redis data set in some way. Examples of the events that are possible to receive are the following:
- All the commands affecting a given key.
- All the keys receiving an specific operation (Set, Delete, etc)
- All the keys expiring in the database.
Keyspace notifications are implemented by sending two distinct types of events for every operation affecting the Redis data space:
- Key-space notification: to monitor specific keys
- Key-event notification: to monitor specific events
By default keyspace notifications are disabled because may have some impact on the Redis performance using some CPU power.
Actions:
To enable Keyspace notifications and receive the events, first we need to enable and configure the Redis notification Keyspace.
When using Azure Cache for Redis, Keyspace notifications can be enabled in Azure Portal, on Redis blade.
Setting the parameter to the empty string disables notifications. In order to enable the feature a non-empty string is used, composed of multiple characters, where every character has a special meaning according to the following table:
K     Keyspace events, published with __keyspace@<db>__ prefix.
E     Keyevent events, published with __keyevent@<db>__ prefix.
g     Generic commands (non-type specific) like DEL, EXPIRE, RENAME, ...
$     String commands
l     List commands
s     Set commands
h     Hash commands
z     Sorted set commands
t     Stream commands
x     Expired events (events generated every time a key expires)
e     Evicted events (events generated when a key is evicted for maxmemory)
m     Key miss events (events generated when a key that doesn't exist is accessed)
A     Alias for "g$lshztxe", so that the "AKE" string means all the events except "m".
At least K or E should be present in the string, otherwise no event will be delivered regardless of the rest of the string.
For instance to enable just Key-space events for lists, the configuration parameter must be set to Kl, and so forth.
The string KEA can be used to enable every possible event.
1. Enable and configure the Redis Keyspace notifications
– Using Azure Portal
As CONFIG command is not supported in Azure Cache for Redis, as described in this documentation, Redis commands not supported in Azure Cache for Redis, we will enable and configure the Redis notifications using Azure Portal. As example we will configure ‘AKE’ to receive all notifications. As described in the table above, we may want to configure only some type of notifications.
To Enable Redis notifications using Azure Portal, we need:
– In Azure Portal, on Redis blade, click on “Advanced Settings” at the left.
– In Notify-Keyspace-Events box, write “AKE”
– Save the changes

With that, we enabled Redis Keyspace for all notifications. Removing all the text leaving a empty box and saving, will disable the Redis Keyspace notifications.
2. Subscribing Keyspace notifications
As described above, two types of events can be subscribed using PSUBSCRIBE command, in this format:
 psubscribe __keyspace@<database>__:<mykey>
 psubscribe __keyevent@<database>__:<operation>
– using Azure portal console:
In this case we will use the psubscribe command using Redis Console available in Azure Portal to subscribe both types of events in any database, for all events and all keys:
psubscribe '__key*__:*'
– using Redis-cli console:
The same as above using redis-cli console command line:
redis-cli --csv psubscribe '__key*__:*'
– using .NET (Stackexchange.Redis) application:
Using Stackexchange.Redis client library to subscribe notifications, we may need to develop some app and use this Class. To subscribe just call NotificationsExample method passing the connection as ConnectionMultiplexer object, in the method parameter:
class RedisKeyspaceNotifications
    {
        /// <summary>
        /// NOTE: For this sample to work, you need to go to the Azure Portal and configure keyspace notifications with "Kxge$" to
        ///       1) turn on expiration notifications (x),
        ///       2) general command notices (g) and
        ///       3) Evicted events (e).
        ///       4) STRING operations ($).
        ///       or AKE for all events, all notifications
        /// IMPORTANT
        ///       1) MAKE SURE YOU UNDERSTAND THE PERFORMANCE IMPACT OF TURNING ON KEYSPACE NOTIFICATIONS BEFORE PROCEEDING
        ///          See http://redis.io/topics/notifications for more details
        ///       2) THIS DOES NOT WORK CORRECTLY ON CLUSTERED REDIS INSTANCES
        ///          See https://github.com/StackExchange/StackExchange.Redis/issues/789 for details
        public static void NotificationsExample(ConnectionMultiplexer connection)
        {
            var subscriber = connection.GetSubscriber();
            string db = "*"; // default db is 0 - Redis DB do you want notifications

            // ----------------------------------------------------------------------
            // subscribing the channel keyspace
            // ----------------------------------------------------------------------
            // keyspace
            string notificationChannel = "__keyspace@" + db + "__:*";             // all events - The Key-space channel receives as message the name of the event.
            //string notificationChannel = "__keyspace@" + db + "__:key25";         // only key25 events

            // keyevent
            //string notificationChannel = "__keyevent@" + db + "__:set";           // all set
            //string notificationChannel = "__keyevent@" + db + "__:del";           // all del
            //string notificationChannel = "__keyevent@" + db + "__:rename_to";     // all rename to
            //string notificationChannel = "__keyevent@" + db + "__:rename_from";   // all rename from
            //string notificationChannel = "__keyevent@" + db + "__:expired";       // all expired
            //string notificationChannel = "__keyevent@" + db + "__:evicted";       // all evicted
            // ----------------------------------------------------------------------
            // ----------------------------------------------------------------------


            Console.WriteLine("Subscribed to notifications...: " + notificationChannel);


            //--------------------------------------------------
            // we only have to do this once, then your callback will be invoked.
            //--------------------------------------------------
            subscriber.Subscribe(notificationChannel, (channel, notificationType) =>
            {
                var msg = GetKey(channel);
                switch (notificationType) // use "Kxge" keyspace notification options to enable all of the below...
                {
                    // looking for some events
                    case "expire": // requires the "Kg" keyspace notification options to be enabled
                        Console.WriteLine("Expiration Set for Key: " + msg);
                        break;
                    case "expired": // requires the "Kx" keyspace notification options to be enabled
                        Console.WriteLine("Key EXPIRED: " + msg);
                        break;
                    case "rename_from": // requires the "Kg" keyspace notification option to be enabled
                        Console.WriteLine("Key RENAME(From): " + msg);
                        break;
                    case "rename_to": // requires the "Kg" keyspace notification option to be enabled
                        Console.WriteLine("Key RENAME(To): " + msg);
                        break;
                    case "del": // requires the "Kg" keyspace notification option to be enabled
                        Console.WriteLine("KEY DELETED: " + msg);
                        break;
                    case "evicted": // requires the "Ke" keyspace notification option to be enabled
                        Console.WriteLine("KEY EVICTED: " + msg);
                        break;
                    case "set": // requires the "K$" keyspace notification option to be enabled for STRING operations
                        Console.WriteLine("KEY SET: " + msg);
                        break;

                    // other events may be added following https://redis.io/topics/notifications - events section

                    // looking for other events
                    default:
                        Console.WriteLine("KEY " + notificationType + ": " + msg);
                        break;
                }
            });


        private static string GetKey(string channel)
        {
            var index = channel.IndexOf(':');
            if (index >= 0 && index < channel.Length - 1)
                return channel.Substring(index + 1);

            //we didn't find the delimeter, so just return the whole thing
            return channel;
        }
    }
From: JonCole RedisKeyspaceNotifications Example
3. Receiving notifications
The notifications will be received in the same console application used to subscribe the Keyspace notifications.
To test and run some command to fire some events, we need to open a different console application (or running our dev/test/prod application).
Below we used Redis Console available in Azure Portal.
In Azure Redis console 1 we can see:
- in blue, the result of subscribing both types of events in any database, for all events and all keys, using the command above.
After setting ‘key1’ with value ‘value1’ (using Azure Redis console 2), we can see the notifications in console 1:
- in pink – the keyspace notification for key ‘key1’
- in red – the keyevent notification for command ‘set’

Because we subscribed both types of events (keyspace and keyevent), we received two notifications.
The command ran in Azure Redis console 2 was setting ‘key1’ with value ‘value1’:

Conclusion:
There are a few other methods to monitor Redis instances. Specially using Azure Cache for Redis, we have Azure Monitor, Metrics, Alerts and Diagnostics features to Monitor Redis instances.
Redis Keyspace Notifications allow us to monitor some specific key or some specific operations apart of all other notifications.
Related documentation:
Azure Monitor for Azure Cache for Redis (preview)
Azure Redis Metrics with Azure Monitor
Azure Alerts for Azure Redis
Activity Logs for Azure Redis
Diagnostic Settings
I hope this can be useful !!!

by Scott Muniz | Aug 7, 2020 | Uncategorized
This article is contributed. See the original author and article here.
Azure Synapse Analytics is a limitless data analytics service that enables you to analyze data on Azure Data Lake storage. It provides managed Apache Spark and T-SQL engines (provisioned and serverless) for analyzing data.
In this article, you will see how you can find the countries with highest weekly increase of COVID cases by analyzing data from the parquet files stored on Azure storage using Synapse SQL endpoint in Synapse Analytics. Synapse SQL engine is the perfect choice for ad-hoc data analytics for the data analysts with T-SQL skills.
Prerequisite
To try this sample, you need to have Azure Synapse Analytics workspace. If you don’t have one you can easily deploy it using Azure portal or this Deployment template. Workspace automatically deploys one serverless Synapse SQL endpoint that is everything we need for this kind of analysis. With the workspace you are also getting easy-to-use Web UI called Synapse Studio that enables you to start analyzing the files directly from your browser.
NOTE: You need Synapse SQL serverless (on-demand) query endpoint to execute the code in this article. The functionalities used in this article are still not available in provisioned endpoint.
COVID data set
In this sample is used the latest available public data on geographic distribution of COVID-19 cases worldwide from the European Center for Disease Prevention and Control (ECDC). Each row/entry contains the number of new cases reported per day and per country. For more information about this dataset, see here. Data set is updated on daily basis and placed as a part of Azure Open Dataset.
Data exploration with OPENROWSET function
Synapse SQL endpoint in Synapse Analytics enables you to use OPENROWSET T-SQL function to analyze data in Azure Data Lake storage. This is easy to use function where you just need to provide URL of some file on Azure storage and you will get the content of the file. Example of OPENROWSET function that reads the content of a parquet file placed on Azure storage is shown in the following example:

If you provide a file URL after the bulk keyword and specify that you are using parquet format, you will get the content of that parquet file. In this result set we can see some interesting columns:
- date_rep – date when the COVID cases are reported.
- countries_and_territories/geo_id identifies the country where the COVID cases are reported.
- cases – number of reported cases in the country on a date_rep
Current and past week cases per country
We can easily get the number of cases reported for each country on a given day. TSQL LAG function enables us to get the number of cases reported 7 days ago:

LAG function will return a value of COVID cases reported in the record with the same geo_id (see PARTITION BY geo_id in OVER clause) column, and return 7th previous record ordered by date_rep (see ORDER BY date_rep in OVER clause). This is the number of cases reported seven days ago in the country.
As you can see on the picture above in Finland is reported 29 cases on 6th august, and 10 cases seven days before. This is exactly what we need to have to compare currently reported number of cases with the number of cases reported seven days ago to calculate the increase per each year.
Average weekly cases
Number of COVID cases might vary if we look at daily values. In some cases, you can see daily variations like 10, 23, 9, 17 that might provide misleading conclusions especially if the variation is close to actual value.
More reliable metric would be to calculate average number of reported cases per week (or any 7-day time window). We can use windowing extension of AVG function for this purpose:
AVG(<value>)
       OVER(partition by <paritition value>
            order by <sort value>
            ROWS BETWEEN <start> AND <end>  )
For each record this window function will get the records that have the same <partition value> (for example country id since we are finding average value within the country), order them by <sort value> (for example date when the cases are reported), and get the records between <start> and <end> in this. Then it will calculate average value (for example cases in our case).
You can find more information about window function in the article Advanced analytics of COVID data using Synapse SQL endpoint.
The following query returns average number of reported cases in past seven days and the average number of cases in previous 7-day period:

Now we have reports with the data like the previous case, but more reliable metric.
The countries with the highest increase of COVID cases
We have information about the countries, number of reported cases this week, and number of reported cases a week ago, so we are ready to compare these values and find the countries with the highest increase of COVID cases.
I will put the query that returns average weekly cases as CTE named query, and do analyze data on the result of this named query:

I’m filtering results on some specific date (5th August), ignoring countries with less than 100 cases, and ordering by percentage of increase. You can see the results with the countries where the number of COVID cases is increased. You can easily modify that report to change time periods or get the report for some point in time in the past.
Conclusion
Synapse SQL endpoint and Synapse Studio in Azure Synapse Analytics are tools for easy data exploration that enable you to easily read the content of a file and do basic data exploration. In this example, we have seen how to leverage T-SQL language and charting features in Synapse Analytics to identify the countries with highest weekly increase of COVID cases. The similar analysis can be repeated on any other data set. You can find more information about querying files in Azure Data Lakes Storage in this article.
If you want to try these queries, the scripts are below:
select top 10  *
from openrowset(bulk 'https://pandemicdatalake.blob.core.windows.net/public/curated/covid-19/ecdc_cases/latest/ecdc_cases.parquet',
                format='parquet') as a;

select  TOP 10 date_rep, countries_and_territories,
        cases,
        prev = LAG(CASES, 7) OVER(partition by geo_id order by date_rep )
from openrowset(bulk 'https://pandemicdatalake.blob.core.windows.net/public/curated/covid-19/ecdc_cases/latest/ecdc_cases.parquet',
                        format='parquet') as a
order by date_rep desc;
GO

select  TOP 10 date_rep, countries_and_territories,
        current_avg = AVG(CASES) OVER(partition by geo_id order by date_rep ROWS BETWEEN 7 PRECEDING AND CURRENT ROW  ),
        prev_avg = AVG(CASES) OVER(partition by geo_id order by date_rep ROWS BETWEEN 14 PRECEDING AND 7 PRECEDING  )
from openrowset(bulk 'https://pandemicdatalake.blob.core.windows.net/public/curated/covid-19/ecdc_cases/latest/ecdc_cases.parquet',
                 format='parquet') as a
order by date_rep desc;
GO
with weekly_cases as (
        select  geo_id, date_rep, countries_and_territories,
                current_avg = AVG(CASES) OVER(partition by geo_id order by date_rep ROWS BETWEEN 7 PRECEDING AND CURRENT ROW  ),
                prev_avg = AVG(CASES) OVER(partition by geo_id order by date_rep ROWS BETWEEN 14 PRECEDING AND 7 PRECEDING  )
        from openrowset(bulk 'https://pandemicdatalake.blob.core.windows.net/public/curated/covid-19/ecdc_cases/latest/ecdc_cases.parquet',
                             format='parquet') as a )
select countries_and_territories, current_avg, prev_avg, [WoW%] = 100*(1.* current_avg / prev_avg - 1)
from weekly_cases
where date_rep = '2020-08-05'
and prev_avg > 100
order by (1. * current_avg / prev_avg -1)  desc
by Scott Muniz | Aug 7, 2020 | Alerts, Microsoft, Technology, Uncategorized
This article is contributed. See the original author and article here.
Hi all, Zoheb here publishing on behalf of a guest author, Morne Naude. So without further ado…
Hi Everyone,
Morne here again and welcome to the first blog in our series on Azure Active Directory Security where we will be sharing all details on how we helped our SMC customers reduce the attack vector by enabling Identity Protection in Azure.
If you have not read our introductory blog covering the entire background on our SMC Delivery Methodology, please do give it a read now before continuing here.
How Microsoft Mission Critical Team Helped Secure AAD
If an Electron Can Be in Two Places at Once, Why Can’t You …
Well you can’t PERIOD
We refer to this as Atypical travel “Sign in from an atypical location based on the user’s recent sign-ins.“ or Unfamiliar sign-in properties “Sign in with properties we’ve not seen recently for the given user.”
Before we get on to more details on how we helped our SMC customer, here is some background information on Identity Protection & Risky Sign ins which may help you understand the subject better.
What is Azure Active Directory Identity Protection?
Identity Protection is a tool that allows organizations to accomplish three key tasks:
- Automate the detection and remediation of identity-based risks.
- Investigate risks using data in the portal.
- Export risk detection data to third-party utilities for further analysis.
Identity Protection uses the learnings Microsoft has acquired from their position in organizations with Azure AD, the consumer space with Microsoft Accounts, and in gaming with Xbox to protect your users. Microsoft analyses 6.5 trillion signals per day to identify and protect customers from threats.
This is but a few examples of risk types Azure identity protection use in its classifications.
Risk Classification
|
Risk detection type
|
Description
|
|
Atypical travel
|
Sign in from an atypical location based on the user’s recent sign-ins.
|
|
Anonymous IP address
|
Sign in from an anonymous IP address (for example: Tor browser, anonymizer VPNs).
|
|
Unfamiliar sign-in properties
|
Sign in with properties we’ve not seen recently for the given user.
|
|
Malware linked IP address
|
Sign in from a malware linked IP address
|
|
Leaked Credentials
|
This risk detection indicates that the user’s valid credentials have been leaked
|
|
Azure AD threat intelligence
|
Microsoft’s internal and external threat intelligence sources have identified a known attack pattern
|
Coming back to our customers’ pain areas, we were detecting a high number of Risky Sign ins every day across the organization, we spotted these during the Azure AD Assessments as well as observations from the Risky Sign in logs.
Working with the Mission Critical team gives our customers the ultimate personalized support experience from a designated team that:
- Knows you and knows what your solution means to your enterprise
- Works relentlessly to find every efficiency to help you get ahead and stay ahead
- Advocates for you and helps ensure get you the precise guidance you need.
Knowing the customer well helped us understand the extent of the problem, to work closely with their Identity team and recommend improvements to them.
There were various attack trends observed from Azure AD Connect Health related to Password spray, Breach replay, Phishing etc. on Azure and it was an urgent need of the hour to get into a better security posture.
After speaking with the messaging team, we realized that few of the Risky users had strange Mailbox rules created and were spamming multiple users in the organization (more details to come in one of our following blogs).
If you are interested to read more about Forms Injection Attacks on emails please see: https://docs.microsoft.com/en-us/microsoft-365/security/office-365-security/detect-and-remediate-outlook-rules-forms-attack?view=o365-worldwide
Our customer had no policy/process configured to tackle this issue, they only had Multi Factor Authentication (MFA) in place for Global Admins.
Policies
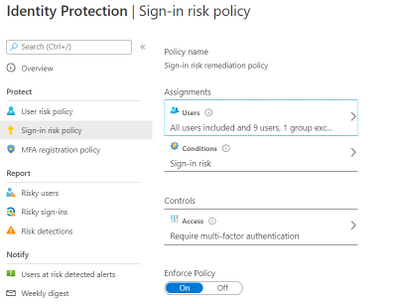
We suggested to enable User Risk as well as Sign-in Risk policies for users deemed as “high-risk”, below are some details on how it was enabled for our customer.
Identity Protection analyses signals from each sign-in, both real-time and offline, and calculates a risk score based on the probability that the sign-in wasn’t performed by the user. Administrators can decide based on this risk score signal to enforce organizational requirements. Administrators can choose to block access, allow access, or allow access but require multi-factor authentication.
We enabled Sign in risk Policy to force “MFA” for all “High Risk” users as per configuration below.

Identity Protection can calculate what it believes is normal for a user’s behaviour and use that to base decisions for their risk. User risk is a calculation of probability that an identity has been compromised. Administrators can decide based on this risk score signal to enforce organizational requirements.
Considering the circumstances, we suggested to our customer to implement below User Risk policy, this policy would ensure that if there is any “High Risk” user he will be required to change Password as per configuration below.

So, these two policies ensured all the Risky Sign in users are forced to use MFA and change their passwords.
Notification for Risky users
Our customer has Azure AD P2 licensing, so we could leverage the full set of Identity protection features.
We configured the users at risk email in the Azure portal under Azure Active Directory > Security > Identity Protection > Users at risk detected alerts.
By default, recipients include all Global Admins. Global Admins can also add other Global Admins, Security Admins, Security Readers as recipients.
Optionally you can Add additional emails to receive alert notifications; this feature is a preview and users defined must have the appropriate permissions to view the linked reports in the Azure portal. We included members of the Identity and Security teams as well.

The weekly digest email contains a summary of new risk detections, such as:
- New risky users detected
- New risky sign-ins detected (in real-time)
- Links to the related reports in Identity Protection

This resulted in a drastic reduction in the number of risky users and risky sign-ins. Additionally we helped implement a process of investigation and remediation of these at- risk accounts from the service desk to the internal security department. Currently the business is in the process of including Medium based at-risk accounts into the above policies.
NOTE: The features and guidelines implemented in this case were specific to this customer’s requirements and environment, so this is not a “General” guideline to enable any of the mentioned features.
Hope this helps,
Morne

Recent Comments