by Scott Muniz | Aug 11, 2020 | Uncategorized
This article is contributed. See the original author and article here.
If you are not familiar with the Microsoft 365 Network Connectivity Principles, you should be. At this stage of cloud powered digital transformation, it has become a well-recognized fact that efficient user connectivity and network architecture that is cloud ready and cloud optimized is one of the most critical decisions that customers should make to achieve best application performance and delightful user experience. For rich cloud-based productivity solutions, such as Microsoft 365, optimal end user connectivity to the cloud becomes especially important.
To help customers modernize their network architectures, Microsoft has developed 4 Network Connectivity Principles. These principles can help customers evaluate their existing network architectures and its readiness for Microsoft 365; inform future network design choices for in office and remote users; and modernize their networks to achieve both security and optimal user experience, instead of trading one versus another. These principles can also be helpful to evaluate different network partner solution architectures for Microsoft 365 alignment and provide confidence that customer network choices are not only optimal, but future proof for the dynamic and evolving nature of the Internet and Microsoft 365 cloud.
Below are the 4 principles at a high level. To dive into the details please watch the first video in our Microsoft 365 Network Connectivity Video Series, embedded in this blog. Please watch out for additional videos that dive deep into the details on how those principles can be applied to network design, network configuration, remote user connectivity, and achieving Zero Trust security.
For the latest information on how to configure your Microsoft 365 network components to maximize performance and provide the best possible user experience visit: https://msft.it/6003To3vP
Principle #1: Optimize Microsoft 365 traffic
Use the Microsoft published endpoint categories to differentiate Microsoft 365 traffic from generic Internet traffic for more efficient routing.
Principle #2: Enable local egress
Egress Microsoft 365 data connections through Internet as close to the user as practical with matching DNS resolution.
Principle #3: Enable direct connectivity
Enable direct egress for Microsoft 365 connections. Avoid network hairpins and minimize network latency (RTT) to Microsoft’s global network.
Principle #4: Modernize security for SaaS
Avoid intrusive network security for Microsoft 365 connections. Bypass proxies, traffic inspection devices, and avoid duplicating security controls already available in Microsoft 365.
by Scott Muniz | Aug 11, 2020 | Uncategorized
This article is contributed. See the original author and article here.
We are living through an extraordinary period in our history where we need to re-evaluate many aspects of our lives, including how we can safely co-exist within common workspaces. There are many technological innovations appearing from Microsoft and others to assist in these adjustments to our daily lives.
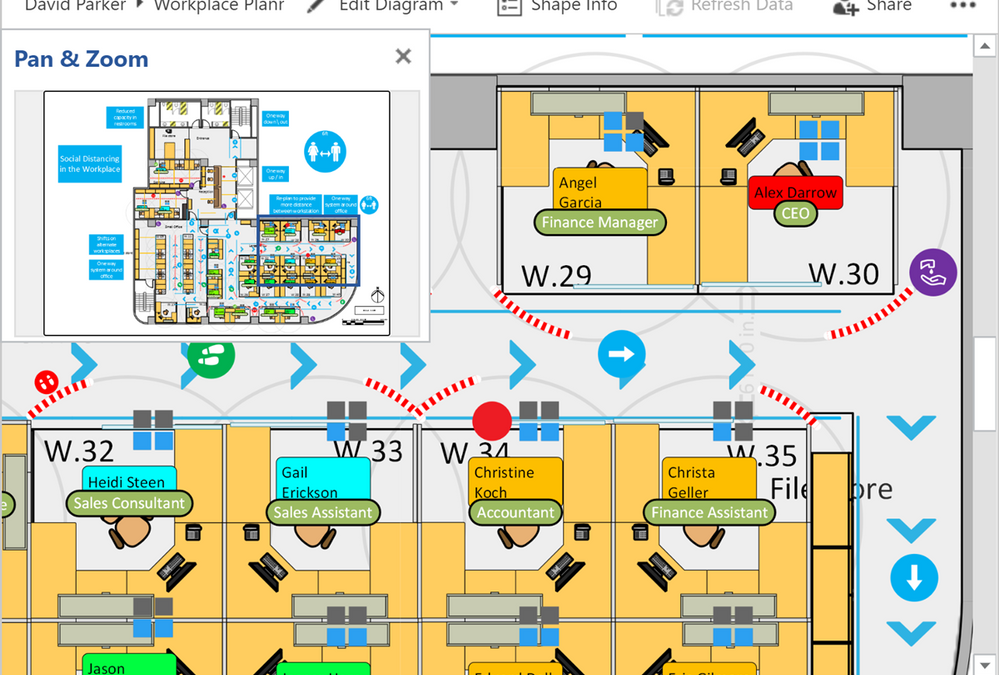
The Microsoft Visio desktop app, which includes Visio Plan 2, has templates for creating office and workplace diagrams to scale, and has the ability to embed CAD diagrams too (see Create a Floor Plan for more information, and Featured Visio templates and diagrams). Indeed, many Visio users have been doing this for many years, but now the world faces the challenge of preparing these workplaces for a new normal where social distancing is required. Most countries in the world have implemented guidelines and laws about social distancing in order to prevent the spread of communicable disease, such as COVID-19, through society. These guidelines may vary on the distance and units used (metres or feet), and so Microsoft have now released a new stencil of symbols, fill and line patterns to assist with the re-planning of workplaces easier, or simply checking if the existing layouts are compliant.
There are possibly two main approaches to providing social distancing in the workplaces:
- Re-plan the workstation layout
- Reduce the occupancy by blocking off alternate, or so, workstations
It will probably require that a one-way system being denoted to walk around the workplace, and this may include designating lifts for access only, and staircases for egress. It may also be necessary to place screens between or alongside workstations to provide greater isolation. Additionally, it may be necessary to restrict entry to restrooms, and to reduce their capacity accordingly. There will also be a need to provide multiple stations where hand sanitizer is available.
Working shifts could be introduced to reduce occupancy, and staggered start and finish times to reduce the flow at entrances and exits. It will be necessary to add signage and floor markings to remind staff of the safe distances to keep to and the direction to walk in.
Microsoft Visio is a perfect application for planning workplaces, and the new Workplace Social Distancing stencils makes it easy to analyze, review and plan for the new guidelines.
The Visio diagrams, that are stored in OneDrive or SharePoint Online, can then be viewed within a web page, using the Microsoft Online Viewer (See any Visio Diagram for free), or within a Power BI report (see Org Chart and Floor Plan ). In the case of the viewer, there is also a JavaScript API that can be utilized to enhance the experience.
The Visio desktop app has a layering feature that enables shapes on layers to have a color assigned to them, and one great use of this is to reduce most of the diagram to gray-scale so that the important features are easier to understand.
|
 Desk layout in color Desk layout in color
|
 Gray-scale applied to most layers Gray-scale applied to most layers
|
This feature is particularly useful when using Power BI to color code visual elements automatically, such as the shift times for each workstation.
 Display workplaces and shifts in Power BI
The layer settings in Visio can be manipulated manually each time a new view is required, or they can be automated with a third-party add-in such as LayerManager from bVisual.
 Managing layers in Visio desktop
The Workplace Social Distancing Stencils
There are two almost identical stencils with the same title, Workplace Social Distancing, so that users of either US Units or Metric Units are accommodated:
They should be placed into the My Shapes folder directly, or within a sub-folder, and preferably renamed tf45259688.vssx to WRKSOCDIST_U.vssx, and tf45492185.vssx to WRKSOCDIST_M.vssx. (Oh, the wonders of the web!)
The stencils contain a number of Masters, a Fill Pattern and Line Patterns to assist with the task of re-planning workplaces to satisfy social distancing guidelines. The scaled Line Patterns are provided in three different size because various countries and states have different distance requirements.
|
 The Masters The Masters
|
 US Units Fill Pattern and Line Patterns US Units Fill Pattern and Line Patterns |
 Metric Fill Pattern and Line Patterns Metric Fill Pattern and Line Patterns |
Masters
Dimensions
Both of these shapes are on the Social Distancing Dimensions layer by default, and they can be formatted to suit.
Distancing Circle
The Distancing Circle shape can be dragged and dropped to the center of the position to check the exclusion zone. The shape can then be re-sized manually or by typing a value in the Width or Height row of the Size & Position window. The aspect ratio of the shape is locked so it does not matter which row the value is entered into, because the other will be kept synchronized.
|
Position centered over target position
|
 Distancing Circle Step 1 Distancing Circle Step 1
|
|
Set the diameter, optionally Lock Size and Hide Text using the Shape Data window or right-mouse action menu.
|
 Distancing Circle Step 2 Distancing Circle Step 2
|
|
Edit Dash Type to suit, duplicate as required, and Send to Back.
|
 Distancing Circle Step 3 Distancing Circle Step 3
|
Distancing Arrow
The Distancing Arrow shape can be dragged and dropped to show the distance between items. The shape can then be re-sized manually or by typing a value in the Length row of the Size & Position window.
|
Drag and drop, and set the Length
|

|
|
Rotate and edit Fill Color as required, and optionally Lock Size using the Shape Data window or right-mouse action menu.
|

|
Barrier Screens
These shapes are on the Furniture and Non-Moveable Furnishings layers, and are used to provide a physical barrier where the full specified social distance is not possible.
Screen
This a simple straight barrier, which could be solid or transparent.
|
Use Screen shapes to be installed specify where extra barriers should be positioned
|
 Add screens as a barrier Add screens as a barrier
|
Curved Screen
Similar to Screen but curved.
Symbols
These shapes are on the Social Distancing layer by default, and can be formatted to suit requirements.
The Fill Foreground, Fill Background and Line Color of these symbols can all be modified with the Format Shape panel.
|
Use Format Shape panel rather than Ribbon buttons
|
 Formatted symbols Formatted symbols
|
- Direction Arrow
- Feet Stop
- Feet Walk
- Keep Apart
- Sanitizer Station
- Escape Route
- Disposal Station
- Wear Glove
|
The symbols are placed, re-sized, rotated and colored to suit.
|
Formatted symbols
|
Pattern Help
This shape contains some instructions for using the custom fill and line patterns.
Fill Patterns
Use Format Shape to select the Diagonal Stripe Pattern fill, then edit the Foreground and Background colors to suit.
|
Diagonal Stripes provides wider striping than the built in patterns.
|

|
Line Patterns
There are both unscaled and scaled custom Line Patterns to assist in demarking social distancing markings and instructions.
Unscaled
These patterns provide two-colored Banded or Striped lines.
- [Blue | Cyan | Green | Magenta | Red | Yellow] Banded Line
- [Blue | Cyan | Green | Magenta | Red | Yellow] Striped Line
|
Use Format Shape / Solid Line to select a colored Banded or Striped Line Dash Type, then Line / Color to select the second color.
|

|
Scaled
These Line Patterns can be used to mark out the spacing, and the direction in two cases, of movement. These patterns work best with straight lines, and with lines that are an exact multiple of the spacing.
- Keep [3’/1m | 4’6”/1.5m | 6’/2m] Apart Arrows
- Keep [3’/1m | 4’6”/1.5m | 6’/2m] Apart Feet
- Keep [3’/1m | 4’6”/1.5m | 6’/2m] Apart Lines
|
Use Format Shape / Solid Line to select a Keep x Apart Arrows, Feet or Lines Dash Type, then Line / Color to select the color.
|

|
Example
Master shapes line Arc – graphical on the Drawing Tool Shapes stencil can be useful to define floor markings that need to be taped, using the appropriate unscaled custom colored line pattern. The scaled custom line patterns define the spacing of floor taping or mats to be added. The appropriately colored symbol shapes define where stickers, mats, posters or similar need to be placed.
The Layer Properties dialog can be used to recede the shapes on the Social Distancing Dimensions layer, or to make them invisible.
|
 Social Distancing Dimensions receded Social Distancing Dimensions receded
|
|
 Adjusted layout with social distancing markings Adjusted layout with social distancing markings
|
There are two almost identical templates with the same title, Workplace Planning with Social Distancing, so that users of either US Units or Metric Units are accommodated:
They should be placed into the Custom Office Templates folder, or similar, and preferably renamed tf33393545.vstx to Workplace Planning with Social Distancing (US Units).vstx, and tf12087500.vstx to Workplace Planning with Social Distancing (Metric).vssx. (Still, the wonders of the web!)
We’d love to hear back from you! Leave a comment below with your experiences, questions, or suggestions. You can also submit ideas for future feature releases on our UserVoice site. Email us at tellvisio@microsoft.com for more detailed questions, and follow us on Facebook and Twitter to stay current on the latest releases.
Written by David Parker, a Visio developer since 1996, and an MVP for the past 16 years, and writer of a Visio blog at blog.bvisual.net. In a prior life, he was an architect and space planner.
by Scott Muniz | Aug 11, 2020 | Azure, Microsoft, Technology, Uncategorized
This article is contributed. See the original author and article here.
This installment is part of a broader series to keep you up to date with the latest enhancements to the Azure Sentinel Devops template.
This blog is a collaboration between @Cristhofer Munoz & @Matt_Lowe.
Introduction
Threats are evolving just as quickly as data-volume growth, with bad actors exploiting every possibility and technique to gain access to the corporate network. At the same time, the risk surface has widened as companies shift to hybrid-cloud environments, adopt DevOps and Internet of Things (IoT) technologies, and expand their remote workforces.
Amid this landscape, organizations require a bird’s-eye view of security posture across the enterprise, hence a security information and event management (SIEM) system is a critical element.
Frankly, deploying a SIEM is not a trivial task. Organizations struggle with the number of tasks to adopt a SIEM due to the lack of an agile methodology to plan, execute, and validate its initial success and deploy into production.
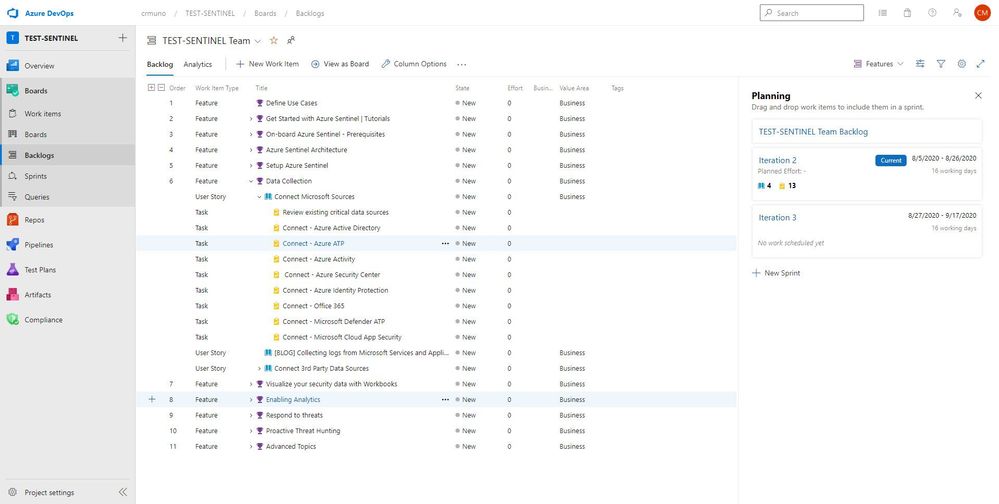
To help alleviate this challenge, we’ve developed an Azure Sentinel DevOps Board Template which serves as a blueprint to understand the tasks and activities to deploy Azure Sentinel following recommended practices. By leveraging the Azure Sentinel DevOps Boards one can quickly start tracking user stories, backlog items, task, features, and bugs associated with your Azure Sentinel deployment. The Azure Sentinel DevOps Board is not a static template, it can be modified to reflect your distinctive needs. You will have the ability to quickly add and update the status of work using the Kanban board. You can also assign work to team members and tag with labels to support queries and filtering.
For additional information on Azure Boards, please refer the public documentation.
In this template we provide prescriptive guidance for the following Azure Sentinel use cases:
- Define Use Cases
- Get Started with Azure Sentinel | Tutorials
- Onboard Azure Sentinel | Prerequisites
- Azure Sentinel Architecture
- Setup Azure Sentinel
- Data Collection
- Visualize your security data with Workbooks
- Enabling Analytics
- Respond to threats
- Proactive threat hunting
- Advanced Topics

Getting Access | Azure DevOps Generator
The purpose of this initiative is to simplify the process and provide tactical guidance to deploy Azure Sentinel by providing an Azure Sentinel DevOps board template that provides the prescriptive guidance you need to get going with your deployment. To populate the Azure Sentinel board, we utilized the Azure DevOps Demo generator service to create pre-populated content.
To get started:
1. Browse to the Azure DevOps Demo Generator site by selecting the link, or copy https://azuredevopsdemogenerator.azurewebsites.net/ into your browser’s URL field.
2. Click Sign In and provide the Microsoft or Azure AD account credentials associated with an organization in Azure DevOps Services. If you don’t have an organization, click on Get Started for Free to create one and then log in with your credentials.
3. After signing in, you will arrive at the “Create New Project” page.

4. Provide a name for your project (such as “AzSentinelDeployment”) that you and other contributors can use to identify the project.
5. Next, Select the organization you will use to host the project created by the Azure DevOps Demo Generator. (You may have multiple accounts of which you are a member, and which are associated with your login, so choose carefully.)
6. Lastly, select the demo project template you want to provision by clicking … (Choose Template) button.

7. A new pane will populate providing you the ability to select a pre-populated template. Click on the Azure Community tab, there you will find the Azure Sentinel Devops template.

8. Select the Azure Sentinel Devops template and create the project. Your project may take a couple of minutes for the Demo Generator to provision. When it completes, you will be provided with a link to the demo project.

9. Select the link to go to the new demo Azure DevOps Services project and confirm it was successfully provisioned. You should arrive at the following page:

10. To access the Azure Sentinel backlog where you will find the features, user stories, and tasks to deploy Azure Sentinel, hover over Boards, and select Backlogs. Make sure that you are viewing the Features hierarchy. The backlog page will be the main page you will visit to consume the recommended practices and detailed steps to deploy Azure Sentinel.
.

Adding Team Members
1. Open your project, and then select Project settings > Teams. Then, select your project.

2. Select Add to invite members to your project.

3. Add users or groups, and then choose Save.

Enter the email addresses of the new users, separated by semicolons, or enter the display names of existing users. Add them one at a time or all at once.
How to Use
The template is comprised of features, user stories, and tasks providing guidance and recommended practices for your Azure Sentinel deployment. The template should help your team to discuss, agree on acceptance criteria, delegate ownership, create iterations, track the progress and efficiently deploy Azure Sentinel.
Note: Please remember that the template is not static, it can be modified to your reflect distinctive needs. You have the ability to add your own features, user stories, and tasks to reflect your custom use cases.
In this template we provide prescriptive guidance for the following Azure Sentinel use cases:
- Define Use Cases
- Get Started with Azure Sentinel | Tutorials
- Onboard Azure Sentinel | Prerequisites
- Azure Sentinel Architecture
- Setup Azure Sentinel
- Data Collection
- Visualize your security data with Workbooks
- Enabling Analytics
- Respond to threats
- Proactive threat hunting
- Advanced Topics
The use cases above are listed as Features, comprised of user stories and tasks providing detailed steps to satisfy the use case. The user stories and tasks are nested within each feature. Each task under the user stories includes important information such as links to public documentation, blogs, and webinars that provide you the necessary information complete the task.

In total, there are 11 features that have been listed above. Features 1 through 4 cover any initial steps and pre-requisites for preparing your Azure Sentinel deployment. Features 5 through 11 cover the actual steps for setting up and exploring features with Azure Sentinel.
Feature 1: Define Use Cases
Defining use cases is the most important step for this entire process. There must be a need and use when pursuing the deployment of a product. To provide some ideas or guidance, Gartner has created an article that covers how to determine and build great use cases when deploying a SIEM.
Feature 2: Get Started with Azure Sentinel | Tutorials
To help introduce and prepare you for the deployment of Azure Sentinel, this feature includes the well put together Azure Sentinel Ninja Training with additional Kusto training to assist. This training is to help introduce the concepts and features of the product with materials to help educate and prepare your users for day to day usage of Azure Sentinel.
Feature 3: Onboard Azure Sentinel | Prerequisites
It is important to identify and understand what the prerequisites are for deploying and using Azure Sentinel. To assist with this, this feature in the template provides a list of prerequisites as well as any associated documents that provide additional information that will help with addressed them.
Feature 4: Azure Sentinel Architecture
The design of a SIEM is as important as the SIEM itself. When deploying, it is essential to anticipate design, architecture, and best practices. To provide some guidance and advice, a blog that covers the best practices for implementing Azure Sentinel and Azure Security Center is included.
Along with the best practices for implementing Azure Sentinel, it is essential to understand the costs associated with using the product. Azure Sentinel as a service is mostly free but it is important to understand where the costs are coming from and how you can project costs when reviewing data ingestion options and volume. The Azure Calculator is an invaluable tool that assists with this process and can provide insight into how much it will cost to ingest data that is not free.
Feature 5: Setup Azure Sentinel
The use cases have been determined. The learning material has been reviewed. The prerequisites are understood. The architecture is set and the costs are projected. It is time to begin to take action and deploy the resources to set up Azure Sentinel. As covered in the Ninja training, Azure Sentinel is built on top of the Azure Log Analytics service. This service will serve as the main point for ingestion and log retention. The Azure Log Analytics is where one will collect, process, and store data at cloud scale. For reference, documentation for creating a new workspace is listed in this feature. Once the workspace is ready to go, it is time to onboard it to Azure Sentinel. The documentation for onboarding the workspace is also included in the feature.
Once the service is set up, it is time to determine the permissions that are needed for the users that will be using it. Azure Sentinel has 3 different roles backed by Azure role-based access control (Azure RBAC) to provide built-in roles that can be assigned to users, groups, and services in Azure. The document with the roles is listed in the feature. Additionally, permissions can be assigned on the table level for data in order to prevent users from seeing certain data types if desired.
Feature 6: Data Collection
Data ingestion is the oxygen of Azure Sentinel. Azure Sentinel improves the ability to collect and use data from a variety of sources to unblock customer deployments and unlock full
SIEM value.
Setting up data collection begins not only the data ingestion, but also the machine learning capabilities of Azure Sentinel. When exploring the dozens of connectors that are available out of the box, we recommend to enable the Microsoft security data connectors first. Once first part connectors are chosen, it is time to explore the 3rd party connectors. Each connector listed in this feature includes a description and a reference to the associated document.


Feature 7: Visualize your security data with Workbooks
Once data begins to be ingested, it is time to visualize the data to monitor trends, identify anomalies, and present useful information within Azure Workbooks. Out of the box, there are dozens of built-in Workbooks to choose from as well as several from the Azure Sentinel GitHub community page. Within the feature for Workbooks are a few sample Workbooks to consider. Not every data source or connector will have a Workbook but there are quite a few that can be useful.
Feature 8: Enabling Analytics
One of the main features of Sentinel is its ability to detect malicious or suspicious behaviors based on the MITRE attack framework. Out of the box, there are over 100 different detections built in that were made by Microsoft Security Professionals. These are simple to deploy and the feature in the template provides documentation for deploying the template detection rules, as well as the document for creating your own custom detection rules.
Feature 9: Respond to threats
To compliment its SIEM capabilities, Azure Sentinel also has SOAR capabilities. This feature contains helpful documents for setting up Playbooks for automated response, deploying Playbooks from the GitHub repository, and how to integrate ticket managing services via Playbooks.
Feature 10: Proactive threat hunting
To go along with the reactive features, Azure Sentinel also provides proactive capabilities that provide you the ability to proactively search, review, and respond to undetected or potentially malicious activities that may indicate a sign of intrusion/compromise. Azure Sentinel offers dozens out of the box hunting queries that identify potentially exploitable or exploited areas and activities within your environment. This feature within the template provides links and information to ignite your proactive threat hunting journey with out the box threat hunting queries, bookmarks, Azure Notebooks, and livestream.
Feature 11: Advanced Topics
If desired, Azure Sentinel can be deployed and managed as code. To help provide context and guidance, this feature within the template includes a blog post that covers how one can deploy and managed Azure Sentinel as code.
Assign work items to a team member
You can only assign a work item to one person at a time. The Assigned To field is a person-name field designed to hold an user identity recognizable by the system. Within the work item form, choose the Assigned To field to select a project member. Or, you can begin typing the name of a project member to quickly focus your search to a select few.

Tracking Progress with Boards
Azure DevOps utilizes a progress tracking approach that is similar to Agile project management. Boards lists each task, the state of progress, and the individuals that are assigned to the tasks. As the tasks are worked on, they will move within the Board until they are closed. The tasks can also be clicked and dragged around the Board as desired. This will provide you the blueprint understanding the completed and outstanding tasks for your Azure Sentinel deployment.

What’s Next
The current version of the Azure Devops Board template provides you the blueprint to understand the tasks and recommended practices to onboard to Azure Sentinel. The next iteration will incorporate a CI/CD pipeline that will enhance and automate the tasks/phases covered in the Azure Devops Board template. The CI/CD pipeline will automate your Azure Sentinel deployment so you spend less time with the nuts and bolts and more time securing your environment.
Get started today!
Supercharge your cloud SIEM today!
We encourage you to leverage the Azure Sentinel Devops Board template to accelerate your Azure Sentinel deployment following recommended practices.
Try it out, and let us know what you think!


Recent Comments