by Scott Muniz | Aug 11, 2020 | Uncategorized
This article is contributed. See the original author and article here.
In a recent case, I was asked to help with an FTP error 550 when the FTP client tried to list the files in the FTP site. The user logged on without error but could not see ant files or folders. There was a firewall but the FTP ports being used were open.
So I asked for the FTP logs to find the reason logged. In the FTP logs, we saw 550 1236 38 (status, win32Status, sub status). We know 550 is no such file or directory, I looked up the win32staus 1236 and it is “The network connection was aborted by the local system.” I was not familiar with the FTP sub status, so I opened article 969061, The FTP status codes in IIS 7.0 and later versions to find sub status 38. this is listed: 38 – Client IP on the control channel didn’t match the client IP on the data channel.
Went back to the FTP log and noticed client IP changing once PASV command is run… .7 to .8 and therefore the error.
2020-07-10 21:37:30 n.n.n.7 <User> <server IP> PASV – 227 0 0 7b461e17-7dc0-45f3-b0a5-ccaf36c708ac –
2020-07-10 21:37:30 n.n.n.8 <User> <server IP> 6003 DataChannelOpened – – 0 0 7b461e17-7dc0-45f3-b0a5-ccaf36c708ac –
2020-07-10 21:37:30 n.n.n.8 <User> <server IP> 6003 DataChannelClosed – – 1236 38 7b461e17-7dc0-45f3-b0a5-ccaf36c708ac –
2020-07-10 21:37:30 n.n.n.7 <User> <server IP> 21 LIST – 550 1236 38 7b461e17-7dc0-45f3-b0a5-ccaf36c708ac /
At this point, the firewall engineer mentioned that this was due to the firewall configuration and this behavior could not be changed so the customer ended up using a different firewall product.
This article lists all of the FTP status codes and what they mean…IIS web sites also log sub status…many times the sub status tells us exactly what is wrong without collecting any other data. There are 56 sub statuses listed near the bottom of the page.
https://support.microsoft.com/en-us/help/969061/the-ftp-7-0-status-codes-in-iis-7-0#:~:text=When%20you%20try%20to%20access%20content%20on%20a,the%20exact%20reason%20that%20a%20request%20is%20unsuccessful.
The FTP substatus codes
This section describes the FTP substatus codes that IIS 7.0 uses:
- 0 – Successful operation.
- 1 – Authorization rules denied the access.
- 2 – File system denied the access.
- 3 – File system returned an error.
- 4 – IP restriction rules denied the access.
- 5 – Write access for the root of the virtual directory is forbidden.
- 6 – Short file name check has failed.
- 7 – Short file names are forbidden.
- 8 – Hidden segment was detected in the path based on request filtering rules.
- 9 – Denied Url sequence detected in the path based on request filtering rules.
- 10 – High bit characters detected in the path based on request filtering rules.
- 11 – File extension was denied based on request filtering rules.
- 12 – Path is too long based on request filtering rules.
- 13 – Attempt was made to open object that is not a file or directory.
- 14 – Control channel timed out.
- 15 – Data channel timed out.
- 16 – Control channel timed out based on new connection timeout.
- 17 – Invalid site configuration.
- 18 – Invalid configuration.
- 19 – Maximum connection limit was reached.
- 20 – Data channel was closed by ABOR command from client.
- 21 – Site is being stopped.
- 22 – Data channel was aborted by server due to an error.
- 23 – Data channel was aborted by client.
- 24 – SSL policy requires SSL for data channel.
- 25 – SSL policy requires SSL for control channel.
- 26 – SSL policy requires SSL for credentials.
- 27 – SSL policy denies SSL for data channel.
- 28 – SSL policy denies SSL for data channel.
- 29 – SSL policy denies SSL for credentials.
- 30 – SSL policy denies SSL for commands.
- 31 – SSL certificate was not configured.
- 32 – SSL initialization failed.
- 33 – Home directory lookup failed.
- 34 – Custom authentication call failed.
- 35 – User failed to authenticate.
- 36 – All authentication methods are disabled.
- 37 – Hostname didn’t match any configured ftp site.
- 38 – Client IP on the control channel didn’t match the client IP on the data channel.
- 39 – Maximum file size was exceeded. 40ActiveDirectory Isolation must be combined with basic authentication.
- 41 – An error occurred during the authentication process.
- 42 – Anonymous authentication is not allowed.
- 43 – Protection negotiation failed. PROT command with recognized parameter must precede this command.
- 44 – SSL certificate was not found.
- 45 – Private key was not found for the specified SSL certificate.
- 46 – SSL certificate hash has invalid length.
- 47 – SSL policy requires client certificate.
- 48 – User provided invalid client certificate.
- 49 – SSL policy requires matching client certificate for control and data channel.
- 50 – Data channel timed out due to not meeting the minimum bandwidth requirement.
- 51 – Command filtering rules denied the access.
- 52 – Session disconnected by administrator.
- 53 – Connection error.
- 54 – Session closed because of configuration change.
- 55 – 128-bit encryption is required for SSL connections.
by Scott Muniz | Aug 11, 2020 | Azure, Microsoft, Technology, Uncategorized
This article is contributed. See the original author and article here.
by @Edwin Hernandez
In this article, I will describe the implementation of a logger for UI Test automation and the integration with test execution from an Azure DevOps Release pipeline. This article and the demo solution are standalone articles; however, I do build on concepts we reviewed on previous articles, specifically:
You may want to read through those articles before starting with this one. Having said that, let us get started describing what the logger does.
Purpose
UI Test automation and Regression are time-consuming expensive tasks because of their initial time investment and their maintenance effort. Even if a test suite is well maintained, once Automated Regression is executed, you still need a QA Automation Engineer to analyze the results and investigate any errors.
The purpose of this logger is to provide a detailed log of the flow of the UI script, including test case steps and screenshots. The QA Engineer or a Business Analyst can use the information from the logger to follow the business logic of the UI test and more easily validate if the intended work was completed or the reason for failure if an error occurred. A descriptive log can be more useful than even an actual video recording of the test.
Logger Features
- The logger creates a single HTML file that contains all messages and embedded images.
- This class is meant to be used in a Page Object Model project, when the LogMessage method is called it reflects itself to get the calling method and class and it uses this information to write a message into the HTML log.
- There are 4 log levels to help filtering how much information you want to log (error, warning, passed, info). This and other configurations are exposed as global variables. You can also specify the level up to which you want screenshots to be taken.
- Screenshots are saved as binary strings and embed into the HTML file so that you end up with a single file. This greatly helps the integration with Azure DevOps.
- This logger is adaptable since it is a standalone class. You can plug it into several types of UI Test projects. I have personally used it with WinAppDriver, CodedUI, Selenium WebDriver, and Xamarin.UITests projects with minimal changes, pretty much all that needs to be changed is the type of session object that is passed as an argument and the screenshot method.
Logger Requirements
- Given the frameworks I just mentioned, you can guess that this Logger class was written in C# and is meant to be used on Visual Studio for UI Test projects running over MSTest or NUnit projects. You could adapt it to other types of frameworks, but it would require more work.
- As I said this logger is meant to be used as part of a Page Object Model (POM), it is not that you couldn’t use it with a straight Top to Bottom test but you would take more advantage of it in a POM project.
Other than that, the log method needs to be specifically called every time something needs to be logged. I explored the option of using the constructor or interfaces, but it would require the class to be more coupled with the test solution and I wanted it to be more portable.
Configuration Variables
The logger configuration variables should be put for example on the Class Initialize method:

A log level of 4 would log all messages, a log level of 3 would log only messages level 1 to 3. You can change the labels of the labels in the HTMLLogFile class itself.
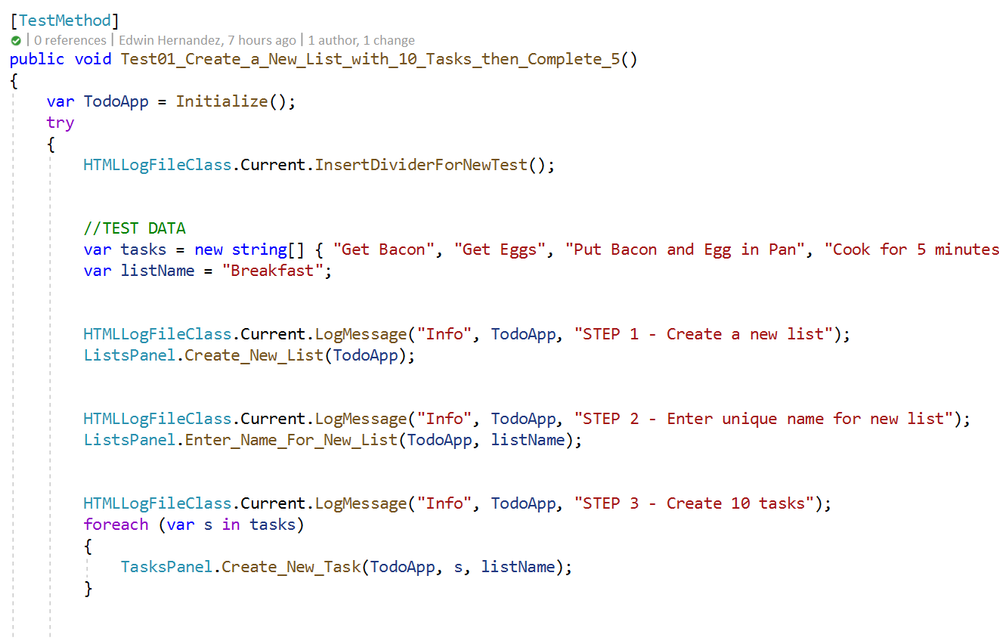
Logging Messages from the Test Method
As I mentioned earlier, the LogMessage method needs to be called every time something is to be logged into the file. I recommend that only “Info” level messages should be logged from the Test Method, mostly to log comments and business step details that would make the HTML report easier to read, for example:

The InsertDividerForNewTest creates a header for the report, then every “Info” step is logged with or without screenshots depending on the configured level.
Logging Messages from the Page Class Methods
This may be the most interesting part, every time you use LogMessage from the Page Class Methods, the HTMLLogFile class will use reflection to get the calling method/class information and it will include this information into the HTML report, take the following for example:

By including LogMessage “Passed” at the end, the HTML log will print the following:
Thus, by having well-constructed Page Object Classes, the log would build itself with very few additional comments.

Finding the Log for Local Test Executions
To have this HTML file to be uploaded to Azure DevOps it must be part of the Test Context. This part is included in this demo in the Class Cleanup Method:

If the UI test is executed from Visual Studio (make sure you have WinAppDriver installed, please check my other post about this on the top). The Test Detail Summary should show additional output already part of the Test Context, and inside of that you can see the HTML file:

.

If you open that, the HTML log should have a header, then every Log Message. Please note that screenshots are expandable on hover.

Integration with Azure DevOps Release Pipeline
Now for the next part, I will only show what the result would look like. Setting up a Release Pipeline in Azure DevOps for UI Test Regression is not in the scope of this article. I intend to cover that in a future article, there are several ways to accomplish that depending on what you need to do.
For now, the screenshot below is a simple Release Pipeline that takes the Test Assemblies as an artifact, executes the Tests on a Private (Self-Hosted) Build Agent set on interactive mode.
MSTest automatically uploads to the Release Pipeline test results information (# of test passed, pass %, duration, etc.) and if you expand a specific test and navigate to the Attachments panel, the HTML Log file should be there already associated with that test. Every test will get a unique HTML file:

The benefits of running Regression from a Release Pipeline are related to traceability against a Build/Environment and even user stories and test cases. For deployment approval and for historical purposes since tests are saved into the cloud instead of local files.
Download Demo Project and HTMLLogFIle class
You can find at the bottom of this post, a file containing a Visual Studio solution that has a demo POM library project, a test project, and the HTMLLogFIle class, as well as a demo HTML report file as a reference.
If you have any comments/concerns, please reach out or comment below.
![The Intrazone, partner edition: “Fujitsu” [innovative scanning solutions]](https://www.drware.com/wp-content/uploads/2020/08/large-538)
by Scott Muniz | Aug 11, 2020 | Uncategorized
This article is contributed. See the original author and article here.
The Intrazone continues to spotlight Microsoft partners, the people and companies who deliver solutions and services to empower our customers to achieve more.
In our fifth partner episode, we talk with Jeff Willinger (Digital Workplace Innovator and Microsoft MVP (Fujitsu)) and his customer, Pete Schweiss (Data and Support Specialist | Boys Hope Girls Hope (BHGH)). BHGH is a not-for-profit helping academically capable and motivated children-in-need to meet their full potential. Fujitsu delivers innovative scanning solutions and services to streamline operations and overcome critical business productivity challenges.
We talk with them about how the Fujitsu solution helps BHGH digitize thousands of paper documents to minimize both physical space requirements and improve both usability and searchability. They, too, shared their planning and considerations for Project Cortex, to further minimize indexing and metadata management to further remove humans from the tagging and sorting process. The real goal is to provide more time spent creating opportunities and education through college – to develop future “graduate stories of hope.”
OK, Partner (edition), on with the show…
Subscribe to The Intrazone podcast! Listen this partner episode on Fujitsu now + show links and more below.
![Left-to-right: Jeff Willinger, Digital Workplace Innovator and Microsoft MVP (Fujitsu) and Pete Schweiss, Data and Support Specialist (Boys Hope Girls Hope); [The Intrazone guests]](https://gxcuf89792.i.lithium.com/t5/image/serverpage/image-id/211817i8754A8520A8A80A9/image-size/large?v=1.0&px=999 "JeffWillinger_PeteSchweiss_Fujitsu-BHGH_IZP_005.jpg") Left-to-right: Jeff Willinger, Digital Workplace Innovator and Microsoft MVP (Fujitsu) and Pete Schweiss, Data and Support Specialist (Boys Hope Girls Hope); [The Intrazone guests]
Left-to-right: Jeff Willinger, Digital Workplace Innovator and Microsoft MVP (Fujitsu) and Pete Schweiss, Data and Support Specialist (Boys Hope Girls Hope); [The Intrazone guests]
Link to articles mentioned in the show:
- Hosts and guests
- Articles and sites
- Events
Subscribe today!
Listen to the show! If you like what you hear, we’d love for you to Subscribe, Rate and Review it on iTunes or wherever you get your podcasts.
Be sure to visit our show page to hear all the episodes, access the show notes, and get bonus content. And stay connected to the SharePoint community blog where we’ll share more information per episode, guest insights, and take any questions from our listeners and SharePoint users (TheIntrazone@microsoft.com). We, too, welcome your ideas for future episodes topics and segments. Keep the discussion going in comments below; we’re hear to listen and grow.
Subscribe to The Intrazone podcast! And listen this partner episode on Fujitsu now.
Thanks for listening!
The SharePoint team wants you to unleash your creativity and productivity. And we will do this, together, one partner at a time.
The Intrazone links
![Left to right [The Intrazone co-hosts]: Chris McNulty, senior product manager (SharePoint, #ProjectCortex – Microsoft) and Mark Kashman, senior product manager (SharePoint – Microsoft).](https://www.drware.com/wp-content/uploads/2020/06/large-147 "Mark Kashman_0-1585068611977.jpeg") Left to right [The Intrazone co-hosts]: Chris McNulty, senior product manager (SharePoint, #ProjectCortex – Microsoft) and Mark Kashman, senior product manager (SharePoint – Microsoft).
Left to right [The Intrazone co-hosts]: Chris McNulty, senior product manager (SharePoint, #ProjectCortex – Microsoft) and Mark Kashman, senior product manager (SharePoint – Microsoft).
 The Intrazone, a show about the Microsoft 365 intelligent intranet (aka.ms/TheIntrazone)
by Scott Muniz | Aug 11, 2020 | Uncategorized
This article is contributed. See the original author and article here.
If you’ve been following news for Microsoft Planner on the commercial side, you likely saw our big announcement last week that we’re starting to rollout Tasks in Teams. As with most commercial releases, Tasks in Teams will be available for government cloud offerings at a later date. Keep an eye on your Office Message Center inbox for updates.
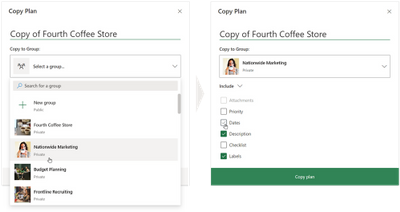
But Tasks in Teams wasn’t the only Planner news of note. Last month, we made Copy plan available for all government plans across GCC, GCC High, and DoD. Copy plan is exactly what it sounds like: the feature lets you copy an existing plan and its task card elements—these include attachments, priority, dates, description, checklist, and labels—into a new or current group (Microsoft 365 Groups) or team (Microsoft Teams). This means you no longer need to manually recreate plans for repeated processes, like requests for proposals or recurring budgeting projects.

You can read more about the Copy plan feature in our June roundup blog.
Please check visit our support page for a complete list of Planner features coming to the government cloud. If you’d like to keep up with all things Planner, our Tech Community page is the perfect place for learning about the latest announcements. You can also leave us suggestions for improving your Planner experience on UserVoice. And if you’re new to Planner, our support page will help get you started.
by Scott Muniz | Aug 11, 2020 | Uncategorized
This article is contributed. See the original author and article here.
Howdy folks,
When it comes to securing your organization, nothing is more effective than enabling multi-factor authentication (MFA) for your users. Whether using traditional methods like phone or token codes, or modern passwordless methods like the Authenticator, Windows Hello, or FIDO, MFA reduces the probability of account compromise by more than 99.9%. As part of adopting MFA, you should block legacy authentication endpoints that can’t support MFA. Legacy authentication protocols like POP, SMTP, IMAP, and MAPI can’t enforce MFA, making them preferred entry points for adversaries attacking your organization.
Organizations use Azure AD Conditional Access to enforce Zero-Trust Least-Privileged Access policies. Conditional Access allows you to determine access based on explicitly verified signals collected during the user’s sign-in, such as the client app, device health, session risk, or IP address. This is the best mechanism to block legacy authentication, but a recent analysis showed fewer than 16% of organizations with Conditional Access have policies that apply to sign-ins using legacy authentication protocols.
To help organizations more easily achieve a secure Zero Trust posture, we’re announcing 2 updates to help customers block legacy authentication:
- New Conditional Access policies will apply to legacy authentication clients by default.
- The client apps condition, including improvements to the client apps admin experience, is now in General Availability.
Daniel Wood, a program manager on the Conditional Access team, has written a blog to explain how these changes can help secure your organization. As always, please share your feedback below or reach out to intelligentaccesspm@microsoft.com with any questions.
Best regards,
Alex Simons (@Alex_A_Simons)
Corporate Vice President of Program Management
Microsoft Identity Division
——-
Hi everyone,
Today, I’m excited to announce we’re taking a big step forward in helping to make organizations more secure by changing the default Conditional Access configuration for new policies to apply to all client apps—including legacy authentication clients.
We’ve simplified the admin experience to make it easier for admins to create policies targeting modern authentication clients and legacy authentication clients. By default, all new Conditional Access policies will apply to all client app types when the client apps condition is not configured. Sign-ins from legacy authentication clients don’t support MFA and don’t pass device state information to Azure AD, so they will be blocked by Conditional Access grant controls, such as requiring MFA or compliant devices. If you have accounts which must use legacy authentication, you can grant them policy exceptions to keep them from being blocked.
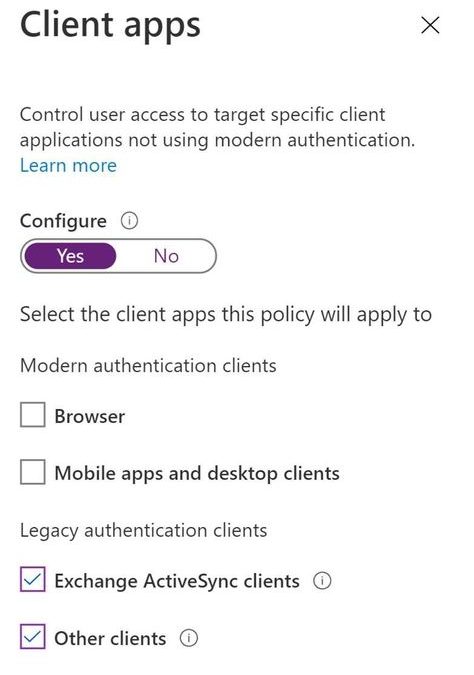
If you want to create a Conditional Access policy that only targets legacy authentication clients, switch the client apps Configure toggle to Yes and deselect Browser and Mobile apps and desktop clients, leaving Exchange ActiveSync and Other clients selected.

And for those of you who manage your policies using the Microsoft Graph API, we’ve simplified the client apps schema with the release of the new Conditional Access API in v1.0 to match the new UX. Here’s an example of the new default configuration for the client apps condition when you create a new policy using the API.

What about my existing Conditional Access policies?
If you have existing Conditional Access policies, they will continue to apply to the same client apps with no change. However, if you view an existing policy, we’ve made it easier to see which client apps are selected by removing the Configure Yes/No toggle. Existing policies where the client apps condition was not configured now look like this:

Understanding client app usage in your organization
Before creating a new policy, it’s good to understand who’s using legacy authentication in your organization. To see which client apps and protocols are being used in your organization during sign-in, simply navigate to the Sign-ins page and filter the results by client app type.

Share your feedback!
We hope that these changes make it easier for admins to secure their organizations by blocking legacy authentication. As always, please share your feedback below or reach out to intelligentaccesspm@microsoft.com with any questions.
Thanks,
Daniel Wood (@Daniel_E_Wood)
Program Manager
Microsoft Identity Division

Recent Comments