by Scott Muniz | Jul 8, 2020 | Uncategorized
This article is contributed. See the original author and article here.
Hey AML community! The VS Code team is excited to present new capabilities we’ve added to the Azure Machine Learning (AML) extension. From version 0.6.12 onwards we’ve introduced UI changes and ways to help you manage Datastores, Datasets, and Compute instances all from directly within your favourite editor!
We’re guessing many of you may be reading about this extension for the first time – don’t worry, we’re here to explain!
The extension is a companion tool to the AML service. It provides a guided experience to help you create and manage your AML resources from directly within VS Code. The extension aims to streamline tasks such as running experiments, creating compute targets, and managing environments, without requiring the context-switch from the editor to the browser. With an easy-to-navigate tree view you can work across all your workspaces and interact with your core AML assets using single-click commands.
If you’d like to learn more and experiment with the extension you can install it here and try the getting started docs here!
Datastore Integration
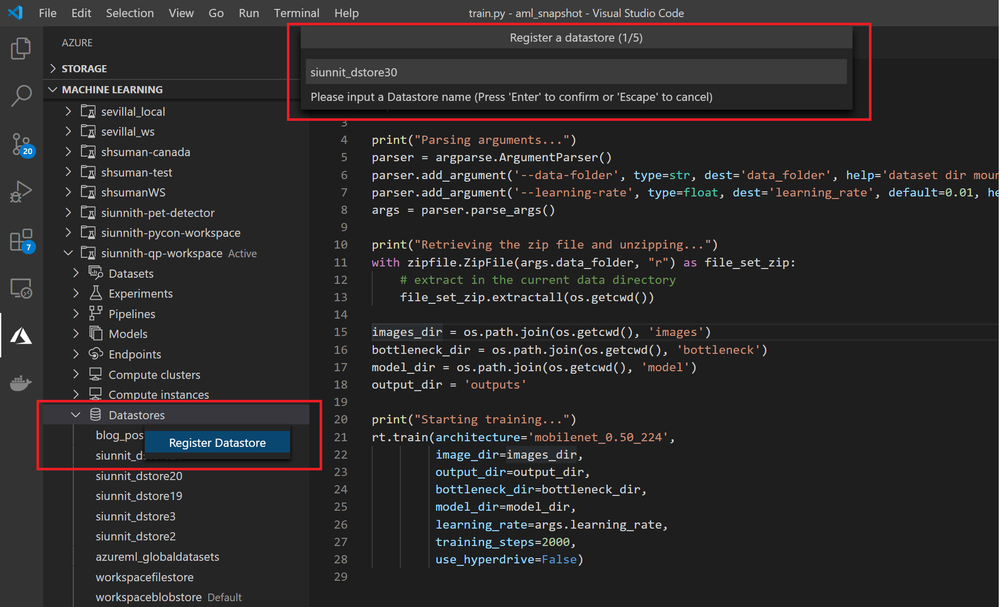
One of the new features we released is the support for Datastore registration. The extension currently supports Azure Blob Storage and Azure File Share datastore types. We’ve designed a set of streamlined input options to enable faster registrations, such as automatic retrieval of your Account Key credentials to authenticate against the storage account.
 Register a Blob or File-based datastore in a highly streamlined manner
Dataset Integration
The extension also supports creating Tabular and File datasets from local files or web URLs.
 Create a Tabular or File Dataset via the extension tree view
Once you’ve created a Tabular dataset, you can use the extension to preview your data from directly within the editor. In the case of parquet data, the extension may require a profile run before previewing
 Preview tabular dataset and filter rows.
Via the extension, you can use your datasets during training without having to write extra AML SDK code. Right before submitting, you’re shown a partial run configuration which abstracts the complexities of referencing your datasets through an estimator. In the configuration, you just need to input the script parameter and attach mechanism you want to use for File datasets, and the named input you’d like for Tabular datasets.
"datasets": {
    // file dataset input
    "mnist-ds": {
        "version": 1,
        "scriptParam": "--data-folder",
        "attachMechanism": "Mount"
    },
    // tabular dataset input
    "titanic-ds": {
        "version": 1,
        "namedInput": "titanic_ds"
    }
}
Compute Instance Integration
Creating and managing compute instances has never been easier! You can view all your workspace’s compute instances and start/stop/restart them through commands in the tree. With a small number of clicks, you can create an SSH-enabled compute instance from directly within VS Code. Upon creating an SSH-enabled compute instance, you can follow our in-editor documentation to easily connect to your compute via the VS Code Remote SSH extension.
 Manage compute instances and connect to them via SSH
UI Changes
Something we’ve been hearing for a long time is how the extension UI differs from the Azure ML Studio. In the previous photos you may have already noticed the highly consistent design in the extension tree view. We’ve updated each node with Studio-equivalent icons and have renamed/reordered them where appropriate.
Feedback
As mentioned throughout the blog post, many of the newly released features are in their preliminary phases and we’re actively working to support a broader set of scenarios that are consistent with the Azure ML Studio and SDK experiences. Here are some of the scenarios we’re actively working on:
- Running your Notebooks in VS Code directly on an AML compute instance.
- Building and working in Docker containers from an AML environment.
- Creating datasets from an existing blob or file-based datastore.
- Using AML environments when deploying an endpoint.
If there’s anything that you would like us to prioritize, please feel free to let us know on Github!
If you’re an existing user of the extension and would like to provide feedback, please feel free to do so via our survey.
by Scott Muniz | Jul 8, 2020 | Azure, Microsoft, Technology, Uncategorized
This article is contributed. See the original author and article here.
Special thanks to “Ofer Shezaf”, “Yaniv Shasha” and “Bindiya Priyadarshini” that collaborating with me on this blog post
As highlighted in my last blog post about Azure Sentinel’s Side-by-Side approach with Splunk, there are in fact reasons that enterprises are using Side-by-Side architecture to take advantage of Azure Sentinel. Side-by-Side is not only about having both SIEMs operating at the same time, but it also provides flexibility for migration of existing SIEM and SOAR use cases to Azure Sentinel.
This blog describes how Azure Sentinel can be used Side-by-Side with QRadar.
The following options are available to ingest Azure Sentinel alerts into QRadar:
This blog post is going to cover the integration with Microsoft Graph Security API.
QRadar can collect events from data sources by using a plug-in called Device Support Module (DSM). IBM provides a DSM to collect data from the Microsoft Graph Security API.
Let’s start the configuration!
Preparation & Use
The following tasks describe the necessary preparation and configurations steps.
- Onboarding Azure Sentinel
- Registration of an application in Azure AD
- Preparation steps in QRadar
- Configuration steps in QRadar
- Using Azure Sentinel alerts in QRadar
Onboarding Azure Sentinel
Onboarding Azure Sentinel is not part of this blog post; however, required guidance can be found here.
Registering an Application in Azure AD
The steps required to register an app in Azure are described here. The registered app requires read access to the SecurityEvents.Read.All field in Microsoft Graph Security API.
For further configuration in QRadar, make a note of following settings:
- The Azure AD Application ID
- The Azure AD Application Secret
- The Tenant ID
Preparation Steps in QRadar
Using the Microsoft Graph Security API DSM to collect alerts from Azure Sentinel requires the following RPMs to be installed on QRadar:
- Protocol Common RPM
- Microsoft Graph Security API Protocol RPM
Download the latest version of RPMs from http://www.ibm.com/support and run the following commands to install the RPMs.
yum -y install DSM-DSMCommon-7.3-20190708191548.noarch.rpm
yum -y install PROTOCOL-MicrosoftGraphSecurityAPI-7.3-20200501003005.noarch.rpm
Preparation Steps in QRadar
Now it is time to use the QRadar portal.
Log on to the “QRadar portal“and click on “Admin“tab
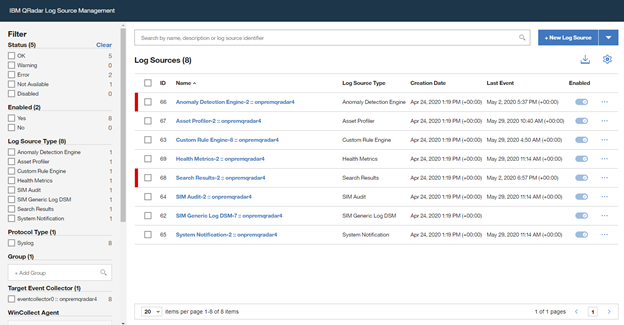
Open the “QRadar Log Source Management“ screen and click on the “+New Log Source” button

Select “Single Log Source”

Search for “Universal DSM“, select it and click on “Step 2: Select Protocol Type”

Search for “Microsoft Graph Security API“, select it and click on “Step 3: Configure Log Source Parameters”

Type a “Name” and a “Description“, and configure “other parameters” , and click to “Step 4: Configure Protocol Parameters“

Add a “Log Source Identifier” and specify the parameters noted above when registering the Azure AD app (Azure AD Client ID, Azure AD Client Secret and Tenant ID).
If you want to filter only Azure Sentinel alerts from Microsoft Graph Security API, use the following filter in the parameter “Event Filter“.
provider eq ‘Azure Sentinel’

Click on “Step 5: Test Protocol Parameters” to continue with the wizard.

If you want to validate the configuration, click ”Start Test”, otherwise finish the configuration by clicking “Skip Test and Finish”.

Once the wizard is closed, the created “Log Source” is shown on the “Log Source Management” screen.

However, the configuration is not finished yet, it must be deployed in the “QRadar Admin portal“. Click on “Deploy Change” to apply the configuration.

Using of Azure Sentinel alerts in QRadar
Once the alerts are ingested, you can query Azure Sentinel alerts in QRadar.
A sample RAW alert from Azure Sentinel collected from Microsoft Security Graph API looks as shown below.
{“eventDateTime“: “2020-06-08T10:39:58.3572933Z“, “category“: “xxxxxxxx-xxxx-xxxx-xxxx-xxxxxxxxxxxx_xxxxxxxx-xxxx-xxxx-xxxx-xxxxxxxxxxxx“, “azureSubscriptionId“: “xxxxxxxx-xxxx-xxxx-xxxx-xxxxxxxxxxxx”, “description“: “Identifies when an RDP connection is new or rare related to any logon type by a given account today based on comparison with the previous 14 days.nRDP connections are indicated by the EventID 4624 with LogonType = 10“, “status“: “newAlert“, “severity“: “medium“, “title“: “Rare RDP Connections“, “hostStates“: [{“netBiosName“: “CLIENT“, “fqdn“: “CLIENT.DOMAIN.LOCAL“}], “vendorInformation“: {“vendor“: “Microsoft“, “provider“: “Azure Sentinel“}, “createdDateTime“: “2020-06-22T10:45:00.0929766Z“, “lastModifiedDateTime“: “2020-06-22T10:45:00.1940637Z“, “userStates“: [{“userPrincipalName“: “user“, “emailRole“: “unknown“, “accountName“: “account“, “domainName“: “domain“}], “id“: “xxxxxxxx-xxxx-xxxx-xxxx-xxxxxxxxxxxx”, “azureTenantId“: “xxxxxxxx-xxxx-xxxx-xxxx-xxxxxxxxxxxx”}
Summary
We just walked through the process of standing up Azure Sentinel Side-by-Side with QRadar. Stay tuned for more Side-by-Side scenarios in our blog channel.
by Scott Muniz | Jul 8, 2020 | Azure, Microsoft, Technology, Uncategorized
This article is contributed. See the original author and article here.
v:* {behavior:url(#default#VML);}
o:* {behavior:url(#default#VML);}
w:* {behavior:url(#default#VML);}
.shape {behavior:url(#default#VML);}
Sarah Young
Normal
Sarah Young
2
168
2020-06-03T23:46:00Z
2020-06-03T23:46:00Z
6
1100
6275
52
14
7361
16.00
0x0101001375AE3D4E6C9D4BA2C69EC322D353A4
Clean
Clean
false
false
false
false
EN-NZ
X-NONE
<w:LidThemeComplexscript>X-NONE</w:LidThemeComplexscript>
Azure Sentinel has several different APIs that you can interact with, and we’ve recently released the Sentinel Management API to add another API into the mix. This topic can – initially – be slightly confusing as we have APIs at both the Sentinel and Log Analytics level that can both be used in conjunction with Azure Sentinel. In this article we are going to explore the following:
- What APIs Sentinel has available
- How to authenticate to each API
- What you can use each API for
- Tools that you can use with the APIs
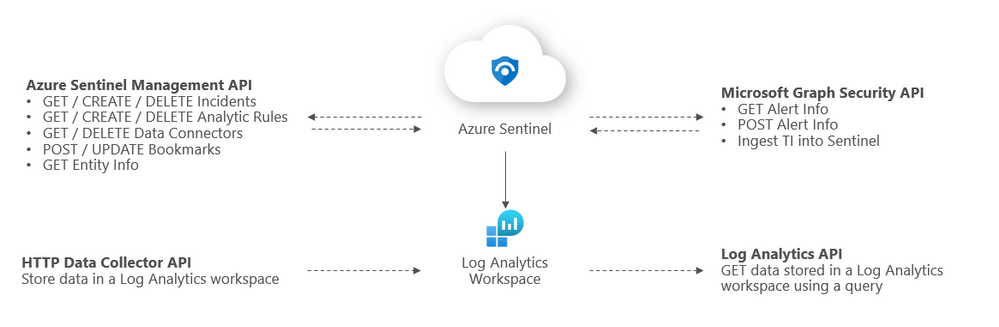
Overview of Sentinel APIs
We can categorize Azure Sentinel APIs as follows:
- Azure Sentinel Management API
- Microsoft Graph Security API
- Log Analytics API
- HTTP Data Collector API
The below diagram summarizes where the different APIs within Sentinel sit architecturally and what calls can be made to them:

Azure Sentinel Management API
The Sentinel Management API allows you to manage aspects of Azure Sentinel specifically outside of Log Analytics e.g. incidents and analytic rules. The GitHub repo link to our API branches can be found here.
Sentinel Management API uses*
- GET / CREATE / DELETE incidents
- GET / CREATE / DELETE analytic rules
- GET / DELETE data connectors
- POST / UPDATE bookmarks
- GET entity info
*Please refer to the GitHub repo for a comprehensive list of API uses.
Example API call
GET https://management.azure.com/subscriptions/{subscriptionID}/resourceGroups/{resourcegroup}/providers/Microsoft.OperationalInsights/workspaces/{workspaceID}/providers/Microsoft.SecurityInsights/incidents/?api-version=2019-01-01-preview
Sentinel Management API authentication
Register an application in Azure AD. To authenticate to the Sentinel Management API, grant Sentinel Contributor / Azure Sentinel Responder / Azure Sentinel Reader” permissions* to the application created in the IAM setting of the Resource Group where Azure Sentinel has been built:
*Adhering to the principle of least privilege, always grant the lowest possible permissions required to your API.

Tools to use with this API
The most common use for the API is to automate the deployment and update of Analytics alert rules and hunting queries. Wortell has created a PowerShell tool called AzSentinel and this can be used to export and import all rules from a workspace. @Javier Soriano and @Philippe Zenhaeusern have implemented a CI/CD flow using GitHub, Azure DevOps, and the Sentinel automation capabilities. It enables you to manage rules, queries, playbooks, workbooks, and more on GitHub and have them continuously deployed to your Sentinel workspace which you can read about here.
Microsoft Graph Security API
You may be familiar with the Graph Security API from using other Microsoft security products. The Microsoft Graph Security API provides a unified interface and schema to integrate with security solutions from Microsoft and ecosystem partners. The Microsoft Graph Security API federates queries to all onboarded security providers and aggregates responses. @Stefan Simon blogged about ingesting M365 alerts into Sentinel on MS Tech Community, the link to this article is here.
Microsoft Graph Security API uses
- GET security alerts.
- POST security alerts.
- Ingest TI into Sentinel.
More details on calling the Graph Security API can be found here.
Example API call
GET https://graph.microsoft.com/v1.0/security/alerts?$filter=vendorInformation/provider eq
‘Azure Sentinel’
Microsoft Graph Security authentication
To authenticate to the Graph Security API, you need to register an app in Azure AD and grant the app permissions to Microsoft Graph:
- SecurityEvents.Read.All or;
- SecurityEvents.ReadWrite.All*
*Adhering to the principle of least privilege, always grant the lowest possible permissions required to your API.

More details on authenticating to the Graph Security API can be found here.
Tools to use with this API
https://docs.microsoft.com/en-us/graph/api/resources/security-api-overview?view=graph-rest-1.0#alerts
https://docs.microsoft.com/en-us/azure/sentinel/connect-threat-intelligence#connect-azure-sentinel-to-your-threat-intelligence-platform
Log Analytics API
The Log Analytics API allows you to query a Log Analytics workspace, including workspaces that have Sentinel set up on them. @rinure blogged on this topic previously in on MS Tech Community and went into great detail, you can read his blog here.
Log Analytics API uses
- GET / POST data stored in a Log Analytics workspace*
*sometimes POST requests will need to be used to read data (not to send data to the LA workspace). More details on the API request format can be found here.
Example API call
GET https://api.loganalytics.io/v1/workspaces/{workspace-id}/query?query=AzureActivity%20|%20summarize%20count()%20by%20Category

Authorization: Bearer <access token>
Log Analytics API authentication
To authenticate to the Log Analytics API, you need to register an app in Azure AD and grant the app Data.Read permissions to the Log Analytics API:

Next, go to the IAM section of your Sentinel Log Analytics workspace and grant “Log Analytics Reader” or “Log Analytics Contributor” permission to the application*:
*Adhering to the principle of least privilege, always grant the lowest possible permissions required to your API.

Limitations of the Log Analytics API
As well as call rate limits and daily quota caps, there are also limits on queries themselves:
- Queries cannot return more than 500,000 rows
- Queries cannot return more than 64,000,000 bytes (~61 MiB total data)
- Queries cannot run longer than 10 minutes by default. See this for details.
For up to date limitations of the Log Analytics API, please see here.
Tools to use with this API
There are some tools that already use the API and can make life simpler:
HTTP Data Collector API (Public Preview)
You can use the HTTP Data Collector API to send log data to a Log Analytics from any client that can call a REST API. This might be a runbook in Azure Automation that collects management data from Azure or another cloud, or it might be an alternate management system that uses Azure Monitor to consolidate and analyze log data. More details about this connector can be found here.

HTTP Data Collector API uses
- POST data to a Log Analytics workspace
Example API call
We’ve put together a simple C# console application to demonstrate how you can leverage the HTTP Data Collector API to post data to Log Analytics custom logs, click here for details.
HTTP Data Collector API authentication
Any request to the Azure Monitor HTTP Data Collector API must include an authorization header. To authenticate a request, you must sign the request with either the primary or the secondary key for the workspace that is making the request. Then, pass that signature as part of the request.
Authorization: SharedKey <WorkspaceID>:<Signature>
HTTP Data Collector API limitations
There are some constraints around the data posted to the HTTP Data Collector API.
- Maximum of 30 MB per post to Azure Monitor Data Collector API. This is a size limit for a single post. If the data from a single post that exceeds 30 MB, you should split the data up to smaller sized chunks and send them concurrently.
- Maximum of 32 KB limit for field values. If the field value is greater than 32 KB, the data will be truncated.
- Recommended maximum number of fields for a given type is 50. This is a practical limit from a usability and search experience perspective.
- A table in a Log Analytics workspace only supports up to 500 columns (referred to as a field in this article).
- The maximum number of characters for the column name is 500.
For up to date limitations of the HTTP Data Collector API, please see here.
Tools to use with this API
The API and the different ways to use it are discussed in the custom connectors blog post.
Summary
You have many options to interface with Azure Sentinel using APIs, and what method you choose will depend on what you’re ultimately trying to achieve and your organization’s use cases. This blog post was intended to serve as a brief introduction to APIs in Sentinel. If you’d like to dive deeper into this topic, we’d encourage you to watch our presentation on Extending and Integrating Sentinel (APIs) from our Security Community webinar series and to check out @Ofer_Shezaf‘s accompanying tech community post here.
The diagrams in this article were drawn by @Takeshi Muto. Credit to @Chi Nguyen for the sample HTTP Data Collector API in our GitHub repo. Final thanks to @Ofer_Shezaf for reviewing the content.

by Scott Muniz | Jul 8, 2020 | Uncategorized
This article is contributed. See the original author and article here.
Over the past few months, many organizations have vaulted into an entirely new world of work. We’ve discovered some of the benefits of this new world through more than 30 research projects here at Microsoft, and by learning from our customers and partners. These benefits range from, increased fluidity between work and life activities, allowing people to move between the two more easily, to increased empathy between teammates, and several other benefits detailed in our latest Work Trend Index Report. We’ve also seen the emergence of new challenges. That same blend of work and life can be difficult to balance, home offices without distractions are rare, remote collaboration can feel more difficult than in-person, and access to reliable networks and equipment isn’t available for everyone. While distributed remote work has its rewards, there are certain advantages to in-office collaboration as well. Through these learnings it has become clear – the workplace of the future will not be one location or the other, but a fluid experience across the two.
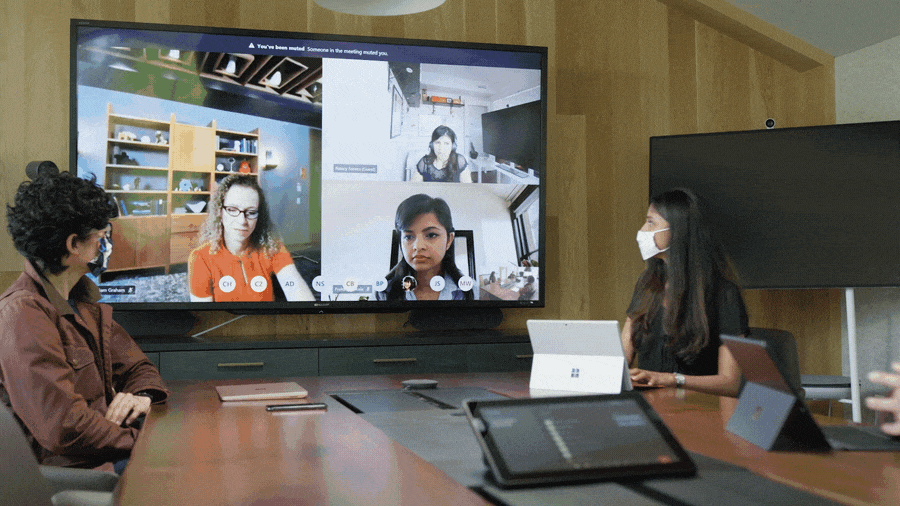
To help our customers navigate this new, hybrid working environment, today we’d like to share some new and reimagined capabilities in Teams-enabled meeting rooms that offer touchless experiences, support inclusive collaboration between remote and in-person attendees, and help remind teams to practice social distancing in meeting rooms.
Touchless experiences on Microsoft Teams devices for shared spaces
Today, people in the meeting room can join a Teams meeting from their Microsoft Teams Room and collaboration bar devices, share content and collaborate using their personal PC or mobile device, all without ever having to touch the shared device display. Later this year, we’ll enable these capabilities on Surface Hub as well. Additionally, Surface Pro X users can use their pen across Surface devices, including Surface Hub 2S, further limiting the contact with the shared device display in a meeting room. As the need for additional touchless experiences grows, we’re expanding these features to allow people to control more aspects of the meeting. In the future, people will be able to choose how they want to interact with their shared space devices, using touch, controls on their own personal devices, and through voice commands.
Soon, in-room participants will be able to control their Teams Room and collaboration bar devices from the Teams mobile app. From the new room remote experience, users will be able to mute and unmute the room, adjust audio volume, turn cameras on and off, and exit the meeting. We’ll also enable wireless casting to any Teams Room, collaboration bar, and Surface Hub for quick ad-hoc connections that don’t require remote participation. Beginning later this year, voice assistance will be enabled for Microsoft Teams Room devices, allowing in-room participants to ask Cortana to join and leave a meeting, and add a phone number or participant from the address book to a meeting.*
When the meeting is over, people can simply leave the room, allowing the Teams Room or collaboration bar to automatically exit the meeting. This feature allows room administrators to designate a period of zero-activity after a meeting is scheduled to end, after which, meeting devices are automatically ejected from the meeting.

Proximity join

Room remote
Wireless casting

Cortana voice assistance on Microsoft Teams Room
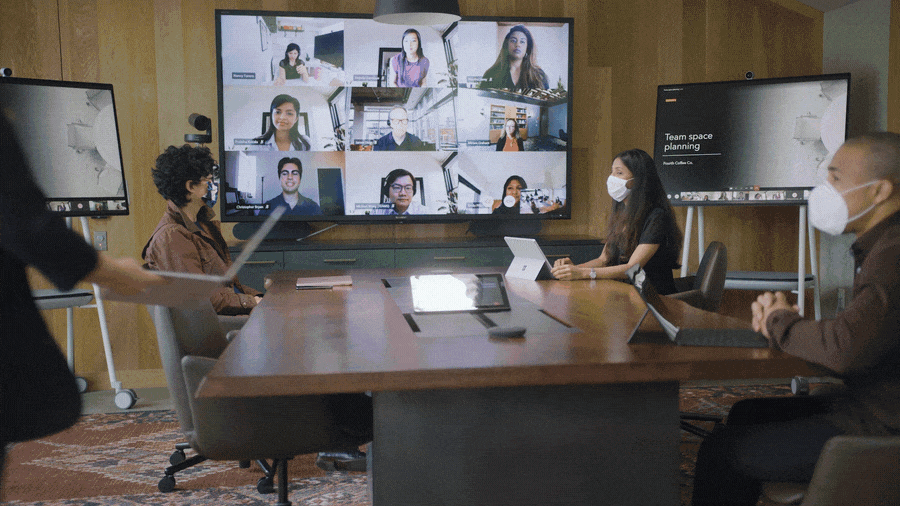
Coordinated meetings with Teams Room and Surface Hub
Teams Room is the premier solution for delivering Teams meeting room experiences with a focus on high fidelity audio, HD video, and seamless content sharing capabilities. Surface Hub delivers unmatched co-creation experiences in meetings, featuring premium pen and inking capabilities, with access to must-have Microsoft apps and Office 365 files. Soon, users will be able to leverage the power of both devices, in the same meeting, through a coordinated experience. Using proximity or one-touch join, both devices join the meeting simultaneously with Teams Rooms running audio and video, while Surface Hub is automatically muted to avoid any distracting feedback. During the meeting, users can maximize screen real estate by using the front of room display to show attendees in the meeting gallery, while the Surface Hub is used to show content or to conduct a collaborative whiteboarding session. With the whiteboard experience on Surface Hub and Microsoft Whiteboard in Teams, people can draw and ink together on the same savable canvas, no matter their location. With this new coordinated device capability, people can drive inclusive, collaborative meeting experiences between remote and in-person attendees like never before.
Coordinated meetings with Surface Hub and Microsoft Teams Room
Meeting room capacity notifications
As organizations plan their transitions back to the office, many are looking to implement new in-office policies to adhere to local safety guidelines. Some of these recommendations include social distancing practices in shared spaces like meeting rooms. To aid our customers in these efforts we’ll soon enable a way for room administrators to automatically notify in-room meeting participants if a room is over capacity. Today, administrators can define meeting room capacity for the room account. Soon, we’ll enable IT to use the data from meeting room cameras with people-counting technologies to identify how many people are in a room, and alert in-room meeting participants if it is over-capacity based on the capacity data defined in the room account. The notification will be displayed as a banner that appears across the top of the screen at the front of the room. In the future, administrators will receive an alert in the Teams Admin Center, allowing them to track room usage to help inform space planning decisions.
Meeting room capacity notifications
Helping people connect across workspaces has never been more important. With Teams meetings and Teams-enabled devices, people can engage in collaborative and inclusive meetings from anywhere.
View our collection of Teams certified devices at the Devices Showcase. From now until 7/31/2020, use code “TeamsDevices20” to receive a discount on a variety of products at checkout. To learn more about Surface Hub, click here.
*Voice assistance will launch first for Microsoft 365 Enterprise users in the U.S., in English. Not all Teams Room audio devices will support Cortana voice assistance.
by Scott Muniz | Jul 8, 2020 | Uncategorized
This article is contributed. See the original author and article here.
Together mode is a new option in Microsoft Teams, Microsoft’s premier app for teamwork and team connection. You’ve probably seen it by now; everyone is united in a virtual space as if in a theater instead of being separated in boxes.
On one level, Together mode is a simple approach to making meetings feel better during the pandemic, however there’s also a deeper level that touches on our latest scientific understandings of cognition, social perception, and communication.
Together mode has a unique look, but it also has a unique feel. People typically become more relaxed, more attentive to one another, more playful, and yet more focused on shared goals. The design offers unique benefits: less fatigue from frequent video meetings, better sense of connection with others, and more effective meetings.
Here are my thoughts on how to get the most of Together mode.
When to use it:
The initial design has been optimized to help people during the pandemic. For now, Together mode is ideal when each person is in front of a webcam in a different location. We are exploring how the design can evolve to support conference rooms and other situations.
- Together mode is especially well-suited to calls in which multiple people will speak; we find that it’s easier and more comfortable for people to find moments to enter a conversation.
- Together mode helps when you must go to a lot of video meetings. Most users report less meeting fatigue.
- Together mode is helpful when a group might have trouble staying attentive, for instance in education settings.
- Together mode supports presenters who need to “read the room” or get energy from attendees.
When to not use it:
If you need to show physical content in your environment, such as a physical whiteboard, then Together mode is not the best choice right now, because it only brings you, not your environment, into the shared space.
The first version of Together mode isn’t optimized to share the screen with PowerPoint presentations. If a PowerPoint presentation is the main event and will take up the entire time of a meeting, Together mode might not be helpful.
Works best when users are not walking around or otherwise moving the camera or screen during the session. It looks weird, like you’re jumping around in your seat.
Together mode is more engaging than a typical video chat, and therefore more distracting from potentially unsafe tasks like driving. You might think, why even bother urging people not to video chat while driving? I wish I could say that I never see people trying to do it! Don’t, please.
The initial release of Together mode supports up to 49 people at a time optimally. Together mode might still be the best choice for a meeting with more than 49 participants, but that will depend on many details about how the meeting is conducted. Best practices for large meetings in Together mode are still emerging.
An itsy-bitsy introduction to the science behind Together mode:
People in Together mode know where others are in a shared virtual space. That means your brain can keep track of what other people are signaling or emoting in a natural way, relying on social/spatial perception; people can intuitively signal each other nonverbally. In a grid, you don’t know where other people are on the screen, relative to you, from their point of view, so natural glances and other subtle cues are impossible.
Together mode creates a shared space in which people are not separated by barriers. Being in overlapping space can lead to silly behavior, as when people “high five”, but there is also a significant benefit. People pay attention to each other more and can gain a better sense of a shared stake in the situation and a shared journey. Constructive behavior signals a level of commitment that isn’t signaled when goofy behavior isn’t even possible.
Together mode creates a usable illusion that the eye contact problem has been mitigated. (Eye contact is a classic problem in video conferencing; people appear to be looking in the wrong direction.) The illusion is based on the unique geometry; everyone is looking at the whole group through a big virtual mirror. The geometry feels natural, yet it turns out that the human brain isn’t great at tracking where someone else is looking within it. Once direct eye contact errors become hard to detect, people intuitively position themselves to look as if they are reacting to one another appropriately.
Best Practices for using Together mode:
It might seem strange to see yourself in the group at first, but that is what allows for the improved understanding of interpersonal signals. Don’t turn off your camera! For example, being a teacher seated with your students might look odd at first, but you’ll probably find that you understand the students better and they pay more attention to you when everyone can see the attention signals passing between all present.
While the initial release works best when everyone has the camera turned on, we are working to support voice only participants at an equal level as well as all types of ability.
But what if you’re shy, and prefer to leave the camera off? I’m often shy too. I ask you to keep an open mind and experiment at whatever pace is comfortable. In our early research, we are seeing people leave the camera on more often in Together mode than in traditional grid designs, and they report that the experience was pleasant. One thing to keep in mind is that when people become more able to interact expressively, then appearance matters proportionately less. If people are paying more attention to what you say and indicate non-verbally, then they’re paying less attention to how you look.
When a group tries Together mode for the first time, or even when someone sees a picture of it for the first time, the first reactions are often light-hearted. Would playfulness get in the way of people understanding that there are important benefits to the design? After all, Teams is for productivity. It isn’t Xbox.
After observing and analyzing many sessions, I’ve come to a new opinion. Playfulness is not a waste of time, even for adults. It is not a bug in human nature, but rather a fine-tuned process crafted over deep evolutionary time that transcends species. It is how we learn to interact with new people, how we build trust and comfort, and how we investigate our environment (consider Together mode as a new part of our environment.) I have stopped trying to get newbie groups to get right to business. Instead I wait for them to get initial, playful reactions out of their systems, and then meetings go wonderfully. It’s not that simple, actually; I sometimes still chastise them during the playful phase because it’s fun to watch people rebel against my exhortations.
What about the physical setup: the monitors, cameras, and so on?
Together mode works fine if you’re sloppy about where the camera, screens, and windows are placed, but here are some tips on how to get the most out of it.
The feature shows you how you present to others, and how you interact with them. People might see your head turn subtly to respond to them, for instance. If you put Together mode in a little window off to the side on a big monitor, then people will see you looking to that side a lot, which can look out of place; that means that they will not get as much in the way of appropriate head turning cues from you. Therefore, Together mode works best if the window containing it is placed straight ahead, in front of you, and takes up all or most of your screen.
Together mode works great on big monitors. I love using it on a Surface Studio. Some people have built up impressive multi-monitor setups for working from home. If you’re one of those people, please place the Together mode window on the same screen where the camera is centered and try to put boring content on your other screens during your meeting. If you look over to the side at a different monitor a lot, it can look a little off. If you want to track mail or text chat during a session, try placing the Together mode window at the top of the screen, centered under the camera, with other windows below it. Then people will see you looking down instead of to the side, which works better.
Together mode works best on a screen that is at least as big as a tablet; it is not optimized for phones right now, although they can work if you prop them up to face you at a head-on angle and aren’t moved around during the meeting. If you use a phone, please try to get the phone and you positioned so that other people can see you looking straight ahead, into the camera, through the duration of the meeting. Once again: much better if the phone is stationary.
Best if the camera is centered, which is true for almost all built-in cameras on laptops and PCs. Together mode looks bigger on tablets when the tablet is positioned horizontally, but then the camera is often off to the side, depending on the tablet’s design, so you might want to position your tablet vertically. Then the view will be smaller, but you won’t be seen looking to the side as much,
The first release of Together mode doesn’t have a reserved seating feature, so if you leave the meeting, you might come back in a different seat, which will disorient other people who thought they knew where to find you. This might not sound important, but the process of spatial/social perception is not entirely conscious, so the disruption can be jarring. Please try to stay in the call the whole time instead of dipping in and out. The design of Together mode will evolve – as will these tips – as new use scenarios are supported.
Because people intuitively adjust themselves to look like they fit well in the virtual space, you might find that you can use Together mode to trick yourself into having better posture. Just tilt the camera – or the camera+screen, if they are the same device – up a little. Then you might find that you raise your frame to look properly seated in Together mode.
We are learning a lot from customers about how to make meetings more engaging and effective; we have many more ideas. We would love for you to try out the first release of Together Mode and let us know what you think to help us shape what comes next. We are in this together.
I know I speak for the many people at Microsoft who have contributed to Together mode when I say we hope you find increased well-being and productivity as you use the new Teams, and maybe even a little fun during difficult times.
-Jaron Lanier

Recent Comments