
by Scott Muniz | Jul 17, 2020 | Uncategorized
This article is contributed. See the original author and article here.
Verbose log is heavily used in replication troubleshooting. You need to find the right job to enable to verbose log. However, it’s not easy to find the jobs when you have hundreds replication jobs in one server.
Here is how:
1.Distribution agent
Following queries list all the distribution agent jobs, including push subscriptions and pull subscriptions. (You may need add more clause to customize your queries). By default, the SQL Server agent job names equal to the agent names for push subscription, unless you explicitly modify the job names.
use distribution—in distributor server
if not exists(select 1 from sys.tables where name =’MSreplservers’)
begin
select job.name JobName,a.name AgentName, a.publisher_db,a.publication as publicationName,sp.name as publisherName ,ss.name as subscriber,a.subscriber_db, a.local_job From MSdistribution_agents a
inner join sys.servers sp on a.publisher_id=sp.server_id–publisher
inner join sys.servers ss on a.subscriber_id =ss.server_id–subscriber
left join msdb..sysjobs job on job.job_id=a.job_id
where a.subscription_type <>2— filter out the anonymous subscriber
end
else
begin
select job.name JobName,a.name AgentName, a.publisher_db,a.publication as publicationName,sp.srvname as publisherName ,ss.srvname as subscriber,a.subscriber_db, a.local_job From MSdistribution_agents a
inner join msreplservers sp on a.publisher_id=sp.srvid–publisher
inner join msreplservers ss on a.subscriber_id =ss.srvid–subscriber
left join msdb..sysjobs job on job.job_id=a.job_id
where a.subscription_type <>2— filter out the anonymous subscriber
end

For push subscription, you can use the job name directly to find the job in distributor server.

For pull subscriptions(local_job=0), you need to run following query in the subscription database in subscriber server.
use subdb2 —in subscriber server
go
select job.name as JobName,distribution_agent as AgentName, *From MSreplication_subscriptions s inner join msdb.dbo.sysjobs job on s.agent_id=job.job_id
By default, the SQL Server agent job names equal to the agent names for pull subscription, unless you explicitly modify the job names.


2.Merge agent
Following queries list all the merge agent jobs, including push subscriptions and pull subscriptions. (You may need add more clause to customize your queries). By default, the SQL Server agent job names equal to the merge agent names.
use distribution—in distributor server
if not exists(select 1 from sys.tables where name =’MSreplservers’)
begin
select job.name JobName,a.name AgentName, a.publisher_db,a.publication as publicationName,sp.name as publisherName ,ss.name as subscriber,a.subscriber_db, a.local_job From MSmerge_agents a
inner join sys.servers sp on a.publisher_id=sp.server_id–publisher
inner join sys.servers ss on a.subscriber_id =ss.server_id–subscriber
left join msdb..sysjobs job on job.job_id=a.job_id
end
else
begin
select job.name JobName,a.name AgentName, a.publisher_db,a.publication as publicationName,sp.srvname as publisherName ,ss.srvname as subscriber,a.subscriber_db, a.local_job From MSmerge_agents a
inner join msreplservers sp on a.publisher_id=sp.srvid–publisher
inner join msreplservers ss on a.subscriber_id =ss.srvid–subscriber
left join msdb..sysjobs job on job.job_id=a.job_id
end

For push subscription, you can use the job name directly to find the job in distributor server.

For pull subscriptions(local_job=0), you need to run following query in the subscription database in subscriber server.
use subdb6–in subscriber server
go
select job.name, sub.publisher,sub.publisher_db,sub.publication from msdb..sysjobs job inner join msdb..sysjobsteps jobStep on job.job_id=jobStep.job_id
inner join MSsubscription_properties sub on sub.job_step_uid=jobStep.step_uid

You can use the job name directly to find the job in subscriber server.

3.Snapshot agent
Following queries list all the snapshot agent jobs. (You may need add more clause to customize your queries). By default, the SQL Server agent job names equal to the snapshot agent names, unless you explicitly modify the job names.
use distribution–in distributor server
if not exists(select 1 from sys.tables where name =’MSreplservers’)
begin
select job.name JobName, a.name AgentName , publisher_db,publication, s.data_source as publisher,
case publication_type
when 0 then ‘Transactional’
when 1 then ‘snapshot’
when 2 then ‘Merge’
end as publication_type
From MSsnapshot_agents a inner join sys.servers s on a.publisher_id=s.server_id
inner join msdb..sysjobs job on a.job_id=job.job_id
end
else
begin
select job.name JobName, a.name AgentName, publisher_db,publication, s.srvname as publisher,
case publication_type
when 0 then ‘Transactional’
when 1 then ‘snapshot’
when 2 then ‘Merge’
end as publication_type
From MSsnapshot_agents a inner join MSreplservers s on a.publisher_id=s.srvid
inner join msdb..sysjobs job on a.job_id=job.job_id
end

You can use the job name directly to find the job in distributor server.

4.Logreader agent
Following queries list all the log agent jobs, including push subscriptions and pull subscriptions. (You may need add more clause to customize your queries). By default, the SQL Server agent job names equal to the log reader agent names.
use distribution
if not exists(select 1 from sys.tables where name =’MSreplservers’)
begin
select job.name JobName, a.name AgentName, publisher_db,s.name as publisher
From MSlogreader_agents a inner join sys.servers s on a.publisher_id=s.server_id
Inner join msdb..sysjobs job on job.job_id=a.job_id
end
else
begin
select job.name JobName, a.name AgentName, publisher_db,s.srvname as publisher
From MSlogreader_agents a inner join MSreplservers s on a.publisher_id=s.srvid
Inner join msdb..sysjobs job on job.job_id=a.job_id
end
Please note, all publications of same publication database share same agent job
Please note, the agent name equals to job name by default, unless user modifies the job.


In some complex cases, you may need to review all the T-SQL statements issued by these agent jobs.
Here is how:
One agent have more than one connections to the servers, they have different session id but share the same process id. Once the process id is identified, you can use this process id to filter, using SQL Server profiler trace or xevent.
- Distribution agent
Distribution agent connects both distributor and subscriber. It has more than one connections in distributor. The application name of one connections equals to the agent name, that’s how I get all the connections of one specific agent.
1)For example, following query returns 6 agents.
use distribution
select * From MSdistribution_agents

2)Let’s say I need to check the T-SQL of first agent.
If SQL Server trace files are collected in distributor and subscriber are collected, use the agent name to filter ApplicationName column to find the process id in distributor trace.
Then Use the process id to filter queries in distributor trace and subscriber trace.
If you need online troubleshoot,run following statement in distributor server.
select hostprocess as PID from sys.sysprocesses where program_name =’NODE1SQLAG-AdventureWorks-TranPubTest1-NODE3SQLAG-6′

3)It returns the process id of this agent. Then you can use the process id of find all the sessions in both distributor server and subscriber server.
In distributor server
select @@servername,*From sys.sysprocesses where hostprocess=1832

In subscriber server
select @@servername,program_name,*From sys.sysprocesses where hostprocess=1832

4)An alternative is to run following query in subscription database, then use the hostprocess to filter…
use subdbName
select hostprocess, *From sys.sysprocesses where spid in
(
select spid From MSsubscription_agents
)
2.Merge agent
The behavior of Merge agent is as same as distribution agent. It connects publisher, distributor and subscriber.
1.Run following query in distributor server.
use distribution
select * From MSmerge_agents

2)Let’s say I need to check the T-SQL of first agent.
If SQL Server trace files are collected in publisher,distributor and subscriber are collected, please use the agent name to filter ApplicationName column to find the process id in publisher trace.
Then Use the process id to filter queries in publisher, distributor trace and subscriber trace.
3)If you need online troubleshoot,. run following statement in publisher server.
select @@servername,hostprocess From sys.sysprocesses where program_name in
(
‘NODE1SQLAG-AdventureWorks-MergePubTest-NODE3SQLAG-1’
)

3)Use this process id to filter queries in distributor and subscriber, the same way I used for distribution agent.
3.Snapshot agent
The behavior of Snapshot agent is as same as distribution agent. It connects publisher and distributor
1.Run following query in distributor server.
use distribution
select * From MSsnapshot_agents

2)Let’s say I need to check the T-SQL of first agent.
If SQL Server trace files are collected in publisher and distributor are collected, please use the agent name to filter ApplicationName column to find the process id in publisher trace.
Then Use the process id to filter queries in publisher and distributor trace.
3)If you need online troubleshoot, run following statement in publisher server.
select @@servername,hostprocess From sys.sysprocesses where program_name in
(
‘NODE1SQLAG-AdventureWorks-MergePubTest-NODE3SQLAG-1’
)
3)Use this process id to filter queries in publisher and distributor , the same way I used for distribution agent.
4.Logreader agent
Logreader agent is little bit different. The agent name of MSlogreader_agents does not match anything. You need to use following pattern to filter.
The application name of logreaer agent consists of Repl-LogReader-number-publicationDBName-number.
For example, if you need to collect process id of logreader of AdventureWorks, run following query in both publisher server and distributor server.
select program_name, hostprocess,@@servername From sys.sysprocesses where program_name like ‘Repl-LogReader%’ and program_name like ‘%AdventureWorks%’


by Scott Muniz | Jul 17, 2020 | Uncategorized
This article is contributed. See the original author and article here.
This article was written by Microsoft employee Sonia Cuff as part of the Humans of IT Guest Blogger Series. Sonia shares about the universal truths that have appeared during her 24 years in tech that can apply to any career.
I have been in a technical role of some kind for the past 24 years. Twenty-four years! I had no idea that following my heart would take me on an adventure through this winding career path, but incrementally, every twist and turn has brought me to a dream job here at Microsoft.
I wasn’t always interested in tech. At school, I did “computers” as a subject and I was good at it, but I didn’t fall in love with BASIC coding on the Apple IIe. In fact, I wanted to be a flight attendant. A paid job in a bank straight after high school lured me away from my plans to study travel & tourism, so I never went into the travel industry. After two years in a bank branch, spending a fair amount of time on the “user” end of helpdesk calls as the resident branch tech expert (I was only 18 years old then!), they asked me to relocate to a different city and join the IT department there. It was December 1995 when I learnt lesson 1:
“Lesson 1: Change your plans.”
Sometimes opportunities come your way that didn’t fit your plans. And sometimes they are even better than your plans.
Could I work in an IT department, with no formal training? I had no idea, but they were willing to take a chance on me so we come to lesson 2:
“Lesson 2: If you are not sure – say yes.”
I was thrown into a project to build and deploy new workstations and servers to our branches nationwide. And I hated it. I had great colleagues who taught me everything, including one vivid session around a whiteboard explaining TCP/IP and subnet masks. But I struggled through the project work and the after-hours deployments, until I figured out why – I missed working with people! So, do I suck it up, after my employer had relocated me, or did I speak up about it? Lesson 3!
“Lesson 3: If you don’t like it, then leave.”
OK, there are all sorts of nuances with lesson 3. Understand that at the time I was living with a partner who could financially support me if this was going to be the end of my tech career, while I looked for a new job or did go and study, and we had no dependents. That makes it so much easier to take a risk and leave a role you are not enjoying. That said, sometimes you do have to suck it up for a while to keep feeding your family and paying the mortgage.
After confessing how I was feeling to my team leader… they gave me another chance in the second level support team. It was going to be sink or swim, so I dived into the basics – xcopying DOS files, installing token ring adapter drivers and more. Here’s where the groundwork was built in with lesson 4:
“Lesson 4: Learn and understand the basics.”
Tech concepts I learnt then are still foundational for the work I do today, and helped me build a strong troubleshooting skill. When things stopped working, I knew what to try next. I also built great working relationships with my colleagues, listening to those who had been in the industry longer than me and taking their advice. This was really informal mentoring before mentoring was a thing, and I soaked it up like a sponge. I jumped into email systems (MS Mail, Microsoft Exchange) and a large migration project, rising to become a Lotus Domino Systems Architect!
Now I’m at the peak of my tech skills inside this global organization – but do I really know what I’m talking about compared to others in the industry? Hello lesson 5!
“Lesson 5 – Take a chance”
I wrote up my CV, went for some interviews, and landed a role with a small IBM Partner.
The rest of my career has mostly been a repeat of those 5 main lessons. I continued to learn, continued to listen, and continued to take chances – then moving into a team leader role and finally as a Service Delivery Manager inside a large systems integrator.
After almost losing it all due to burnout, I changed my plans again – left the country and started a managed service provider looking after small and medium businesses. Here I learnt lesson 6:
“Lesson 6: Share your stories”
I became active on social media, attending user groups and conferences, and also blogging. I shared how I fixed errors or deployed things, and earned the title of Microsoft MVP. Then lesson 7 appeared:
“Lesson 7: Always be learning”
My tech career has been nothing but learning, and that was about to ramp up again with an opportunity to interview at Microsoft as a Cloud Advocate. In Azure. When I’d been focused on Office 365. Again, all of the qualities I’d grown throughout my career, plus my commitment to sharing with technical communities, meant I was an ideal candidate, even without an impressive Azure resume. The last two years in this role have been Learn – Share – Repeat!
There are many other lessons in this story, including one about taking care of yourself, and one about the stresses of being a manager or business owner. Some lessons are easier to say than they are to do.
And some lessons absolutely apply to people differently depending on their circumstances at the time.
Ultimately, I’ve found that my successful 23 year career has been directed by these simple truths and they’re likely to resonate with people in different tech roles too. Picking the hottest technology to specialize in is not as important as these human skills you will use to navigate your career.
Always be learning, and stay open to whatever the next change of plans looks like, for you.
#HumansofIT
#CareerJourneys
Enjoyed this article from Sonia? Be sure to watch this recording of her Microsoft Ignite 2019 session on “An Introvert’s Guide to the IT Industry”: https://myignite.techcommunity.microsoft.com/sessions/81710?source=sessions.
You can also connect with Sonia by following her on Twitter at @SoniaCuff.
by Scott Muniz | Jul 17, 2020 | Uncategorized
This article is contributed. See the original author and article here.
As a project manager, your job is to schedule tasks accurately to ensure everything happens at the right time. However, before you begin to schedule, you need to determine the number of the working hours and days it will take to complete these tasks.
Project for the web comes with a default work template that can be automatically applied to all projects. This template is based on the average work schedule: it specifies work hours of 9AM through 5PM from Monday through Friday. If your work does not follow this schedule, you can create a new work template to suit your project’s needs. This blog post will walk you through the steps of changing the working hours and days of a project in Microsoft Project.
Project for the web is built on the Microsoft Power Platform. Because of this, some aspects of calendar and assignment setup needs to be done in Power Apps.
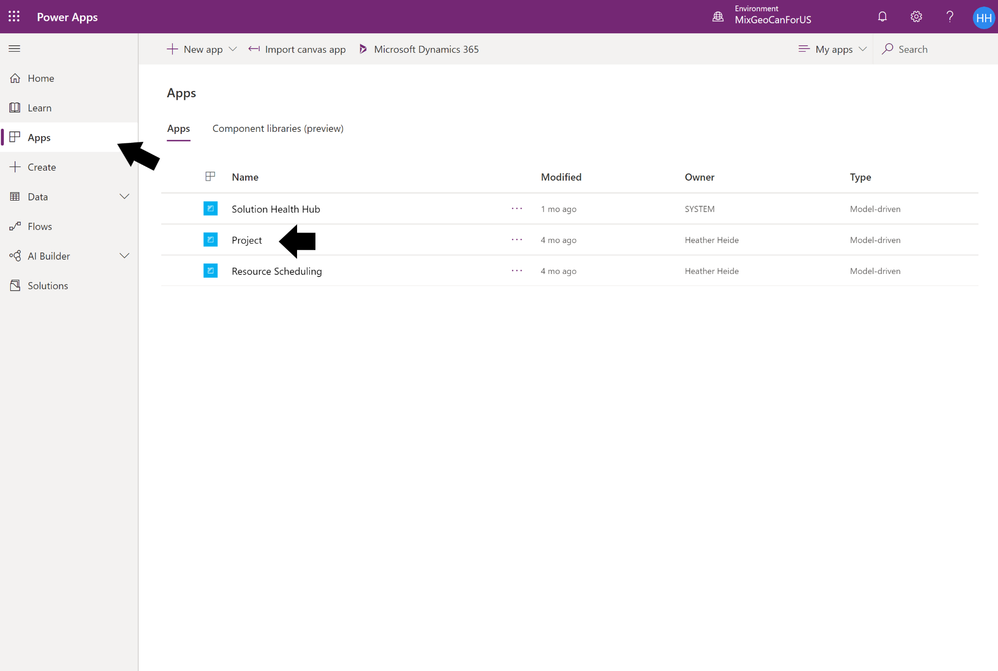
To access Dynamics 365:
- While signed in to Office 365, open a browser window and go to https://web.powerapps.com
- On the PowerApps page, select Apps.
- On the Apps page, in the Org Apps tab, select Project.

From here, you can make changes to your projects and resources, implementing behind-the-scenes capabilities that can help you with project planning.
Note: For the purposes of this article, we will refer to assignees as resources. This is the term used by Dynamics 365 to refer to people assigned to complete tasks, but this term is not generally used in Project for the web.
Creating a work hours template
A work hour template (WHT) is a template that defines working days and hours and can later be applied to a project or resource. For example, a user might have a “Night Shift” WHT defined as Monday-Sunday 8PM-7AM, or a “Weekend Shift” WHT defined as Thursday-Sunday, 8AM-5PM.
There are several ways you can create a work hours template; however, all work templates are based off the calendars of bookable resources. A bookable resource is anything that can be scheduled. You can create a bookable resource in Dynamics 365 and configure its working hours. These working hours will define when the resource can be assigned work.
Note: You will not be able to create new bookable resources or work hours templates if you are not an Dynamics admin. If you follow these steps and do NOT see the buttons discussed here, talk to your Office 365 admin to help you with this work.
To create a bookable resource:
- From the Project Power Apps page, select Resources.
- Select New.
- Add a resource type, user, and a name to your bookable resource, then select Save and Close. This will bring you back to the resources page Note: To learn more about bookable resources, check out the Set up bookable resources article. In summary, “Resource type” indicates who and what the resource is, “User” indicates who owns the bookable resource, and “Name” is the name of the bookable resource.
- Select the name of your newly created resource.
- On the top ribbon, select Show Work Hours

- Select one of the working days. This should open a new view with options to ‘Edit’ and ‘Delete’ the working hours
- Select ‘Edit’ and ‘All events in the series’
- From this pane, select your desired working days and working hours

- Select ‘Save’ on the Hours pane
- Select Save and Close until you get back to your resource page.
Once you’ve configured a Bookable Resource’s calendar, you can create a work hours template based on this resource. You can do this in one of the following two ways.
To create a work template from the Active Work Hour Templates page:
- From the Project Power Apps page, select the Projects menu on the bottom of the left pane, and then select Settings.
- On the Project Settings Parameters page, select Calendar Templates.
- On the Active Work Hour Templates page, select New.
- Name your work template and (optionally) add a description
- Use the drop-down menu to select the Template Resource that you would like to base the work hours on.
- Select Save and Close. Your new work hours template will display on the Active Work Hour Templates page.

To create a work template from the Resources page:
- On the Resources page, select the resource you want to base your work hours on.
- Select Save Calendar As, enter a name for the work hours template, and then select Save.
- When you’re done changing options, select Save and Close.
Applying a calendar to a project
Once you’ve created a work hours template, you can apply that template directly to a project.
To apply a work hours template to a project:
- In your project, open the Project Settings pane.
- Select the Calendar drop-down menu and select the work hours template you want to apply to the project.
If you do not see the Calendar field in Project details, this means you only have one available work hours template.
Once you have configured the calendar field to the right WHT, your work should only be scheduled during the working hours defined on the template.
FAQ
Q: Where can I find out more?
A: Check out our article: Create and apply work calendars in Project for the web
Q: Can I configure a resource calendar?
A: You can apply a calendar to a resource from the Resources page on PowerApps. From the Resources page, select the resources that you want to apply a calendar for and select Set Calendar. In the Work Template window, select the work template that you want to apply to your resource.
You can learn more about applying a calendar to a resource.
Q: Who has access to this functionality?
A: Dynamics 365 admins have the ability to create and apply calendars. If you follow these steps and do not see the mentioned buttons, then you do not have admin access to Project. You should contact your admin for help with calendar issues.

Recent Comments