by Scott Muniz | Jul 20, 2020 | Uncategorized
This article is contributed. See the original author and article here.
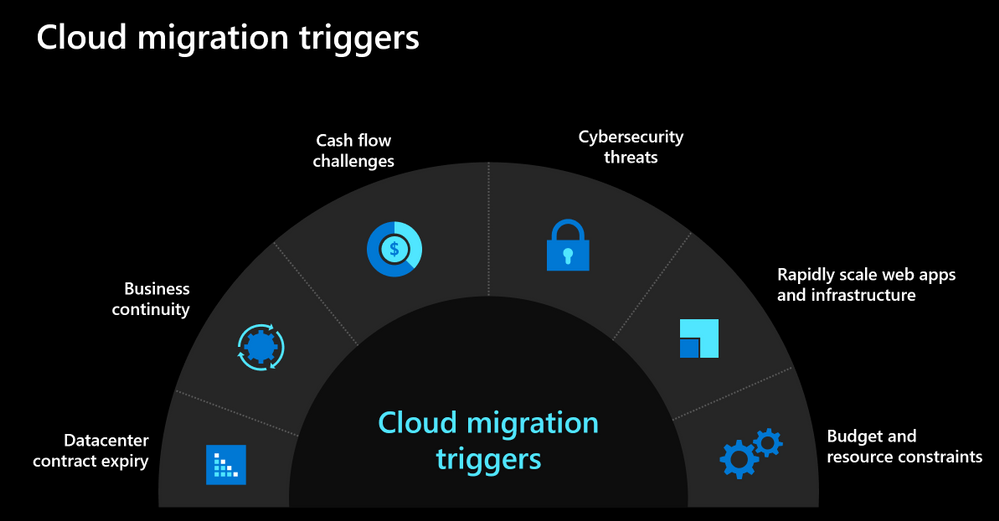
As we navigate the challenges posed by the current environment, many organizations are looking to move to the cloud to not only respond to the current crisis but also be better prepared for future. Below you can see some of the common cloud migration triggers that we see with our customers.

Our customers are ready to move to the cloud but don’t know where to begin. They are seeking help and guidance so that they can confidently move their on-premises workloads and applications to the cloud to meet their evolving needs.

Based on our learnings from hundreds of customer engagements, we’ve developed some recommendations and best practices guidance that you can leverage to accelerate your journey to Azure. Listen to Jeremy Winter, Partner Director of Azure Management share his top three recommendations to quickly move to the cloud in this video.
We also kicked off a blog series to address some of the common challenges that our customers face with cloud migration. You can read the kick-off blog to get an idea about the topics we’ll be discussing. We also published the next blog which focuses on financial considerations for cloud migration. Stay tuned and follow the series to learn about critical considerations for migration such as performing assessments, building the landing zone, executing migration and managing your cloud resources.
by Scott Muniz | Jul 20, 2020 | Alerts, Microsoft, Technology, Uncategorized
This article is contributed. See the original author and article here.
Update: Monday, 20 July 2020 23:42 UTC
We are aware of issues within Application Insights Live Metrics and are actively investigating. Some customers may not be able to access Live Metrics data in Azure portal.
- Next Update: Before 07/21 04:00 UTC
-vincent
by Scott Muniz | Jul 20, 2020 | Uncategorized
This article is contributed. See the original author and article here.
Imagine you could book an office to work anywhere in the world. Now imagine this could be done in Outlook. Well, we have built a feature to let you do that! We have built this in Outlook for Windows, Mac and Outlook on the web users with Exchange Online mailboxes.
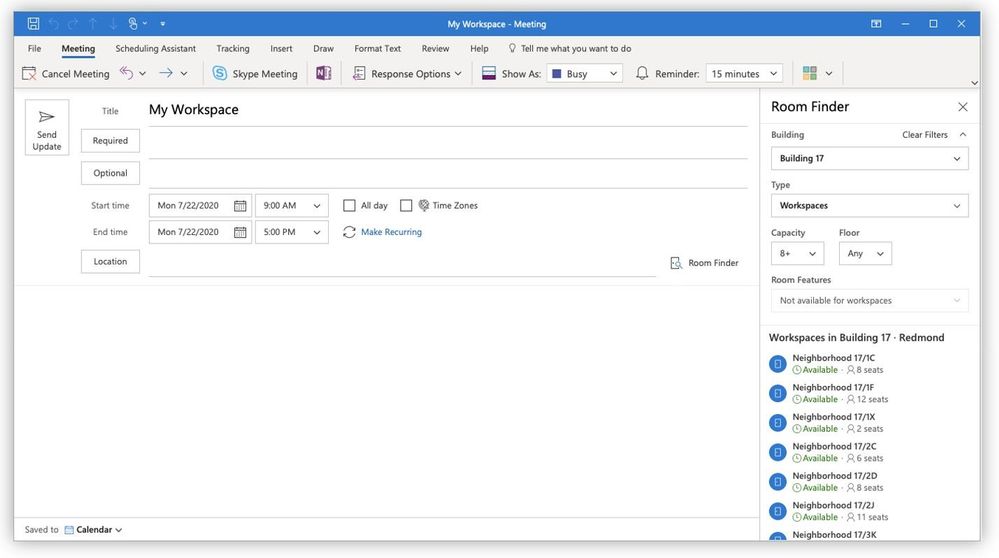
In the image below you can see the room finder has a new ‘type’ drop down. In the drop down you would be able to select workspace or conference room. Here’s what users can expect to see in Outlook for Windows:
 The same rich capability in Outlook on the web:
 And for those cool kids with a Mac, the same great experience. No matter what client your users choose, they can use this feature just the same:

What is a workspace?
A workspace is a physical location where employees can work from. It can be made up of many desks or can be a single desk. The way you book a workspace is very similar to how you book a conference room in Outlook. The same policies that can apply for a conference room can also apply for a workspace.
The main difference with workspaces is that they have a capacity and a minimum booking duration requirement. Workspaces can be booked by the number of people that the capacity was set for. Capacity refers to the total capacity of the workspace. For example, if a workspace has 10 desks but has been already booked to 50% capacity, only 5 people can book that workspace for a specific time period. If the 11th person tries to book the same workspace, it will be shown as unavailable and they will receive an automatic decline.
How do your users book a workspace?
- Open the Outlook calendar and create a “new event”. A minimum duration of 3 hours is needed for workspace booking. We recommend booking a workspace as an all-day event.
- Set the “Show as” status to “Free” so the invite doesn’t block your calendar.
- Open the “Room finder” by selecting the location input and then “Browse with Room Finder”.
- Select your building from the drop-down and “Workspace” option from the “Type” drop-down. If you don’t see a workspace option, then your building may not have workspaces (or they have not been defined yet – see below for how to do that).
- Browse available workspaces. Availability is shown based on if there is at least one available space for the duration of this booking.
- Save the event and then the user will get the auto-generated email confirming the booking:

Note: Additional attendees can be added to an invite and a seat will be reserved for them if available. If the number of additional attendees added to the invite exceeds the number of available seats, then the booking will be rejected.
How do you create a workspace?
Configuring a workspace is very similar to how you would configure a conference room. The key to defining a room mailbox as the workspace is adding the word ‘space’ into the Custom Attribute 11 for the room.
Step 1: Create a new mailbox as a space using New-Mailbox
New-Mailbox {alias} -Room -CustomAttribute11 “space”
Step 2: Add required metadata using Set-Place. For tenants who chose to create rooms on-prem and sync to the cloud (Hybrid) you will want to use set-user and set-mailbox for the properties you can set, some of which follow:
- Capacity
- Street
- City
- State
- Postal code
- CountryOrRegion
- GeoCoordinates
- Floor
Step 3: Add workspace to an appropriate roomlist (distribution group) so the workspace shows up in a particular building, for example:
Add-DistributionGroupMember -Identity “Building 32” -Member wkspace3223@contoso.com
Note: Today, the capacity is configurable by the tenant admin. The minimum booking duration is not configurable and is currently set to 180 mins or 3 hours. In the future, we will make this policy configurable. Also, distribution groups or lists cannot be added to the booking request. Individual people can be added, and workspace bookings will count the capacity of all attendees on the request. Please note it may take up to 24 hours for workspaces and new room list to appear in the room finder.
Summary
The Outlook on the web feature is starting to roll out to all Office 365 commercial customers now. Outlook for Windows will start rolling out in the next couple of weeks and will follow the room finder roll out staging noted in this link. Outlook for Mac will be available to all Insider Fast users using the new Outlook for Mac.
We would love to know if these features help your users plan and manage their meetings and if finding the right rooms is now easier for them.
Please, tell us what you think in the comments below, in our UserVoice channel or using the in-product smile feature.
Thank you!
Victoria Rodriguez
by Scott Muniz | Jul 20, 2020 | Uncategorized
This article is contributed. See the original author and article here.
In this post I will demonstrate how to install the PowerShell Core 7.0.3 on Windows Terminal.
I am assuming that you already have Windows Terminal and a Linux distribution installed. Please check the following posts in case you need more details about how to install Windows Terminal and a Linux distro:
Using WSL2 in a Docker Linux container on Windows to run a Minecraft Java Edition
https://techcommunity.microsoft.com/t5/windows-dev-appconsult/using-wsl2-in-a-docker-linux-container-on-windows-to-run-a/ba-p/1482133

Installing .NET Core 3.1 on Windows 10
Please skip this session in case you already have .NET Core 3.1 SDK installed on Windows 10.
As PowerShell Core is developed in .NET Core 3.1, it is necessary to install .NET Core SDK available at:
https://dotnet.microsoft.com/download/dotnet-core/3.1
You need to choose an version according with your processor architecture:

I am using the x64 version:
https://dotnet.microsoft.com/download/dotnet-core/thank-you/sdk-3.1.302-windows-x64-installer

The next step is to install the PowerShell Core on Windows.
Installing PowerShell Core 7.0.3 on Windows 10
Now that .NET Core 3.1 SDK is installed, the next step is to install PowerShell Core 7.0.3 available for download at:
https://github.com/PowerShell/PowerShell/releases/tag/v7.0.3
Please selected a version according to your operating system and processor architecture:

I am using the PowerShell-7.0.3-win-x64.msi to install on Windows 10:

Once installed, open a new version of Windows Terminal and observe that PowerShell Core is installed:

Initial prompt:

Installing .NET Core 3.1 on WSL
Please skip this session in case you already have .NET Core 3.1 installed on WSL.
As PowerShell Core is developed in .NET Core 3.1, it is necessary to install .NET Core SDK available at:
https://dotnet.microsoft.com/download/dotnet-core/3.1
As I am using a 64-bit machine and the Ubuntu distro, I will install the x64 version available at:
https://dotnet.microsoft.com/download/dotnet-core/thank-you/sdk-3.1.301-linux-x64-binaries
Run the following commands to download and to extract the package :
wget https://dotnet.microsoft.com/download/dotnet-core/thank-you/sdk-3.1.301-linux-x64-binaries
sudo dpkg -i packages-microsoft-prod.deb

Run the following commands to install .NET Core SDK:
mkdir -p $HOME/dotnet && tar zxf dotnet-sdk-3.1.301-linux-x64.tar.gz -C $HOME/dotnet
export DOTNET_ROOT=$HOME/dotnet
export PATH=$PATH:$HOME/dotnet
Run dotnet to double-check if .NET Core SDK was successfully installed:

More details at:
https://dotnet.microsoft.com/download/dotnet-core/thank-you/sdk-3.1.302-linux-x64-binaries
Installing PowerShell 7.0.3 on WSL
Now that .NET Core 3.1 SDK is installed on WSL, the next step is to install PowerShell 7.0.3 whose installers are available for download at:
https://github.com/PowerShell/PowerShell/releases/tag/v7.0.3

I will install the powershell_7.0.3-1.ubuntu.18.04_amd64.deb, as I am using the Ubuntu distro.
Run the following command to download the package. Please make sure that you are using the file associated to you Linux distro.
wget https://github.com/PowerShell/PowerShell/releases/download/v7.0.3/powershell_7.0.3-1.ubuntu.18.04_amd64.deb

Once you have the package, run the following command to install it:
sudo dpkg -i powershell_7.0.3-1.ubuntu.18.04_amd64.deb
Follows the expected result:

Run the following command to launch PowerShell Core on Linux:
pwsh

Done. Now you have PowerShell Core installed on Windows and WSL.
I hope you liked!!!!
by Scott Muniz | Jul 20, 2020 | Alerts, Microsoft, Technology, Uncategorized
This article is contributed. See the original author and article here.
This post is authored by @Mimi Gentz, Senior Product Manager at Microsoft.
You may have heard that Microsoft has a free learning platform that offers interactive material to help you up-level your skills. But did you know Azure HDInsight has a whole learning path, with over three hours of material available for you to learn how Azure HDInsight can meet your businesses growing need for analytics?
Whether you’re new to cloud scale analytics, interested in migrating your on-premises analytics to the cloud, or even if you’ve gone in depth with one of the open source technologies Azure HDInsight integrates with, this course will show you the benefits of using each of the cluster types available on Azure HDInsight, what scenarios work best with each technology, and how to integrate those technologies with visualization tools such as Power BI and Jupyter Notebooks.
There are currently six modules in the Building Open Source Software (OSS) Analytical Solutions with Azure HDInsight learning path (with more to come), and in this blog we’ll take a look at what you’ll learn in each one. Think of a module as a chapter in a book, and the learning path as the whole book. Throughout each module you’ll complete tutorials, read, and fill in short quizzes to check your learning.
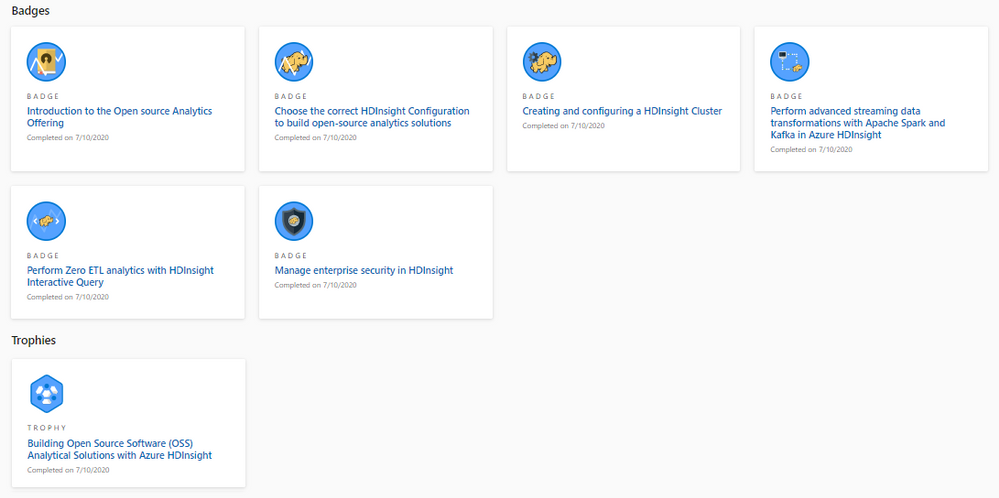
Keep in mind that you can complete these modules at your own pace. Once you create a Learn profile and sign-in, your progress will be automatically tracked by the Learn site, and you’ll earn XP (experience points) as you go. As you complete modules and learning paths, you’ll earn badges and a trophy that you can share on social media to impress all your friends!

What will you learn in each module?
- In the Introduction module, you’ll learn how analytics (using open-source frameworks such as Hadoop, Apache Spark, Apache Hive, Interactive Query, and Apache Kafka) is implemented within Azure HDInsight, how storage and processing are decoupled (to save you money), and how Azure HDInsight, unlike its competitors, has a unique ability to support business processes that require multiple workloads.
- In the Choose the correct HDInsight Configuration to build open-source analytics solutions module, you’ll learn which HDInsight cluster type to select to best support your scenario and which processing and analysis business requirements Azure HDInsight supports. Additionally, you’ll walk through a sample case study to determine the best HDInsight cluster configuration to choose, and you’ll learn about some of the cost saving measures HDInsight provides.
- In the Creating and configuring a HDInsight cluster module, you’ll create an Azure HDInsight cluster in the Azure portal, create a Jupyter notebook that is linked to that cluster, run some queries on the data to create visual representations, monitor your cluster, and learn how to troubleshoot common issues.
- In the Perform advanced streaming data transformations with Apache Spark and Kafka in Azure HDInsight module, you’ll learn about common scenarios where Kafka and Spark can be used for real-time analytics and structured streaming, you’ll create a VNet and add a Spark and Kafka cluster to it, then you’ll create a Kafka producer and stream the data into a Jupyter notebook.
- In the Perform Zero ETL analytics with HDInsight Interactive Query module, you’ll learn how Interactive Query is great for ad-hoc analytics with minimal transformations, you’ll create an Interactive Query cluster in the Azure Portal, upload data using Data Analytics Studio, explore Hive tables using a Zeppelin notebook, and create a Power BI dashboard for evaluating real estate trends in the sample data.
- In the Manage enterprise security in HDInsight module, you’ll learn about the shared responsibility model, Network Security Groups (NSGs), HDInsight Service Tags, VNets, operating system security, authentication with AAD and MFA, authorization of specific actions and operations, data access security, Transport Layer Security (TLS) 1.2, virtual network service endpoints, and customer-managed keys.

Get started by going to Building Open Source Software (OSS) Analytical Solutions with Azure HDInsight and starting your learning path today. Feel free to post your feedback, issues, or requests about HDInsight learning content to this page or via the Feedback channel.
Thanks,
Mimi
Azure HDInsight Twitter | Documentation | Service Updates
Mimi Gentz Twitter | Linked In | Docs Achievements and Trophies

Recent Comments