by Scott Muniz | Jul 22, 2020 | Alerts, Microsoft, Technology, Uncategorized
This article is contributed. See the original author and article here.
This tutorial walks you through the process on how to load data from Always Encrypted enabled Azure SQL database using SQL Server Integration Services (SSIS) in Azure Data Factory.
Azure-SSIS integration runtime has built-in Microsoft ODBC Driver 13 for SQL Server. In this tutorial, we use SSIS ODBC source with Microsoft ODBC Driver 13 to load data from Azure SQL database. Details about ODBC driver setup, refer to using Always Encrypted with the ODBC Driver for SQL Server via Azure Key Vault built-in keystore provider.
- Follow the steps to configure Always Encrypted by using Azure Key Vault , Column Master Key (CMK) is now stored in Azure Key Vault.
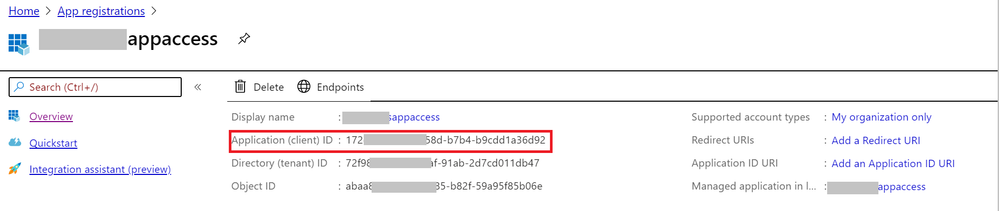
- Enable client application access to get the Application (client) ID and client secrete.


3. Grant the client application proper permissions (get, unwrapKey, and verify) in the Azure Key Vault.

- Create simple SSIS package in Visual Studio 2017 that uses an ODBC source and a flexible file destination. Configure connection string like below:
DRIVER={ODBC Driver 13 for SQL Server};SERVER= <EnterYourServer.database.windows.net>;uid=<myuser>; DATABASE=<mydatabase>;ColumnEncryption=Enabled;KeyStoreAuthentication=KeyVaultClientSecret; KeyStorePrincipalId=<Application (client) ID>;KeyStoreSecret=<client secrete>
Note:
Surround the value with { } when there are [ ] { ( ) , ; ? * = ! @ characters in the client secrete, and manually escape the interior } with a second }.
Example:
keystoresecret={)#|;_=&*{+>*-.&)$8?%}}|S|_^?|*=?.;o==_#-QA=&%};

- Execute package successfully in Visual Studio.
- Deploy project to SSIS in Azure Data Factory.

7. Author data factory pipeline with execute SSIS package activity, input password in connection manager parameter.

8. Execute data factory pipeline.
by Scott Muniz | Jul 22, 2020 | Uncategorized
This article is contributed. See the original author and article here.
Ahora que Teams está siendo fuertemente utilizado en el sector de educación, Microsoft ha estado invirtiendo más esfuerzos en agregar características a la plataforma que agreguen valor a las clases en línea que se dictan.
Uno de los principales problemas reportados durante las clases, es que los estudiantes tienen predeterminadamente el privilegio de silenciar, expulsar o compartir contenido, así que se vuelve muy fácil sabotear o interrumpir. Esto es porque al unirse a una reunión recién programada, de forma predeterminada todos los asistentes tienen el rol de presentador.
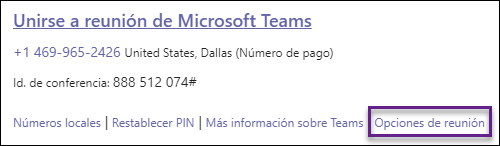
Para poder cambiar esto, es necesario programar la reunión y luego ir a las Opciones de reunión, ubicadas debajo del enlace de acceso:

También es posible acceder a estas opciones desde la parte superior derecha de la lista de asistentes de una llamada en curso:

En la página de opciones de reunión, en la lista desplegable de ¿Quién puede presentar?, escoger Solo yo:

Al realizar este cambio, solo el organizador de la reunión tendrá el rol de presentador, y las demás personas, el rol de asistente. Para entender más sobre los roles en Microsoft Teams, pueden leer Roles en una reunión de Teams.
Aunque la configuración es bastante sencilla de realizar, es un trabajo que tendría que realizar el profesor manualmente para cada nueva reunión, por lo que se vuelve bastante propenso a errores, sea por mala configuración, porque se le olvidó o porque simplemente no se hizo. Para mitigar esto, el equipo de Microsoft Teams liberó una directiva para designar el rol de presentador de forma predeterminada, de esta forma la configuración se establecerá para toda la organización y los organizadores no tendrán que hacer el cambio manual, pero seguirá habilitado.
En este artículo, explicaré cómo realizar esta configuración a través de PowerShell para toda la organización.
Instalación de los módulos necesarios
Para gestionar completamente Teams, es necesario instalar dos módulos:
Módulo de PowerShell para Microsoft Teams
Para instalar el módulo correspondiente a Microsoft Teams:
1. Ejecutar PowerShell ISE como administrador:

2. Presionar CTRL + N o ir al menú Archivo > Nuevo para crear un nuevo script
3. En el script, digitar:
Install-Module MicrosoftTeams
4. Para ejecutarlo, seleccionar todo el texto del comando y presionar el botón de Ejecutar selección (o presionar F8):

5. En la ventana de instalación del NuGet, clic en el botón Sí para continuar:

6. En la ventana del repositorio que no es de confianza, clic en Sí a todo para continuar:

7. Guardar el script y cerrar la ventana de PowerShell
Módulo de PowerShell para Skyper for Business
Para instalar el módulo correspondiente a Skype for Business:
1. Descargar e instalar el módulo:

2. Ejecutar PowerShell ISE siguiendo el primer paso de la instalación del módulo anterior y abrir el script que se guardó
3. Digitar en el script:
Import-Module SkypeOnlineConnector
$credential = Get-Credential
$session = New-CsOnlineSession -Credential $credential
Import-PSSession $session
4. Seleccionar todo y presionar el botón superior de Ejecutar selección (o presionar F8):

5. En la ventana de credenciales, digitar las que corresponden al administrador global en la organización y clic en Aceptar:

6. Dejar la ventana de PowerShell ISE abierta
Conectarse a Microsoft Teams
Para conectarse a Microsoft Teams:
1. Desde la ventana de PowerShell ISE que se dejó abierta, digitar en el script:
Connect-MicrosoftTeams -Credential $credential
2. Seleccionar toda la línea y presionar el botón superior de Ejecutar selección:

Nota: en caso de que se haya cerrado el script, es necesario abrirlo de nuevo y ejecutar desde el paso 3 anterior para que se pueda conectar, puesto que el paso 1 de conexión a Teams da por hecho de que aún se mantiene la sesión anterior conectada y la variable de $credential.
3. Dejar abierta la consola de PowerShell para los siguientes pasos
Creación de la directiva de rol asignado
Para crear la directiva que aplique el rol predeterminado:
1. Desde el script de PowerShell, digitar:
New-CsTeamsMeetingPolicy -Identity DesignatedRolePolicy -DesignatedPresenterRoleMode OrganizerOnlyUserOverride
Nota: el valor de -Identity corresponde al nombre que se le desea asignar a la directiva, así que puede ser diferente.
2. Seleccionar todo y presionar el botón de Ejecutar selección en la parte superior:

3. Si la directiva ejecuta bien, debe de aparecer en la consola inferior el resumen de todas las configuraciones predeterminadas para la directiva recién creada, incluyendo la del rol:

4. Dejar la ventana de PowerShell abierta para los próximos pasos
Asignación de la directiva manualmente
Para asignar la directiva a un usuario:
1. Desde la sesión de PowerShell, escribir en el script:
Grant-CsTeamsMeetingPolicy -Identity <userID> -PolicyName DesignatedRolePolicy
Donde <userID> hace referencia al nombre de usuario completo al que se le va asignar la política. Por ejemplo, para el caso mío que es Cara Coleman, quedaría así:
Grant-CsTeamsMeetingPolicy -Identity carac@nalacorp.info -PolicyName DesignatedRolePolicy
2. Seleccionar todo el script y presionar el botón de Ejecutar selección en la parte superior:

3. Cerrar la ventana de PowerShell
Después de unas horas (generalmente 2 o 4), cada sesión que se agende por parte del usuario tendrá la opción de Solo yo de forma predeterminada:

Configuración de la directiva global
En caso de que más del 50 % de usuarios requieran tener esta configuración, es conveniente aplicar el cambio en la política global, de esta forma todos los usuarios podrán ver reflejado el cambio en cuestión de horas.
Para modificar la política global:
1. Abrir el script de PowerShell que se generó anteriormente
2. Ejecutar solamente esta parte:
$credential = Get-Credential
$session = New-CsOnlineSession -Credential $credential
Import-PSSession $session
Connect-MicrosoftTeams -Credential $credential
3. Una vez conectados a Teams, ejecutar:
Set-CsTeamsMeetingPolicy -Identity global -DesignatedPresenterRoleMode OrganizerOnlyUserOverride

4. Para verificar que el cambio haya quedado aplicado, ejecutar:
Get-CsTeamsMeetingPolicy -Identity global
5. Buscar que el valor de DesignatedPresenterRoleMode sea el de OrganizerOnlyUserOverride:

6. Cerrar la ventana de PowerShell
Después de aproximadamente 4 horas, cada reunión que se cree en Teams tendrá como valor predeterminado el Solo yo para el presentador:

Para tener en cuenta
Basado en mi experiencia en Colombia, quiero compartir algunos detalles:
1. Aunque la configuración cambia el tipo de rol predeterminado, el profesor u organizador puede ir en cualquier momento y hacer el cambio a todos o a personas específicas. No hay forma todavía de bloquear el cambio
2. Técnicamente, solo se necesita el módulo de Skype for Business para este cambio, puesto que se trata de configuración de llamadas
3. Generalmente la configuración se ve primero en la versión web que en la de escritorio. Es muy importante cerrar sesión del todo en escritorio y volver a iniciar con la cuenta
4. La única forma de verificar y hacer los cambios es a través de PowerShell; desde la consola no se pueden ver estos
by Scott Muniz | Jul 22, 2020 | Uncategorized
This article is contributed. See the original author and article here.
You may have seen the recent announcement of new meeting features in Teams in Reimagining virtual collaboration for the future of work and learning (if not, check it out!). Today, we’re pleased to share that we’re making several of these features available to most users of Teams over the next few days.
We’re gradually rolling the features out. Once you’ve got the build that has the new experience (Teams desktop app only), you’ll have the option to turn it on. Read on to learn how to turn it on, what comes with it, how to use it, and answers to some common questions. Let’s get right to it!
Turn on the new experience
You do this via a checkbox in Teams Settings. Here’s how:
- Select your profile pic at the top of the Teams app, then Settings > General. (General should be what’s showing when you open Settings, so you probably won’t have to select it.)
- Select Turn on new meeting experience.
- Restart Teams by doing the following:
a. Right-click or Cmd-click the Teams icon in the Windows task bar or Mac System Tray.
b. Select Quit.
c. Start Teams again like you normally would.
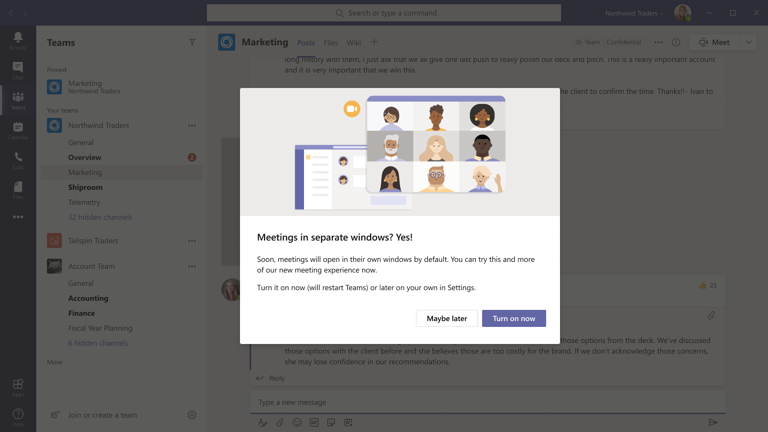
You might also see a notification that announces the new experience or reminds you to turn it on. Then it’s even easier—in that notification, choose Turn it on now if you’re ready at that point, or Maybe later if you’re in the middle of something.

What happens after you’ve turned it on
After turning on the new experience and restarting Teams, the biggest thing you’ll probably notice is that any calls and meetings will pop out into their own window, separate from the main Teams window. Like this:

If you’re still seeing calls and meetings in the main Teams window after turning the setting on and restarting, go to your profile pic again and select Check for updates. Once that is done, do the same quit and restart procedure per above. That should do the trick.
But wait, there’s more
Here are the other new things you’ll see and can try out:
- Meeting controls are moved to the top of the meeting screen. They’re docked there so you always have access to them (without jiggling your mouse) and they’re out of the way of the content and video that’s being shared.

- Large gallery view lets you see up to 49 video streams at once. This view is available when there are 10 or more attendees who are sharing video. To switch to large gallery, go to More options (…) in the meeting controls > Large gallery.

Here’s what it looks like—pretty cool to see all those faces!

- Together mode lets you feel like you’re in the same shared space with everyone in the meeting. (It might be even more fun than Large gallery.) It’s in the same menu as Large gallery, just below it. Here’s Together mode:

Together mode is available when 5 or more participants are sharing video.
Both Large gallery and Together mode are being rolled out gradually over the next few weeks. If you don’t see them right away, check again later.
- Meeting notes are now taken directly on the meeting’s Meeting notes tab in the main Teams window. (This is one of the benefits of having the meeting in a separate window.) To access or take notes from within the meeting window, select More options (…) > Show meeting notes and you’ll see the usual side pane come up. In the pane, there is a Take notes button that brings you to the Meeting notes tab.

- Focus mode is available when content is being shared. If you’d like to pay close attention to content, without the distraction of seeing video feeds, Focus mode is for you. It’s available in the meeting controls under More options (…) > Focus mode. Give it a whirl!
Common questions
- Has screen sharing changed? How do I share my screen?
No big changes here. In the meeting controls at the top, select Share screen. The screen choices you have will come up from the bottom of the meeting window just like they did before.

To stop sharing your screen, select Close screen share in the meeting controls. It’s the icon next to the Leave button.
- Why are message extensions grayed out? I like to send polls in meeting chat.
We’re working on it! For now, if you want to send a poll or use other message extensions in the meeting chat, go back to the main Teams window, select the meeting chat (either via the Calendar or the list in Chat), and do it there.
- What about InVision Freehand whiteboard?
Yup, we’re working on that, too.
- Will live events also open in their own window?
No, not yet—that functionality is coming soon.
- Focus mode is nice, but what about Full screen view?
We like Full screen view, too! (It’s available currently in meetings that happen in the main Teams window.) We’re working on bringing that to the new experience as well. When we do, you’ll have both Focus mode and Full screen view to choose from.
- Is this available for any license type?
The new experience isn’t available for Teams for Government or Teams free just yet. But soon.
The new meeting and calling experience is available for the Teams desktop client on both Windows and Mac. It’s not available for Teams on the web. (If you need to download the desktop client, go here.)
- What if I don’t turn the new experience on?
We’d love for you to try it out. We’re making it available in this way partly because in the near future, we’ll turn the experience on by default. Eventually, the setting to turn it on and off will go away. At that time, the experience of meetings in separate windows, with the meeting controls at the top, will become the norm. So we want you to have ample time to get familiar with it.
That’s our overview and how-to for this new meeting and calling experience. We hope you’ll try it. Remember to check for updates and restart the Teams client after you turn it on. Enjoy!
by Scott Muniz | Jul 22, 2020 | Uncategorized
This article is contributed. See the original author and article here.
Microsoft Threat Protection simplifies security operations center (SOC) work by consolidating powerful security solutions protecting your devices, email and docs, identities, and cloud apps. With advanced hunting, you get an extremely flexible query-based tool designed for proactive exploration, investigation, and hunting across a comprehensive set of data, covering system information, regular event logs, and security alerts.
To make advanced hunting even more accessible and easy to use, we’ve built some enhancements that many SOC analysts, whether hunting enthusiasts or budding defenders, will find useful:
- Pivot and query from multiple contexts
- Inspect records quickly
- Get reference info while hunting
Pivot and query from multiple contexts
When investigating an incident, we always look to learn more about affected assets and other entities, hoping to enrich the investigation with more data and insight. The new Go hunt action in Microsoft Threat Protection lets us quickly pivot from an ongoing incident investigation to inspecting a specific event, user, device, or other entity type on advanced hunting with an exhaustive, predefined query.
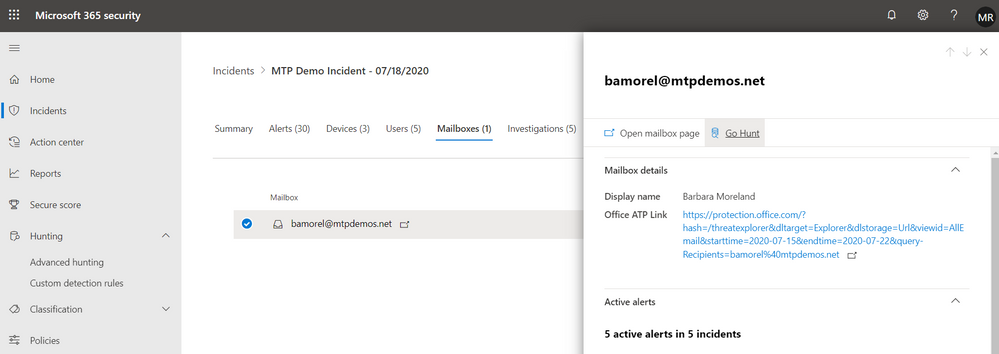
Let’s take a look at this incident involving a particular mailbox:

For most intrusions, a mailbox is typically the initial entry point of an attack. Therefore, we should start by investigating the mailbox to look for suspicious emails that were identified by Office 365 ATP as phishing or malware. By selecting Go hunt from the mailbox details pane, we are immediately taken to advanced hunting with a prepopulated query for email events related to the mailbox.

From this starting point, we can make small tweaks to the query to go deeper into the pivot. We add a new line to narrow down to only emails found to be phishing or malware.
let selectedTimestamp = datetime(2020-07-18T08:02:04.0000000Z);
let emailAddress = "bamorel@mtpdemos.net";
EmailEvents
| where Timestamp between ((selectedTimestamp - 24h) .. (selectedTimestamp + 24h))
and RecipientEmailAddress == emailAddress
//malicious emails
and (MalwareFilterVerdict == "Malware" or PhishFilterVerdict == "Phish")
Seasoned hunters will find many other ways to tweak these queries and surface even more insights about the mailbox in question and ultimately the investigation. As you work with other investigations on Microsoft Threat Protection, you will find many other go hunt entry points for digging deeper while utilizing the power of flexible queries.
Read more about go hunt
Inspect records thoroughly and quickly
Let’s say our modified go hunt query for malicious emails returned two emails, both of which had links and were detected as phishing. Of course, we’ll want to inspect each of those emails.
In the past, the best we could do was scroll slowly to the right while reading the values under each column. To speed things up and give defenders back a little bit more leisure time, we’ve added the Inspect record pane, which slides out to display all the columns as well as other relevant details about a selected record. You also get related assets, such as users and mailboxes that received or sent the email. If the record has process-related information, you also get a process tree.

You’ll be scrolling down for more info, which is much faster than scrolling to the right.

Get reference info while hunting
As we inspect one of the phishing emails, we‘d want to inspect the phishing link or URL embedded in the email. Our original go hunt query traversed the EmailEvents table, which broadly contains email processing events, but what we need is email content information.
To locate the right schema table, most of us will likely look at the schema tree and find EmailUrlInfo. We can quickly confirm that this is the right table by selecting View reference.

This opens the in-portal reference, which can also be accessed by selecting Schema reference in the upper right of the page.

The in-portal reference includes detailed information about each table and its columns. For those who want to explore schema items further, it also comes with sample queries as well as detailed ActionType (event type) information for tables that hold event information.

Now that we’ve found the EmailUrlInfo table and have verified that it holds information about URLs in email messages, we can try a little bit of Kusto Query Language (KQL) magic. In the example below, we use the join operator to get the embedded URLs in each of the phishing emails:
let selectedTimestamp = datetime(2020-07-18T08:02:04.0000000Z);
let emailAddress = "bamorel@mtpdemos.net";
EmailEvents
| where Timestamp between ((selectedTimestamp - 24h) .. (selectedTimestamp + 24h))
and RecipientEmailAddress == emailAddress
//malicious emails
and (MalwareFilterVerdict == "Malware" or PhishFilterVerdict == "Phish")
| join EmailUrlInfo on NetworkMessageId
| project EmailTime = Timestamp, Subject, Url

The hunt continues
Want to see how the rest of this investigation unfolds? Stay tuned for the next chapter where we continue the hunt using other fresh enhancements to advanced hunting.
For more information about advanced hunting and the features discussed in this article, read:
by Scott Muniz | Jul 22, 2020 | Uncategorized
This article is contributed. See the original author and article here.
We keep hearing many of you are eager to host gRPC-enabled services on IIS in Azure, such as here on GitHub. However, the lack of support for several HTTP features in the platform components is blocking you. We listened, and we have good news: we built HTTP support for gRPC into Http.sys! We are targeting the feature for Windows Server vNext. You can try it out today if you have access to Windows Server Insider builds.
Let us back up a bit. gRPC is a “modern open-source high-performance RPC framework”. You can read more about it here on the gRPC website. It allows clients and backends to communicate with one another with relative ease while using different frameworks and languages. In theory, such communication is achievable with JSON serialization. However, gRPC significantly outperforms it in terms of message sizes and speed of serialization. For its full functionality, it has more requirements from the implementation of the HTTP/2 protocol, which is the transport for gRPC. Unlike the browser scenarios, it requires support for bidirectional streaming and response trailers. Http.sys has always supported bidirectional streaming, but the response trailers were a feature gap up to this point. You can read more about the use of gRPC here in the context of .NET and usage patterns.
If you want to try out native gRPC support in Http.sys, you will need to start by getting an Insider build of Windows Server. You can do that by following the instructions on the Windows Server Insider Preview page.
Once you have your Windows Server vNext installed, you can test out the new HTTP features, whether you are building on top of Http.sys or simply want to see it working under the hood. The following code sample will show you how to verify the necessary HTTP features are working properly.
HTTP_DATA_CHUNK Chunks[2];
HTTP_UNKNOWN_HEADER Trailers[2];
PSTR ResponseBody = "Response Body";
HTTP_RESPONSE Response;
HTTP_CACHE_POLICY CachePolicy = {0};

Trailers[0].pName = "Trailer1";
Trailers[0].NameLength = (USHORT)strlen(Trailer[0].pName);
Trailers[0].pRawValue = "Value1";
Trailers[0].RawValueLength = (USHORT)strlen(Trailer[0].pRawValue);

Trailers[1].pName = "Trailer2";
Trailers[1].NameLength = (USHORT)strlen(Trailer[0].pName);
Trailers[1].pRawValue = "Value2";
Trailers[1].RawValueLength = (USHORT)strlen(Trailer[0].pRawValue);

Chunks[0].DataChunkType = HttpDataChunkFromMemory;
Chunks[0].FromMemory.pBuffer = (PVOID)ResponseBody;
Chunks[0].FromMemory.BufferLength = (USHORT)strlen(ResponseBody);

Chunks[1].DataChunkType = HttpDataChunkTrailers;
Chunks[1].Trailers.TrailerCount = RTL_NUMBER_OF(Trailers);
Chunks[1].Trailers.pTrailers = Trailers;

RtlZeroMemory(&Response, sizeof(Response));

Response.StatusCode = 200;
Response.pReason = "OK";
Response.ReasonLength = (USHORT) strlen(Response.pReason);

Response.pEntityChunks = Chunks;
Response.EntityChunkCount = RTL_NUMBER_OF(Chunks);

Error = HttpSendHttpResponse(RequestQueue,
                             Request->RequestId,
                             0,
                             &Response,
                             &CachePolicy,
                             &BytesSent,
                             NULL,
                             NULL,
                             NULL,
                             NULL);
We are excited about this feature and eager to hear you feedback!

Recent Comments