by Scott Muniz | Jul 22, 2020 | Alerts, Microsoft, Technology, Uncategorized
This article is contributed. See the original author and article here.
`Invoke-AzRestMethod` is a new Azure PowerShell cmdlet. It allows you to make custom HTTP requests to the Azure Resource Management (ARM) endpoint using the Az context.
This cmdlet is useful when you want to manage Azure services for features that aren’t yet available in the Az PowerShell modules.
How to use Invoke-AzRestMethod?
As an example, you can allow access to Azure Container Registry (ACR) only for specific networks or deny public access. This feature isn’t available yet in the Az.ContainerRegistry PowerShell module. However, it can be managed in the interim with `Invoke-AzRestMethod`.
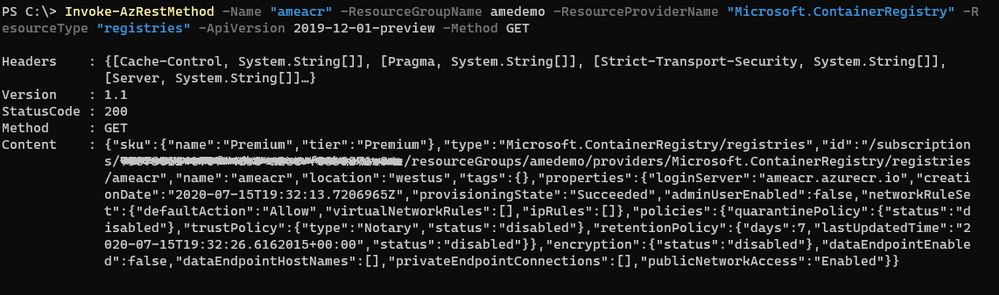
We want to disable public access to the existing ACR named `ameacr` in the `amedemo` resource group. Let’s start by understanding how the cmdlet works with a GET operation:
Invoke-AzRestMethod
-ResourceGroupName “amedemo”
-ResourceProviderName "Microsoft.ContainerRegistry"
-ResourceType “registries”
-Name “ameacr”
-ApiVersion 2019-12-01-preview
-Method GET

To allow maximum flexibility, most of the parameters are optional. However, when you’re managing resources within a resource group, you’ll most likely need to provide either the full ID to the resource or parameters like resource group, resource provider and resource type.
The ‘ResourceType‘ and ‘Name‘ parameters can take multiple values when targeting resources that require more than one name. For example, to manipulate a saved search in a Log Analytics workspace, the parameters look like the following:
‘-ResourceType @(‘workspaces’, ‘savedsearches’) -Name @(‘ame-la’, ‘ame-search’)’
Using a mapping based on the position in the array, the cmdlet constructs the following resource Id:‘/workspaces/yabo-test-la/savedsearches/ame-search’.
The ‘APIVersion’ parameter allows you to use a specific API, including preview ones as it is the case here. The supported API versions for Azure Resource providers can be found in the following repository: https://github.com/Azure/azure-rest-api-specs
You can find the definition for the 2019-12-01-preview version of ACR at the following location: https://github.com/Azure/azure-rest-api-specs/tree/master/specification/containerregistry/resource-manager/Microsoft.ContainerRegistry/preview
To disable the public network access, we need to make a PATCH call to the API that changes the value of the “publicNetwokAccess” parameter:
Invoke-AzRestMethod
  -ResourceGroupName amedemo
  -Name "ameacr"
  -ResourceProviderName "Microsoft.ContainerRegistry"
  -ResourceType "registries"
  -ApiVersion 2019-12-01-preview
  -Payload '{ "properties": {
     "publicNetworkAccess": "Disabled"
     } }'
  -Method PATCH
The Payload property is a JSON string that shows the path of the property to be modified.

All the parameters for this API are described in the rest-api-spec file associated with this API. More specifically, the definition for the publicNetworkAccess parameter can be found in the following JSON file: https://github.com/Azure/azure-rest-api-specs/blob/2a9da9a79d0a7b74089567ec4f0289f3e0f31bec/specification/containerregistry/resource-manager/Microsoft.ContainerRegistry/preview/2019-12-01-preview/containerregistry.json
To only allow access to the registry from a specific IP address, the payload needs to be adjusted as follows:
Invoke-AzRestMethod
  -ResourceGroupName amedemo
  -Name "ameacr"
  -ResourceProviderName "Microsoft.ContainerRegistry"
  -ResourceType "registries"
  -ApiVersion 2019-12-01-preview
  -Payload '{ "properties": {
      "networkRuleSet": {
      "defaultAction": "Deny",
      "ipRules": [ {
         "action": "Allow",
         "value": "24.22.123.123"
         } ]
      }
  } }'
  -Method PATCH

How does this compare to the (New|Get|Set)-AzResource?
The *-AzResource cmdlets allow you to customize the REST API call to Azure by specifying the resource type, the API version, and the properties to be updated. However, the properties need to be a PSObject which can easily become complicated to create.
With `Invoke-AzRestMethod`, we wanted to offer a simpler way to manage Azure resources. In the previous example, you can see that the payload is a JSON string. You don’t have to struggle with the conversion between JSON and PSObjects.
If you’re already familiar with the *-AzResource cmdlets, you can continue using them. We have no plans to stop supporting them. With `Invoke-AzRestMethod`, we have added a new cmdlet to the family.
Feedback
As always, we value your feedback and welcome issues and contributions on our GitHub repo: https://github.com/Azure/azure-powershell
We’re also conducting a survey until August 15th about the PowerShell modules for Azure. Please take some time to provide your feedback on how we’re doing, it shapes our strategy:
https://microsoft.qualtrics.com/jfe/form/SV_bK37YHU5FBZepcF?Q_CHL=blog
by Scott Muniz | Jul 22, 2020 | Uncategorized
This article is contributed. See the original author and article here.
Introduction
My name is John Barbare and I am a Sr Customer Engineer at Microsoft focusing on all things in the Cybersecurity space. Welcome to another customer offering article to inform you about the newest threats and what protective measures from Microsoft you can utilize. In this article, we will present Premier Services Offerings around Modern Workplace Threat Protection.
Offering Overview
With the rise in Ransomware attacks and increased focus around threats facing small to large scale enterprises, we decided to take two customer offerings and combine them into one. We took the Proactive Operations Program: Protecting Against Ransomware and merged it with Modern Workplace Threat Protection to give the best overview of all the different types of attacks that enterprises are facing and include the entire M365 security stack to protect, detect, and prevent these attacks into a combined four–day customer offering. With this new update, we were able to provide a four–day customer offering to meet and exceed customer expectations.
 Security: Modern Workplace Threat Protection – Fundamentals
What’s Included
The content of this offering is a mix of education, governance, administration, and security best practices at the L200-L300 level which focuses on the breadth of the M365 security stack.
Modern Workplace Threat Protection is four day engagement where you will learn about modern threat protection components and security technologies, evaluate the features and functionality, and get started in deploying in a Proof of Concept environment wherever feasible. It will also expand your understand of how different types of malware, Zero Days, and Ransomware attacks are carried out and gain improved insights into protecting, detecting, and securing your environment and users against these destructive threat measures.
 Ransomware attacks are on the rise
Areas Covered
The below sections are covered in detail throughout the four–day offering and expand on each objective to maximize your understanding of each topic and focus area. Deployment methods in the offering cover Group Policy, Microsoft Endpoint Configuration Manager, and Intune.
Ransomware and Dark Market Overview – Objectives focus on Ransomware background, enterprise Ransomware mitigations, trends and observations, key principles, and the different methods Microsoft can help with.
AppLocker & Application Control – Objectives focus on AppLocker overview and Application Whitelisting, prerequisites, rules, PowerShell, event logs, troubleshooting, Windows Defender Application Control and overview, and Application Control Deployment.
Windows Defender Exploit Guard & Application Guard – Objectives focus on Exploit Guard Overview, components, setup and deployment, Application Guard overview, the anatomy of an attack and containment, and Application Guard setup and deployment.
Windows Defender Antivirus – Objectives focus on benefits & unique optics of Windows Defender Antivirus (AV), the evolving threat landscape & the role of cloud-based protection, what’s on your computer – the Windows Defender AV endpoint, Windows Defender AV Block at First Sight, and behind the scenes of using the Potential Unwanted Application feature.
Securing Privileged Access – Objectives focus on a detailed overview of virtualization–based security, Credential Guard, Remote Credential Guard, and using Restricted Admin modes.
Code Signing & Macro Controls – Objectives focus on code signing, the importance of code signing, code signing certificates, and how the signing process works.
Advanced Threat Protection – Objectives focus on the overview of the current threat landscape and how it can impact your environment. Deep dives go into using Microsoft Defender Advanced Threat Protection (ATP), Office ATP, Azure ATP, and the new Microsoft Threat Protection to showcase the latest and best technologies Microsoft is keeping its customers and employees safe.
End user, Phishing & Social Engineering – Objectives focus on social engineering, phishing attacks, spear phishing, using the O365 attack simulator, and overall end user education.
Hardening Basics, Disabling Legacy Protocols, Security Update Management, & Data Backup – Objectives focus on the importance of software updates, hardening basics, using Microsoft security baselines, disabling legacy protocols, and the importance of backups and recovery methods if an attack does occur.
Hands on/Implementation
During this offering there are multiple hands on exercises to use in a Microsoft demo tenant, your own environment, or implement in a proof of concept to deployed later after testing. The following areas are listed below:
•AppLocker
•Exploit Guard and Application Guard
•Virtualization Based Security
•Macro Controls
•Windows Defender Antivirus
•Microsoft Defender ATP
•Office ATP
•Microsoft Threat Protection
•Phishing attacks and Social Engineering -Prevention
•Backups -Azure Backup
Delivery model
The delivery model is designed to be an educational offering covering threat protection technologies within the Modern Workplace including identity, access management, and endpoint security. Proof of Concept pilot enablement of key scoped Windows Defender endpoint defenses.
Key Personnel For this Offering
Within your organization, any Business Decision Makers/Key Stakeholders, IT/Security/Networking staff and management, SecOps, Cyber Analysts, Red Team, Blue Team, or any internal Cybersecurity staff that would assist in implementing and using these security technologies detailed in this offering. Other members of the IT organization that will be engaged as needed in each technology and threat protection area as needed.
Conclusion
Cybersecurity and threat protection are a topic that is being discussed daily with all clients that Microsoft has and also with future clients. Since there is no single product that can fix everything with one click and every client’s environment is unique, Modern Workplace Threat Protection addresses and answers the tough security challenges.
Ann Johnson, Microsoft’s Chief Vice President of Cybersecurity, stated on May 18, 2020 that, “operational resilience cannot be achieved without a true commitment to, and investment in, cyber resilience. We want to help empower every organization on the planet by continuing to share our learnings to help you reach the state where core operations and services won’t be disrupted by geopolitical or socioeconomic events, natural disasters, or even cyber events.”
By selecting this offering, it is a great start to see what Microsoft security features are already in your environment and be able to gain a better understanding around the Microsoft security stack and be ready to deploy and safeguard against the newest threats and attacks.
Ask your Microsoft Account Representative, Technical Account Manager (TAM) or Service Delivery Manager (SDM) to reserve a spot and have one of Microsoft’s highly skilled Cybersecurity Customer Engineers deliver this offering to your organization very soon!
Disclaimer
As of this writing, the above modules are in scope, however, they are subject to change as M365 Security offerings and Modern Workplace Threat Protection evolve responding to customers’ feedback.
Credit
Special thanks to the offering team: Paul Bergson, John Barbare, Anderson Moriya da Silva, and Joe Zerafa.
Thanks for reading and have a great Cybersecurity day!
by Scott Muniz | Jul 22, 2020 | Alerts, Microsoft, Technology, Uncategorized
This article is contributed. See the original author and article here.
Managed identity is a feature that enables you to authenticate to Azure resources securely without needing to insert credentials into your code. Managed identities are automatically managed by Azure and enable you to authenticate to services that support Azure Active Directory authentication, like Azure Database for PostgreSQL – Single Server.
Today we’ll create a managed identity for an Azure Function app and connect to an Azure Database for PostgreSQL server. (We also have a tutorial for connecting from a VM with managed identity).
In this blog, we’ll be going through the following steps:
- Step 1: Configure Azure AD Authentication for PostgreSQL
- Step 2: Enable managed identity for the Function app
- Step 3: Use the managed identity ID to create a user in Postgres
- Step 4: Write code for function app
- Step 5: Test the function app and connect to Postgres
Step 1: Configure Azure AD Authentication for Azure Database for PostgreSQL – Single Server
First, we need to make sure that our Azure Database for PostgreSQL server is configured for Azure Active Directory authentication. The Use Azure Active Directory for authentication with PostgreSQL walkthrough shows you how to do so.
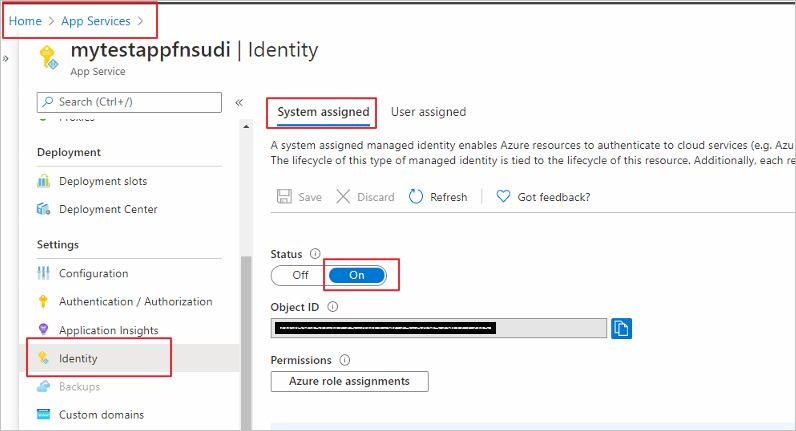
Step 2: Enable a managed identity for the Function app
Next is to enable a system-assigned managed identify for the Azure Function app. A system-assigned managed identity is an Active Directory identity that’s created by Azure for a specific resource.
Sign in to the Azure portal and select the Function app you’d like to use. Select Identity under Settings. In the System assigned tab, set Status to On.

Step 3: Use the managed identity ID to create a user in Postgres
Now we will create a Postgres user for your managed identity. For this we need to get the application’s ID. Search and open Azure Active Directory in the Azure portal. Select Enterprise Applications.

Select your Function app and copy its Application ID.

Now, connect to your Azure Database for PostgreSQL server using your Azure AD administrator user (from Step 1). Run the following in Postgres, substituting in your application ID:
SET aad_validate_oids_in_tenant = off;
CREATE ROLE myuser WITH LOGIN PASSWORD '<APPLICATION_ID>' IN ROLE azure_ad_user;
The managed identity now has access when authenticating to Postgres with the username myuser.
Step 4: Write code for the Function app
Next let’s see how to get an access token using the Function app’s system-managed identity. We’ll use that token to call Azure Database for PostgreSQL. Azure Database for PostgreSQL – Single Server natively supports Azure AD authentication, so it can directly accept access tokens obtained using managed identities for Azure resources. When creating a connection to PostgreSQL, you pass the access token in the password field.
Here’s a .NET code example of opening a connection to PostgreSQL using an access token. This code must run on the Function app to access the system-assigned managed identity’s endpoint. .NET Framework 4.6 or higher or .NET Core 2.2 or higher is required to use the access token method.
Replace the values of Servername, User, and Database to match yours.
using System;
using System.IO;
using System.Threading.Tasks;
using Microsoft.AspNetCore.Mvc;
using Microsoft.Azure.WebJobs;
using Microsoft.Azure.WebJobs.Extensions.Http;
using Microsoft.AspNetCore.Http;
using Microsoft.Extensions.Logging;
using Newtonsoft.Json;
using Npgsql;
using Microsoft.Azure.Services.AppAuthentication;
namespace myfunctionappsudi
{
    public static class Function1
    {
        /*Declare Database Details*/
        private static string Host = "<Servername>.postgres.database.azure.com";/*Database FQDN*/
        private static string User = "myuser@<Servername>"; /*User Created with managed identity*/
        private static string DBname = "<DB Name>";/*Database Name*/
        private static string Port = "5432";/*Database Port*/
        static string responsemsg;
        [FunctionName("Function1")]
        public static async Task<IActionResult> Run(
            [HttpTrigger(AuthorizationLevel.Function, "get", "post", Route = null)] HttpRequest req,
            ILogger log)
        {
            log.LogInformation("C# HTTP trigger function processed a request.");
            /*Gettting the Token*/
            var sqlServerTokenProvider = new AzureServiceTokenProvider();
            var SqlAccessToken = await sqlServerTokenProvider.GetAccessTokenAsync("https://ossrdbms-aad.database.windows.net");
            //log.LogInformation (SqlAccessToken); /*For troubleshooting in case you need to print the token */
            log.LogInformation("Connecting to database.");
            string connString = String.Format(
                    "Server={0}; User Id={1}; Database={2}; Port={3}; Password={4};SSLMode=Prefer",
                    Host,
                    User,
                    DBname,
                    Port,
                    SqlAccessToken);
            /*Connecting to PostgreSQL*/
            using (var conn = new NpgsqlConnection(connString))
            {
                log.LogInformation("Opening connection");
                log.LogInformation(connString);
                conn.Open();
                log.LogInformation("Opening connection using access token....");
                /*Query the Database */
                    using (var command = new NpgsqlCommand("SELECT version()", conn))
                    {

                        var reader = command.ExecuteReader();
                        while (reader.Read())
                        {
                            log.LogInformation("nConnected!nnPostgres version: {0}", reader.GetString(0));
                          responsemsg = reader.GetString(0);
                        }
                    }
              }
             responsemsg = "The version of the Azure Database for PostgreSQL is : " + responsemsg;
            return new OkObjectResult(responsemsg);
        }
    }
}
Step 5: Test the Function app and connect to Postgres
Once you publish the Function app, you can test it. In the Azure portal, go to the Function app you published and select Functions.

Once the Function is selected you can choose Code+Test and then Test/Run

Select Run in the pop-up window.

You can see the function’s output in terminal for App Insights.

We can see that the function connected to the Postgres database with managed identity and could successfully run the query.
You no longer have to keep credentials in code
Managed identity sets you free from storing credentials in code or source control. If you’re interested in how to use managed identity to connect from an Azure VM to Azure Database for PostgreSQL – Single Server, check out our walkthrough.


Recent Comments