by Scott Muniz | Jul 23, 2020 | Alerts, Microsoft, Technology, Uncategorized
This article is contributed. See the original author and article here.
In my introductory post we saw that there are many different ways in which you can host a GraphQL service on Azure and today we’ll take a deeper look at one such option, Azure App Service, by building a GraphQL server using dotnet. If you’re only interested in the Azure deployment, you can jump forward to that section. Also, you’ll find the complete sample on my GitHub.
Getting Started
For our server, we’ll use the graphql-dotnet project, which is one of the most common GraphQL server implementations for dotnet.
First up, we’ll need an ASP.NET Core web application, which we can create with the dotnet cli:
Next, open the project in an editor and add the NuGet packages we’ll need:
<PackageReference Include="GraphQL.Server.Core" Version="3.5.0-alpha0046" />
<PackageReference Include="GraphQL.Server.Transports.AspNetCore" Version="3.5.0-alpha0046" />
<PackageReference Include="GraphQL.Server.Transports.AspNetCore.SystemTextJson" Version="3.5.0-alpha0046" />
At the time of writing graphql-dotnet v3 is in preview, we’re going to use that for our server but be aware there may be changes when it is released.
These packages will provide us a GraphQL server, along with the middleware needed to wire it up with ASP.NET Core and use System.Text.Json as the JSON seralizer/deserializer (you can use Newtonsoft.Json if you prefer with this package).
We’ll also add a package for GraphiQL, the GraphQL UI playground, but it’s not needed or recommended when deploying into production.
<PackageReference Include="GraphQL.Server.Ui.Playground" Version="3.5.0-alpha0046" />
With the packages installed, it’s time to setup the server.
Implementing a Server
There are a few things that we need when it comes to implementing the server, we’re going to need a GraphQL schema, some types that implement that schema and to configure our route engine to support GraphQL’s endpoints. We’ll start by defining the schema that’s going to support our server and for the schema we’ll use a basic trivia app (which I’ve used for a number of GraphQL demos in the past). For the data, we’ll use Open Trivia DB.
.NET Types
First up, we’re going to need some generic .NET types that will represent the underlying data structure for our application. These would be the DTOs (Data Transfer Objects) that we might use in Entity Framework, but we’re just going to run in memory.
public class Quiz
{
    public string Id
    {
        get
        {
            return Question.ToLower().Replace(" ", "-");
        }
    }
    public string Question { get; set; }
    [JsonPropertyName("correct_answer")]
    public string CorrectAnswer { get; set; }
    [JsonPropertyName("incorrect_answers")]
    public List IncorrectAnswers { get; set; }
}
As you can see, it’s a fairly generic C# class. We’ve added a few serialization attributes to help converting the JSON to .NET, but otherwise it’s nothing special. It’s also not usable with GraphQL yet and for that, we need to expose the type to a GraphQL schema, and to do that we’ll create a new class that inherits from ObjectGraphType<Quiz> which comes from the GraphQL.Types namespace:
public class QuizType : ObjectGraphType<Quiz>
{
    public QuizType()
    {
        Name = "Quiz";
        Description = "A representation of a single quiz.";
        Field(q => q.Id, nullable: false);
        Field(q => q.Question, nullable: false);
        Field(q => q.CorrectAnswer, nullable: false);
        Field<NonNullGraphType<ListGraphType<NonNullGraphType>>>("incorrectAnswers");
    }
}
The Name and Description properties are used provide the documentation for the type, next we use Field to define what we want exposed in the schema and how we want that marked up for the GraphQL type system. We do this for each field of the DTO that we want to expose using a lambda like q => q.Id, or by giving an explicit field name (incorrectAnswers). Here’s also where you control the schema validation information as well, defining the nullability of the fields to match the way GraphQL expects it to be represented. This class would make a GraphQL type representation of:
type Quiz {
    id: String!
    question: String!
    correctAnswer: String!
    incorrectAnswers: [String!]!
}
Finally, we want to expose a way to query our the types in our schema, and for that we’ll need a Query that inherits ObjectGraphType:
public class TriviaQuery : ObjectGraphType
{
    public TriviaQuery()
    {
        Field<NonNullGraphType<ListGraphType<NonNullGraphType<QuizType>>>>("quizzes", resolve: context =>
        {
            throw new NotImplementedException();
        });

        Field<NonNullGraphType<QuizType>>("quiz", arguments: new QueryArguments() {
            new QueryArgument<NonNullGraphType<StringGraphType>> { Name = "id", Description = "id of the quiz" }
        },
        resolve: (context) => {
            throw new NotImplementedException();
        });
    }
}
Right now there is only a single type in our schema, but if you had multiple then the TriviaQuery would have more fields with resolvers to represent them. We’ve also not implemented the resolver, which is how GraphQL gets the data to return, we’ll come back to that a bit later. This class produces the equivalent of the following GraphQL:
type TriviaQuery {
    quizzes: [Quiz!]!
    quiz(id: String!): Quiz!
}
Creating a GraphQL Schema
With the DTO type, GraphQL type and Query type defined, we can now implement a schema to be used on the server:
public class TriviaSchema : Schema
{
    public TriviaSchema(TriviaQuery query)
    {
        Query = query;
    }
}
Here we would also have mutations and subscriptions, but we’re not using them for this demo.
Wiring up the Server
For the Server we integrate with the ASP.NET Core pipeline, meaning that we need to setup some services for the Dependency Injection framework. Open up Startup.cs and add update the ConfigureServices:
public void ConfigureServices(IServiceCollection services)
{
    services.AddTransient<HttpClient>();
    services.AddSingleton<QuizData>();
    services.AddSingleton<TriviaQuery>();
    services.AddSingleton<ISchema, TriviaSchema>();

    services.AddGraphQL(options =>
    {
        options.EnableMetrics = true;
        options.ExposeExceptions = true;
    })
    .AddSystemTextJson();
}
The most important part of the configuration is lines 8 – 13, where the GraphQL server is setup and we’re defining the JSON seralizer, System.Text.Json. All the lines above are defining dependencies that will be injected to other types, but there’s a new type we’ve not seen before, QuizData. This type is just used to provide access to the data store that we’re using (we’re just doing in-memory storage using data queried from Open Trivia DB), so I’ll skip its implementation (you can see it on GitHub).
With the data store available, we can update TriviaQuery to consume the data store and use it in the resolvers:
public class TriviaQuery : ObjectGraphType
{
    public TriviaQuery(QuizData data)
    {
        Field<NonNullGraphType<ListGraphType<NonNullGraphType<QuizType>>>>("quizzes", resolve: context => data.Quizzes);

        Field<NonNullGraphType<QuizType>>("quiz", arguments: new QueryArguments() {
            new QueryArgument<NonNullGraphType<StringGraphType>> { Name = "id", Description = "id of the quiz" }
        },
        resolve: (context) => data.FindById(context.GetArgument<string>("id")));
    }
}
Once the services are defined we can add the routing in:
public void Configure(IApplicationBuilder app, IWebHostEnvironment env)
{
    if (env.IsDevelopment())
    {
        app.UseDeveloperExceptionPage();
        app.UseGraphQLPlayground();
    }

    app.UseRouting();

    app.UseGraphQL<ISchema>();
}
I’ve put the inclusion GraphiQL. within the development environment check as that’d be how you’d want to do it for a real app, but in the demo on GitHub I include it every time.
Now, if we can launch our application, navigate to https://localhost:5001/ui/playground and run the queries to get some data back.
Deploying to App Service
With all the code complete, let’s look at deploying it to Azure. For this, we’ll use a standard Azure App Service running the latest .NET Core (3.1 at time of writing) on Windows. We don’t need to do anything special for the App Service, it’s already optimised to run an ASP.NET Core application, which is all this really is. If we were using a different runtime, like Node.js, we’d follow the standard setup for a Node.js App Service.
To deploy, we’ll use GitHub Actions, and you’ll find docs on how to do that already written. You’ll find the workflow file I’ve used in the GitHub repo.
With a workflow committed and pushed to GitHub and our App Service waiting, the Action will run and our application will be deployed. The demo I created is here.
Conclusion
Throughout this post we’ve taken a look at how we can create a GraphQL server running on ASP.NET Core using graphql-dotnet and deploy it to an Azure App Service.
When it comes to the Azure side of things, there’s nothing different we have to do to run the GraphQL server in an App Service than any other ASP.NET Core application, as graphql-dotnet is implemented to leverage all the features of ASP.NET Core seamlessly.
Again, you’ll find the complete sample on my GitHub for you to play around with yourself.
This post was originally published on www.aaron-powell.com .
by Scott Muniz | Jul 23, 2020 | Uncategorized
This article is contributed. See the original author and article here.
Hello everyone, here is part 12 of a series focusing on Application Deployment in Configuration Manager. This series is recorded by @Steve Rachui , a Microsoft principal premier field engineer. These tutorials are from our library and uses Configuration Manager 2012 in the demos, however the concepts are still relevant for Configuration Manager current branch.
This session presents an overview of App-V, discussing what App-V is, it’s benefits and the components of a standalone environment. It then switches the discussion to focus on App-V/ConfigMgr integration and presents a demo of App-V in action.
Next in the series Steve focuses on the App-V 5.0 sequencer and how it can be used to sequence packages to run in the App-V virtual environment.
Posts in the series
Go straight to the playlist
by Scott Muniz | Jul 23, 2020 | Uncategorized
This article is contributed. See the original author and article here.
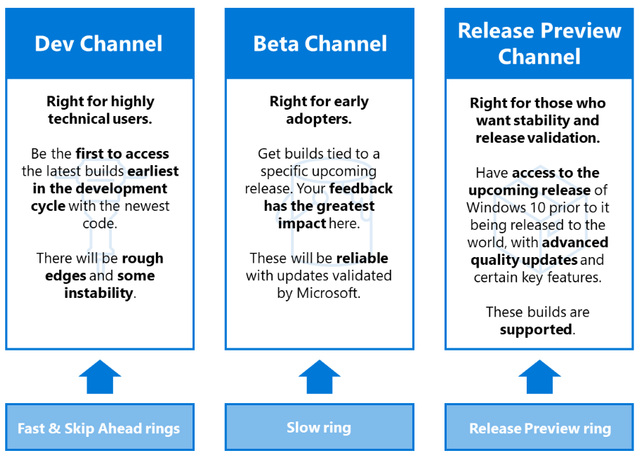
On June 15, 2020, Windows introduced Windows Insider Channels, which change the way we release new builds to all Windows Insiders. We are converting our current ring model, based on the frequency of builds, to a new channel model that pivots on the quality of builds and will better support parallel coding efforts. The goal of this blog post is to provide clarity for existing and new Windows Insiders as you choose the channel experience that is right for you.
We want to provide clear guidance on how IT administrators can leverage the Windows Insider Program and the new channels to get ahead. Specifically, we want to share how you, as an IT administrator, can leverage the new Dev Channel, Beta Channel, and Release Preview Channel, and how your policies can map to these channels.
 Image depicting a comparison of key characteristics for Dev, Beta, and Release Preview Channels, and how those channels map to the rings previously used for the Windows Insider Program
|
Note: Release Preview builds are only supported for IT administrators enrolled in the Windows Insider Program for Business.
|
Explore new features using the Beta Channel
The Beta Channel is recommended for IT administrators who want to explore new features as they are being created, and for those who want to provide feedback with maximum impact to help shape the product. We recommend that you enroll a small subset of devices in the Beta Channel. These devices can be within the IT department or with end users who are Windows enthusiasts and enroll their devices. Updates from the Beta Channel will be tied to the upcoming Windows 10 version. Users on Beta Channel will receive security updates to ensure preview builds stay patched in line with production software.
To receive Beta Channel builds via Windows Update for Business, follow these steps:
- Enable preview builds.
|
Type
|
Policy Name
|
Configure to
|
|
Group Policy
|
Windows Update > Windows Update for Business > Manage preview builds
|
Enable preview builds
|
|
Configuration service provider (CSP)
|
Update/ManagePreviewBuilds
|
2, Enable preview builds
|
Table showing configuration settings to enable preview builds using Group Policy or CSP
- Configure policies to receive Beta builds.
|
Type
|
Policy Name
|
Configure to
|
|
Group Policy
|
Windows Update > Windows Update for Business > Select when Preview Builds and Feature Updates are received > Select the Windows readiness level for the updates you receive
|
Preview build – Slow
|
|
CSP
|
Update/BranchReadinessLevel
|
4, Windows Insider build – Slow
|
Table showing configuration settings required in Group Policy or configuration service provider to get Beta builds
|
Note: Due to the nature of Group Policy templates and configuration service provider policies, the naming in management tools will change with a new Windows 10 version release. Prior to this change, IT administrators will have to set “Preview build – Slow” in Group Policy or “Windows Insider build – Slow” in configuration service policies to get Beta builds.
|
Validate the upcoming release using the Release Preview Channel
Having devices in the Beta Channel allows you to explore upcoming features as they are being created; however, you may decide to focus your validation efforts on a version of Windows 10 that is about to be released. In that case, we recommend that you have a set of devices on the Release Preview Channel. This channel allows you to validate the next version of Windows 10 a few months prior to release, and the release is supported for IT administrators enrolled in the Windows Insider Program for Business.
We recommend that 1% of your organization’s devices run on Release Preview. Ideally, this 1% is a diverse group of devices that represents the hardware and software used across your organization. To fully leverage Release Preview, utilize your preferred management tool with your typical policy set. This will ensure that you can validate the upcoming release and that your policies and rollout process are working as expected prior to release.
To get Release Preview builds, leverage Windows Update for Business, Windows Server Update Service (WSUS), or Azure Marketplace, or utilize ISOs. Regardless of which method you use to install Release Preview builds, these builds will be the same, and will have the same quality level and release cadence.
Use Windows Update for Business to deploy Release Preview builds
- Enable preview builds.
|
Type
|
Policy Name
|
Configure to
|
|
Group Policy
|
Windows Update > Windows Update for Business > Manage preview builds
|
Enable preview builds
|
|
Configuration service provider
|
Update/ManagePreviewBuilds
|
2, Enable preview builds
|
Table showing configuration settings to deploy Release Preview builds using Group Policy or configuration service provider
- Configure policies to receive Release Preview builds.
|
Type
|
Policy Name
|
Configure to
|
|
Group Policy
|
Windows Update > Windows Update for Business > Select when Preview Builds and Feature Updates are received > Select the Windows readiness level for the updates you receive
|
Release Preview
|
|
Configuration service provider
|
Update/BranchReadinessLevel
|
8, Release Preview Insider build
|
Table showing configuration settings required in Group Policy or configuration service provider to get Release Preview builds
Use WSUS and Configuration Manager to deploy Release Preview builds
- Enable the Windows Insider Pre-Release product. In the Products tab of Software Update Point Component Properties, select the box next to Windows Insider Pre-Release.
 How Windows Insider Pre-Release builds appear in WSUS
- From the list of Windows 10 updates in WSUS, select “Windows Insider Pre-release Feature Update”.
If you manage your organization’s deployments using Microsoft Endpoint Configuration Manager, use the same procedure you currently use to deploy any other Windows 10 feature update (Software Library > Overview > Windows 10 Servicing > All Windows 10 Updates). Once you reach the list of All Windows 10 Updates, you will see an option for “Windows Insider Pre-release Feature Update to Windows 10 Version 2004.”
- Deploy the release the same way you would deploy any other feature update.
Create Release Preview virtual machines (VMs) with Azure Marketplace
To create a VM based on a specific Release Preview build, visit the Azure Marketplace and either search for “Windows 10 Preview” or select Products > Windows 10 Preview.
 Windows 10 Preview in the Azure Marketplace
Download Release Preview ISOs
Visit the Windows Insider Program website and select the ISOs labeled from the Release Preview Channel. ISOs are typically released for Release Preview builds within a week of being shipped via Windows Update.
Submit feedback
For any major issues that may become deployment blockers after a feature update is released, IT administrators can use the Microsoft Support option for the Release Preview build of the upcoming Windows 10 release.
To provide feedback, search for “Feedback Hub” using the search bar in Windows 10. In Feedback Hub, you can report problems and suggest features, quickly navigate to the Windows Insider site, and find more ways to connect with the Windows Community.
 Screenshot of Feedback Hub
Select Feedback in the left pane. Then you can enter your feedback in the fields provided and explore additional information and feedback.
 Screenshot of feedback options in Feedback Hub
We appreciate your new or continued support of the Windows Insider Program for Business. Please let us know what we can do to best meet your needs for feature exploration and validation of upcoming feature updates prior to release.
For additional information:
![[Guest Blog] Express Yourself with Creative Coding!](https://www.drware.com/wp-content/uploads/2020/07/medium-123)
by Scott Muniz | Jul 23, 2020 | Uncategorized
This article is contributed. See the original author and article here.
The article was written by MVP Marc Duiker as part of the Humans of IT Guest Bloggers Series. Marc shares about what creative coding is, his own journey in infusing creativity in tech and how you can get started!
Hi, my name is Marc Duiker. I’m an Azure MVP working on event-driven architectures and a big fan of serverless technology. I really enjoy coding because I like to create things that others can use and benefit from. This is why I not only code for work, but also as a hobby where I do creative coding. Here’s the Wikipedia definition:
“Creative coding is a type of computer programming in which the goal is to create something expressive instead of functional. It is used to create live visuals for VJing, as well as creating visual art and design, entertainment, art installations, projections and projection mapping, sound art, advertising, product prototypes, and much more.”
Source: Wikipedia
For me, creative coding means creating something enjoyable for myself and, hopefully, also for others. Creative coding can be a myriad of things, allowing you to express yourself in many different ways. I’d like to share my experience with you, and I hope you’ll be inspired to try some creative coding yourself!
Games & Graphics
My fascination with creative coding started with computer graphics. This started in my early teenage years while playing Prince of Persia. The fascination grew over time when I began to create graphics myself. I created 3D landscapes with Bryce, fractal flames using Apophysis, and other recursive structures using L-System generators. I’m still intrigued by how well recursive rules can describe nature. Look at this computer-generated fern  :
:
 Computer generated fern by Laug (created with Processing)
Photography
For a couple of years, my attention turned to photography and photo editing. I especially enjoyed urban exploration photography, visiting abandoned locations, and capturing the beauty of buildings and interiors in decay. The atmosphere of these locations is breathtaking.
 “There lies the gold” by Marc Duiker
For about two years, I gave photography workshops at the local community college. This experience really helped me to speak in public with more confidence.
Visual arts
When I learned to code, during my first job, my interest in creating computer graphics spiked again. I discovered Processing, a software sketchbook. I created many sketches while watching tutorials from Daniel Schiffman (The Coding Train). He has a gift for explaining topics on software engineering, maths, and graphics in a very accessible way.
 The Coding Train channel on YouTube
I especially recommend The Nature of Code playlist, which features 83 videos ranging from Perlin noise, my favorite type of noise, to fractals and genetic algorithms.
 “Noise Worms” by Marc Duiker
You can play with the Noise Worms sketch here.
Retro game development
I excel in starting new projects and never finishing them (ha!) . Sometimes I don’t even start them at all. However, about one and a half years ago, I read about retro game development using PICO-8. I bought the software with the intent to create some cool games, but I didn’t touch the software for a couple of months. Then, I read about PICO-8 again, this time in a MagPi magazine. At about the same time, Scott Hanselman invited Joseph White, the creator of PICO-8, on one of his podcasts. This clearly was a sign I had to pick up PICO-8 and create a game with it. Since I am a big fan of Azure Functions, I created a game in which you play the Azure Functions logo and need to collect items to restore the power of an Azure data center.
 “Azure Functions – The Game” by Marc Duiker
Creating this puzzle game took some effort – I spent many evenings and nights over a couple of weeks, but the process was so much fun!
PICO-8 is a very restricted environment to create games in, the screen is only 128×128 pixels, sprites are 8×8 pixels, and there’s even a restriction on the amount of code you can write. Once it was finished, I was thrilled that the game was well received in the community, the Azure Functions team and others within Microsoft!
 Mark Russinovich was playing my game!
My next game, YuckyYAML, is still in progress. It is a puzzle game, inspired by Sokoban, and is themed around Docker & Kubernetes, so it features whales and containers.
 “YuckyYaml” by Marc Duiker
PICO-8 is also an excellent platform to create mini-games. These are very basic games you can play in a minute or so. I created two interactive cards for a lovely 5-year-old, one for his birthday, where he needs to collect all the balloons. And another one for Easter, where he needs to collect eggs. These mini-games are around 100 lines of code and take only an hour or two to create.
You can play the above mentioned games at marcduiker.itch.io. If you want to learn about game development with PICO-8, I highly recommend this YouTube playlist, which contains over 70 videos on how to create a breakout game from start to finish.
Microsoft Build 2020
I was very fortunate to be part of Microsoft Build this year. In one session, I took part in a panel discussion on Serverless APIs, and the other, I talked about one of my pet projects, the Azure Functions Updates Twitterbot. Be sure to check out the session recordings!
8-bit avatars
After my talks, I wanted to show appreciation to the hosts since I know it takes a lot of effort to keep an event rolling smoothly. So I started creating 8-bit pixel portraits for the hosts. I used a 16×16 pixel format, which is really limited, so it was a challenge drawing everyone in a way they were still recognizable. I posted them on Twitter, and the responses I got were so kind. I kept making the portraits until I had one for each of the hosts. At the end of Build, the hosts gave me a special shout-out for my work, which made me very proud. It was a wonderful experience to contribute to Build in this way:
 MS Build hosts & a quokka by Marc Duiker
Make Code
One of the last sessions of Microsoft Build was about MakeCode, an educational programming platform backed by various organizations. During this session, Louanne Murphy and Scott Hanselman showed how versatile and accessible the platform is. One of the areas where you can use MakeCode is creating arcade games, so obviously, I had to try that. In about 1.5 hours, I completed this mini-game featuring Dona and Seth, competing to eat as many Cheeze-Its within 30 seconds.
 “Cheeze-It Deth Match” on MakeCode Arcade
Play Cheeze-It Deth Match here.
Post Build
I was really starting to like the 8-bit avatars, so I kept on making some for close (Twitter) friends. Others began to notice the avatars, and the demand just kept increasing! Since I was saving up for a Surface Go 2, I decided to ask for a small donation when people ask me to create their avatar. So far, I’ve created 120 of these avatars, and I’m still receiving commissions! Since the avatars I created for Build, I’ve now doubled the resolution by switching to 32×32 pixels, which is still very limited but allows a bit more detail in hair and clothes. I also deliberately use a limited 32 color palette, which ensures all portraits have the same look & feel.
 8-bit avatars by Marc Duiker
What’s next
Creative coding has really become a part of my life. It is ever-changing – sometimes it’s visuals, sometimes music, sometimes games. As long as I can keep creating something that I and others like, it gives me a very satisfying feeling, and I will continue doing this for a long time. I encourage you to ty creative coding yourself! It doesn’t matter if you are a programming veteran or a novice, you can start very small and build up your skills over time and try different tools and languages. I’m very curious about your creations! Please share them with me on Twitter: @MarcDuiker.
If you want to support my creative coding work, please consider a donating a coffee or commission me to create your personalized 8-bit avatar :) I draw them entirely by hand and each one is 100% unique!
 Rock on!
I hope this inspires you to embark on your own creative coding as well. After all, life’s more fun when we can effectively combine tech and art, don’t you think?
#HumansofIT
#CareerJourneys
#TechsGotTalent
Enjoyed this article by Marc? He recently shared about his experience on this month’s edition of the Humans of IT MVP/RD PGI call. If you are an active MVP/RD, you can watch the session recording on the MVP Yammer page. You should also have received an email recap from the MVP PGI Events alias. Thank you for your support!
by Scott Muniz | Jul 23, 2020 | Alerts, Microsoft, Technology, Uncategorized
This article is contributed. See the original author and article here.
In part one of this two-part series, Shreya Verma discusses the different backups options (point-in-time restore, long-term retention) Azure SQL provides and how to effectively manage them.
Watch on Data Exposed
Additional Resources:
Overview of Business Continuity
Automated Backups
Backup Cost Management
PiTR and Geo-Restore
Long-Term Retention
Recovery Drills
Azure SQL Blogs
View/share our latest episodes on Channel 9 and YouTube!

Recent Comments